HTML REVIEW html There are certain mandatory tags


- Slides: 52
HTML REVIEW
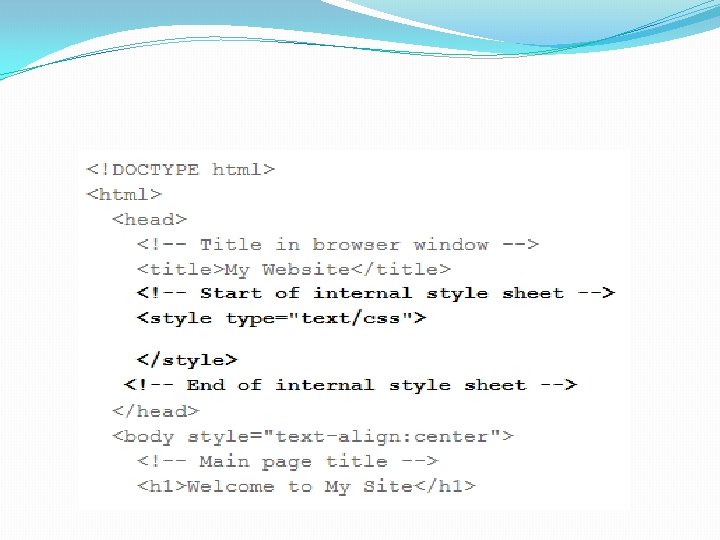
<html> �There are certain mandatory tags that every Web page must contain. �You'll create a Web page that contains those mandatory tags. �To get started, you'll need to open Notepad. In that editor, start by typing this tag: <html>
<head> �Now, please press ENTER to start a new line. Then type one more tag as shown below. �<head>
<title></title> �Next, we'll type a couple of tags right next to each other. �Notice that here you'll start to see that some tags contain a forward slash (/). That's not the same as a backslash (), which leans back on the letter that precedes it. �Make sure you always use a forward slash (/) in your HTML tags. Here are the two tags I want you to type next to each other now: <title></title>
Sample Web Page Your sample Web page should look like this if you're using Notepad as your editor: Do you see any errors in your own code? If so, now would be a good time to correct them.
<h 1>…</h 1> �To illustrate, I'll introduce you to a couple of new HTML tags. The first are the heading 1 tags (h 1 tags), which look like this: <h 1>…</h 1> �Any text placed between those tags is considered a level-1 heading. �Translation to plain English would be "the main title at the top, " such as a story title or headline. �There are h 2 headings for subheadings, h 3 for subsubheadings and so forth.
<p> … </p> �There are tags that mark the beginning and end of each paragraph. �A paragraph is any sentence or group of sentences that have some empty space above and below them. �To mark the beginning and end of a paragraph use the tags: <p> </p>
<strong> </strong> �You'll also notice that the word boldface is darker. �That's because in the source code, that word is enclosed in <strong>…</strong> tags. <strong> bold
<em> </em> �The word italic is slanted. �That's because that word is enclosed in <em>…</em> tags. �The em is short for emphasis, and it makes the text look italic on the screen, <em> italics
Inline vs. Block �Here's something else you might notice: Before, when you put in the h 1 and p tags, it separated the heading text from the paragraph with a blank line. �That's because those are block elements, meaning they always start on a new line (start a new block of text). �The strong and em tags you added didn't do that. �In other words, the <strong> and <em> tags don't cause the text to start on a new line. They allow the text to continue to flow normally. �Strong and em are inline elements as opposed to block elements. Inline elements stay in line with the rest of the text on the line, rather than start a new line.
List Tags �Both types of lists are so common that HTML has tags for them. �We use <ul>…</ul> tags to define an unordered list. �And we use <ol>…</ol> tags to define an ordered list. � Regardless of which type of list you're creating, you use <li>…</li> tags to define each list item. �Notice that the tags indicate the type of element each creates. Use ul for an unordered list, ol for an ordered list, and li for each list item within either type of list.
<a href = ‘ value‘ > </a> �The link starts with an <a> tag. �The <a> tag uses an href attribute whose value defines the target of the link (where the link takes the user). There must be a space before the href, an = sign after it, and the value must be enclosed in quotation marks. �After the <a> tag comes the link text, the text that's visible on the page that the user will click. �The </a> tag comes after the link text and marks the end of the link.
Putting Images in Pages �Once you have a JPEG, GIF, or PNG image in your website folder, the next step is to specify where you want it to show. You'll use the HTML <img> (image) tag for that step. The syntax for the img tag is as follows: <img src="path" alt="alternate. Text"/>
Empty Tags �Note that unlike other tags you've seen, there's no tag pair here. In other words, it isn't <img>. . . </img>. And there are no words between tags. �We call such tags empty tags. � It may seem a bit of a misnomer because the img tag itself isn't empty. �It contains two attributes, src= and alt=. In this context, "empty" means "no opening and closing tags with words in between. "
Width �To specify the image width, use the width attribute in the img tag. Here's the syntax for this: width="x" �Never type the letter x. Rather, replace x with the number of pixels wide you want the image to be. � If you specify only the width, the height will be calculated automatically to maintain the same aspect ratio. �The aspect ratio is the ratio of the width to the height, and it defines the shape of the image.
Change the width �As an example, here's an img tag for displaying the hot dog image with a width of 100 pixels. <img src="hotdog. png" alt="Hot dog" width="100" /> �As always, put a space before the attribute and enclose the value in quotation marks. �The image below shows the hot dog picture with a width of 100 pixels. The original is 200 pixels, so the one below is about half its size.
height �To specify the height, use height= with a similar syntax: height="y" �Replace y with the height you want, in pixels. � If you specify only the height, the width will be calculated automatically to maintain the original shape. �Here's an example of specifying only a height for the hot dog image in an img tag: <img src="hotdog. png" alt="Hot dog" height="50" />
Table tags �Here are the tags we use to create tables: �<table>. . . </table>: Mark the beginning and end of a table. �<tr>. . . </tr>: Mark the beginning and end of a table row. �<th>. . . </th>: Marks the beginning and end of a table header cell. �<td>. . . </td>: Marks the beginning and end of a table data cell.
Adding Borders �To add borders, you can add a border= attribute to the <table> tag. �This is the syntax: <table border="1"> border="x“
The Cellspacing Attribute �The cellspacing attribute allows you to control the empty space between cells. �The syntax is (all one word, no spaces, all lowercase) cellspacing="x" �The default is 2, which means that if you don't use cellspacing at all, or if you put in cellspacing="2”, you get two pixels of space between cells.
The Cellpadding Attribute �The cellpadding attribute controls the amount of space inside cells. �The syntax is similar to that of other attributes: cellpadding="x“ �The default is 1.
align = �To align the contents of a cell, add an align= attribute to the <td> or <th> cell whose contents you want to align. The syntax is as follows: �align="value" �Replace the word value with one of the following words: left center right
colspan �Of course, you could just put in the <td>. . . </td> tags for the missing cell. � But if for whatever reason you really only need two cells in that row, you could make either of the existing cells span the width of two columns. � To do that, you use a colspan attribute with the following syntax: colspan="x"
rowspan �You can also make a cell expand multiple rows if you'd like. �To do this, you use the rowspan attribute rather than colspan attribute. �The syntax is rowspan="x”
Using Programmer Comments �programmer comments, often called comments for short are like notes to yourself �The comments don't show up in the Web browser � They're not required. �Comments have no effect on how the code functions, �Comments can still be useful. � Most programmers don't use them enough. �The idea behind comments is to simply jot down notes in your code that might serve as a reminder to yourself �It can even be helpful to quickly scan through the code looking at the plain-English comments rather than the more complex code. �The syntax for using comments in HTML is the following: <!-- any text here -->
Nesting �The <p>. . . </p> tags mark the beginning and end of a paragraph. The <em>. . . </em> tags mark two types of text: text that is spoken with emphasis by screen readers for the blind, and text shown in italics on the screen and printed page. �We say the tags above are properly nested because the <em>. . . </em> tags are contained within (nested within) the <p>. . . </p> tags. That's good—just the way you want it. �The wrong way to do it would be to put the closing tag for the em element outside the closing paragraph for the paragraph. The difference becomes more apparent if you envision lines connecting each opening tag with its closing tag.
CSS Syntax �Like all computer languages, CSS follows certain rules of syntax. �You basically define a style using this syntax: property: value �In this syntax, property is any valid CSS property, and value is any acceptable value for that property. �Notice that you use a colon (: ) to separate the property from the value. �You can put a space after the colon, if you like. Some developers type a space there to make the code a little easier to read.
Inline Style �There a couple of places where you can put CSS property: value pairs. �Using the inline style where put the property: value pair right inside the tag of the element you want to style, using a style= attribute.
CSS syntax �The tag part represents any tag that you may want to apply a style to, like body, h 1, h 2, p, list, or ul. �For a style= attribute, the value between the quotation marks is one or more CSS property: value pairs. �If you want to use just one property: value pair, it goes between those quotation marks like this:
Adding css �inside the <body> tag on that on your index. htm page, please insert an attribute that reads (exactly) style="text-align: center; " after the word body but still inside the > at the end of the tag.
The Text-Align Property �So far, you've used the left and center values with the text-align property. �There actually four values you can use with textalign—left, right, center, or justify. �In real life, you'd probably only use left or justify for paragraphs. �The center and right options are best used for shorter lines of text like titles, columns of dates, or numbers in a table.
CSS 3 and HTML 5 Summary �The W 3 C is the standards organization that defines all Web languages. �The W 3 C produced HTML versions 1 through 4 between 1990 and 1999. �XHTML, a version of HTML that borrows some syntactical rules from the XML language, has been around since the turn of the century. �Most websites created in the 21 st century are written in XHTML and use CSS for styling. �Right now, most people are using XHTML and CSS 2. 1 to create their sites. �HTML 5 is the next major version of HTML that the W 3 C will release. �CSS 3 is the next major version of CSS that the W 3 C will release. �Even though the specs, and browser support, for CSS 3 and HTML 5 are incomplete, both languages are rapidly gaining strength and the premier languages for web development, and even for some mobile app and desktop software development.
CSS Style Rules �So far, you've seen an example of using a CSS inline style to center all of the text on a page. � An inline style gets its name from the fact that it's in line with (actually, inside of) an HTML tag. �Style rules are another way to apply CSS styling to a page. �Unlike inline styles, you don't put style rules inside Web tags. �With style rules, there's no style= attribute and no quotation marks. �Instead, there's a selector and some curly braces.
Selector Syntax �The syntax for constructing a style rule looks like this: selector { property: value; }
Adding Color With CSS �Color is a great way to add some visual interest to your page. �You can add color to your pages, using two CSS properties: �Background-color: Allows you to define the background color of any element. �Color: Allows you to define the foreground (text) color of any element.
�Each property accepts one value. That value can be any one of the 16 color names listed below. Or it can be a color hex code—and there a lot more hex codes than the 16 shown here:
CSS Summary � Beyond the specifics and details, it's important to understand that when it comes to styling websites and other electronic documents, CSS is king. It has been for several years, and will be for many years to come. � When style rules conflict, the one that's closest to the element being styled takes precedence. � This means that you can set up some general styles that you apply to the body element. And then you can override them, if needed and as needed, for individual elements on the page. � Inline styles are CSS styles that actually go inside an HTML tag using a style= attribute. � A CSS style rule is a way of applying CSS outside the tags—and even outside the body of the page. � A style rule consists of a selector, which describes what type of element the style rule styles. � The selector is followed by a pair of curly braces that contain CSS property: value pairs that define how it's styled. � The background-color property in CSS lets you define the background color of the page (or any other element). � The color property allows you to color the text. For either property, you define a color using one of the 16 color names or a color hex code that defines the color as a mixture of red, green, and blue.
Page Layout
div tag �Since any page might contain multiple divisions, we often use multiple pairs of div tags in a page. �To give each one a unique identity that we can apply styling to, we assign a name using the id= attribute, followed by the name enclosed in quotation marks. �The name can be anything you like, so long as it starts with a letter and doesn't contain any blank spaces. �For example, the first division on the top of the page is sometimes referred to as the page header, and so the div is also often named header as below. <div id="header"> </div><!-- End header -->
Nav bar �The next page division under the header is often the navigation bar, or navbar for short. Its name is often navbar or nav or something similar, and its tags might look like this: <div id="nav"> </div><!-- End nav --> �In between those tags, you'd put the code and content for a navigation bar. �As always, the comment after the closing tag is optional, but it's a good idea, because it makes it easy to see which division that </div> tag is closing.
main �After the navigation bar comes the main content area. Its name is often main or content, and its tags look like this: <div id="main"> </div><!-- End main --> �So basically, we use a pair of div tags to define each major page division in the layout. �We assign an id name to each division, because (as you'll see shortly), that allows us to create a CSS style rule for each one.
CSS width: property �As its name implies, that property allows you to define how wide you want an element to be. �You can specify the width in pixels (using px) or in percent (using %). �The % is good when you want to create equal-width columns, because you just divide 100 by the number of items you want included it the width to determine the percent width of each column. �For example, if you were to have five items, each would have a width of 20% (100 divided 5). �If you wanted four items, each would have a width of 25% (100 divided by 4). �If you have three items, each would have a width of 33. 3%. (You can't use fractions like 1/3 or 1/2 in CSS or most other programming languages. You have to use a decimal point. )
nav table <table style="width: 100%" cellspacing="2" cellpadding="2"> <tr style="background-color: #ffcc 33; "> <td style="width: 20%"><a href="index. html">Home</a></td> <td style="width: 20%"><a href="products. html">Products</a></td> <td style="width: 20%"><a href="services. html">Services</a></td> <td style="width: 20%"><a href="about. html">About Us</a></td> <td style="width: 20%"><a href="contact. html">Contact Us</a></td> </tr> </table>
Layout Summary � To define a division in a Web page, we use <div>. . . </div> tags. � Because a page usually consists of multiple divisions, we often assign each division a unique identity (name) using an id= attribute. � The name you give to a division can be any name you like, so long as it starts with a letter and doesn't contain any blank spaces. � the first division is often named heading using <div id="header"> as the tag. � The next division, which often contains links to all of the pages within the site, is called the navigation bar. � And the div tag for that one might be <div id="nav"> or something similar. � Then, the main content for the page comes next and is often enclosed in a division that starts with <div id="main">. � The main reason for giving each division a name is so that you can create a style rule for each, which allows you to define its coloring and other stylistic features. � Normally, the selector for a style rule is the tag that you want the style rule to apply to. For instance, when creating a style rule for h 1 elements, you just use h 1 as the selector. � When you want to associate a style rule with an id name rather than an element type, you have to use a # sign in front of the name to indicate an id. � So the selector for an element that contains id="header" is #header.
Liquid vs. Fixed Layouts �Your sample. htm file contains some code and content that you could reuse on every page in a multipage website. �If you open sample. html now in a Web browser, you might notice that it stretches the full width of the browser window. �If your Web browser window is very wide, then the page header and navigation bar up top are also very wide, as in this example:
Fixed Layout �As an alternative to the liquid layout, you can use a fixed layout, where the page content maintains a constant width. �So if the browser window is very wide, the layout maintains its width and has empty space outside of it. Take a look at this example: Fixed layout in a wide browser window �If the browser window is narrower than the page layout, the layout doesn't squish down to fit. �Instead, some of it is chopped off at the right side of the browser window. � But a horizontal scroll bar appears at the bottom of the browser window automatically, so the user can scroll across the page to see
<div id = “wrapper”> Open sample. html for editing (right-click its icon, choose Open With, and then Notepad, Move the cursor to just after the <body> tag, and press ENTER to start a new line under that tag. 2. Type <div id="wrapper">. Be careful not to make any mistakes or leave anything out! 3. Move the cursor to the start of the </body> tag, and press ENTER to insert a new blank line above </body>. 4. Move the cursor to the new blank line above the </body> tag, and type the closing div tag. If you'd like, you can add a comment to help you remember which <div> tag it closes. In other words, you want to type </div><!-- End wrapper -->. As always, be careful not to make any mistakes. 1.
Width attribute
Margin attribute �Let's try it out: 1. Get back to sample. html in your editor. 2. Put the cursor at the end of the line that reads width: 760 px; and press ENTER to start a new line. 3. Type margin: 0 auto; making sure to type the number 0 (not the letter O). The code for that, in CSS, is margin: 0 auto; where 0 (zero) applies to the top and bottom margins, and auto applies to the left and right margins.
Border attribute �so it's in the wrapper style rule as shown here:
Page Layout Summary �While there's no rule that says you must create a page layout for your site, doing so can add some professional polish to the effort. �Use a wrapper div to constrain the width of layout, which converts your pages from a liquid layout to a fixed layout. �Use the sample. html page as a template for other pages in your site. �Copy sample. html to the appropriate file. (Make sure the name of that file matches one of the filenames in your navigation bar. ) �You don't have to retype all the code for the header and navigation bar. You can just replace the generic Main content goes here text with whatever tags and content you want that page to show.