HP Open View Omni Back II Users Guide

HP Open. View Omni. Back II User’s Guide Using the Motif User Interface Manual Edition 1 豫知情報技術株式會社 Release A. 03. 50 Hp Open. View Omni. Back II

Introducing Omni. Back II

Introducing Omni. Back II omnidbcheck Omni. Back II 데이터베이스를 점거, 관리 omnidbinit Omni. Back II 데이터베이스를 초기화 omniminit 미디어를 초기화 omnimlist Media Pool 에 있는 미디어 목록을 나열함 omnimm Pool 에 있는 미디어를 관리함 omnimnt 미디어를 새로 넣으라는 Mount Prompt 에 반응함 omnimver 미디어내의 데이터를 검증함 omnir 복원작업 수행 omnistat 진행중인 백업/복원 모니터링 omnisv. sh Omni. Back II 프로세스의 시작, 종료 omnitrig 계획된 백업을 시작시킴 omnidownload Omni. Back II 로부터 Logical Device 구성을 내림 omniupload Omni. Back II 데이터베이스로 Logical Device 구성 을 갱신함 . v
")
Introducing Omni. Back II Contents Installing Omni. Back II Installing the Cell Manager (CM) & Installation Server (IS)………. . 1 -2 Installing on an HP-UX System………. . . ……………… 1 -2 Distributing the Omni. Back II Software to Client…. . ………………… 1 -8 Using Omni. Back II Modif GUI…………………… 1 -8 Configuring Users & User Group Omni. Back II User Right…………………………. 2 -2 Predefined Omni. Back II User Groups………………… 2 -5 Adding a New User Group……………………… 2 -6 Adding a New User…………………………… 2 -8 Creating Media Pool & Configuring Logical Device Creating a Media Pool………………………… 3 -2 Properties of a Media Pool………………………. 3 -3 Configuring Logical Device………………………. . 3 -6 Configuring Standalone Device…………. …. . …………… 3 -7 Configuring Library Device………………………. 3 -9 Configuring File Device……………………… 3 -13 Initializing Media…………………………… 3 -15 Initializing Library Devices……………………… 3 -15 Initializing Standalone & File Device………………. 3 -17 v

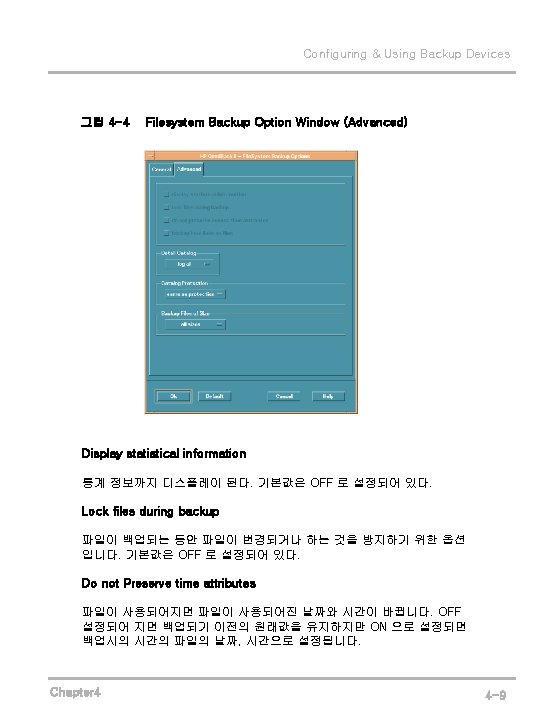
Introducing Omni. Back II Contents Backup Configuring Backups for Client Systems………………. . 4 -2 Backing up Filesystem…………………………. . 4 -3 Generate Backup Specification…………………… 4 -3 Creating Backup Specification……………………. 4 -5 Filesystem Backup Options……………………… 4 -7 Backing up Disks as Disk Image Objects (Rawdisks)……………. 4 -11 Interactive Backup…………………………… 4 -13 Scheduling unattented Backups…………………… 4 -15 Starting Backups on Specific Datas………………. 4 -15 Starting Periodic Backups……………………… 4 -17 Restore Restoring System…………………………… 5 -1 Regular Files………………………………. . 5 -1 Filesystem Restore Options……………………. . 5 -4 Disk Image (Rawdisk)…………………………. 5 -8 Rawdisk Restore Options………………………. 5 -10 Monitoring Monitorig Sessions……………………………. 6 -2 Viewing Currently Running Session…………… 6 -2 Viewing Finished Session…………………. 6 -2 Responding to Mount Requests………………. ……. . 6 -4 Restarting Failed Backups……………………. … 6 -4 v

1 Installing Omni. Back II

Installing Omni. Back II 위의 사항을 점검한 뒤에 HP-UX 시스템에 Unix용 Omni. Back II Cell Manager & Installation Server를 다음의 순서에 따라 설치해 보자. 1. CD-ROM을 삽입한 후 /usr/sbin/swinstall 을 실행시킨다. 2. Specify Source Window에서 Network Directory/CDROM을 선택하면 Source Depot Path에 CD-ROM의 mount point를 적어 주어야 한다. 그리고 나서 OK 버튼을 누르면 SD Install – Software Selection 창이 뜬다. 3. Software Package 목록에 Omni. Back-II 라는 항목이 있다. 더블 클릭하면 내용이 디스플레이 된다. 그 내용은 다음과 같다. OB 2 -CM Cell Manager Software OB 2 -IS Installation Server for HP-UX OB 2 -DOCS HP Open. View Omni. Back II documentation subproduct that includes Omni. Back II manuels in the PDF format. 4. 소프트웨어 전체를 설치하려면 Omni. Back-II 를 선택한 후 마우스의 오른쪽 버튼을 눌러 Mark for Install을 선택한다. 모든 Subproduct가 필요치 않다면 Omni. Back-II 를 더블클릭 한 후, 목록에서 필요한 Item만 선택한다. 그림 1 -1을 참조해라. 5. Action List에서 Install Analysis를 클릭한 후 OK 버튼을 누르면 Omni. Back. II 설치가 진행된다. 만약 Install Analysis가 실패한다면, Logfile 버튼을 눌러 Error Message를 본다. Chapter 1 1 -3

Installing Omni. Back II 그림 1 -1 SD Install – Software Selection 설치가 완료되면 Omni. Back II 소프트웨어의 Core는 /opt/omni/bin에 Installation Server for UNIX 는 /opt/omni/databases/vendor에 위치한다. Omni. Back. II 의 하부 디렉토리는 아래와 같다. /opt/omni/bin All Commands /opt/omni/sbin Superuser Commands /opt/omni/sbin/install Installation Scripts /etc/opt/omni Configuration Information /opt/omn/lib/help Online Help files /opt/omni/lib/icon GUI icons Chapter 1 1 -4

Installing Omni. Back II /opt/omni/lib Shared libraris for compression, data encoding, and device handling /var/opt/omni/log Log files /opt/omni/lib/nls/C Message catalog files /opt/omni/lib/man Man pages /var/opt/omni/tmp Temporary files /var/opt/omni/db/cdb Omni. Back II catalog database /var/opt/omni/db/mmdb Omni. Back II media management database /var/opt/omni/db/catalog Omni. Back II internal database catalog /var/opt/omni/db/syslog Omni. Back II internal database systemlogs Omni. Back II 는 시스템 재시작시 모든 Omni. Back II 프로세스들이 자동적으로 시작하고 종료하게 설계되어 있다. 다음의 파일들은 자동적으로 생성되는 파일들이다. /sbin/inet. d/omni A script with start-up and shutdown procedures. /sbin/rc 1. d/K 162 omni A link to the /sbin/inet. d/omni script that shuts down Omni. Back II. /sbin/rc 2. d/S 838 omni A link to the /sbin/inet. d/omni script that starts up Omni. Back II. Chapter 1 1 -5

Installing Omni. Back II /etc/rc. config. d/omni contains an omni variable defining: omni=1……Omni. Back. II is automatically stopped and started at system reboot. This is the default option. omni=0……Omni. Back. II is not automatically stopped and started at system reboot. Omni. Back II 설치 하는 동안 Cell Manager 시스템에서는 아래의 시스템 파일들이 수정된다. /etc/services The Omni. Back II port number for the service is added to the file. /etc/opt/lbin/crs The Omni. Back II service is added. 설치가 끝나면 Cell Manager 시스템에서는 다음과 프로세스가 동작한다. /opt/omni/lbin/crs The Omni. Back II Cell Request Server (CRS) service runs on the Cell Manager system and is started when the Cell Manager software is installed on the system. CRS starts and controls backup and restore session in the cell. /opt/omni/lbin/rds The Omni. Back II Raima Database Server (RDS) service runs on the Cell Manager system and is started when the Cell Manager software is installed on the system. RDS manages the Omni. Back II database. Chapter 1 1 -6
 service runs")
Installing Omni. Back II /opt/omni/lbin/mmd The Omni. Back II Media Management Daemom(MMD) service runs on Cell Manager system and is started when the Cell Manager software is installed on the system. MMD managers the device and media management operations. HP-UX 시스템에 Cell Manager 를 설치할때 디스크의 공간이 충분한지를 고려하여야 한다. 특히 /opt 디렉토리와 데이터베이스가 저장되는 /var 디렉토리( 백업되는 데이터 양의 1~2% 정도)는 디스크 여유분이 어느 정도인지 잘 파악해야 한다. 디스크 공간이 충분하지 않다면, swinstall 유틸리티를 실행하기 전에 다음과 같이 한다. /omniback 으로 마운트된 충분한 디스크 공간이 있다면 이것을 /opt/omni 와 다음과 같이 링크을 시킨다. mkdir /omniback/opt_omni ln –s /omniback/opt_omni /opt/omni Chapter 1 /var/opt/omni 도 위와 같이 링크를 시킨다. 1 -7

Installing Omni. Back II Distributing the Omni. Back II Software to Client 이번에는 Installation Server를 사용하여 Omni. Back II Software를 Client 에 분배하는 것을 설명한다. Using Omni. Back II Modif GUI Omni. Back II graphical user interface를 사용하여 Client를 설치하는 절차는 다음과 같다. 1. Omni. Back II CUI를 띄운다. OBII 메인 메뉴에서 Install 을 선택하면 Omni. Back II – Cell Administration 창이 뜬다. 2. Edit Install Hosts UNIX Hosts or Windows Hosts를 선택하면 Cell Administration – Install 창이 뜬다. 3. Add 버튼을 누르면 Install – Load Hosts 창이 뜬다. 다음의 Text Box에 Cilent Modul을 설치할 호스트 정보를 적고 OK 버튼을 누른다. Network Range The Network Range text box show the network number of the IP address. To change IP address, click the field with the address, and then enter the new IP address. Filter Type the host names you have chosen and select Add. You can use short and long host names. Wildcards can be used to select several host at once. You can select hosts by their names or their IP addresses by entering exact host IP address or a range of addresses to add several host at once. 4. Installation Target hosts field에 적절한 호스트들이 명시되어 있는지 확인한다. Chapter 1 1 -8

Installing Omni. Back II 그림 1 -2 HP Omni. Back II Cell Administration - Install 5. Install modules field에서 설치할 Modul을 선택한다. 6. 선택한 사항을 확인한 후 OK 버튼을 누른다. HP Omni. Back II - Installation Monitor 창이 뜨고 원격 설치가 시작된다. Omni. Back II Components User Interface Chapter 1 The User Interface includes Omni. Back II graphical user interface either for UNIX(Modif) or Windows, and the command line interface. The software is needed to the access Omni. Back II Cell Manager and the must be installed at least on the system, which is used for managing the cell. 1 -9
 User Interface The Manager of Mangers")
Installing Omni. Back II Manager of Manager(Mo. M) User Interface The Manager of Mangers (Mo. M) User Interface Includes the Omni. Back II graphical user interface for either UNIX(Modif) or Windows, and the command line interface. The software is needed to access the Omni. Back II Manager of Managers functionality and control multi-cell environment. Disk Agent The Disk Agent component must be installed on the systems that have disk that will be backed up with Omni. Back II Media Agent The Media Agent component must be installed on the systems that have backup devices connected and will be managed by Omni. Back II. 이 밖의 모듈은 Install & Licensing Guide를 참조하여라. Chapter 1 1 -10

2 Configuring Users & User Groups
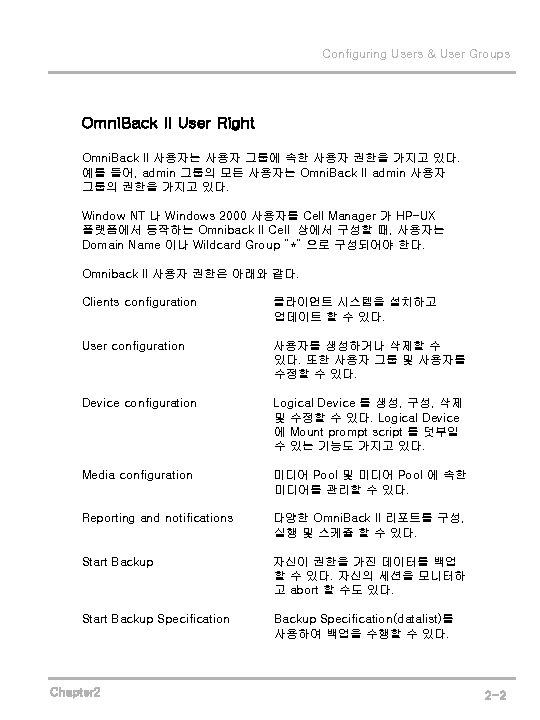

Configuring Users & User Groups Predefined Omni. Back II User Groups Omni. Back II 에서 기본적으로 정의된 세가지 그룹 (Admin, Operator, User) 이 있다. 그 그룹들의 권한은 표 2 -1 과 같다. 표 2 -1 Add Group Window Chapter 2 User Right Admin Operator Start Backup Y Y Start Datalist Backup Y Y Save Datalist Y Y Backup as Root Y Y Mount Prompt Y Y Start Restore Y Y Restore to Other Hosts Y Y Restore to Other Users Y Y Restore as Root Y Y Monitor Y Y Abort Y Y User Configuration Y Y Device Configuration Y Media Configuration Y Switch Session Owenership Y See Private Object Y User Y Y 2 -5

Configuring Users & User Groups 그림 2 -1 Chapter 2 Add Group Window 2 -7

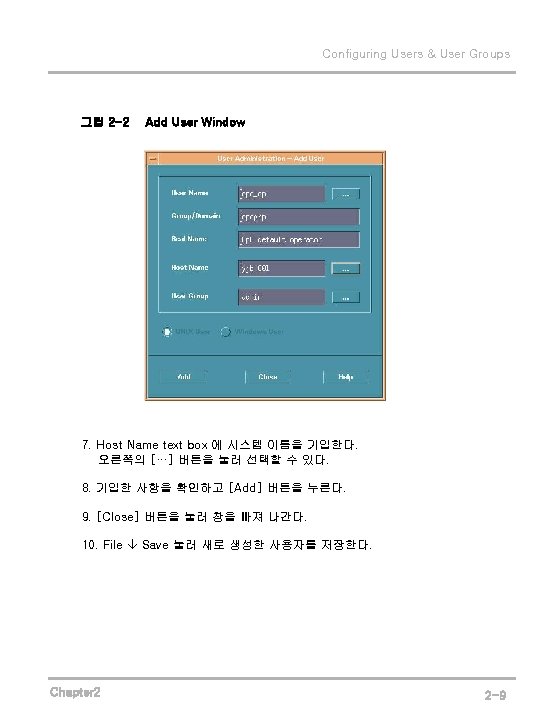
Configuring Users & User Groups Adding a New User Omni. Back II 을 설치한 이후에 아래의 사용자들은 admin 사용자 그룹 으로 구성되어야 한다. UNIX root user on UNIN systems Windows administrator on Windows NT and Windows 2000 systems The user performing the installatrion 사용자는 사용자 그룹의 일원으로 사용자가 속한 그룹이 가진 권한을 갖는다. UNIX 사용자는 Logon 하는 Login name, UNIX user group, system 에 따라 정의되고, Windows NT 및 Windows 2000 사용자는 Logon 하는 Logon name, Windows user group(domain), system 에 따라 정의된 다. 두 사용자 모두 Wildcard ”*” 사용이 가능하다. 1. HP Omni. Back II – Main Window 에서 User 아이콘을 클릭하여 Omni. Back II – User Administration Window 를 연다. 2. User Group 목록에서 새로 생성할 사용자가 속할 그룹을 선택한다. 3. Edit Add User 를 클릭하여 User Administration – Add User Window를 연다. 4. User Name text box 에 Unix 로그인 이름을 기입한다. 오른쪽의 […] 버튼을 눌러 선택할 수 있다. 사용자 목록은 /etc/passwd 파일에서 얻을 수 있다. 5. Group/Domain text box 에 Unix 그룹 이름을 기입한다. 6. Real Name field 에 사용자의 실제 이름을 기입한다. Chapter 2 2 -8

3 Creating Media Pool & Configuring Logical Device

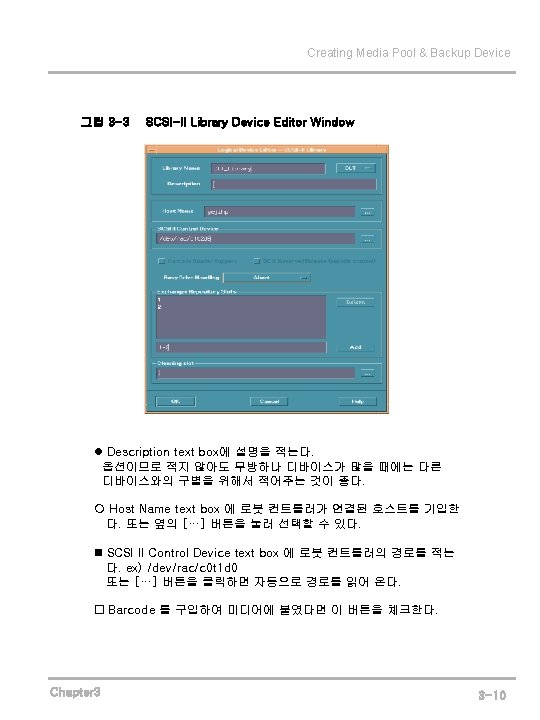
Creating Media Pool & Backup Device 그림 3 -2 Standalone Device Editor Window Filenames of Physical Device text box 에 장치명을 입력하고 (또는 옆의 [Add] 버튼을 누르면 자동으로 검색된다. ) Add 버튼을 누른다. 기입한 내용을 확인한 후 [OK]버튼을 누른다. Chapter 3 3 -8
![Creating Media Pool & Backup Device Library가 사용할 slot을 입력한 후 [Add] 버튼을 누른다.](http://slidetodoc.com/presentation_image_h2/048a0391b6fcb3e20c8cd92941936190/image-38.jpg "Creating Media Pool & Backup Device Library가 사용할 slot을 입력한 후 [Add] 버튼을 누른다.")
Creating Media Pool & Backup Device Library가 사용할 slot을 입력한 후 [Add] 버튼을 누른다. Cleaning 테잎의 slot # 도 입력한다. Cleaning slot text box에 Cleaning tape slot #를 적는다. 또는 […] 버튼을 눌러 선택한다. 기입한 내용을 확인한 후 [OK] 버튼을 누른다. 4. [OK] 버튼을 누르면 다음과 같이 묻는 Question Window가 뜬다. Do you want to create a drive for “the selected logical device”? [Yes] 버튼을 누르면 Logical Device Editor – Drive Window 가 뜬다. 그림 3 -4 Logical Device Editor - Drive Window 5. Logical Device Editor – Drive Window에서 요구하는 정보들을 정확 히 적고 [OK] 버튼을 누른다. 그림 3 -4 와 다음을 참조하여라. Chapter 3 3 -11

Creating Media Pool & Backup Device 그림 3 -5 Creating File Device Filename of Physical Devices text box 에 File Device 의 완전한 경로를 적는다. ex) /tmp/omniback 기입한 내용을 확인한 뒤 [OK] 버튼을 눌러 창을 닫는다. Chapter 3 3 -14
![Creating Media Pool & Backup Device 그림 3 -6 Initialize Window [Specify]를 선택한 후,](http://slidetodoc.com/presentation_image_h2/048a0391b6fcb3e20c8cd92941936190/image-43.jpg "Creating Media Pool & Backup Device 그림 3 -6 Initialize Window [Specify]를 선택한 후,")
Creating Media Pool & Backup Device 그림 3 -6 Initialize Window [Specify]를 선택한 후, 우측의 공란에 크기를 입력한다. Determine으로 놓아도 Tape에 저장되는 양은 변하지 않는다. ※ 미디어의 Size DDS 90 m: 2048 MB (DDS 1) DDS 120 m: 4096 MB (DDS 2) DDS 125 m: 12288 MB (DDS-3) DLT 4000: 20460 MB DLT 7000 & DLT 8000: 40960 MB 다른 Application에서 사용했던 테잎이라면 Force Initialize 옵션을 체크한다. [OK] 버튼을 누르고 Media Management 화면의 [Message] 창을 보고 Error 유무를 확인한다. Chapter 3 3 -16

Creating Media Pool & Backup Device Initializing Standalone & File Device 1. 초기화할 Media Pool 을 선택한 후 Edit Manager를 선택하거나 그 Library을 더블 클릭하면 Media Management Window가 뜬다. 2. Media Management Window 에서 Edit Init… 을 선택하면 Media Management – Initialize Medium Window가 뜬다. 3. Media Management – Initialize Medium Window 에 적절한 정보를 적고 [OK] 버튼을 누르면 미디어 초기화가 시작된다. Medium Initialize Data 에서 Autolabel을 선택한다. Logical Device for Initialization 의 Logical Device text box 에 미디어가 속하는 Logical Device 를 옆의 […] 버튼을 눌러 선택한 다. Medium Capacity 는 알맞은 미디어의 크기를 입력하기 위해 [Specify]를 선택한 후, 우측의 공란에 크기를 입력한다. Determine으로 놓아도 Tape에 저장되는 양은 변하지 않는다. ※ 미디어의 Size DDS 90 m: 2048 MB (DDS 1) DDS 120 m: 4096 MB (DDS 2) DDS 125 m: 12288 MB (DDS-3) DLT 4000: 20460 MB DLT 7000 & DLT 8000: 40960 MB 다른 Application에서 사용했던 테잎이라면 Force Initialize 옵션을 체크한다. [OK] 버튼을 누르고 Media Management 화면의 [Message] 창을 보고 Error 유무를 확인한다. Chapter 3 3 -17

4 Backup

Configuring & Using Backup Devices Creating Backup Specification 을 만드는 방법에는 다음의 두 가지가 있다 Generate Backup Specification 이 방법을 이용하면 Omni. Back II 데이터베이스에 있는 지역 또는 모든 호스트의 파일시스템을 모두 백업하는 specification 이 만들 수 있다. 이렇게 만들어진 specification 을 후에 알맞게 수정할 수도 있다. 다음과 같은 방법으로 Backup Specification 생성할 수 있다. 그림 4 -1 을 참조하여라. 1. HP Omni. Back II – Main Window 에서 Backup 아이콘을 클릭하여 Omni. Back II – Backup Window를 연다. 2. Actions Generate Backup Specification 을 클릭하여 Omni. Back II - Generate Backup Specification Window를 연다. 3. Hosts 에서 백업할 호스트나 파일시스템을 선택한다. 4. Backup selected hosts as 에서 filesystem backup 을 선택한다. 5. Save Backup Specification AS text box 에 저장할 적당한 이름을 적고 내용을 확인한 다음 [Generate] 버튼을 누른다. Chapter 4 4 -3

Configuring & Using Backup Devices 그림 4 -1 Chapter 4 Generate Backup Specification Window 4 -4


Configuring & Using Backup Devices Interactive Backup 즉시 백업하기를 원할 경우, 이 방법을 이용하면 백업 리스트에서 원하 는 것을 바로 백업 받을 수 있다. 아래와 같은 방법으로 Interactive Backup 을 받을 수 있다. 그림 4 -6, 4 -7 을 참조하여라. 1. HP Omni. Back II – Main Window 에서 Backup 아이콘을 클릭하여 Omni. Back II – Backup Window를 연다. 2. Omni. Back II - Backup Window 에서 원하는 Specification 을 선택 하면 (double click), Omniback II Backup Editor 화면이 뜬다. Actions Start Backup을 선택하면, Run Omni. Back II Backup Window 가 열린다. 3. Run Omni. Back II Backup Window 에서 Backup Mode를 선택한다. Backup Mode에는 Full 과 Incr 1 ~ incr 9 가 있다. Full 은 전체를 다 받는 것이고, Incr(Incremental)은 변화된 부분만을 백업 받는 Mode이다. Incr 1은 Full Backup을, Incr 2는 Incr 1 을 기준 으로 하여 변화된 File만을 받는다. 4. Network Load를 선택한다. 5. [Start Backup] 버튼을 누른다. Omni. Back II Backup Monitor 화면의 Message 창을 보고 Error 유무 를 확인한다. Chapter 4 4 -13

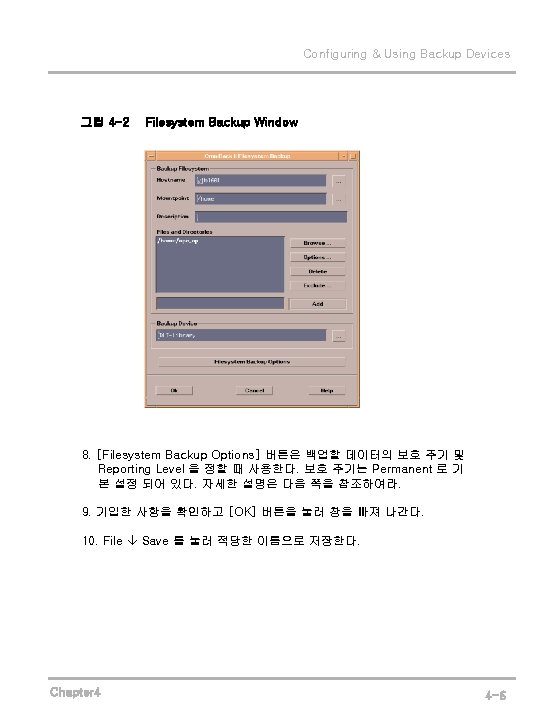
Configuring & Using Backup Devices 그림 4 -6 Omni. Back II Backup Editor Window 그림 4 -7 Run Omni. Back II Backup Window Chapter 4 4 -14

Configuring & Using Backup Devices 그림 4 -8 Scheduler Window 그림 4 -8 Daily Edit Window Chapter 4 4 -16

Configuring & Using Backup Devices Starting Periodic Backups Using the Predefinded Backup Schedule 일정 주기의 시케쥴 설정은 다음과 같이 하면 된다. 그림 4 -10 을 참조하여라. 1. HP Omni. Back II – Main Window 에서 Backup 아이콘을 클릭하여 Omni. Back II – Backup Window를 연다. 2. Omni. Back II – Backup Window 에서 스케쥴 할 Backup Sepecification 을 선택한 후, Menu bar 에서 Edit Change Schedule 을 클릭하여 Scheduler Window를 연다. 3. Edit Predefinded 클릭하여 Predefined Schedules Window 를 열어 원하는 스케쥴을 선택한 후 [OK] 버튼을 누른다. Daily intensive 매일 자정에 Full Backup 이 이루어지고, 매일 12: 00, 18: 00 시에 Incremental Backup 을 한다. Daily full 매일 21: 00 시에 Full Backup 을 한다. Weekly full 매주 금요일에 Full Backup 을 하고, 월요일부터 금요일까지 21: 00 시에 Incr-1 Backup 을 한다. Fortnightly full 매달 두번째 금요일에 Full Backup 을 하고 월요일 부터 목요일까지 21: 00 시에 Incr-1 Backup 을 한다. Monthly Full 그 달의 첫번째 월요일에 Full Backup 을 하고, Incr-1 Backup 이 매주, 다른 날에는 Incremental Backup 을 한다. 4. Scheduler Window 의 Menu bar 에서 File Save 를 누른 후 Scheduler Window 를 빠져 나간다. Chapter 4 4 -17

Configuring & Using Backup Devices 그림 4 -10 Predefinded Schedules Window Configuring a Recurring Backup 1. HP Omni. Back II – Main Window 에서 Backup 아이콘을 클릭하여 Omni. Back II – Backup Window를 연다. 2. Omni. Back II – Backup Window 에서 스케쥴 할 Backup Sepecification 을 선택한 후, Menu bar 에서 Edit Change Schedule 을 클릭하여 Scheduler Window를 연다. 3. Scheduler Window 의 Menu bar 에서 Edit Periodic 을 클릭하여 Periodic Tagging Window 를 연다. 그림 4 -11 을 참조하여라. Backup Mode, Time Cycle 및 Time Unit 설정한다. Backup Time을 설정한다. 15분 간격으로 할 수 있다. Scheduling 백업을 시작할 날짜를 정한다. Chapter 4 4 -18
![Configuring & Using Backup Devices 그림 4 -11 Periodic Tagging Window [Apply] 버튼을 누른다.](http://slidetodoc.com/presentation_image_h2/048a0391b6fcb3e20c8cd92941936190/image-63.jpg "Configuring & Using Backup Devices 그림 4 -11 Periodic Tagging Window [Apply] 버튼을 누른다.")
Configuring & Using Backup Devices 그림 4 -11 Periodic Tagging Window [Apply] 버튼을 누른다. 4. Scheduler Window 의 Menu bar 에서 File Save 를 누른 후 Scheduler Window 를 빠져 나간다. Chapter 4 4 -19

5 Restore

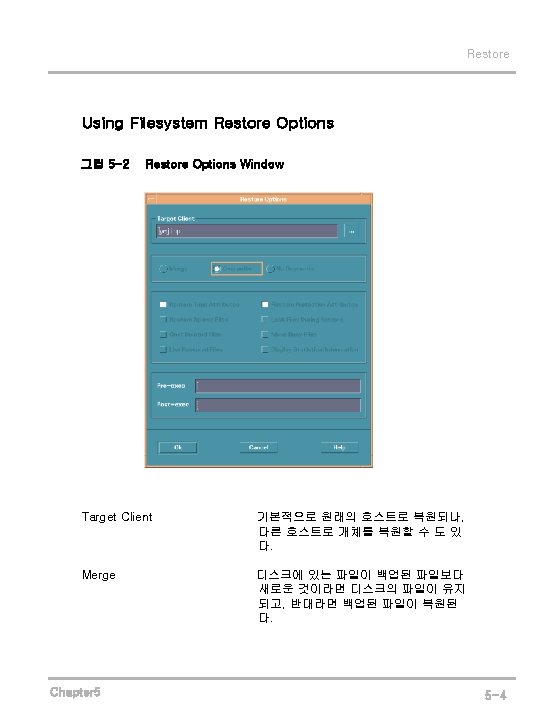
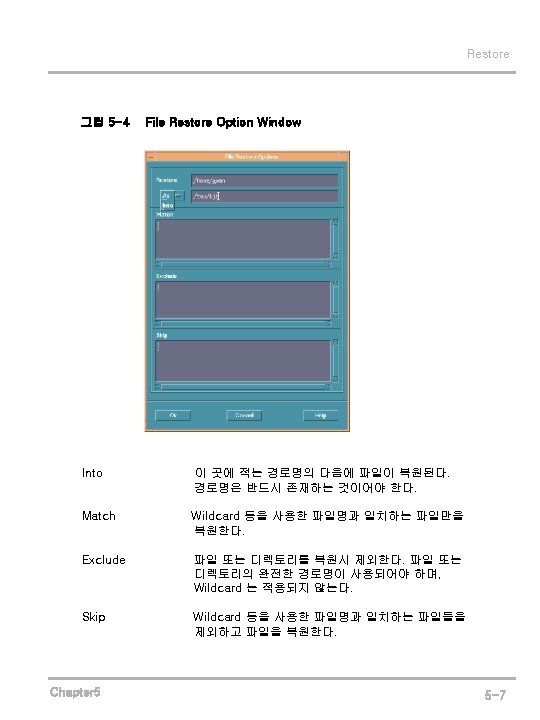
Restore Actions Start Restore 선택하면, Omni. Back II Restore Window 가 뜬다. Omni. Back II Restore Window Network Load 및 Restore Level 을 설정한다. [Start Restore] 버튼을 누르고 Omni. Back-II Restore Monitor Window 화면의 [Message] 창을 보고 Error 유무를 확인한다. 그림 5 -1 Chapter 5 Filesystem Restore Dialog Window 5 -3
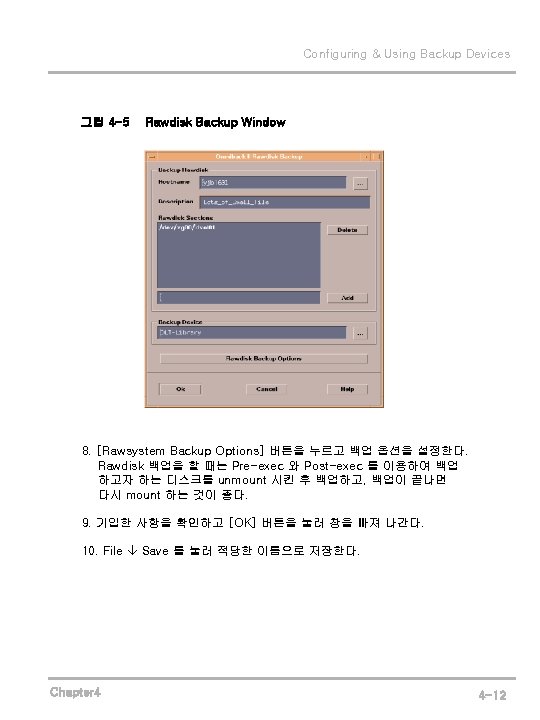
 다음과 같은 방법으로 백업 받은 Rawdisk 를 복원할 수 있다.")
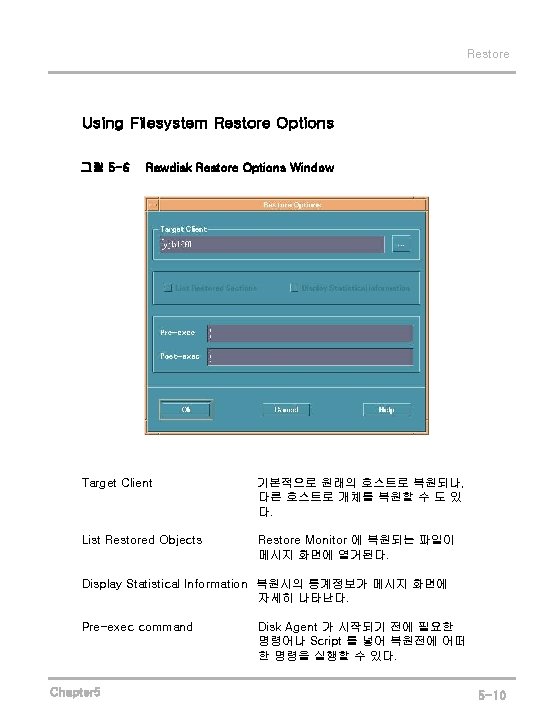
Restore Disk Image (Rawdisk) 다음과 같은 방법으로 백업 받은 Rawdisk 를 복원할 수 있다. 1. HP Omni. Back II – Main Window 에서 Restore 아이콘을 클릭하여 Omni. Back II Restore Window를 연다. 2. Restore Window 에서 Restore 를 원하는 호스트를 더블 클릭하면, 그 호스트의 백업받은 파일 시스템 및 Rawdisk 가 나타난다. Rawdisk 기호 옆에는 Backup Specification 작성시 기입했던 설명이 적혀 있어 Rawdisk 를 구별할 수 있다. 그림 5 -5 Chapter 5 Rawdisk Restore Dialog Window 5 -8

Restore 3. 원하는 Rawdisk 를 더블 클릭하면 Rawdisk Restore Dialog Window 가 뜬다. 그림 5 -5 을 참조하여라. 4. Backed Up On text box 오른쪽의 […] 버튼을 눌러 원하는 복원 버전을 선택한다. 5. [Options] 버튼을 눌러 복원할 경로명을 적는다. 기본 설정은 백업 받은 경로명이다. 6. [Rawdisk Restore Options] 버튼을 눌러 옵션을 선택한다. 7. 선택한 사항을 확인한 후 [OK] 버튼을 누르면, Omni. Back-II Restore Monitor Window 가 뜬다. Actions Start Restore 선택하면, Omni. Back II Restore Window 가 뜬다. Omni. Back II Restore Window Network Load 및 Restore Level 을 설정한다. [Start Restore] 버튼을 누르고 Omni. Back-II Restore Monitor Window 화면의 [Message] 창을 보고 Error 유무를 확인한다. Chapter 5 5 -9


6 Monitoring
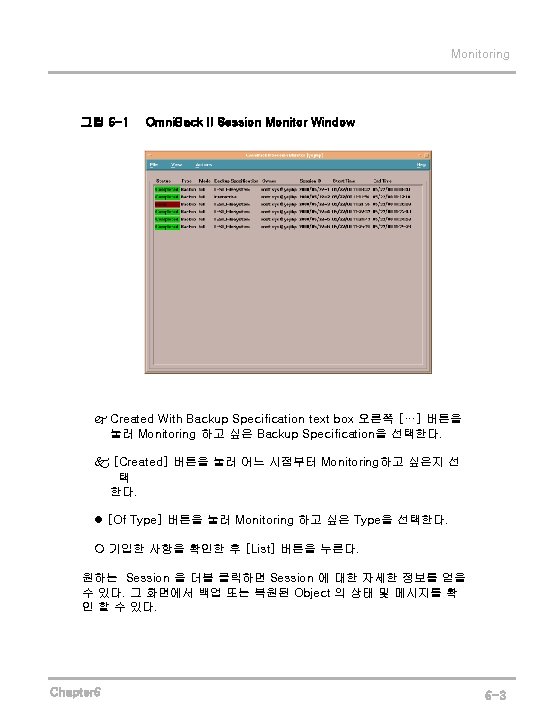
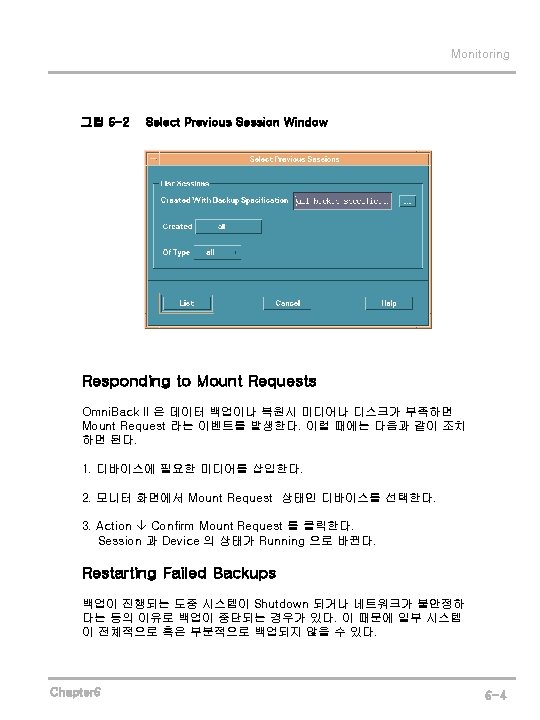

Monitoring 이 같은 경우로 백업을 받지 못한 Failed Backup Session 을 재시작 하 는 방법은 다음과 같다. 1. HP Omni. Back II – Main Window 에서 Monitor 아이콘을 클릭하여 Omni. Back II Session Monitor Window를 연다. 2. 모니터 화면에서 View Previous Sessions All Sessions 을 선 택한다. All Sessions 을 선택하면 모니터 화면에 지나간 Session 및 현재 진행 중인 Session 이 나타난다. 3. Failed Session 을 선택한후 Action Restart Failed Object 를 클 릭하면 실패한 Session 이 재시작 한다. Chapter 6 6 -5

7 Database
- Slides: 90