
How to run the Playbook By Jason Hahnstadt
How to run the Playbook By Jason Hahnstadt
“Offense is all about attack, assault, and surprise - striking the first blow. Offense must have the ability to force the defense into mistakes and then exploit these errors. You must at times take chances if you are to surprise the defense. ” Joe Paterno
Philosophy “To execute what we can execute well, with great confidence and excellence. ”
6 Keys To A Successful Offense 1. Speed – The most important factor in our execution. Never sacrificing execution.
6 Keys To A Successful Offense 2. Adaptability – Multiple and flexible. Keeps defense off balance and exploits defensive weaknesses. Never sacrificing simplicity.
6 Keys To A Successful Offense 3. Balance – Keeping defenses honest. Passing game critical.
6 Keys To A Successful Offense 4. Opportunistic – Striking when opponent is confused or demoralized. Use of both High consistency plays (Bread and Butter) and low consistency plays (Bingo).
6 Keys To A Successful Offense 5. Team Strengths – Exploiting our strength against their weakness.
6 Keys To A Successful Offense 6. Morale – Positive and encouraging. Supporting every player.
Outcomes After completing this course, you will be able… • To install every play to coaches and players at all levels quickly (2 week plan for total installation).
Outcomes After completing this course, you will be able… • To know with confidence that your players and coaches understand the offense.
Outcomes After completing this course, you will be able… • To set up an effective game plan quickly against any defense and to have answers prepared for teams whose defense is unknown or may change suddenly.
Outcomes After completing this course, you will be able… • To excite coaches and players about the fun aspects of running this offensive system.
Outcomes Continued After completing this course, you will be able… • To build confidence with your players in their execution of the simple schemes and adjustments.
Outcomes Continued After completing this course, you will be able… • To challenge opponents with your scheme and technique who are more talented then you physically.
Outcomes Continued After completing this course, you will be able… • To create buy in by all members of your program by demonstrating the ease and effectiveness of this package to players, coaches, feeder programs and anyone else.
Outcomes Continued After completing this course, you will be able… • To have clear plans for running high intense and effective practices.
Definition of the Multiple Pro Style Spread Offense “A style of offense that utilizes multiple traditional and contemporary offensive formations and plays to take advantage of individual weaknesses in today’s modern defenses. ”
Combination of Pro Style: Power, Toss, Counter, 2 -back formations.
With Spread Offense: Bubble Screen, 1 Back Spread Formations, Pistol Backfield, Fly Sweep, 3 and 5 Step passing game.
Ten Advantages of the Multiple Spread Run focused.
Ten Advantages of the Multiple Spread Ball control offense.
Ten Advantages of the Multiple Spread Flexible with personnel and talent.
Ten Advantages of the Multiple Spread Clear rules for every position.
Ten Advantages of the Multiple Spread High percentage plays.
Ten Advantages of the Multiple Spread Challenges defenses with formations.
Ten Advantages of the Multiple Spread Simplified play calling packages.
Ten Advantages of the Multiple Spread Create match-up advantages and open field one on one’s.
Ten Advantages of the Multiple Spread Built in adjustments.
Ten Advantages of the Multiple Spread Difficult to scout – week to week variety.
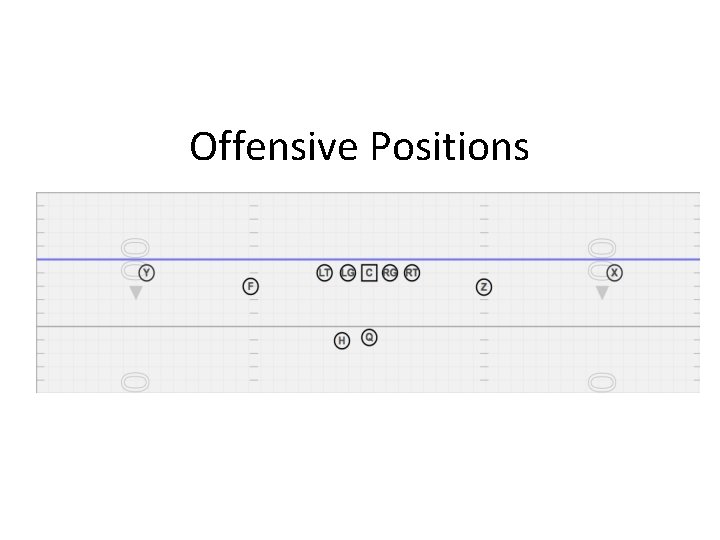
Offensive Positions
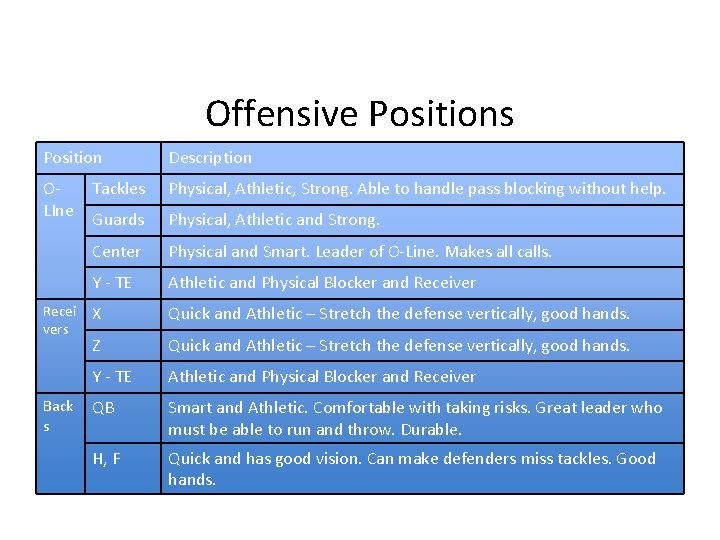
Offensive Positions Position Description OLIne Tackles Physical, Athletic, Strong. Able to handle pass blocking without help. Guards Physical, Athletic and Strong. Center Physical and Smart. Leader of O-Line. Makes all calls. Y - TE Athletic and Physical Blocker and Receiver X Quick and Athletic – Stretch the defense vertically, good hands. Z Quick and Athletic – Stretch the defense vertically, good hands. Y - TE Athletic and Physical Blocker and Receiver QB Smart and Athletic. Comfortable with taking risks. Great leader who must be able to run and throw. Durable. H, F Quick and has good vision. Can make defenders miss tackles. Good hands. Recei vers Back s
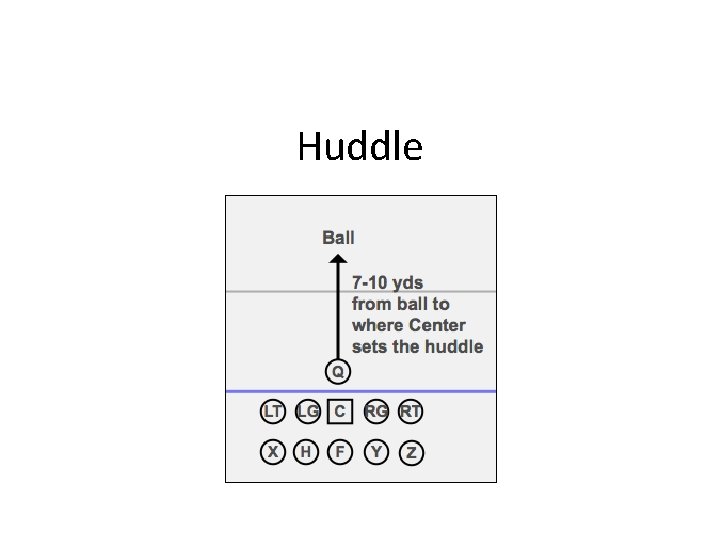
Huddle
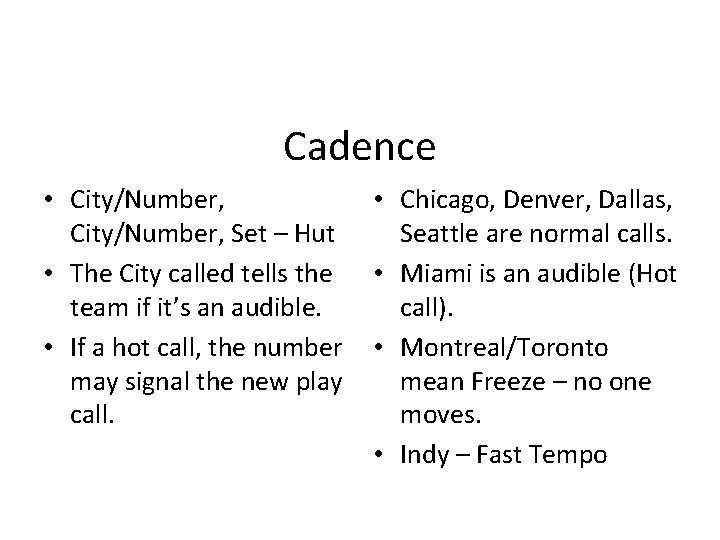
Cadence • City/Number, Set – Hut • The City called tells the team if it’s an audible. • If a hot call, the number may signal the new play call. • Chicago, Denver, Dallas, Seattle are normal calls. • Miami is an audible (Hot call). • Montreal/Toronto mean Freeze – no one moves. • Indy – Fast Tempo
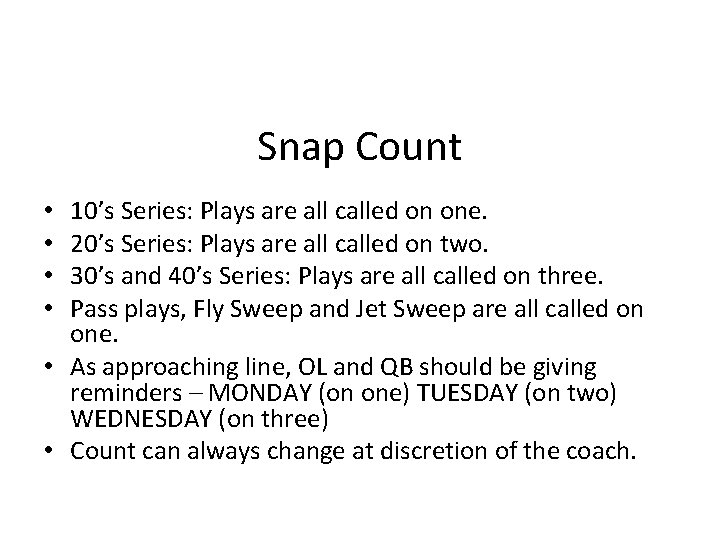
Snap Count 10’s Series: Plays are all called on one. 20’s Series: Plays are all called on two. 30’s and 40’s Series: Plays are all called on three. Pass plays, Fly Sweep and Jet Sweep are all called on one. • As approaching line, OL and QB should be giving reminders – MONDAY (on one) TUESDAY (on two) WEDNESDAY (on three) • Count can always change at discretion of the coach. • •
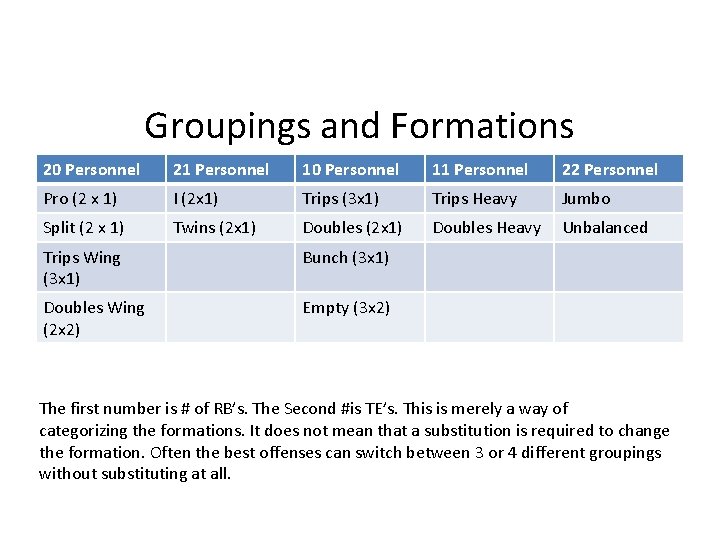
Groupings and Formations 20 Personnel 21 Personnel 10 Personnel 11 Personnel 22 Personnel Pro (2 x 1) I (2 x 1) Trips (3 x 1) Trips Heavy Jumbo Split (2 x 1) Twins (2 x 1) Doubles Heavy Unbalanced Trips Wing (3 x 1) Bunch (3 x 1) Doubles Wing (2 x 2) Empty (3 x 2) The first number is # of RB’s. The Second #is TE’s. This is merely a way of categorizing the formations. It does not mean that a substitution is required to change the formation. Often the best offenses can switch between 3 or 4 different groupings without substituting at all.
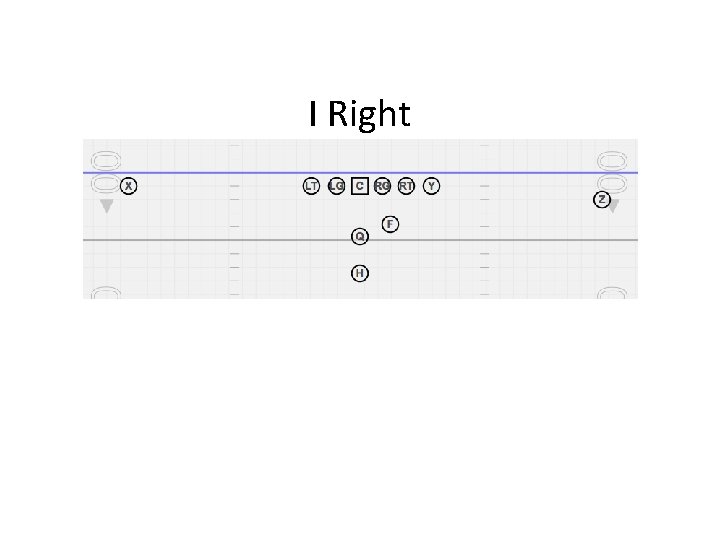
I Right
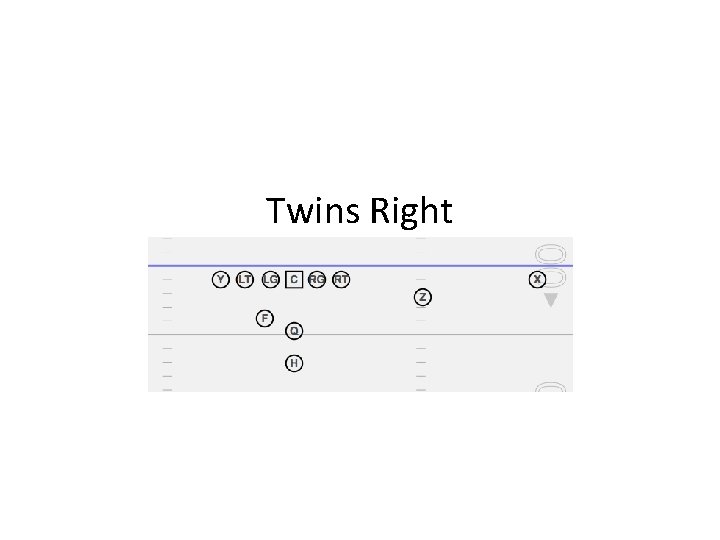
Twins Right
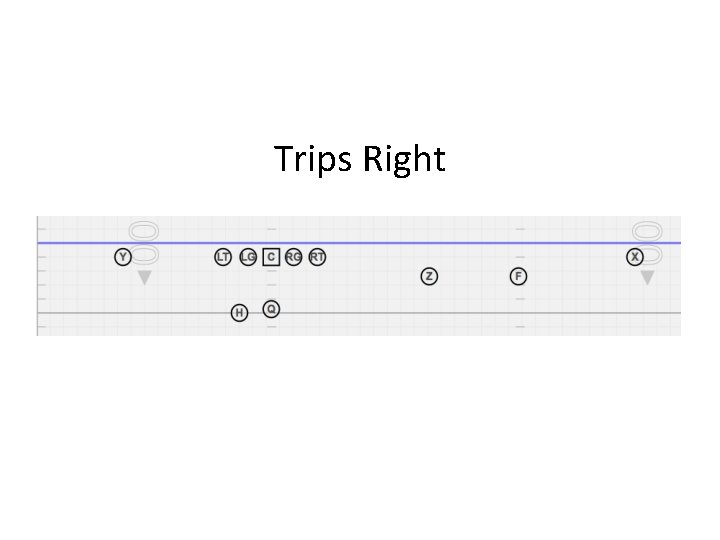
Trips Right
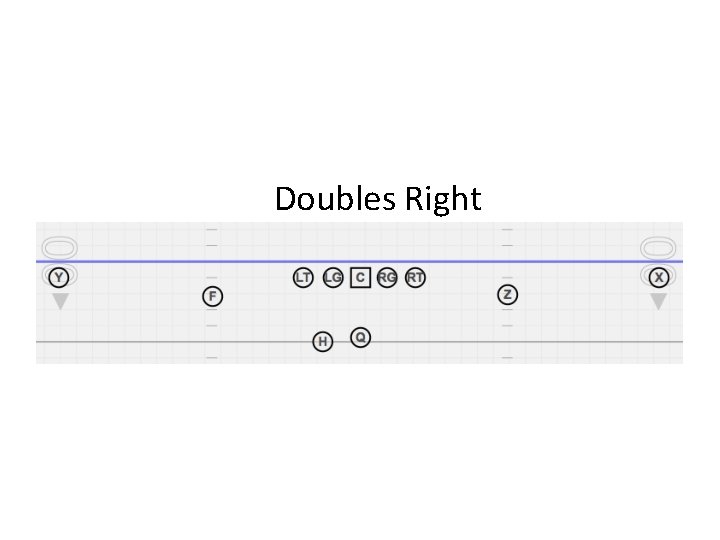
Doubles Right
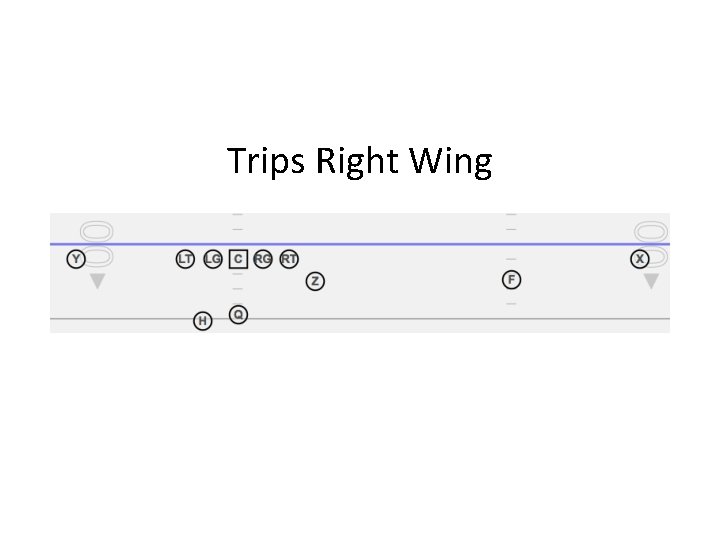
Trips Right Wing
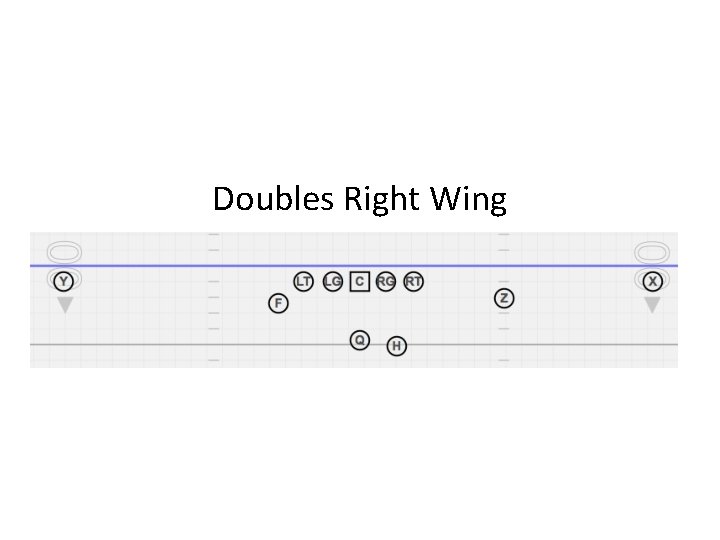
Doubles Right Wing
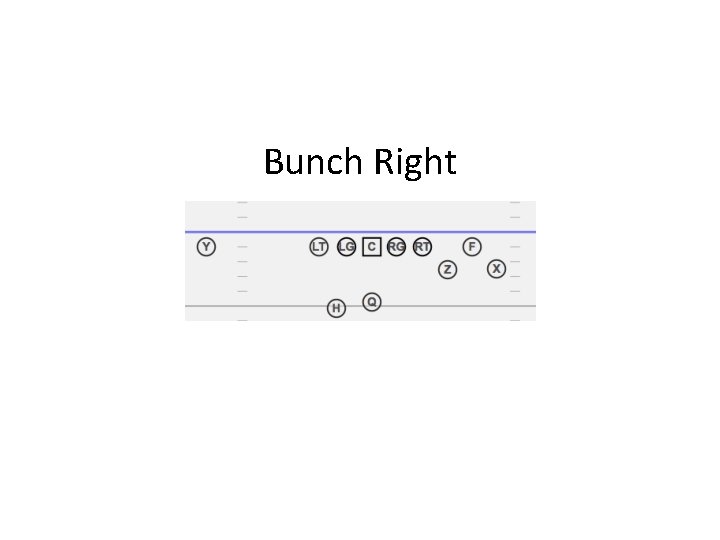
Bunch Right
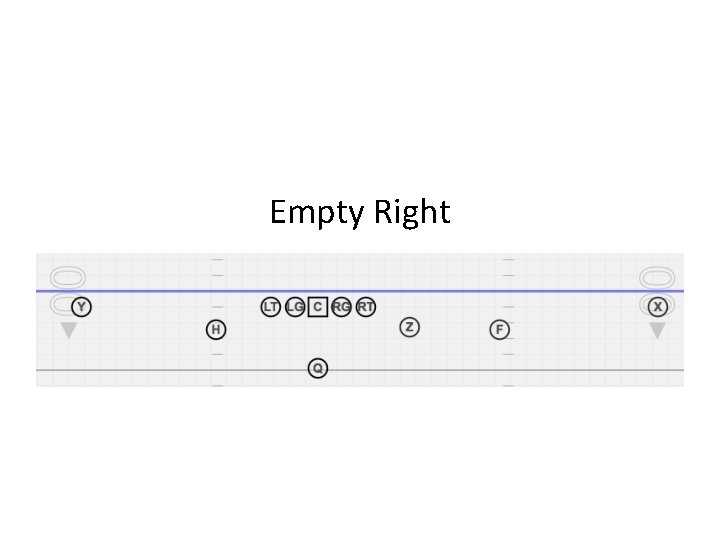
Empty Right
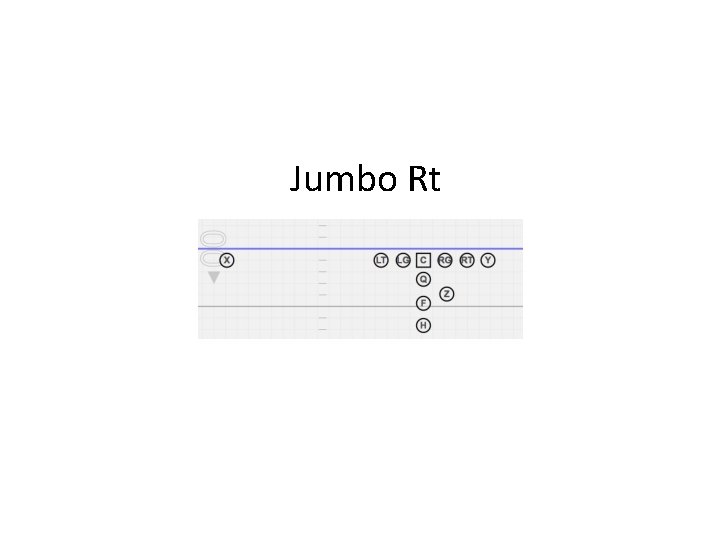
Jumbo Rt
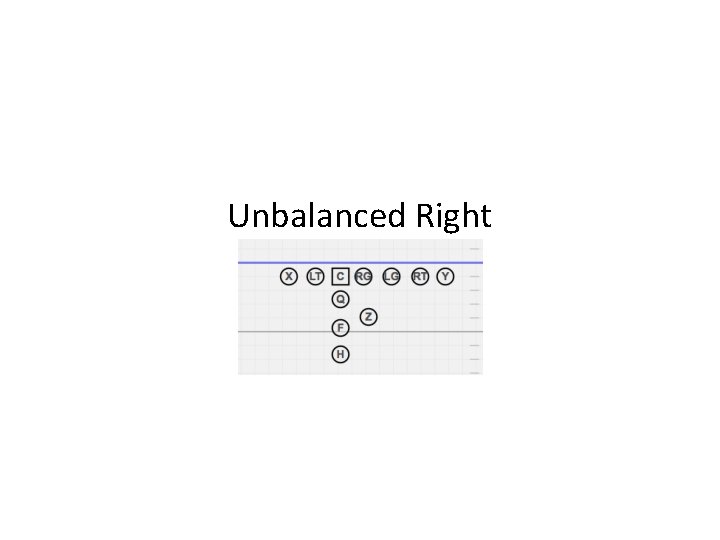
Unbalanced Right
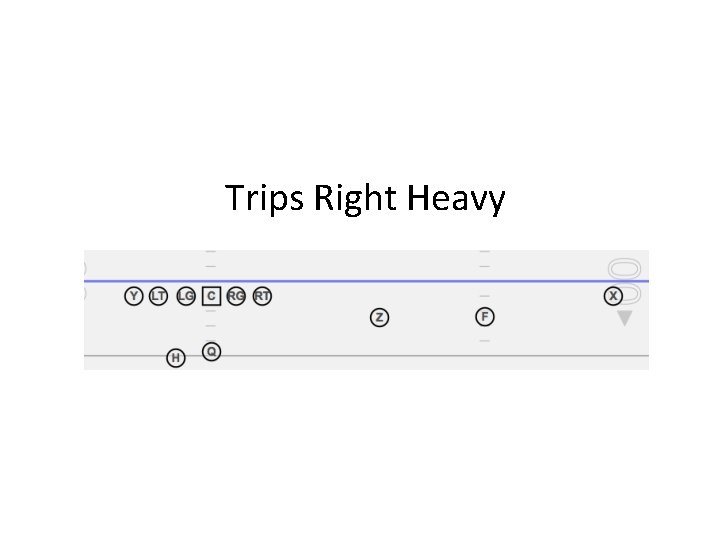
Trips Right Heavy
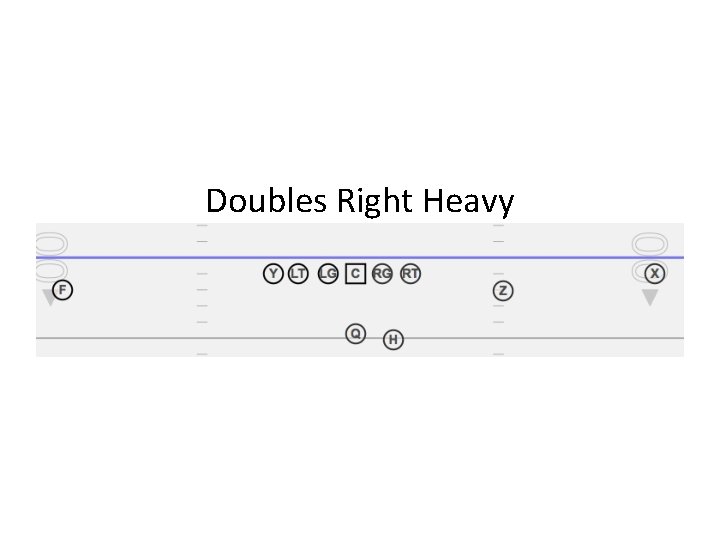
Doubles Right Heavy
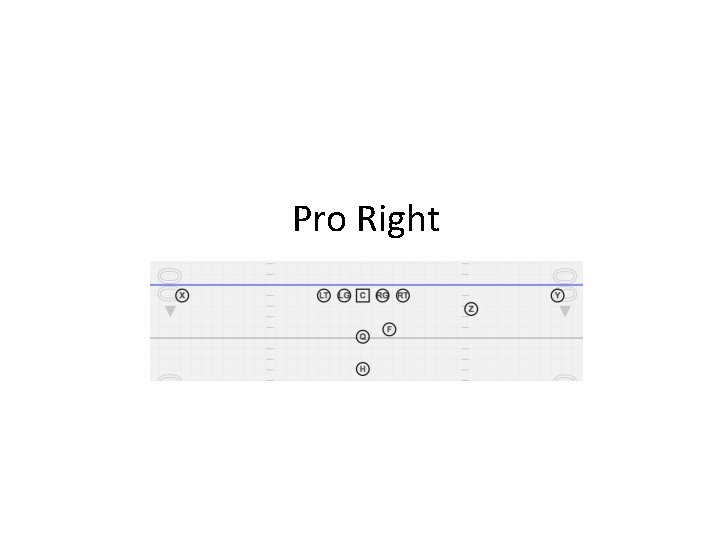
Pro Right
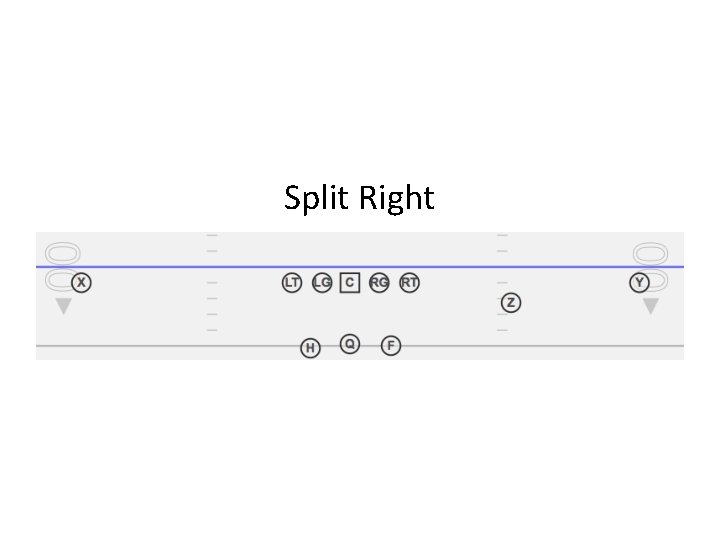
Split Right
Motions
H- Motions We use a simple system for calling motions. A single word call for the type of motion and which back tells you who is going where. The formation call follows the motion call and that is where everyone ends up after the motion. Anytime we use a motion like this we start movement when the QB starts the audibles inside the cadence. Fat – F Across. F Starts in position opposite of where he finishes. Fit – F In. F Starts in position outside of where he finishes. Fox – F Out. F Starts in position inside of where he finishes. Frat – F Return. F starts in same position he finishes, faking motion across formation. Zap – Z Across. Zip – Z In. Zoo – Z Out. H Starts in a position where he can then motion to where he should end up. Sample Play Call – “Ham I Right 24 Power”
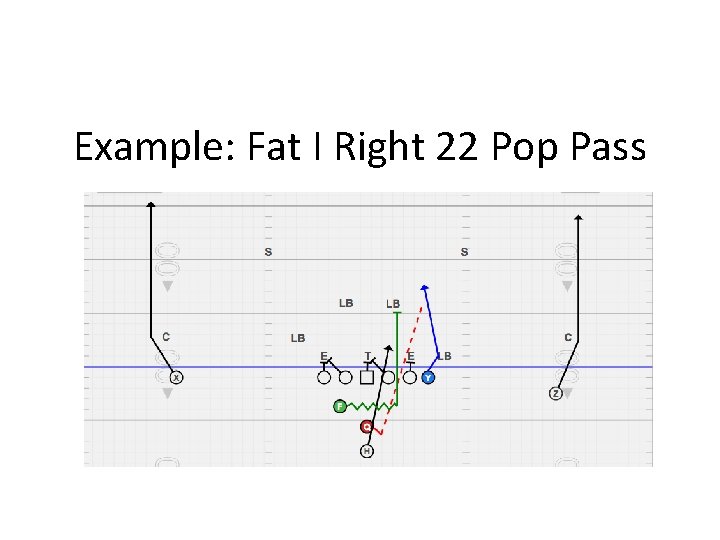
Example: Fat I Right 22 Pop Pass
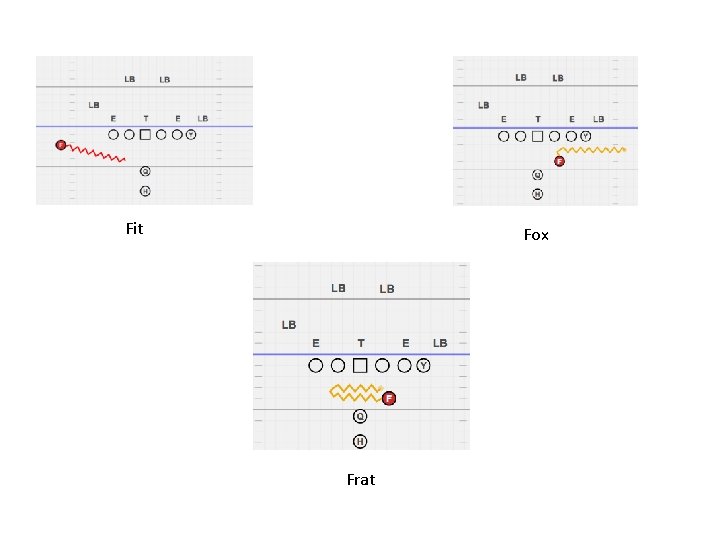
Fit Fox Frat
Base Run Plays 26 -27 Power 24 -25 Counter 28 -29 Toss
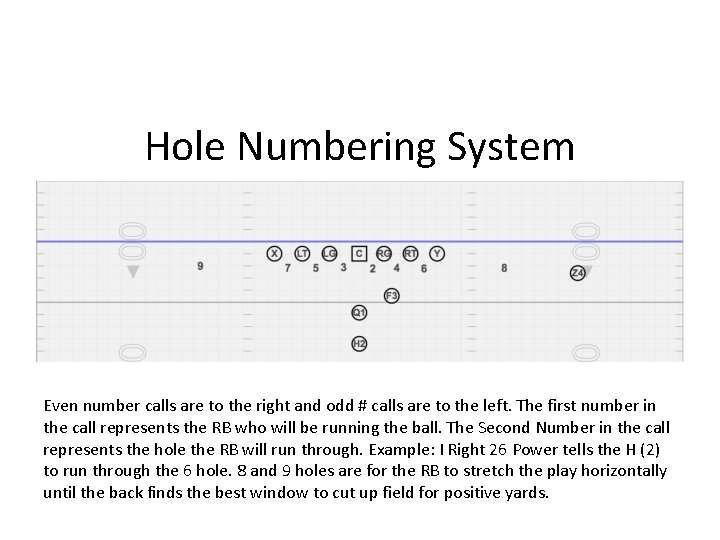
Hole Numbering System Even number calls are to the right and odd # calls are to the left. The first number in the call represents the RB who will be running the ball. The Second Number in the call represents the hole the RB will run through. Example: I Right 26 Power tells the H (2) to run through the 6 hole. 8 and 9 holes are for the RB to stretch the play horizontally until the back finds the best window to cut up field for positive yards.
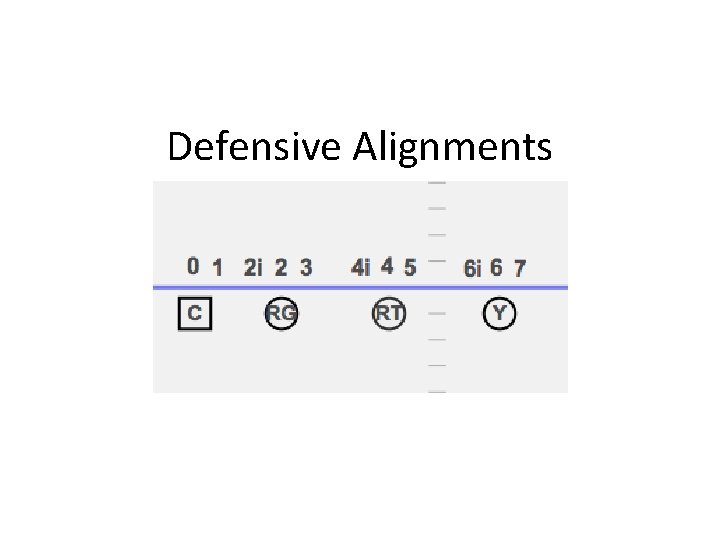
Defensive Alignments
How to run the Core Run Game
Plays Covered • • 24/25 Power 24/25 BOE (Back On End) 22/23 Read 28/29 Toss
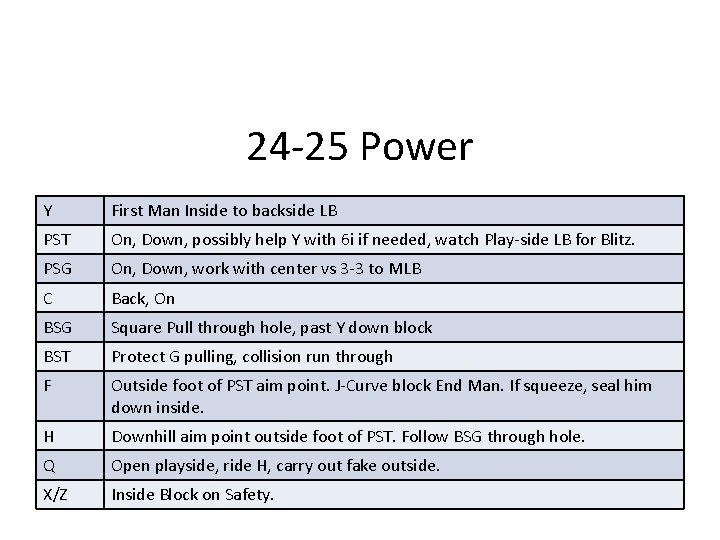
24 -25 Power Y First Man Inside to backside LB PST On, Down, possibly help Y with 6 i if needed, watch Play-side LB for Blitz. PSG On, Down, work with center vs 3 -3 to MLB C Back, On BSG Square Pull through hole, past Y down block BST Protect G pulling, collision run through F Outside foot of PST aim point. J-Curve block End Man. If squeeze, seal him down inside. H Downhill aim point outside foot of PST. Follow BSG through hole. Q Open playside, ride H, carry out fake outside. X/Z Inside Block on Safety.
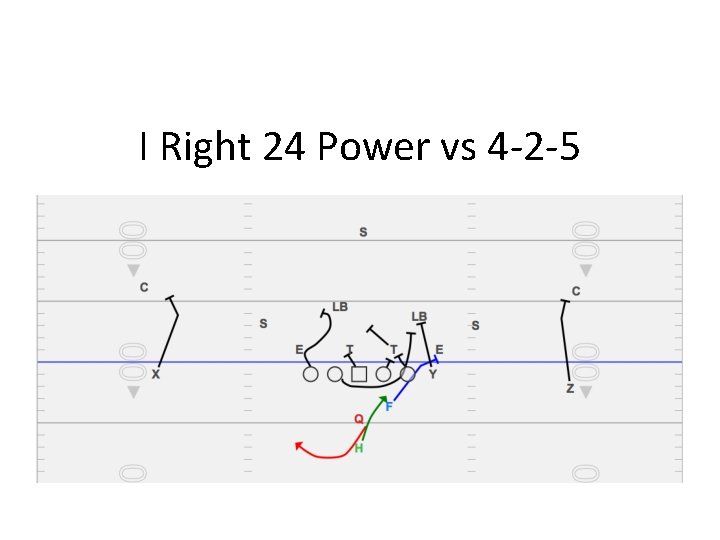
I Right 24 Power vs 4 -2 -5
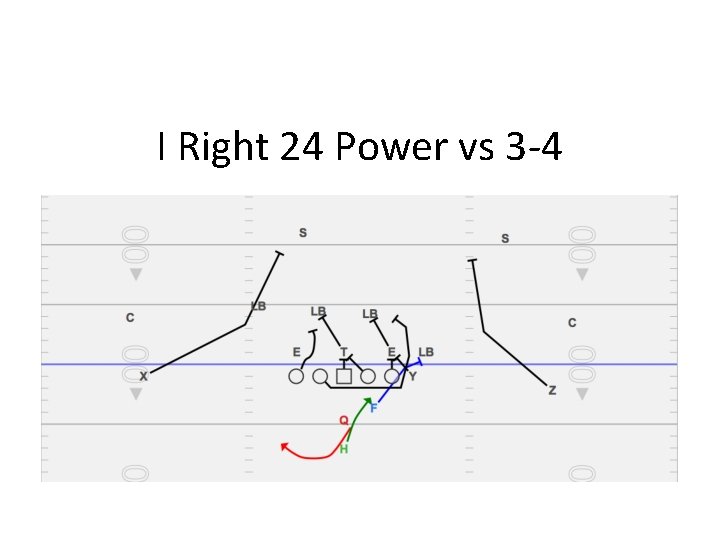
I Right 24 Power vs 3 -4
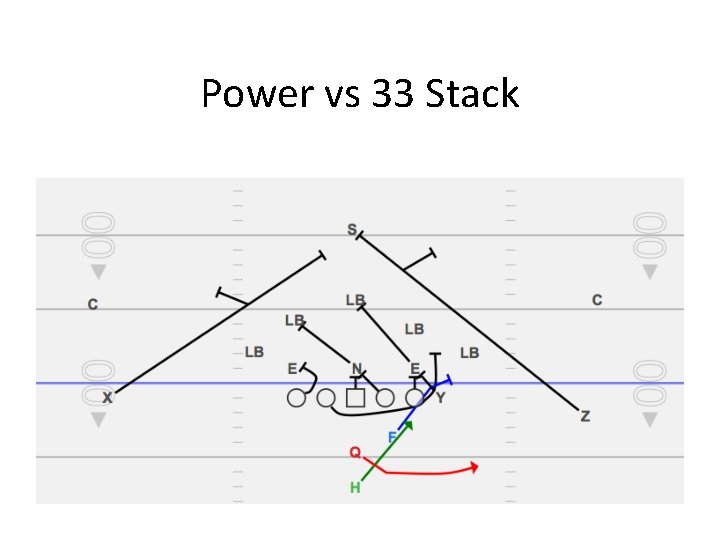
Power vs 33 Stack
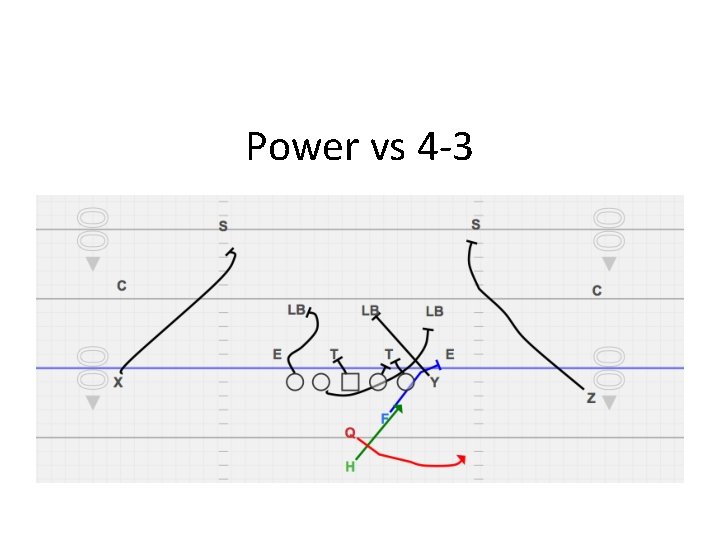
Power vs 4 -3
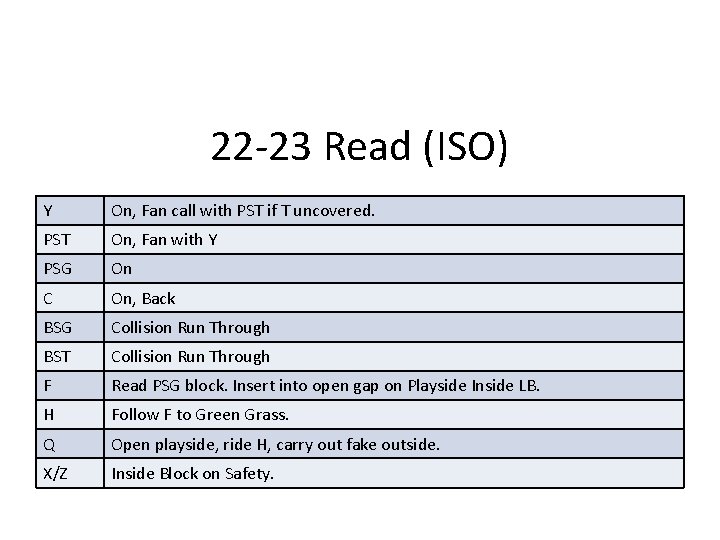
22 -23 Read (ISO) • Y • • • • • PST Y First Man Inside to backside LB PST On, Down, possibly help Y with 6 i if needed, watch Play-side LB for Blitz. PSG On, Down, work with center vs 3 -3 to MLB C Back, On BSG Square Pull through hole, past Y down block BST Protect G pulling, collision run through F Outside foot of PST aim point. J-Curve block End Man. If squeeze, seal him down inside. H Downhill aim point outside foot of PST. Follow BSG through hole. Q Open playside, ride H, carry out fake outside. X/Z Inside Block on Safety. On, Fan call with PST if T uncovered. On, Fan with Y PSG On C On, Back BSG Collision Run Through BST Collision Run Through F H Q X/Z Read PSG block. Insert into open gap on Playside Inside LB. Follow F to Green Grass. Open playside, ride H, carry out fake outside. Inside Block on Safety.
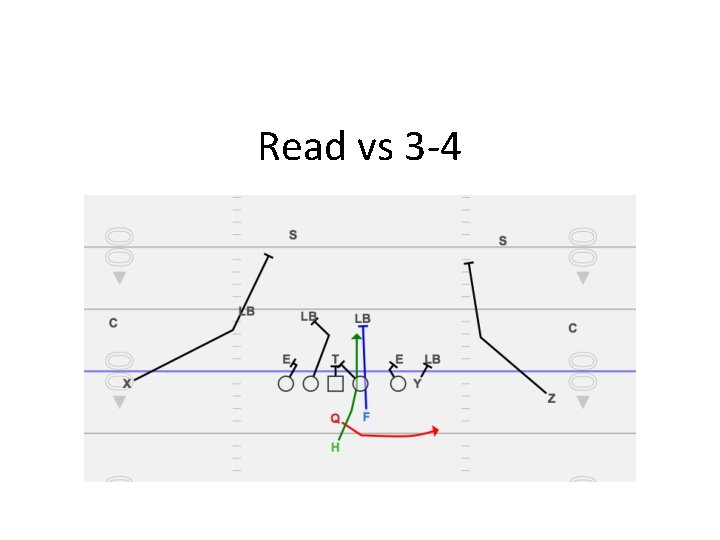
Read vs 3 -4
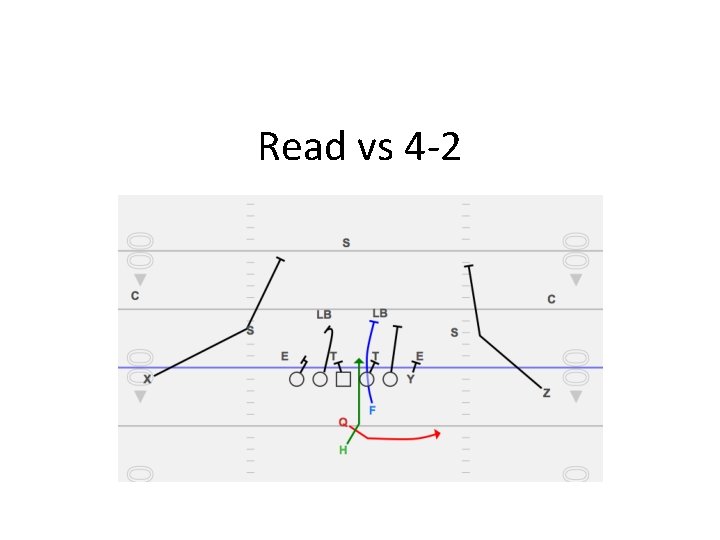
Read vs 4 -2
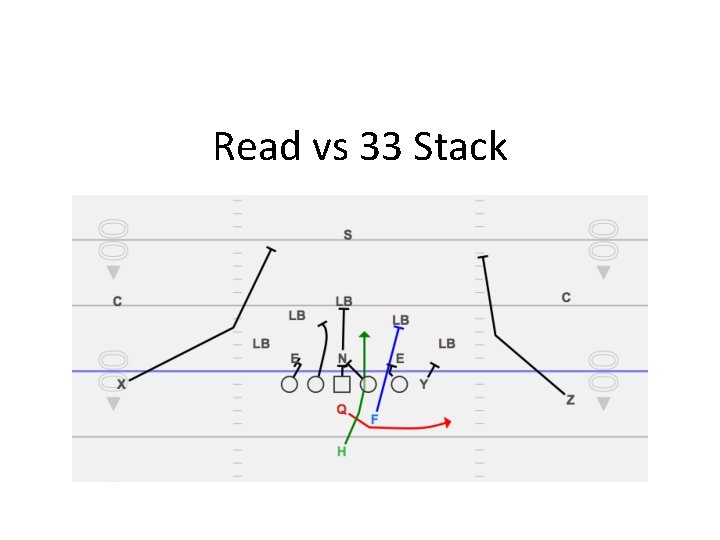
Read vs 33 Stack
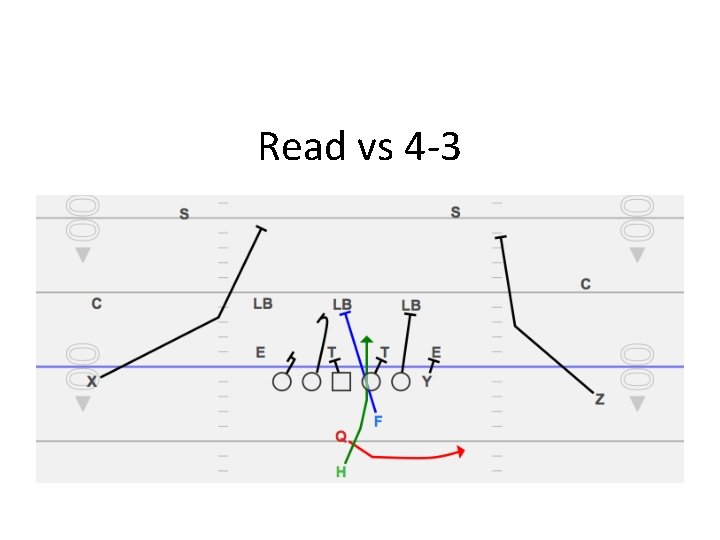
Read vs 4 -3
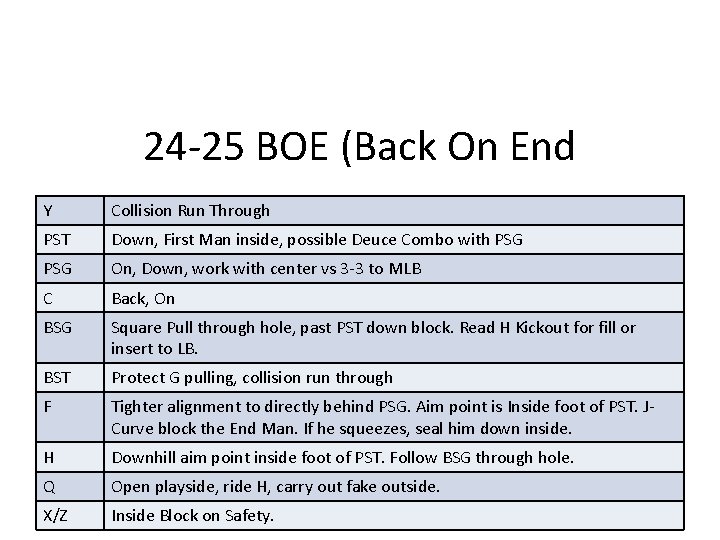
24 -25 BOE (Back On End • Y • • • • • PST Y First Man Inside to backside LB PST On, Down, possibly help Y with 6 i if needed, watch Play-side LB for Blitz. PSG On, Down, work with center vs 3 -3 to MLB C Back, On BSG Square Pull through hole, past Y down block BST Protect G pulling, collision run through F Outside foot of PST aim point. J-Curve block End Man. If squeeze, seal him down inside. H Downhill aim point outside foot of PST. Follow BSG through hole. Q Open playside, ride H, carry out fake outside. X/Z Inside Block on Safety. Collision Run Through Down, First Man inside, possible Deuce Combo with PSG On, Down, work with center vs 3 -3 to MLB C Back, On BSG Square Pull through hole, past PST down block. Read H Kickout for fill or insert to LB. BST Protect G pulling, collision run through F Tighter alignment to directly behind PSG. Aim point is Inside foot of PST. JCurve block the End Man. If he squeezes, seal him down inside. H Downhill aim point inside foot of PST. Follow BSG through hole. Q Open playside, ride H, carry out fake outside. X/Z Inside Block on Safety.
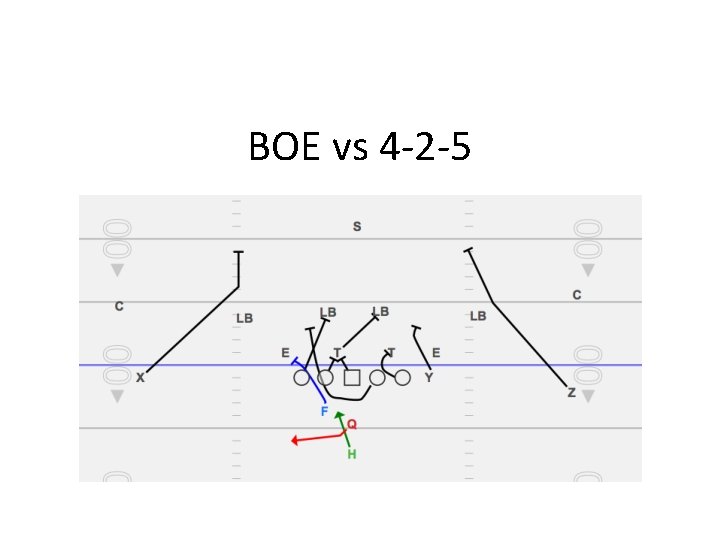
BOE vs 4 -2 -5
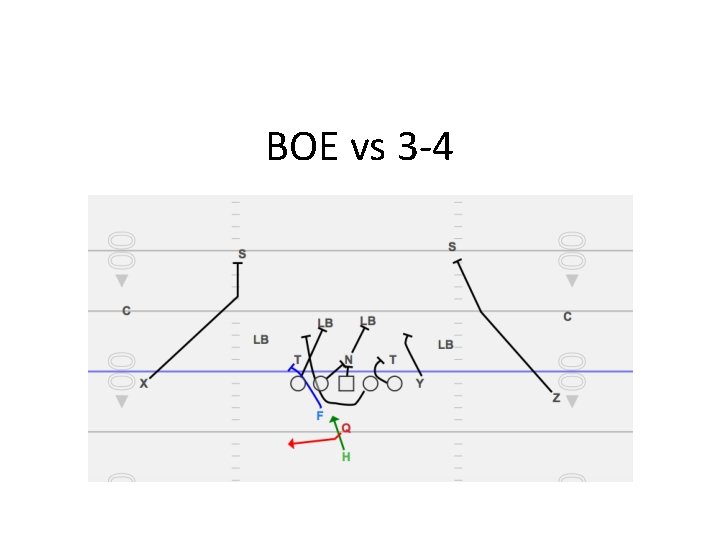
BOE vs 3 -4
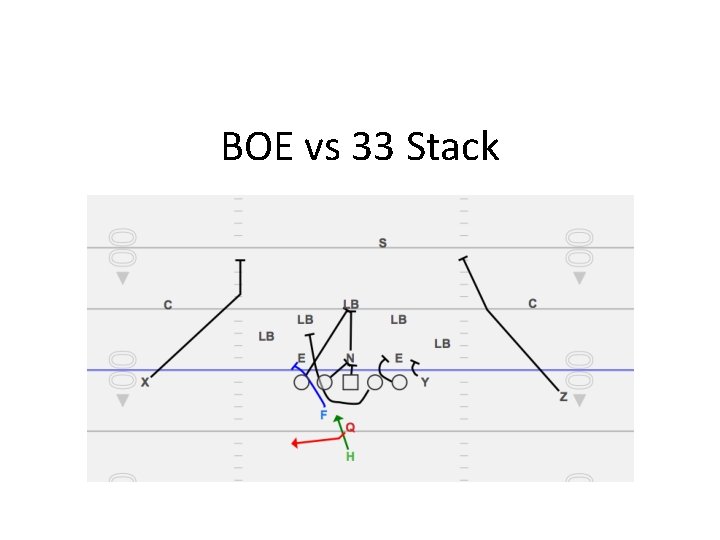
BOE vs 33 Stack
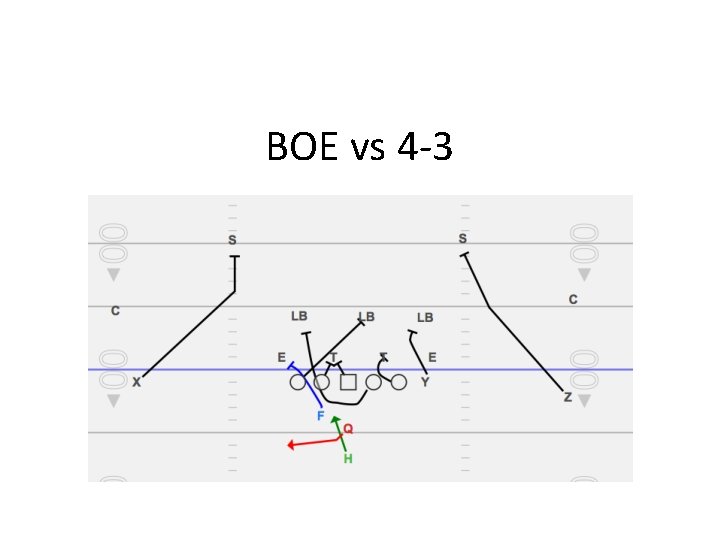
BOE vs 4 -3
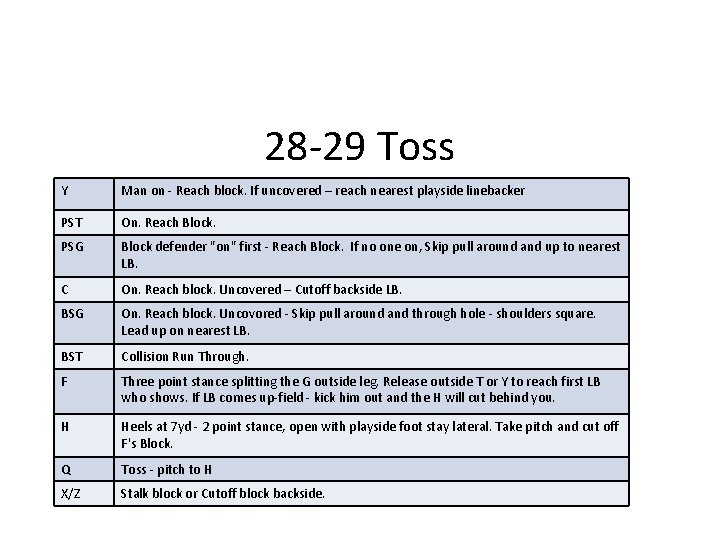
28 -29 Toss Y Man on - Reach block. If uncovered – reach nearest playside linebacker PST On. Reach Block. PSG Block defender "on" first - Reach Block. If no one on, Skip pull around and up to nearest LB. C On. Reach block. Uncovered – Cutoff backside LB. BSG On. Reach block. Uncovored - Skip pull around and through hole - shoulders square. Lead up on nearest LB. BST Collision Run Through. F Three point stance splitting the G outside leg. Release outside T or Y to reach first LB who shows. If LB comes up-field - kick him out and the H will cut behind you. H Heels at 7 yd - 2 point stance, open with playside foot stay lateral. Take pitch and cut off F's Block. Q Toss - pitch to H X/Z Stalk block or Cutoff block backside.
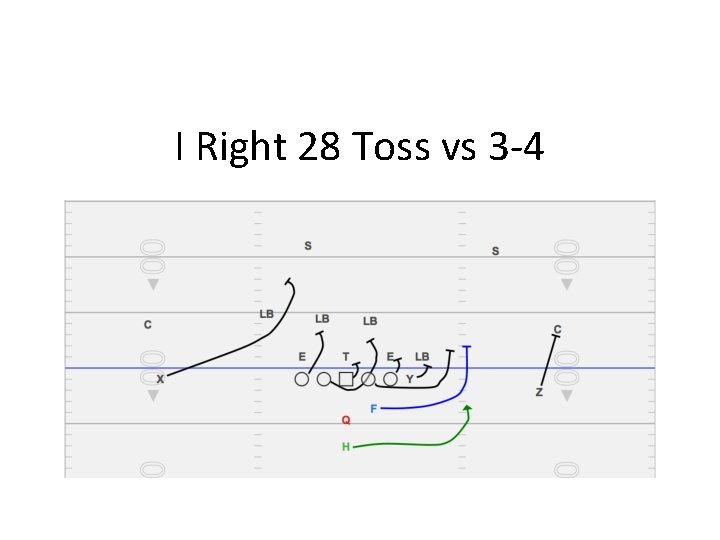
I Right 28 Toss vs 3 -4
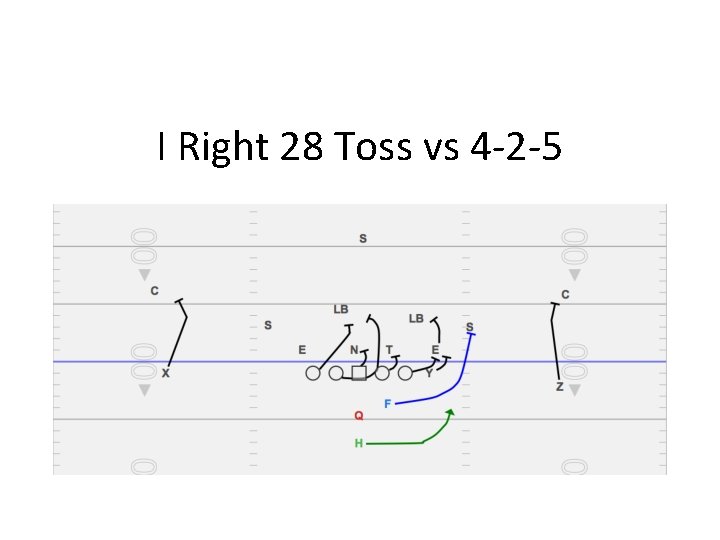
I Right 28 Toss vs 4 -2 -5
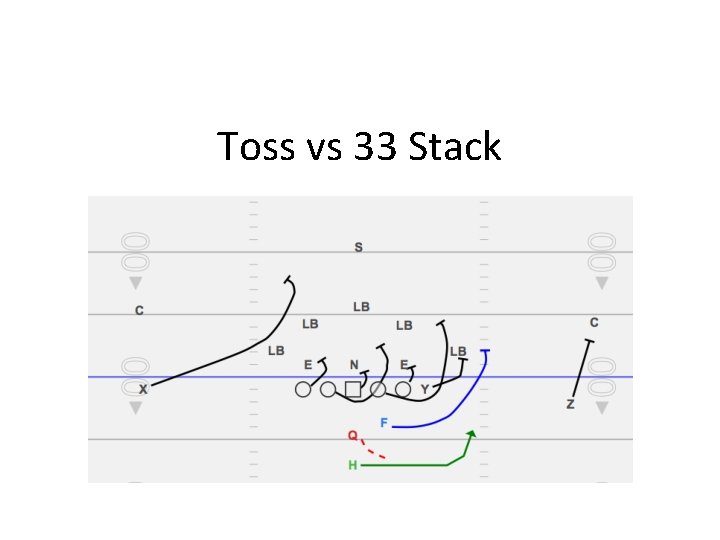
Toss vs 33 Stack
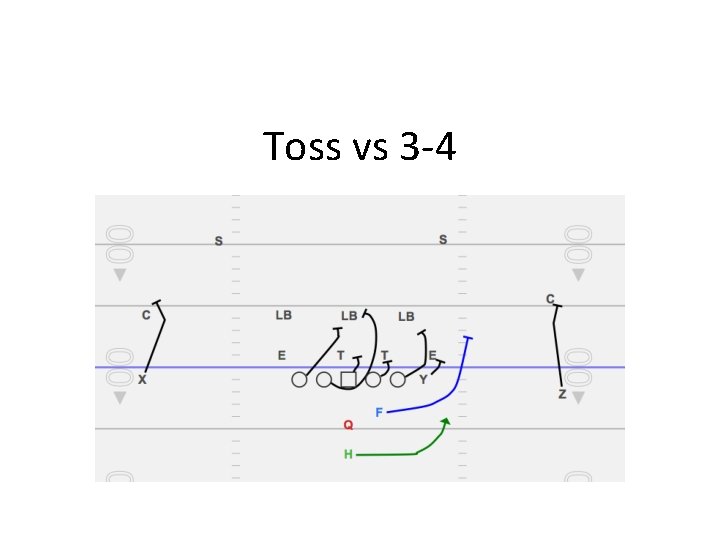
Toss vs 3 -4
How to run the Auxiliary Run Game
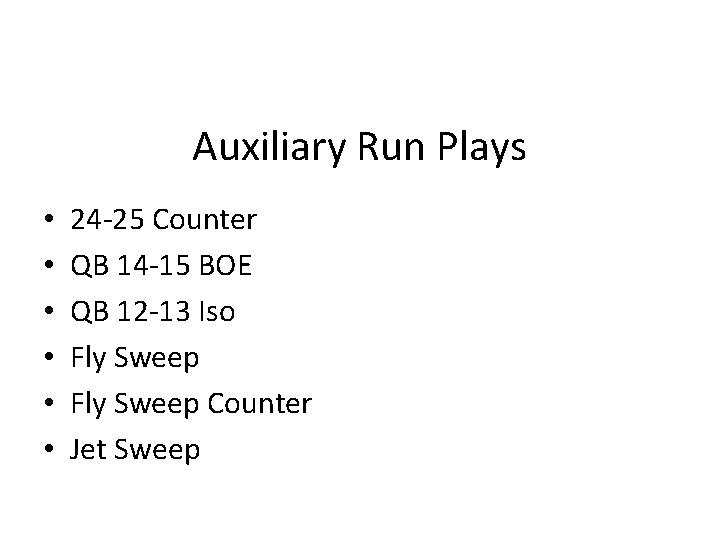
Auxiliary Run Plays • • • 24 -25 Counter QB 14 -15 BOE QB 12 -13 Iso Fly Sweep Counter Jet Sweep
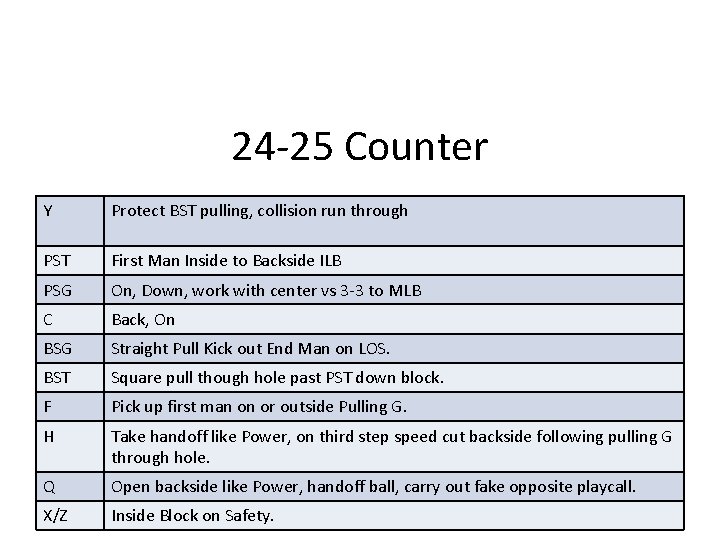
24 -25 Counter Y Protect BST pulling, collision run through PST First Man Inside to Backside ILB PSG On, Down, work with center vs 3 -3 to MLB C Back, On BSG Straight Pull Kick out End Man on LOS. BST Square pull though hole past PST down block. F Pick up first man on or outside Pulling G. H Take handoff like Power, on third step speed cut backside following pulling G through hole. Q Open backside like Power, handoff ball, carry out fake opposite playcall. X/Z Inside Block on Safety.
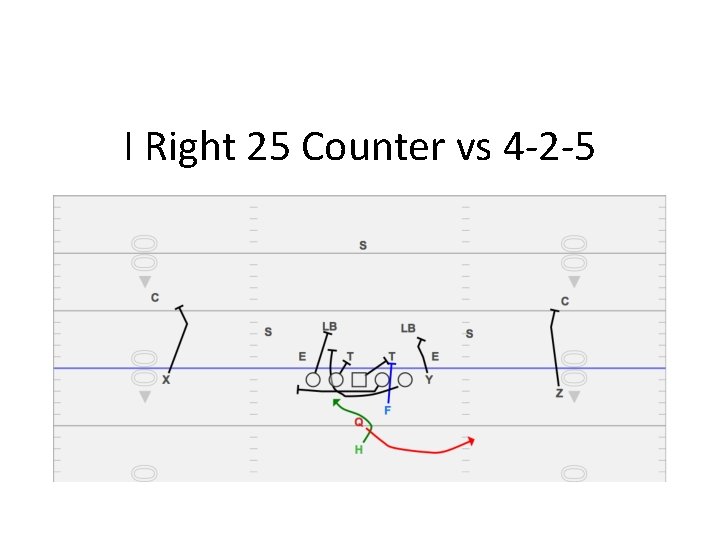
I Right 25 Counter vs 4 -2 -5
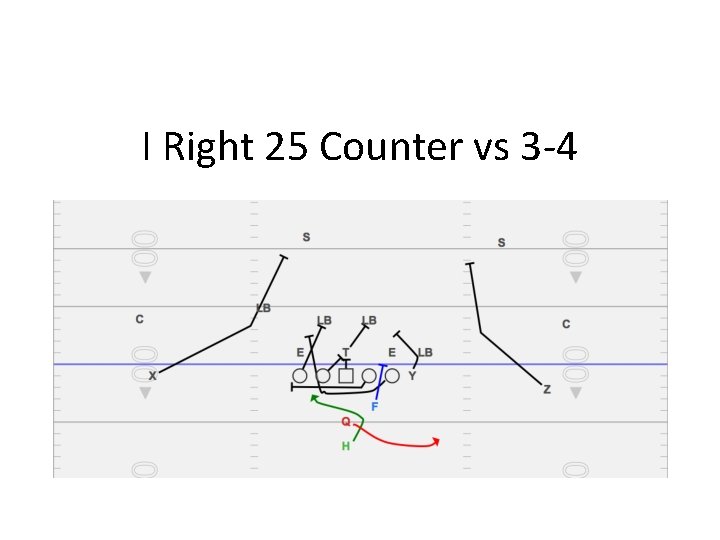
I Right 25 Counter vs 3 -4
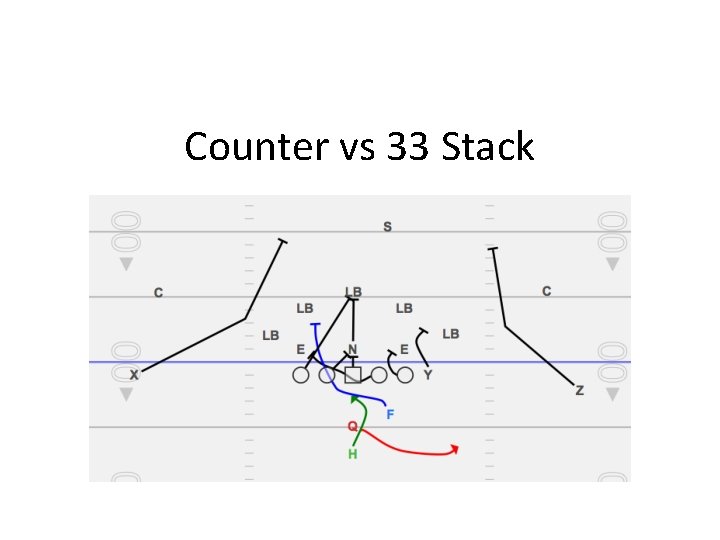
Counter vs 33 Stack
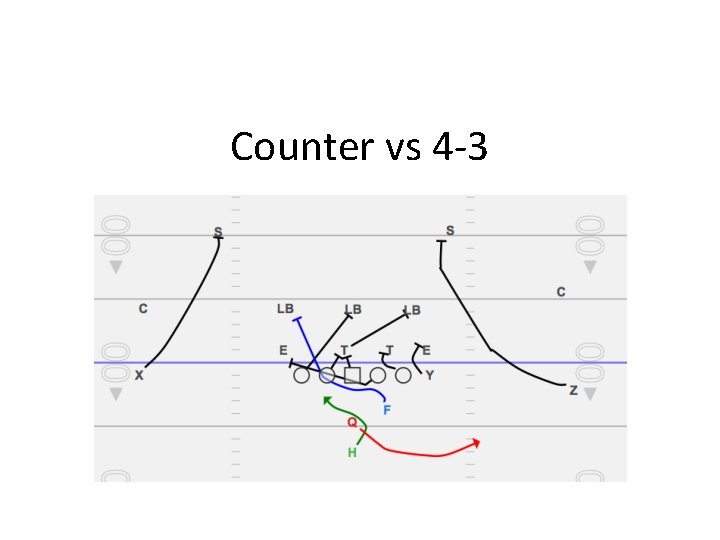
Counter vs 4 -3
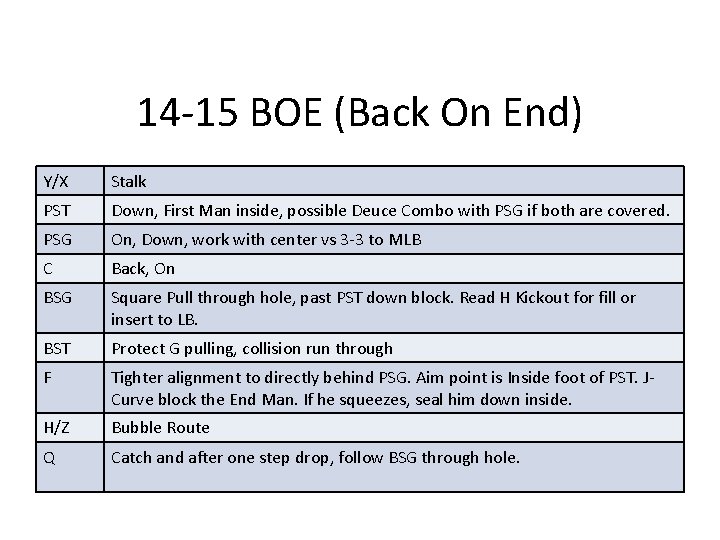
14 -15 BOE (Back On End) Y/X Stalk • Y • • • • • PST On, Down, possibly help Y with 6 i if needed, watch Play-side LB for Blitz. PSG On, Down, work with center vs 3 -3 to MLB C Back, On BSG Square Pull through hole, past Y down block BST Protect G pulling, collision run through F Outside foot of PST aim point. J-Curve block End Man. If squeeze, seal him down inside. H Downhill aim point outside foot of PST. Follow BSG through hole. Q Open playside, ride H, carry out fake outside. X/Z Inside Block on Safety. PST Down, First. LB Man inside, possible Deuce Combo with PSG if both are covered. • First Man Inside to backside PSG On, Down, work with center vs 3 -3 to MLB C Back, On BSG Square Pull through hole, past PST down block. Read H Kickout for fill or insert to LB. BST Protect G pulling, collision run through F H/Z Q Tighter alignment to directly behind PSG. Aim point is Inside foot of PST. JCurve block the End Man. If he squeezes, seal him down inside. Bubble Route Catch and after one step drop, follow BSG through hole.
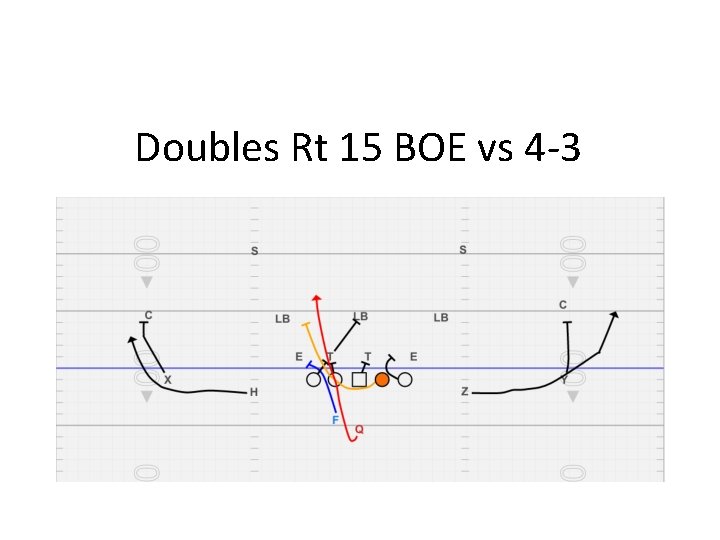
Doubles Rt 15 BOE vs 4 -3
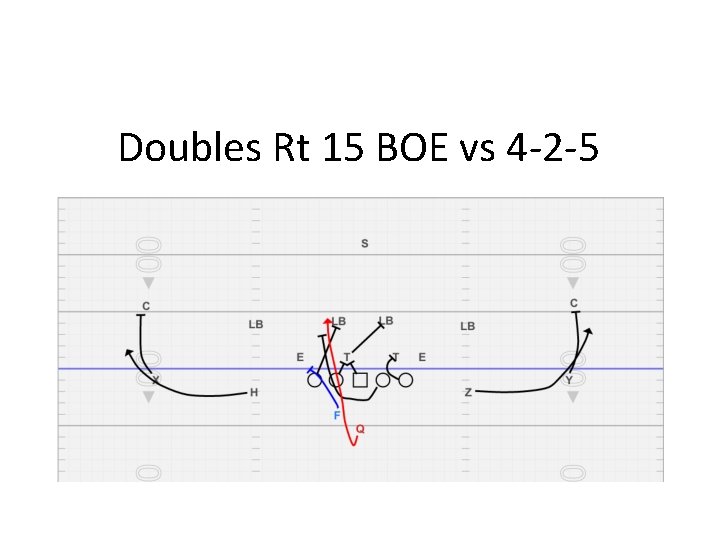
Doubles Rt 15 BOE vs 4 -2 -5
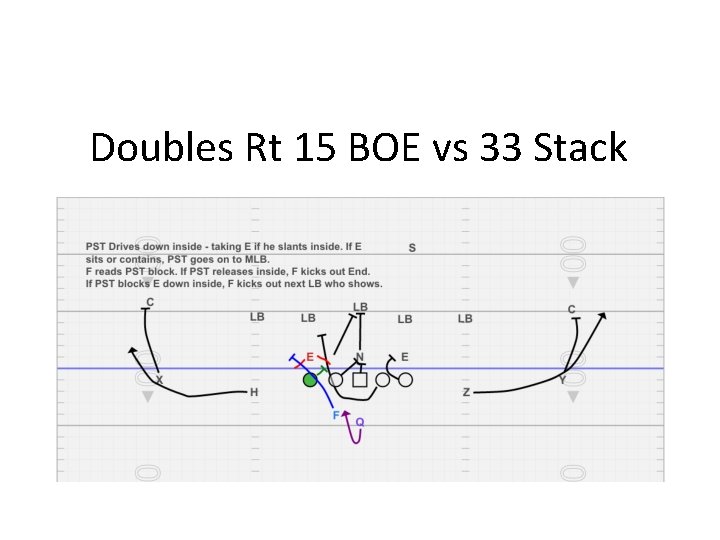
Doubles Rt 15 BOE vs 33 Stack
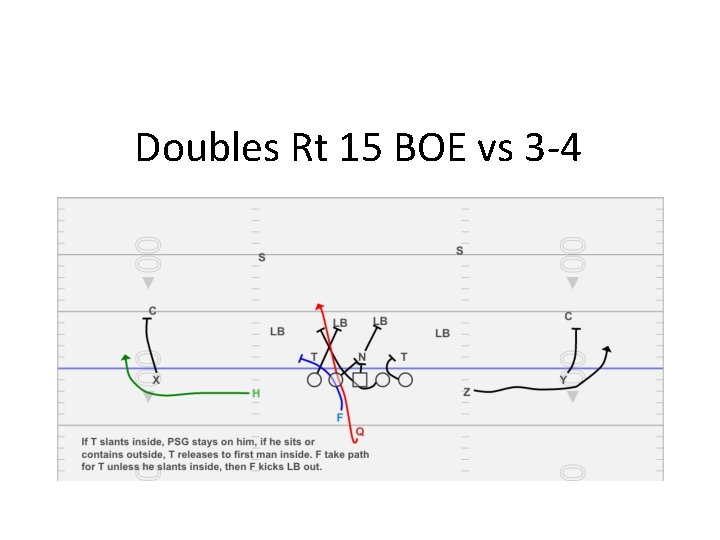
Doubles Rt 15 BOE vs 3 -4
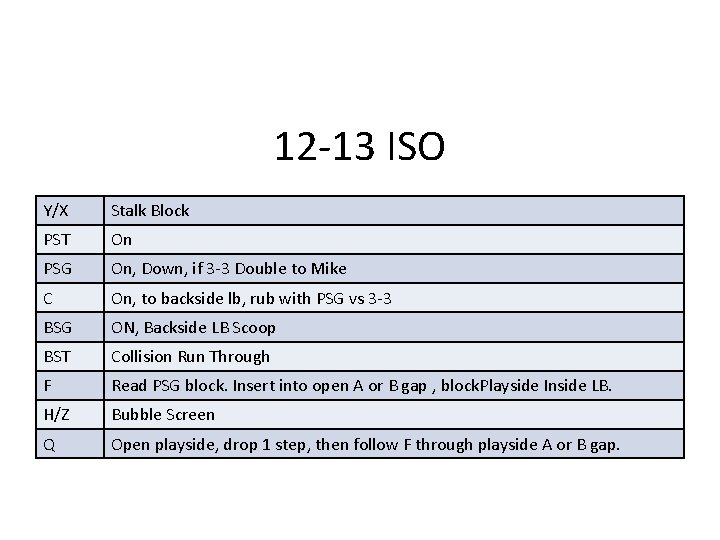
12 -13 ISO • Y • • • • • PST On, Down, possibly help Y with 6 i if needed, watch Play-side LB for Blitz. PSG On, Down, work with center vs 3 -3 to MLB C Back, On BSG Square Pull through hole, past Y down block BST Protect G pulling, collision run through F Outside foot of PST aim point. J-Curve block End Man. If squeeze, seal him down inside. H Downhill aim point outside foot of PST. Follow BSG through hole. Q Open playside, ride H, carry out fake outside. X/Z Inside Block on Safety. Y/X Stalkto backside Block. LB • First Man Inside PST On PSG On, Down, if 3 -3 Double to Mike C On, to backside lb, rub with PSG vs 3 -3 BSG ON, Backside LB Scoop BST Collision Run Through F H/Z Q Read PSG block. Insert into open A or B gap , block. Playside Inside LB. Bubble Screen Open playside, drop 1 step, then follow F through playside A or B gap.
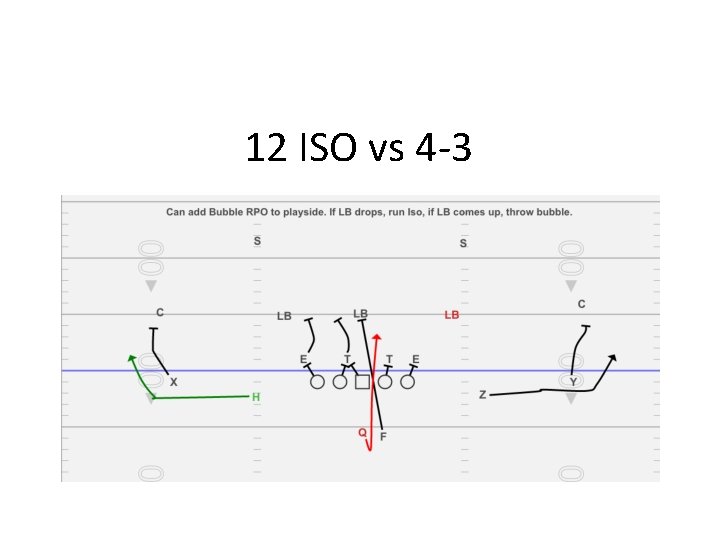
12 ISO vs 4 -3
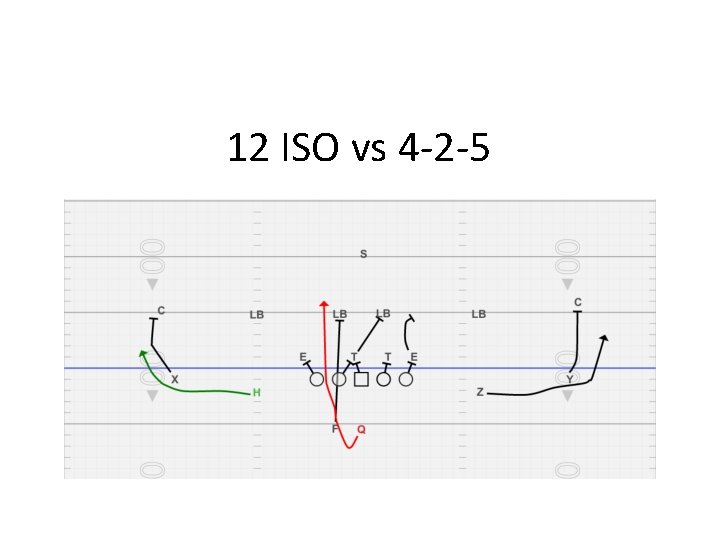
12 ISO vs 4 -2 -5
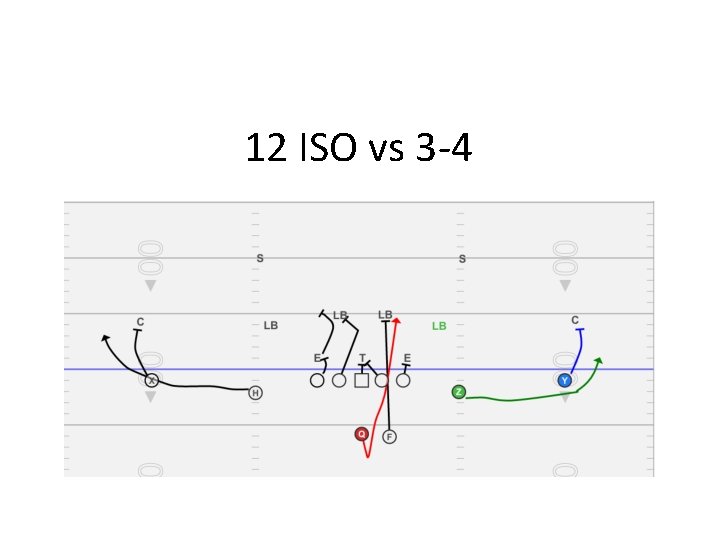
12 ISO vs 3 -4
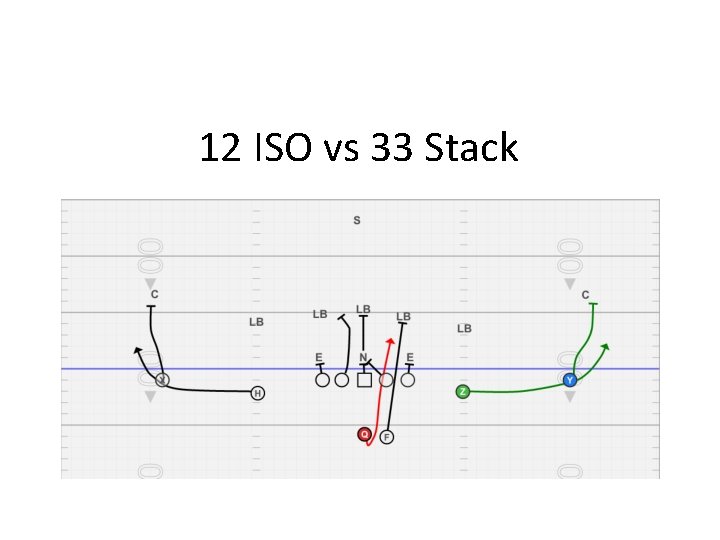
12 ISO vs 33 Stack
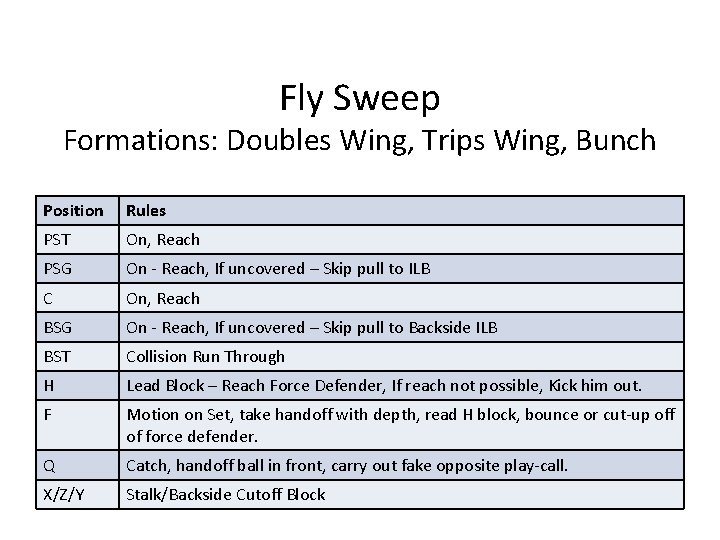
Fly Sweep Formations: Doubles Wing, Trips Wing, Bunch Position Rules PST On, Reach PSG On - Reach, If uncovered – Skip pull to ILB C On, Reach BSG On - Reach, If uncovered – Skip pull to Backside ILB BST Collision Run Through H Lead Block – Reach Force Defender, If reach not possible, Kick him out. F Motion on Set, take handoff with depth, read H block, bounce or cut-up off of force defender. Q Catch, handoff ball in front, carry out fake opposite play-call. X/Z/Y Stalk/Backside Cutoff Block
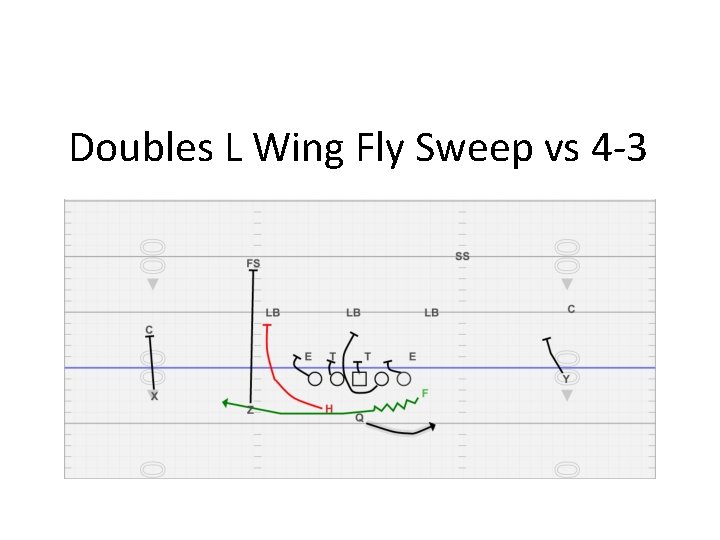
Doubles L Wing Fly Sweep vs 4 -3
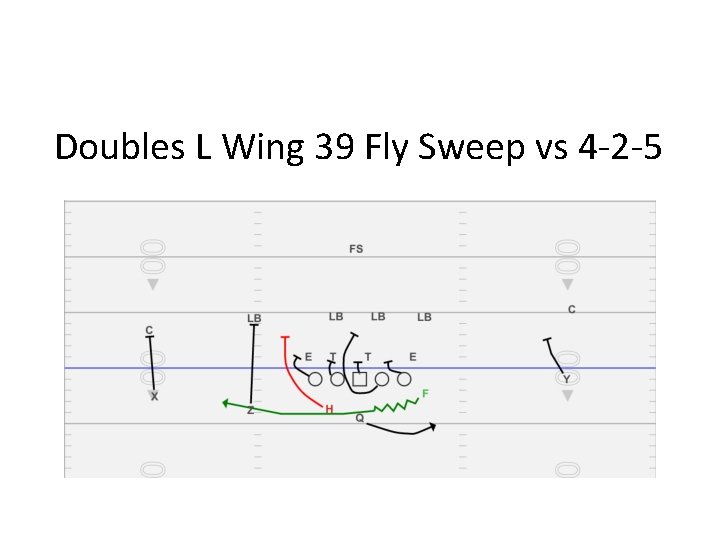
Doubles L Wing 39 Fly Sweep vs 4 -2 -5
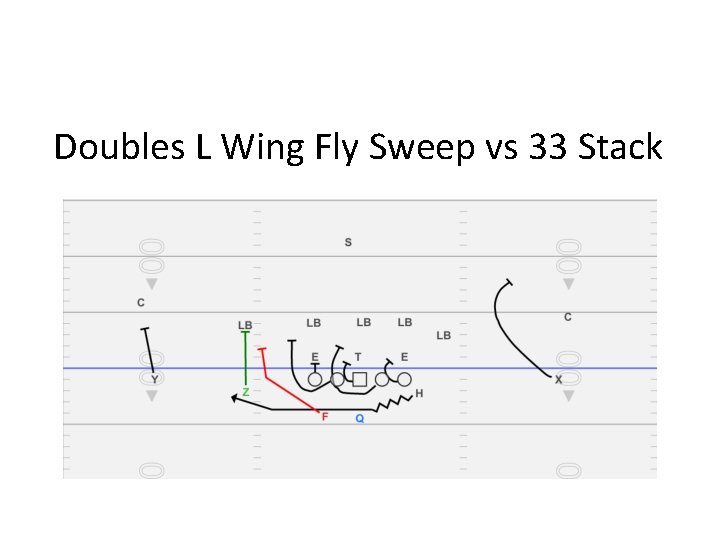
Doubles L Wing Fly Sweep vs 33 Stack
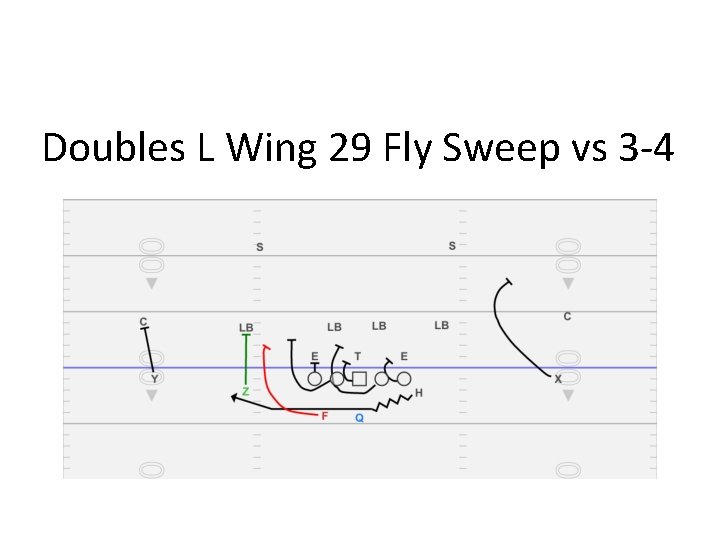
Doubles L Wing 29 Fly Sweep vs 3 -4
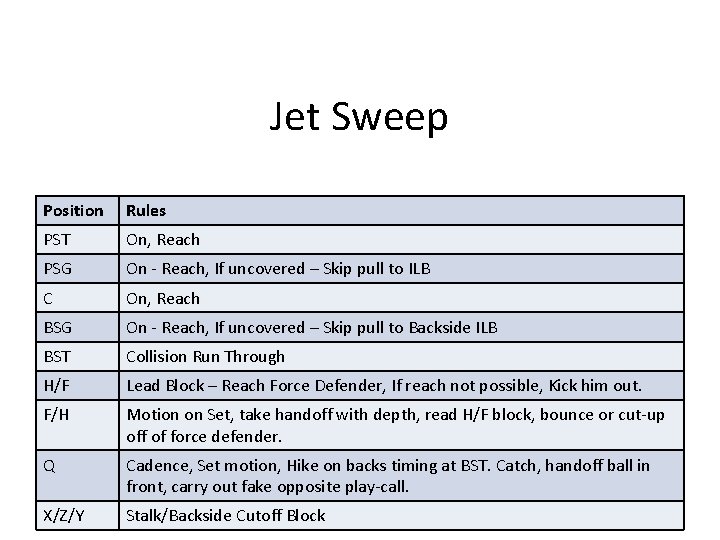
Jet Sweep Position Rules PST On, Reach PSG On - Reach, If uncovered – Skip pull to ILB C On, Reach BSG On - Reach, If uncovered – Skip pull to Backside ILB BST Collision Run Through H/F Lead Block – Reach Force Defender, If reach not possible, Kick him out. F/H Motion on Set, take handoff with depth, read H/F block, bounce or cut-up off of force defender. Q Cadence, Set motion, Hike on backs timing at BST. Catch, handoff ball in front, carry out fake opposite play-call. X/Z/Y Stalk/Backside Cutoff Block
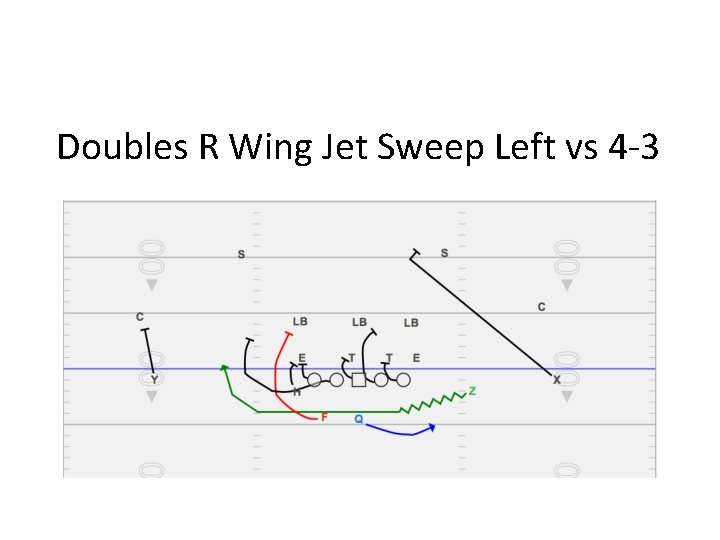
Doubles R Wing Jet Sweep Left vs 4 -3
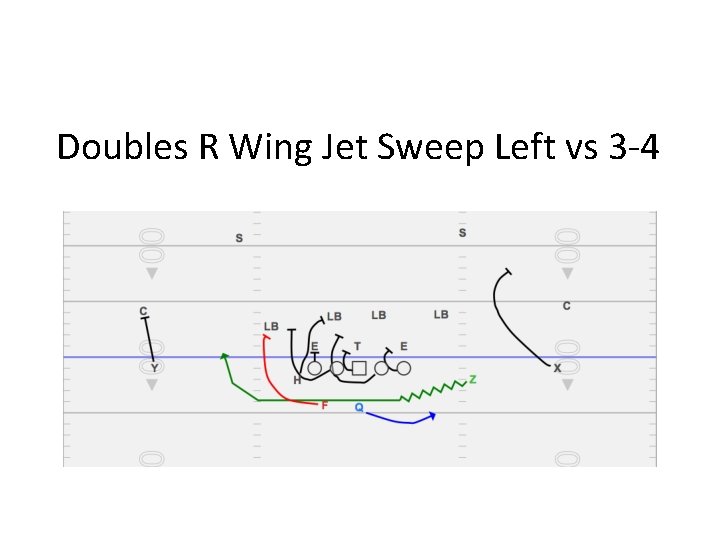
Doubles R Wing Jet Sweep Left vs 3 -4
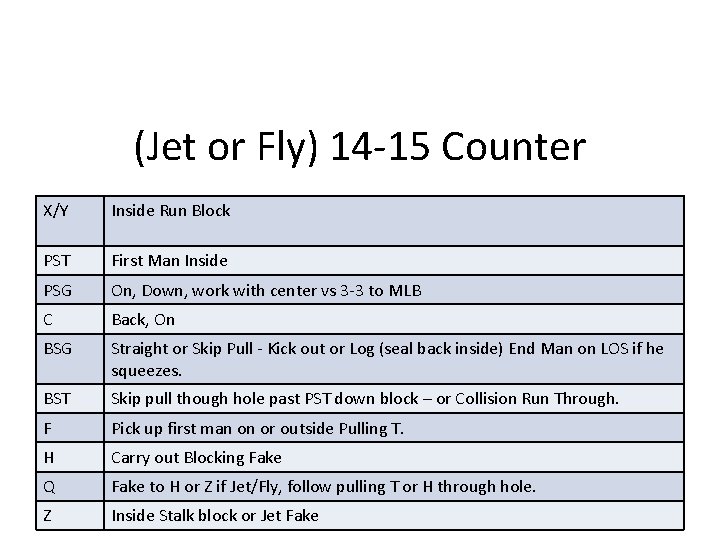
(Jet or Fly) 14 -15 Counter X/Y Inside Run Block PST First Man Inside PSG On, Down, work with center vs 3 -3 to MLB C Back, On BSG Straight or Skip Pull - Kick out or Log (seal back inside) End Man on LOS if he squeezes. BST Skip pull though hole past PST down block – or Collision Run Through. F Pick up first man on or outside Pulling T. H Carry out Blocking Fake Q Fake to H or Z if Jet/Fly, follow pulling T or H through hole. Z Inside Stalk block or Jet Fake
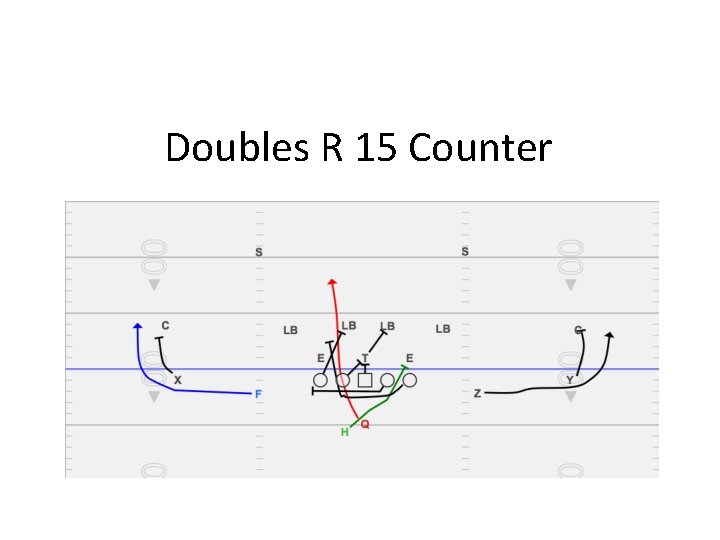
Doubles R 15 Counter

Doubles R Wing Jet 14 Counter
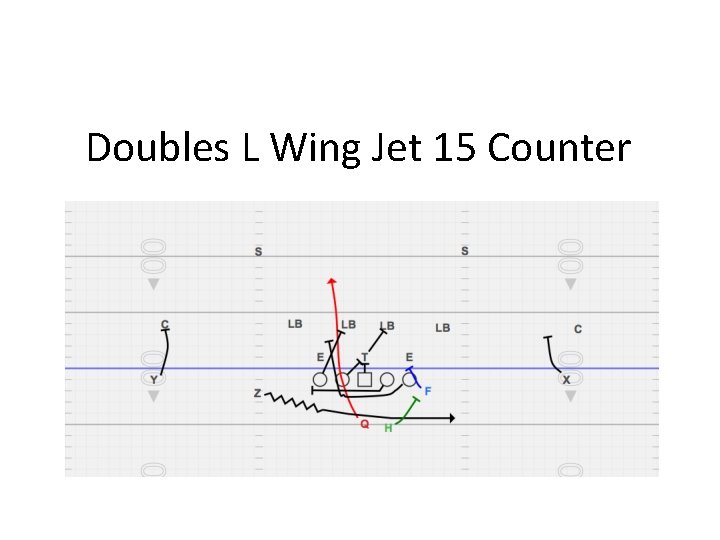
Doubles L Wing Jet 15 Counter
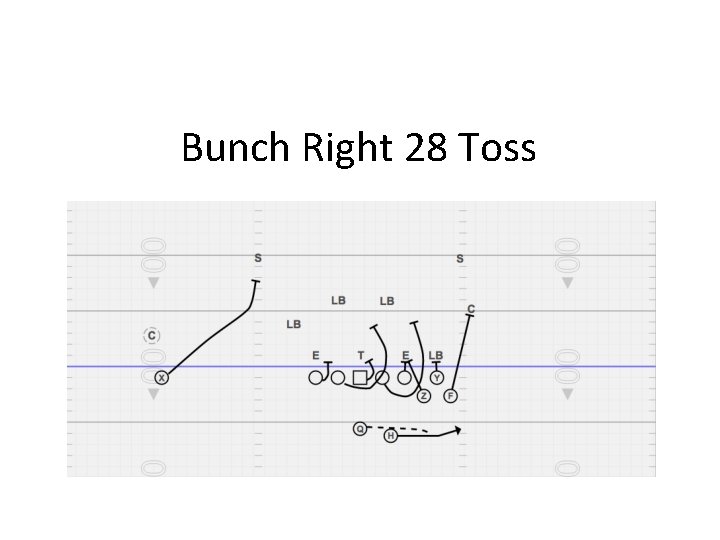
Bunch Right 28 Toss
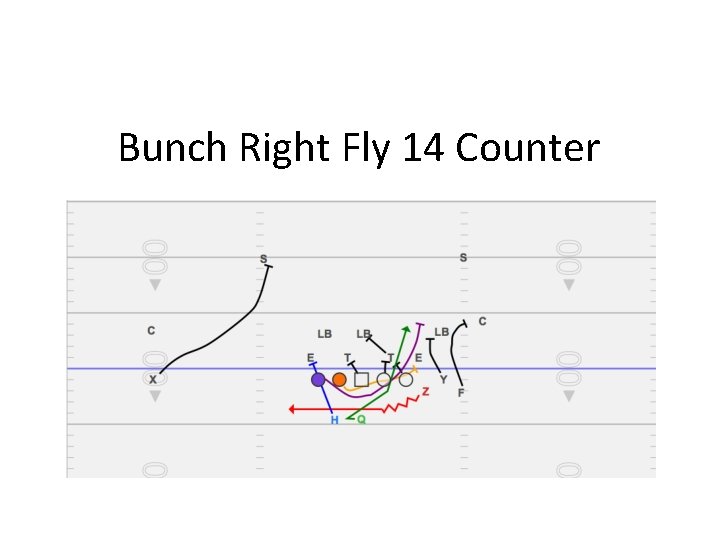
Bunch Right Fly 14 Counter
Power I Goal Line Series Any time we go into the Power I, a few things change. First, we change personnel. We like to add an extra Back or TE into the game for the Z. That give us 22 or 13 Personnel if the back is a good blocker. Second, we will operate from under center. This give us the opportunity to run QB wedge for very short gains if we need to. Third, we drop all pre-snap audibles and every play is on one. The tempo changes to…break the huddle, sprint to the line and the QB calls the cadence very quickly. This really forces the defense to recognize our front rapidly and get set…often they cannot do this in time and we gain the advantage. We do not carry more then three of these plays into a game but change them up every game. That way teams cannot scout us or prepare for us easily.
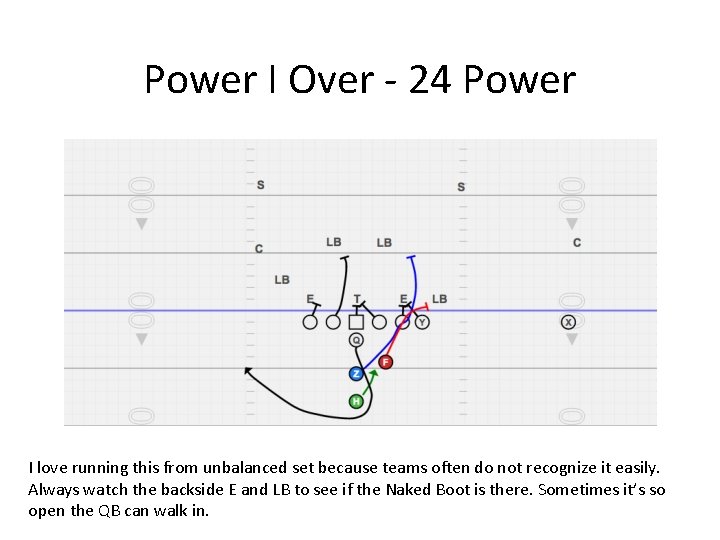
Power I Over - 24 Power I love running this from unbalanced set because teams often do not recognize it easily. Always watch the backside E and LB to see if the Naked Boot is there. Sometimes it’s so open the QB can walk in.
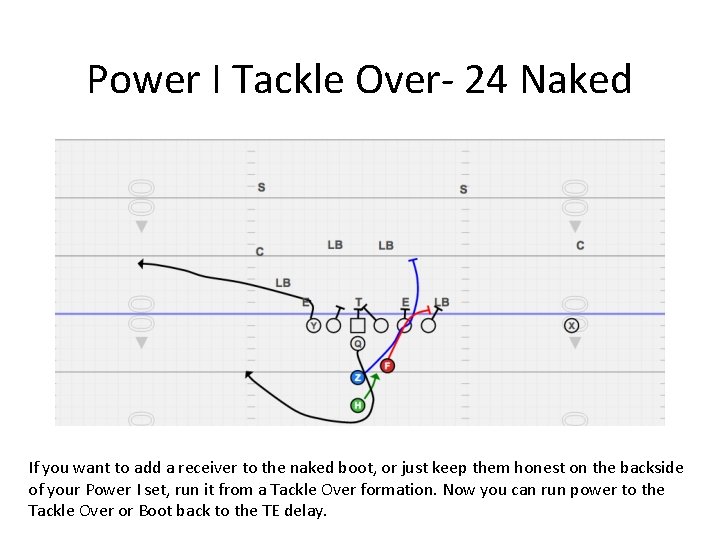
Power I Tackle Over- 24 Naked If you want to add a receiver to the naked boot, or just keep them honest on the backside of your Power I set, run it from a Tackle Over formation. Now you can run power to the Tackle Over or Boot back to the TE delay.
Press Pass Plays (Sprint Out and Play Action)

WR Passing Tree
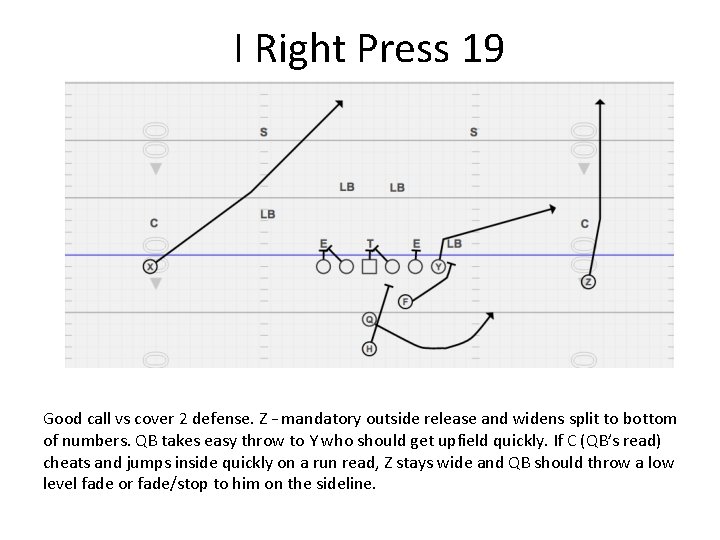
I Right Press 19 Good call vs cover 2 defense. Z – mandatory outside release and widens split to bottom of numbers. QB takes easy throw to Y who should get upfield quickly. If C (QB’s read) cheats and jumps inside quickly on a run read, Z stays wide and QB should throw a low level fade or fade/stop to him on the sideline.
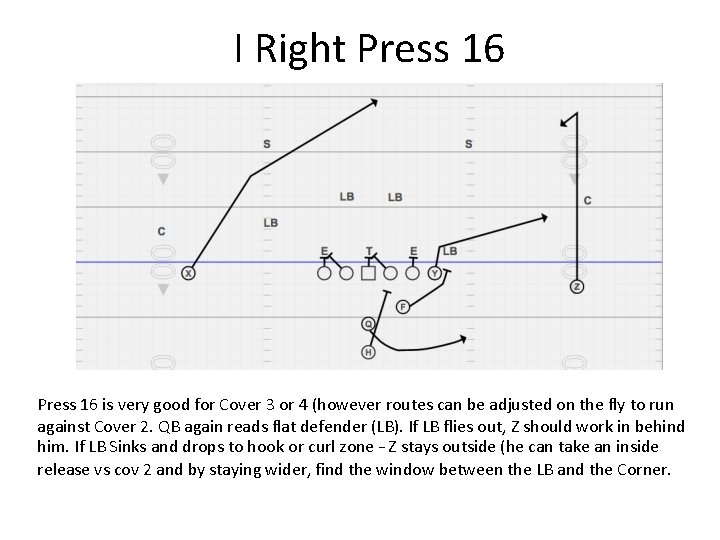
I Right Press 16 is very good for Cover 3 or 4 (however routes can be adjusted on the fly to run against Cover 2. QB again reads flat defender (LB). If LB flies out, Z should work in behind him. If LB Sinks and drops to hook or curl zone – Z stays outside (he can take an inside release vs cov 2 and by staying wider, find the window between the LB and the Corner.
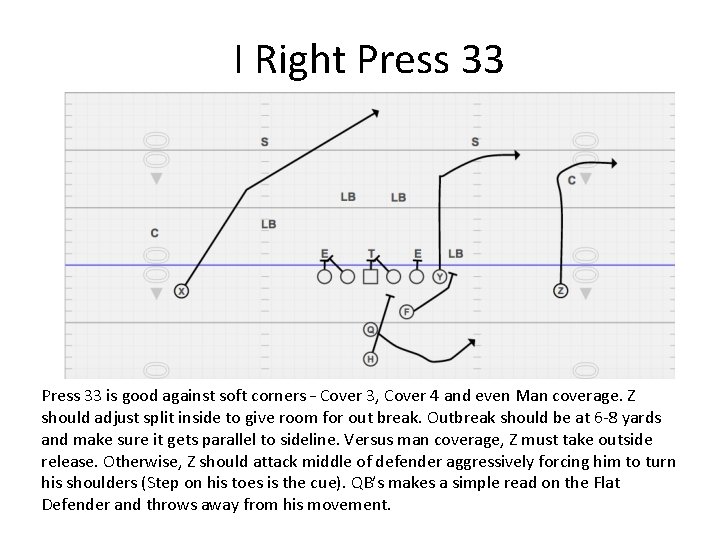
I Right Press 33 is good against soft corners – Cover 3, Cover 4 and even Man coverage. Z should adjust split inside to give room for out break. Outbreak should be at 6 -8 yards and make sure it gets parallel to sideline. Versus man coverage, Z must take outside release. Otherwise, Z should attack middle of defender aggressively forcing him to turn his shoulders (Step on his toes is the cue). QB’s makes a simple read on the Flat Defender and throws away from his movement.
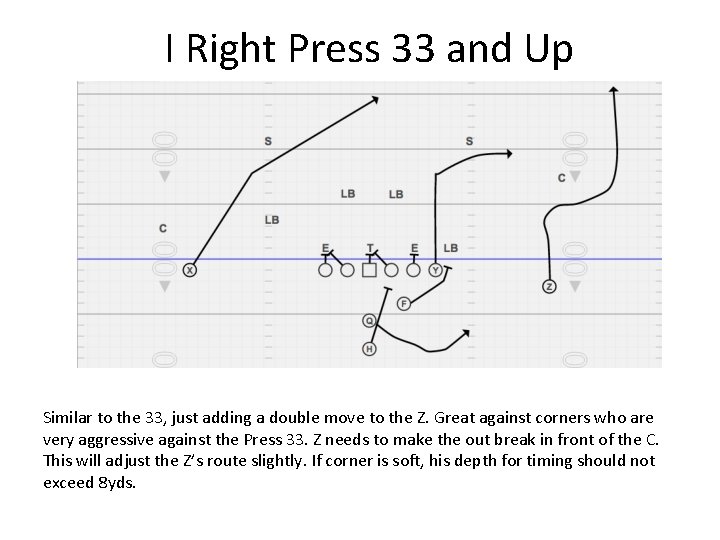
I Right Press 33 and Up Similar to the 33, just adding a double move to the Z. Great against corners who are very aggressive against the Press 33. Z needs to make the out break in front of the C. This will adjust the Z’s route slightly. If corner is soft, his depth for timing should not exceed 8 yds.
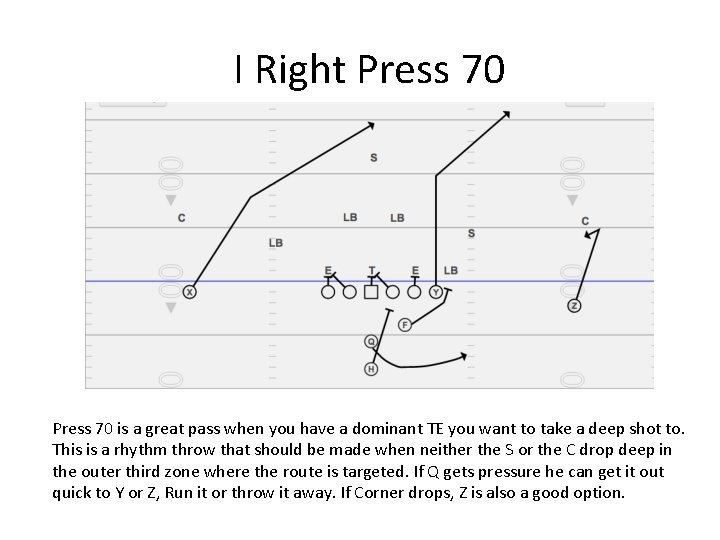
I Right Press 70 is a great pass when you have a dominant TE you want to take a deep shot to. This is a rhythm throw that should be made when neither the S or the C drop deep in the outer third zone where the route is targeted. If Q gets pressure he can get it out quick to Y or Z, Run it or throw it away. If Corner drops, Z is also a good option.
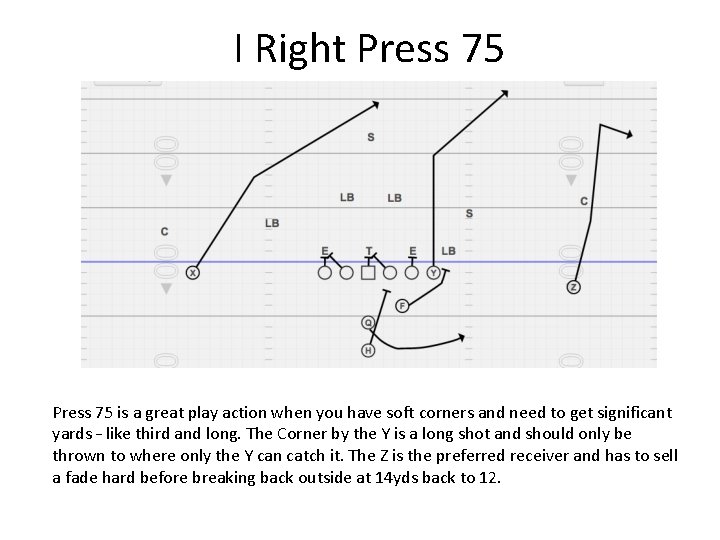
I Right Press 75 is a great play action when you have soft corners and need to get significant yards – like third and long. The Corner by the Y is a long shot and should only be thrown to where only the Y can catch it. The Z is the preferred receiver and has to sell a fade hard before breaking back outside at 14 yds back to 12.
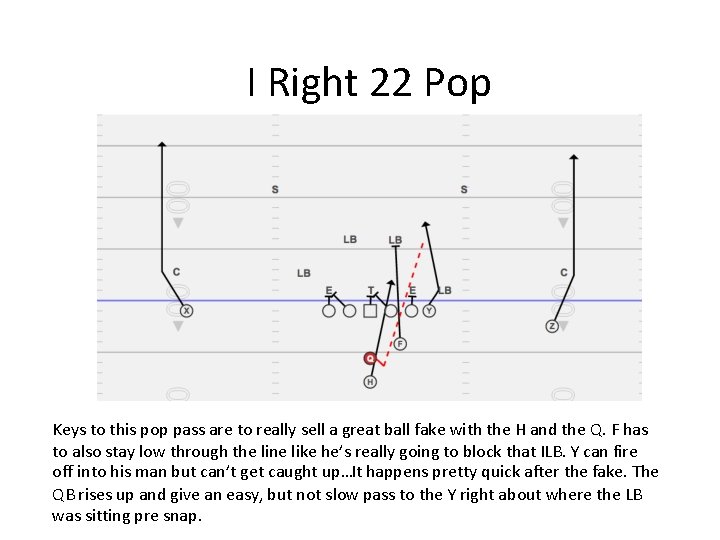
I Right 22 Pop Keys to this pop pass are to really sell a great ball fake with the H and the Q. F has to also stay low through the line like he’s really going to block that ILB. Y can fire off into his man but can’t get caught up…It happens pretty quick after the fake. The QB rises up and give an easy, but not slow pass to the Y right about where the LB was sitting pre snap.
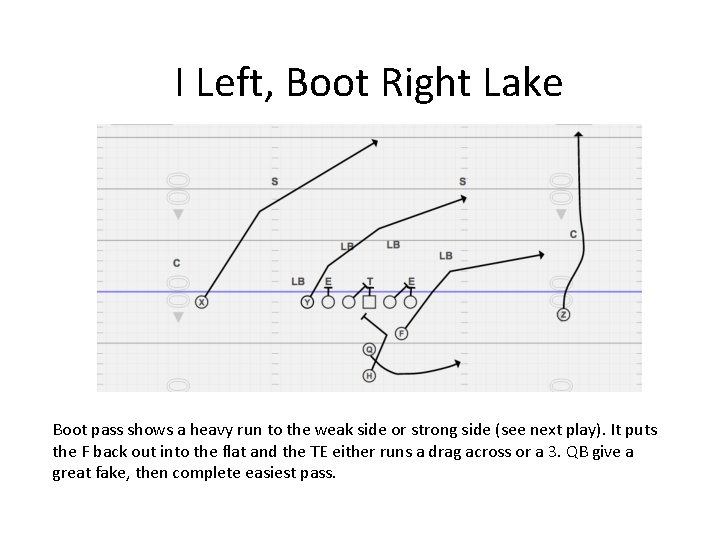
I Left, Boot Right Lake Boot pass shows a heavy run to the weak side or strong side (see next play). It puts the F back out into the flat and the TE either runs a drag across or a 3. QB give a great fake, then complete easiest pass.
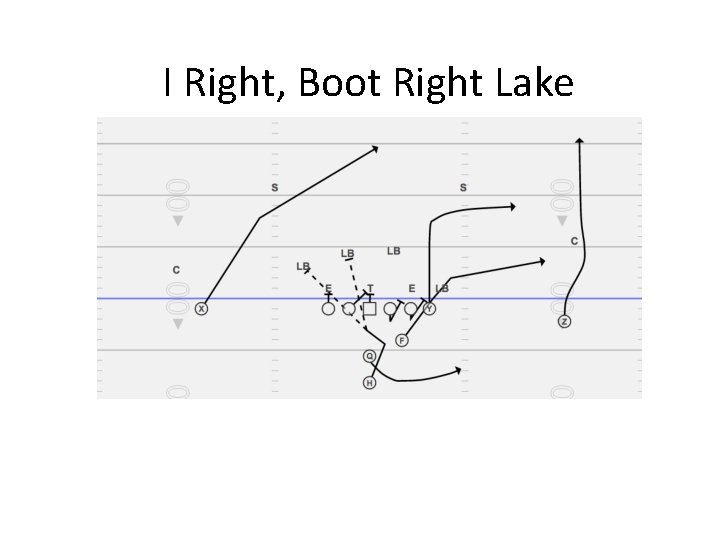
I Right, Boot Right Lake
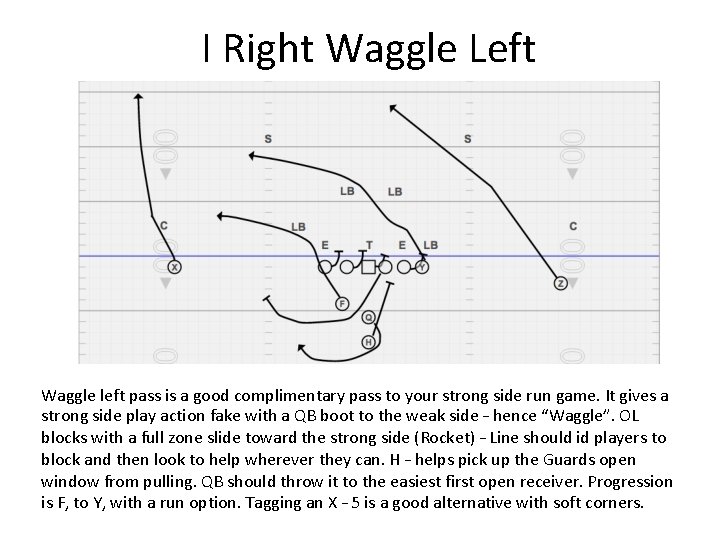
I Right Waggle Left Waggle left pass is a good complimentary pass to your strong side run game. It gives a strong side play action fake with a QB boot to the weak side – hence “Waggle”. OL blocks with a full zone slide toward the strong side (Rocket) – Line should id players to block and then look to help wherever they can. H – helps pick up the Guards open window from pulling. QB should throw it to the easiest first open receiver. Progression is F, to Y, with a run option. Tagging an X – 5 is a good alternative with soft corners.
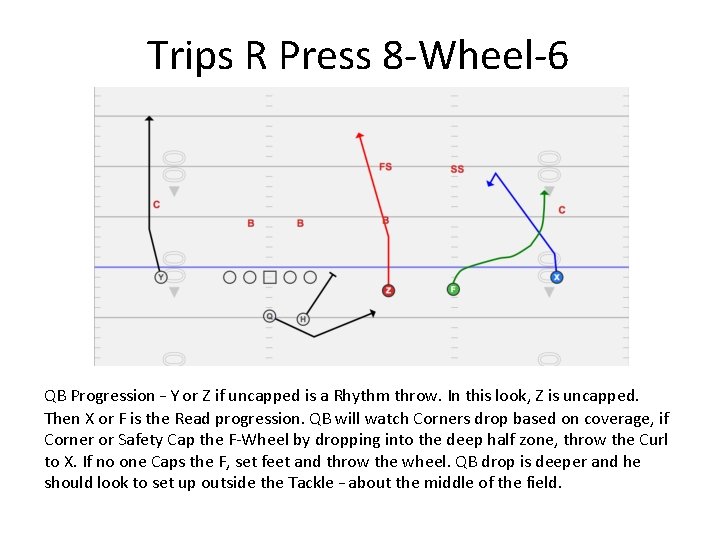
Trips R Press 8 -Wheel-6 QB Progression – Y or Z if uncapped is a Rhythm throw. In this look, Z is uncapped. Then X or F is the Read progression. QB will watch Corners drop based on coverage, if Corner or Safety Cap the F-Wheel by dropping into the deep half zone, throw the Curl to X. If no one Caps the F, set feet and throw the wheel. QB drop is deeper and he should look to set up outside the Tackle – about the middle of the field.
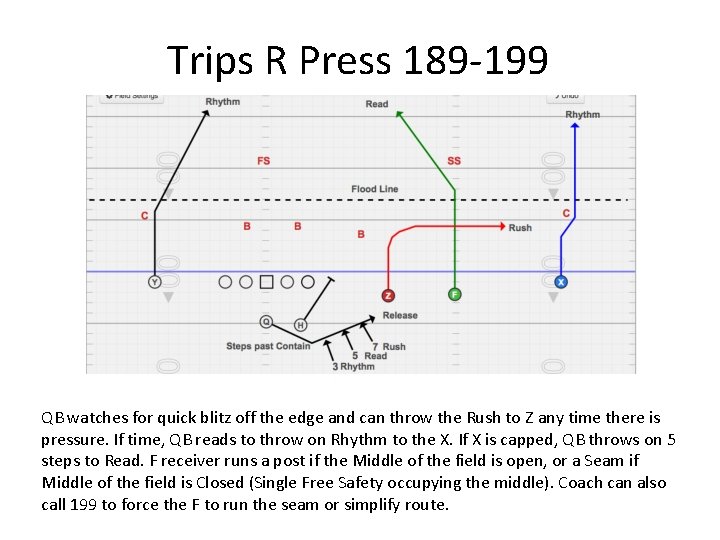
Trips R Press 189 -199 QB watches for quick blitz off the edge and can throw the Rush to Z any time there is pressure. If time, QB reads to throw on Rhythm to the X. If X is capped, QB throws on 5 steps to Read. F receiver runs a post if the Middle of the field is open, or a Seam if Middle of the field is Closed (Single Free Safety occupying the middle). Coach can also call 199 to force the F to run the seam or simplify route.
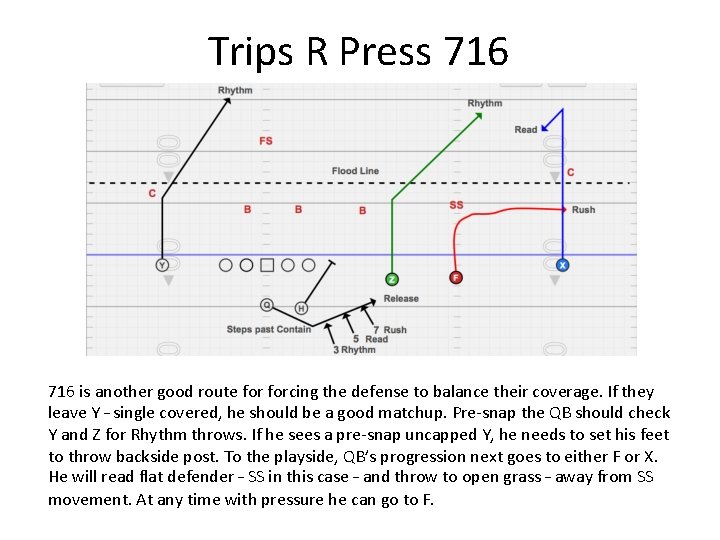
Trips R Press 716 is another good route forcing the defense to balance their coverage. If they leave Y – single covered, he should be a good matchup. Pre-snap the QB should check Y and Z for Rhythm throws. If he sees a pre-snap uncapped Y, he needs to set his feet to throw backside post. To the playside, QB’s progression next goes to either F or X. He will read flat defender – SS in this case – and throw to open grass – away from SS movement. At any time with pressure he can go to F.
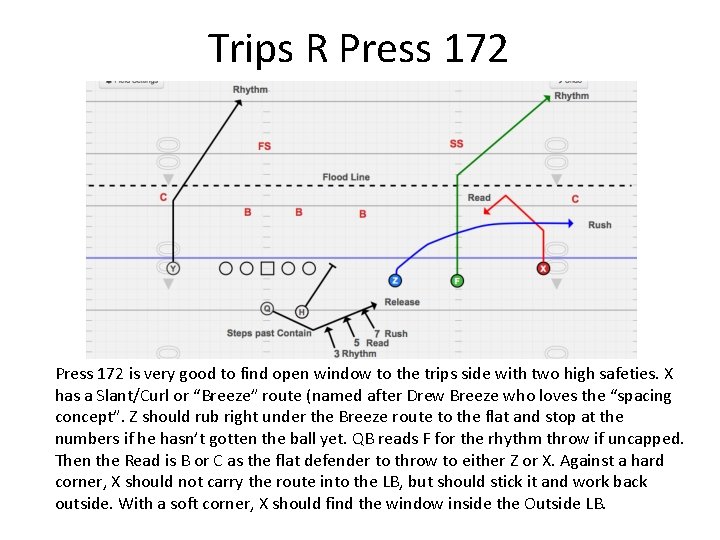
Trips R Press 172 is very good to find open window to the trips side with two high safeties. X has a Slant/Curl or “Breeze” route (named after Drew Breeze who loves the “spacing concept”. Z should rub right under the Breeze route to the flat and stop at the numbers if he hasn’t gotten the ball yet. QB reads F for the rhythm throw if uncapped. Then the Read is B or C as the flat defender to throw to either Z or X. Against a hard corner, X should not carry the route into the LB, but should stick it and work back outside. With a soft corner, X should find the window inside the Outside LB.
Quick Passes Quick passes are best used to force defenses to cover up defenders – much like the bubble screen package. If there is an uncovered defender to a side, a quick pass can take advantage by reading the flat defender. They are also great vs man coverage. QB should pick a side based on the receiver who has the defender in the most advantageous position.
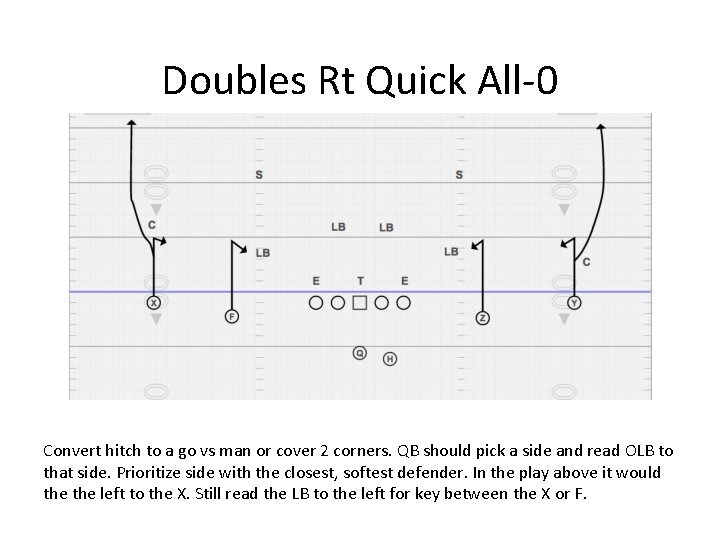
Doubles Rt Quick All-0 Convert hitch to a go vs man or cover 2 corners. QB should pick a side and read OLB to that side. Prioritize side with the closest, softest defender. In the play above it would the left to the X. Still read the LB to the left for key between the X or F.
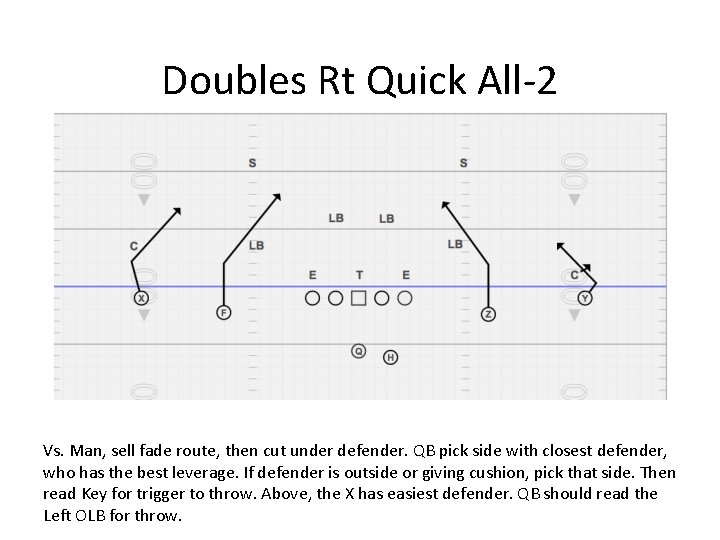
Doubles Rt Quick All-2 Vs. Man, sell fade route, then cut under defender. QB pick side with closest defender, who has the best leverage. If defender is outside or giving cushion, pick that side. Then read Key for trigger to throw. Above, the X has easiest defender. QB should read the Left OLB for throw.
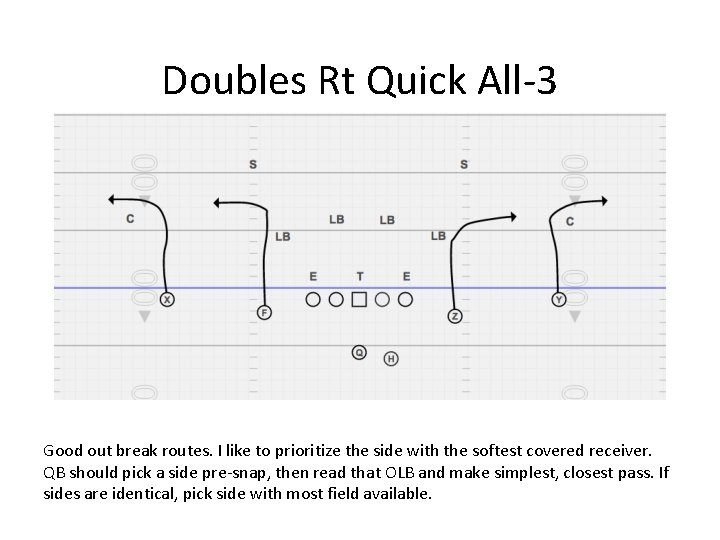
Doubles Rt Quick All-3 Good out break routes. I like to prioritize the side with the softest covered receiver. QB should pick a side pre-snap, then read that OLB and make simplest, closest pass. If sides are identical, pick side with most field available.
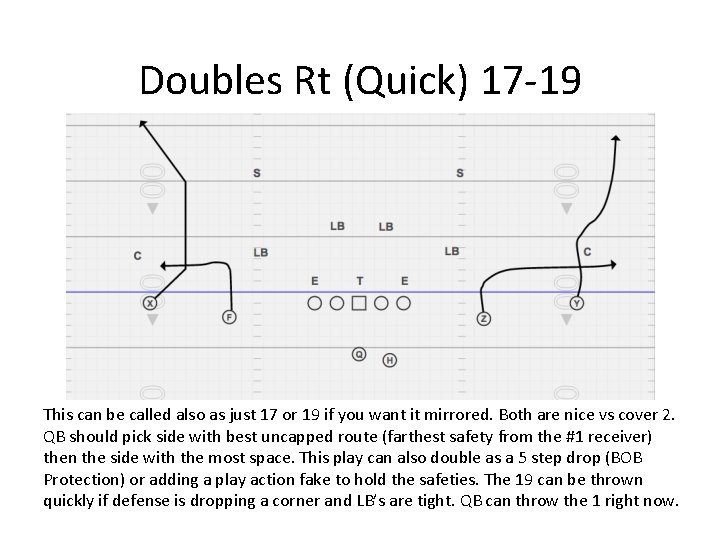
Doubles Rt (Quick) 17 -19 This can be called also as just 17 or 19 if you want it mirrored. Both are nice vs cover 2. QB should pick side with best uncapped route (farthest safety from the #1 receiver) then the side with the most space. This play can also double as a 5 step drop (BOB Protection) or adding a play action fake to hold the safeties. The 19 can be thrown quickly if defense is dropping a corner and LB’s are tight. QB can throw the 1 right now.
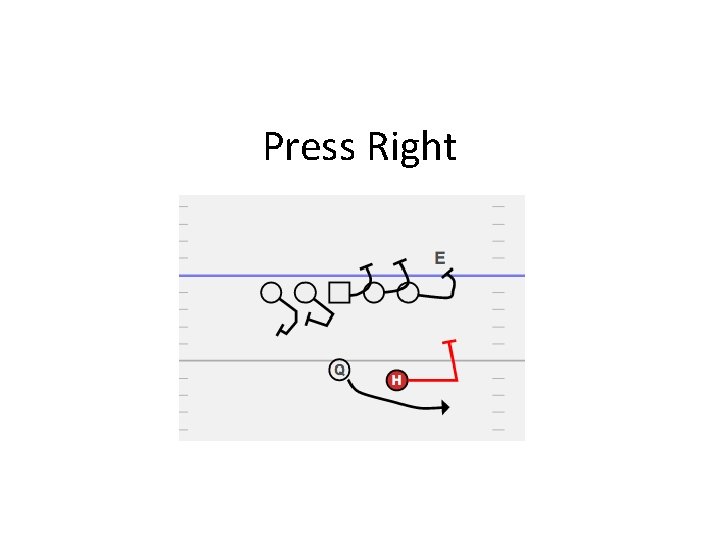
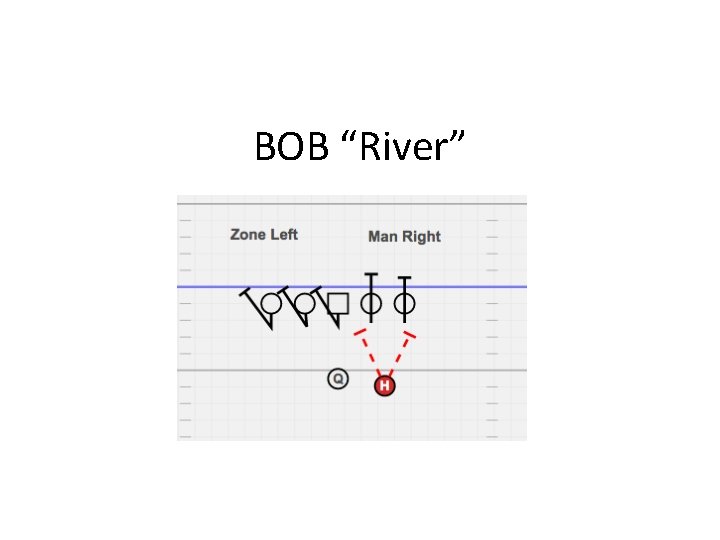
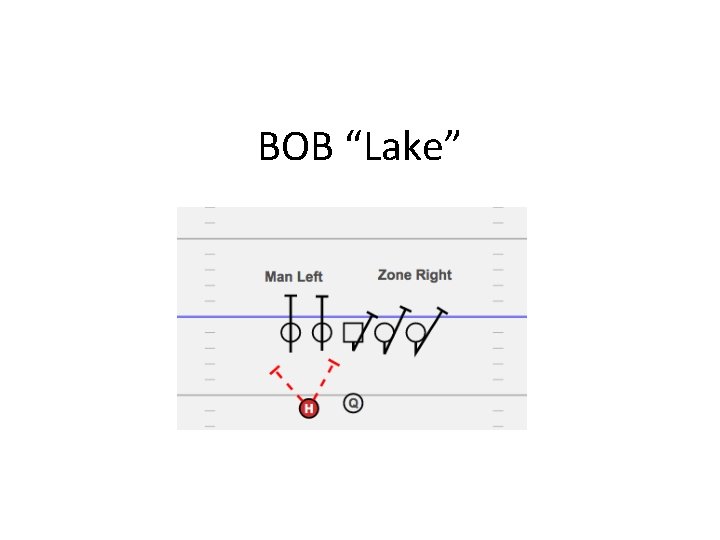
Pass Protections • Bubble Screen – Reach playside gap, work to second level. Stop penetration. Back picks up the edge. • Press – Sprint Out Protection – Playside: Reach playside Gap/Defender – Backside G/T: Slide, Hinge and Protect • BOB – River/Lake: Half Zone, Half Man
Press Right
BOB “River”
BOB “Lake”
BOB Pass Plays (Drop Back) • Wide Bunch BOB 170 • Empty BOB 09 -990
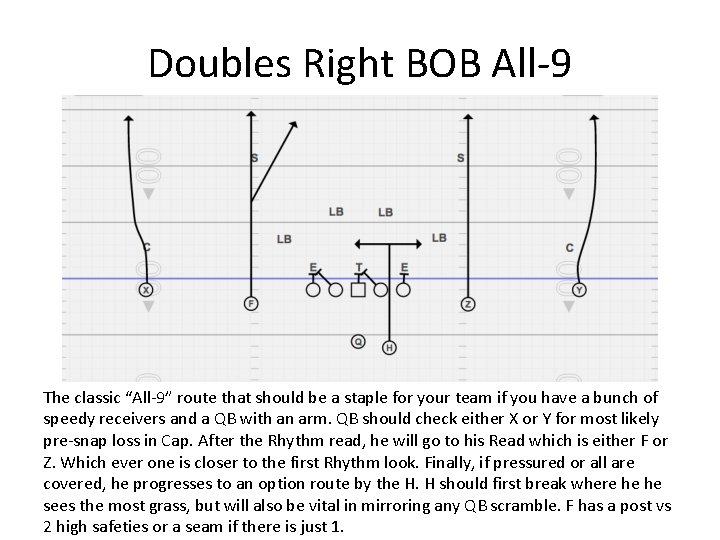
Doubles Right BOB All-9 The classic “All-9” route that should be a staple for your team if you have a bunch of speedy receivers and a QB with an arm. QB should check either X or Y for most likely pre-snap loss in Cap. After the Rhythm read, he will go to his Read which is either F or Z. Which ever one is closer to the first Rhythm look. Finally, if pressured or all are covered, he progresses to an option route by the H. H should first break where he he sees the most grass, but will also be vital in mirroring any QB scramble. F has a post vs 2 high safeties or a seam if there is just 1.
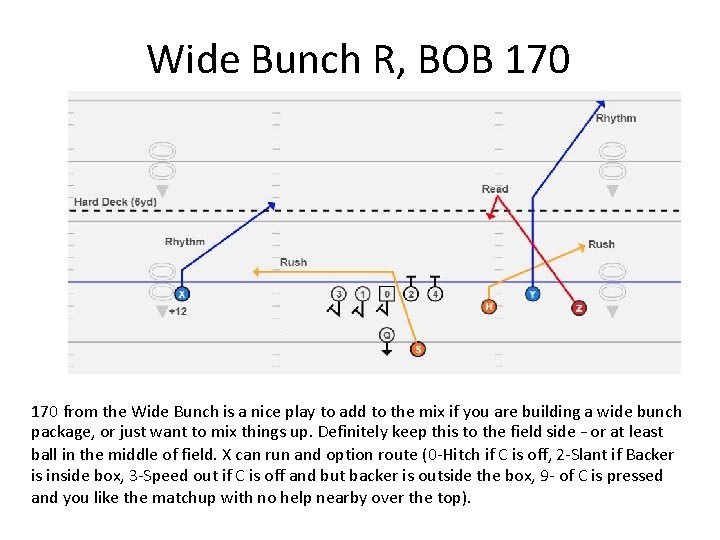
Wide Bunch R, BOB 170 from the Wide Bunch is a nice play to add to the mix if you are building a wide bunch package, or just want to mix things up. Definitely keep this to the field side – or at least ball in the middle of field. X can run and option route (0 -Hitch if C is off, 2 -Slant if Backer is inside box, 3 -Speed out if C is off and but backer is outside the box, 9 - of C is pressed and you like the matchup with no help nearby over the top).
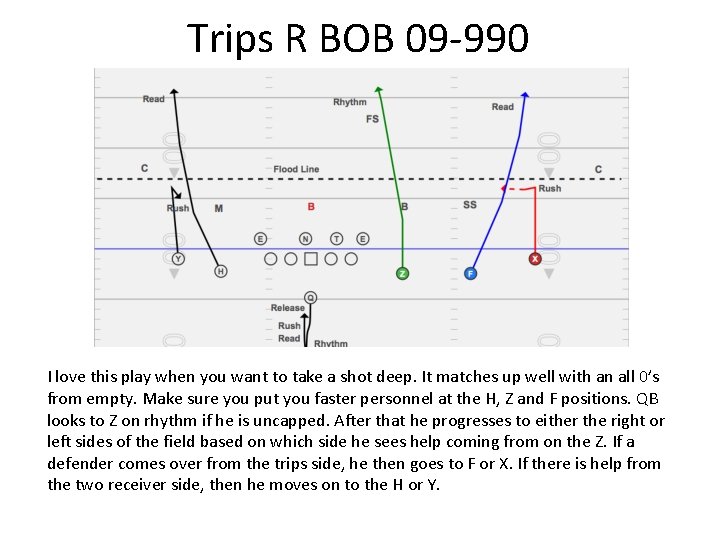
Trips R BOB 09 -990 I love this play when you want to take a shot deep. It matches up well with an all 0’s from empty. Make sure you put you faster personnel at the H, Z and F positions. QB looks to Z on rhythm if he is uncapped. After that he progresses to either the right or left sides of the field based on which side he sees help coming from on the Z. If a defender comes over from the trips side, he then goes to F or X. If there is help from the two receiver side, then he moves on to the H or Y.
PPO – Pass Options • X Jailbreak • BOB 0 -H Bubble • H-Bubble/X-Middle Screen
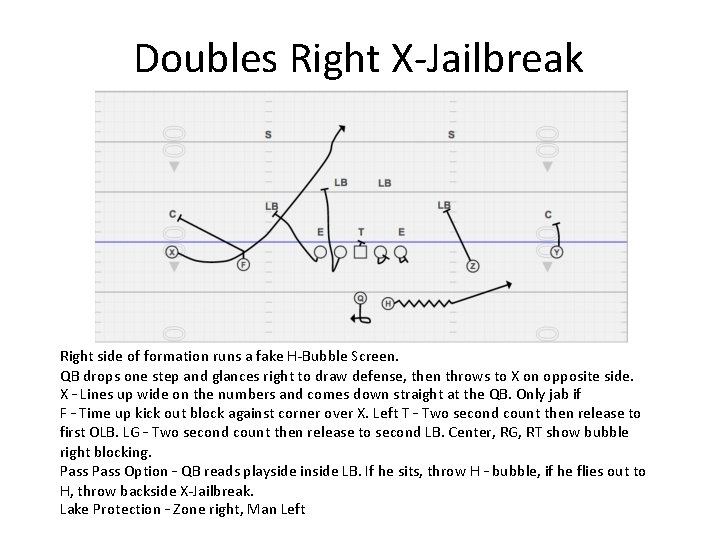
Doubles Right X-Jailbreak Right side of formation runs a fake H-Bubble Screen. QB drops one step and glances right to draw defense, then throws to X on opposite side. X – Lines up wide on the numbers and comes down straight at the QB. Only jab if F – Time up kick out block against corner over X. Left T – Two second count then release to first OLB. LG – Two second count then release to second LB. Center, RG, RT show bubble right blocking. Pass Option – QB reads playside inside LB. If he sits, throw H – bubble, if he flies out to H, throw backside X-Jailbreak. Lake Protection – Zone right, Man Left
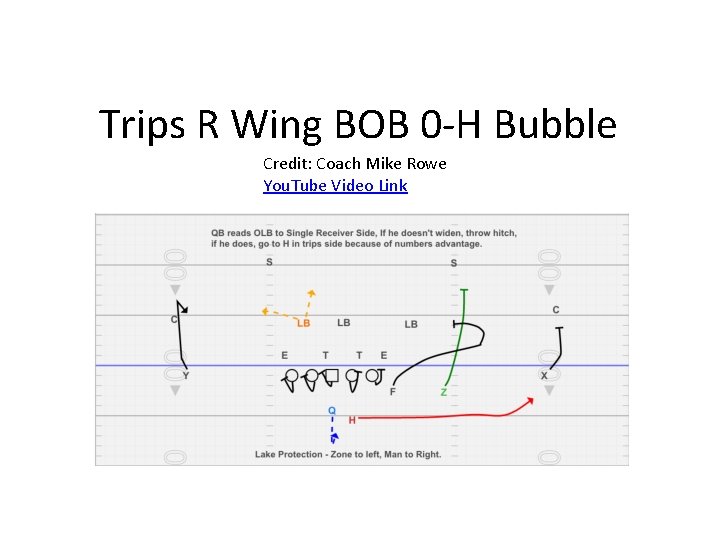
Trips R Wing BOB 0 -H Bubble Credit: Coach Mike Rowe You. Tube Video Link
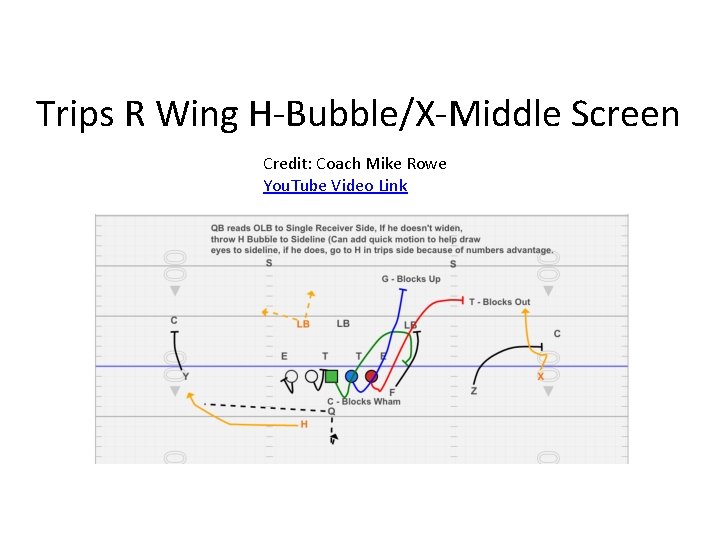
Trips R Wing H-Bubble/X-Middle Screen Credit: Coach Mike Rowe You. Tube Video Link
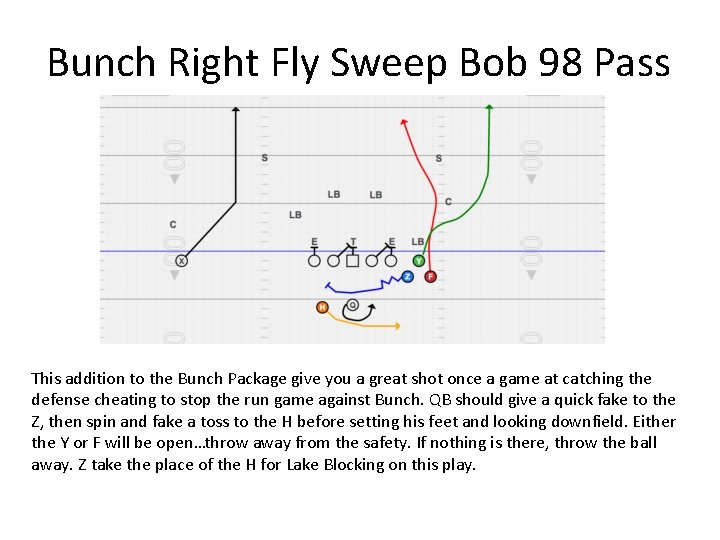
Bunch Right Fly Sweep Bob 98 Pass This addition to the Bunch Package give you a great shot once a game at catching the defense cheating to stop the run game against Bunch. QB should give a quick fake to the Z, then spin and fake a toss to the H before setting his feet and looking downfield. Either the Y or F will be open…throw away from the safety. If nothing is there, throw the ball away. Z take the place of the H for Lake Blocking on this play.
Bubble Screen Package
Plays • • • Bubble Slant Bubble Go H-Bubble Slant H-Bubble Go
H-Back Alignment • Bubble Screen – Align away from call, straddle outside leg of G. – Block anyone off the edge. • H-Bubble Screen – Align towards the call, straddle inside leg of T. – Motion out on second Audible. Ex. Chicago 22, Chicago 22 (Start Motion) Set, Hut.
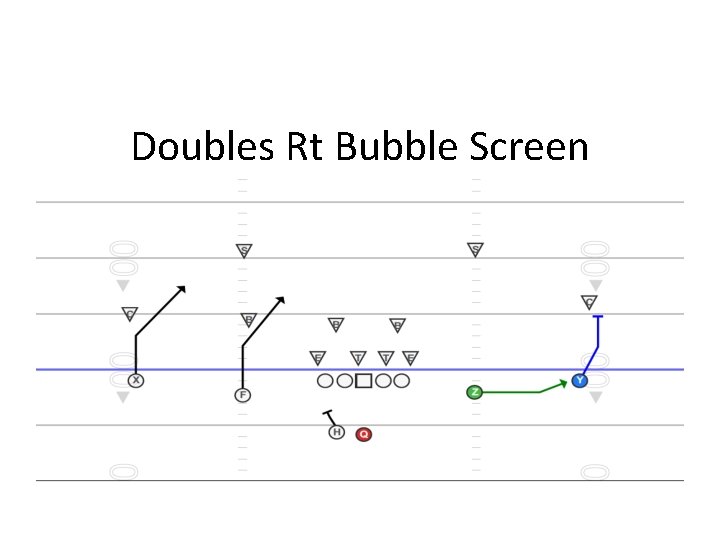
Doubles Rt Bubble Screen
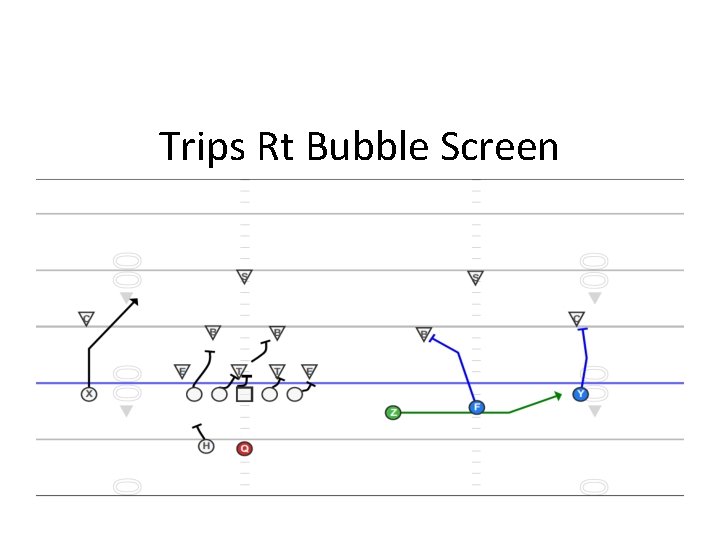
Trips Rt Bubble Screen
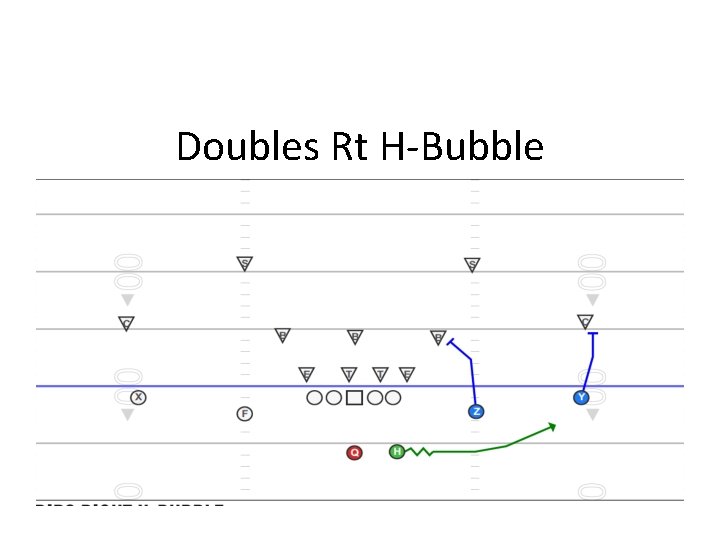
Doubles Rt H-Bubble
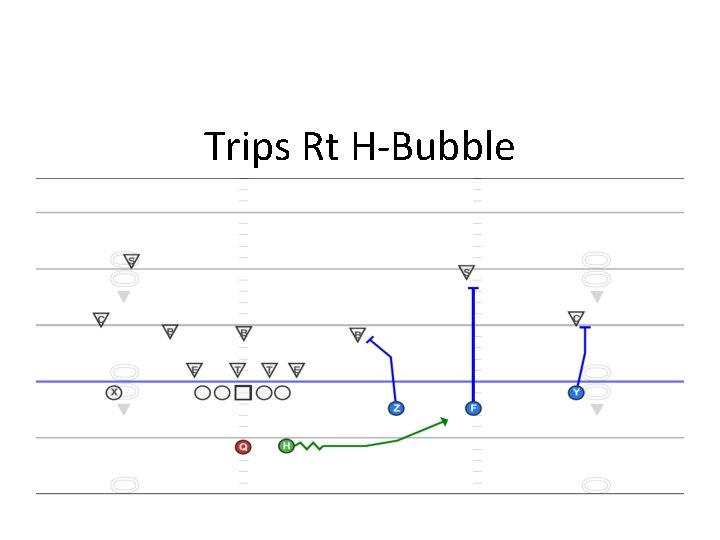
Trips Rt H-Bubble
Perimeter Blocking • We must block what the defender is coached to do. Ex. A corner is taught to contain everything inside, therefore, we will work our leverage to his outside forcing him to widen or be blocked. • Breakdown or shimmy with fast feet must occur with enough distance between blocker and defender – 3 -5 yds. is usually enough.
ABCD’s of Stalk Blocking • Alignment: Tells the blocker what the defenders intentions are. If he is shaded outside, his job is to primarily force the ball carrier inside. Note also depth of defender to determine how quickly the blocker must break down. • Bead/Breakdown – Take the correct angle of attack toward the defender, keep shoulders square. If corner widens, you widen with him. Breakdown/shimmy with room to move with defenders reaction. Keep eyes on his hips, not head.
ABCD’s cont. • Contact: While you shimmy feet with wide base slowly approach defender. Then punch with two hands upward and into defenders chest with open palms. Double upper-cut. Do not hold defender. • Drive: With wide base and arms extended drive defender wherever he goes. Keep feet moving and head up.
QB Technique • From shotgun: Take one small step back and plant foot at angle perpendicular to where you are going to throw (Bubble, Slant or Go). • Bubble and H-bubble do not require throwing with fingers on the laces. Practice throwing without them. • Target is chin-strap of receiver, ball on a line. • From under center, take quick 3 steps back and then plant foot for throw.
Offensive Line • Bubble Screen: – Step play-side and rip through nearest defender’s outside shoulder. – Progress up-field to block in space. • Bubble Slant/Plus: – Step play-side working to REACH the outside shoulder of defender (without getting downfield). – If no threat is present, turn back to help.
H/Z Backs • H – Motion is at 70% speed. Stay at QB depth. When ball is snapped, take a shallow but quick three step deepening curve with route to help get shoulders around. After ball is caught then GET OUTSIDE! If forced up inside, always break back outside again. • Z – No motion, outside foot back in WR stance. Sprint three steps outside and then snap head and shoulders around to QB for lateral run and then to catch the ball. Critical to stay at depth so you can continue path outside after catch. Do not get deeper or lose ground since you are already off the line of scrimmage.
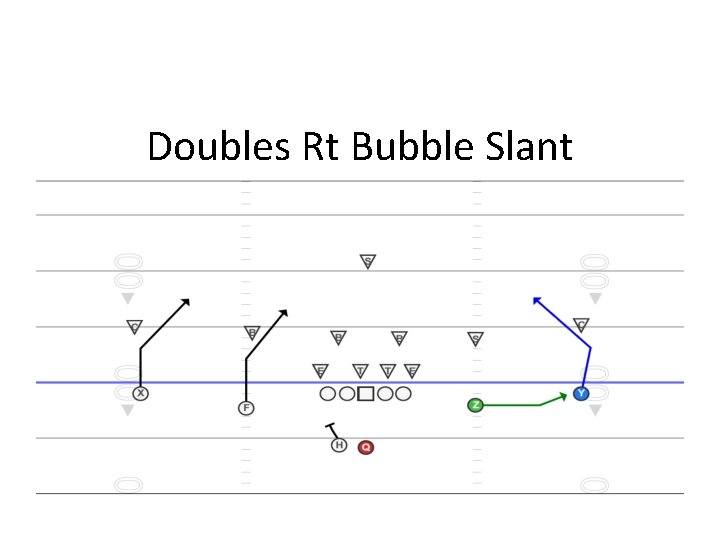
Doubles Rt Bubble Slant
Bubble Slant • QB: Catch and one step drop and pivot to play-side – timing is a quick throw. When OLB flies out to cover bubble, throw behind him to slant. If Y is covered or collisioned, tuck ball and release for run or scramble pass. • Y: Outside foot back in stance. Three step wide slant. Angle outside like you are running a “GO” route. One third step plant and cut hard inside avoiding contact with LB. Find window at 6 -8 yd. depth. Secure catch and get up field.
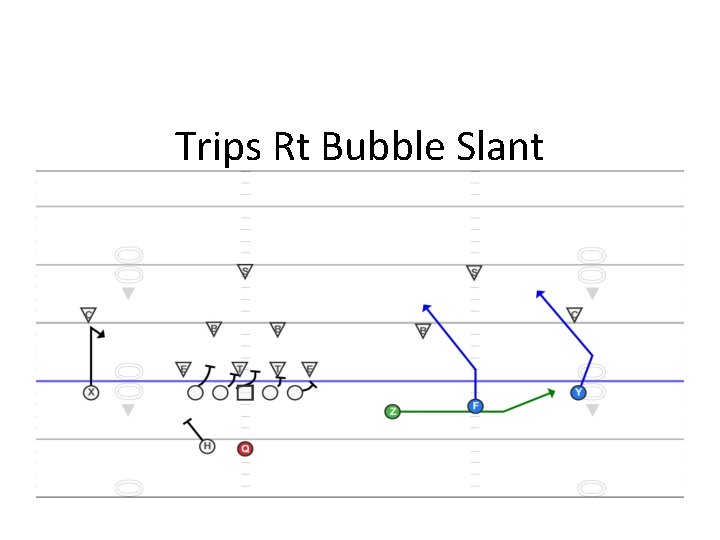
Trips Rt Bubble Slant
Trips Bubble Slant • QB: Same as Bubble slant but progression is now F to Y to Release. • F: Straight Slant. Outside foot back, three steps straight up field, break into window 68 yd where LB vacated. Avoid contact, catch and get up-field. • Y: Wide Slant.
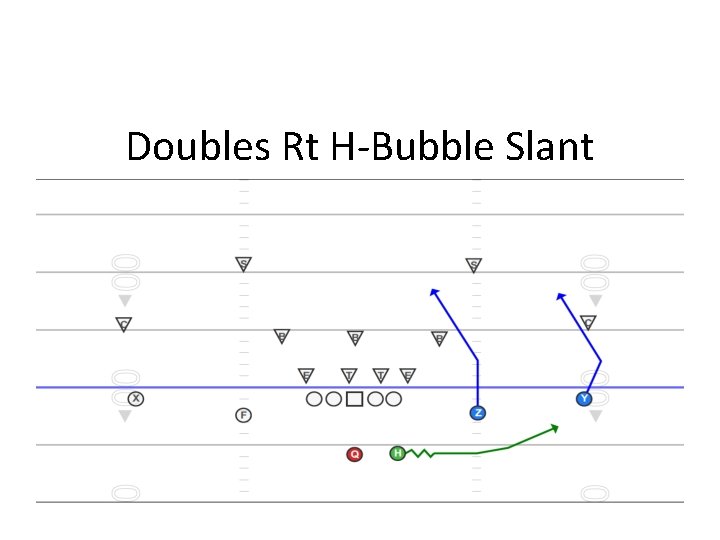
Doubles Rt H-Bubble Slant
Doubles Rt. H-Bubble Slant • QB: Progression is Z to Y to Release. • Z: Straight Slant. Outside foot back, three steps straight up field, break into window 68 yd where LB vacated. Avoid contact, catch and get up-field. • Y: Wide Slant
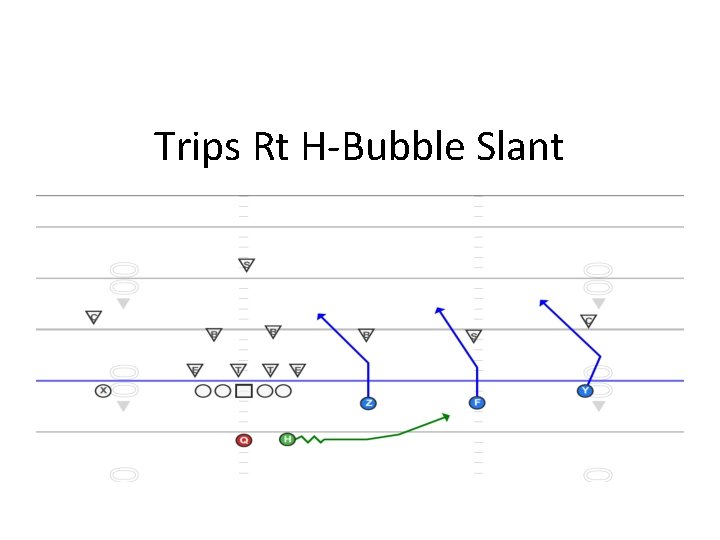
Trips Rt H-Bubble Slant
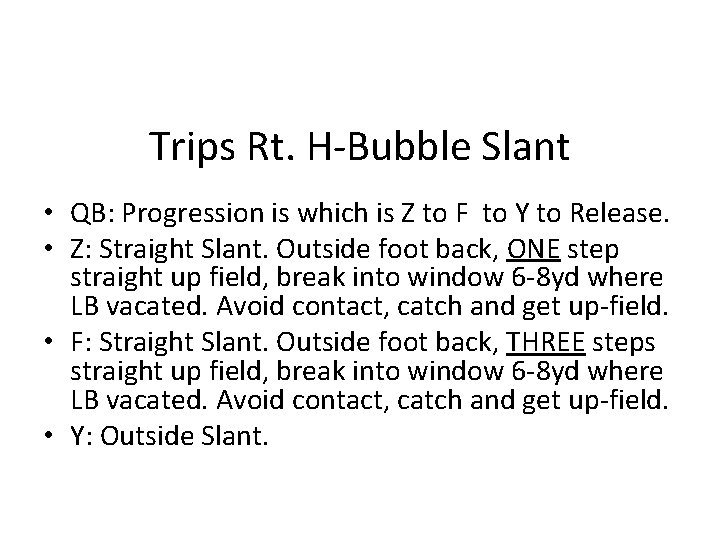
Trips Rt. H-Bubble Slant • QB: Progression is which is Z to F to Y to Release. • Z: Straight Slant. Outside foot back, ONE step straight up field, break into window 6 -8 yd where LB vacated. Avoid contact, catch and get up-field. • F: Straight Slant. Outside foot back, THREE steps straight up field, break into window 6 -8 yd where LB vacated. Avoid contact, catch and get up-field. • Y: Outside Slant.
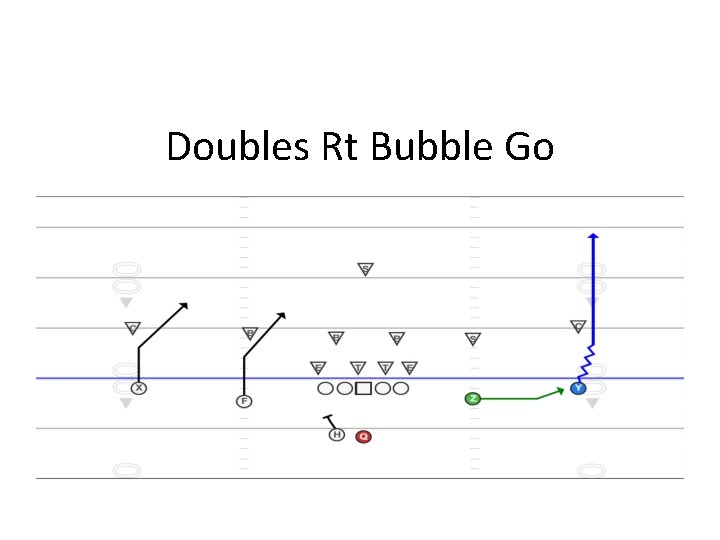
Doubles Rt Bubble Go
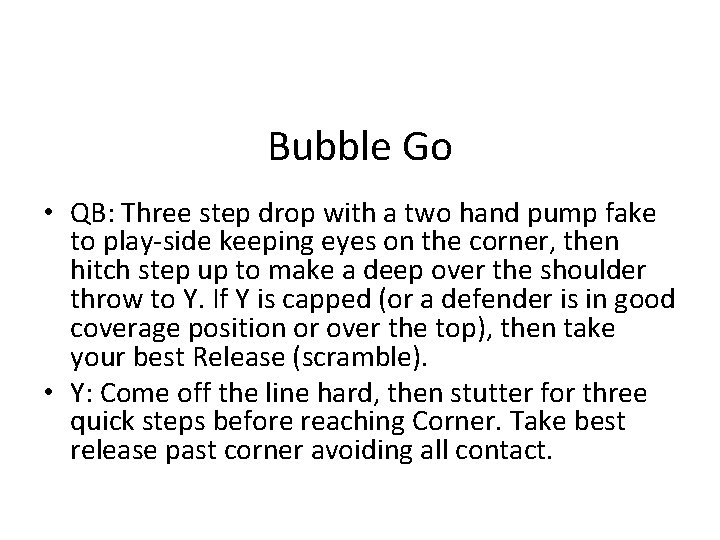
Bubble Go • QB: Three step drop with a two hand pump fake to play-side keeping eyes on the corner, then hitch step up to make a deep over the shoulder throw to Y. If Y is capped (or a defender is in good coverage position or over the top), then take your best Release (scramble). • Y: Come off the line hard, then stutter for three quick steps before reaching Corner. Take best release past corner avoiding all contact.
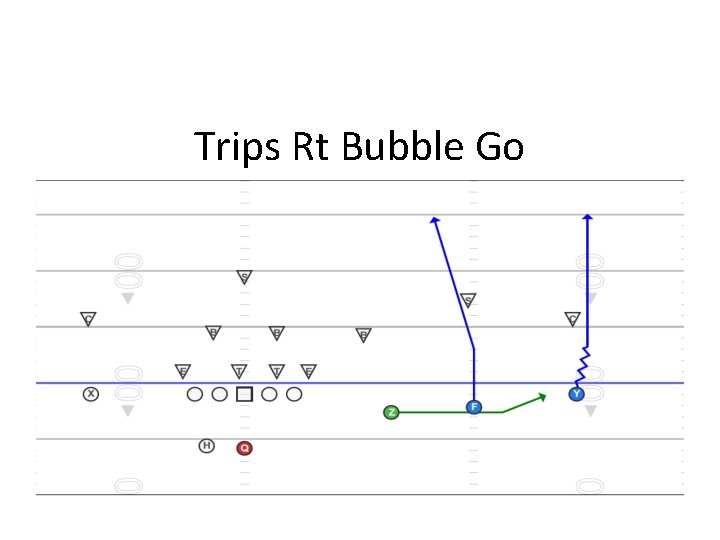
Trips Rt Bubble Go
Trips Bubble Go • QB: Same as Bubble Go, but progression is now three step drop with pump fake and rhythm throw to F if he is not covered or collisioned. Then hitch up to to Y, then Release. Pre-snap check to see who is capped (defender over the top by alignment and depth – 7+yards). • F: 5 -step skinny post, avoid contact with OLB. Aim for point between safeties if there are two. If one safety, stay wide on hash away from MOF (middle of field). • Y: Come off the line hard, then stutter for three quick steps before reaching Corner. Take best release past corner avoiding all contact.

Doubles Rt H-Bubble Go
H-Bubble Go • QB: Same as Trips Bubble Go, but progression is now Z, then Y, then H, then Release. Keep eye on Safety while pump faking. • OL: BOB blocking adjustment – no help from H backside. • Z: 5 -step skinny post, avoid contact with OLB. Aim for point between safeties if there are two. If one safety, stay wide on hash away from MOF (middle of field). • Y: Come off the line hard, then stutter for three quick steps before reaching Corner. Take best release past corner avoiding all contact. • F: Seam route. Stay on the hash with speed. • H: Rush route option – if QB gets heat or nothing down field, ball can come to you.
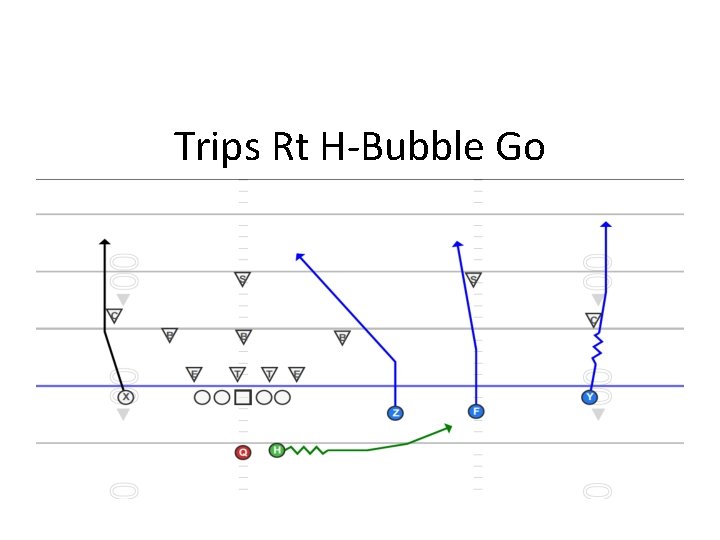
Trips Rt H-Bubble Go
Trips Rt H-Bubble Go • QB: Progression is Rhythm throw to Z, hitch to F, hitch to Y, then Rush to H or Release. Pre-snap cap read important can help speed up progression. IF two safeties, progress quickly to F then Y. IF one safety, progress from Z to F. • OL: BOB blocking adjustment – no help from H backside. • Z: 5 -step post. If 2 safeties, run between them. If one safety, run to open window on opposite hash of field. • F: Vertical Seam. Avoid contact with OLB. Stay on hash. If Safety is over the top of you, maintain inside position. • H: Rush route option – if QB gets heat or nothing down field, ball can come to you.
- Slides: 176