How to Read a Measuring Tape Coach Ketcham


 •")
 inch is exactly what")


 measuring")


- Slides: 26
How to Read a Measuring Tape Coach Ketcham Productions
Imperial units/imperial system • Imperial units or the imperial system is a system of units, first defined in the British Weights and Measures Act of 1824, later refined (until 1959) and reduced. • Systems of imperial units are sometimes referred to as foot-pound-second, after the base units of length, mass and time. • The units were introduced in the British Empire, excluding then already independent United States. As of 2008, all countries that used the imperial system have become officially metric (except for Burma and Liberia), but imperial units continue to be used alongside metric units. • Canadian units are the traditional weights and measures used in Canada. The country has officially adopted the metric system, but still maintains legal definitions of the imperial units
Countries that have not officially adopted the metric system Myanmar, Liberia and the United States.
Just Saying
How to Read a Measuring Tape • Measuring tapes come in different styles. For measuring rooms, or large areas, the heavy duty style, in a case that pulls open and snaps shut is often used. Measuring tapes also come in soft material, used for the dress maker, or to measure a hem and everything in between. Understanding what measurement it shows, is important, in any project.
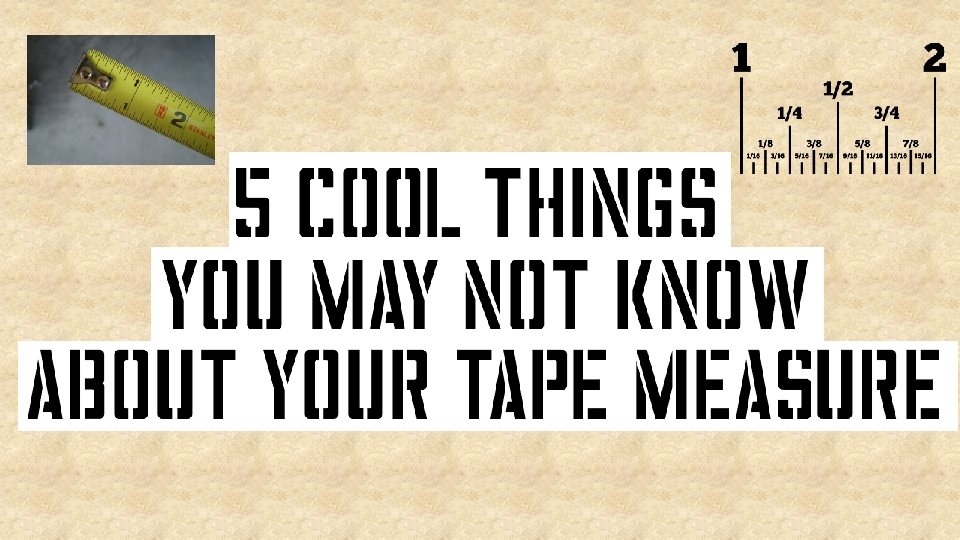
How to Read a Measuring Tape • Inches (Symbol of Inches is: “) • Inches are the long lines that cross either half of, or all of the 1" width of the tape. They usually are preceded or followed by numbers.
How to Read a Measuring Tape • A 1/2 (half) inch is exactly what it sounds like: Half of 1 inch.
How to Read a Measuring Tape • 1/4 of an inch is every four marks on your tape measure.
How to Read a Measuring Tape • An 1/8 of an inch is twice as big as the 1/16 of an inch. It is every other mark.
How to Read a Measuring Tape • 16 ths • Understand what a 1/16 th is. A 1/16 of an inch, is usually the smallest measurement on a tape measure. The distance between every line on the tape measure is 1/16 of an inch. • The distance between each measurement that has a red dot above it.
How to Read a Measuring Tape • Different manufacturers may use different markings or symbols on the faces of their tapes based on the tape's length and any special purposes for which the tape measure is intended. Given the possibility for variance, most tape measures share the following markings: • Tapes are usually clearly marked every 12" with a black arrow and a number denoting the length in feet at that point on the tape.
How to Read a Measuring Tape • Clearly marked multiples of 16" help during framing. There will normally be some sort of easily discernible highlight located every 16" on the face of the tape. In most cases the number denoting the length in inches will have a red, rectangular background. These marks help the user mark for 16" on center (OC) when framing walls, floors and rafters.
How to Read a Measuring Tape • Many tape measures also have a small black diamond every 19. 2". The diamond is an alternative OC spacing for framing materials. The diamond OC spacing matches 16" OC spacing every 8' so it is compatible with most sheet goods (plywood, paneling, etc. ). The benefit of using the diamond spacing is that you save one joist or stud every 8'. Always check with your local building authority before using an alternate spacing.
How to Read a Measuring Tape • The tip of the tape is riveted in place and slides slightly; the length of the slide is the same as the thickness of the tip, to allow the user to make accurate measurements. With a sliding tip you get the same measurement hooking the end of the tape over a piece of lumber or butting the tip into a corner.
How to Read a Measuring Tape • Most tape measures have a slight curve in the tape to add rigidity to the blade. To get more accurate measurements, roll the tape so the side from which you are reading is in direct contact with the material being measured.
How to Read a Measuring Tape • Making accurate marks is as important as taking accurate readings. To ensure that your markings are correct, make a "V" on the material being marked. Draw the "V" so its point is centered where you want the mark. This marking method reduces the chance of reading on one side of a single mark.
How to Read a Measuring Tape • Keep the tape dry and free of grit. If you are using the tape in a wet or sandy environment, wipe the blade with a dry towel or rag as it retracts into the case. It is also a good idea to apply a light coat of paste wax to the tape occasionally. The wax inhibits rust and helps keep the blade moving freely.
How to Read a Measuring Tape TIPS • On most full-sized (1" wide) measuring tapes, inches are broken down into 1/16 fractions. Each line represents 1/16 of an inch starting with the first one after any given number or the start of the tape. • Note: Most measuring tapes have the same unit of measure on the top and bottom of the tape. This guide assumes that this is the case. • With contractor measuring tapes, used for measuring large areas, you often cannot get a measurement using just the tape, as the body or case of the measuring tape gets in the way. That's why these bodies are carefully designed and marked to a certain width. Look on the case body for the width indicator. Many are 3". To measure a room from one corner to the other: • Lay the tape on the floor and hook the end into one corner of the room. • Pull out the tape along the floor. • When you reach the other corner push the butt of the tape case into the corner (the butt or back of the case has been flattened for this purpose). • Take your measurement from the tape and then add the 3" for the complete width.
How to Read a Measuring Tape • Example: Measure a space on your wall. Place the front of the tape at the start point and extend it until after you reach the stop point. Look at the tape and see the last number before the stop point, for example, 17. After the number 17, count four lines, noticing that you stop on the third longest line. That would make the total measured space 17 and 1/4 of an inch. • This applies only to a tape that measures using standard Imperial (feet and inches) units. Consider using a metric measuring tape, which some say are more logical and easier to use. Also consider that the usage of metric is not commonplace to linear measurements in areas that use Imperial units; and to expect to confuse contractors, home-improvement store employees and other people that may assist you. You may have to use a calculator and list of conversions as building materials commonly do not list both systems of measurement.
The Nail and Screw Grab There is a small slot in the end hook of almost every tape measure. That slot is there to grab on to the head of a nail or screw. This way, if you’re by yourself and need to measure a set point on a flat surface that would normally require someone holding the tape, you can sink a screw or nail, hook the end of the tape measure into this slot, and securely and accurately measure from there.
Serrated Scribing Tool Have you ever noticed the serrated bottom edge of the end hook on your tape measure? If you’re using the measure and don’t have a marking tool at hand, you can press this edge into your work piece, scratch it back and forth, and make a mark.
Understanding the True Zero Hook Feature That riveted metal tab that holds the end hook on the tape has travel in it for a reason. If you’ll notice, the inch marks on the tape actually start 1/16″ short. That’s because thickness of the hook itself is 1/16″. So, if you take an inside measurement (pressing the hook end against the work piece you’re measuring), you will get an accurate measurement. But also, if you hook the end onto a work piece, the play in the rivets will move the hook out to compensate for hooking onto the material, creating a 1/16″ gap between the hook and the tape, allowing for an accurate measurement. Always make sure to pull the tape taut when making an outside measurement to make sure the end hook is fully extended.
The Case of the Tape Measure is a Measure You are likely already aware of this, but a tape measure’s plastic or metal case always has a number on it indicating the exact length of its base. Knowing this, you can use the case itself in doing inside measurements where you would otherwise have to bend the tape into a 90 degree angle and sort of guess the exact mark you want to measure. Instead, you can use the case itself to measure all of the way to the corner, adding the length of the case to the number you get at the top of the tape.
Using the Nail Grab to Scribe a Circle • Because the slot in the grab feature can turn on a nail or screw head, you can use it to act as the center-point when scribing a circle. If you hold the end hook grab on a centered nail or screw head and hold a pen, pencil, or scribe against the far end of the tape measure, you can draw out a circle at a desired radius.