High pressure gas flow system operation at CPC

- Slides: 33

High pressure gas flow system operation at CPC Jen-Tsung Luo, Ph. D, Researcher Chinese Petroleum Corporation(CPC) Refining&Manufacture Research Institute 2013. 11. 22 APMP 2013 1

Outline • Introduction of RMRI gas flow calibration Laboratory • Calibration operation – – Calibration system Calibration method Calibration check Measurement uncertainty • NG business flowmeter calibration • Datan Power Plant Flowmeter calibration • Summary APMP 2013 2

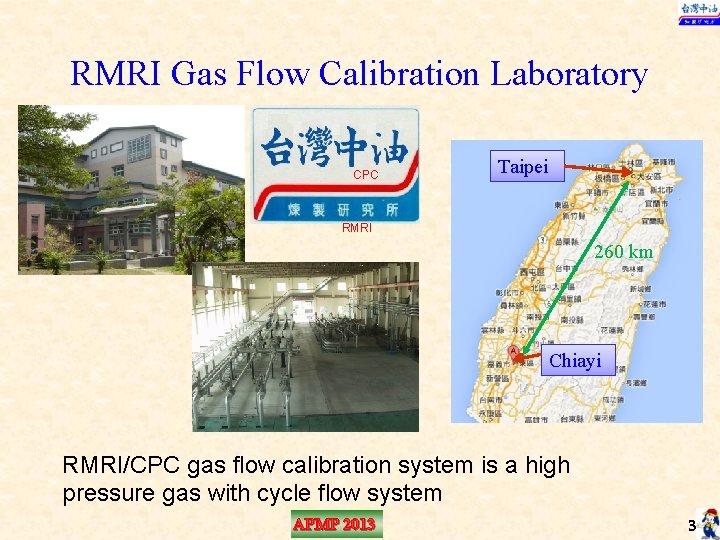
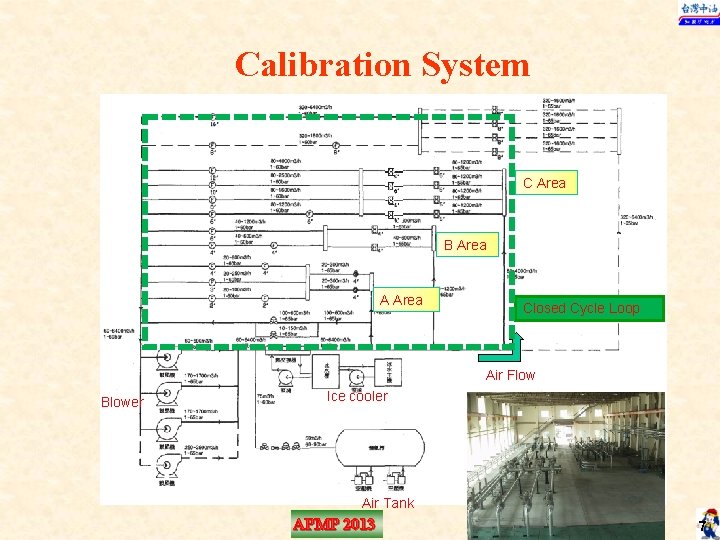
RMRI Gas Flow Calibration Laboratory CPC Taipei RMRI 260 km Chiayi RMRI/CPC gas flow calibration system is a high pressure gas with cycle flow system APMP 2013 3

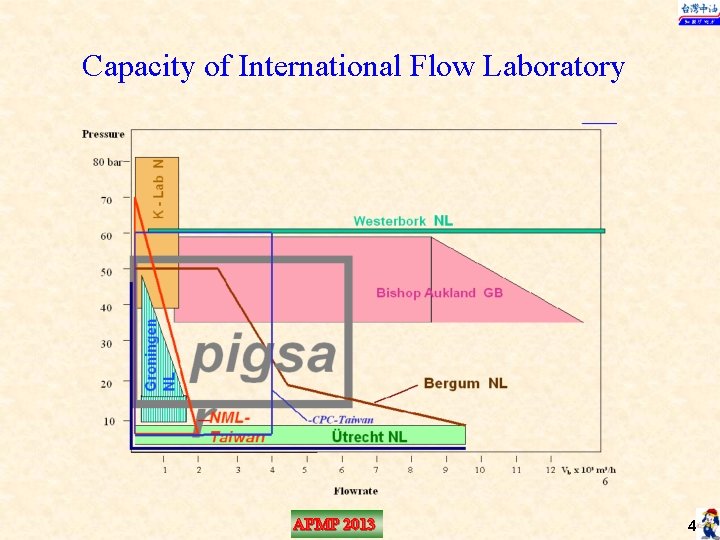
Capacity of International Flow Laboratory APMP 2013 4

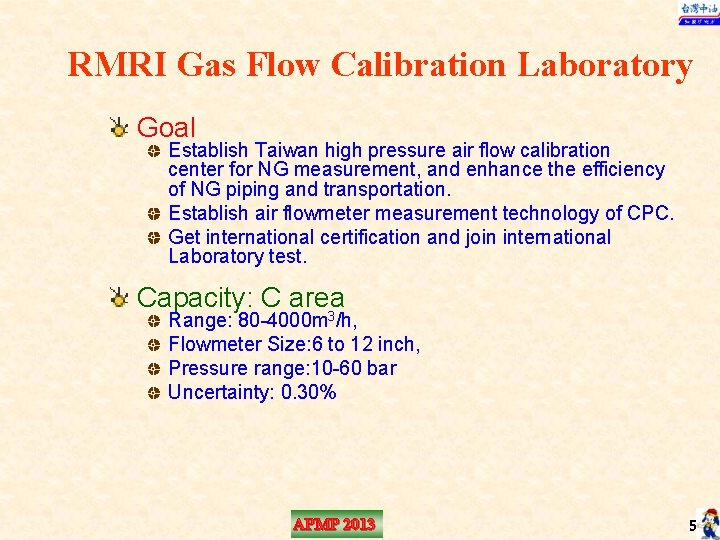
RMRI Gas Flow Calibration Laboratory Goal Establish Taiwan high pressure air flow calibration center for NG measurement, and enhance the efficiency of NG piping and transportation. Establish air flowmeter measurement technology of CPC. Get international certification and join international Laboratory test. Capacity: C area Range: 80 -4000 m 3/h, Flowmeter Size: 6 to 12 inch, Pressure range: 10 -60 bar Uncertainty: 0. 30% APMP 2013 5

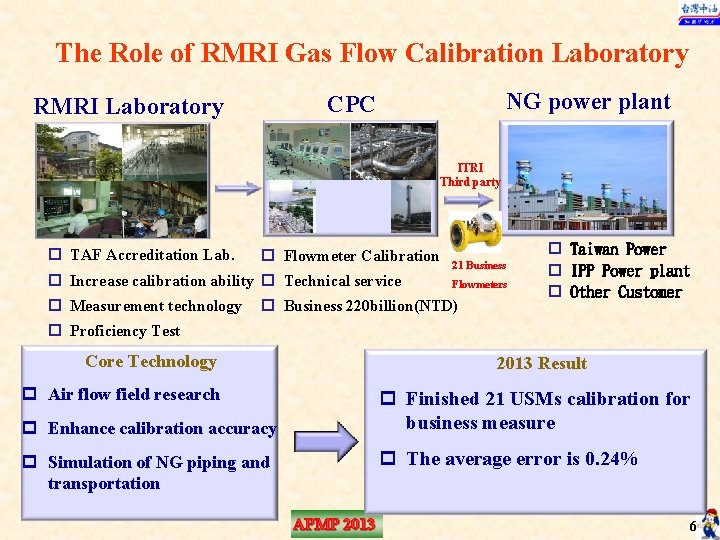
The Role of RMRI Gas Flow Calibration Laboratory NG power plant CPC RMRI Laboratory ITRI Third party p TAF Accreditation Lab. p Flowmeter Calibration p Increase calibration ability p Technical service p Measurement technology 21 Business Flowmeters p Business 220 billion(NTD) p Taiwan Power p IPP Power plant p Other Customer p Proficiency Test Core Technology 2013 Result p Air flow field research p Finished 21 USMs calibration for business measure p Enhance calibration accuracy p The average error is 0. 24% p Simulation of NG piping and transportation APMP 2013 6

Calibration System C Area B Area A Area Closed Cycle Loop Air Flow Blower Ice cooler Air Tank APMP 2013 7

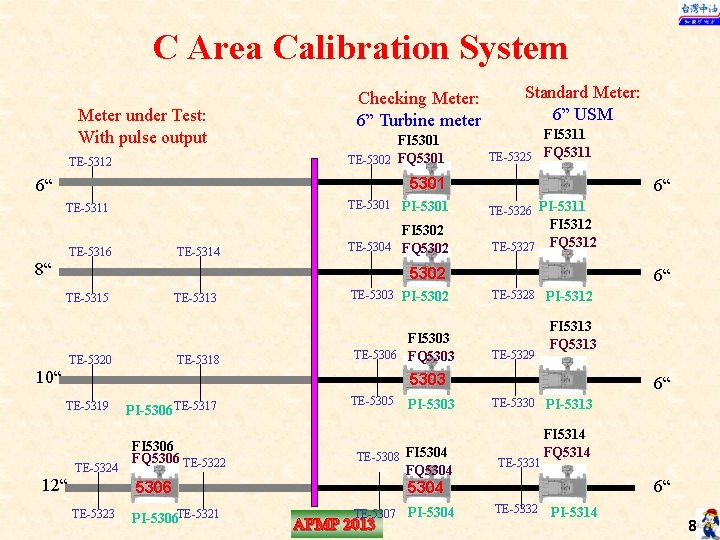
C Area Calibration System Meter under Test: With pulse output TE-5312 Checking Meter: 6” Turbine meter FI 5301 TE-5302 FQ 5301 Standard Meter: 6” USM FI 5311 TE-5325 FQ 5311 5301 6“ TE-5311 TE-5301 PI-5301 TE-5316 FI 5302 TE-5304 FQ 5302 TE-5314 8“ 6“ TE-5326 PI-5311 TE-5327 FI 5312 FQ 5312 5302 TE-5315 TE-5320 TE-5313 TE-5303 PI-5302 TE-5318 FI 5303 TE-5306 FQ 5303 10“ 6“ TE-5328 PI-5312 TE-5329 FI 5313 FQ 5313 5303 TE-5319 TE-5324 12“ PI-5306 TE-5317 FI 5306 FQ 5306 TE-5322 TE-5305 TE-5308 FI 5304 FQ 5304 5306 TE-5323 PI-5306 TE-5321 PI-5303 6“ TE-5330 PI-5313 TE-5331 FI 5314 FQ 5314 6“ 5304 TE-5307 PI-5304 APMP 2013 TE-5332 PI-5314 8

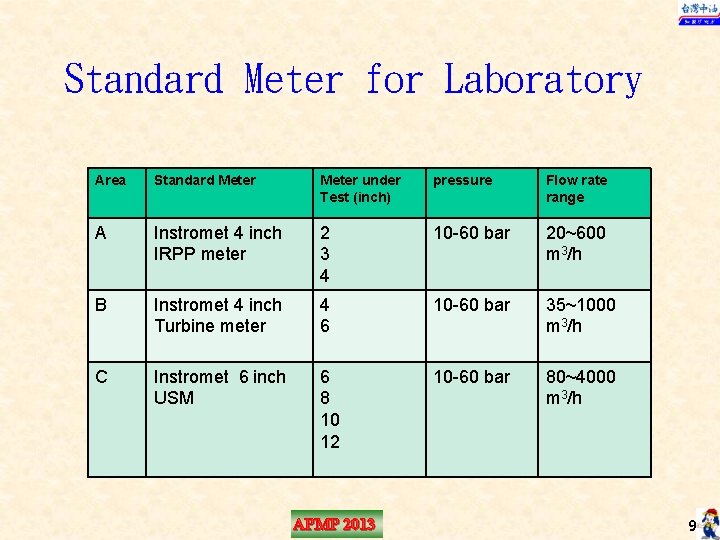
Standard Meter for Laboratory Area Standard Meter under Test (inch) pressure Flow rate range A Instromet 4 inch IRPP meter 2 3 4 10 -60 bar 20~600 m 3/h B Instromet 4 inch Turbine meter 4 6 10 -60 bar 35~1000 m 3/h C Instromet 6 inch USM 6 8 10 12 10 -60 bar 80~4000 m 3/h APMP 2013 9

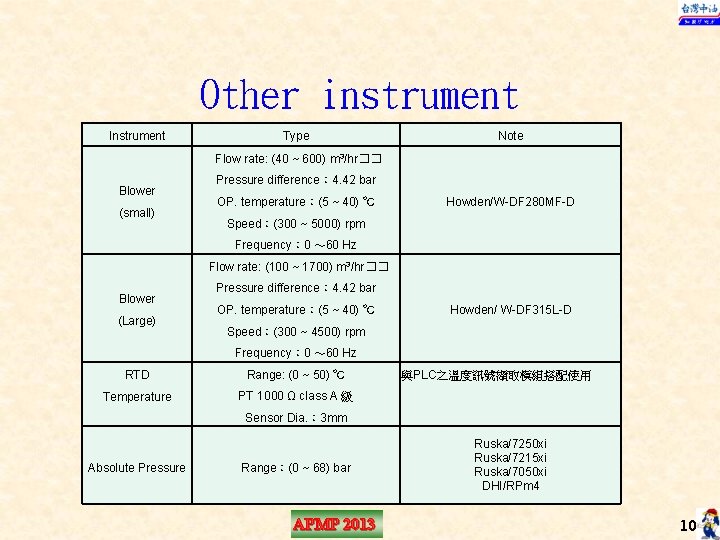
Other instrument Instrument Type Note Flow rate: (40 ~ 600) m 3/hr�� Blower (small) Pressure difference: 4. 42 bar OP. temperature:(5 ~ 40) ℃ Howden/W-DF 280 MF-D Speed:(300 ~ 5000) rpm Frequency: 0 ~ 60 Hz Flow rate: (100 ~ 1700) m 3/hr�� Blower (Large) Pressure difference: 4. 42 bar OP. temperature:(5 ~ 40) ℃ Howden/ W-DF 315 L-D Speed:(300 ~ 4500) rpm Frequency: 0 ~ 60 Hz RTD Range: (0 ~ 50) ℃ Temperature PT 1000 Ω class A 級 與PLC之溫度訊號擷取模組搭配使用 Sensor Dia. : 3 mm Absolute Pressure Range:(0 ~ 68) bar APMP 2013 Ruska/7250 xi Ruska/7215 xi Ruska/7050 xi DHI/RPm 4 10

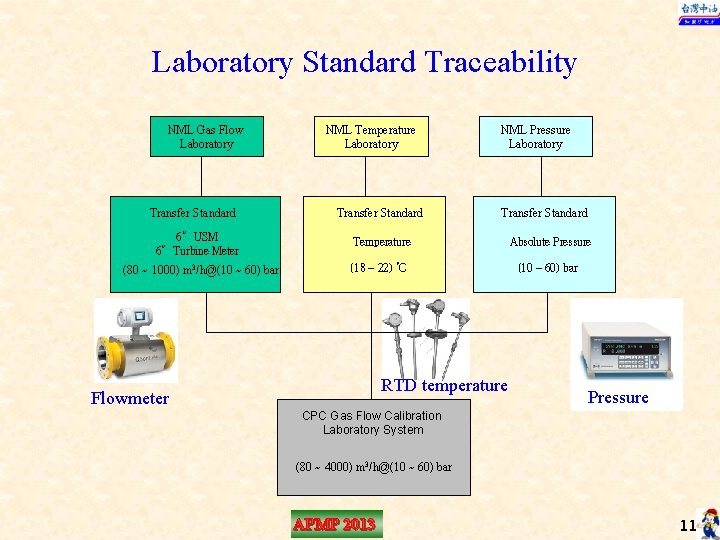
Laboratory Standard Traceability NML Gas Flow Laboratory Transfer Standard 6”USM 6”Turbine Meter (80 ~ 1000) m 3/h@(10 ~ 60) bar NML Temperature Laboratory Transfer Standard NML Pressure Laboratory Transfer Standard Temperature Absolute Pressure (18 ~ 22) ℃ (10 ~ 60) bar RTD temperature Flowmeter Pressure CPC Gas Flow Calibration Laboratory System (80 ~ 4000) m 3/h@(10 ~ 60) bar APMP 2013 11

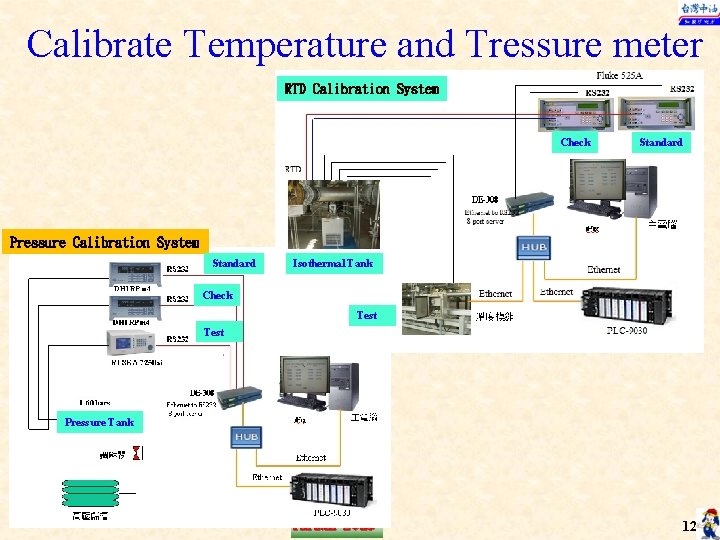
Calibrate Temperature and Tressure meter RTD Calibration System Check Standard Pressure Calibration System Standard Isothermal Tank Check Test Pressure Tank APMP 2013 12

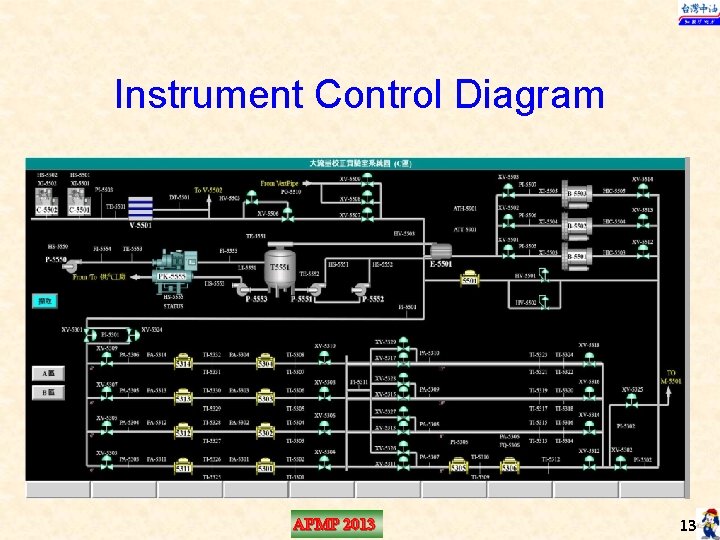
Instrument Control Diagram APMP 2013 13

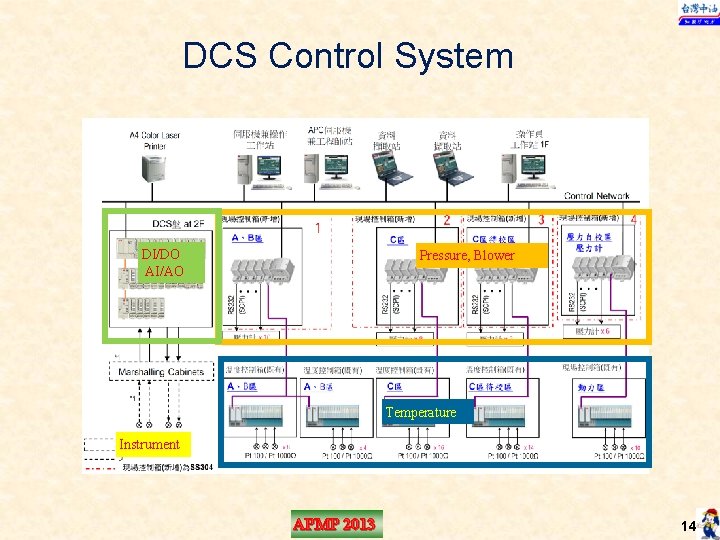
DCS Control System DI/DO AI/AO Pressure, Blower Temperature Instrument APMP 2013 14

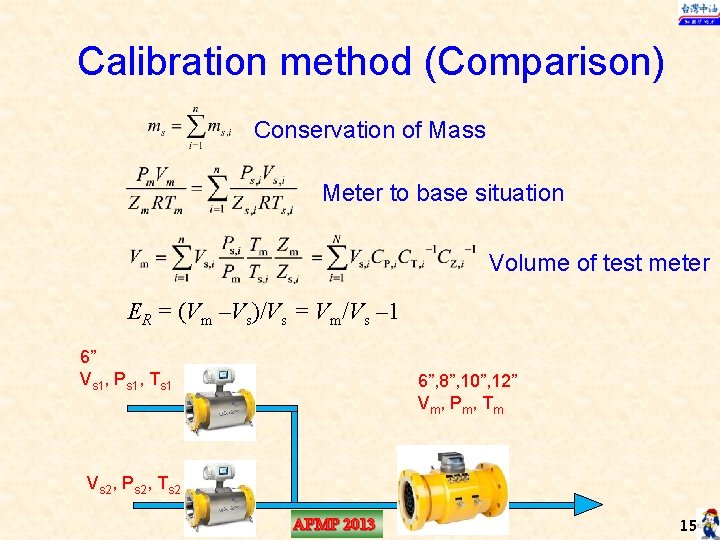
Calibration method (Comparison) Conservation of Mass Meter to base situation Volume of test meter ER = (Vm –Vs)/Vs = Vm/Vs – 1 6” Vs 1, Ps 1, Ts 1 6”, 8”, 10”, 12” Vm, Pm, Tm Vs 2, Ps 2, Ts 2 APMP 2013 15

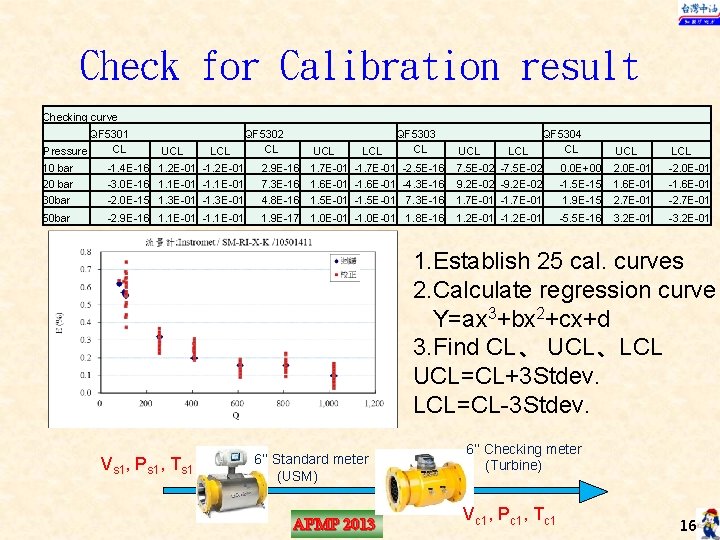
Check for Calibration result Checking curve QF 5301 CL Pressure QF 5302 CL QF 5303 CL QF 5304 CL 10 bar 20 bar 30 bar UCL LCL -1. 4 E-16 1. 2 E-01 -3. 0 E-16 1. 1 E-01 -2. 0 E-15 1. 3 E-01 -1. 3 E-01 UCL LCL 2. 9 E-16 1. 7 E-01 -2. 5 E-16 7. 3 E-16 1. 6 E-01 -4. 3 E-16 4. 8 E-16 1. 5 E-01 -1. 5 E-01 7. 3 E-16 UCL LCL 7. 5 E-02 -7. 5 E-02 9. 2 E-02 -9. 2 E-02 1. 7 E-01 -1. 7 E-01 50 bar -2. 9 E-16 1. 1 E-01 -1. 1 E-01 1. 9 E-17 1. 0 E-01 -1. 0 E-01 1. 8 E-16 1. 2 E-01 -1. 2 E-01 0. 0 E+00 -1. 5 E-15 1. 9 E-15 UCL 2. 0 E-01 1. 6 E-01 2. 7 E-01 LCL -2. 0 E-01 -1. 6 E-01 -2. 7 E-01 -5. 5 E-16 3. 2 E-01 -3. 2 E-01 1. Establish 25 cal. curves 2. Calculate regression curve Y=ax 3+bx 2+cx+d 3. Find CL、 UCL、LCL UCL=CL+3 Stdev. LCL=CL-3 Stdev. Vs 1, Ps 1, Ts 1 6’’ Standard meter (USM) APMP 2013 6’’ Checking meter (Turbine) Vc 1, Pc 1, Tc 1 16

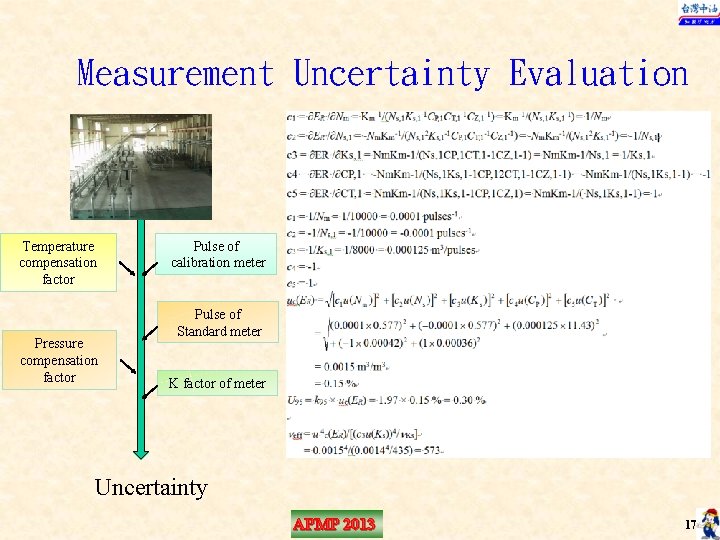
Measurement Uncertainty Evaluation Temperature compensation factor Pressure compensation factor Pulse of calibration meter Pulse of Standard meter K factor of meter Uncertainty APMP 2013 17

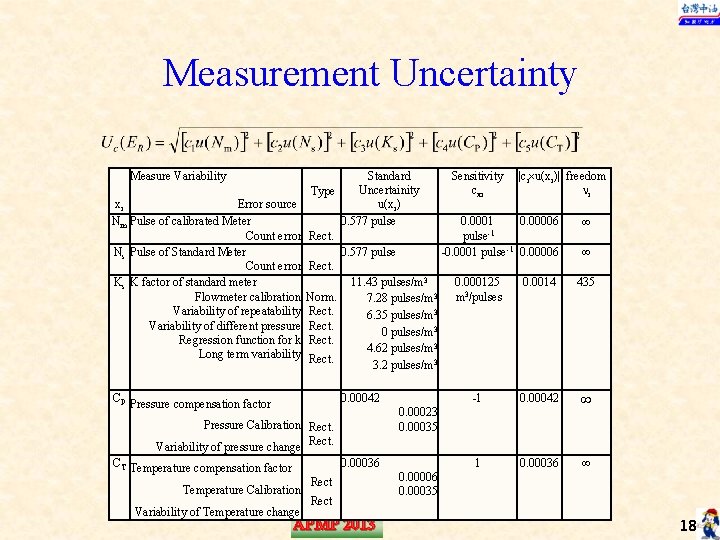
Measurement Uncertainty Measure Variability xi Error source Nm Pulse of calibrated Meter Count error Ns Pulse of Standard Meter Count error Ks K factor of standard meter Flowmeter calibration Variability of repeatability Variability of different pressure Regression function for k Long term variability Standard Sensitivity Uncertainity cxi Type u(xi) 0. 577 pulse 0. 0001 Rect. pulse-1 0. 577 pulse -0. 0001 pulse-1 Rect. 11. 43 pulses/m 3 0. 000125 3 Norm. m 3/pulses 7. 28 pulses/m Rect. 6. 35 pulses/m 3 Rect. 0 pulses/m 3 Rect. 4. 62 pulses/m 3 Rect. 3. 2 pulses/m 3 CP Pressure compensation factor 0. 00042 0. 00036 Temperature Calibration Variability of Temperature change 0. 00006 0. 0014 435 -1 0. 00042 1 0. 00036 0. 00023 0. 00035 Pressure Calibration Rect. Variability of pressure change Rect. CT Temperature compensation factor |ci u(xi)| freedom i Rect APMP 2013 0. 00006 0. 00035 18

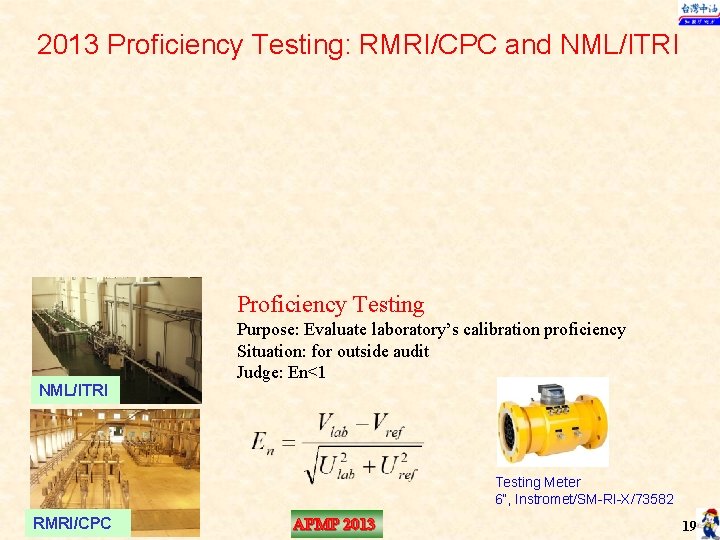
2013 Proficiency Testing: RMRI/CPC and NML/ITRI Proficiency Testing NML/ITRI Purpose: Evaluate laboratory’s calibration proficiency Situation: for outside audit Judge: En<1 Testing Meter 6”, Instromet/SM-RI-X/73582 RMRI/CPC APMP 2013 19

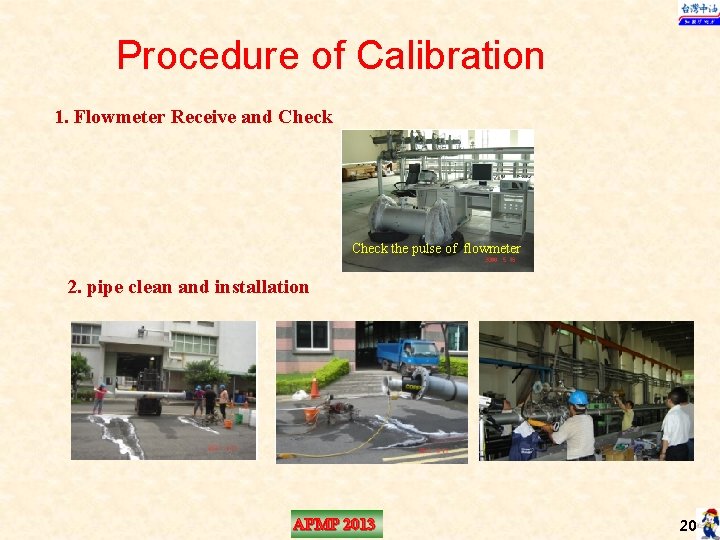
Procedure of Calibration 1. Flowmeter Receive and Check the pulse of flowmeter 2. pipe clean and installation APMP 2013 20

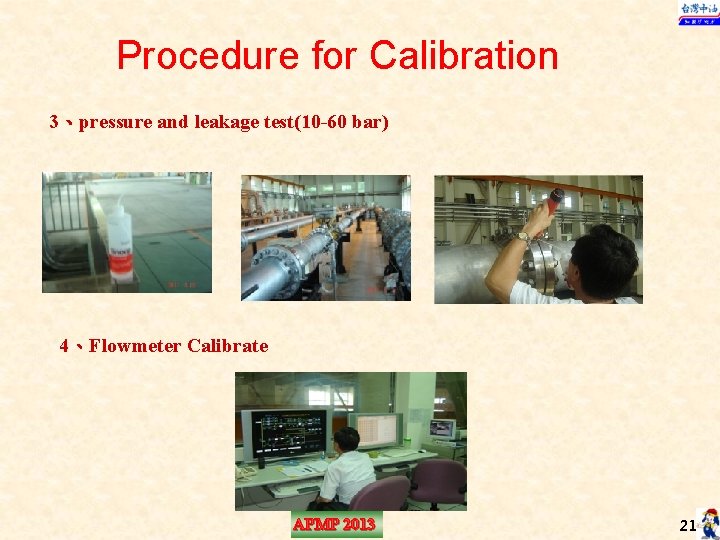
Procedure for Calibration 3、pressure and leakage test(10 -60 bar) 4、Flowmeter Calibrate APMP 2013 21

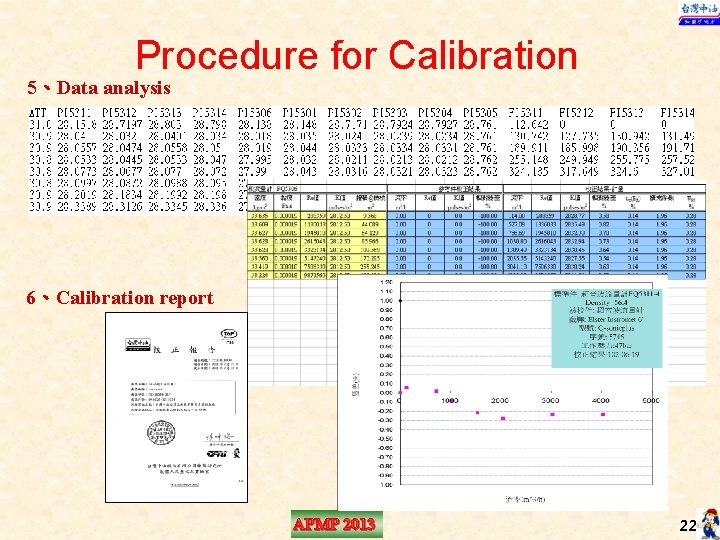
Procedure for Calibration 5、Data analysis 6、Calibration report APMP 2013 22

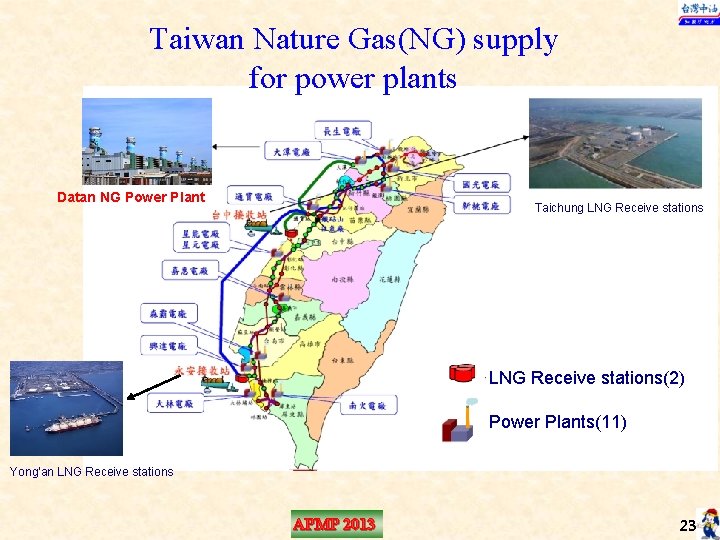
Taiwan Nature Gas(NG) supply for power plants Datan NG Power Plant Taichung LNG Receive stations(2) Power Plants(11) Yong'an LNG Receive stations APMP 2013 23

Why use Ultrasonic Flow Meter for NG business measure Since 2009, The measurement of NG supply for Taiwan power plant has replaced orifice plate with multi path ultrasonic flowmeters (10”, 12”, 24”) The error is from 2% to less than 0. 5% The advantage of USM Accuracy: Can be calibrated to <0. 1%. Large Turndown: >80: 1 Calibration is available Bi-directional: Measures volumes in both directions with comparable performance. Tolerant of Wet Gas: Important for production applications. Low Maintenance: No moving parts means reduced maintenance, minimal pressure drop, and diagnose a meter’s health is available. APMP 2013 24

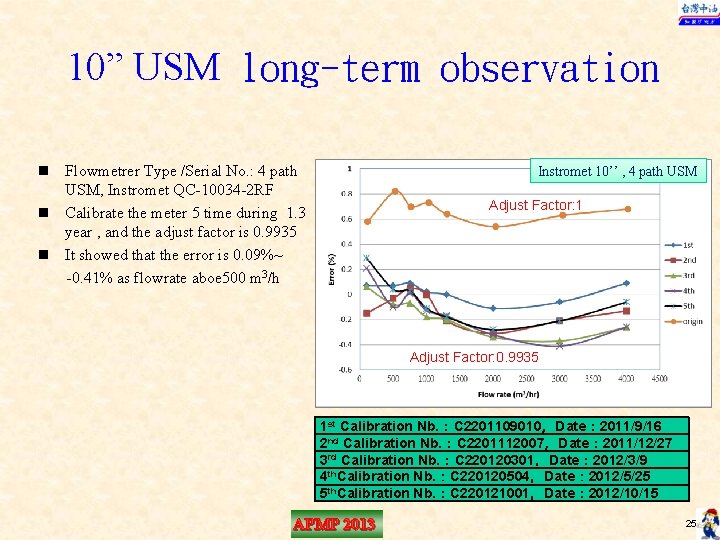
10” USM long-term observation n Flowmetrer Type /Serial No. : 4 path USM, Instromet QC-10034 -2 RF n Calibrate the meter 5 time during 1. 3 year , and the adjust factor is 0. 9935 n It showed that the error is 0. 09%~ -0. 41% as flowrate aboe 500 m 3/h Instromet 10’’ , 4 path USM Adjust Factor: 1 Adjust Factor: 0. 9935 1 st Calibration Nb. :C 2201109010,Date: 2011/9/16 2 nd Calibration Nb. :C 2201112007,Date: 2011/12/27 3 rd Calibration Nb. :C 220120301,Date: 2012/3/9 4 th. Calibration Nb. :C 220120504,Date: 2012/5/25 5 th. Calibration Nb. :C 220121001,Date: 2012/10/15 APMP 2013 25

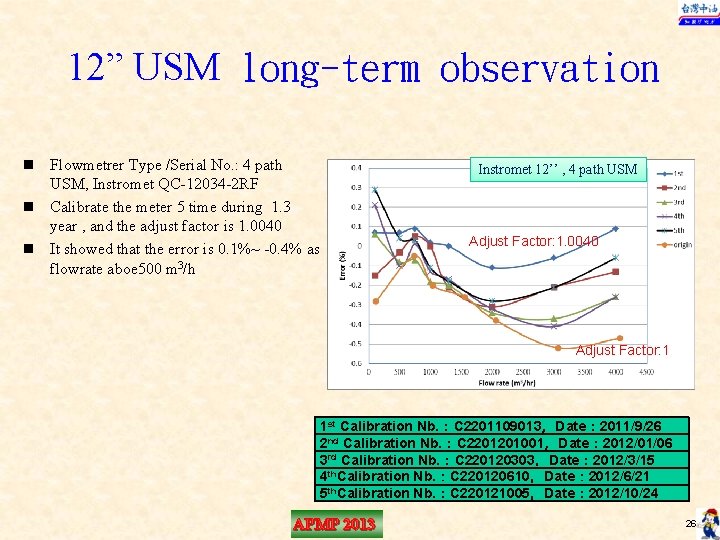
12” USM long-term observation n Flowmetrer Type /Serial No. : 4 path USM, Instromet QC-12034 -2 RF n Calibrate the meter 5 time during 1. 3 year , and the adjust factor is 1. 0040 n It showed that the error is 0. 1%~ -0. 4% as flowrate aboe 500 m 3/h Instromet 12’’ , 4 path USM Adjust Factor: 1. 0040 Adjust Factor: 1 1 st Calibration Nb. :C 2201109013,Date: 2011/9/26 2 nd Calibration Nb. :C 2201201001,Date: 2012/01/06 3 rd Calibration Nb. :C 220120303,Date: 2012/3/15 4 th. Calibration Nb. :C 220120610,Date: 2012/6/21 5 th. Calibration Nb. :C 220121005,Date: 2012/10/24 APMP 2013 26

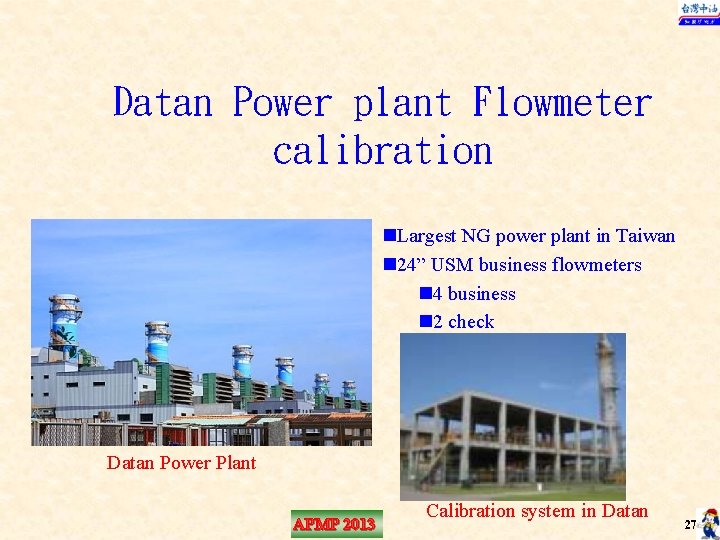
Datan Power plant Flowmeter calibration n. Largest NG power plant in Taiwan n 24” USM business flowmeters n 4 business n 2 check Datan Power Plant APMP 2013 Calibration system in Datan 27

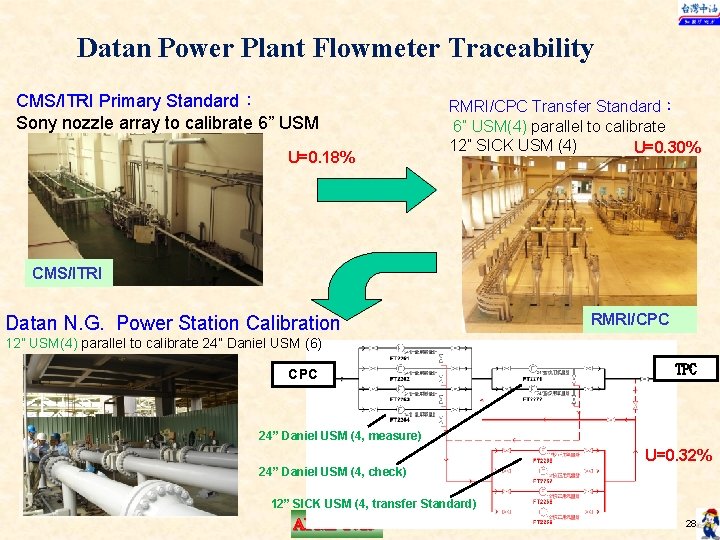
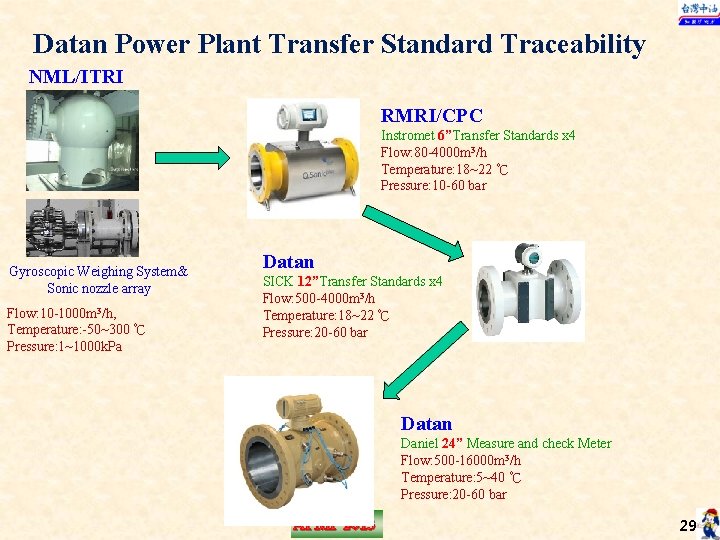
Datan Power Plant Flowmeter Traceability CMS/ITRI Primary Standard: Sony nozzle array to calibrate 6” USM U=0. 18% RMRI/CPC Transfer Standard: 6” USM(4) parallel to calibrate 12” SICK USM (4) U=0. 30% CMS/ITRI Datan N. G. Power Station Calibration RMRI/CPC 12” USM(4) parallel to calibrate 24” Daniel USM (6) CPC TPC 24” Daniel USM (4, measure) U=0. 32% 24” Daniel USM (4, check) power plant metering station 12” SICK USM (4, transfer Standard) APMP 2013 28

Datan Power Plant Transfer Standard Traceability NML/ITRI RMRI/CPC Instromet 6”Transfer Standards x 4 Flow: 80 -4000 m 3/h Temperature: 18~22 ℃ Pressure: 10 -60 bar Gyroscopic Weighing System& Sonic nozzle array Flow: 10 -1000 m 3/h, Temperature: -50~300 ℃ Pressure: 1~1000 k. Pa Datan SICK 12”Transfer Standards x 4 Flow: 500 -4000 m 3/h Temperature: 18~22 ℃ Pressure: 20 -60 bar Datan Daniel 24” Measure and check Meter Flow: 500 -16000 m 3/h Temperature: 5~40 ℃ Pressure: 20 -60 bar APMP 2013 29

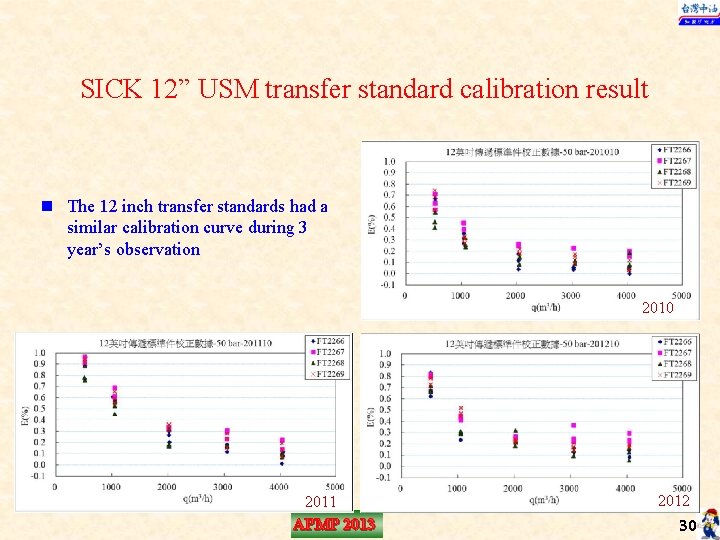
SICK 12” USM transfer standard calibration result n The 12 inch transfer standards had a similar calibration curve during 3 year’s observation 2010 2011 APMP 2013 2012 30

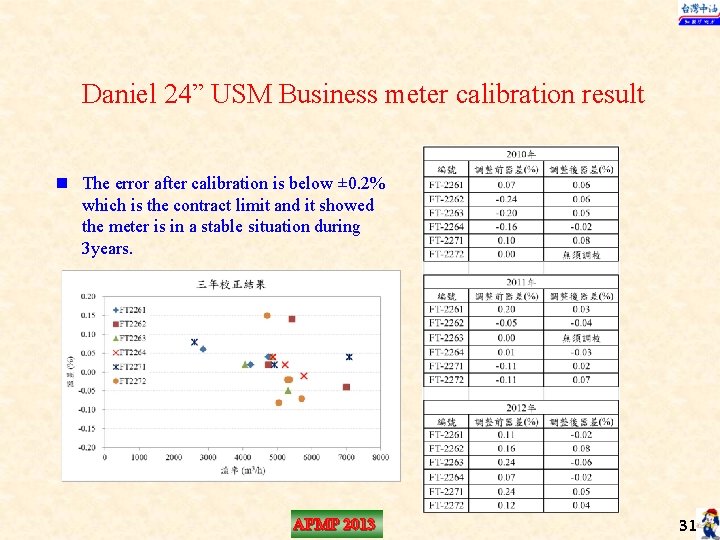
Daniel 24” USM Business meter calibration result n The error after calibration is below ± 0. 2% which is the contract limit and it showed the meter is in a stable situation during 3 years. APMP 2013 31

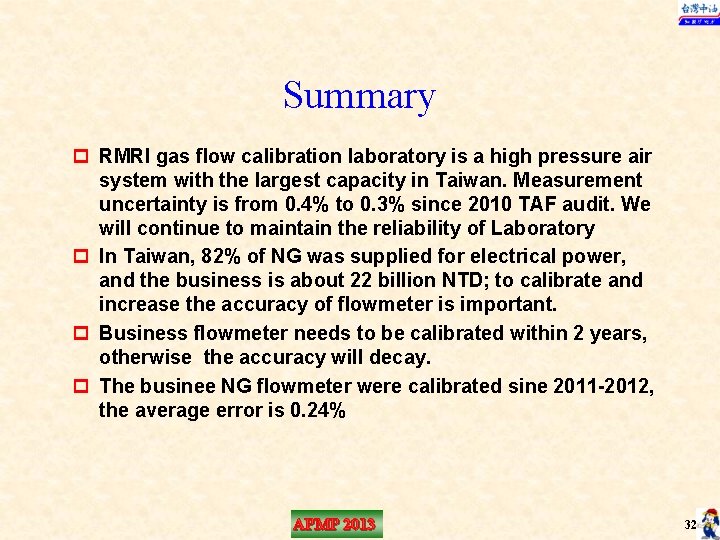
Summary p RMRI gas flow calibration laboratory is a high pressure air system with the largest capacity in Taiwan. Measurement uncertainty is from 0. 4% to 0. 3% since 2010 TAF audit. We will continue to maintain the reliability of Laboratory p In Taiwan, 82% of NG was supplied for electrical power, and the business is about 22 billion NTD; to calibrate and increase the accuracy of flowmeter is important. p Business flowmeter needs to be calibrated within 2 years, otherwise the accuracy will decay. p The businee NG flowmeter were calibrated sine 2011 -2012, the average error is 0. 24% APMP 2013 32

Thank you For your attention 謝謝 APMP 2013 33