Handwriting at Uplands Before we begin some points

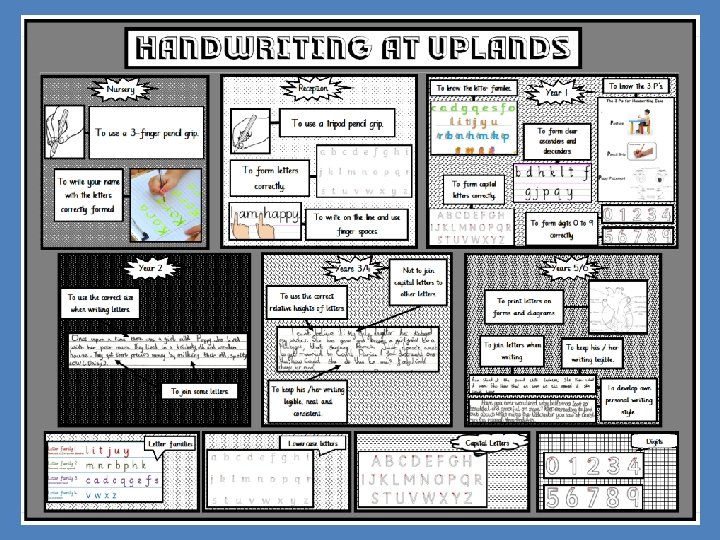
Handwriting at Uplands

Before we begin, some points to consider… Which handwriting style do we use? We have traditionally taught letter formation following the cursive style without the flick, and then adding the flick for when teaching joins in Year 1 and 2. We had identified that the handwriting strategy we were using was not having the required impact. Following some research into different approaches to teaching handwriting we decided to embark on a trial of continuous cursive in Reception and Year 1, and with strategic groups across the school who needed handwriting interventions. The major difference between the two styles is that from the beginning of the continuous cursive programme, the children are taught to add lead-ins to their lower case letters as shown here: Cursive a b c d e f g h i j k l m n o p q r s t u v w x y z Continuous Cursive abcdefghijklmnopqrstuvwxyz

Before we begin, some points to consider… There are many different viewpoints as to when and how children should be taught a joined style of handwriting. The British. The Dyslexia Foundation recommends that children use a continuous cursive stylethat from However, National Handwriting Association have an opposing opinion and suggest a as early an cursive age as possible: continuous style (where lead-ins are taught right from EYFS) may cause confusion for some children: ‘Typically, when first learning to write, children ‘print’ their letters. They then move on to ‘joined up’ writing at a teach later stage. children with dyslexia, learning twobase styles of This handwriting can ‘Some schools young For children to begin each letter from the line. means that add starting an extra layer difficulty cause confusion. It is, therefore, much image more helpful a the point is of very easy toand remember but it may complicate the visual of someif of young child can learn to in use single of handwriting frombegins the start. ’ the letters and also result theaneed forsystem some relearning when right the child to join(British letters Dyslexia Association) together. The letters joined from ‘o, ’ ‘r’, ‘v’ and ‘w’ do not start from the baseline, which then requires children to relearn an established movement pattern, which is not good practice. ’ (National Handwriting Association) It is essential that there is a whole school approach to handwriting, where one style is adopted by the entire school. Whichever style that you decide upon, the handwriting will require frequent, discrete and direct teaching.

When should we start to teach ‘joining’? The 2014 National Curriculum states that pupils should ‘start using some of the diagonal and It is important to remember stepsfrom are not to be taught schools to a specific age horizontal strokes needed tothat jointhe letters’ Yeardesigned 2, and encourages to teach group. Within each there areasideas a specific area securely of handwriting that would children ‘to write withlesson, a joined style soontoasdevelop they can form letters with the correct work well with all children within the primary age range. orientation’. However, using a joined handwriting style is not a statutory requirement until Key Stage 2. 3 1 2 Warm-Up Forming Letter Activities Families Positioning & Pre-Cursive Joining Letters Developed Created to to teach buildchildren hand sets wrist of ‘letter strength, families’ upper with body thestrength aim of securing and improve the correct Targeted on the beginnings of joining with a focus on forming letters of the correct Designed to develop pupils’ understanding of different types of letter joins (and the co-ordination. letter formation. relative size, positioning and spacing. letters best left unjoined) in an aim to increase legibility, quality and consistency. (Recommended All lower case letters to be are used shown at theusing beginning a printed of every style. ) handwriting session. )

How do left-handed children learn best? Left-handed pupils should receive specific teaching to meet their needs. Some left-handed children may find it more appropriate to leave a lower case ‘t’ unjoined as this letter is formed differently for them. Some other capital letters are also often formed differently for left-handed writers (E, F, H, I, J, T). Left-handed children should be reminded of the best positioning of their paper to allow them to view their writing and also to help prevent ‘smudging’. It also may be helpful for left-handed children to hold their writing implement slightly higher (about 2 cm from the tip) so that what they are writing isn’t shielded from their view. During handwriting sessions, it is recommended that right-handed children are not seated on the left-hand side of a left-handed child to ensure that their elbows do not collide. How do we model handwriting? All of our handwriting lessons have simple animations that have been made to clearly show the letter formations and joins. They are modelled by the teachers and teaching assistants in all areas of the curriculum, as well as being encouraged in every pupils’ own independent writing.

How important is pen/pencil grip? Children should not be made to hold a pen or pencil in a way that feels uncomfortable to them. Many children hold their pen or pencil in unconventional ways. However, so do many competent writers and there is no evidence to date to link poor pencil grasp with poor handwriting (National Handwriting Association). However, the dynamic tripod grasp is recommended once the child is old enough to hold a writing implement. This grip minimises the risk of strain and offers the greatest control. This suggested grip is revisited within every lesson presentation and could also be reinforced through displaying the ‘How to Grip a Writing Tool’ poster within your classroom. Pupils are encouraged to think about how to ‘nip, flip and grip’ their chosen writing implement.

How important is the correct sitting and paper positioning? The correct seating position and the positioning of a pupil’s paper on their desk can make a noticeable change in the quality of a child’s handwriting. For this reason, correct positioning is revisited throughout the sessions.

How should we celebrate handwriting success? The celebration of children’s work and high expectations play a huge part in children making handwriting progress. In Year 1 and 2 we use the handwriting ladder to motivate children, as well as the prospect of writing with a silver, and later gold pencil as incentives to encourage children to work on their handwriting targets. We also display and share children’s work showing exceptional improvements or a high standard of work to showcase their handwriting achievements. Why is a fluent, speedy and legible handwriting style so important? Legible handwriting that can be produced at speed, and with a minimum of thought, allows a child to give their full attention to the composition and content of their writing, and to their learning in other curriculum areas. Without fast and legible handwriting, students may miss out on learning opportunities and under-achieve academically (National Handwriting Association).

Terminology All children are taught to use the correct terminology in all handwriting lessons. Ascenders – go above the high middle line to the top They are: b, d, f, h, k, l, t Descenders – go below the lowest middle line to the bottom They are: f, g, j, p, q, y

The Journey to Cursive: Handwriting Joins For children in Year 2, their handwriting programme focused forming letters without the lead in, and on the two main basic joins included within the 2014 National Curriculum: diagonal joins and horizontal joins. Diagonal joins used to join: to these letters: (the most common letter join – formed from the baseline) a, b, c, d, e, h, i, k, l, m, n, p, s, t, u, z b, e, f, h, i, j, k, l, m, n, p, r, t, u, v, w, x, y, z Horizontal joins used to join: to these letters: (formed from the top of the letter) o, r, v, w b, e, f, h, i, j, k, l, m, n, p, r, t, u, v, w, x, y, z Unjoined letters f, g, j, q, x, y and to these tricky letters (where the letter is formed in an anticlockwise movement): a, c, d, g, o, q, s (where no onward join is needed) • Denotes a letter that is joined using a more complex bottom diagonal join.

The Journey to Continuous Cursive: Handwriting Joins Children in Reception and Year 1 have been taught the letter shapes with the lead in from the autumn term and have been expected to join since day one. “Fancy writing!” Diagonal joins used to join: to these letters: (the most common letter join – formed from the baseline) a, b, c, d, e, h, i, k, l, m, n, p, q, s, t, u, x, z b, e, f, h, i, j, k, l, m, n, p, r, t, u, v, w, x, y, z Horizontal joins used to join: to these letters: (formed from the top of the letter) o, r, v, w b, e, f, h, i, j, k, l, m, n, p, r, t, u, v, w, x, y, z Descender joins used to join: to these letters: (formed from the loop of a descender) f, g, j, y b, e, f, h, i, j, k, l, m, n, p, r, t, u, v, w, x, y, z • and to these tricky letters (where the letter is formed in an anticlockwise movement): a, c, d, g, o, q, s Denotes a letter that is joined using a more complex bottom diagonal join.
 l down")
Letter Families 1 The Ladder Family (l, i, u, t, y, j) l down from the top i down, lift and dot u down, round, up and down t down from the top, curve, lift and across y down , round, up, down and round j down to the bottom, around, lift and dot

Whichever handwriting style is favoured within your school, Twinkl recommend teaching the handwriting activity packs in a specific order to ensure progression and consolidate prior learning: 2 The One-Armed Robot Family (n, m, h, k, b, p, r) n down and up, around, down and stop m down and up, around, down and up around, down h down from the top, up, around and down k down from the top, up and right round, kick b down from the top, up and around p down from the top, up and around r down, up, around and stop

Letter Families 3 The Curly Caterpillar Family (c, a, d, e, s, g, f, q, o) c curve around and stop a curve around, up and down d curve around, up to the top and down e up and diagonal across, curve round and stop s curve around, curve around g curve around, up, down to the bottom and around f curve, down and cross q curve around, up, down to the bottom and flick o curve around and up around
 z across, diagonal")
Letter Families 4 The Zig-Zag Monster Family (z, v, w, x) z across, diagonal down, across v diagonal down, diagonal up w diagonal down, diagonal up, diagonal down and diagonal up x diagonal down, lift, diagonal down

Capital Letter Families Capital letters are all formed at the same height and they are not joined to other letters. The order of the strokes is not as important as when lower case letters are formed but below are some formation suggestions. Note, left-handed children will probably form the capital letters E, F, H, I, J and T differently. Capitals without lifting (C, L, O, S, U, V, W, Z)

Capital Letter Families Capital letters are all formed at the same height and they are not joined to other letters. The order of the strokes is not as important as when lower case letters are formed but below are some formation suggestions. Note, left-handed children will probably form the capital letters E, F, H, I, J and T differently. Capitals with one lift (B, D, G, J, K, M, N, P, Q, R, T, X, Y)

Capital Letter Families Capital letters are all formed at the same height and they are not joined to other letters. The order of the strokes is not as important as when lower case letters are formed but below are some formation suggestions. Note, left-handed children will probably form the capital letters E, F, H, I, J and T differently. Capitals with two or more lifts (A, E, F, H, I)

National Curriculum Links Good handwriting should not just be showcased in handwriting lessons, it is about emphasising the importance of fluency, neatness and speed in writing across the curriculum. Nursery 22 -36 M: • Beginning to use three fingers (tripod grip) to hold writing tools; • Imitates drawing simple shapes such as circles and lines; • May be beginning to show preference for dominant hand. 30 -50 M: • Holds pencil between thumb and two fingers, no longer using whole-hand grasp; • Holds pencil near point between first two fingers and thumb and uses it with good control; • Can copy some letters, e. g. letters from their name.

National Curriculum Links Reception: 40 -60 M: • Shows a preference for a dominant hand; • Begins to use anticlockwise movement and retrace vertical lines; • Begins to form recognisable letters; • Uses a pencil and holds it effectively to form recognisable letters, most of which are correctly formed. ELG: • Children show good control and co-ordination in large and small movements. They move confidently in a range of ways, safely negotiating space. They handle equipment and tools effectively, including pencils for writing.

National Curriculum Links Year 1: Pupils should be taught to: • sit correctly at a table, holding a pencil comfortably and correctly; • begin to form lower-case letters in the correct direction, starting and finishing in the right place; • form capital letters • form digits 0 -9; • understand which letters belong to which handwriting ‘families’ (i. e. letters that are formed in similar ways) and to practise these.

National Curriculum Links Year 2: Pupils should be taught to: • form lower-case letters of the correct size relative to one another; • start using some of the diagonal and horizontal strokes needed to join letters and understand which letters, when adjacent to one another, are best left un-joined; • write capital letters and digits of the correct size, orientation and relationship to one another and to lower -case letters; • use spacing between words that reflects the size of the letters.

National Curriculum Links Year 2 Interim Assessment Framework : WT – Pupils can write sentences, after discussion with the teacher: • forming lower-case letters in the correct direction, starting and finishing in the right place; • forming lower-case letters of the correct size relative to one another in some of the writing; • using spacing between words. ES – Pupils can write a narrative, after discussion with the teacher: • using the diagonal and horizontal strokes needed to join letters in some of their writing; • writing capital letters and digits of the correct size, orientation and relationship to one another and to lower case letters; • using spacing between words that reflects the size of the letters. GDS – Pupils can write for different purposes, after discussion with the teacher: • using the diagonal and horizontal strokes needed to join letters in most of their writing.
- Slides: 24