Grounding and Cabling for the Small Studio David

Grounding and Cabling for the Small Studio David Etlinger 1/17/2006
 n AC current can KILL")
Disclaimers n NEVER defeat the AC ground!! (round prong) n AC current can KILL – if in doubt, stop and get more info n I am not an electrician so don’t count on me to keep you safe

Objectives n How can we get rid of that annoying hum? !? n How can we reduce the noise floor through proper cabling? n How can we keep our equipment and ourselves safe while doing it? n Can we do this systematically, not haphazardly?
 – difference in charge between two points (V –")
Basic Definitions n Voltage (Potential) – difference in charge between two points (V – Volts) n Current – the flow of electricity (positive to negative) (I – Amperes) n Resistance – a component’s opposition to current flow (R – Ohms) V=IR

Part I Grounding
 • Ground (1) – Literally the Earth, effectively a point with 0")
Grounding (Earthing) • Ground (1) – Literally the Earth, effectively a point with 0 potential and infinite charge-holding capacity • Ground (2) – The lowest potential point in a circuit, serving as a current return path Signal Ground Chassis Ground Earth Ground

Two-Prong Outlets Hot – Black, Red or Blue Neutral - White

Three-Prong Outlets Hot – Black, Red or Blue Neutral – White Ground – Green

Already a Problem • Many, many home AC circuits are wired improperly • This can cause noise and shock hazards • Use a multimeter or $5 Radioshack tester to verify every AC outlet

Short Circuit with Proper Grounding

Short with Broken Ground Mics and Electric Guitars with broken grounds are especially dangerous
 on")
Ground Noise • All signals are referenced to ground • Noise (voltage changes) on the ground line create noise in the signal • Since AC oscillates at 60 Hz, this often results in a 60 Hz hum

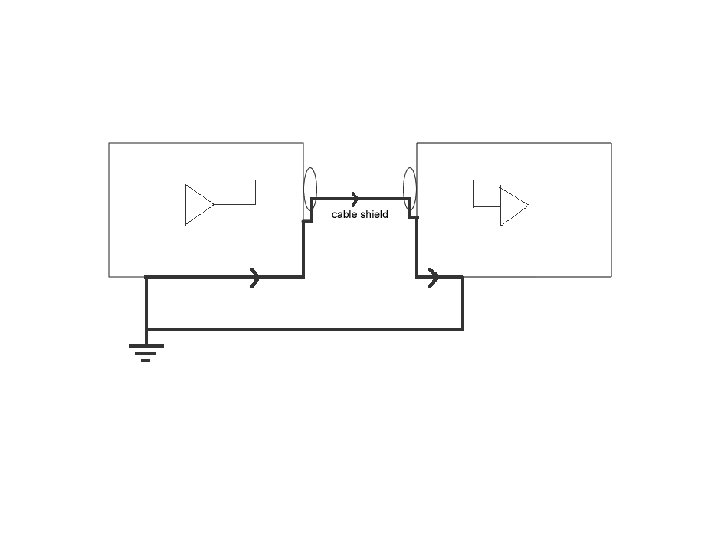
Ground Loops • “One point, two paths to ground” • Current requires a closed loop to flow • Two paths to ground makes a closed loop • Ground noise is then possible

Chassis-to-Chassis • Touching chassis can form an electrical connection • Rackmount rails can also connect chassis • This can be good or bad, depending on the situation

Noise Source: Two Circuits Easiest solution: Put both devices on one AC circuit

Noise Source: Dirty Ground • Remember V = I R : Low resistance means big current • Solve with a power conditioner (Furman, etc. ) or isolation transformer • Or put everything on one AC outlet, but watch the power draw

Induced Current

Induced Ground Current

Solution

Induced Current, Cont’d • Usually, 6” separation is enough to eliminate induced current • Wall-wart transformers have unpredictable fields; keep them as isolated as possible • Induced currents cannot be totally eliminated
 – Upgrade")
Other Sources of Ground Noise • Internal Power Supply (Induction and Capacitance) – Upgrade or mod the equipment – use balanced cables

Fixing Ground Loops l l Put everything on one AC circuit • Separate Signal cables from AC cables (and esp. Wall-wart transformers) • • l Use a current meter like Kill-a-Watt or Power Angel to measure current draw Try to keep at least 6” between Cross at 90° if necessary Use Balanced Cables wherever possible

Part II Cabling

Balanced Cabling: CMR

Balanced Advantages • High rejection of ground noise • Also rejects external EMF • CMR not perfect; still wise to minimize ground noise • Properation depends on proper ground wiring

AC vs. Signal Ground • AC Ground is designed for safety • Signal Ground is an internal reference for circuit paths • Signal Ground is usually tied to Chassis Ground at one point • Balanced cables should ALWAYS use chassis ground
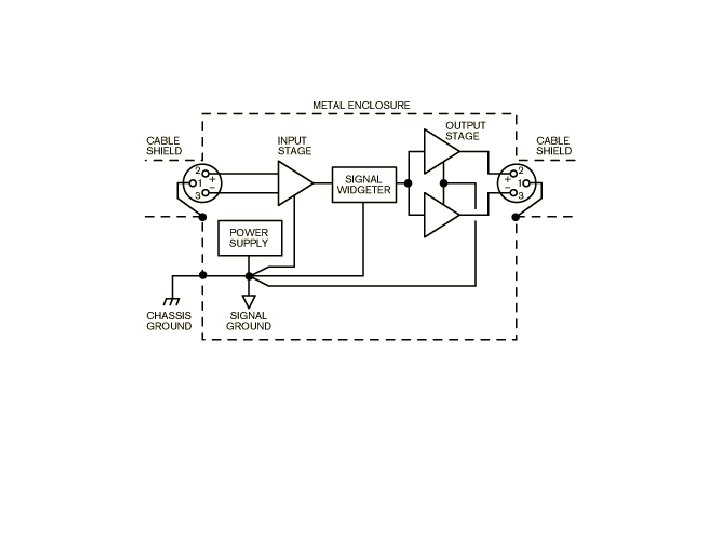

WRONG: Signal Ground

RIGHT: Chassis Ground

Problems • Much old or cheap equipment uses signal ground • Unfortunately, this can cause noise even with balanced connections • The only choices are upgrading or modding

Finding Improper Grounding • Visual Inspection • Use a multimeter to test for voltage between shield and chassis • Should be very low (ideally 0 V) – But, could tie to both chassis and signal ground

Fixing Improper Balanced I/O • Best: Cut the trace to signal ground and bond to chassis ground • Easier: Disconnect the cable shield at the end tied to signal ground – Breaks any ground loops – But shield is now an RF antenna – Can alleviate by bonding shield to chassis through a 0. 01μF capacitor – But then why not just mod the equipment? !?

Worst Case • Both input and output tied to signal ground • No standard solution, but most people connect one end of the shield • Which end is unimportant, but you must make the same choice each time – Might be a very slight benefit to lifting at the input side

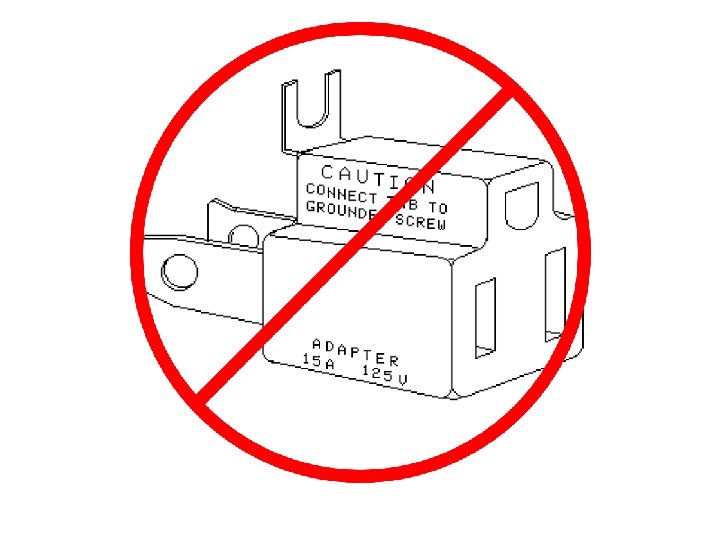
One More Problem • Units with a wall-wart transformer are not connected to AC ground • These units can have balanced I/O • Solve this by bonding the ungrounded chassis to a known grounded chassis

Sidebar: Cable Quality ¢ Cable quality varies substantially ¢ Foil shields: best protection but easily damaged l ¢ Use in fixed installations Braided shields: look for maximum coverage

Some Brands ¢ ¢ Pro Quality: Canare, Mogami Also good: Belden, Gepco, Rapco, Whirlwind AVOID: HOSA Monster: Good but way overpriced ¢ Or make your own: pro quality at a budget price ¢ Connectors: Neutrik, Switchcraft

Unbalanced Cabling • Two conductors: Hot and Neutral • No CMR; no magnetic field rejection • Often found on semi-pro or consumer gear • ¼” TS (mono); RCA • Always keep unbalanced runs as short as possible

Shield goes to Signal Ground! • Shield acts as current return path • Necessary to form a complete circuit • Not a “true” shield but does offer some protection

Best Solution: Convert to Balanced

Next Best Solution: Transformers www. whirlwindusa. com Audio Isolation Transformers; DI Boxes; Many Preamps; etc.


Last Resort: Cut the Shield • N. B. : Cutting the shield on a single-wire cable will ruin the cable!! • We are going to cut the shield on a twowire (“balanced”) cable • This modified cable can then be used to connect unbalanced <-> balanced

Most Common: Unbalanced Balanced • Simply disconnect the shield at one end • TRS: sleeve; XLR: pin 1

Balanced Unbalanced

Balanced Unbalanced

Balanced Unbalanced

Hierarchy of Preference l Balanced --> Balanced • Unbalanced --> Balanced • Balanced --> Unbalanced • Unbalanced --> Unbalanced l Chassis-shielded at both ends • Chassis-shielded at one end, other end lifted • Signal-shielded at one end, other end lifted

More Info • If the choice of which end to cut is arbitrary, make the same choice each time • Many possible scenarios • See the two Rane references for excellent charts • Also see Jensen whitepapers for a more technical discussion

Summary of Best Practices l l l Connect all devices to one AC circuit Use balanced I/O whenever possible Transformer-Isolate unbalanced lines when possible • Cut shielding at one end if necessary l Keep signal lines away from AC (esp. wall-warts) • Cross signal and AC lines at 90° if necessary

Noise Isolation Procedure 1. 2. 3. 4. Disconnect everything Connect monitors to main I/O; verify good grounding and no noise Connect balanced gear one by one; verify no noise Connect unbalanced gear one by one; modify until noise is acceptable

Sidebar: Advanced Studio Grounding ¢ Pros: l ¢ Can reduce noise floor to commercial-studio levels Cons: l l l Complex Expensive Often a workaround for improper cabling or equipment design

Primary Techniques ¢ Isolated Ground: drive a dedicated ground bar, completely separate from the main AC grid ¢ Star Grounding: Use heavy copper wiring to ground every device to one central point
")
Balanced Power Common-Mode Rejection Cancels Ground Noise (just like balanced audio!)

Balanced Power Pros and Cons Pros Eliminates noise from reactive current (i. e. , bad internal design) l Isolates from building power l Cons Won’t solve all ground loop problems l Pricey!! ($1000 and up) l

Digital Audio Cables • Digital signals themselves should be immune to ground noise • But, the cabling can create ground loops that affect other signals • AES/EBU: Isolation transformers prevent loops • Optical S/PDIF (TOSLink): No electrical connection so no loops • Coaxial S/PDIF: Supposedly isolated but some cheap equipment isn’t – Can build an isolator; usually easier solutions

Interfacing with the Computer • Tricky!!! • High power load might require a separate AC circuit • Many different I/O paths

Common I/O schemes • “Soundblaster”-type cards – Almost always unbalanced – Treat like any other unbalanced I/O • Firewire Interfaces (MOTU 828, etc. ) – Firewire grounds to the computer – Must then consider the computer part of the grounding topology

Computer I/O Cont’d • Cable Modem – Ethernet interfaces usually won’t link grounds – USB interfaces can link computer to cable ground – Use a Cable Isolator to break the coax ground • Many other I/Os possible • You’ll need to experiment

Final Sidebar: Impedance Too complex to cover here ¢ Basically, impedance is like a frequency-dependent resistance ¢ Really good CMR requires I/O circuits with good impedance design ¢ ¢ If you want really low noise, read up on impedance

Grounding References n http: //www. epanorama. net/documents/gro undloop/ n http: //www. equitech. com/articles. html http: //www. rane. com/note 151. html n http: //www. dself. dsl. pipex. com/ampins/gro undloops/grndloop. htm n

Cabling References http: //www. jensentransformers. com/apps_wp. html n http: //www. rane. com/note 110. html n

http: //www. davidetlinger. com Good luck!!
- Slides: 64