Getting started with Boom Learning What is boom

Getting started with Boom Learning

What is boom learning? BOOM Learning is an amazing tool for the classroom! Have you heard of BOOM cards? They are digital task cards and I love them! Furthermore, I have been using BOOM decks with my middle schoolers. They loved the interactive lessons! However, BOOM cards are perfect for all ages.

What are the benefits of Boom Cards? ● They allow for easy differentiation– you can assign different decks to different students OR you can create a custom play for your students with varying numbers of cards for levels of practice. ● Immediate feedback and self-correcting– students are prompted to choose again if the incorrect answer is chosen. Also, the teacher can log in to the dashboard and see all the scores. ● Time saver– no prep or grading necessary! ● Flexible– the decks can be done independently, as a whole class, or in small groups. ● Fun– they are engaging and interactive. As a result your students will enjoy them!

What do you need for Boom? ● Technology- a computer, tablet, i. Pad, phone, or interactive whiteboard ● Internet access ● Boom account

How much does it cost? BOOM offers free plans, but paid plans are very affordable and there are tiers to fit your needs.
 Go to Boom Learning and click on the green")
How to get Started 1) Go to Boom Learning and click on the green Sign up button. 2) Join with your Google account, this helps with not having to remember a username or password. 3) Once you've created a username and password, click on the Library tab. 4) Scroll down to the bottom and click on the green "Show me free stuff!" button. You can type in a specific topic in the search bar or refine the results by subject and grade level.

This is where you would look for free decks
 Click on the deck of cards")
How to Get started continued …. . 5) Click on the deck of cards that you would like to use and click on the Add to Library green button. Don't forget you can preview the first 4 cards of any deck make sure to click on full-size preview to see how they work. 6) Next, click on Classes. You can now enter your name and picture (if you want).
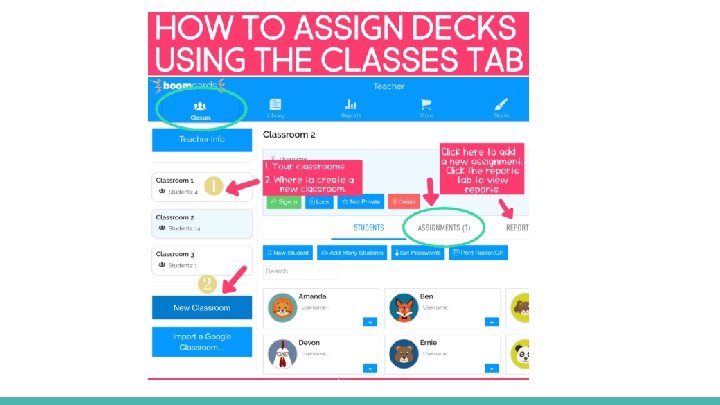
 Create a classroom. Click on the")
How to Get started continued …. . 7) Create a classroom. Click on the blue "New Classroom" button at the bottom. It will automatically create a name based on what you entered in your profile. You can click on it and change it to Mrs. Smith's class, 1 st period, Algebra 1, or whatever you would like to call the class. You can also change the username and password for your class.
 Add students to your classroom. ●")
How to Get started continued …. . 8) Add students to your classroom. ● You can link your Boom Learning Account to Google Classroom Or ● Add students to your class individually If you link students to your Google Classroom their username will be their nps email. Note: You can set the same password for every student. 9) Assign decks to students. So easy to do! Go to your library and find a deck that you want students to complete. If you click on the blue "Action" button by the deck, it will give you several options to choose from.

How to Get started continued …. . Assign: Click this to assign the deck to students. You can assign it to one class or multiple classes (or to individual students). If you choose this option, it will record student scores. Fast Pin: Use this option if you want students to practice and don't want to record their scores. It will give you a link that students can use without needing to log in. Once students have this link, they click on the Fast. Play option at the top and type in the pin to start. Hyperplay Link: This gives you a link that will prompt students to log in and then play will begin. Grab this link if you want to post it in Google Classroom. Print: Click this if you want to print a hard copy of the cards. Hide Cards: Use this if there any cards in the deck you don't want students to see. Great option if the deck is too long or if there are cards that aren't quite what you were looking for and you don't want to assign them to students. Custom Play Settings: You can adjust the number of cards that students see here. Note that this option does not work with Fast. Pins. You'll need student accounts for this option.


Students do not have to complete all cards Once you’ve set up your classroom and assigned decks to students, there’s an Action tab under the deck called “Custom Play Settings. ” This can help you set the number of cards lower if you’d like that for your students.

Boom Learning checks student work For the most part all of the cards are self-checking. Woohoo! Some cards will give immediate feedback once the student gives his/her answer. Other decks, like the Escape Room Decks, will require the students to hit “Submit” before moving to the next card.

What is the difference between a “deck” and a “card”? What helped me sort these terms out in my head was to think of a deck of playing cards. The entire group of cards is called a “deck. ” Each individual card is a “card. ” It works the same with Boom. Easy-peasy!

Where can you get boom learning Cards? Boom cards can be purchased directly on the Boom Learning site or on Teachers Pay Teachers. If you purchase the decks directly on Boom Learning, the file is automatically added to your Boom library. If you purchase the decks on Teachers Pay Teachers, you will need to download the PDF (just like you always do for purchases) and click the link the PDF to add the deck to your Boom library.

Steps for Student Login Here are the steps I gave my students to be able to log in. If you forgot how to log on to boom learning here are the steps: *Click on the link to the boom learning website. *Click on student sign-in *Click on Sign in with Boom *Type in your username (Your username is your nps email) *Type in your password (The password for everyone is……. . . )
- Slides: 19