Getting Started Ansoft HFSS 8 0 Section 7
- Slides: 21

Getting Started: Ansoft HFSS 8. 0 Section 7: Solution Setup 6 -1

Synopsis ò The Solution Setup Window ò General Overview n n ò Driven Solution Layout Eigensolution Layout Driven Solution Settings and Guidelines n n n Frequency and Adaptation Criteria Sweep Settings Mesh Settings n n ò Output Options Eigensolution Settings and Guidelines n n ò Seeding and Manual Refinement Frequency and Adaptation Criteria Mesh Settings Monitoring the Solution in Progress 6 -2

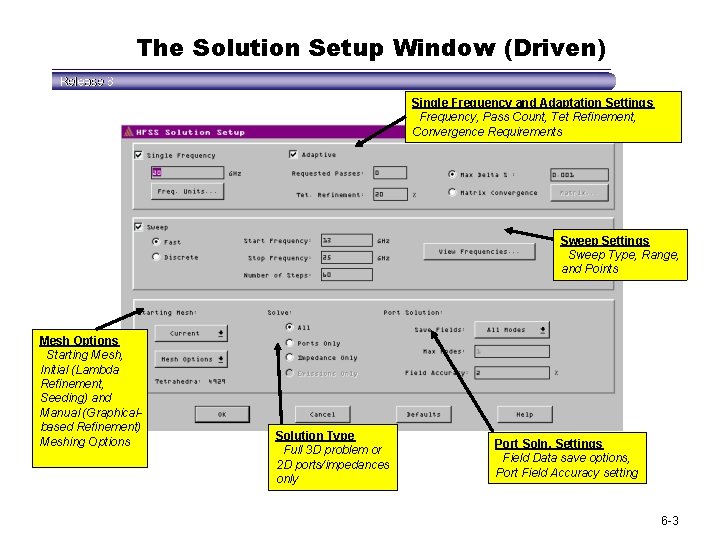
The Solution Setup Window (Driven) Single Frequency and Adaptation Settings Frequency, Pass Count, Tet Refinement, Convergence Requirements Sweep Settings Sweep Type, Range, and Points Mesh Options Starting Mesh, Initial (Lambda Refinement, Seeding) and Manual (Graphicalbased Refinement) Meshing Options Solution Type Full 3 D problem or 2 D ports/impedances only Port Soln. Settings Field Data save options, Port Field Accuracy setting 6 -3

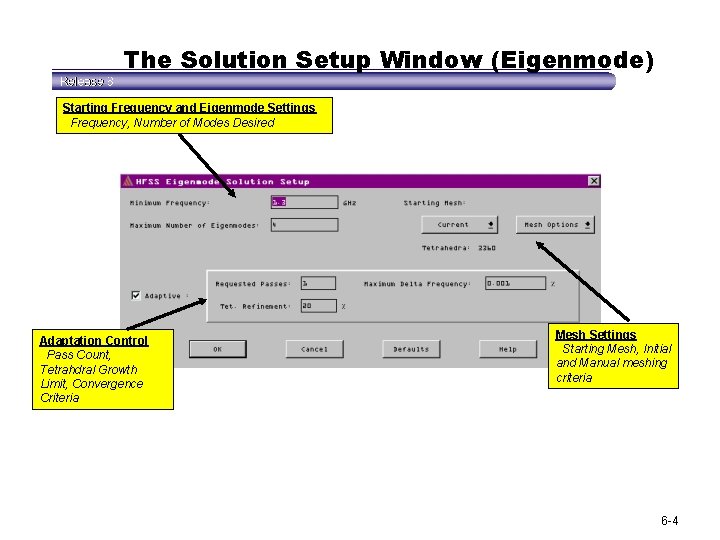
The Solution Setup Window (Eigenmode) Starting Frequency and Eigenmode Settings Frequency, Number of Modes Desired Adaptation Control Pass Count, Tetrahdral Growth Limit, Convergence Criteria Mesh Settings Starting Mesh, Initial and Manual meshing criteria 6 -4

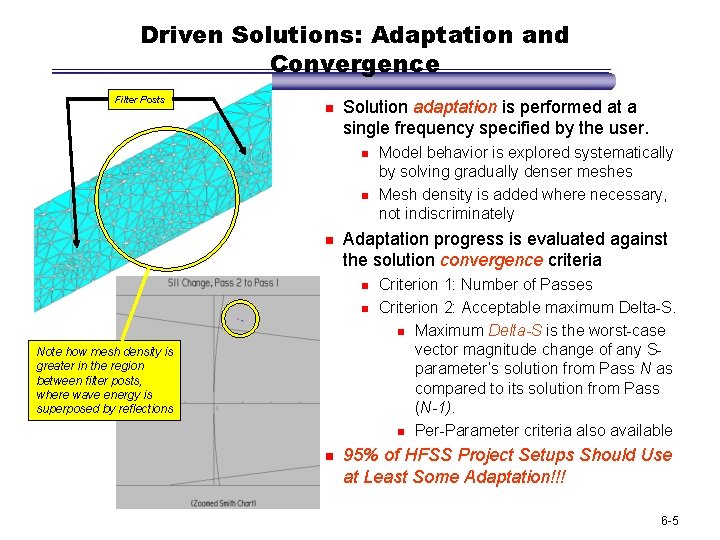
Driven Solutions: Adaptation and Convergence Filter Posts n Solution adaptation is performed at a single frequency specified by the user. n n n Adaptation progress is evaluated against the solution convergence criteria n n Note how mesh density is greater in the region between filter posts, where wave energy is superposed by reflections n Model behavior is explored systematically by solving gradually denser meshes Mesh density is added where necessary, not indiscriminately Criterion 1: Number of Passes Criterion 2: Acceptable maximum Delta-S. n Maximum Delta-S is the worst-case vector magnitude change of any Sparameter’s solution from Pass N as compared to its solution from Pass (N-1). n Per-Parameter criteria also available 95% of HFSS Project Setups Should Use at Least Some Adaptation!!! 6 -5

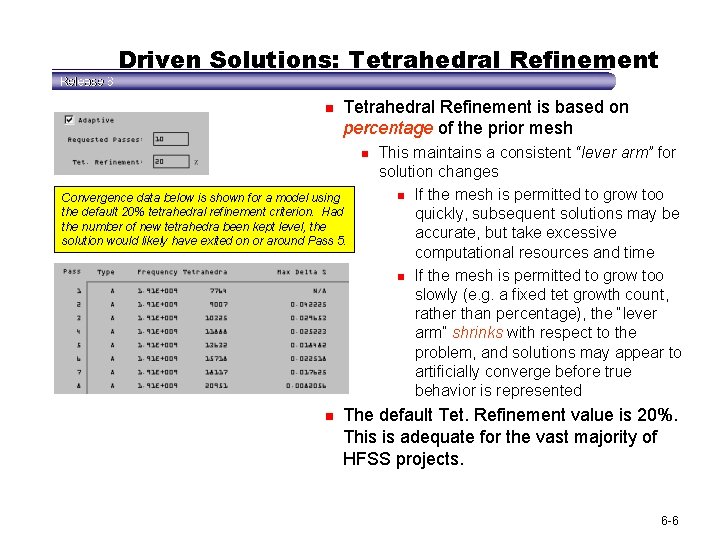
Driven Solutions: Tetrahedral Refinement n Tetrahedral Refinement is based on percentage of the prior mesh n Convergence data below is shown for a model using the default 20% tetrahedral refinement criterion. Had the number of new tetrahedra been kept level, the solution would likely have exited on or around Pass 5. n This maintains a consistent “lever arm” for solution changes n If the mesh is permitted to grow too quickly, subsequent solutions may be accurate, but take excessive computational resources and time n If the mesh is permitted to grow too slowly (e. g. a fixed tet growth count, rather than percentage), the “lever arm” shrinks with respect to the problem, and solutions may appear to artificially converge before true behavior is represented The default Tet. Refinement value is 20%. This is adequate for the vast majority of HFSS projects. 6 -6

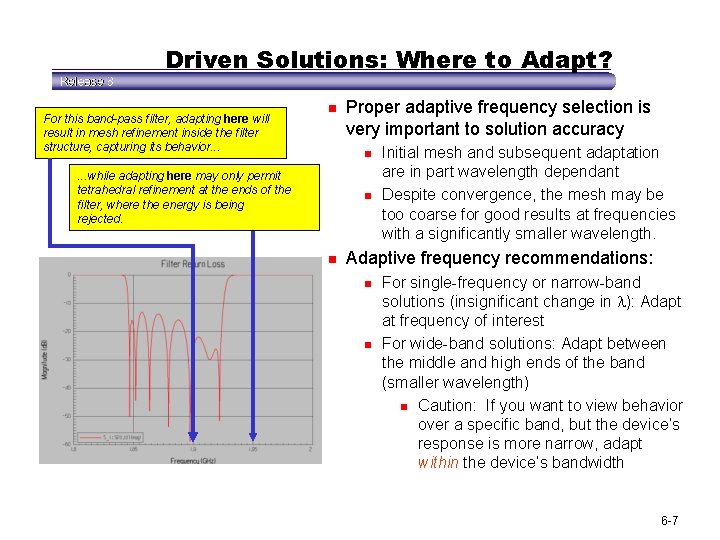
Driven Solutions: Where to Adapt? For this band-pass filter, adapting here will result in mesh refinement inside the filter structure, capturing its behavior. . . n Proper adaptive frequency selection is very important to solution accuracy n . . . while adapting here may only permit tetrahedral refinement at the ends of the filter, where the energy is being rejected. n n Initial mesh and subsequent adaptation are in part wavelength dependant Despite convergence, the mesh may be too coarse for good results at frequencies with a significantly smaller wavelength. Adaptive frequency recommendations: n n For single-frequency or narrow-band solutions (insignificant change in ): Adapt at frequency of interest For wide-band solutions: Adapt between the middle and high ends of the band (smaller wavelength) n Caution: If you want to view behavior over a specific band, but the device’s response is more narrow, adapt within the device’s bandwidth 6 -7

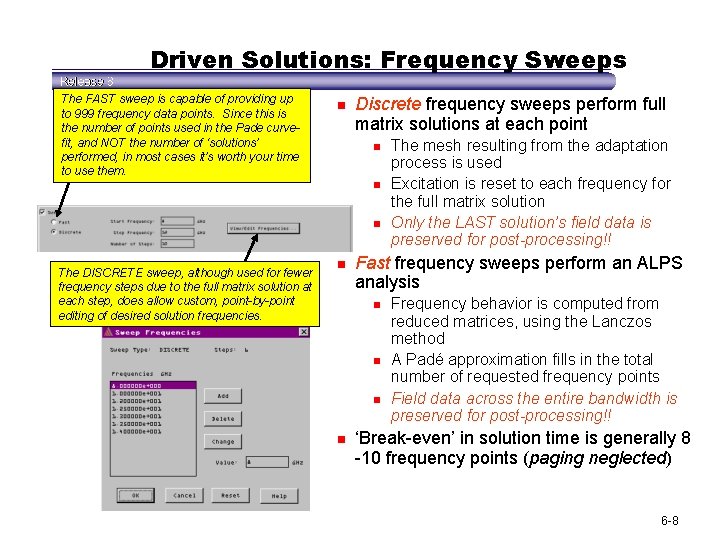
Driven Solutions: Frequency Sweeps The FAST sweep is capable of providing up to 999 frequency data points. Since this is the number of points used in the Pade curvefit, and NOT the number of ‘solutions’ performed, in most cases it’s worth your time to use them. n Discrete frequency sweeps perform full matrix solutions at each point n n n The DISCRETE sweep, although used for fewer frequency steps due to the full matrix solution at each step, does allow custom, point-by-point editing of desired solution frequencies. n Fast frequency sweeps perform an ALPS analysis n n The mesh resulting from the adaptation process is used Excitation is reset to each frequency for the full matrix solution Only the LAST solution’s field data is preserved for post-processing!! Frequency behavior is computed from reduced matrices, using the Lanczos method A Padé approximation fills in the total number of requested frequency points Field data across the entire bandwidth is preserved for post-processing!! ‘Break-even’ in solution time is generally 8 -10 frequency points (paging neglected) 6 -8

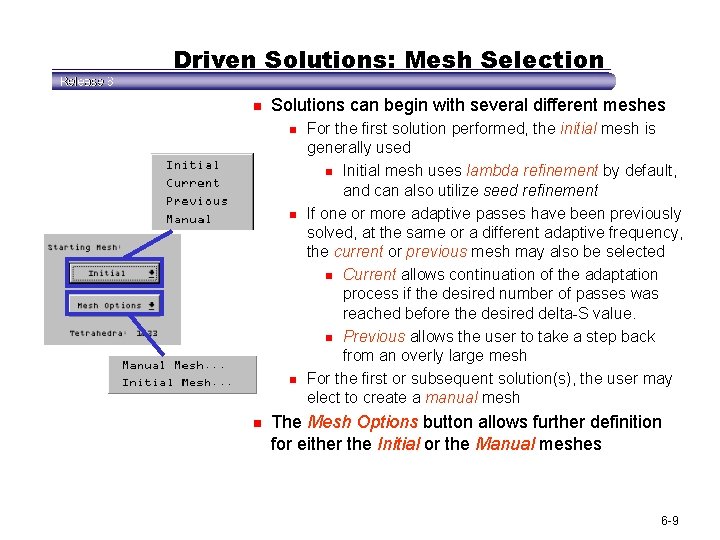
Driven Solutions: Mesh Selection n Solutions can begin with several different meshes n n For the first solution performed, the initial mesh is generally used n Initial mesh uses lambda refinement by default, and can also utilize seed refinement If one or more adaptive passes have been previously solved, at the same or a different adaptive frequency, the current or previous mesh may also be selected n Current allows continuation of the adaptation process if the desired number of passes was reached before the desired delta-S value. n Previous allows the user to take a step back from an overly large mesh For the first or subsequent solution(s), the user may elect to create a manual mesh The Mesh Options button allows further definition for either the Initial or the Manual meshes 6 -9

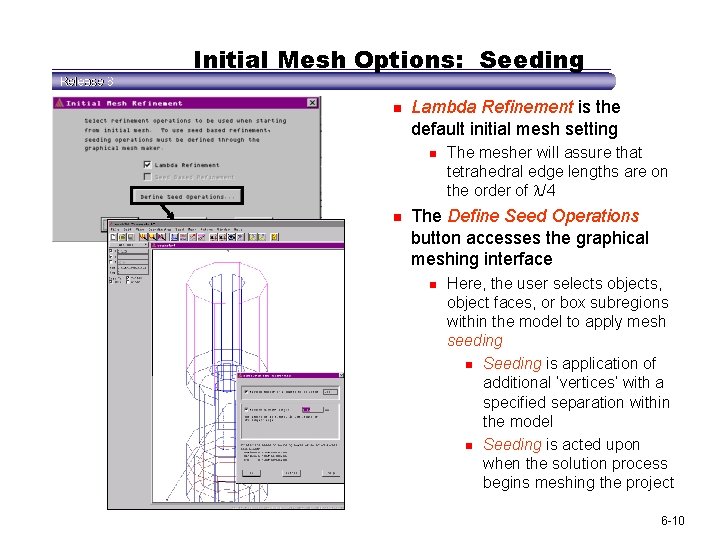
Initial Mesh Options: Seeding n Lambda Refinement is the default initial mesh setting n n The mesher will assure that tetrahedral edge lengths are on the order of /4 The Define Seed Operations button accesses the graphical meshing interface n Here, the user selects objects, object faces, or box subregions within the model to apply mesh seeding n Seeding is application of additional ‘vertices’ with a specified separation within the model n Seeding is acted upon when the solution process begins meshing the project 6 -10

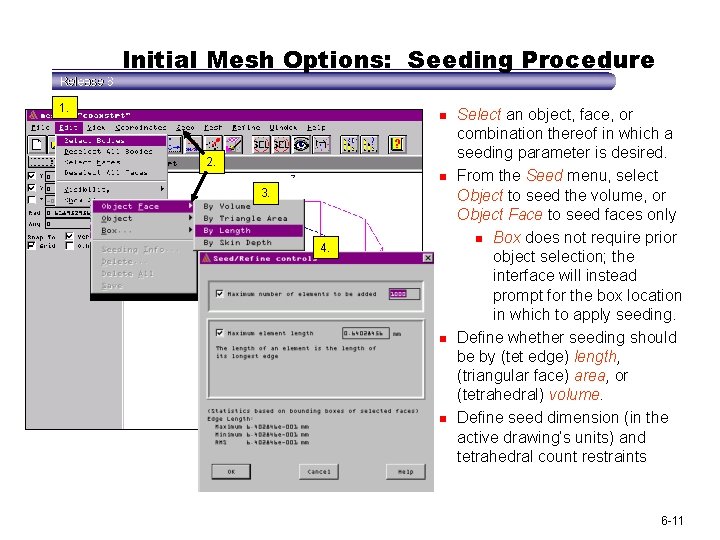
Initial Mesh Options: Seeding Procedure 1. n 2. n 3. 4. n n Select an object, face, or combination thereof in which a seeding parameter is desired. From the Seed menu, select Object to seed the volume, or Object Face to seed faces only n Box does not require prior object selection; the interface will instead prompt for the box location in which to apply seeding. Define whether seeding should be by (tet edge) length, (triangular face) area, or (tetrahedral) volume. Define seed dimension (in the active drawing’s units) and tetrahedral count restraints 6 -11

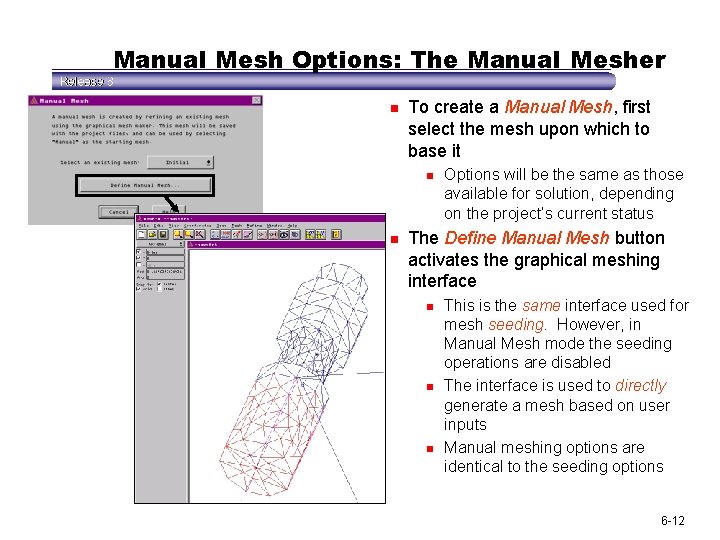
Manual Mesh Options: The Manual Mesher n To create a Manual Mesh, first select the mesh upon which to base it n n Options will be the same as those available for solution, depending on the project’s current status The Define Manual Mesh button activates the graphical meshing interface n n n This is the same interface used for mesh seeding. However, in Manual Mesh mode the seeding operations are disabled The interface is used to directly generate a mesh based on user inputs Manual meshing options are identical to the seeding options 6 -12

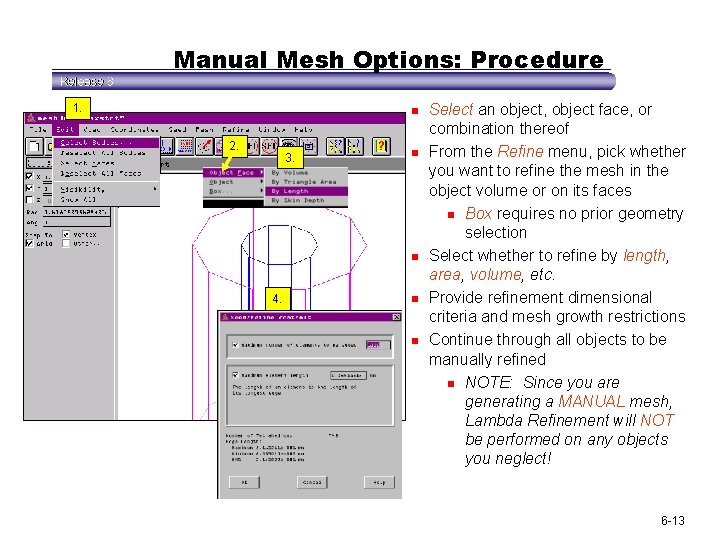
Manual Mesh Options: Procedure 1. n 2. 3. n n 4. n n Select an object, object face, or combination thereof From the Refine menu, pick whether you want to refine the mesh in the object volume or on its faces n Box requires no prior geometry selection Select whether to refine by length, area, volume, etc. Provide refinement dimensional criteria and mesh growth restrictions Continue through all objects to be manually refined n NOTE: Since you are generating a MANUAL mesh, Lambda Refinement will NOT be performed on any objects you neglect! 6 -13

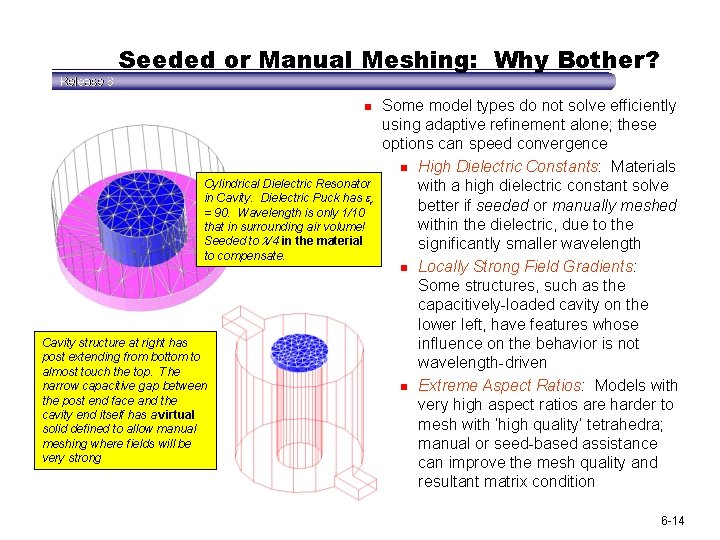
Seeded or Manual Meshing: Why Bother? n Cylindrical Dielectric Resonator in Cavity. Dielectric Puck has r = 90. Wavelength is only 1/10 that in surrounding air volume! Seeded to /4 in the material to compensate. Cavity structure at right has post extending from bottom to almost touch the top. The narrow capacitive gap between the post end face and the cavity end itself has a virtual solid defined to allow manual meshing where fields will be very strong Some model types do not solve efficiently using adaptive refinement alone; these options can speed convergence n High Dielectric Constants: Materials with a high dielectric constant solve better if seeded or manually meshed within the dielectric, due to the significantly smaller wavelength n Locally Strong Field Gradients: Some structures, such as the capacitively-loaded cavity on the lower left, have features whose influence on the behavior is not wavelength-driven n Extreme Aspect Ratios: Models with very high aspect ratios are harder to mesh with ‘high quality’ tetrahedra; manual or seed-based assistance can improve the mesh quality and resultant matrix condition 6 -14

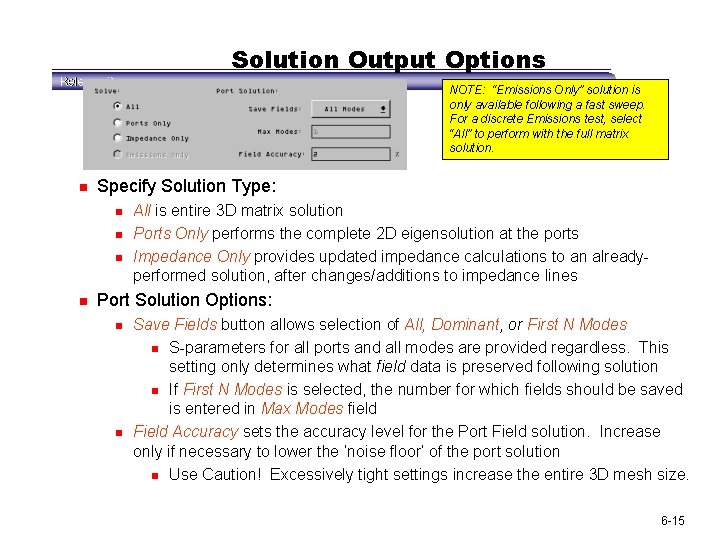
Solution Output Options NOTE: “Emissions Only” solution is only available following a fast sweep. For a discrete Emissions test, select “All” to perform with the full matrix solution. n Specify Solution Type: n n All is entire 3 D matrix solution Ports Only performs the complete 2 D eigensolution at the ports Impedance Only provides updated impedance calculations to an alreadyperformed solution, after changes/additions to impedance lines Port Solution Options: n n Save Fields button allows selection of All, Dominant, or First N Modes n S-parameters for all ports and all modes are provided regardless. This setting only determines what field data is preserved following solution n If First N Modes is selected, the number for which fields should be saved is entered in Max Modes field Field Accuracy sets the accuracy level for the Port Field solution. Increase only if necessary to lower the ‘noise floor’ of the port solution n Use Caution! Excessively tight settings increase the entire 3 D mesh size. 6 -15

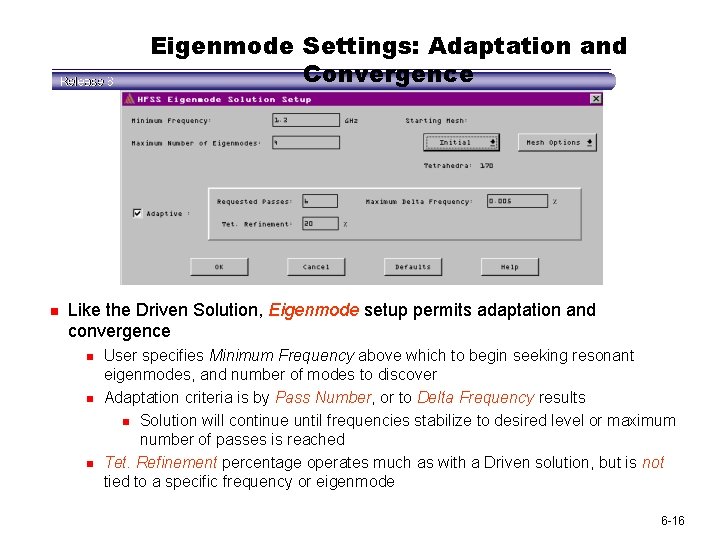
Eigenmode Settings: Adaptation and Convergence n Like the Driven Solution, Eigenmode setup permits adaptation and convergence n n n User specifies Minimum Frequency above which to begin seeking resonant eigenmodes, and number of modes to discover Adaptation criteria is by Pass Number, or to Delta Frequency results n Solution will continue until frequencies stabilize to desired level or maximum number of passes is reached Tet. Refinement percentage operates much as with a Driven solution, but is not tied to a specific frequency or eigenmode 6 -16

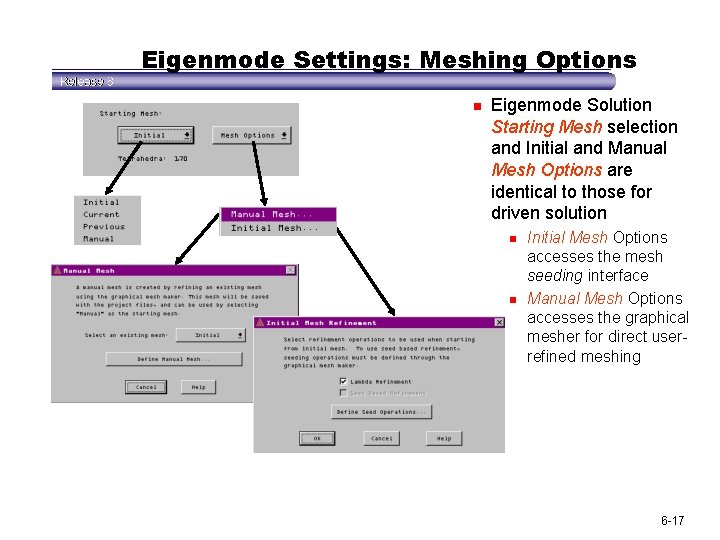
Eigenmode Settings: Meshing Options n Eigenmode Solution Starting Mesh selection and Initial and Manual Mesh Options are identical to those for driven solution n n Initial Mesh Options accesses the mesh seeding interface Manual Mesh Options accesses the graphical mesher for direct userrefined meshing 6 -17

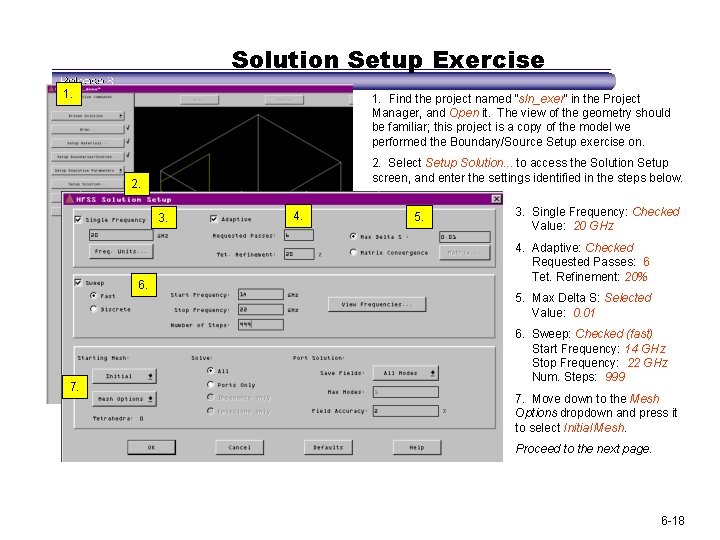
Solution Setup Exercise 1. Find the project named “sln_exer” in the Project Manager, and Open it. The view of the geometry should be familiar; this project is a copy of the model we performed the Boundary/Source Setup exercise on. 2. Select Setup Solution. . . to access the Solution Setup screen, and enter the settings identified in the steps below. 2. 3. 6. 7. 4. 5. 3. Single Frequency: Checked Value: 20 GHz 4. Adaptive: Checked Requested Passes: 6 Tet. Refinement: 20% 5. Max Delta S: Selected Value: 0. 01 6. Sweep: Checked (fast) Start Frequency: 14 GHz Stop Frequency: 22 GHz Num. Steps: 999 7. Move down to the Mesh Options dropdown and press it to select Initial Mesh. Proceed to the next page. 6 -18

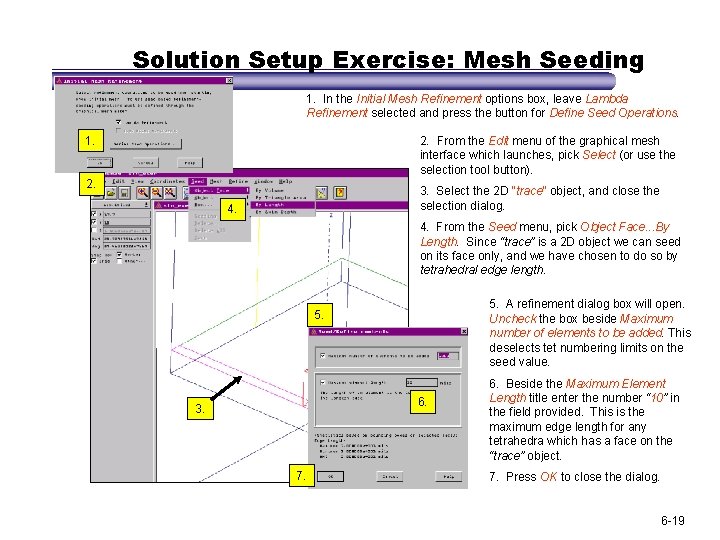
Solution Setup Exercise: Mesh Seeding 1. In the Initial Mesh Refinement options box, leave Lambda Refinement selected and press the button for Define Seed Operations. 1. 2. From the Edit menu of the graphical mesh interface which launches, pick Select (or use the selection tool button). 2. 3. Select the 2 D “trace” object, and close the selection dialog. 4. From the Seed menu, pick Object Face. . . By Length. Since “trace” is a 2 D object we can seed on its face only, and we have chosen to do so by tetrahedral edge length. 5. A refinement dialog box will open. Uncheck the box beside Maximum number of elements to be added. This deselects tet numbering limits on the seed value. 5. 6. 3. 7. 6. Beside the Maximum Element Length title enter the number “ 10” in the field provided. This is the maximum edge length for any tetrahedra which has a face on the “trace” object. 7. Press OK to close the dialog. 6 -19

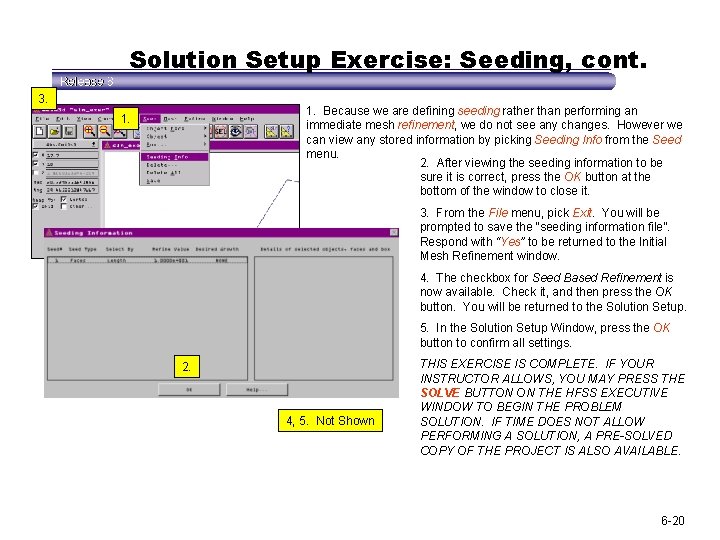
Solution Setup Exercise: Seeding, cont. 3. 1. Because we are defining seeding rather than performing an immediate mesh refinement, we do not see any changes. However we can view any stored information by picking Seeding Info from the Seed menu. 2. After viewing the seeding information to be sure it is correct, press the OK button at the bottom of the window to close it. 1. 3. From the File menu, pick Exit. You will be prompted to save the “seeding information file”. Respond with “Yes” to be returned to the Initial Mesh Refinement window. 4. The checkbox for Seed Based Refinement is now available. Check it, and then press the OK button. You will be returned to the Solution Setup. 5. In the Solution Setup Window, press the OK button to confirm all settings. 2. 4, 5. Not Shown THIS EXERCISE IS COMPLETE. IF YOUR INSTRUCTOR ALLOWS, YOU MAY PRESS THE SOLVE BUTTON ON THE HFSS EXECUTIVE WINDOW TO BEGIN THE PROBLEM SOLUTION. IF TIME DOES NOT ALLOW PERFORMING A SOLUTION, A PRE-SOLVED COPY OF THE PROJECT IS ALSO AVAILABLE. 6 -20

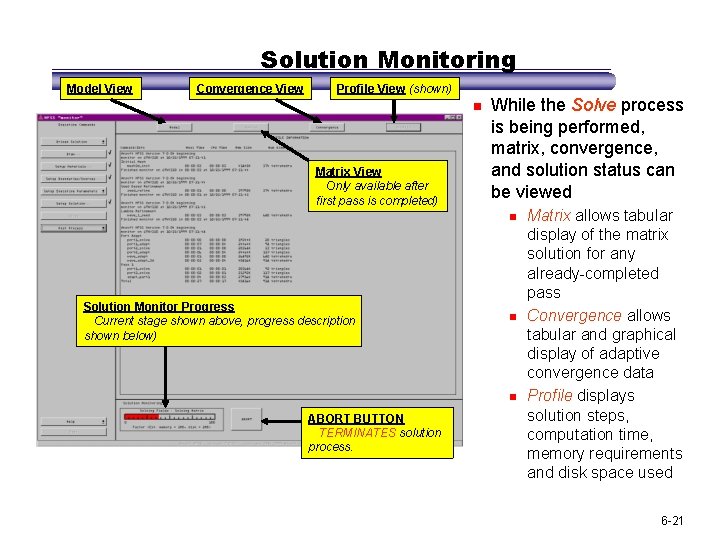
Solution Monitoring Model View Convergence View Profile View (shown) n Matrix View Only available after first pass is completed) While the Solve process is being performed, matrix, convergence, and solution status can be viewed n Solution Monitor Progress Current stage shown above, progress description shown below) n n ABORT BUTTON TERMINATES solution process. Matrix allows tabular display of the matrix solution for any already-completed pass Convergence allows tabular and graphical display of adaptive convergence data Profile displays solution steps, computation time, memory requirements and disk space used 6 -21