Gate and Runner Design Gate Types Manual Trim





- Slides: 59

Gate and Runner Design

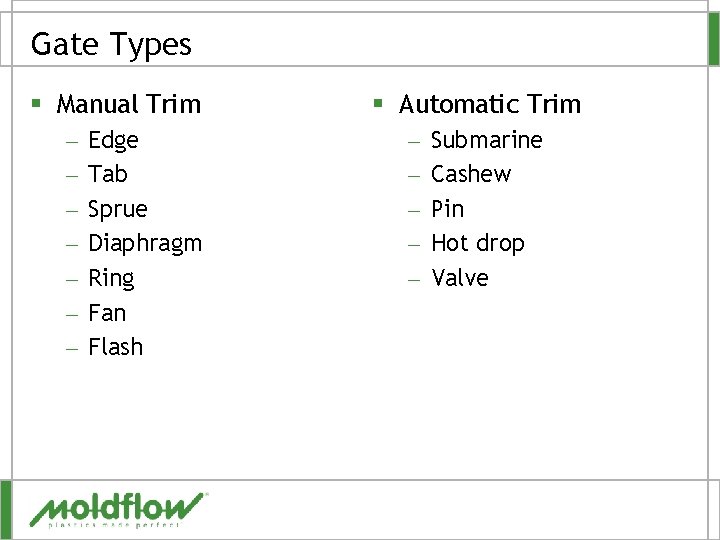
Gate Types § Manual Trim – – – – Edge Tab Sprue Diaphragm Ring Fan Flash § Automatic Trim – – – Submarine Cashew Pin Hot drop Valve

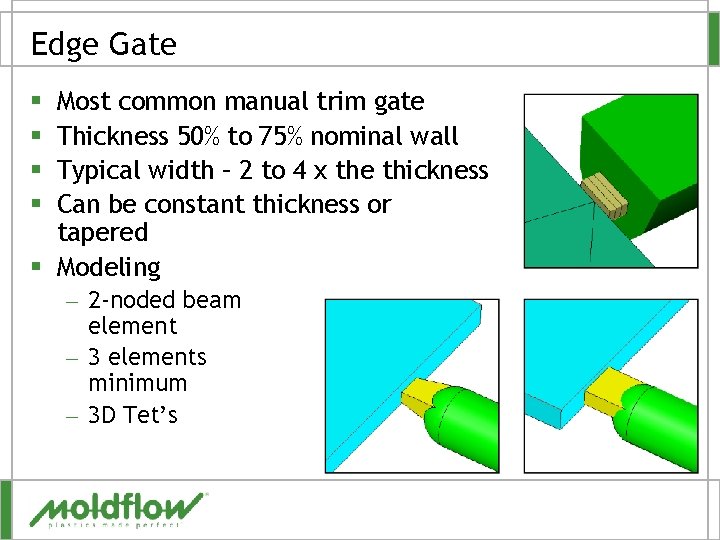
Edge Gate Most common manual trim gate Thickness 50% to 75% nominal wall Typical width – 2 to 4 x the thickness Can be constant thickness or tapered § Modeling § § – 2 -noded beam element – 3 elements minimum – 3 D Tet’s

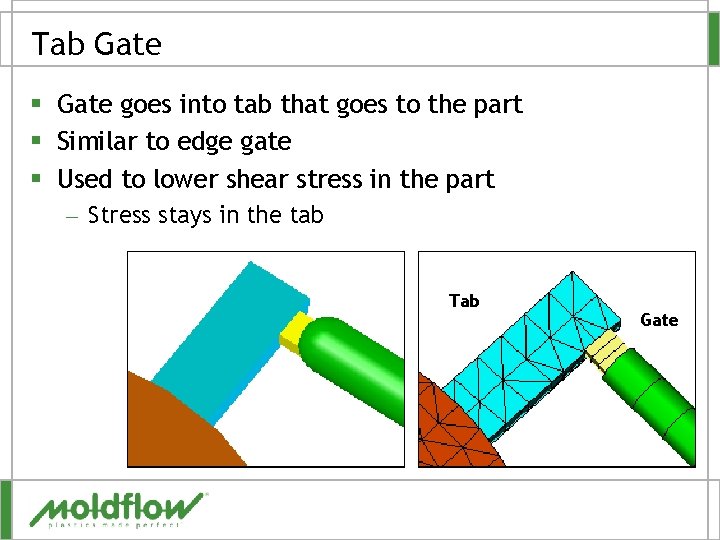
Tab Gate § Gate goes into tab that goes to the part § Similar to edge gate § Used to lower shear stress in the part – Stress stays in the tab Tab Gate

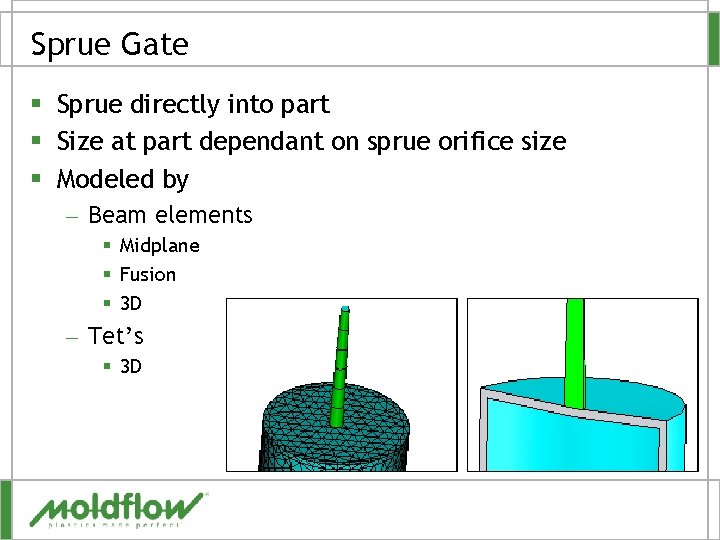
Sprue Gate § Sprue directly into part § Size at part dependant on sprue orifice size § Modeled by – Beam elements § Midplane § Fusion § 3 D – Tet’s § 3 D

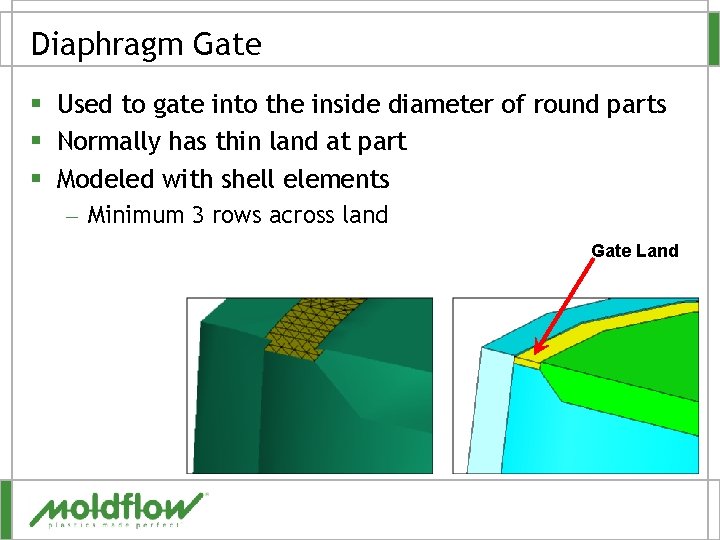
Diaphragm Gate § Used to gate into the inside diameter of round parts § Normally has thin land at part § Modeled with shell elements – Minimum 3 rows across land Gate Land

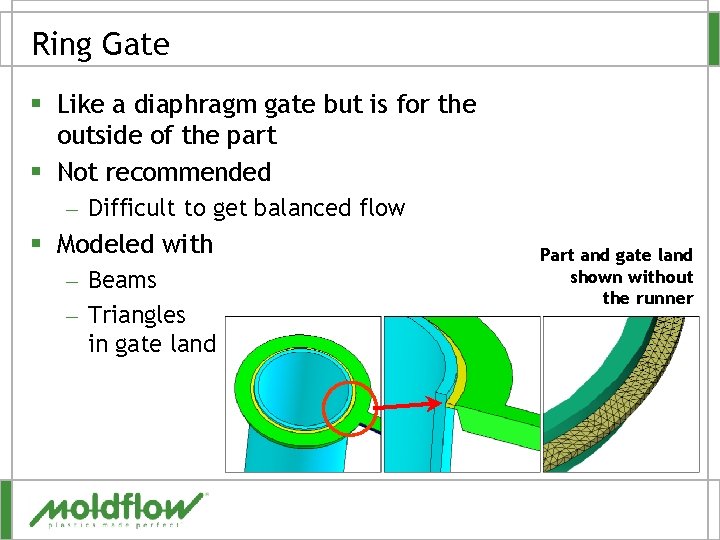
Ring Gate § Like a diaphragm gate but is for the outside of the part § Not recommended – Difficult to get balanced flow § Modeled with – Beams – Triangles in gate land Part and gate land shown without the runner

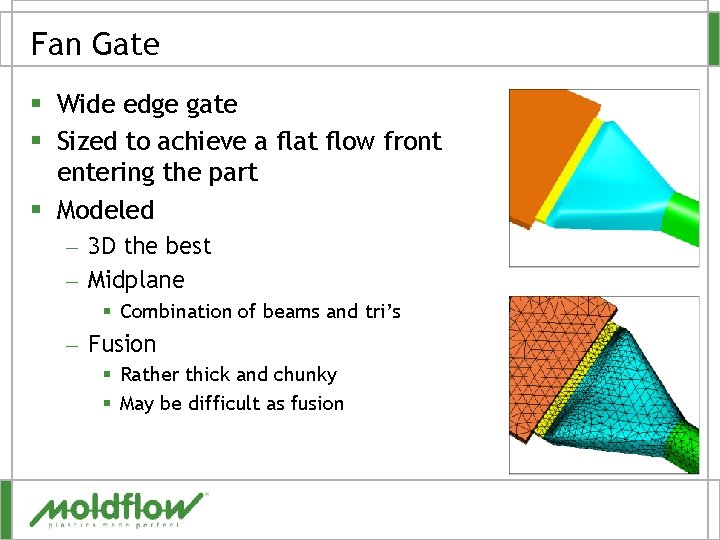
Fan Gate § Wide edge gate § Sized to achieve a flat flow front entering the part § Modeled – 3 D the best – Midplane § Combination of beams and tri’s – Fusion § Rather thick and chunky § May be difficult as fusion

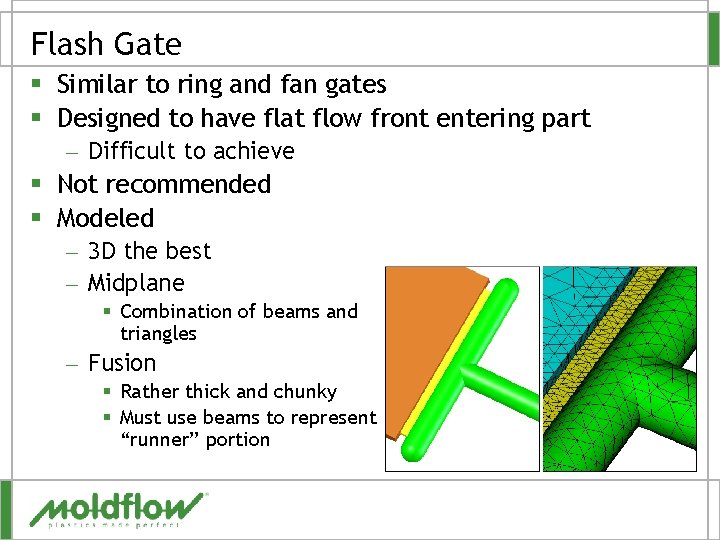
Flash Gate § Similar to ring and fan gates § Designed to have flat flow front entering part – Difficult to achieve § Not recommended § Modeled – 3 D the best – Midplane § Combination of beams and triangles – Fusion § Rather thick and chunky § Must use beams to represent “runner” portion

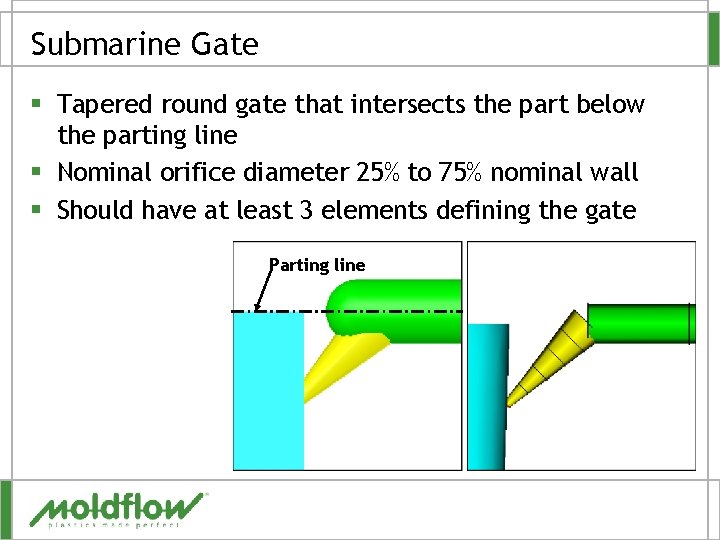
Submarine Gate § Tapered round gate that intersects the part below the parting line § Nominal orifice diameter 25% to 75% nominal wall § Should have at least 3 elements defining the gate Parting line

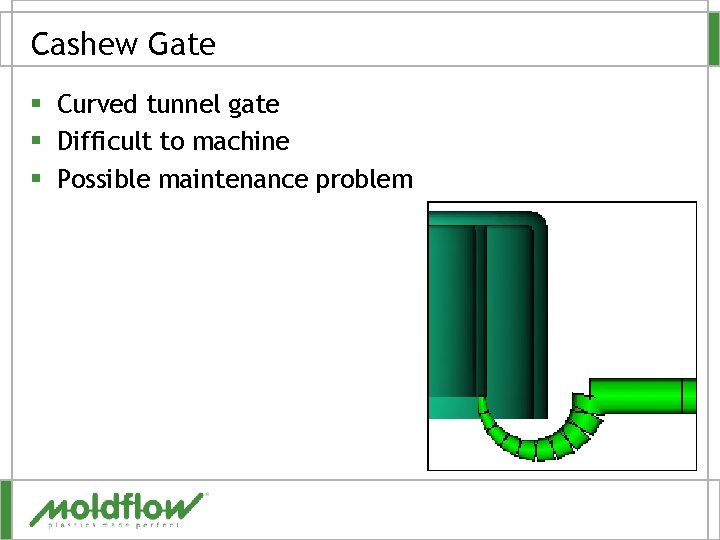
Cashew Gate § Curved tunnel gate § Difficult to machine § Possible maintenance problem

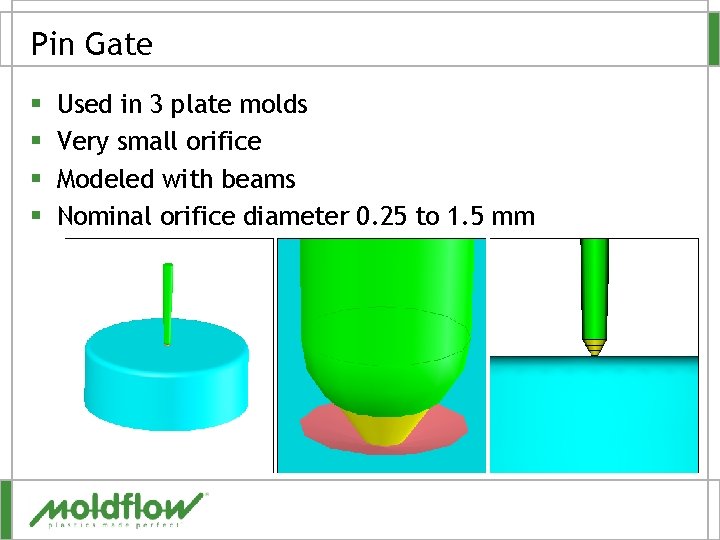
Pin Gate § § Used in 3 plate molds Very small orifice Modeled with beams Nominal orifice diameter 0. 25 to 1. 5 mm

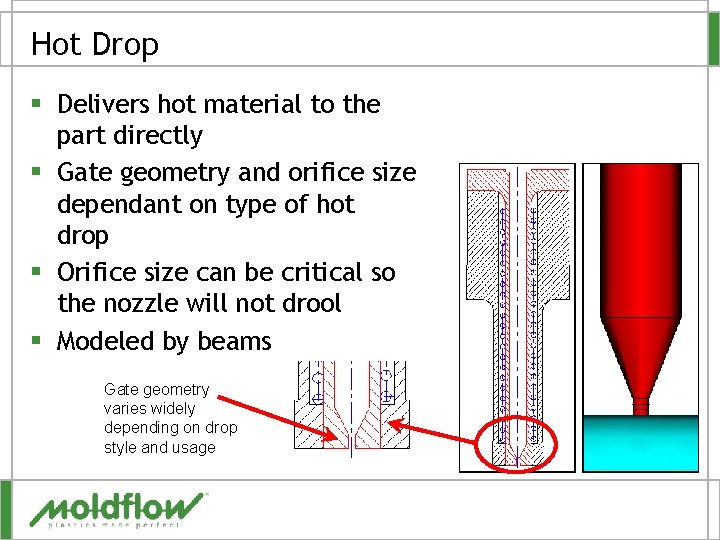
Hot Drop § Delivers hot material to the part directly § Gate geometry and orifice size dependant on type of hot drop § Orifice size can be critical so the nozzle will not drool § Modeled by beams Gate geometry varies widely depending on drop style and usage

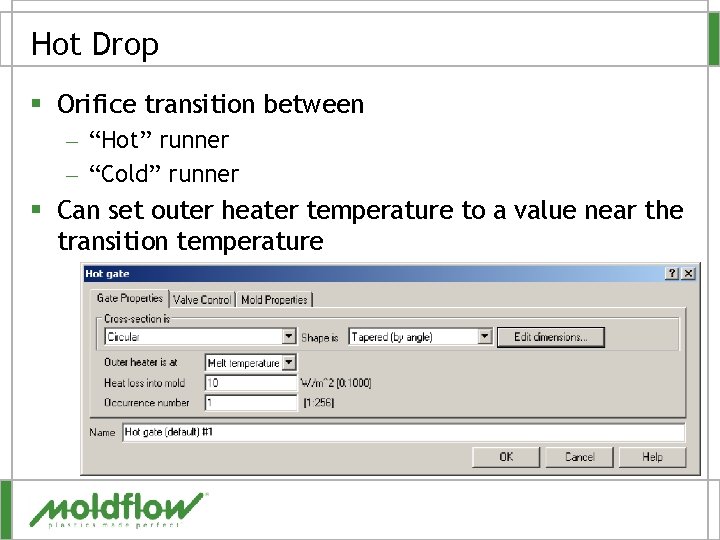
Hot Drop § Orifice transition between – “Hot” runner – “Cold” runner § Can set outer heater temperature to a value near the transition temperature

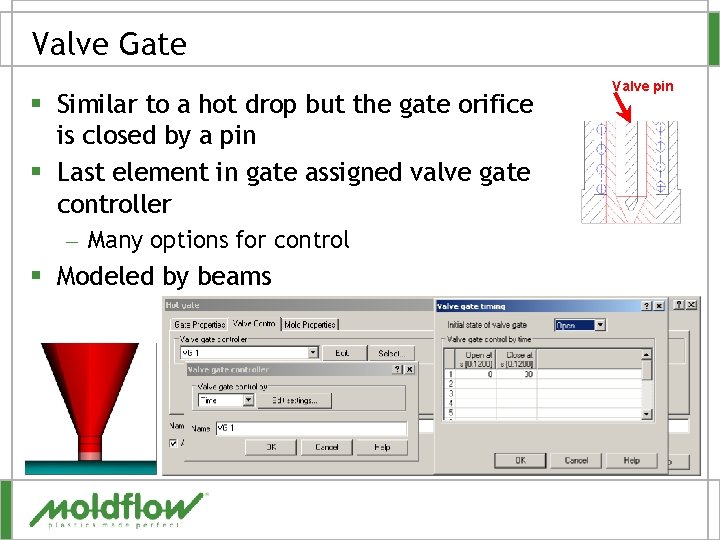
Valve Gate § Similar to a hot drop but the gate orifice is closed by a pin § Last element in gate assigned valve gate controller – Many options for control § Modeled by beams Valve pin

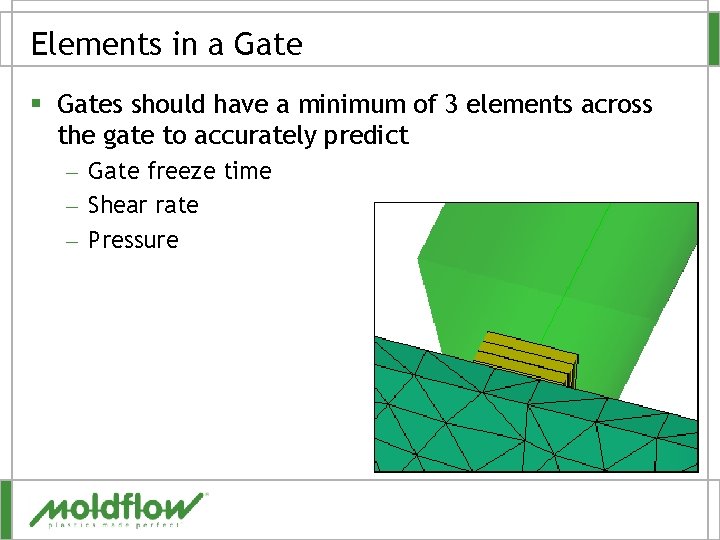
Elements in a Gate § Gates should have a minimum of 3 elements across the gate to accurately predict – Gate freeze time – Shear rate – Pressure

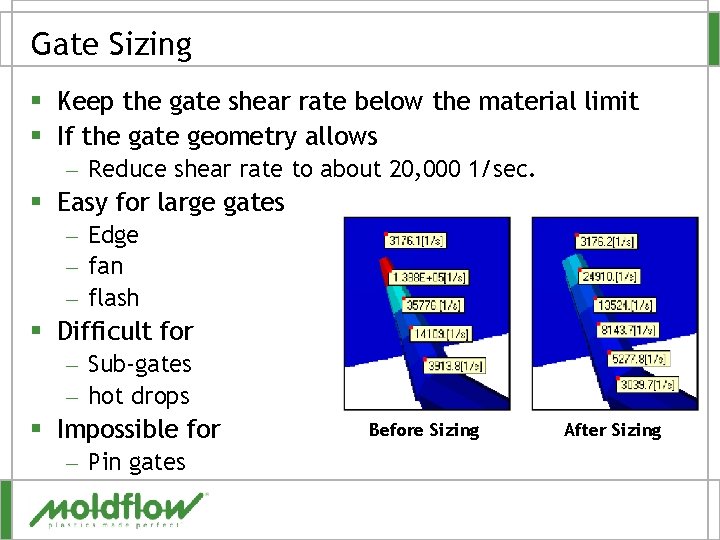
Gate Sizing § Keep the gate shear rate below the material limit § If the gate geometry allows – Reduce shear rate to about 20, 000 1/sec. § Easy for large gates – Edge – fan – flash § Difficult for – Sub-gates – hot drops § Impossible for – Pin gates Before Sizing After Sizing

QUESTIONS?

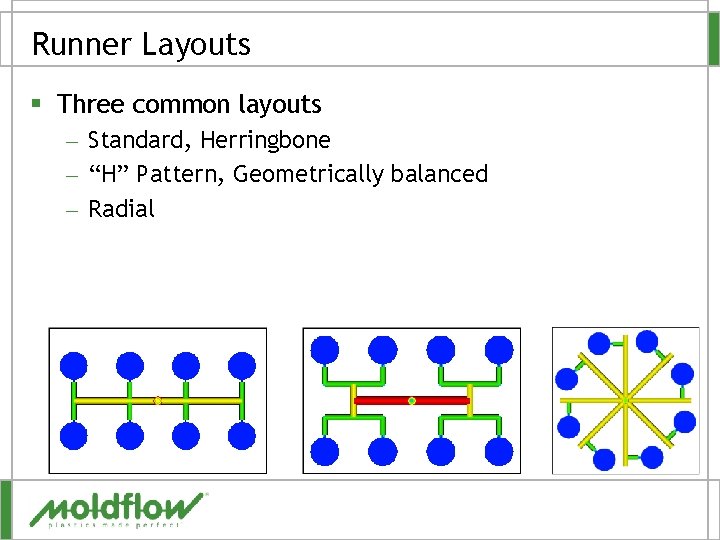
Runner Layouts § Three common layouts – Standard, Herringbone – “H” Pattern, Geometrically balanced – Radial

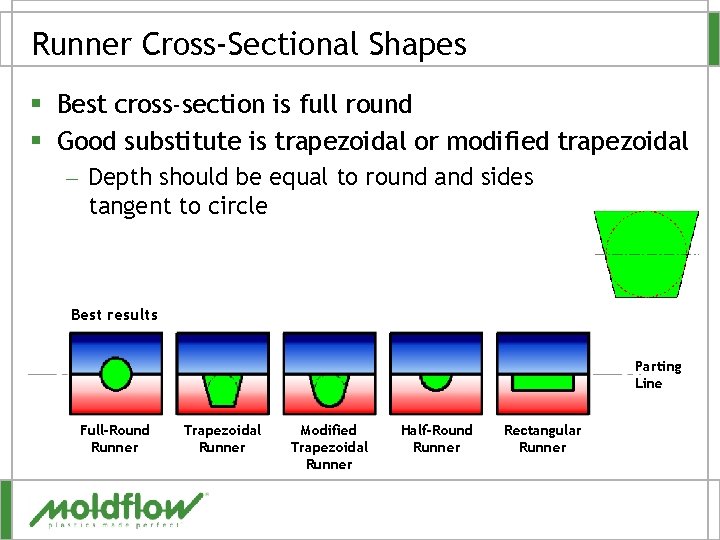
Runner Cross-Sectional Shapes § Best cross-section is full round § Good substitute is trapezoidal or modified trapezoidal – Depth should be equal to round and sides tangent to circle Best results Parting Line Full-Round Runner Trapezoidal Runner Modified Trapezoidal Runner Half-Round Runner Rectangular Runner

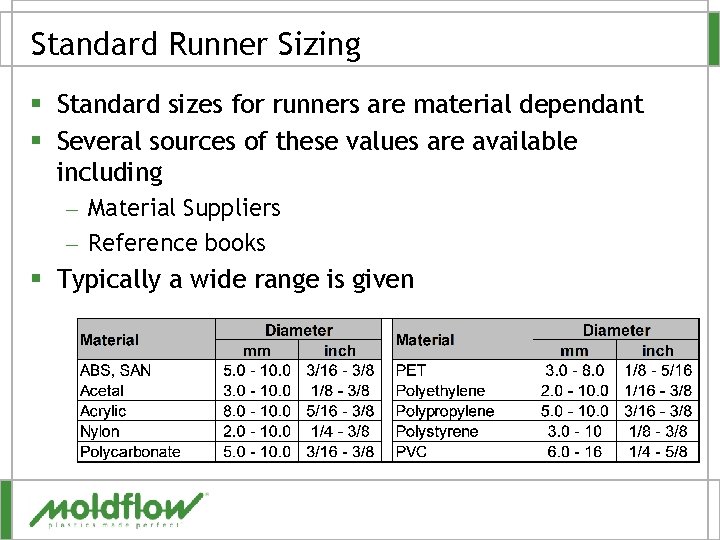
Standard Runner Sizing § Standard sizes for runners are material dependant § Several sources of these values are available including – Material Suppliers – Reference books § Typically a wide range is given

Runner Sizes § Dependant on – Runner length – Material viscosity – Pressure requirements of the part § Without analysis runners are often larger than needed wasting – Material – Cycle time – Money!!

Runner Creation § Create with Wizards – Cavity Duplication Wizard – Runner System Wizard § Manual construction – Copy – Create curves – Create beams

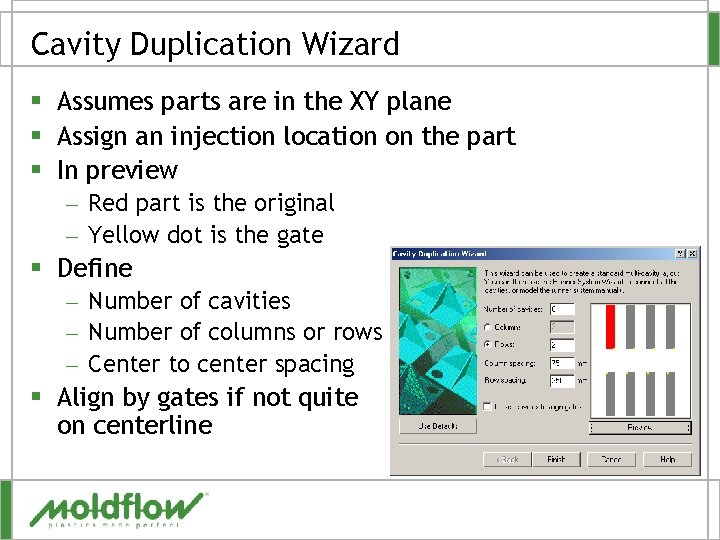
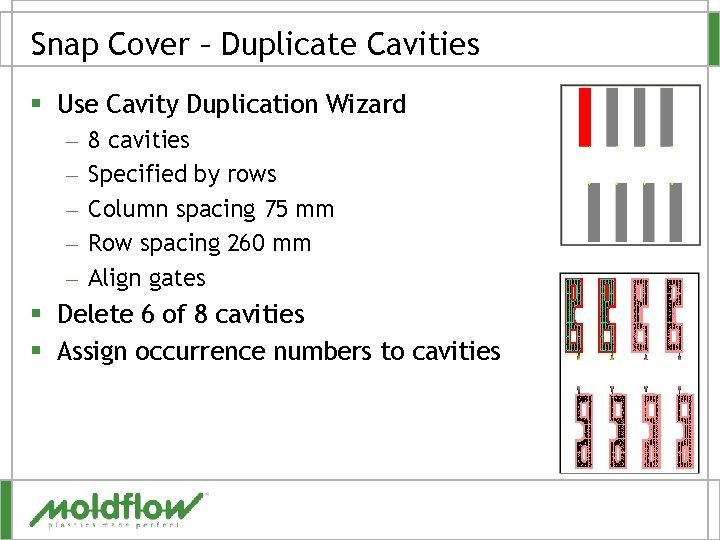
Cavity Duplication Wizard § Assumes parts are in the XY plane § Assign an injection location on the part § In preview – Red part is the original – Yellow dot is the gate § Define – Number of cavities – Number of columns or rows – Center to center spacing § Align by gates if not quite on centerline

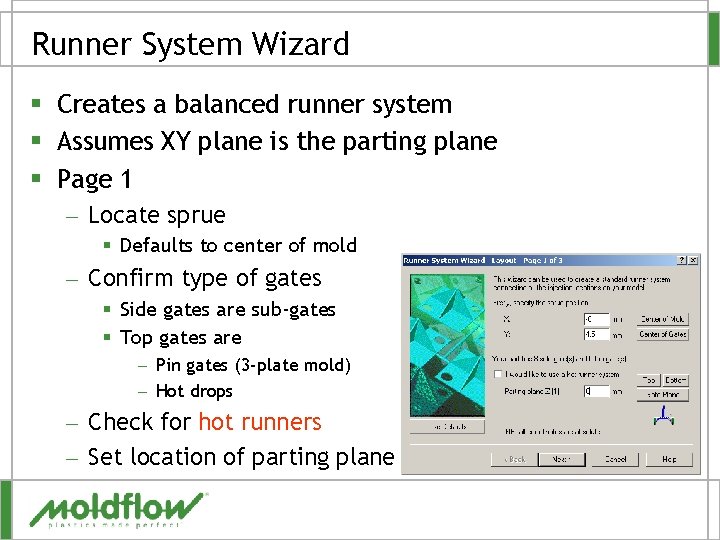
Runner System Wizard § Creates a balanced runner system § Assumes XY plane is the parting plane § Page 1 – Locate sprue § Defaults to center of mold – Confirm type of gates § Side gates are sub-gates § Top gates are – Pin gates (3 -plate mold) – Hot drops – Check for hot runners – Set location of parting plane

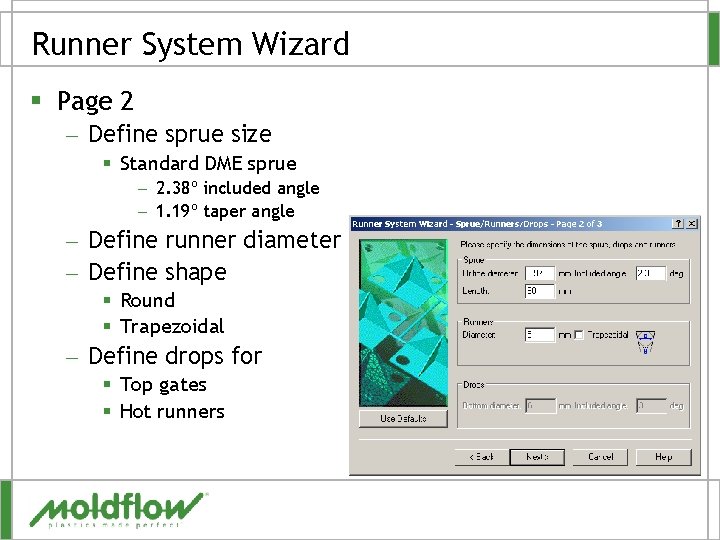
Runner System Wizard § Page 2 – Define sprue size § Standard DME sprue – 2. 38º included angle – 1. 19º taper angle – Define runner diameter – Define shape § Round § Trapezoidal – Define drops for § Top gates § Hot runners

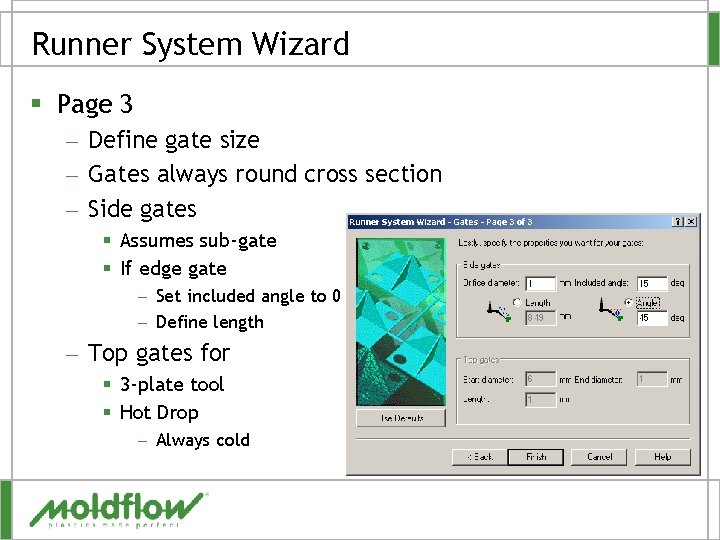
Runner System Wizard § Page 3 – Define gate size – Gates always round cross section – Side gates § Assumes sub-gate § If edge gate – Set included angle to 0 – Define length – Top gates for § 3 -plate tool § Hot Drop – Always cold

Manual Runner Construction § Order of construction dependant on the tool layout § Position cavities so 0, 0, 0 (X, Y, Z) location is at base of sprue - optional – Called tool position § Duplicate cavities § Construct – Gate(s) – Runners – Sprue § Create curves then mesh or create beams directly

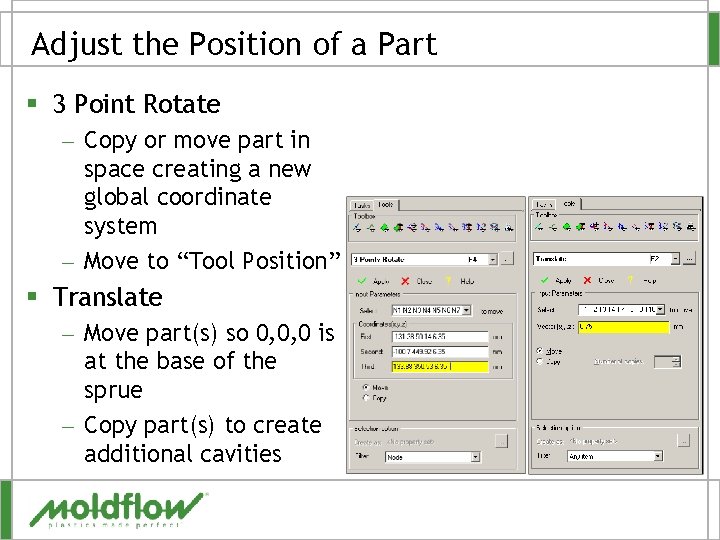
Adjust the Position of a Part § 3 Point Rotate – Copy or move part in space creating a new global coordinate system – Move to “Tool Position” § Translate – Move part(s) so 0, 0, 0 is at the base of the sprue – Copy part(s) to create additional cavities

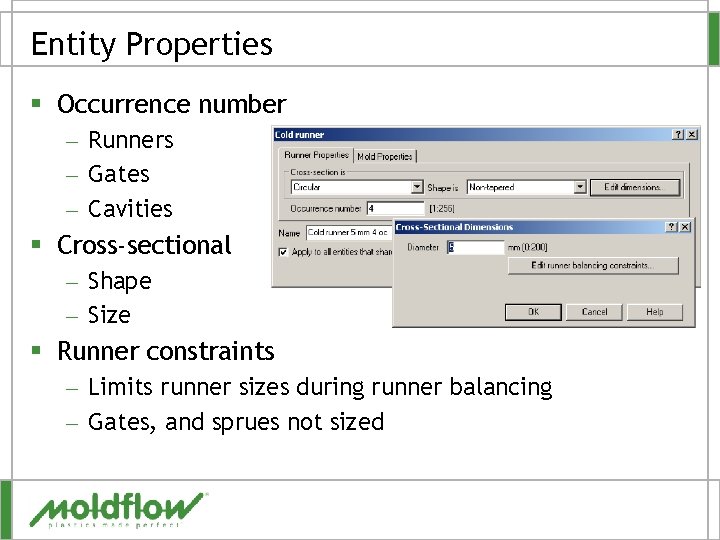
Entity Properties § Occurrence number – Runners – Gates – Cavities § Cross-sectional – Shape – Size § Runner constraints – Limits runner sizes during runner balancing – Gates, and sprues not sized

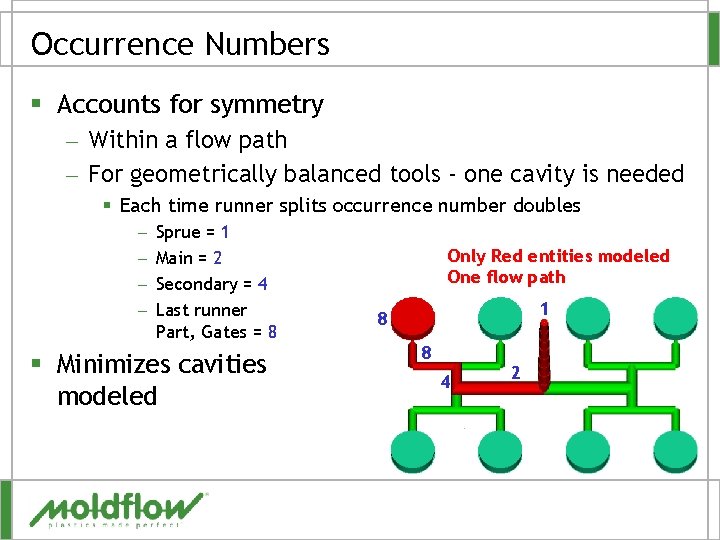
Occurrence Numbers § Accounts for symmetry – Within a flow path – For geometrically balanced tools - one cavity is needed § Each time runner splits occurrence number doubles – – Sprue = 1 Main = 2 Secondary = 4 Last runner Part, Gates = 8 § Minimizes cavities modeled Only Red entities modeled One flow path 1 8 8 4 2

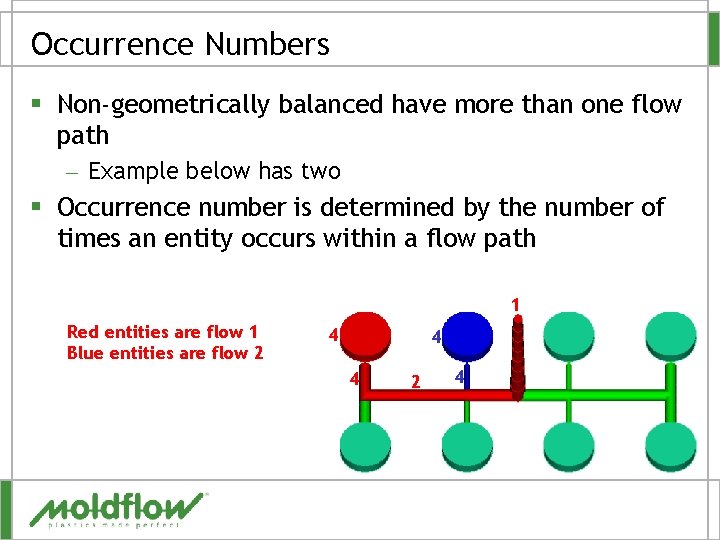
Occurrence Numbers § Non-geometrically balanced have more than one flow path – Example below has two § Occurrence number is determined by the number of times an entity occurs within a flow path 1 Red entities are flow 1 Blue entities are flow 2 4 4 4 2 4

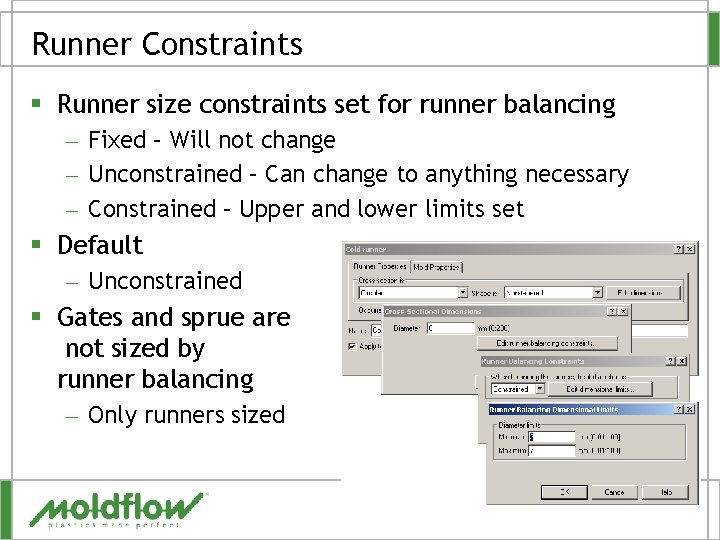
Runner Constraints § Runner size constraints set for runner balancing – Fixed – Will not change – Unconstrained – Can change to anything necessary – Constrained – Upper and lower limits set § Default – Unconstrained § Gates and sprue are not sized by runner balancing – Only runners sized

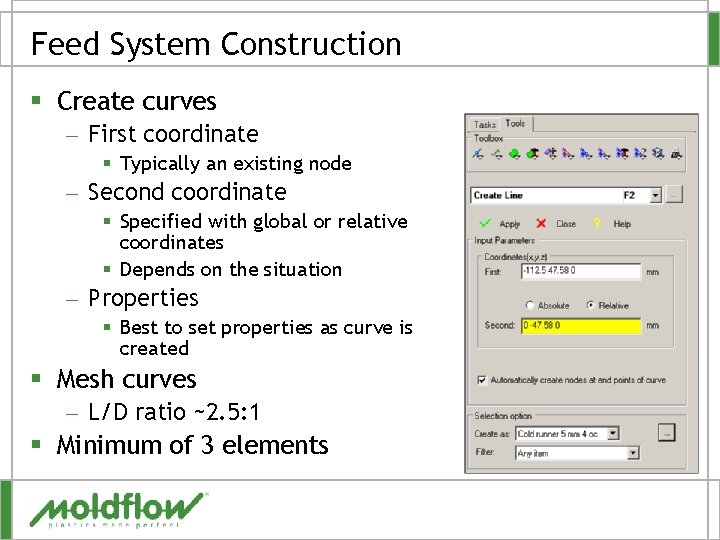
Feed System Construction § Create curves – First coordinate § Typically an existing node – Second coordinate § Specified with global or relative coordinates § Depends on the situation – Properties § Best to set properties as curve is created § Mesh curves – L/D ratio ~2. 5: 1 § Minimum of 3 elements

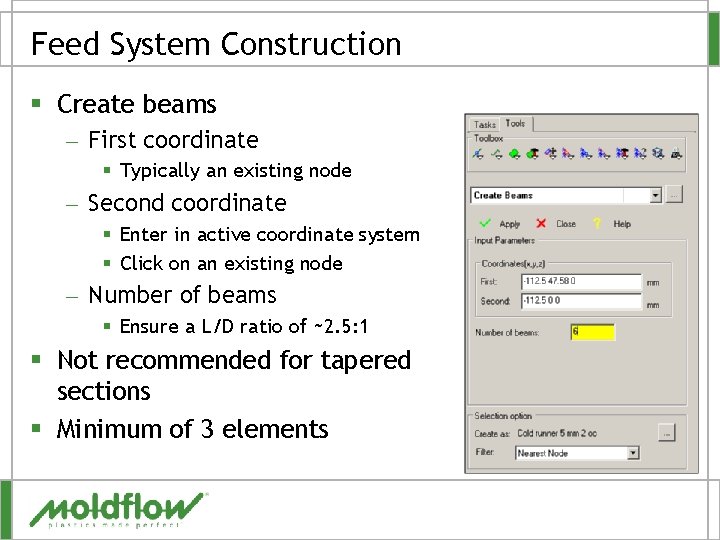
Feed System Construction § Create beams – First coordinate § Typically an existing node – Second coordinate § Enter in active coordinate system § Click on an existing node – Number of beams § Ensure a L/D ratio of ~2. 5: 1 § Not recommended for tapered sections § Minimum of 3 elements

QUESTIONS?

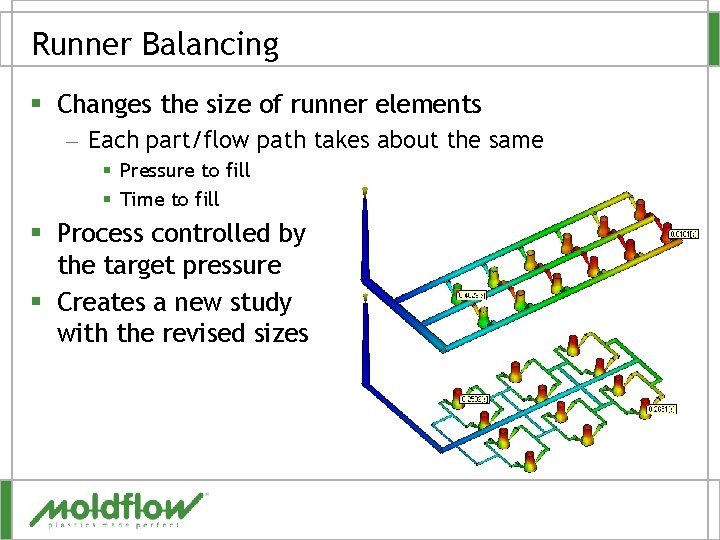
Runner Balancing § Changes the size of runner elements – Each part/flow path takes about the same § Pressure to fill § Time to fill § Process controlled by the target pressure § Creates a new study with the revised sizes

Why Balance the Runners? § § § Ensure parts will fill evenly (balanced) Ensure packing is uniform Larger processing window Maintain an acceptable pressure magnitude Minimize runner volume

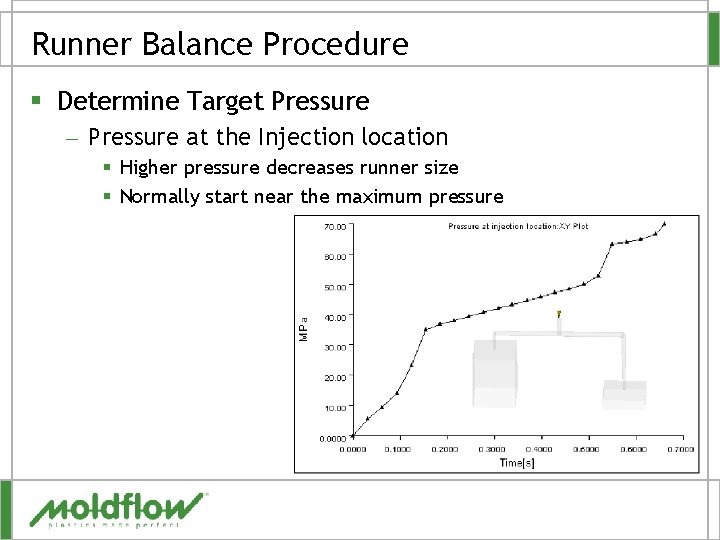
Runner Balance Procedure § Determine Target Pressure – Pressure at the Injection location § Higher pressure decreases runner size § Normally start near the maximum pressure

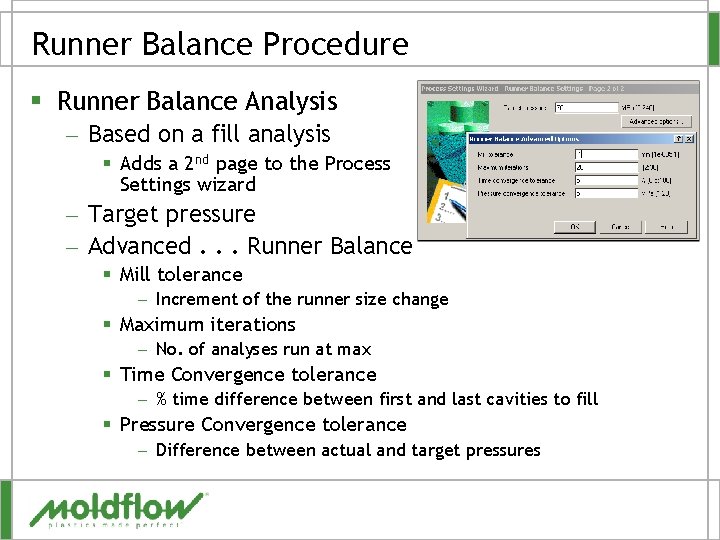
Runner Balance Procedure § Runner Balance Analysis – Based on a fill analysis § Adds a 2 nd page to the Process Settings wizard – Target pressure – Advanced. . . Runner Balance § Mill tolerance – Increment of the runner size change § Maximum iterations – No. of analyses run at max § Time Convergence tolerance – % time difference between first and last cavities to fill § Pressure Convergence tolerance – Difference between actual and target pressures

Runner Balance Procedure § Review Runner Balance Results – Two results created § Original study – Screen output file – Volume Change § New study – Contains revised runner sizes – Has (Runner Balance) appended to the study name – Has fill analysis results

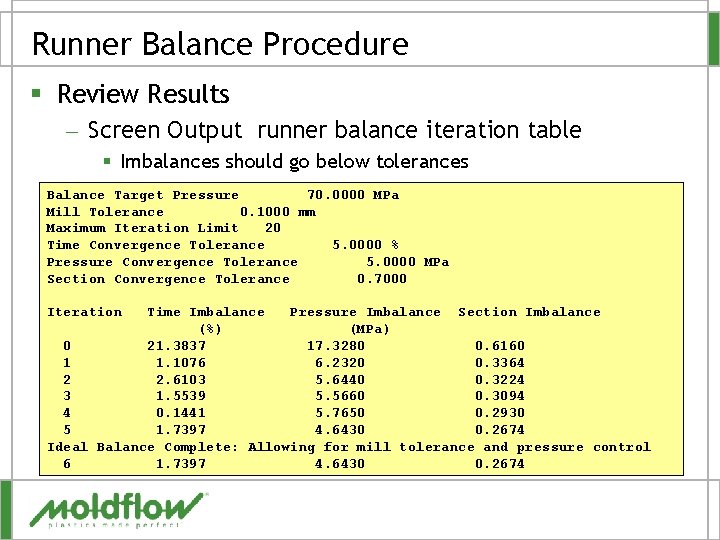
Runner Balance Procedure § Review Results – Screen Output runner balance iteration table § Imbalances should go below tolerances Balance Target Pressure 70. 0000 MPa Mill Tolerance 0. 1000 mm Maximum Iteration Limit 20 Time Convergence Tolerance 5. 0000 % Pressure Convergence Tolerance 5. 0000 MPa Section Convergence Tolerance 0. 7000 Iteration Time Imbalance Pressure Imbalance Section Imbalance (%) (MPa) 0 21. 3837 17. 3280 0. 6160 1 1. 1076 6. 2320 0. 3364 2 2. 6103 5. 6440 0. 3224 3 1. 5539 5. 5660 0. 3094 4 0. 1441 5. 7650 0. 2930 5 1. 7397 4. 6430 0. 2674 Ideal Balance Complete: Allowing for mill tolerance and pressure control 6 1. 7397 4. 6430 0. 2674

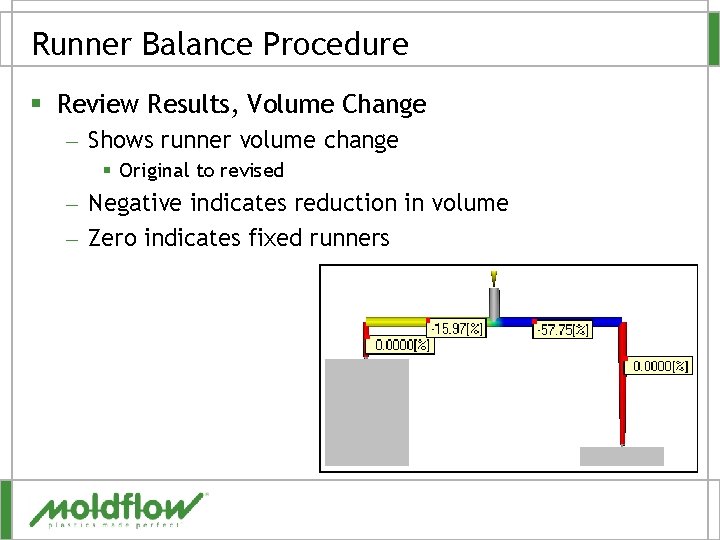
Runner Balance Procedure § Review Results, Volume Change – Shows runner volume change § Original to revised – Negative indicates reduction in volume – Zero indicates fixed runners

Runner Balance Procedure § Review Results, New Study – (Runner Balance) appended to the study name § Time balance – Is the time to fill the cavities close enough? – Is 5% OK, or should it be tighter? § Pressure balance – Is the pressure even between the cavities? – If not, is it OK anyway? § Runner sizes – Are the runner sizes good, too small or big? – Can they be averaged or rounded to close standard sizes?

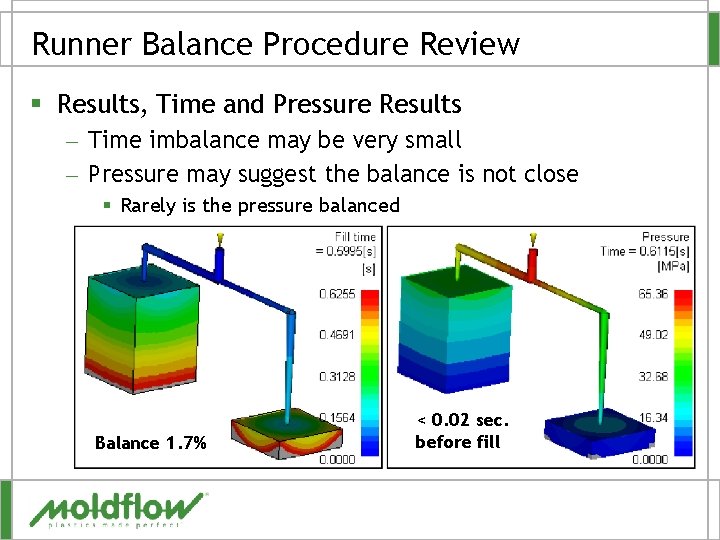
Runner Balance Procedure Review § Results, Time and Pressure Results – Time imbalance may be very small – Pressure may suggest the balance is not close § Rarely is the pressure balanced Balance 1. 7% < 0. 02 sec. before fill

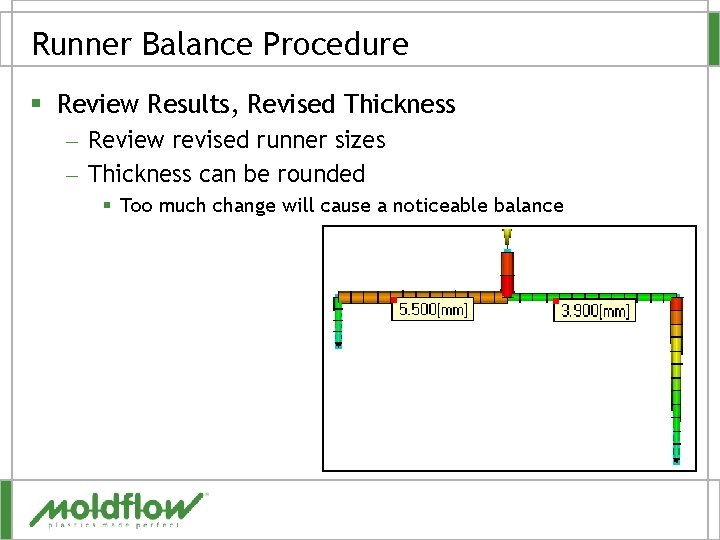
Runner Balance Procedure § Review Results, Revised Thickness – Review revised runner sizes – Thickness can be rounded § Too much change will cause a noticeable balance

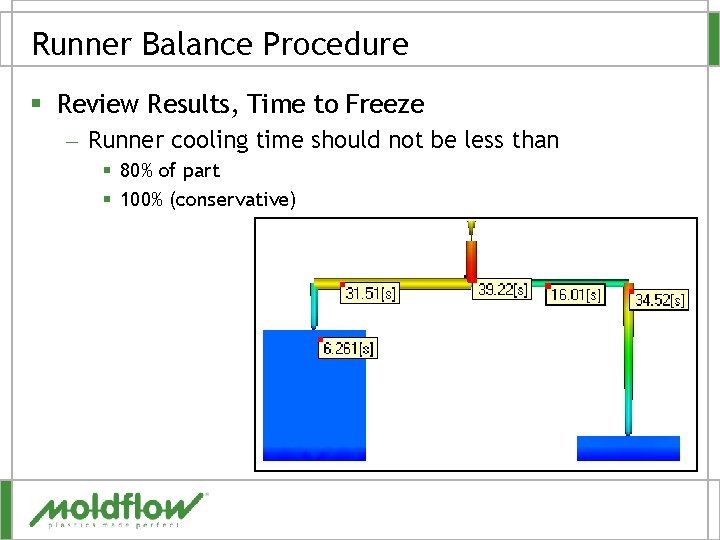
Runner Balance Procedure § Review Results, Time to Freeze – Runner cooling time should not be less than § 80% of part § 100% (conservative)

Runner Balance Procedure § Round runner sizes – Nearest standard size if close – Re-run fill to validate final sizes § Validate Beyond Filling – Packing § Volumetric shrinkage should be uniform – Between cavities » Indicate the runners are not too small – Across cavities » Good packing profile – Warpage § Linear dimensions should be similar and within tolerance § Warp shape/magnitude should be similar

QUESTIONS?

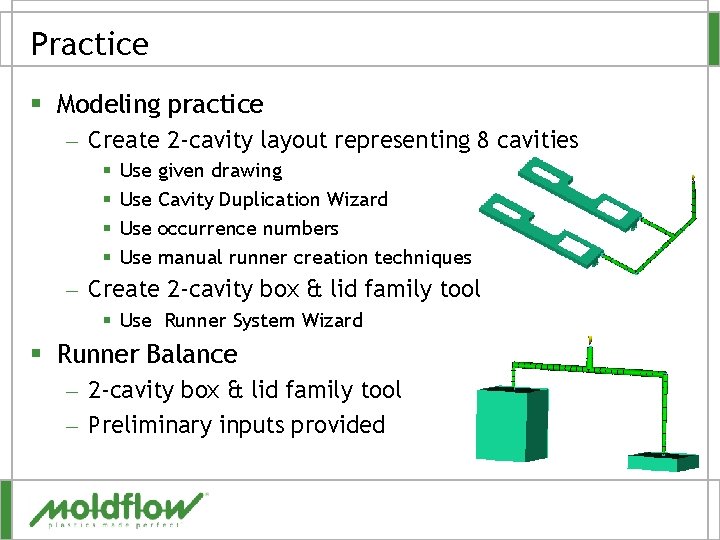
Practice § Modeling practice – Create 2 -cavity layout representing 8 cavities § § Use Use given drawing Cavity Duplication Wizard occurrence numbers manual runner creation techniques – Create 2 -cavity box & lid family tool § Use Runner System Wizard § Runner Balance – 2 -cavity box & lid family tool – Preliminary inputs provided

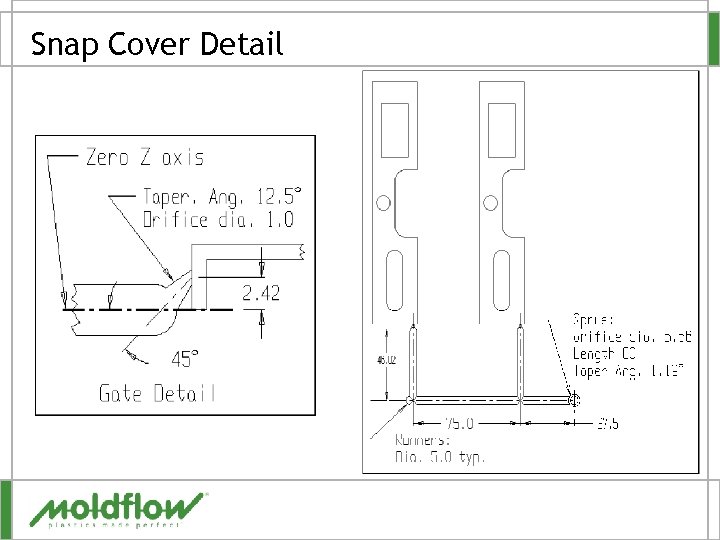
Snap Cover Detail

Snap Cover – Duplicate Cavities § Use Cavity Duplication Wizard – – – 8 cavities Specified by rows Column spacing 75 mm Row spacing 260 mm Align gates § Delete 6 of 8 cavities § Assign occurrence numbers to cavities

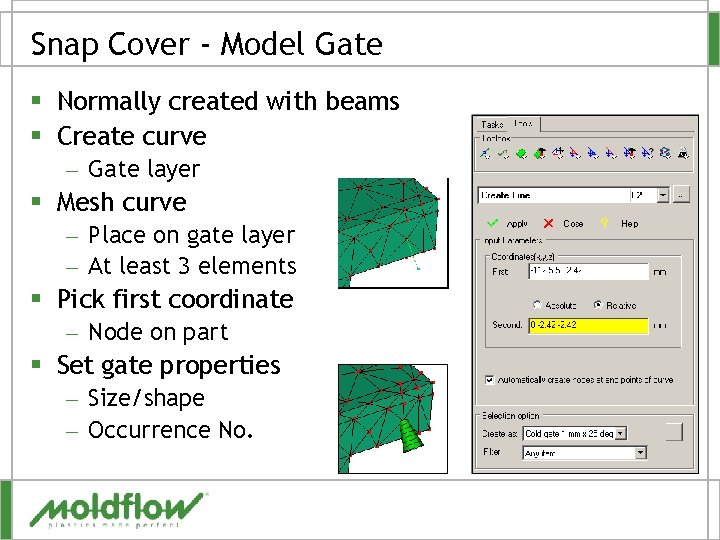
Snap Cover - Model Gate § Normally created with beams § Create curve – Gate layer § Mesh curve – Place on gate layer – At least 3 elements § Pick first coordinate – Node on part § Set gate properties – Size/shape – Occurrence No.

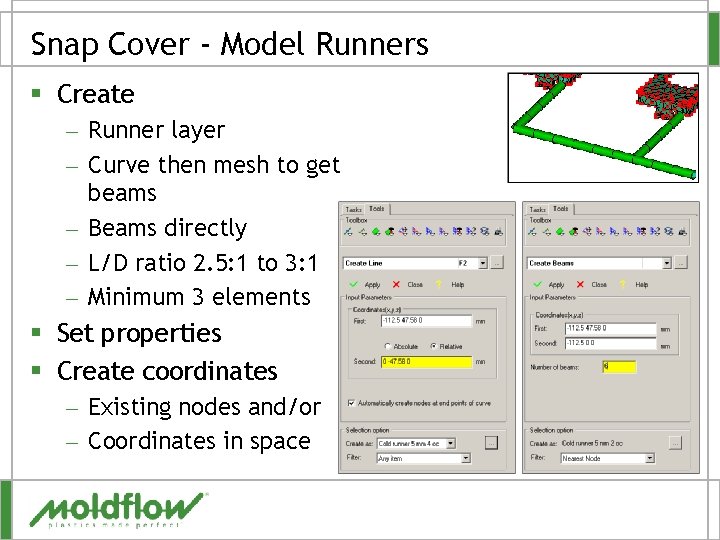
Snap Cover - Model Runners § Create – Runner layer – Curve then mesh to get beams – Beams directly – L/D ratio 2. 5: 1 to 3: 1 – Minimum 3 elements § Set properties § Create coordinates – Existing nodes and/or – Coordinates in space

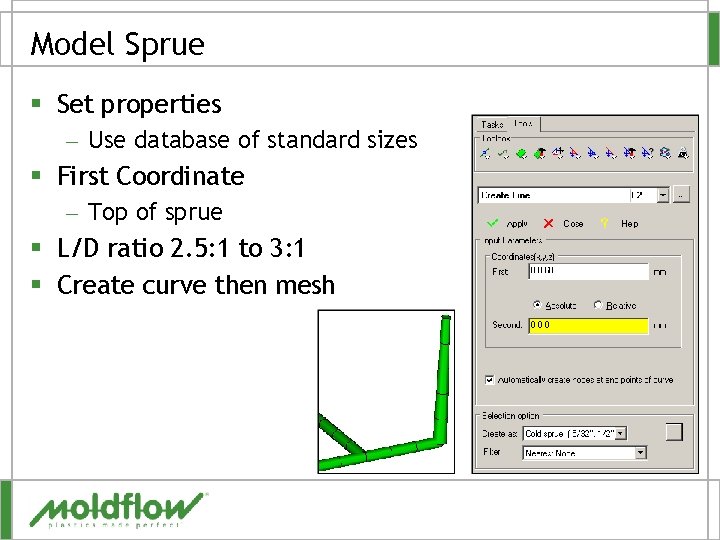
Model Sprue § Set properties – Use database of standard sizes § First Coordinate – Top of sprue § L/D ratio 2. 5: 1 to 3: 1 § Create curve then mesh

QUESTIONS?

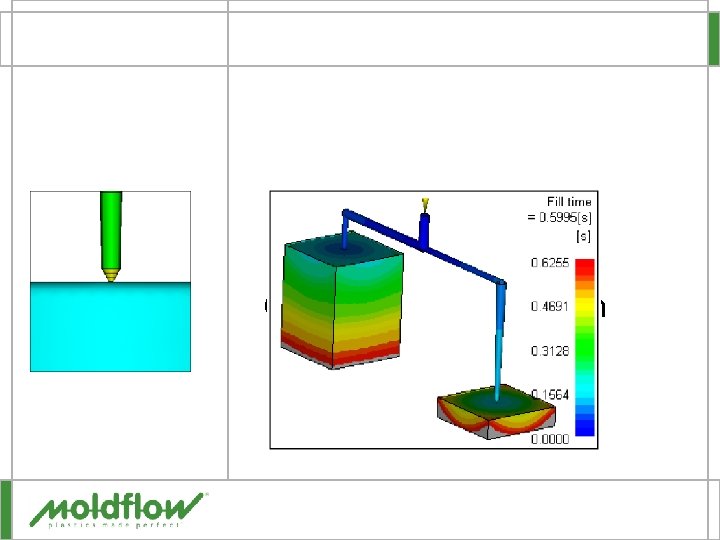
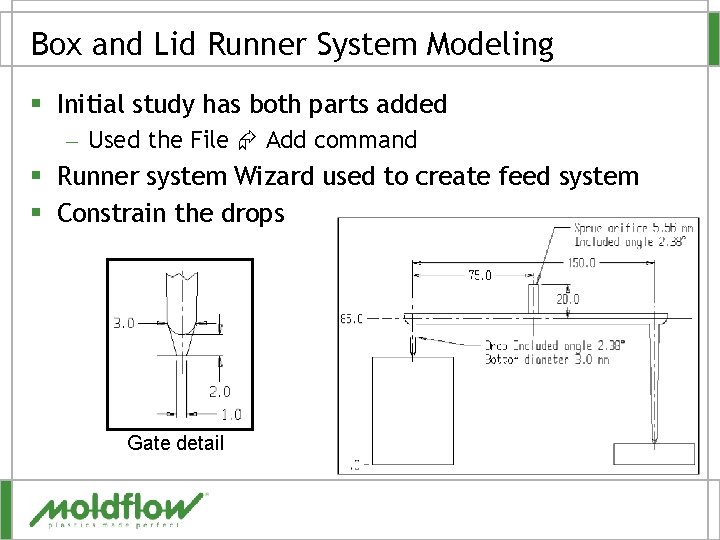
Box and Lid Runner System Modeling § Initial study has both parts added – Used the File Add command § Runner system Wizard used to create feed system § Constrain the drops Gate detail

Box and Lid Runner Balance Analysis § Run fill analysis with runner system – Material Austran SAN 23, Huntsman Chemical Co. – Mold 60ºC, melt 225ºC, flow rate 56. 7 cm^3/sec – Switchover at 100%, Pack Pressure 100% fill pressure § Determine target pressure – Use pressure at injection location: XY plot § Run the balance analysis – Use 70 MPa as the target pressure § Review results – Time – Pressure

QUESTIONS?