FVCC FIRE RESCUE LADDERS PART C POSITIONING RAISING


- Slides: 55
FVCC FIRE RESCUE LADDERS PART C
POSITIONING, RAISING, & LOWERING FOR RESCUE, VENTILATION, & HOSE DEPLOYMENT � � 14 foot single or wall ladder 2 -6. 8. 1 24 foot extension ladder 2 -6. 8. 2 35 foot extension ladder 2 -6. 8. 3 Folding/attic ladder 2 -6. 8. 4
POSITIONING, RAISING, & LOWERING FOR RESCUE, VENTILATION, & HOSE DEPLOYMENT � One Firefighter Single Ladder Raise Lowers the butt end to the ground Simultaneously raise the ladder to a vertical position Grasp both beams, heels the butt end of the ladder, and lowers it onto the building
POSITIONING, RAISING, & LOWERING FOR RESCUE, VENTILATION, & HOSE DEPLOYMENT � One Firefighter Extension Ladder Raise Lower the butt to the ground at a point determined for establishing the proper climbing angle Visually check for obstructions before bringing the ladder to a vertical position
POSITIONING, RAISING, & LOWERING FOR RESCUE, VENTILATION, & HOSE DEPLOYMENT As the ladder is brought to a vertical position, pivot the ladder 90 degrees
POSITIONING, RAISING, & LOWERING FOR RESCUE, VENTILATION, & HOSE DEPLOYMENT Take a position facing the ladder on the side away from the building Prepare to extend the ladder by placing one foot at the butt on one beam, and with the instep, knee and leg, steadies the ladder
POSITIONING, RAISING, & LOWERING FOR RESCUE, VENTILATION, & HOSE DEPLOYMENT Grasp the halyard and extend the fly section with a hand-over-hand motion Check to make sure that the ladder locks are in place, when the tip is at the desired elevation Prepare to lower the ladder by placing at least one foot against a butt spur or on the bottom rung while grasping the beams Gently lower the ladder into the building Roll the ladder over to position the ladder with the fly section out
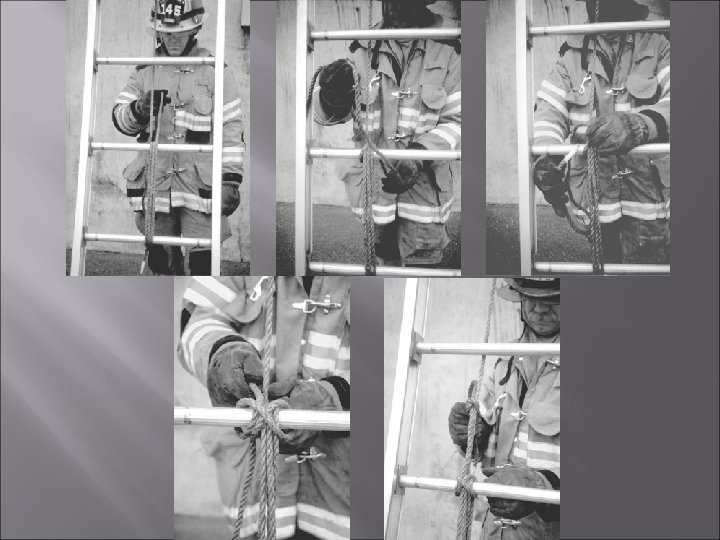
POSITIONING, RAISING, & LOWERING FOR RESCUE, VENTILATION, & HOSE DEPLOYMENT � Tying the halyard � Wrap the excess halyard around two convenient rungs � Pull it taut � Hold the halyard between the thumb and forefinger with the palm down � Turn the hand palm up and push the halyard underneath and back over the top of the rung � Grasp the halyard with the thumb and fingers, and pull it through the loop making a clove hitch � Finish the tie by making a half hitch or overhand safety on top of the clove hitch
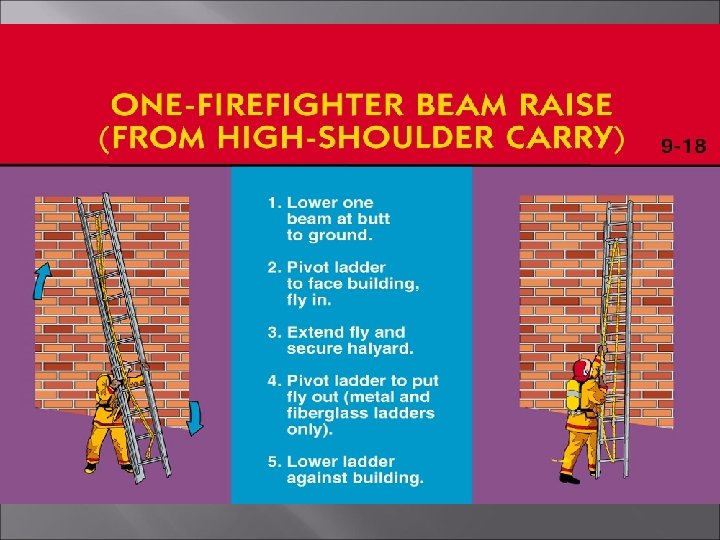
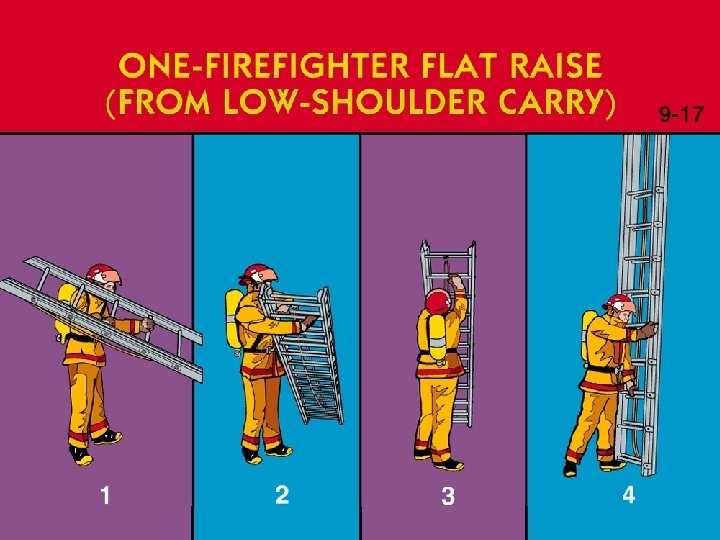
POSITIONING, RAISING, & LOWERING FOR RESCUE, VENTILATION, & HOSE DEPLOYMENT � One Firefighter Raise from the Low Shoulder Carry Place the butt end of the ladder on the ground with the butt spurs against the wall of the building With a free hand, grasp a rung in front of the shoulder, while removing the opposite arm from between the rungs Step beneath the ladder and grasp a convenient rung with the other hand
POSITIONING, RAISING, & LOWERING FOR RESCUE, VENTILATION, & HOSE DEPLOYMENT Visually check for obstructions before bringing the ladder to a vertical position Visually check the terrain in front of them before stepping forward Advance hand-over-hand down the rungs toward the butt until the ladder is in a vertical position Extend the ladder by pulling the halyard straight down until the ladder has been raised to the desired level Check to make sure the pawls are engaged
POSITIONING, RAISING, & LOWERING FOR RESCUE, VENTILATION, & HOSE DEPLOYMENT Position the ladder for climbing by pushing against an upper rung with one hand to keep the ladder against the building Grasp a lower rung with the other hand carefully move the ladder butt out from the building to the desired location Roll the ladder to bring the fly to the out position, if necessary
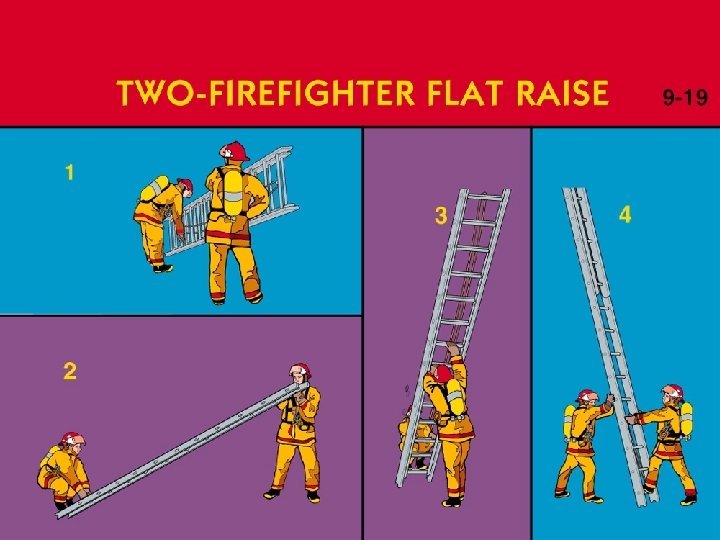
POSITIONING, RAISING, & LOWERING FOR RESCUE, VENTILATION, & HOSE DEPLOYMENT � Two firefighter flat raise Heel position �Place the ladder butt end on the ground while the firefighter at the tip rests the ladder beam on a shoulder, when the desired location for the raise has been reached �Heel the ladder by standing on the bottom rung, crouch down to grasp a convenient rung or the beams with both hands, and lean back �As the ladder comes to a vertical position, grasp successively higher rungs or higher on the beams until the firefighter is standing upright �Face the other firefighter and heel the ladder by placing the toes against the same beam
POSITIONING, RAISING, & LOWERING FOR RESCUE, VENTILATION, & HOSE DEPLOYMENT Assist in pivoting the ladder to position the fly away from the building, if it is not already in position Place one foot against a butt spur, or on the bottom rung, and grasp the beams Gently lower the ladder into the building with the assistance of the other firefighter � Tip position Rest the ladder beam on a shoulder, while the other firefighter places the ladder butt end on the ground when the desired location for the raise has been reached Step beneath the ladder and grasp a convenient rung with both hands while the other firefighter heels the ladder
POSITIONING, RAISING, & LOWERING FOR RESCUE, VENTILATION, & HOSE DEPLOYMENT Visually check the area overhead for obstructions before bringing the ladder to a vertical position Visually check the terrain before stepping forward Advance hand-over-hand down the rungs toward the butt end until the ladder is in a vertical position Face the other firefighter and heel the ladder by placing the toes against the same beam
POSITIONING, RAISING, & LOWERING FOR RESCUE, VENTILATION, & HOSE DEPLOYMENT Assist in pivoting the ladder to position the fly away from the building, if it is not already in that position. (When the ladder is pivoted, the firefighters will move as a group with the ladder. They will not just “pass” the ladder as it is pivoted) Grasp the halyard and extend the fly section with a hand-over -hand motion Check to make sure the ladder locks are in place when the tip is at the desired elevation Gently lower the ladder into the building with the assistance of the other firefighter
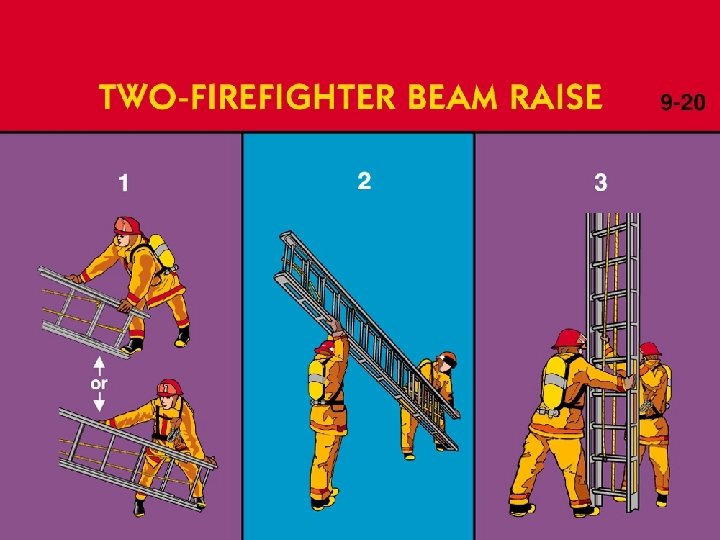
POSITIONING, RAISING, & LOWERING FOR RESCUE, VENTILATION, & HOSE DEPLOYMENT � Two firefighter beam raise Heel position �Place the ladder beam on the ground when the desired location has been reached �Place one foot on the lower beam at the butt spur �Assist in pivoting the ladder to position the fly away from the building if it is not already in position �Place one foot against a butt spur, or on the bottom rung, and grasp the rung or beams �Gently lower the ladder into the building with the assistance of the other firefighter
POSITIONING, RAISING, & LOWERING FOR RESCUE, VENTILATION, & HOSE DEPLOYMENT Tip position �Rest the beam on one shoulder while the firefighter at the heel places one foot on the lower beam at butt spur �Grasp the upper beam with hands apart. The other foot extended back to act as a counterbalance �Visually check the area overhead for obstructions before bringing the ladder to a vertical position �Visually check terrain before stepping forward �Advance hand-over-hand down the beam toward the butt until the ladder is in a vertical position �Grasp the halyard and extend the fly section with a hand-overhand motion �Check to make sure the ladder locks are in place when the tip is at the desired elevation �Gently lower the ladder into the building with the assistance of the other firefighter
POSITIONING, RAISING, & LOWERING FOR RESCUE, VENTILATION, & HOSE DEPLOYMENT � Three firefighter Heel position raise �Place the ladder butt end on the ground when the desired location for the raise has been reached �Heel the ladder by standing on the bottom rung, crouch down, and grasp a convenient rung with both hands, and lean back �Assist in pivoting the ladder to position the fly section away from the building, if necessary �Steady the ladder �Place one foot against a butt spur, or on the bottom rung, and grasp the beam or a convenient rung to lower the ladder �Assist in gently lowering the ladder into the building
POSITIONING, RAISING, & LOWERING FOR RESCUE, VENTILATION, & HOSE DEPLOYMENT Tip position #1 �Rest the ladder flat on one shoulder �Visually check the area overhead for obstructions before bringing the ladder to a vertical position �Visually check the terrain before stepping forward �Advance in unison with other tip person, with the outside hands on the beams and inside hands on the rungs, until the ladder is in a vertical position �Assist in pivoting the ladder to position the fly section away from the building, if necessary �Grasp the halyard and extend the fly with a handover-hand motion �Check to make sure that the ladder locks are in place when the tip is at the desired elevation �Steady the ladder from the inside position �Assist in gently lowering the ladder into the building
POSITIONING, RAISING, & LOWERING FOR RESCUE, VENTILATION, & HOSE DEPLOYMENT Heel position #2 �Place the ladder butt on the ground when the desired location to raise the ladder is reached �Heel the ladder by placing their inside foot on the bottom rung and the outside foot on the ground outside the beam �Grasp a convenient rung with the inside hand the beam with the other hand pull back �Assist in pivoting the ladder to position the fly section away from the building, if necessary �Extending the fly section alone with other heel, firefighters grasp the halyard using hand-overhand motion, pulling the halyard. If both do this, they must coordinate their actions so as not to drop the fly section accidentally
POSITIONING, RAISING, & LOWERING FOR RESCUE, VENTILATION, & HOSE DEPLOYMENT �Make sure that the ladder locks are in place when the tip is at the desired elevation �Assist in gently lowering the ladder into the building Tip position #3 �Rest the ladder flat on their shoulder �Visually checks the area overhead for obstructions before bringing the ladder to a vertical position �Visually check the terrain before stepping forward �Advance in unison, with the other firefighter using the outside hands on the beams and inside hands on the rungs, until the ladder is in a vertical position �Assist in pivoting the ladder to position the fly section away from the building, if necessary �Lower the ladder by placing the inside foot against the butt spur on bottom rung and grasping the beams
POSITIONING, RAISING, & LOWERING FOR RESCUE, VENTILATION, & HOSE DEPLOYMENT Tip position #4 �Rest the ladder flat on the shoulders �Visually check the area overhead for obstructions before bringing the ladder to a vertical position �Visually check the terrain before stepping forward �Advance in unison, with the other firefighter using the outside hands on the beams and inside hands on the rungs until the ladder is in a vertical position �Assist in pivoting the ladder to position the fly section away from the building, if necessary �Lower the ladder by placing the inside foot against the butt spur or bottom rung and grasp the beams
POSITIONING, RAISING, & LOWERING FOR RESCUE, VENTILATION, & HOSE DEPLOYMENT � One firefighter folding/attic ladder Remove attic/folding ladder for apparatus bracket Carry ladder to location of use Unfold ladder and verifies lock is set Raise ladder to the vertical position and place in scuttle opening
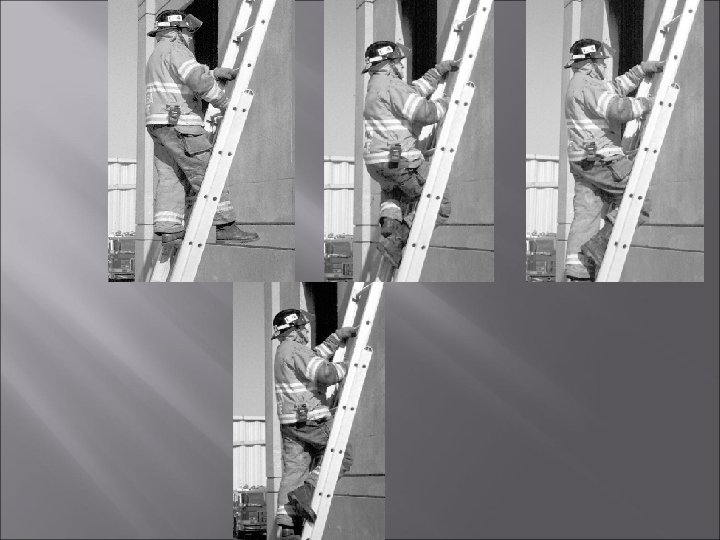
CLIMBING LADDERS � Climbing ladders � Check to make sure ladder has been positioned for proper climbing angle � Check to make sure ladder is properly secured � Keep eyes focused forward, with an occasional glance at the tip of the ladder � Keep arms straight during the climb � Grasp the rungs with the palm down and the thumb beneath the rung
CLIMBING LADDERS Grasp either every rung with alternate hands while climbing or grasp alternate rungs � As an option for hand placement when climbing, the firefighter may climb with both hands sliding up behind the beams to maintain constant contact, as when climbing and carrying equipment � All upward progress is done with the leg muscles � The arms and hands do not reach upward during the climb � Bend the knees while climbing � Climb is accomplished smoothly and with rhythm �
TOOL CARRIES � Tool carries up a ladder � Slide the free hand under the beam while making the climb � Slide the hand under the tool along the beam if the hands are large enough � Climb the ladder smoothly
MOVING INJURED PEOPLE DOWN A LADDER � Assisting a conscious victim down a ladder � Receive the victim’s feet first from the firefighter in the building, making sure the victim is facing the ladder � Place both arms around the victim, under the armpits, with hands on the rungs in front of the victim � Descend the ladder first, prepared to “receive” the victim � Reassure the victim constantly while descending the ladder
MOVING INJURED PEOPLE DOWN A LADDER � Assisting an unconscious victim down a ladder (Method #1) � Receive the victim feet first from the firefighter in the building, making sure the victim is facing the ladder (Victim may also be positioned facing away from the ladder to prevent entanglement of their limbs) � Place both arms around the victim, under the armpits, with hands on the rungs in front of the victim and resting the victim’s body on the knee � Place the victim’s feet outside the rails to prevent entanglement
MOVING INJURED PEOPLE DOWN A LADDER � Assisting an unconscious victim down a ladder (Method #2) Receive the victim feet first from the firefighter in the building, making sure the victim is facing away from the ladder � Place the victim’s knees over the shoulders � The victim’s armpits are supported by the rescuer’s forearms � Lean in toward the ladder to slow the process in order to increase control over the victim � Descent the ladder rung by rung, while sliding the hands down the beams �
WORKING OFF LADDERS � Working on a ground ladder � Climb to the desired height � Advance one run higher � Slide the leg opposite the working side over and behind the rung that they will lock into � Hook the foot either on the rung or behind the beam � Rest on the thigh � Step down with the opposite leg
WORKING OFF LADDERS � Working on an aerial ladder � Climb to the tip of the ladder � Place your feet into the foot plates � Secure the ladder harness to a truss member on the ladder
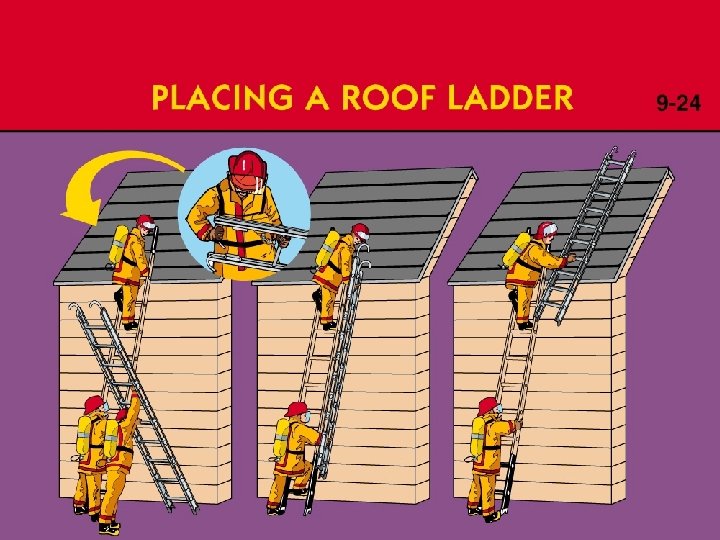
DEPLOYMENT OF A ROOF LADDER � Placing a roof ladder Carry the roof ladder to the ladder that is to be ascended � Set the roof ladder down and open the hooks � Tilt the roof ladder up so that it rests against the other ladder with the hooks facing away from them � Climb the main ladder until the shoulder is about 2 rungs above the midpoint of the roof ladder � Reach through the rungs of the roof ladder and hoist it onto the shoulder with the hooks facing away from them � Climb to the top of the ladder � Use a leg lock or life safety harness to lock into the ladder �
DEPLOYMENT OF A ROOF LADDER � Once locked in, take the roof ladder off the shoulder, and use the hand-over-hand method to push the roof ladder, with the hooks in the down position onto the roof � Push the roof ladder up the roof until the hooks go over the edge of the peak and catch solidly � Remove the roof ladder by reversing the process
CLEANING LADDERS � Cleaning a ladder � Follow manufacturer’s instructions � Set up work area � Remove any grease with solvent � Clean ladder with scrub brush and rinse � Wipe dry � Lubricate moving parts, if warranted
INSPECTION PROCEDURES � Inspecting ground ladders for: � Rungs Tightness Cracks Dents Slivers � Bolts, rivets and welds Tightness Cracks or defects
INSPECTION PROCEDURES � Beams and rungs Cracks Splinters Breaks Gouges Checks Wavy conditions Deformities Heat indicator color changes
INSPECTION PROCEDURES � Inspecting extension ladders for: � Pawl assemblies – working properly � Halyard – fraying or kinking � Moving parts – move freely � Staypole toggle – condition and operation � Latches – free operation � Inspecting roof ladders for: � Rust � Deformed or malfunctioning hooks � Hooks firmly attached – no sign of looseness
MAINTENANCE PROCEDURES � Identify maintenance procedures for different types of ground ladders 2 -6. 16 (3 -3. 5(b)) � Maintenance of ground ladders Keep clean and free of moisture Do not store or rest ladders near exhaust or other heat sources Do not store ladders where they are exposed to the elements Do not paint ladders except of top and bottom 12 inches for visibility Notify trained ladder technician of needed repair(s)
5. ___ 4. ___ a. b. c. d. 2. ___ Butt Fly Bed Tip 7. ___ 6. ___ 1. ___ a. b. c. d. 3. ___ Staypole Halyard Pulley Toggle 8. ___
9. ___ 11. ___ 10. ___ 12. ___ 13. ___ a. b. c. d. e. Rung Beam Hook Lock Sensor
Homework � � 17. ___ 14. ___ 15. ___ 16. ___ A. Pompier Ladder B. Pole Ladder C. Extension Ladder D. Straight Ladder
20. ___ a. 18. ___ 19. ___ b. c. Roof Ladder Folding Ladder Combination Ladder
Homework Select facts about selecting the proper ladder for the job. Write the correct letters on the blanks. 21. What is the average distance from floor to floor in commercial buildings? a. 8 to 10 feet with a 3 -foot distance from floor to windowsill b. b. 12 feet with a 4 -foot distance from floor to windowsill c. 6 to 8 feet with a 3 -foot distance from floor to windowsill d. 14 feet with a 4 -foot distance from floor to windowsill 22. The length marked on the side of ladders gives the actual extended length, not the reach. About how much less than their extended length is the reach of ladders 35 feet or less? a. 1 foot b. 2 feet c. 3 feet d. 4 feet 23. Where should the tip of the ladder be for window rescue? a. Just above the window top b. Just below the windowsill c. Three of four rungs above the windowsill d. To one side and two rungs below the windowsill �
Homework 24. Firefighter A says that single and roof ladders meeting NFPA 1931 are required to have a measured length equal to the designated length. � Firefighter B says that the maximum length of folding ladders may be as much as 6 inches (150 mm) less than the designated length. � Who is correct? a. Firefighter A b. Firefighter B c. Both A and B d. Neither A nor B 25. Approximately how long a ladder is needed for a working location on a second story roof? � a. 16 to 20 feet b. 20 to 28 feet c. 28 to 35 feet d. 40 to 50 feet 26. What is the approximate minimum distance a ladder should extend beyond the roof edge to provide footing and handholds for persons stepping on and off the roof? a. 3 rungs b. 4 rungs c. 5 rungs d. 6 rungs
Homework Select facts about ground ladder placement. Write the correct letters on the blanks. 27. Who normally determines the exact spot where the ladder butt is placed? a. An officer b. The fire fighter carrying the ladder and nearest the butt c. The firefighter at midpoint regardless of direction of travel d. The firefighter carrying the ladder and nearest the tip 28. When a ladder is to support a smoke fan, how should it be positioned? a. Beside the window with the tip above the window opening b. Directly in front of the window with the tip above the window opening c. Directly in front of the window with the tip below the window opening d. Beside the window with the tip at about the midpoint of the window opening 29. What is the optimum ladder climbing angle? a. Approximately 65 degrees c. Approximately 75 degrees b. Approximately 70 degrees d. Approximately 80 degrees �
Homework 30. How should a ladder be placed when it is to be used as a vantage point from which to direct a hose stream into a window opening and no entry is to be made? a. Directly in front of the window with the tip on the wall above the window opening b. Alongside the window to the windward side with the tip even with the top of the window c. Under the window with the tip even with or slightly below the sill d. In front of the window with the tip extended above the roof edge 31. How should a ladder be placed when it is to be used to effect ventilation from a window? a. In front of the window with the tip extended above the roof edge b. Directly in front of the window with the tip on the wall above the window opening c. Under the window with the tip even with or slightly below the sill d. To the windward side of the window with the tip even with the top of the window 32. Which of the following is not a factor that affects ladder placement? a. Uneven terrain and soft spots b. Type of ladder carry c. Main paths of travel for firefighters and evacuees d. Obstructions overhead and on the ground
Homework 33. . What is the easiest way to determine the proper climbing angle by computing the distance between the heel of the ladder and the building? a. Divide the extended length by three and place the ladder butt that distance from the building. b. Multiply the ladder width by four and place the ladder butt that distance from the building. c. Subtract four times the ladder width from its length and place the ladder that distance from the building. d. Divide the used length of the ladder by four and place the ladder butt that distance from the building. 34. Who normally designates the general location where a ladder is to be positioned? a. An officer b. The firefighter carrying the ladder and nearest the butt c. The firefighter carrying the ladder and leading in the direction of travel, regardless of ladder position d. The fire fighter carrying the ladder and nearest the tip 35. Firefighter A says that the closer the ladder butt is placed to the building, the more stable the ladder will be. � Firefighter B says if the ladder butt is placed too far away from the building the load carrying capacity of the ladder is reduced. � Who is right? a. Firefighter A b. Firefighter B c. Both A and B d. Neither A nor B
Homework 36. If a firefighter stands on the bottom rung of a ladder and reaches out to the rung directly in front, when is the ladder at the correct angle? a. When the firefighter can stand straight up with arms bent at a 45 degree angle and reach the rung b. When the firefighter can stand at a 75 -degree angle with arms straight out and reach the rung c. When the firefighter can stand straight up with arms straight out and reach the rung d. When the firefighter can stand at a 75 -degree angle with arms bent at a 45 -degree angle and reach the rung 37. Firefighter A says that heeling is not an acceptable method of securing a ladder that must be placed at a poor angle. � Firefighter B says that tying off the bottom is an acceptable method of securing a ladder that must be placed at a poor angle. � Who is right? a. Firefighter A b. Firefighter B c. Both A and B d. Neither A nor B