FUNDAMENTALS OF TOOTH PREPARATION By Dr Syed Mukhtarun

FUNDAMENTALS OF TOOTH PREPARATION By: Dr. Syed Mukhtar-un- Nisar Andrabi Assistant Professor, Conservative Dentistry & Endodontics, Dr. Z. A. Dental College, A. M. U. Aligarh

Definition Ø Mechanical alteration of a defective, injured, or diseased tooth to best receive a restorative material that will re-establish a healthy state for the tooth, including esthetic corrections where indicated, along with normal form and function.
 Remove all defects and provide necessary protection to the")
Objectives of tooth Preparation (1) Remove all defects and provide necessary protection to the pulp (2) Extend the restoration as conservatively as possible. (3) Form the tooth preparation so under force of mastication, Tooth or Restoration will not fracture and not be displaced. (4) Allow for esthetic and functional placement of a restorative material.

Factors Affecting Tooth Preparation 1. Diagnosis * Caries * Fracture * Esthetic needs * Pulp & periodontal condition * Occlusal relationship * Needs for function 2. Knowledge of dental anatomy * Direction of enamel rods * Thickness of enamel * Dentin body * Size & position of the pulp 3. Patient factors • Age/ sex/ Socio- Economic status 4. Restorative material factors * Economic and esthetic values are primary patient decisions. * The ability to isolate the operating area. 5. Conservation of tooth structure v Minimal extensions of the tooth preparations. v Supragingival margins. v Rounded internal line angles.

Tooth Preparation. Terminology Simple if only one tooth surface is involved Compound if two surfaces are involved Complex for a preparation involving three (or more) surfaces Simple Compound Complex

Preparation Designs Conventional design Typical for amalgam restoration and includes the following : Uniform pulpal and/or axial wall depths, Cavosurface margin design that results in 90 O restoration margin, Primary retention form derived from smooth, parallel or slightly occlusally converging vertical walls. Beveled conventional designs conventional preparations with beveling of some accessible enamel margins- Cast Restorations Modified preparation designs may not have uniform axial or pulpal depths or occlusally converging vertical walls

Conventional Beveled Conventional Modified

Classification Of Tooth Preparation Classification of tooth preparation according to the anatomic areas involved and by the associated type of treatment was presented by Dr. G. V. Black (1896). 1) Class I 2) Class II 3) Class III 4) Class IV 5) Class V Additional classification added to G. V. Black’s classification is Class VI.

Class I Restorations All pit-and-fissure restorations are Class I and they are assigned is three groups: 1. Restorations on occlusal surface of Premolar and Molars.

2. Restorations on the gingival two thirds of the facial and lingual surfaces of premolars and molars.

3. Restorations on the palatal surfaces of maxillary incisors.

Class II Restorations on the proximal surfaces of posterior teeth are Class II. ( G. V. Black) According to Marzouk : Class II cavity preparation is the proximal, Proximo-facial(lingual), proximo-occlusal or (combination thereof) tooth preparation. It is part of mechano-therapy for smooth surface lesion, involving the proximal surfaces of molars and premolars.

Class III Restorations on the proximal surfaces of anterior teeth that do not involve the incisal angle are class III. 11/2/2020 14

Class IV Restorations on the proximal surfaces of anterior teeth that do involve the incisal edge is class IV.

Class V Restorations on the gingival third of the facial or lingual surfaces of all teeth (except pit-andfissure lesions) are class V.

Class VI Restorations on the incisal edge of anterior teeth or the occlusal cusp heights of posterior teeth are class VI.

Stages Of Tooth Preparation Initial Tooth Preparation Stage Step 1: Outline form and initial depth. Step 2: Primary resistance form. Step 3: Primary retention form. Step 4: Convenience form. Final Tooth Preparation Stage Step 5: Removal of any remaining infected dentin and/or old restorative material, if indicated. Step 6: Pulp protection, if indicated. Step 7: Secondary resistance and retention forms. Step 8: Procedures for finishing external walls. Step 9: Final procedures: cleaning, inspecting, sealing
 Placing the preparation margins in the")
Definition : Establishing the outline form means 1) Placing the preparation margins in the positions they will occupy in the final preparation except for finishing enamel walls and margins. 2) Preparing an initial depth of 0. 2 to 0. 8 mm pulpally of the DEJ position or normal root –surface position.
 The extent of caries lesion,")
Factors that dictate and determine the outline form 1) The extent of caries lesion, defect or faulty old restoration. 2) Esthetic consideration-affects the choice of restorative material and design. 3) Occlusal relationship. 4) Adjacent tooth contour.
Preserving cuspal strength. 2)Preserving marginal ridge strength. 3)Minimizing facio-lingual extensions. 4)Using enameloplasty. 5)Connecting")
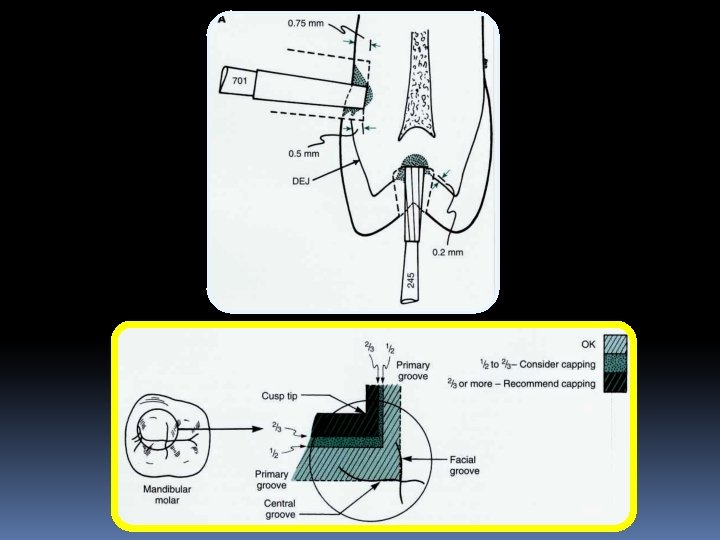
Features 1)Preserving cuspal strength. 2)Preserving marginal ridge strength. 3)Minimizing facio-lingual extensions. 4)Using enameloplasty. 5)Connecting two close (less than 0. 5 mm) faults or tooth preparation. 6)Restricting the depth of the preparation into the dentin to a maximum of 0. 2 mm for pit and fissure caries and 0. 2 -0. 8 mm for axial wall of smooth surface caries.

Enameloplasty

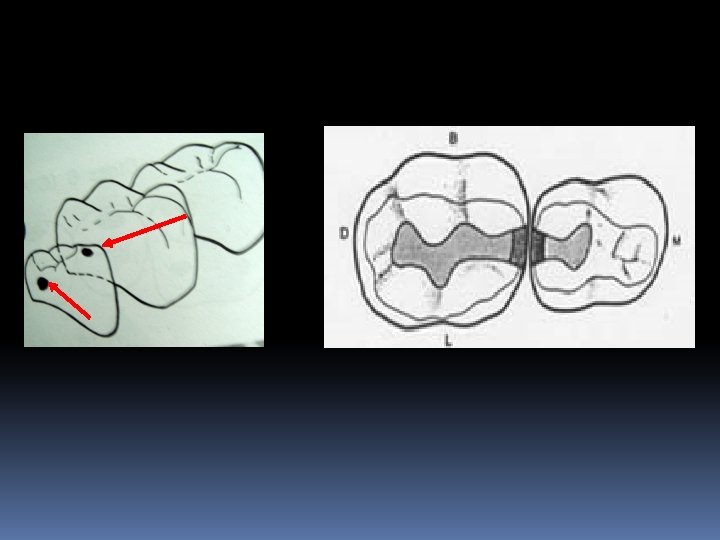
Rules For Establishing Outline Form For Pit-and. Fissure Tooth Preparation. 1. Extend the preparation margin until the sound tooth structure is obtained, and no unsupported or weakened enamel remains. 2. Avoid terminating the margin on extreme eminences, such as cusp heights or ridge crest. 3. If the extension from a primary groove includes one half or more of the cusp incline, consideration should be given to capping the cusp. 11/2/2020 23

4. Extend the preparation margin to include all of the fissure that cannot be eliminated by appropriate enameloplasty. 5. Restrict the pulpal depth of maximum of 0. 2 mm into dentin. 6. When 2 pit and fissure preparations have less than 0. 5 mm of sound tooth structure between them, then should be joined to eliminate a weak enamel wall between them. 7. Extend the outline form to provide sufficient access for proper tooth preparation, restoration placement and finishing procedure.

Rules for Establishing Outline Forms for Proximal Surface Tooth Preparations. 1. Extend the preparation margin until the sound tooth structure is obtained, and no unsupported or weakened enamel remains. 2. Avoid terminating the margin on extreme eminences, such as cusp heights or ridge crest. 3. Restrict the axial wall pulpal depth of proximal preparation to maximum of 0. 2 to 0. 8 mm into dentin.

4. Gingival margins of tooth preparations are extended apically of the proximal contact to provide a minimum clearance of 0. 5 mm between the gingival margin and adjacent tooth. 0. 5
 b) c) Restricted Extension Esthetic requirement. Proximal contours")
Restricted and Increased Extensions: 1. a) b) c) Restricted Extension Esthetic requirement. Proximal contours and Root approximity. Tooth preparation for composite restorations. 2. Increased Extension a) Restoration of teeth as partial denture abutments or as units of a splint. b) Additional measures for retention and resistance form. c) Need to adjust tooth contour.

STEP 2: PRIMARY RESISTANCE FORM Definition: “Primary resistance form may be defined as the shape and placement of the preparation walls that best enable the restoration and the tooth to withstand , without fracture, masticatory forces delivered principally in the long axis of tooth”.

Principles ØTo use the box shape with flat pulpal floor. ØTo restrict the extension of the external walls. ØTo provide enough thickness of restorative material to prevent its fracture under load. ØRounded internal line angles. ØTo cap weak cusps and envelope or include enough of a weakened tooth. ØBond the material to the tooth. Width of the cavity-1/4 th intercuspal distance.

The relatively flat pulpal and gingival walls prepared perpendicular to the tooth's long axis help resist forces in the long axis of the tooth and prevent tooth fracture from wedging effects

According to Gainsford: Resistance to fracture of tooth or restoration may be promoted if the outline form of the cavity is smoothly curved and avoiding sharp angles. The cavosurface angle formed by the buccal and lingual embrassure walls of the class II cavity are often poorly aligned. To obtain optimum strength the buccal and lingual walls should form right angles with tooth surface.


The gingival step of the proximal preparation should be prepared at right angles to the occlusal load to maintain the resistance form. The gingival step should be adequately wide mesiodistally , to support restoration. Rodda (1972) recommended minimum width is not less than 1 mm. If caries extend beyond the amelocemental junction the angulation have to be altered to run parallel to the external surface of tooth.

This will provide an adequate width of gingival step for resistance, while avoiding pulpal exposure.

Factors affecting resistance form: 1. Occlusal contact-on the restoration and the tooth, the greater the occlusal force and contacts the greater is the potential for future fracture. 2. Remaining tooth structure- large teeth which is intensively involved may require less resistance form in regard to cusp capping because the remaining tooth structure is still bulky. 3. Type of restorative material. For amalgam the depth of the cavity is 1. 5 mm. For inlay the depth of the cavity is 1 -2 mm. For porcelain it is 2 mm.

Features: 1. 2. 3. 4. 5. 6. 7. Relatively flat floor. Box Shape preparation. Inclusion of weakened tooth structure. Preservation of cusp and marginal ridge. Rounded internal line angle. Adequate thickness of restorative material. Reduction of cusps for capping when indicated.

Primary Retention Form Is that shape or form of the conventional preparation that resists displacement or removal of the restoration from tipping or lifting forces. Retention form and resistance form are accomplished in the same cutting procedure. For amalgam restorations in most Class I and all Class II the external tooth walls converge occlusally


Convenience Form is that shape or form of the preparation that provides for adequate observation, accessibility, and ease of operation in preparing and restoring the tooth.

Final tooth preparation stage Step 5: Removal of Any Remaining Enamel Pit or Fissure, Infected Dentin, and/or Old Restorative Material, if Indicated. Step 6: Pulp Protection, if Indicated (Placement of liners and bases). It is not a step in tooth preparation in the strict sense of the word, it is a step in adapting the preparation for receiving the final restorative material. Step 7: Secondary Resistance and Retention Forms.

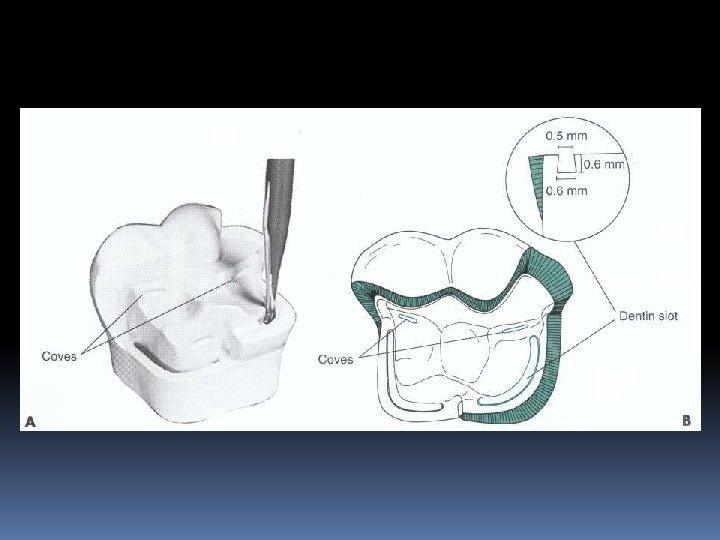
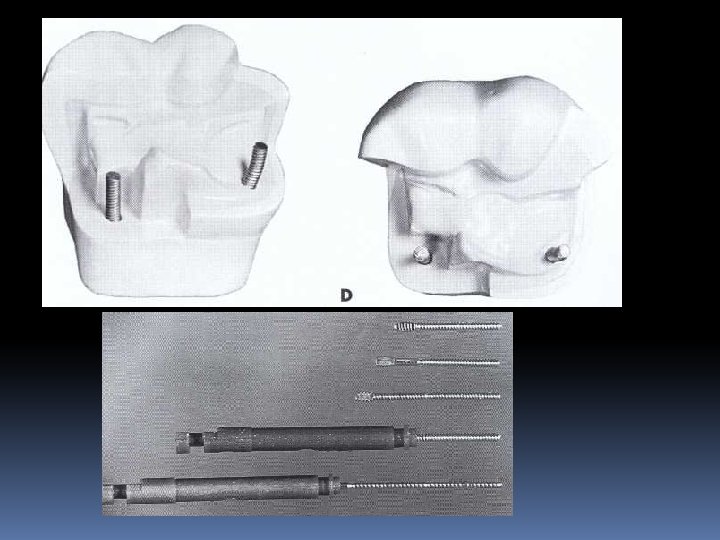
Secondary Resistance and Retention Forms. Retention locks, grooves, and coves Groove extensions Skirts. Bevelled enamel margins Pins, slots, steps, and amalgam pins

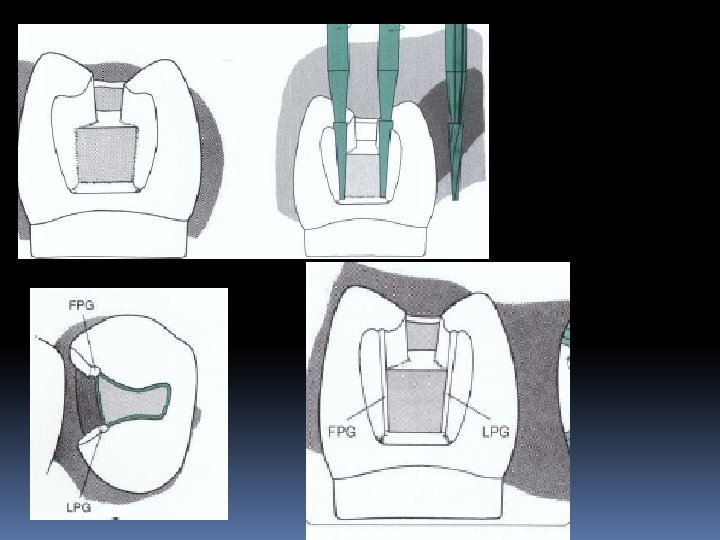
Locks and grooves Vertically oriented retention locks and retention grooves are used to provide additional retention for proximal portions of some tooth preparations; Locks: class II amalgam restorations Grooves : class II cast metal restorations
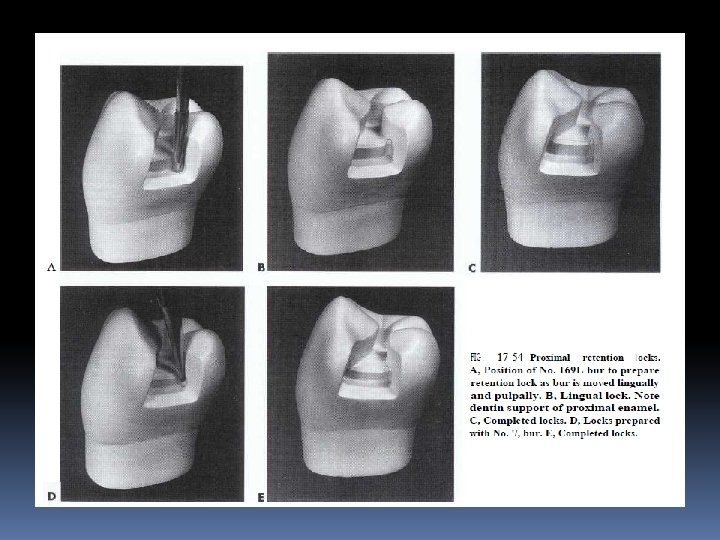

Locks: Grooves

Groove extensions

Occlusal view showing mesiolingual and distolingual skirts.

Coves Retention coves are appropriately placed undercuts for the incisal retention of Class III amalgams occlusal portion of some amalga restorations some Class V amalgams and occasionally for facilitating the start of insertion of certain gold foil restorations.


Final tooth preparation stage Step 8: Finishing the External Walls of the Tooth Preparation. Degree of smoothness and cavosurface design. Step 9: Final Procedures: Cleaning, Inspecting, and Sealing.

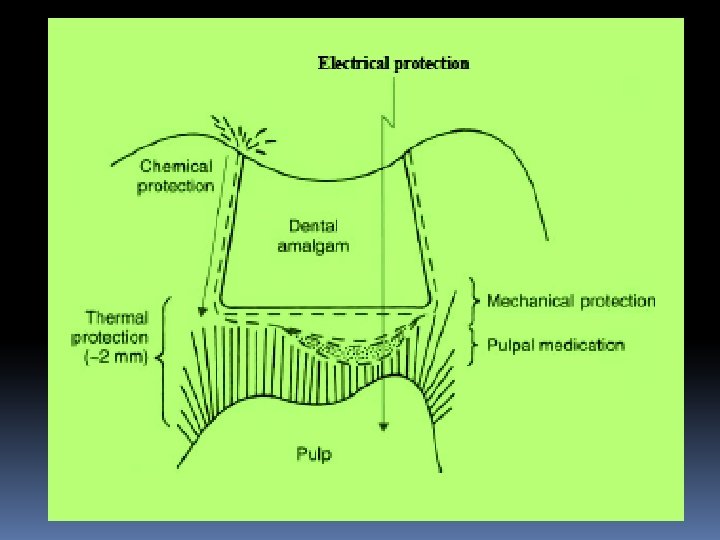
Pulp Protection Pulpal protection requires consideration of Ø chemical protection, Ø electrical protection, Ø thermal protection, Ø pulpal medication, and Ø mechanical protection
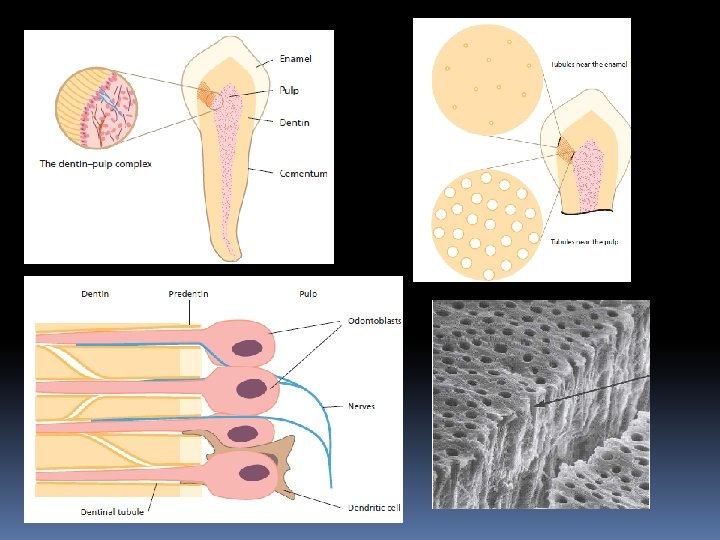
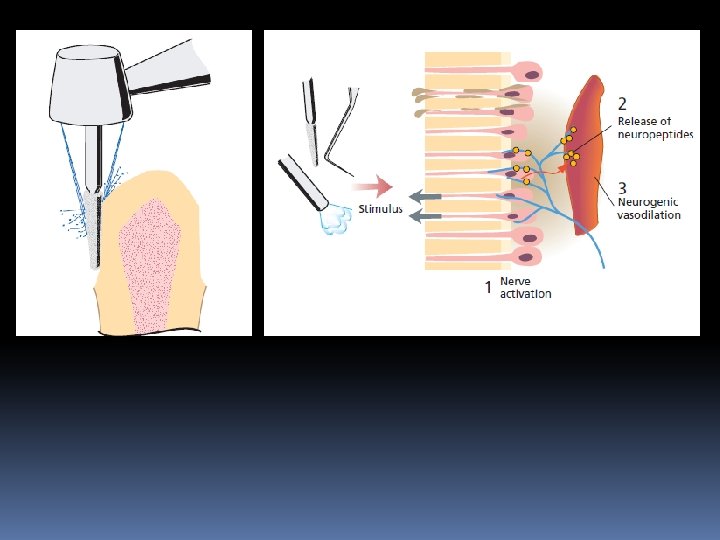

Role Of Odontoblasts In Pulpal Immunity Odontoblasts are supplied with a multitude of receptors, which enable them to sense and respond to microbial elements and thereby alert the immune system. • production of proinflammatory cytokines and chemokines • release antimicrobial peptides with the capability of direct killing both Gram-positive and Gram-negative bacteria • Odontoblast is a prime mover of the pulp’s defense to both externally and internally derived adverse influences

Pulp Protection Approximately 2 mm of dentin, or an equivalent thickness of material, should exist to protect the pulp. This thickness is not always possible, but 1 to 1. 5 mm of insulation is accepted as a practical thickness. As the tooth preparation extends closer to the pulp, a thick liner or a base is used to augment dentin to the proper thickness range.

Liners are relatively thin layers of material used primarily to provide a barrier to protect the dentin from residual reactants diffusing out of a restoration and/or oral fluids that may penetrate leaky tooth-restoration interfaces. They also contribute initial electrical insulation; generate some thermal protection; and, in some formulations, provide pulpal treatment as well Traditional liners are now mostly replaced by dentin bonding agents.
 a barrier that protects the dentin from noxious agents from either")
Liners provide: (1) a barrier that protects the dentin from noxious agents from either the restorative material or oral fluids (2) initial electrical insulation (3) Pulpal medication and/or (4) some thermal protection

Liners Nowadays liners are used only when “the tooth preparation is extremely close to the pulp and pulpal medication becomes a concern”
 Solution liners (2 to 50 μm) Varnishes")
Thin film liners (1 to 50 μm) Solution liners (2 to 50 μm) Varnishes Suspension liners Cement liners (200 to 1000 μm) (0. 2 to 1 mm) Needed for pulpal medication

Varnishes Most varnish coatings are produced by drying solutions of copal or other resin dissolved in a volatile solvent. Composition: 10% copal resin in a combination of ether, alcohol, and acetone When applied the solvent evaporates in 8 -10 s and a thin film of resin is produced. A single coat effectively covers only 55% of the surface A second thin layer is recommended to produce sealing of 80% to 85% of the surface.

Suspension liners produce the same effect, but dry more slowly and produce thicker films. (20 to 25 µm)

Cement liners Those aqueous suspensions or dispersions of zinc oxide or calcium hydroxide that can be applied to a tooth surface in a relatively thin films' and are used to affect a particular pulpal response. (200 -1000µm)

Bases are considered those cements commonly used in thicker dimensions beneath permanent restorations to provide for mechanical, chemical, and thermal protection of the pulp. zinc phosphate; zinc oxide-eugenol; calcium hydroxide; polycarboxylate; some type of glass ionomer.

the level to which a base is built should never compromise the desired tooth preparation depth, resulting in inadequate restorative material thickness. Base Materials should provide “maximum strength in minimum thickness”
 is RDT ≥ 2 mm Varnish or DBA")
Guidelines When remaining dentin thickness (RDT) is RDT ≥ 2 mm Varnish or DBA RDT< 1. 5 mm solution liner or DBA RDT < 0. 5 mm Ca. OH liner + Base Near or actual Pulp exposure: a 1 -mm thickness of calcium hydroxide overlaid with a base

Summary of factors to be considered before tooth preparation

Thank you
- Slides: 71