Fundamentals of Robot Technology Integral Parts of a

Fundamentals of Robot Technology

Integral Parts of a Robot • • • Robot Anatomy Drive System Control System Sensors Actuators / End Effectors
 • Joint : relative motion between two parts of")
Degrees of Freedom (Do. F) • Joint : relative motion between two parts of the robot body. • Joint provides the robot with degree-offreedom of motion. • In most cases, 1 Do. F is associated with a joint. • Robots are often classified according to total number of Do. F they posses.

Links are rigid components of the robot manipulator

Robot Anatomy: Joints & Links Linear joint, L Orthogonal Joint, O Rotational Joint, R Twisting Joint, T Revolving Joint, V
 Prismatic Joint 1 DOF")
basic joints Revolute Joint 1 DOF ( Variable - ) Prismatic Joint 1 DOF (linear) (Variables - X) Spherical Joint 3 DOF ( Variables - X, , Z)

Example 2 3 4 1 There are two more joints on the end effector (the gripper) This robot arm has SIX revolute joints A revolute joint has ONE degree of freedom ( 1 DOF) that is defined by its angle

3 Do. F wrist assembly Degrees of Freedom

6 Basic Robot Configurations Polar Jointed-Arm Cylindrical Mobile Cartesian SCARA

Kinematics = the motion of bodies We are interested in two kinematics topics Forward Kinematics (angles to position) What you are given: The length of each link The angle of each joint What you can find: The position of any point (i. e. it’s (x, y, z) coordinates) Inverse Kinematics (position to angles) What you are given: The length of each link The position of some point on the robot What you can find: The angles of each joint needed to obtain that position

Point Representation: RR Robot Position of the end of the arm Pj = ( 1, 2) joint space Pw = (x, y) world space World space is useful when the robot must communicate with other devices.

Forward Transformation: Going from joint space to world space We can determine the position of the end of the arm in world space By defining a vector for Link 1 and another for Link 2. r 1 = [ L 1 cos 1, L 1 sin 1] r 2 = [ L 2 cos( 1 + 2), L 2 sin( 1 + 2) ] Adding these two vectors yields the coordinates x and y of the point Pw x = L 1 cos 1 + L 2 cos( 1 + 2) y = L 1 sin 1 + L 2 sin( 1 + 2)

Reverse Transformation: Going from world space to joint space Two possible configurations to achieve the position Using cos(A+B) = cos. A cos. B – sin. A sin. B sin(A+B) = sin. A cos. B + sin. B cos. A Rewrite the coordinates x = L 1 cos 1 + L 2 cos 1 cos 2 – L 2 sin 1 sin 2 y = L 1 sin 1 + L 2 sin 1 cos 2 + L 2 cos 1 sin 2

Square both sides and add the two cos 2 = Also (x 2 + y 2 - L 12 - L 22 ) / 2 L 1 L 2 tan = L 2 sin 2 / ( L 2 cos 2+ L 1) tan = y / x Using tan(A – B) = (tan. A – tan. B) / ( 1 + tan. A tan. B) tan 1 = [y(L 1+ L 2 cos 2) -x L 2 sin 2] / [x(L 1+ L 2 cos 2) - y. L 2 sin 2]

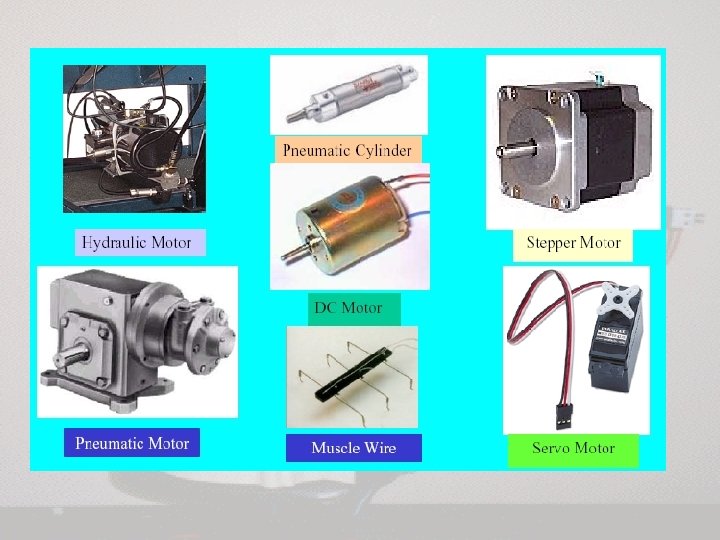
Drive Systems/Actuators • Hydraulic Larger Robots Greater speed & strength Larger floor space required Rotary vane actuators for rotary motion Hydraulic pistons for linear motion • Electric Accuracy & repeatability is better Smaller floor space Stepper motors or servo motors Drive train/gear systems for rotational Pulleys or similar systems for linear motion. • Pneumatic Smaller robots with fewer Do. F Pick-and-place with fast cycles Pneumatic pistons

Seesaw Physics T = Torque F = Force r = radius T = r. F sin T = r. F

Meshing Gears

• LEGO Gears 40 T 8 T 16 T 24 T 1 T Worm 24 T Crown Bevel

Worm Gears • Pull one tooth per revolution 3 1 2 • Result is a 24: 1 gearbox 4

Motors • 9 V Gear Motor • ~ 150 m. A • 300 RPM (no load)

Motors • 9 V Micro Motor • 20 -30 RPM

Mounting Motors
 Torque (Lego units) Torque at a speed of")
Lego Motors Motor Normal speed (RPM) Torque (Lego units) Torque at a speed of (metric units) 3240 370 1920 bricks X bump 3. 840 Kg X cm 15 RPM 36 64 bricks X bump 0. 128 Kg X cm 36 RPM 880 bricks X bump 1. 760 Kg X cm 40 RPM

Stepper motors: A stepper motor's shaft has permanent magnets attached to it, together called the rotor. Around the body of the motor is a series of coils that create a magnetic field that interacts with the permanent magnets. When these coils are turned on and off the magnetic field causes the rotor to move. As the coils are turned on and off in a certain sequence the motor will rotate forward or reverse. This is called the phase pattern and there are several types that will cause the motor to turn. Common types are full-double phase, full-single phase, and half step. To make a stepper motor rotate, you must constantly turn on and off the coils. If you simply energize one coil the motor will just jump to that position and stay there resisting change. This energized coil pulls full current even though the motor is not turning. This is the main way steppers generate heat, when at standstill. This ability to stay put at one position rigidly is often an advantage of stepper motors. The torque at standstill is called the holding torque.

Because steppers can be controlled by turning on and off coils, they are easy to control using digital computers. The computer simply energizes the coils in a certain pattern and the motor will move accordingly. At any given time the computer will know the position of the motor since the number of steps given can be stored. This is true only if some outside force of greater strength than the motor has not interfered with the motion. An optical encoder could be attached to the motor to verify its position but this is not necessary. A stepper motor can be run in "open-loop" mode (without feedback of an encoder or other device). Most stepper motor control systems will have a home switch associated with each motor that will allow the software to determine the starting or reference "home" position. http: //www. cs. uiowa. edu/~jones/step/types. html
. If")
Servo motors: Take a normal DC motor that has one coil (2 wires). If you attach a battery to those wires the motor will spin continuously Reversing the polarity will reverse the direction. Attach that motor to the wheel of a robot and watch the robot move, note the speed. Now add a heavier payload to the robot, what happens? The robot will slow down due to the increased load. The computer inside of the robot would not know this happened unless there was an encoder on the motor keeping track of its position. So, in a DC servo, the speed and current drawn are affected by the load. For applications that the exact position of the motor must be known, a feedback device like an encoder MUST be used. The control circuitry to perform good servo of a DC motor is MUCH more complex than the circuitry that controls a stepper motor.

A Servo is a small device that has an output shaft. This shaft can be positioned to specific angular positions by sending the servo a coded signal. As long as the coded signal exists on the input line, the servo will maintain the angular position of the shaft. As the coded signal changes, the angular position of the shaft changes. In practice, servos are widely used in radio controlled devices and robots.

Servos are extremely useful in robotics. The motors are small, as you can see by the picture below, have built in control circuitry, and are extremely powerful for their size. A standard servo such as the Futaba S 148 has 42 oz/inches of torque, which is pretty strong for its size. It also draws power proportional to the mechanical load. A lightly loaded servo, therefore, doesn't consume much energy. The guts of a servo motor are shown in the picture below. You can see the control circuitry, the motor, a set of gears, and the case. You can also see the 3 wires that connect to the outside world. One is for power (+5 volts), ground, and the white wire is the control wire.

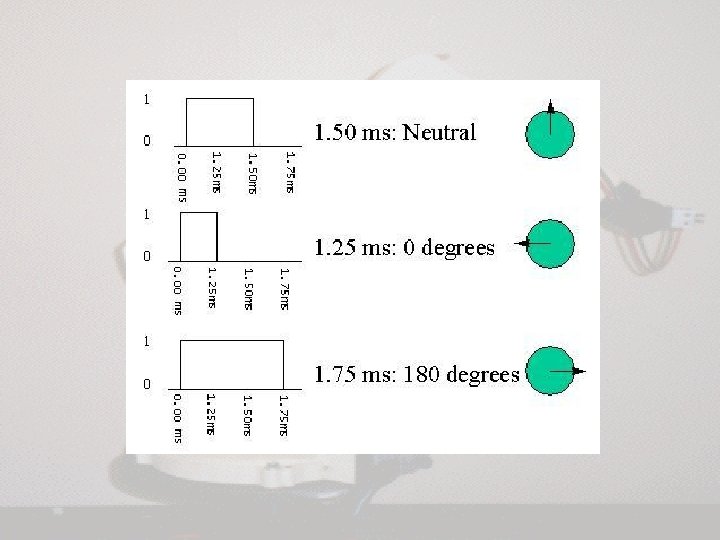
So, how does a servo work? The servo motor has some control circuits and a potentiometer (a variable resistor, aka pot) that is connected to the output shaft. This pot allows the control circuitry to monitor the current angle of the servo motor. If the shaft is at the correct angle, then the motor shuts off. If the circuit finds that the angle is not correct, it will turn the motor to the correct direction until the angle is correct. The output shaft of the servo is capable of traveling somewhere around 180 degrees. A normal servo is used to control an angular motion of between 0 and 180 degrees. A normal servo is mechanically not capable of turning any farther due to a mechanical stop built on to the main output gear.

The amount of power applied to the motor is proportional to the distance it needs to travel. So, if the shaft needs to turn a large distance, the motor will run at full speed. If it needs to turn only a small amount, the motor will run at a slower speed (proportional control) How do you communicate the angle at which the servo should turn? The control wire is used to communicate the angle. The angle is determined by the duration of a pulse that is applied to the control wire. This is called Pulse Coded Modulation. The servo expects to see a pulse every 20 milliseconds (. 02 seconds). The length of the pulse will determine how far the motor turns. A 1. 5 millisecond pulse, for example, will make the motor turn to the 90 degree position (often called the neutral position). If the pulse is shorter than 1. 5 ms, then the motor will turn the shaft to closer to 0 degrees. If the pulse is longer than 1. 5 ms, the shaft turns closer to 180 degrees.

Sensors: Anything that detects the state of the environment. • Light sensing • Heat sensing • Touch sensing • Rotational • Sonar • Radar • Infra-red
 Cost: sensors")
There are four main factors to consider in choosing a sensor. 1) Cost: sensors can be expensive, especially in bulk. 2) Environment: there are many sensors that work well and predictably inside, but that choke and die outdoors. 3) Range: Most sensors work best over a certain range of distances. If something comes too close, they bottom out, and if something is too far, they cannot detect it. Choose a sensor that will detect obstacles in the range you need. 4) Field of View: depending upon what you are doing, you may want sensors that have a wider cone of detection. A wider “field of view” will cause more objects to be detected per sensor, but it also will give less information about where exactly an object is when one is detected.

Gas Sensor Gyro Accelerometer Pendulum Resistive Tilt Sensors Metal Detector Piezo Bend Sensor Gieger-Muller Radiation Sensor Pyroelectric Detector UV Detector Resistive Bend Sensors Digital Infrared Ranging CDS Cell Resistive Light Sensor Pressure Switch Miniature Polaroid Sensor Limit Switch Touch Switch Mechanical Tilt Sensors IR Pin Diode IR Sensor w/lens Thyristor IR Reflection Sensor Magnetic Reed Switch IR Amplifier Sensor Hall Effect Magnetic Field Sensors Polaroid Sensor Board IRDA Transceiver Lite-On IR Remote Receiver Radio Shack Remote Receiver IR Modulator Receiver Solar Cell Compass Piezo Ultrasonic Transducers

Resistive Sensors Bend Sensors • Resistance = 10 k to 35 k • Force to produce 90 deg = 5 grams • www. jameco. com = 10$ Potentiometers • Fixed Rotation Sensors • Easy to find, easy to mount Resistive Bend Sensor Potentiometer Light Sensor • Good for detecting direction/presence of light • Non-linear resistance • Slow response Cadmium Sulfide Cell

Applications Sensor • Measure bend of a joint Sensors • Wall Following/Collision Detection Sensor • Weight Sensor

Lego tips: Structure • Common pitfall when trying to increase mechanical robustness:

Structure • The right way:

Structure • The right way:

Connector pegs • Black pegs are tight-fitting for locking bricks together. • Grey pegs turn smoothly in bricks for making a pivot

Car Turn

Differential Gear

Differential Drive Where D represents the arc length of the center of the robot from start to finish of the movement.
- Slides: 45