Fitting Machining INTERPRET TECHNICAL DRAWING MEM 09002 B
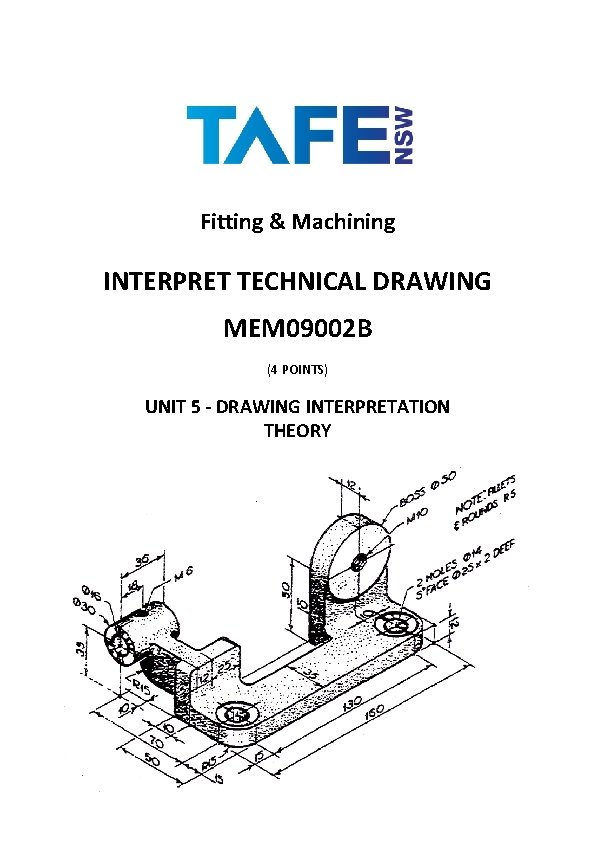
Fitting & Machining INTERPRET TECHNICAL DRAWING MEM 09002 B (4 POINTS) UNIT 5 - DRAWING INTERPRETATION THEORY
Contents DRAWING INTERPRETATION Learning Outcomes/Assessment & Resources 3 Part A – Paper Limits • Breaking Lines 4 • Scaled Drawing 5 -6 Part B – Welding Symbols • Welding Symbols 7 - 12 Part C – Surface Texture • Surface Texture 12 -16 Part D – Tolerancing • Tolerancing 17 - 19 • Limits and Fits 20 -25 Part E – Geometric Tolerancing • Geometric Tolerancing 26 -32 Part F – Sectioning Drawings • Sectioning Drawing 33 -37 Part G – Symbols and Abbreviations • Symbols and Abbreviations 37 -46 Part H – Print Reading Unit 5 - Drawing interpretation © New South Wales Technical and Further Education Commission, 2017 (TAFE NSW – WSI) • Print Reading 47 - 2
Drawing Interpretation Learning Outcome Interpret the practical implications of information specified on technical drawings as appropriate to the mechanical fabrication and electrical/electronic industries. . On completion of this unit you will be able to correctly use the following techniques when interpreting / executing an engineering drawing: • • Scaling / Breaking Welding symbols Surface finish Limits and fits Tolerancing Geometric tolerancing Sectioning Assessment Competency will be assessed by training tasks throughout this section. Please complete the training task assessment sheets and forward them to your supervisor for assessment on completion of this unit. Instruments you will need: • Pencil or pen • Calculator • Surface finish comparison gauges Resources: Student workbook and college developed material AS 1100 AS 1101 Unit 5 - Drawing interpretation © New South Wales Technical and Further Education Commission, 2017 (TAFE NSW – WSI) 3

Part A - Paper Limits In engineering, drawings are often required for parts and assemblies which do not easily fit within the range of standard paper sizes. Usable drawing representations are often made to fit within the confines of standard paper sheets by utilising the following methods: • • Removing unnecessary areas with Breaking Lines. Scaling drawings. Break Lines Drawings of large components may be condensed to a suitable size by removing areas which do not contain any useful information. Break lines are used to indicate a portion of the objects representation has been removed. Where break lines are utilised, the objects true proportion is not shown and the dimensions must be consulted to determine the objects true size. Unit 5 - Drawing interpretation © New South Wales Technical and Further Education Commission, 2017 (TAFE NSW – WSI) 4
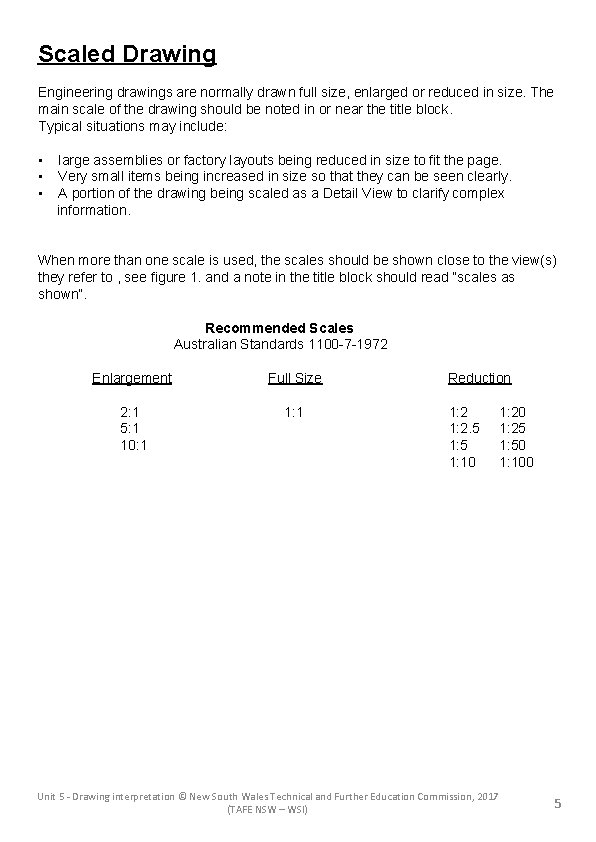
Scaled Drawing Engineering drawings are normally drawn full size, enlarged or reduced in size. The main scale of the drawing should be noted in or near the title block. Typical situations may include: • • • large assemblies or factory layouts being reduced in size to fit the page. Very small items being increased in size so that they can be seen clearly. A portion of the drawing being scaled as a Detail View to clarify complex information. When more than one scale is used, the scales should be shown close to the view(s) they refer to , see figure 1. and a note in the title block should read “scales as shown”. Recommended Scales Australian Standards 1100 -7 -1972 Enlargement Full Size 2: 1 5: 1 10: 1 1: 1 Reduction 1: 2. 5 1: 10 1: 25 1: 50 1: 100 Unit 5 - Drawing interpretation © New South Wales Technical and Further Education Commission, 2017 (TAFE NSW – WSI) 5
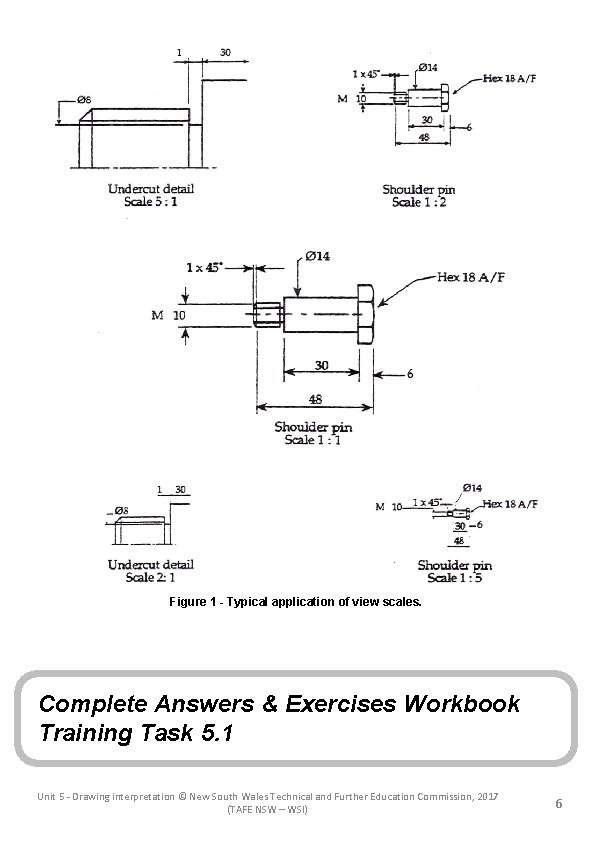
Figure 1 - Typical application of view scales. Complete Answers & Exercises Workbook Training Task 5. 1 Unit 5 - Drawing interpretation © New South Wales Technical and Further Education Commission, 2017 (TAFE NSW – WSI) 6
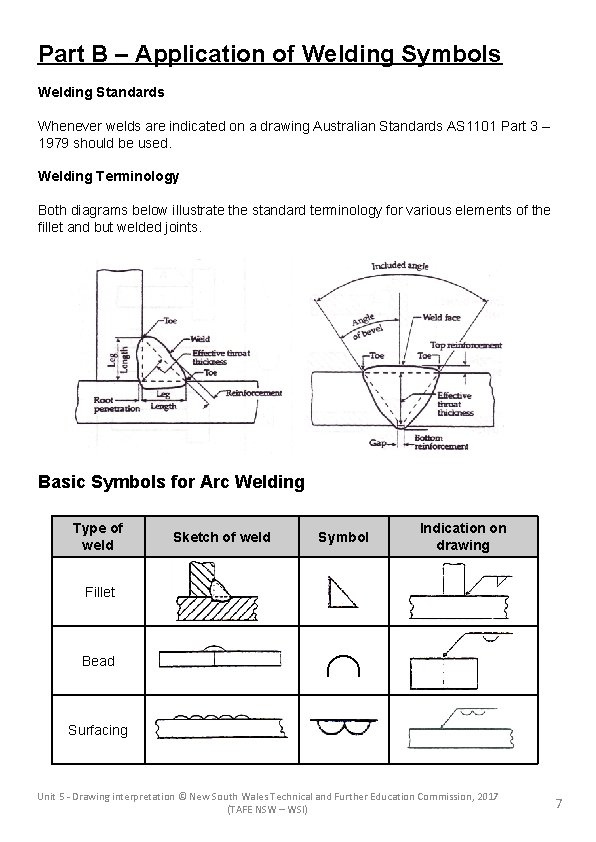
Part B – Application of Welding Symbols Welding Standards Whenever welds are indicated on a drawing Australian Standards AS 1101 Part 3 – 1979 should be used. Welding Terminology Both diagrams below illustrate the standard terminology for various elements of the fillet and but welded joints. Basic Symbols for Arc Welding Type of weld Sketch of weld Symbol Indication on drawing Fillet Bead Surfacing Unit 5 - Drawing interpretation © New South Wales Technical and Further Education Commission, 2017 (TAFE NSW – WSI) 7
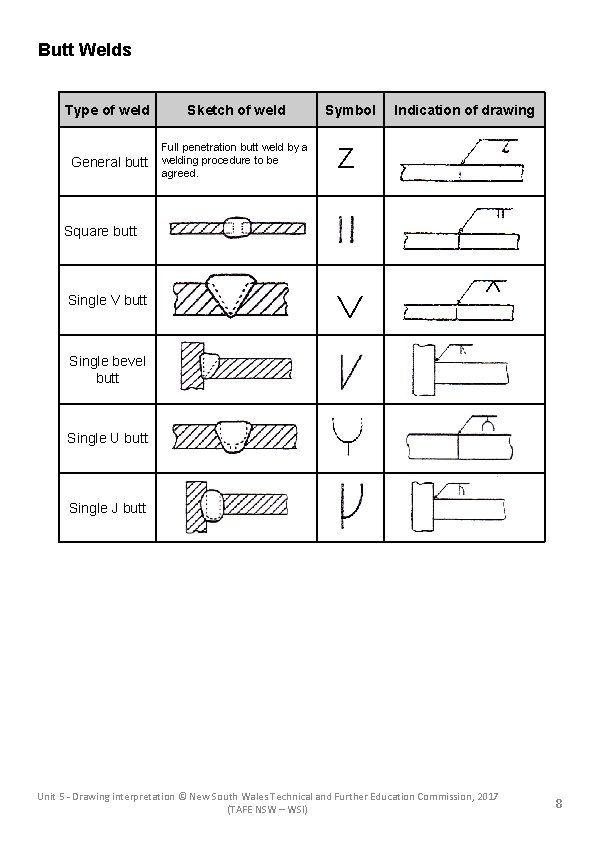
Butt Welds Type of weld Sketch of weld General butt Full penetration butt weld by a welding procedure to be agreed. Symbol Indication of drawing Z Square butt Single V butt Single bevel butt Single U butt Single J butt Unit 5 - Drawing interpretation © New South Wales Technical and Further Education Commission, 2017 (TAFE NSW – WSI) 8
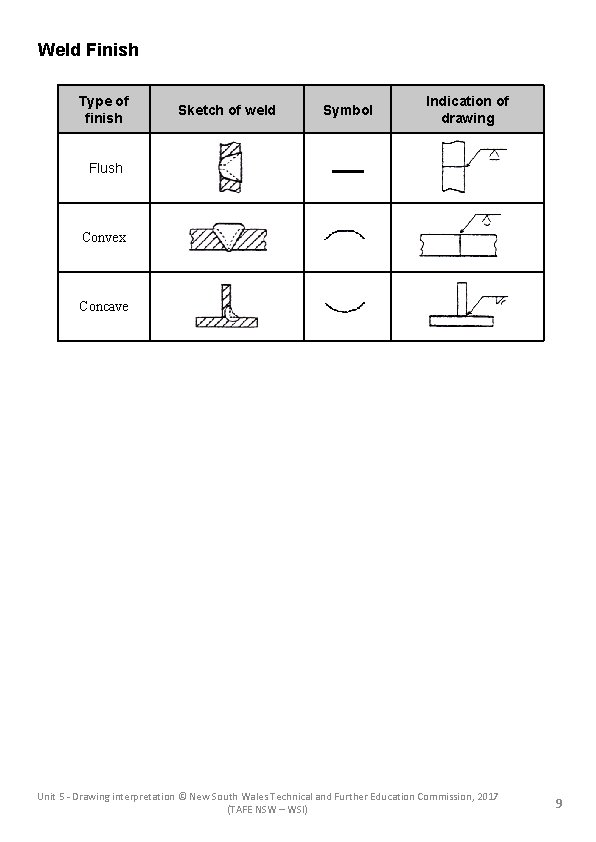
Weld Finish Type of finish Flush Sketch of weld Symbol Indication of drawing — Convex Concave Unit 5 - Drawing interpretation © New South Wales Technical and Further Education Commission, 2017 (TAFE NSW – WSI) 9
Welds-Fillet Elements of a weld symbol The Symbol Location of Weld Symbols Unit 5 - Drawing interpretation © New South Wales Technical and Further Education Commission, 2017 (TAFE NSW – WSI) 10
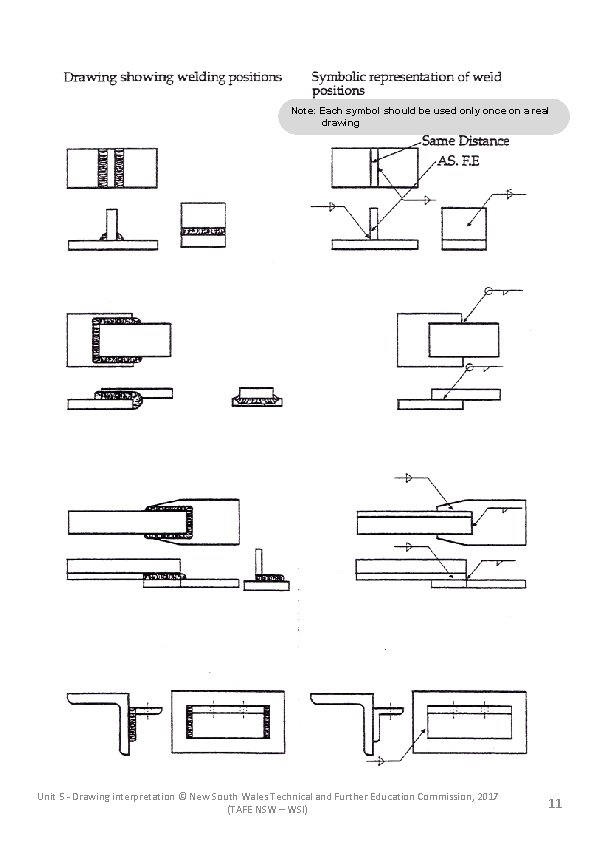
Note: Each symbol should be used only once on a real drawing Unit 5 - Drawing interpretation © New South Wales Technical and Further Education Commission, 2017 (TAFE NSW – WSI) 11
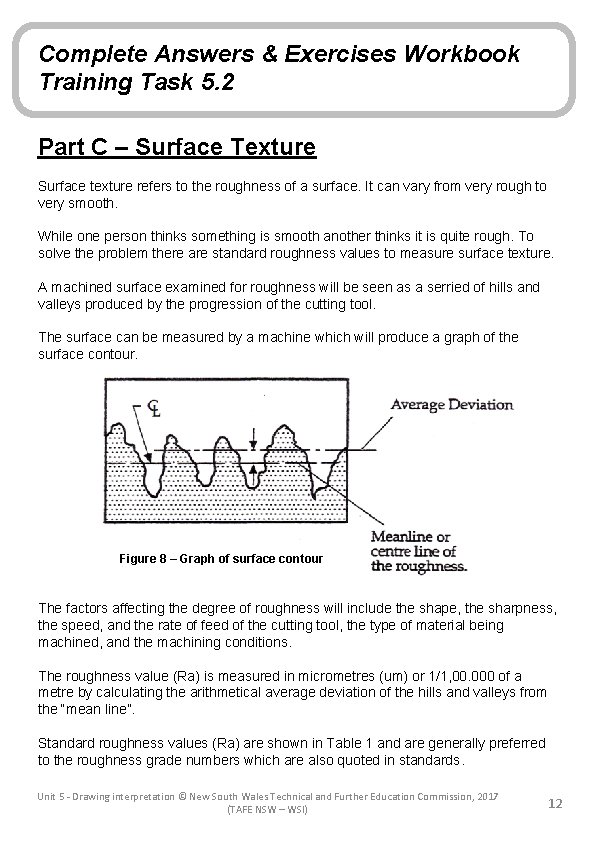
Complete Answers & Exercises Workbook Training Task 5. 2 Part C – Surface Texture Surface texture refers to the roughness of a surface. It can vary from very rough to very smooth. While one person thinks something is smooth another thinks it is quite rough. To solve the problem there are standard roughness values to measure surface texture. A machined surface examined for roughness will be seen as a serried of hills and valleys produced by the progression of the cutting tool. The surface can be measured by a machine which will produce a graph of the surface contour. Figure 8 – Graph of surface contour The factors affecting the degree of roughness will include the shape, the sharpness, the speed, and the rate of feed of the cutting tool, the type of material being machined, and the machining conditions. The roughness value (Ra) is measured in micrometres (um) or 1/1, 00. 000 of a metre by calculating the arithmetical average deviation of the hills and valleys from the “mean line”. Standard roughness values (Ra) are shown in Table 1 and are generally preferred to the roughness grade numbers which are also quoted in standards. Unit 5 - Drawing interpretation © New South Wales Technical and Further Education Commission, 2017 (TAFE NSW – WSI) 12
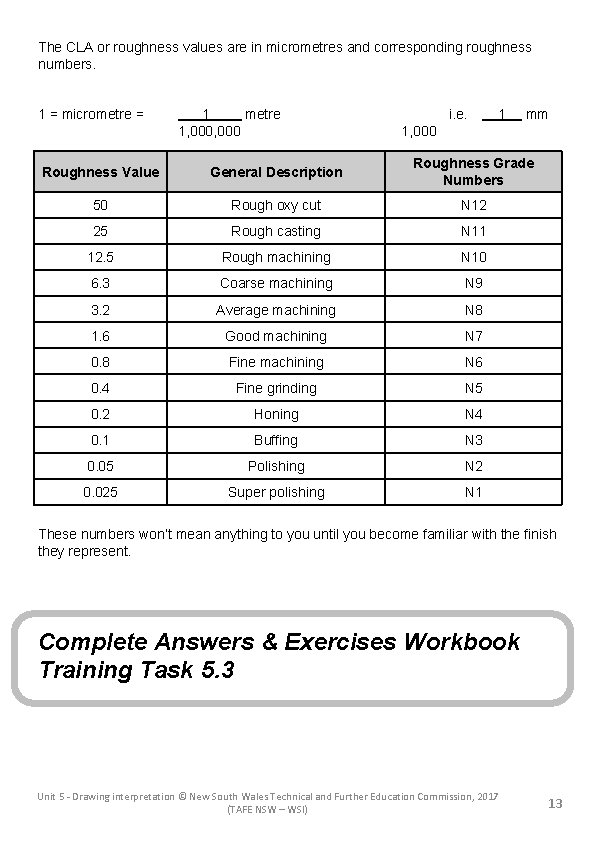
The CLA or roughness values are in micrometres and corresponding roughness numbers. 1 = micrometre = 1 metre 1, 000 i. e. 1 mm 1, 000 Roughness Value General Description Roughness Grade Numbers 50 Rough oxy cut N 12 25 Rough casting N 11 12. 5 Rough machining N 10 6. 3 Coarse machining N 9 3. 2 Average machining N 8 1. 6 Good machining N 7 0. 8 Fine machining N 6 0. 4 Fine grinding N 5 0. 2 Honing N 4 0. 1 Buffing N 3 0. 05 Polishing N 2 0. 025 Super polishing N 1 These numbers won’t mean anything to you until you become familiar with the finish they represent. Complete Answers & Exercises Workbook Training Task 5. 3 Unit 5 - Drawing interpretation © New South Wales Technical and Further Education Commission, 2017 (TAFE NSW – WSI) 13
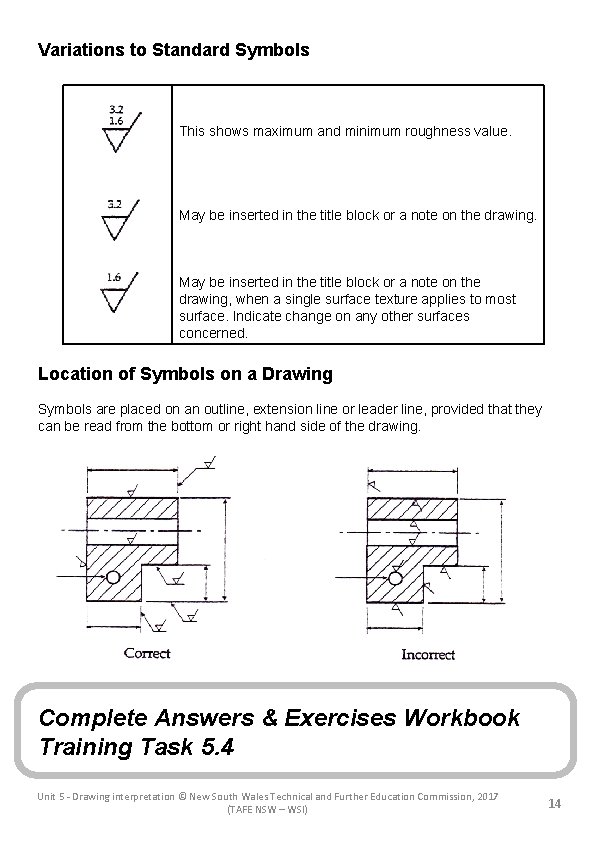
Variations to Standard Symbols This shows maximum and minimum roughness value. May be inserted in the title block or a note on the drawing, when a single surface texture applies to most surface. Indicate change on any other surfaces concerned. Location of Symbols on a Drawing Symbols are placed on an outline, extension line or leader line, provided that they can be read from the bottom or right hand side of the drawing. Complete Answers & Exercises Workbook Training Task 5. 4 Unit 5 - Drawing interpretation © New South Wales Technical and Further Education Commission, 2017 (TAFE NSW – WSI) 14
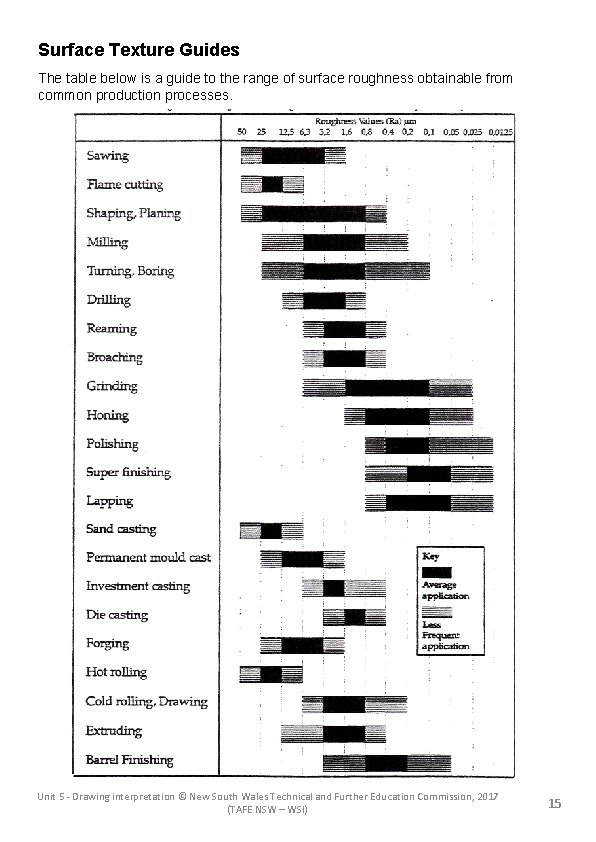
Surface Texture Guides The table below is a guide to the range of surface roughness obtainable from common production processes. Unit 5 - Drawing interpretation © New South Wales Technical and Further Education Commission, 2017 (TAFE NSW – WSI) 15
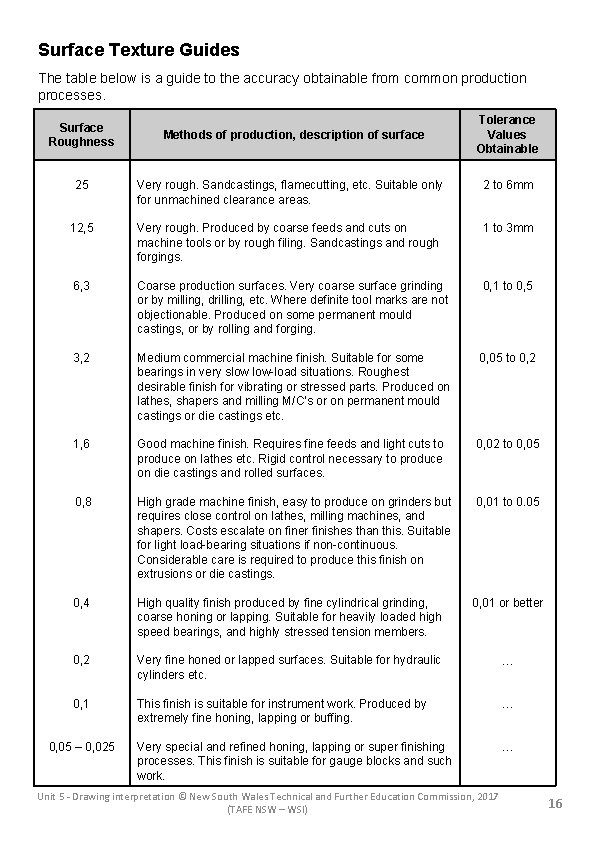
Surface Texture Guides The table below is a guide to the accuracy obtainable from common production processes. Surface Roughness Methods of production, description of surface Tolerance Values Obtainable 25 Very rough. Sandcastings, flamecutting, etc. Suitable only for unmachined clearance areas. 2 to 6 mm 12, 5 Very rough. Produced by coarse feeds and cuts on machine tools or by rough filing. Sandcastings and rough forgings. 1 to 3 mm 6, 3 Coarse production surfaces. Very coarse surface grinding or by milling, drilling, etc. Where definite tool marks are not objectionable. Produced on some permanent mould castings, or by rolling and forging. 0, 1 to 0, 5 3, 2 Medium commercial machine finish. Suitable for some bearings in very slow low-load situations. Roughest desirable finish for vibrating or stressed parts. Produced on lathes, shapers and milling M/C’s or on permanent mould castings or die castings etc. 0, 05 to 0, 2 1, 6 Good machine finish. Requires fine feeds and light cuts to produce on lathes etc. Rigid control necessary to produce on die castings and rolled surfaces. 0, 02 to 0, 05 0, 8 High grade machine finish, easy to produce on grinders but requires close control on lathes, milling machines, and shapers. Costs escalate on finer finishes than this. Suitable for light load-bearing situations if non-continuous. Considerable care is required to produce this finish on extrusions or die castings. 0, 01 to 0. 05 0, 4 High quality finish produced by fine cylindrical grinding, coarse honing or lapping. Suitable for heavily loaded high speed bearings, and highly stressed tension members. 0, 01 or better 0, 2 Very fine honed or lapped surfaces. Suitable for hydraulic cylinders etc. 0, 1 This finish is suitable for instrument work. Produced by extremely fine honing, lapping or buffing. Very special and refined honing, lapping or super finishing processes. This finish is suitable for gauge blocks and such work. 0, 05 – 0, 025 Unit 5 - Drawing interpretation © New South Wales Technical and Further Education Commission, 2017 (TAFE NSW – WSI) 16
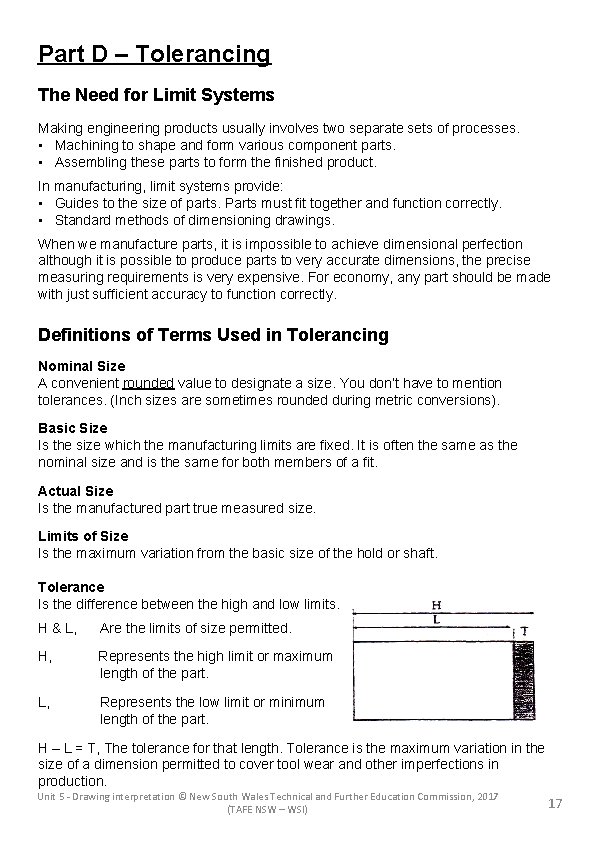
Part D – Tolerancing The Need for Limit Systems Making engineering products usually involves two separate sets of processes. • Machining to shape and form various component parts. • Assembling these parts to form the finished product. In manufacturing, limit systems provide: • Guides to the size of parts. Parts must fit together and function correctly. • Standard methods of dimensioning drawings. When we manufacture parts, it is impossible to achieve dimensional perfection although it is possible to produce parts to very accurate dimensions, the precise measuring requirements is very expensive. For economy, any part should be made with just sufficient accuracy to function correctly. Definitions of Terms Used in Tolerancing Nominal Size A convenient rounded value to designate a size. You don’t have to mention tolerances. (Inch sizes are sometimes rounded during metric conversions). Basic Size Is the size which the manufacturing limits are fixed. It is often the same as the nominal size and is the same for both members of a fit. Actual Size Is the manufactured part true measured size. Limits of Size Is the maximum variation from the basic size of the hold or shaft. Tolerance Is the difference between the high and low limits. H & L, Are the limits of size permitted. H, Represents the high limit or maximum length of the part. L, Represents the low limit or minimum length of the part. H – L = T, The tolerance for that length. Tolerance is the maximum variation in the size of a dimension permitted to cover tool wear and other imperfections in production. Unit 5 - Drawing interpretation © New South Wales Technical and Further Education Commission, 2017 (TAFE NSW – WSI) 17
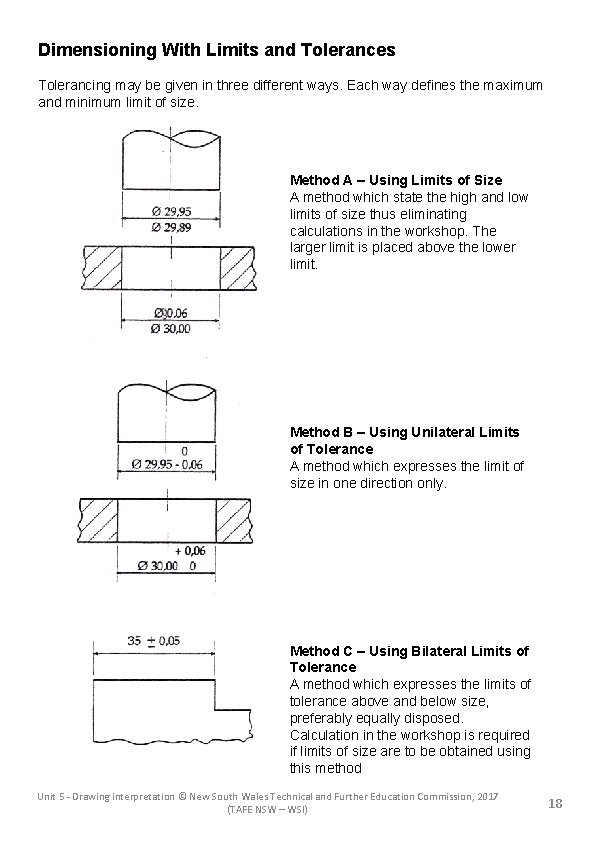
Dimensioning With Limits and Tolerances Tolerancing may be given in three different ways. Each way defines the maximum and minimum limit of size. Method A – Using Limits of Size A method which state the high and low limits of size thus eliminating calculations in the workshop. The larger limit is placed above the lower limit. Method B – Using Unilateral Limits of Tolerance A method which expresses the limit of size in one direction only. Method C – Using Bilateral Limits of Tolerance A method which expresses the limits of tolerance above and below size, preferably equally disposed. Calculation in the workshop is required if limits of size are to be obtained using this method Unit 5 - Drawing interpretation © New South Wales Technical and Further Education Commission, 2017 (TAFE NSW – WSI) 18
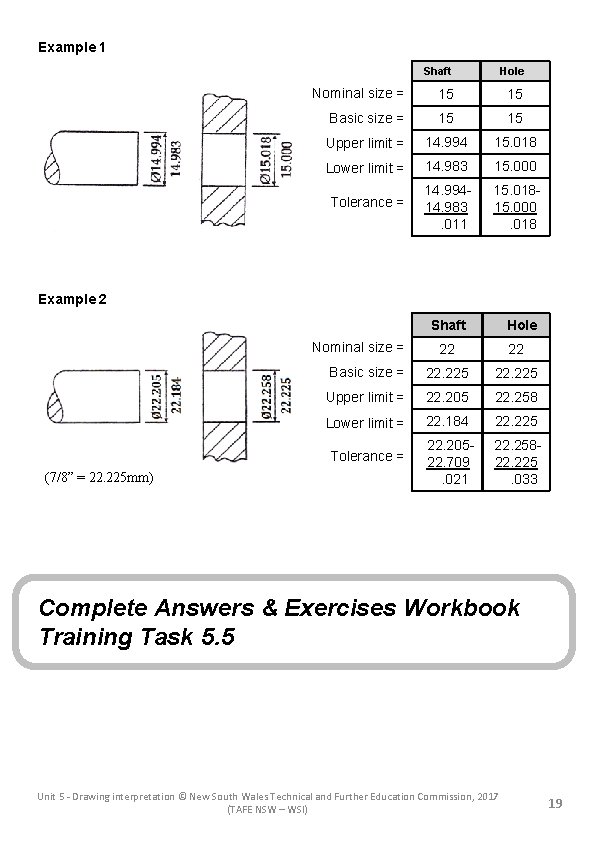
Example 1 Shaft Hole Nominal size = 15 15 Basic size = 15 15 Upper limit = 14. 994 15. 018 Lower limit = 14. 983 15. 000 Tolerance = 14. 99414. 983. 011 15. 01815. 000. 018 Example 2 Shaft Nominal size = (7/8” = 22. 225 mm) Hole 22 22 Basic size = 22. 225 Upper limit = 22. 205 22. 258 Lower limit = 22. 184 22. 225 Tolerance = 22. 20522. 709. 021 22. 25822. 225. 033 Complete Answers & Exercises Workbook Training Task 5. 5 Unit 5 - Drawing interpretation © New South Wales Technical and Further Education Commission, 2017 (TAFE NSW – WSI) 19
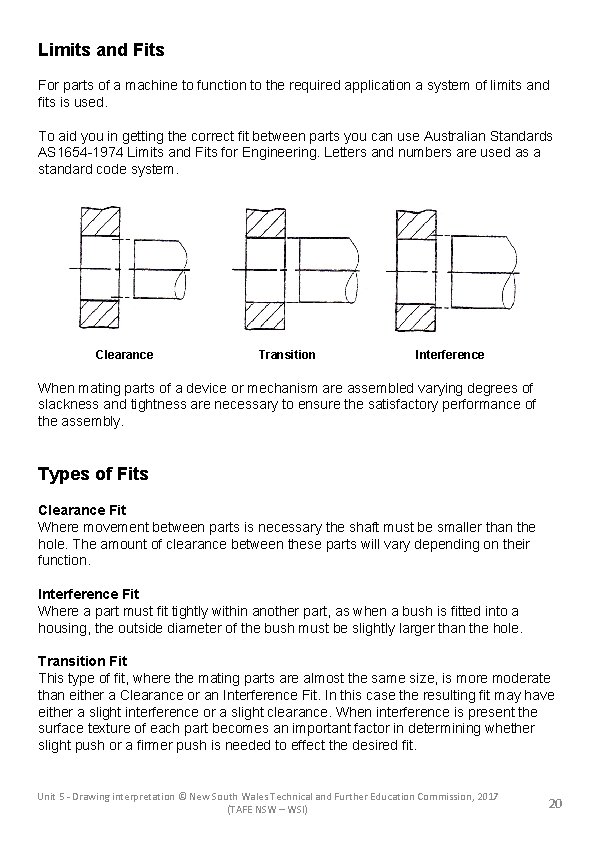
Limits and Fits For parts of a machine to function to the required application a system of limits and fits is used. To aid you in getting the correct fit between parts you can use Australian Standards AS 1654 -1974 Limits and Fits for Engineering. Letters and numbers are used as a standard code system. Clearance Transition Interference When mating parts of a device or mechanism are assembled varying degrees of slackness and tightness are necessary to ensure the satisfactory performance of the assembly. Types of Fits Clearance Fit Where movement between parts is necessary the shaft must be smaller than the hole. The amount of clearance between these parts will vary depending on their function. Interference Fit Where a part must fit tightly within another part, as when a bush is fitted into a housing, the outside diameter of the bush must be slightly larger than the hole. Transition Fit This type of fit, where the mating parts are almost the same size, is more moderate than either a Clearance or an Interference Fit. In this case the resulting fit may have either a slight interference or a slight clearance. When interference is present the surface texture of each part becomes an important factor in determining whether slight push or a firmer push is needed to effect the desired fit. Unit 5 - Drawing interpretation © New South Wales Technical and Further Education Commission, 2017 (TAFE NSW – WSI) 20
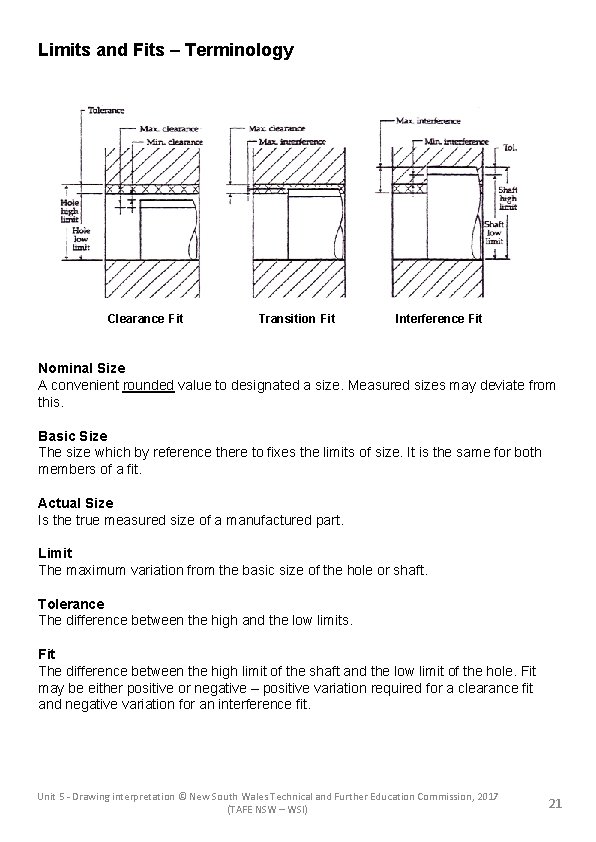
Limits and Fits – Terminology Clearance Fit Transition Fit Interference Fit Nominal Size A convenient rounded value to designated a size. Measured sizes may deviate from this. Basic Size The size which by reference there to fixes the limits of size. It is the same for both members of a fit. Actual Size Is the true measured size of a manufactured part. Limit The maximum variation from the basic size of the hole or shaft. Tolerance The difference between the high and the low limits. Fit The difference between the high limit of the shaft and the low limit of the hole. Fit may be either positive or negative – positive variation required for a clearance fit and negative variation for an interference fit. Unit 5 - Drawing interpretation © New South Wales Technical and Further Education Commission, 2017 (TAFE NSW – WSI) 21
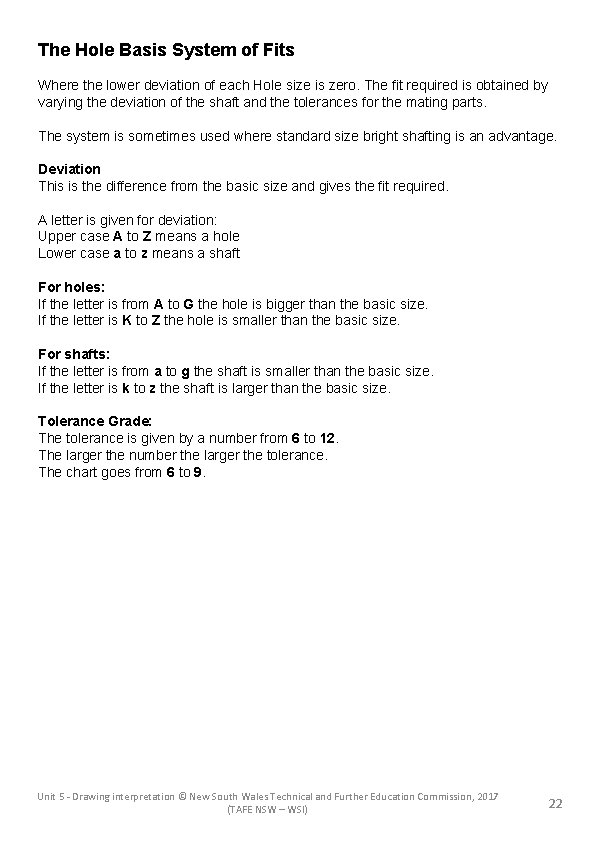
The Hole Basis System of Fits Where the lower deviation of each Hole size is zero. The fit required is obtained by varying the deviation of the shaft and the tolerances for the mating parts. The system is sometimes used where standard size bright shafting is an advantage. Deviation This is the difference from the basic size and gives the fit required. A letter is given for deviation: Upper case A to Z means a hole Lower case a to z means a shaft For holes: If the letter is from A to G the hole is bigger than the basic size. If the letter is K to Z the hole is smaller than the basic size. For shafts: If the letter is from a to g the shaft is smaller than the basic size. If the letter is k to z the shaft is larger than the basic size. Tolerance Grade: The tolerance is given by a number from 6 to 12. The larger the number the larger the tolerance. The chart goes from 6 to 9. Unit 5 - Drawing interpretation © New South Wales Technical and Further Education Commission, 2017 (TAFE NSW – WSI) 22
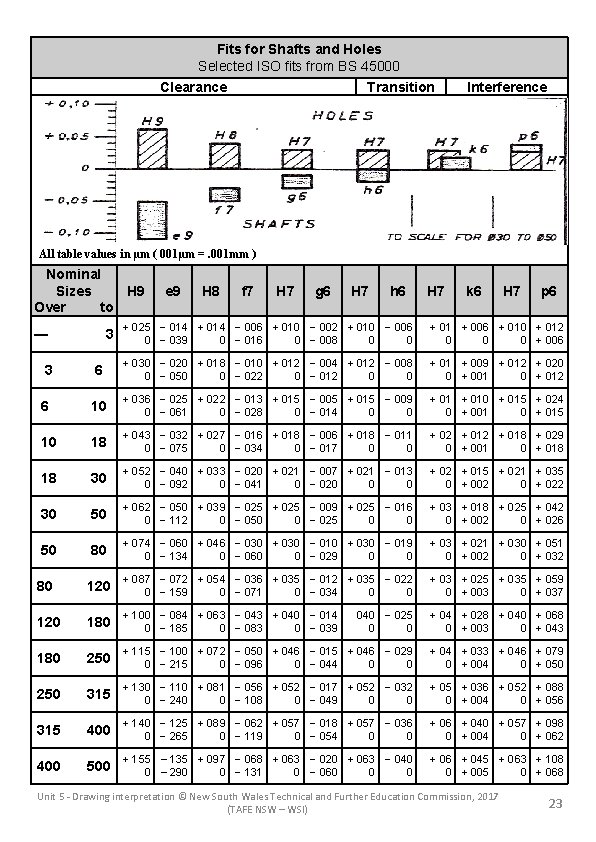
Fits for Shafts and Holes Selected ISO fits from BS 45000 Clearance Transition Interference All table values in µm ( 001µm =. 001 mm ) Nominal Sizes H 9 Over to — 3 e 9 H 8 f 7 H 7 g 6 H 7 h 6 H 7 k 6 H 7 p 6 + 025 − 014 + 014 − 006 + 010 − 002 + 010 − 006 0 − 039 0 − 016 0 − 008 0 0 + 01 + 006 + 010 + 012 0 0 0 + 006 3 6 + 030 − 020 + 018 − 010 + 012 − 004 + 012 − 008 0 − 050 0 − 022 0 − 012 0 0 + 01 + 009 + 012 + 020 0 + 001 0 + 012 6 10 + 036 − 025 + 022 − 013 + 015 − 005 + 015 − 009 0 − 061 0 − 028 0 − 014 0 0 + 010 + 015 + 024 0 + 001 0 + 015 10 18 + 043 − 032 + 027 − 016 + 018 − 006 + 018 − 011 0 − 075 0 − 034 0 − 017 0 0 + 02 + 018 + 029 0 + 001 0 + 018 18 30 + 052 − 040 + 033 − 020 + 021 − 007 + 021 − 013 0 − 092 0 − 041 0 − 020 0 0 + 02 + 015 + 021 + 035 0 + 002 0 + 022 30 50 + 062 − 050 + 039 − 025 + 025 − 009 + 025 − 016 0 − 112 0 − 050 0 − 025 0 0 + 03 + 018 + 025 + 042 0 + 002 0 + 026 50 80 + 074 − 060 + 046 − 030 + 030 − 019 0 − 134 0 − 060 0 − 029 0 0 + 03 + 021 + 030 + 051 0 + 002 0 + 032 80 120 + 087 − 072 + 054 − 036 + 035 − 012 + 035 − 022 0 − 159 0 − 071 0 − 034 0 0 + 03 + 025 + 035 + 059 0 + 003 0 + 037 120 180 + 100 − 084 + 063 − 043 + 040 − 014 0 − 185 0 − 083 0 − 039 040 − 025 0 0 + 04 + 028 + 040 + 068 0 + 003 0 + 043 180 250 + 115 − 100 + 072 − 050 + 046 − 015 + 046 − 029 0 − 215 0 − 096 0 − 044 0 0 + 04 + 033 + 046 + 079 0 + 004 0 + 050 250 315 + 130 − 110 + 081 − 056 + 052 − 017 + 052 − 032 0 − 240 0 − 108 0 − 049 0 0 + 05 + 036 + 052 + 088 0 + 004 0 + 056 315 400 + 140 − 125 + 089 − 062 + 057 − 018 + 057 − 036 0 − 265 0 − 119 0 − 054 0 0 + 06 + 040 + 057 + 098 0 + 004 0 + 062 400 500 + 155 135 + 097 − 068 + 063 − 020 + 063 − 040 0 290 0 − 131 0 − 060 0 0 + 06 + 045 + 063 + 108 0 + 005 0 + 068 Unit 5 - Drawing interpretation © New South Wales Technical and Further Education Commission, 2017 (TAFE NSW – WSI) 23
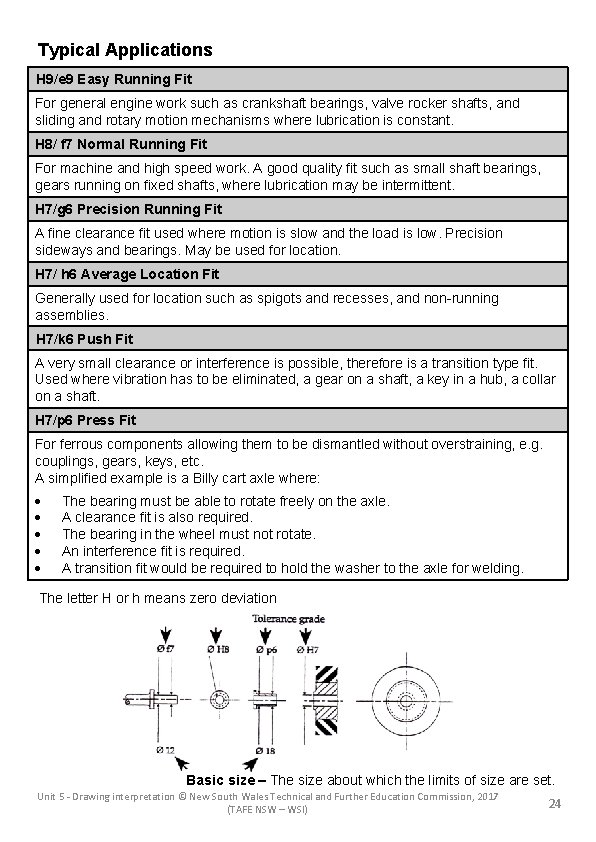
Typical Applications H 9/e 9 Easy Running Fit For general engine work such as crankshaft bearings, valve rocker shafts, and sliding and rotary motion mechanisms where lubrication is constant. H 8/ f 7 Normal Running Fit For machine and high speed work. A good quality fit such as small shaft bearings, gears running on fixed shafts, where lubrication may be intermittent. H 7/g 6 Precision Running Fit A fine clearance fit used where motion is slow and the load is low. Precision sideways and bearings. May be used for location. H 7/ h 6 Average Location Fit Generally used for location such as spigots and recesses, and non-running assemblies. H 7/k 6 Push Fit A very small clearance or interference is possible, therefore is a transition type fit. Used where vibration has to be eliminated, a gear on a shaft, a key in a hub, a collar on a shaft. H 7/p 6 Press Fit For ferrous components allowing them to be dismantled without overstraining, e. g. couplings, gears, keys, etc. A simplified example is a Billy cart axle where: The bearing must be able to rotate freely on the axle. A clearance fit is also required. The bearing in the wheel must not rotate. An interference fit is required. A transition fit would be required to hold the washer to the axle for welding. The letter H or h means zero deviation Basic size – The size about which the limits of size are set. Unit 5 - Drawing interpretation © New South Wales Technical and Further Education Commission, 2017 (TAFE NSW – WSI) 24

Complete Answers & Exercises Workbook Training Task 5. 6 Complete Answers & Exercises Workbook Knowledge Challenge. Unit 5 - Drawing interpretation © New South Wales Technical and Further Education Commission, 2017 (TAFE NSW – WSI) 25
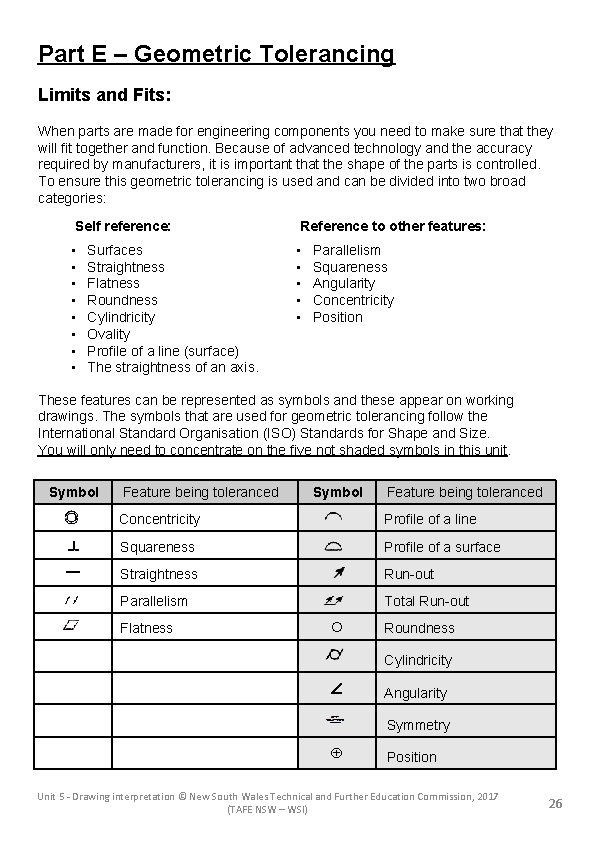
Part E – Geometric Tolerancing Limits and Fits: When parts are made for engineering components you need to make sure that they will fit together and function. Because of advanced technology and the accuracy required by manufacturers, it is important that the shape of the parts is controlled. To ensure this geometric tolerancing is used and can be divided into two broad categories: Self reference: Reference to other features: • • • • Surfaces Straightness Flatness Roundness Cylindricity Ovality Profile of a line (surface) The straightness of an axis. Parallelism Squareness Angularity Concentricity Position These features can be represented as symbols and these appear on working drawings. The symbols that are used for geometric tolerancing follow the International Standard Organisation (ISO) Standards for Shape and Size. You will only need to concentrate on the five not shaded symbols in this unit. Symbol — Feature being toleranced Symbol Feature being toleranced Concentricity Profile of a line Squareness Profile of a surface Straightness Run-out Parallelism Total Run-out Flatness Roundness Cylindricity Angularity Symmetry Position Unit 5 - Drawing interpretation © New South Wales Technical and Further Education Commission, 2017 (TAFE NSW – WSI) 26
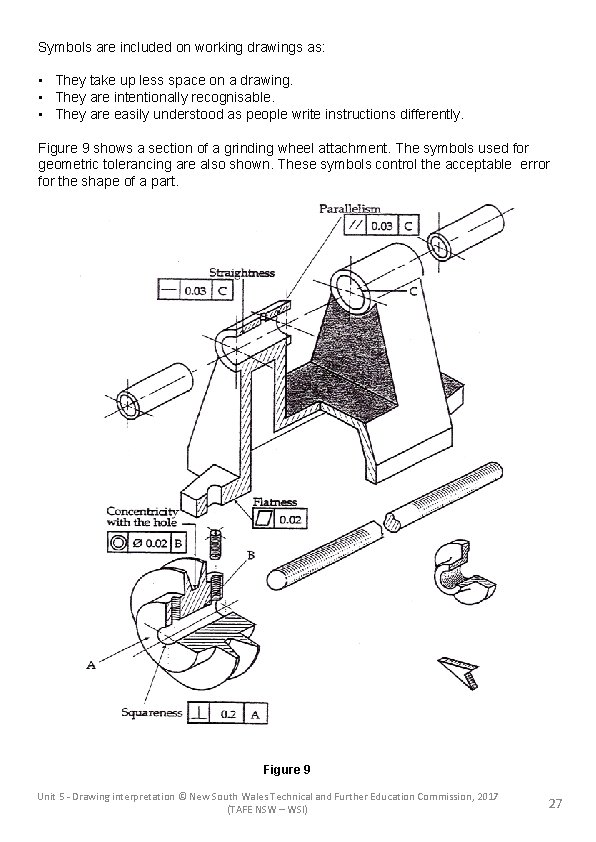
Symbols are included on working drawings as: • They take up less space on a drawing. • They are intentionally recognisable. • They are easily understood as people write instructions differently. Figure 9 shows a section of a grinding wheel attachment. The symbols used for geometric tolerancing are also shown. These symbols control the acceptable error for the shape of a part. Figure 9 Unit 5 - Drawing interpretation © New South Wales Technical and Further Education Commission, 2017 (TAFE NSW – WSI) 27
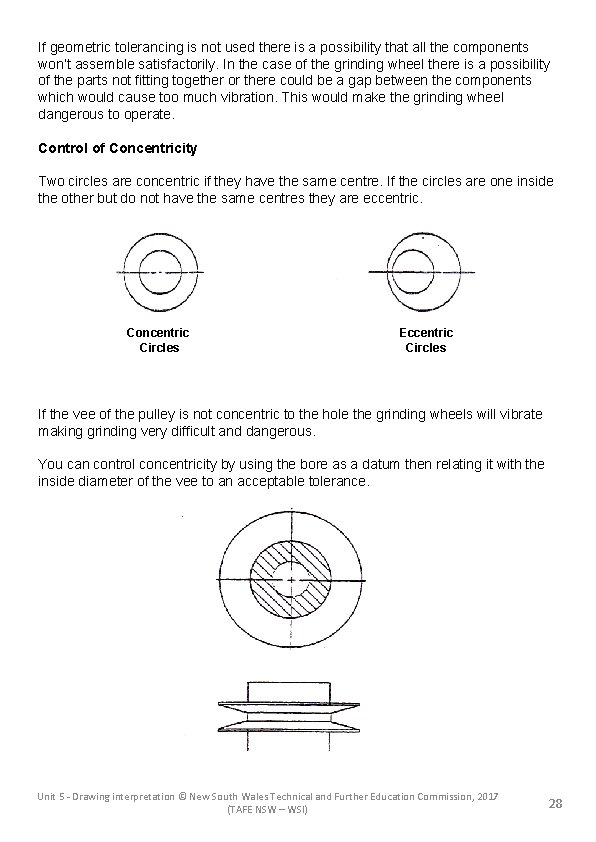
If geometric tolerancing is not used there is a possibility that all the components won’t assemble satisfactorily. In the case of the grinding wheel there is a possibility of the parts not fitting together or there could be a gap between the components which would cause too much vibration. This would make the grinding wheel dangerous to operate. Control of Concentricity Two circles are concentric if they have the same centre. If the circles are one inside the other but do not have the same centres they are eccentric. Concentric Circles Eccentric Circles If the vee of the pulley is not concentric to the hole the grinding wheels will vibrate making grinding very difficult and dangerous. You can control concentricity by using the bore as a datum then relating it with the inside diameter of the vee to an acceptable tolerance. Unit 5 - Drawing interpretation © New South Wales Technical and Further Education Commission, 2017 (TAFE NSW – WSI) 28
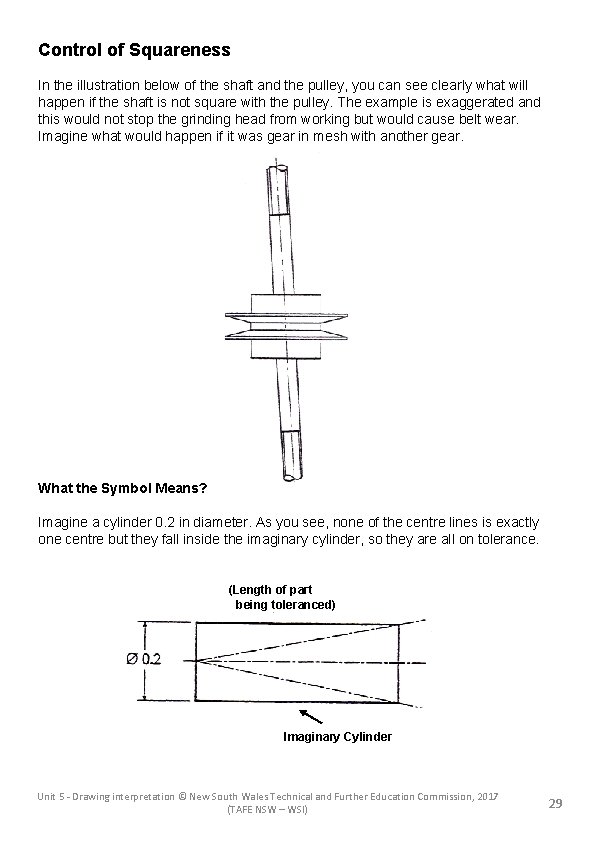
Control of Squareness In the illustration below of the shaft and the pulley, you can see clearly what will happen if the shaft is not square with the pulley. The example is exaggerated and this would not stop the grinding head from working but would cause belt wear. Imagine what would happen if it was gear in mesh with another gear. What the Symbol Means? Imagine a cylinder 0. 2 in diameter. As you see, none of the centre lines is exactly one centre but they fall inside the imaginary cylinder, so they are all on tolerance. (Length of part being toleranced) Imaginary Cylinder Unit 5 - Drawing interpretation © New South Wales Technical and Further Education Commission, 2017 (TAFE NSW – WSI) 29
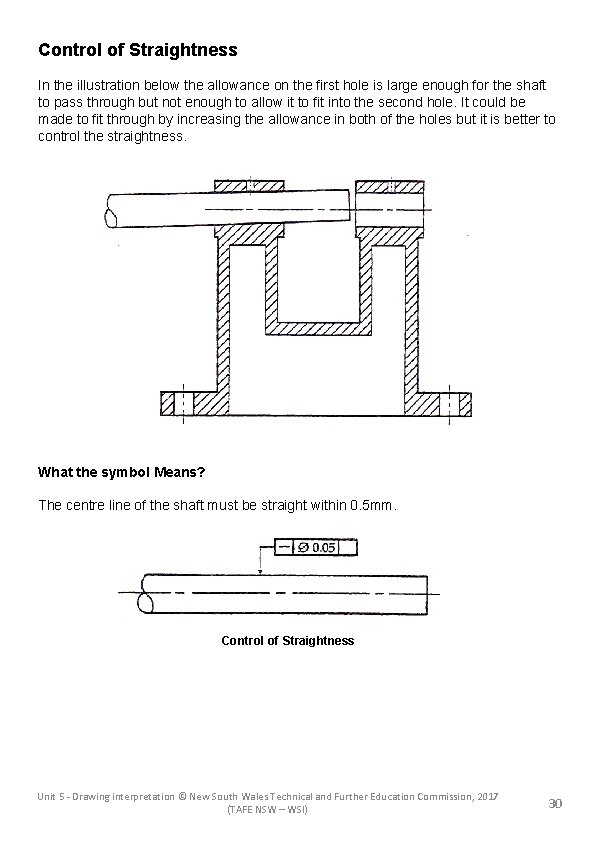
Control of Straightness In the illustration below the allowance on the first hole is large enough for the shaft to pass through but not enough to allow it to fit into the second hole. It could be made to fit through by increasing the allowance in both of the holes but it is better to control the straightness. What the symbol Means? The centre line of the shaft must be straight within 0. 5 mm. Control of Straightness Unit 5 - Drawing interpretation © New South Wales Technical and Further Education Commission, 2017 (TAFE NSW – WSI) 30
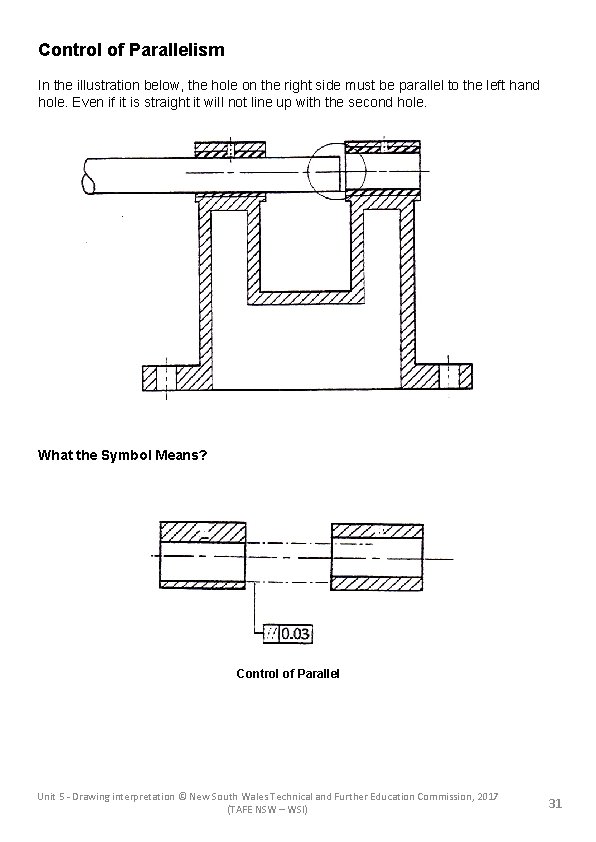
Control of Parallelism In the illustration below, the hole on the right side must be parallel to the left hand hole. Even if it is straight it will not line up with the second hole. What the Symbol Means? Control of Parallel Unit 5 - Drawing interpretation © New South Wales Technical and Further Education Commission, 2017 (TAFE NSW – WSI) 31
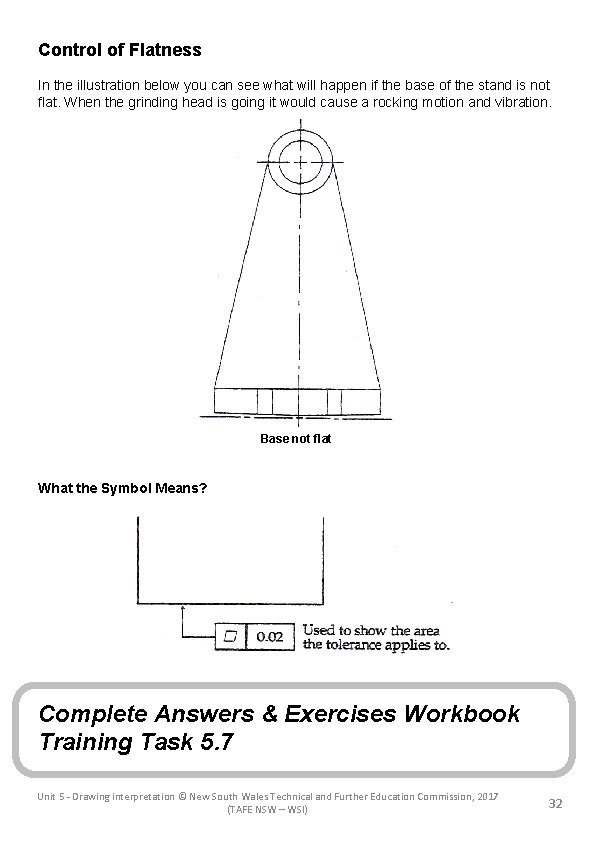
Control of Flatness In the illustration below you can see what will happen if the base of the stand is not flat. When the grinding head is going it would cause a rocking motion and vibration. Base not flat What the Symbol Means? Complete Answers & Exercises Workbook Training Task 5. 7 Unit 5 - Drawing interpretation © New South Wales Technical and Further Education Commission, 2017 (TAFE NSW – WSI) 32
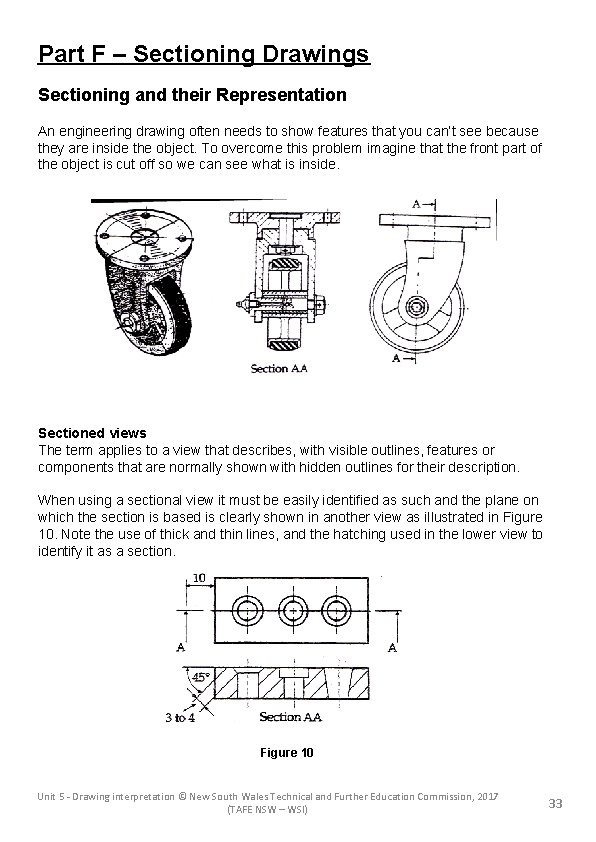
Part F – Sectioning Drawings Sectioning and their Representation An engineering drawing often needs to show features that you can’t see because they are inside the object. To overcome this problem imagine that the front part of the object is cut off so we can see what is inside. Sectioned views The term applies to a view that describes, with visible outlines, features or components that are normally shown with hidden outlines for their description. When using a sectional view it must be easily identified as such and the plane on which the section is based is clearly shown in another view as illustrated in Figure 10. Note the use of thick and thin lines, and the hatching used in the lower view to identify it as a section. Figure 10 Unit 5 - Drawing interpretation © New South Wales Technical and Further Education Commission, 2017 (TAFE NSW – WSI) 33
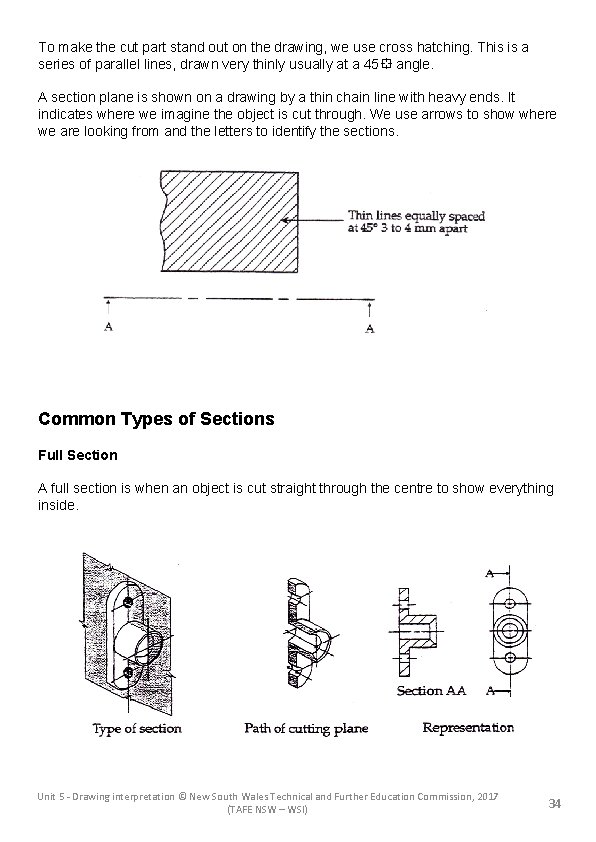
To make the cut part stand out on the drawing, we use cross hatching. This is a series of parallel lines, drawn very thinly usually at a 45 angle. A section plane is shown on a drawing by a thin chain line with heavy ends. It indicates where we imagine the object is cut through. We use arrows to show where we are looking from and the letters to identify the sections. Common Types of Sections Full Section A full section is when an object is cut straight through the centre to show everything inside. Unit 5 - Drawing interpretation © New South Wales Technical and Further Education Commission, 2017 (TAFE NSW – WSI) 34
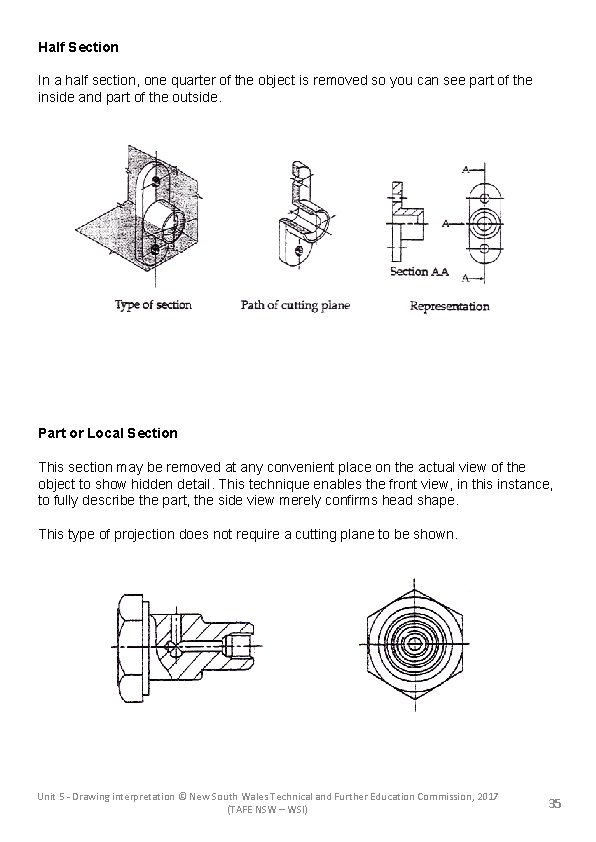
Half Section In a half section, one quarter of the object is removed so you can see part of the inside and part of the outside. Part or Local Section This section may be removed at any convenient place on the actual view of the object to show hidden detail. This technique enables the front view, in this instance, to fully describe the part, the side view merely confirms head shape. This type of projection does not require a cutting plane to be shown. Unit 5 - Drawing interpretation © New South Wales Technical and Further Education Commission, 2017 (TAFE NSW – WSI) 35
Other Sectioning Practices The components chosen as examples of aligned sections introduce conventions related to the treatment of webs. If a cutting plane cuts along the web then hatching is omitted from that area in the sectioned view. Hidden outlines are also omitted from all sectional views. Unit 5 - Drawing interpretation © New South Wales Technical and Further Education Commission, 2017 (TAFE NSW – WSI) 36
Complete Answers & Exercises Workbook Training Task 5. 8 Part G – Symbols and Abbreviations In engineering, objects are drawn so that the shape is clear. Dimensions are then added to define the size. Notes can then be added to explain things that may not be clear to the manufacturer. Notes are required for complicated parts, however, the more notes there are on a drawing the more untidy it becomes. An international system of symbols and abbreviations has been developed to save time and space. This system has been adopted by the Standards Association. Each symbol has only one meaning. Most symbols are used by all branches of engineering however some branches have their own specific abbreviations. Unit 5 - Drawing interpretation © New South Wales Technical and Further Education Commission, 2017 (TAFE NSW – WSI) 37
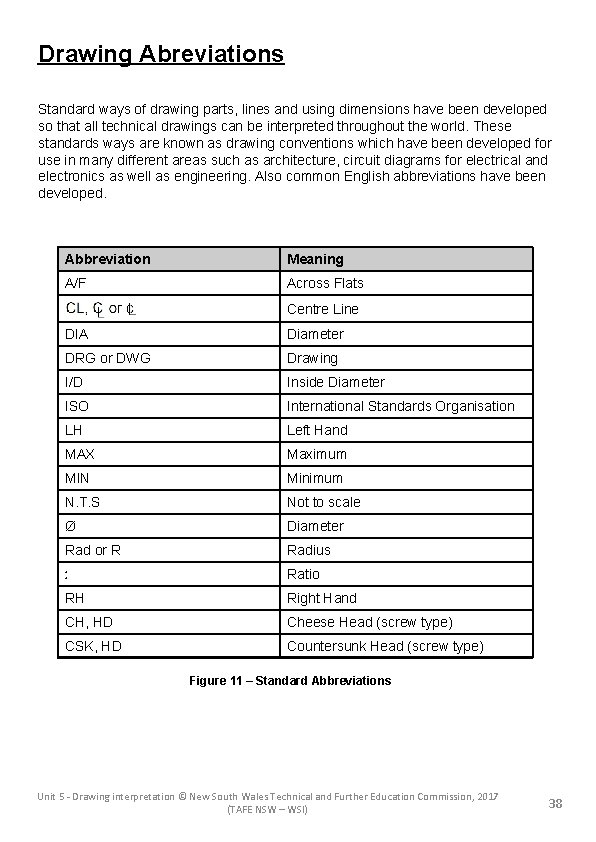
Drawing Abreviations Standard ways of drawing parts, lines and using dimensions have been developed so that all technical drawings can be interpreted throughout the world. These standards ways are known as drawing conventions which have been developed for use in many different areas such as architecture, circuit diagrams for electrical and electronics as well as engineering. Also common English abbreviations have been developed. Abbreviation Meaning A/F Across Flats Centre Line DIA Diameter DRG or DWG Drawing I/D Inside Diameter ISO International Standards Organisation LH Left Hand MAX Maximum MIN Minimum N. T. S Not to scale Ø Diameter Rad or R Radius Ratio RH Right Hand CH, HD Cheese Head (screw type) CSK, HD Countersunk Head (screw type) Figure 11 – Standard Abbreviations Unit 5 - Drawing interpretation © New South Wales Technical and Further Education Commission, 2017 (TAFE NSW – WSI) 38
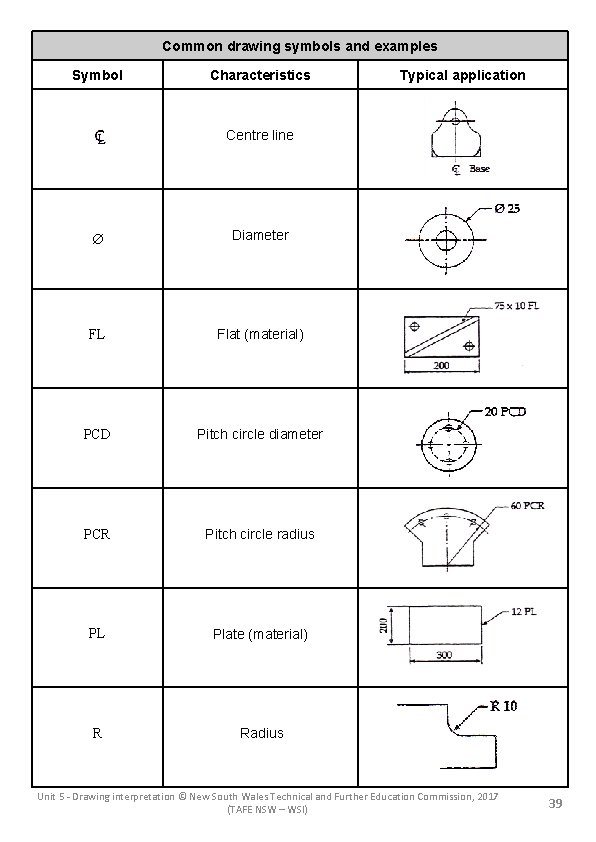
Common drawing symbols and examples Symbol Characteristics Typical application Centre line Diameter FL Flat (material) PCD Pitch circle diameter PCR Pitch circle radius PL Plate (material) R Radius Unit 5 - Drawing interpretation © New South Wales Technical and Further Education Commission, 2017 (TAFE NSW – WSI) 39
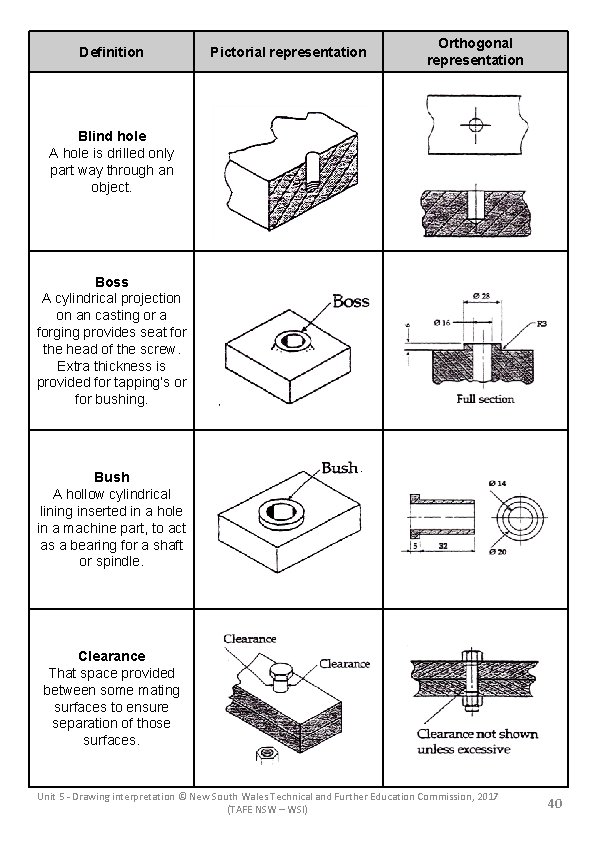
Definition Pictorial representation Orthogonal representation Blind hole A hole is drilled only part way through an object. Boss A cylindrical projection on an casting or a forging provides seat for the head of the screw. Extra thickness is provided for tapping’s or for bushing. Bush A hollow cylindrical lining inserted in a hole in a machine part, to act as a bearing for a shaft or spindle. Clearance That space provided between some mating surfaces to ensure separation of those surfaces. Unit 5 - Drawing interpretation © New South Wales Technical and Further Education Commission, 2017 (TAFE NSW – WSI) 40
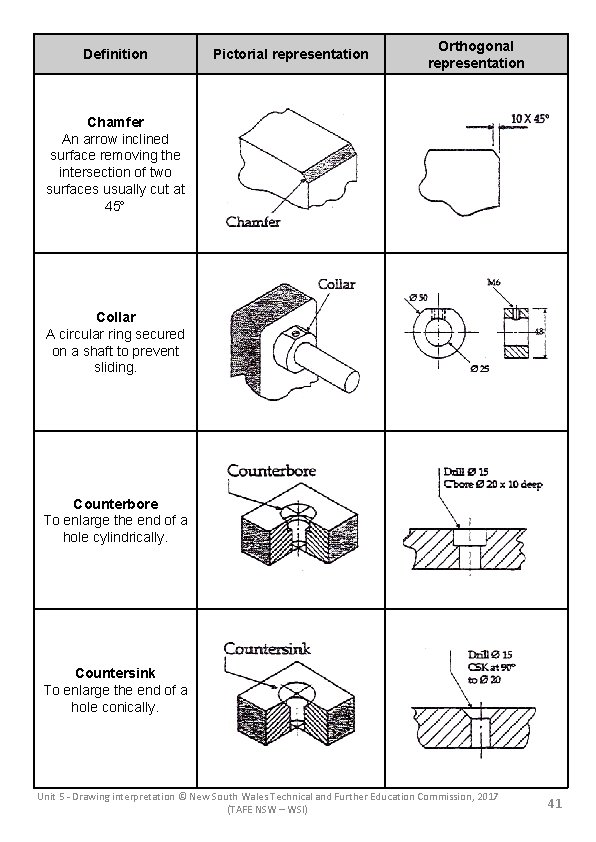
Definition Pictorial representation Orthogonal representation Chamfer An arrow inclined surface removing the intersection of two surfaces usually cut at 45 Collar A circular ring secured on a shaft to prevent sliding. Counterbore To enlarge the end of a hole cylindrically. Countersink To enlarge the end of a hole conically. Unit 5 - Drawing interpretation © New South Wales Technical and Further Education Commission, 2017 (TAFE NSW – WSI) 41
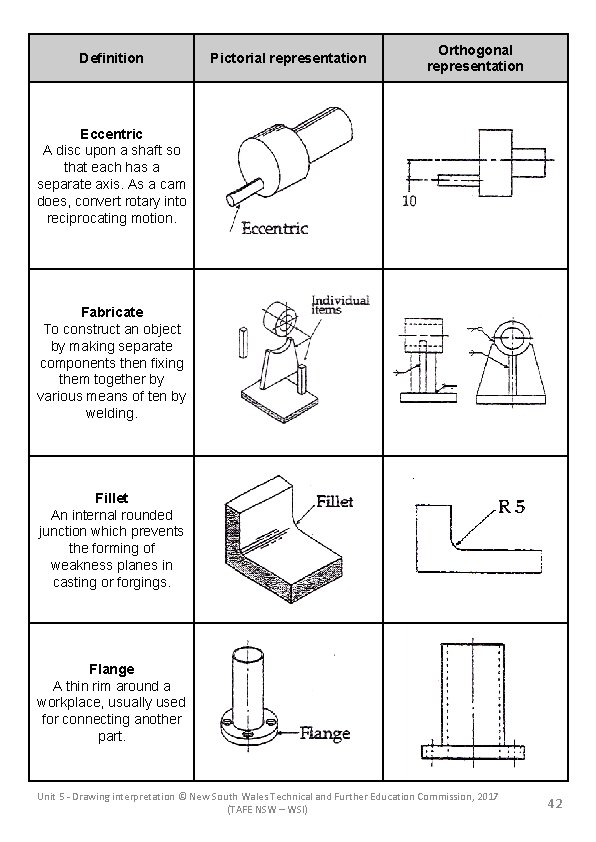
Definition Pictorial representation Orthogonal representation Eccentric A disc upon a shaft so that each has a separate axis. As a cam does, convert rotary into reciprocating motion. Fabricate To construct an object by making separate components then fixing them together by various means of ten by welding. Fillet An internal rounded junction which prevents the forming of weakness planes in casting or forgings. Flange A thin rim around a workplace, usually used for connecting another part. Unit 5 - Drawing interpretation © New South Wales Technical and Further Education Commission, 2017 (TAFE NSW – WSI) 42
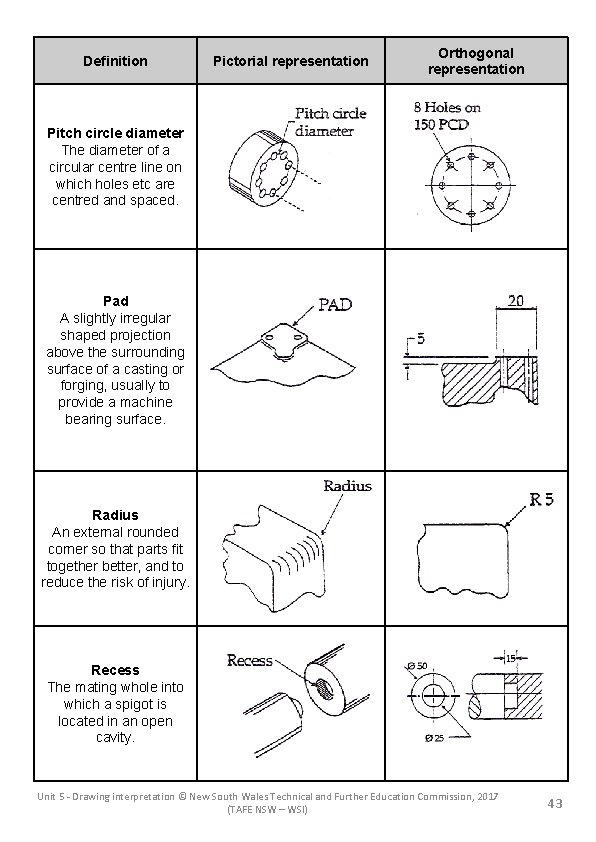
Definition Pictorial representation Orthogonal representation Pitch circle diameter The diameter of a circular centre line on which holes etc are centred and spaced. Pad A slightly irregular shaped projection above the surrounding surface of a casting or forging, usually to provide a machine bearing surface. Radius An external rounded corner so that parts fit together better, and to reduce the risk of injury. Recess The mating whole into which a spigot is located in an open cavity. Unit 5 - Drawing interpretation © New South Wales Technical and Further Education Commission, 2017 (TAFE NSW – WSI) 43
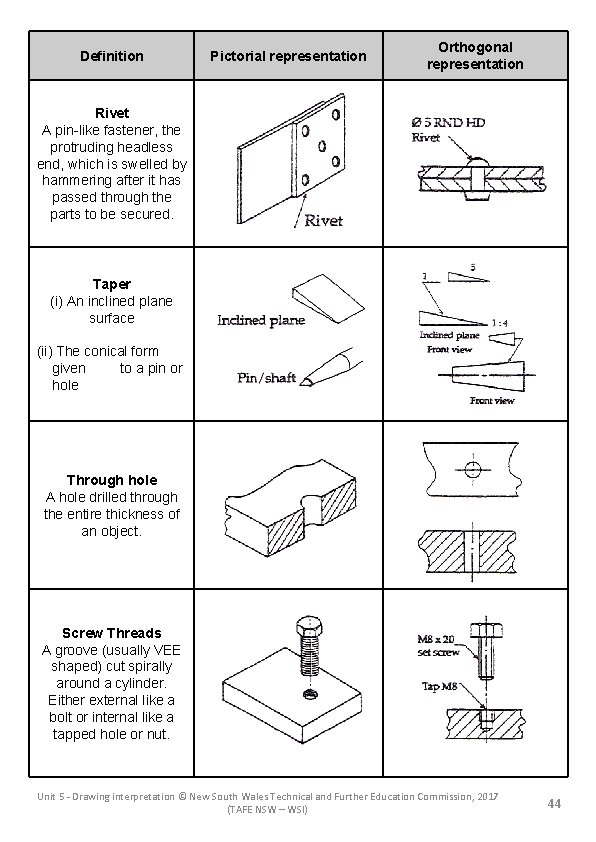
Definition Pictorial representation Orthogonal representation Rivet A pin-like fastener, the protruding headless end, which is swelled by hammering after it has passed through the parts to be secured. Taper (i) An inclined plane surface (ii) The conical form given to a pin or hole Through hole A hole drilled through the entire thickness of an object. Screw Threads A groove (usually VEE shaped) cut spirally around a cylinder. Either external like a bolt or internal like a tapped hole or nut. Unit 5 - Drawing interpretation © New South Wales Technical and Further Education Commission, 2017 (TAFE NSW – WSI) 44
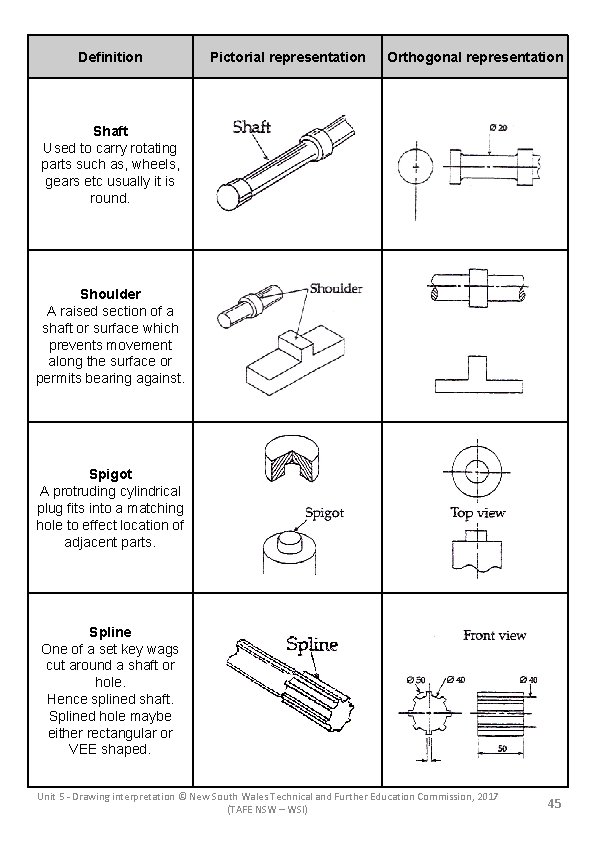
Definition Pictorial representation Orthogonal representation Shaft Used to carry rotating parts such as, wheels, gears etc usually it is round. Shoulder A raised section of a shaft or surface which prevents movement along the surface or permits bearing against. Spigot A protruding cylindrical plug fits into a matching hole to effect location of adjacent parts. Spline One of a set key wags cut around a shaft or hole. Hence splined shaft. Splined hole maybe either rectangular or VEE shaped. Unit 5 - Drawing interpretation © New South Wales Technical and Further Education Commission, 2017 (TAFE NSW – WSI) 45
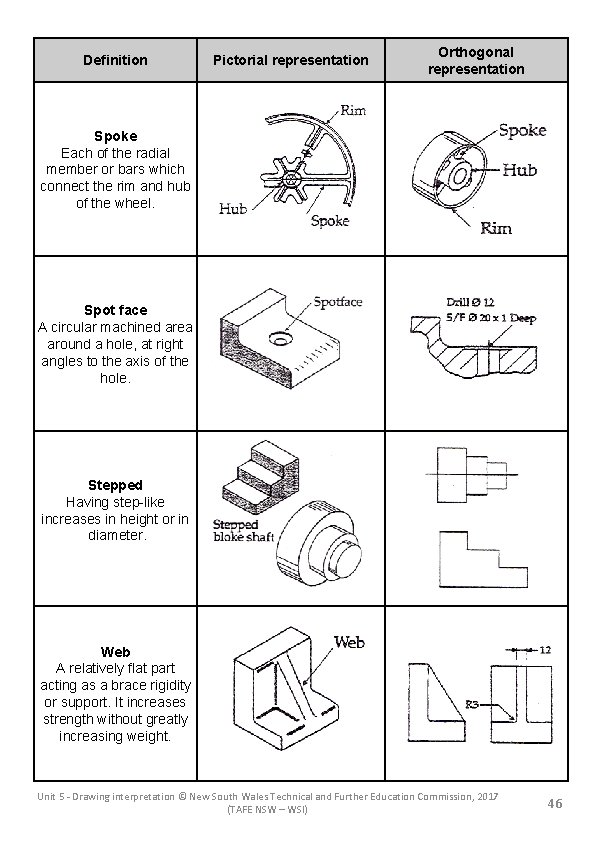
Definition Pictorial representation Orthogonal representation Spoke Each of the radial member or bars which connect the rim and hub of the wheel. Spot face A circular machined area around a hole, at right angles to the axis of the hole. Stepped Having step-like increases in height or in diameter. Web A relatively flat part acting as a brace rigidity or support. It increases strength without greatly increasing weight. Unit 5 - Drawing interpretation © New South Wales Technical and Further Education Commission, 2017 (TAFE NSW – WSI) 46

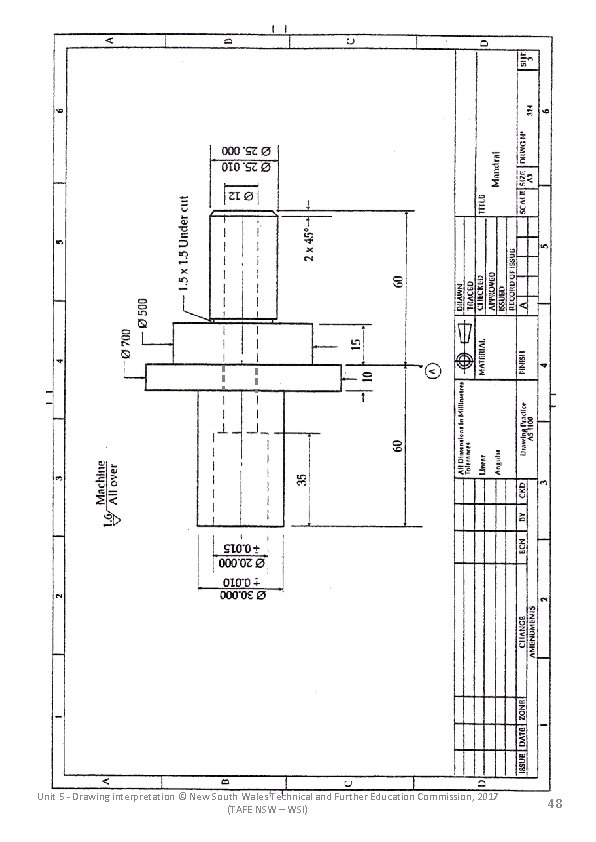
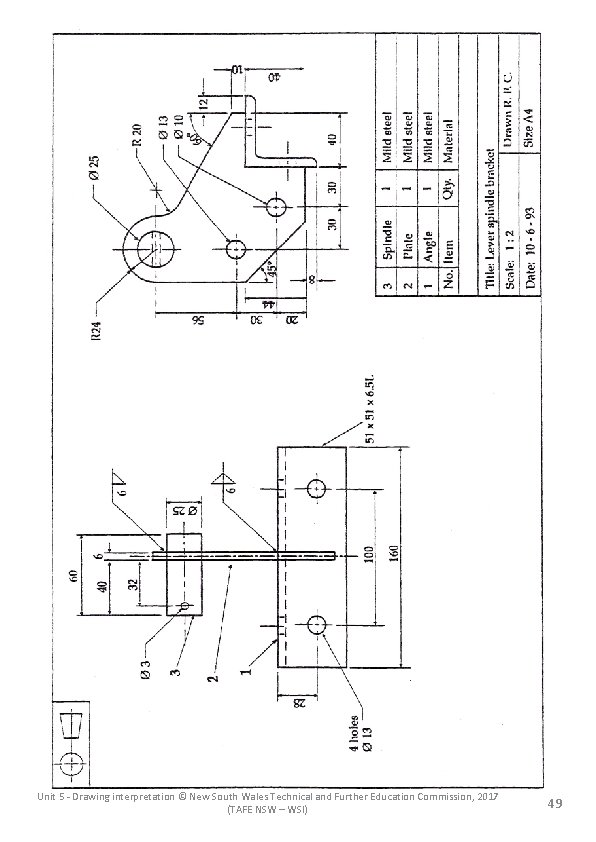
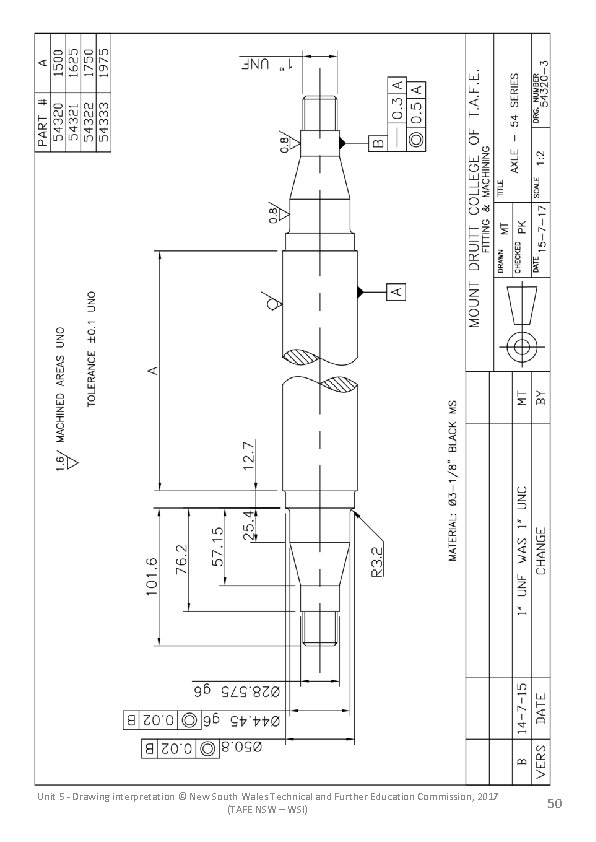
Part H – Print Reading It is very important that you learn to interpret the information shown on engineering drawings. This will allow you to plan a job logically and as economically as possible. Print reading is part of your job planning and requires: • Reading the title block to identify the parts to be made and the quantity required. • Finding the dimensions of the parts to order materials for the job. • Deciding how many parts have to be manufactured and the machines available for the job. If you follow the procedure: • You will save the material because less mistakes will be made about specifications • You will save labour because you can plan which people should do the job. • You will make the best use of your machinery. Unless you learn these skills you will not be as effective as you should be. Complete Answers & Exercises Workbook Training Task 5. 9 Complete Answers & Exercises Workbook Training Task 5. 10 Complete Answers & Exercises Workbook Training Task 5. 11 Unit 5 - Drawing interpretation © New South Wales Technical and Further Education Commission, 2017 (TAFE NSW – WSI) 47
Unit 5 - Drawing interpretation © New South Wales Technical and Further Education Commission, 2017 (TAFE NSW – WSI) 48
Unit 5 - Drawing interpretation © New South Wales Technical and Further Education Commission, 2017 (TAFE NSW – WSI) 49
Unit 5 - Drawing interpretation © New South Wales Technical and Further Education Commission, 2017 (TAFE NSW – WSI) 50
- Slides: 50