Fitness Testing SHMD 139 1452012 Agility TTest Purpose


")


 Women (cm) Super Ø 65 Ø 68 Excellent 55 – 65")


 Females (cm) Excellent > 70 > 60 Very Good 61")


 counts")
 15 – 19 20 - 29")
 • Purpose: The 20 m multistage fitness")

 reached")


 time (seconds) distance time 1 0. 045 26 0. 230 51 0.")


- Slides: 45
Fitness Testing SHMD 139 14/5/2012
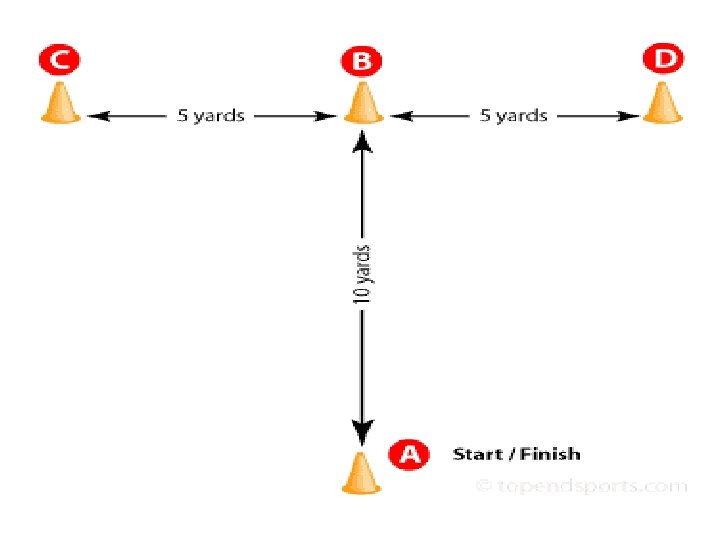
Agility T-Test Purpose: The T-Test is a test of agility for athletes, and includes forward, lateral, and backward running. Equipment required: Tape measure, marking cones, stopwatch, timing gates (optional).
Procedure • Set out four cones (5 yards = 4. 57 m, 10 yards = 9. 14 m). • The subject starts at cone A. • On the command of the timer, the subject sprints to cone B and touches the base of the cone with their right hand. • They then turn left and shuffle sideways to cone C, and also touches its base, this time with their left hand. • Then shuffling sideways to the right to cone D and touching the base with the right hand. • They then shuffle back to cone B touching with the left hand, and run backwards to cone A. • The stopwatch is stopped as they pass cone A.
Scoring • The trial will not be counted if the subject cross one foot in front of the other while shuffling, • fails to touch the base of the cones, or fails to face forward throughout the test. • Take the best time of three successful trials to the nearest 0. 1 seconds.
Scoring The table below shows some scores for adult team sport athletes. Males (seconds) Females (seconds) Excellent < 9. 5 < 10. 5 Good 9. 5 to 10. 5 to 11. 5 Average 10. 5 to 11. 5 to 12. 5 Poor > 11. 5 > 12. 5
• Reliability: The type of surface that is used should be consistent to ensure good test-retest reliability. • Advantages: This is a simple agility test to perform, requiring limited equipment and space. • Disadvantages: Only one person can perform the test at a time.
Stork Balance Stand Test • Purpose: To assess the ability to balance on the ball of the foot. • Equipment required: Flat, non-slip surface, stopwatch, paper and pencil.
Procedure • Remove the shoes and place the hands on the hips. • Position the non-supporting foot against the inside knee of the supporting leg. • The subject is given one minute to practice the balance. • The subject raises the heel to balance on the ball of the foot. • The stopwatch is started as the heel is raised from the floor. • The stopwatch is stopped if any of the follow occur: – the hand(s) come off the hips. – the supporting foot swivels or moves (hops) in any direction. – the non-supporting foot loses contact with the knee. – the heel of the supporting foot touches the floor.
Scoring: The total time in seconds is recorded. The score is the best of three attempts. The adjacent table lists general ratings for this test. Rating Score (seconds) Excellent > 50 Good 40 - 50 Average 25 - 39 Fair 10 - 24 Poor < 10
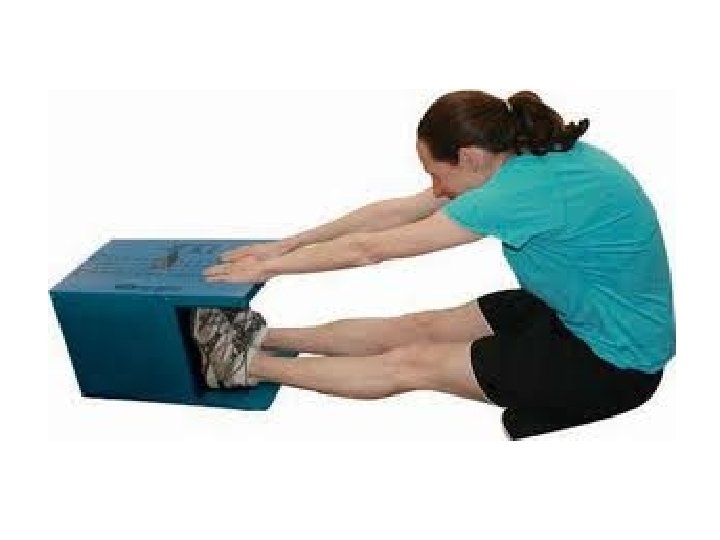
Sit and Reach Flexibility Test • Purpose: The sit and reach test is a common measure of flexibility, and specifically measures the flexibility of the lower back and hamstring muscles. • Equipment required: sit and reach required: box.
• Procedure: This test involves sitting on the floor with • • • legs stretched out straight ahead. Shoes should be removed. The soles of the feet are placed flat against the box. Both knees should be locked and pressed flat to the floor - the tester may assist by holding them down. With the palms facing downwards, and the hands on top of each other or side by side, the subject reaches forward along the measuring line as far as possible. Ensure that the hands remain at the same level, not one reaching further forward than the other. After some practice reaches, the subject reaches out and holds that position for at one-two seconds while the distance is recorded.
Scoring Men (cm) Women (cm) Super Ø 65 Ø 68 Excellent 55 – 65 59 - 68 Good 44 – 54 49 – 58 Average 38 – 53 39 – 48 Fair 30 – 37 31 – 38 Poor 18 – 29 23 – 30 Very poor < 18 < 23
• Advantages: The sit and reach test is a common test of flexibility, and is an easy and quick test to perform. If using the standard testing procedure, there is a lot of published data to use for comparison. • Disadvantages: Variations in arm, leg and trunk length can make comparisons between individuals misleading. This test is specific to the range of motion and muscles and joints of the lower back and hamstrings, and may not be relevant to other parts of the body.
Handgrip Strength Test • Purpose: to measure the maximum isometric Purpose: strength of the hand forearm muscles. • Equipment required: handgrip dynamometer. required:
• Procedure: The subject holds the dynamometer in • • the hand to be tested, with the arm at right angles and the elbow by the side of the body. The handle of the dynamometer is adjusted if required - the base should rest on first metacarpal (heel of palm), while the handle should rest on middle of four fingers. When ready the subject squeezes the dynamometer with maximum isometric effort, which is maintained for about 5 seconds. No other body movement is allowed. The subject should be strongly encouraged to give a maximum effort.
Scoring: The best result from several trials for each hand is recorded, with at least 15 seconds recovery between each effort. MALES FEMALES Rating* kg kg Excellent > 64 > 38 Very good 56 -64 34 -38 Above average 52 -55 30 -33 Average 48 -51 26 -29 Below average 44 -47 23 -25 Poor 40 -43 20 -22 Very poor < 40 < 20
• Advantages: This is a simple and commonly used test of general strength level, well researched and many norms are available. • Disadvantages: The dynamometer must be adjusted for hand size, how successfully this is done will affect the accuracy of the measurement. • Comments: It is also useful to record whether the athlete is left or right handed, as this may help in the interpretation of results. The non-dominant hand usually scores about 10% lower. The forearm muscles are easily fatigued, so the best scores are usually achieved in the first or second trial.
Vertical Jump Test • Advantage: quick & easy to perform. • Disadvantage: difficult to mark the wall & the Disadvantage: peak of the jump. • Equipment: smooth wall, Equipment: chalk, tape measure.
Procedure • The athlete rubs chalk on their fingers, and stands about 15 cm away from the wall. • With their feet flat on the floor, they reach as high as they can and make a mark on the wall. • The athlete rubs more chalk on their fingers. • They bend their knees to 90 degrees and jump as high as they can into the air. • At the top of their jump they make a second chalk mark with their fingertips. • The trainer measures the difference between the 2 marks – this is their standing jump score. • This test is done 3 times, so the athlete can take the best of their 3 jumps.
Scoring Rating Males (cm) Females (cm) Excellent > 70 > 60 Very Good 61 -70 51 -60 Above Average 51 -60 41 -50 Average 41 -50 31 -40 Below Average 31 -40 21 -30 Poor 21 -30 11 -20 Very Poor < 21 < 11
Alternate Hand Wall Toss Test • Purpose: To measure hand-eye coordination. • Equipment required: Tennis ball or baseball, smooth and solid wall, marking tape, stopwatch.
• Procedure: A mark is placed a certain distance from the wall (e. g. 2 meters, 3 feet). The person stands behind the line and facing the wall. The ball is thrown from one hand in an underarm action against the wall, and attempted to be caught with the opposite hand. The ball is then thrown back against the wall and caught with the initial hand. The test can continue for a nominated number of attempts or for a set time period (e. g. 30 seconds). By adding the constraint of a set time period, you also add the factor of working under pressure.
• Scoring: This table lists general ratings for the Wall Toss Test, based on the score of the number of successful catches in a 30 second period. Rating Score (in 30 seconds) Excellent Good Average Fair Poor > 35 30 - 35 20 - 29 15 - 19 < 15
• Variations: There are numerous variation that can be made to the procedures of this test depending on the desired outcomes: the size, weight and shape of the object, the distance from the wall, the number of attempts or time period can all be varied. The procedure should be recorded with the results and kept consistent for future testing of the same subjects. • Advantages: minimal equipment and costs are involved in conducting this test, and it can be self-administered. • Disadvantages: the ability to catch the ball can be affected by how hard and straight the ball is thrown to the wall. You may want to draw a target on the wall to help with throwing accuracy. The test results may be skewed if the subject 'flukes' a few catches, so repeating the test a few times may result in more accurate results.
Push Up Test • Purpose: measures upper body strength and endurance. • Equipment required: floor mat.
• Procedure: A standard push up begins with the hands and toes touching the floor, the body and legs in a straight line, feet slightly apart, the arms at shoulder width apart, extended and at a right angles to the body. • Keeping the back and knees straight, the subject lowers the body to a predetermined point, or until there is a 90 -degree angle at the elbows, then returns back to the starting position with the arms extended. • This action is repeated, and test continues until exhaustion, or until have reached the target number of push-ups.
• Scoring: Record the number of correctly completed pushups. • Target population: the push up test is commonly used as a general test of strength. There are some sports in which upper body strength is particularly important. • Advantages: this test is easy and quick to perform, usually requiring minimal or inexpensive equipment. Many subjects can be tested at once.
Maximal Push-up Norms Men Age: 20 -29 Age: 30 -39 Age: 40 -49 Age: 50 -59 Age: 60+ Excellent 54 or more 44 or more 39 or more 34 or more 29 or more Good 45 -54 35 -44 30 -39 25 -34 20 -29 Average 35 -44 24 -34 20 -29 15 -24 10 -19 Poor 20 -34 15 -24 12 -19 8 -14 5 -9 Very Poor 20 or fewer 15 or fewer 12 or fewer 8 or fewer 5 or fewer Women Age: 20 -29 Age: 30 -39 Age: 40 -49 Age: 50 -59 Age: 60+ Excellent 48 or more 39 or more 34 or more 29 or more 19 or more Good 34 -48 25 -39 20 -34 15 -29 5 -19 Average 17 -33 12 -24 8 -19 6 -14 3 -4 Poor 6 -16 4 -11 3 -7 2 -5 1 -2 Very Poor 6 or fewer 4 or fewer 3 or fewer 2 or fewer 1 or fewer
Curl Up / Sit-Up / Crunch Test • Purpose: abdominal muscular strength and endurance of the abdominals and hip-flexors, is important for back support and core stability. • Equipment required: flat, clean, cushioned surface, stopwatch.
• Sit-up technique: The subject lies on a cushioned, flat, clean surface with knees flexed, usually at 90 degrees. • Some techniques may specify how far the feet are from the buttocks. • A partner may assist by anchoring the feet to the ground. • The position of the hands and arms can affect the difficulty of the test. • They are generally not placed behind the head as this encourages the subject to stress the neck and pull the head forward. • The hand may be placed by the side of the head, or the arms crossed over the chest, reaching out in front. • The subject raises the trunk in a smooth motion, keeping the arms in position, curling up the desired amount. • The trunk is lowered back to the floor so that the shoulder blades or upper back touch the floor. • Test procedure: A common method of performing a sit up fitness test is to record the maximum number of sit ups in a certain time period, such as 30 seconds, one minute or two minutes.
• Scoring: The completion of one complete curl up (up and back) counts as one. The sit up must be performed correctly for it to be counted. For the tempo tests, the test is continued until the subject cannot maintain the rhythm or has reached the target number for the test. • Advantages: this test is simple to perform requiring minimal equipment, and large groups may be tested at once. • Disadvantages: a curl up with the feet held increases the involvement of the hip flexor muscles, making the test less valid as a measure of abdominal strength. It is sometimes difficult to determine if a correct sit up is performed, and there may be dispute about the total number. When using the tempo method, the instructor should have clear guidelines of when they terminate the test.
Norms for 1 minute sit-up test Age (yrs) 15 – 19 20 - 29 30 - 39 Gender M F M F M F Excellent >48 >42 >43 >36 >29 >31 >25 >26 >19 >23 >16 Above Average 4247 3641 3742 3135 31 -35 24 -28 26 -30 20 -24 22 -25 12 -18 17 -22 12 -15 Average 3841 3235 3336 2530 27 -30 20 -23 22 -25 15 -19 18 -21 5 -11 12 -16 4 -11 Below Average 3337 2731 2932 2124 22 -26 15 -19 17 -21 7 -14 13 -17 3 -4 7 -11 2 -3 Poor <32 <26 <28 <20 <21 <12 <6 <1 <14 40 - 49 <16 <6 50 - 59 <2 60 - 69
20 m Multistage Fitness Test (Beep Test) • Purpose: The 20 m multistage fitness test is a commonly used maximal running aerobic fitness test. It is also known as the 20 meter shuttle run test, beep or bleep test among others. • Equipment required: Flat, non-slip surface, marking cones, 20 m measuring tape, beep test cd, cd player, recording sheets.
• Procedure: This test involves continuous running between two lines 20 m apart in time to recorded beeps. • The test subjects stand behind one of the lines facing the second line, and begin running when instructed by the cd or tape. • The speed at the start is quite slow. • The subject continues running between the two lines, turning when signaled by the recorded beeps. • After about one minute, a sound indicates an increase in speed, and the beeps will be closer together. • This continues each minute (level). • If the line is not reached in time for each beep, the subject must run to the line turn and try to catch up with the pace within 2 more ‘beeps’. • Also, if the line is reached before the beep sounds, the subject must wait until the beep sounds. • The test is stopped if the subject fails to reach the line (within 2 meters) for two consecutive ends.
Scoring: The athlete's score is the level and number of shuttles (20 m) reached before they were unable to keep up with the recording. Record the last level completed (not necessarily the level stopped at). Men Women Excellent Ø 13 Ø 12 Very Good 11 – 13 10 – 12 Good 9 – 11 8 – 10 Average 7– 9 6– 8 Poor 5– 7 4– 6 Very Poor <5 <4
• Target population: this test is suitable for sports teams and school groups, but not for populations in which a maximal exercise test would be contraindicated. • Advantages: Large groups can perform this test all at once for minimal costs. Also, the test continues to maximum effort unlike many other tests of endurance capacity. • Disadvantages: Practice and motivation levels can influence the score attained, and the scoring can be subjective. As the test is often conducted outside, the environmental conditions can affect the results.
Ruler Reaction Time Drop • Procedure: The person to be tested stands or sits near the edge of a table, resting their elbow on the table so that their wrist extends over the side. • The assessor holds the ruler vertically in the air between the subject's thumb and index finger, but not touching. • Align the zero mark with the subjects fingers. • The subject should indicate when they are ready. • Without warning, release the ruler and let it drop - the subject must catch it as quickly as possible as soon as they see it fall. • Record in meters the distance the ruler fell. • Repeat several times (e. g. 10 times) and take the average score.
• Target population: sports requiring good handeye coordination and quick reactions, such as race car driving, boxing and racket sports. • Comments: results for left and right hands can be expected to be different, therefore this should be controlled for or at least the hand used recorded with the results.
distance (cm) time (seconds) distance time 1 0. 045 26 0. 230 51 0. 323 76 0. 394 2 0. 064 27 0. 235 52 0. 326 77 0. 396 3 0. 078 28 0. 239 53 0. 329 78 0. 399 4 0. 090 29 0. 243 54 0. 332 79 0. 402 5 0. 101 30 0. 247 55 0. 335 80 0. 404 6 0. 111 31 0. 252 56 0. 338 81 0. 407 7 0. 120 32 0. 256 57 0. 341 82 0. 409 8 0. 128 33 0. 260 58 0. 344 83 0. 412 9 0. 136 34 0. 263 59 0. 347 84 0. 414 10 0. 143 35 0. 267 60 0. 350 85 0. 416 11 0. 150 36 0. 271 61 0. 353 86 0. 419 12 0. 156 37 0. 275 62 0. 356 87 0. 421 13 0. 163 38 0. 278 63 0. 359 88 0. 424 14 0. 169 39 0. 282 64 0. 361 89 0. 426 15 0. 175 40 0. 286 65 0. 364 90 0. 429 16 0. 181 41 0. 289 66 0. 367 91 0. 431 17 0. 186 42 0. 293 67 0. 370 92 0. 433 18 0. 192 43 0. 296 68 0. 373 93 0. 436 19 0. 197 44 0. 300 69 0. 375 94 0. 438 20 0. 202 45 0. 303 70 0. 378 95 0. 440 21 0. 207 46 0. 306 71 0. 381 96 0. 443 22 0. 212 47 0. 310 72 0. 383 97 0. 445 23 0. 217 48 0. 313 73 0. 386 98 0. 447 24 0. 221 49 0. 316 74 0. 389 99 0. 449 25 0. 226 50 0. 319 75 0. 391 100 0. 452
10 x 5 m Shuttle Test • Purpose: this is a test of speed and agility. • Equipment required: stopwatch, measuring tape, marker cones, a flat non-slip surface. • Scoring: Record the total time taken to complete the 50 m course.
• Procedure: marker cones and/or lines are placed five meters apart. • Start with a foot at one marker. • When instructed by the timer, the subject runs to the opposite marker, turns and returns to the starting line. • This is repeated five times without stopping (covering 50 meters total). • At each marker both feet must fully cross the line.
Revision Questions • Know: the purpose, advantages and disadvantages of each test. • You will not be asked to describe the procedure of a test in a test/exam.