Fall Hazards Roofs Methods of Roof Fall Protection


 • Toe boards at edges of platforms • Use")


- Slides: 51
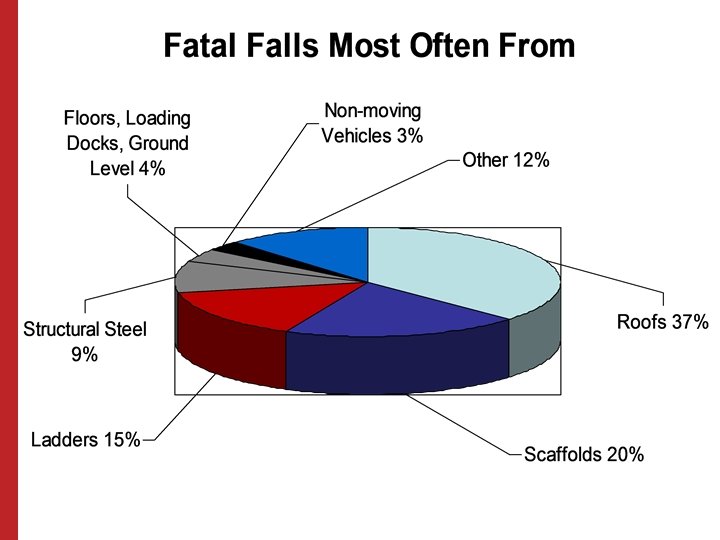
Fall Hazards
Roofs
Methods of Roof Fall Protection Safety Monitors Guardrails and warning lines Fall Arrest
Safety Monitor • Oversees work outside the warning lines. • Establishes the procedure to protect. • Workers must receive special training. • Use should be extremely limited
Warning Line Requirements for Roofers • Set at 34 – 39 inches • Must be maintained at all times. • Workers outside warning lines must be tied-off or have safety monitor.
High Roof Warning Lines adequately set Lines too close to edge
Outside Warning Lines • Parapet up to at least 39" • Fall Restraint • Fall Arrest • Safety Monitors
Roof Guardrails
Roof Fall Arrest Restraint
Open Sided Floors & Edges • Open edges on decks, roof, mezzanines, etc. over 6' high must be protected
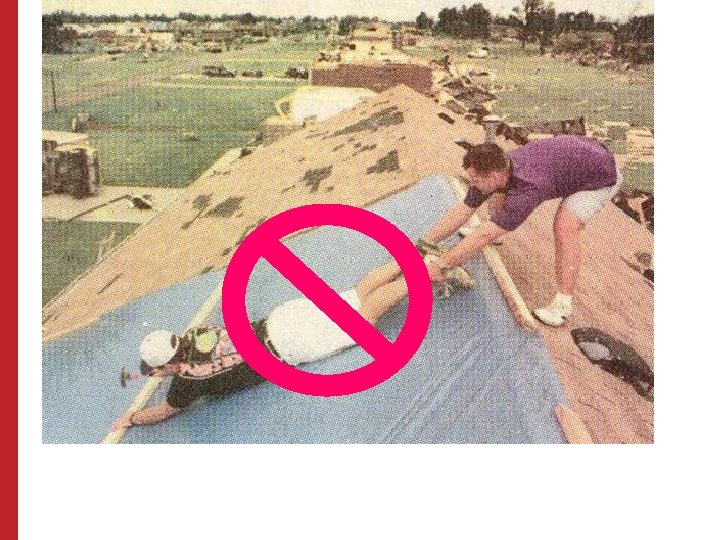
Stay Back from Edges • Stay away from edges unless work requires it • Always face the edge • Work from your knees Fall Hazard
Warning Line For Non-Roofing Work • Warning lines for nonroofing work must be at least 15 feet back from holes or edges. • These warning lines should only be used temporarily. • Workers outside the warning line must be tied off.
Guardrails
Guardrail Coverage Bad Better
Holes • Covers • Guardrails
Material Handling Platforms & Hoist Areas • Material handling platforms must have guardrails • When the guardrails are opened to receive material, workers must be tied off • Gates are preferred to removable rails
Don’t Create a Greater Hazard
Practical Implications of Total & Free Fall Distance Added Together • This worker is tied to the beam with a basket hitch. • How far will he fall? • What about swing?
Free Fall Distance or “Vertical Displacement” 5’ From D-Ring to Worker’s Feet 6’ Lanyard Length 3. 5’ Deceleration Device 5’ From D-Ring to Worker’s Feet 3’ Safety Factor (stretch, bounce, etc. ) Total 11’ travel distance of d-ring before fall arrest takes effect. This potential impact force exceeds many lanyard capacities (and OSHA standards). When added to “total fall distance”, anchoring at the feet can become problematic All distances are approximate, and shown for illustration only. This is why it is critical to maintain the safety factor distance!
Harness Pressure Points Spread load across butt strap and belt strap if on the harness Excess pressure here can cut blood flow to the legs Some studies have indicated permanent damage to the lower extremities when the worker hangs for more than twenty (20) minutes
Slip & Trip Hazards - Housekeeping! • Watch trip hazards • Here trash creates a trip hazard for everyone in the building
Stairways • Stair pans should not be used for access until poured, and until guardrails and handrails installed • Be sure all debris is removed immediately
Scaffolds & Ladders
Scaffold Requirements • • • Be on a firm foundation with base plates Be plumb, square and adequately braced Have a fully planked work deck Have guardrails over 10 feet Be tied-in over 4: 1 height to base ratio Have an adequate means of access and egress
Good Foundations Mason’s Adjustable Frames Hydro-mobile
Access • No access by cross braces • Bottom rung can not be more than 24" high • You must use a ladder or frames designed to be used as ladders
Proper Access Ladder Platform Ladder tied into scaffold Ladder Frame Stairway Frame
Baker-type Scaffolds • Baker scaffolds can be unstable • Never use a double stack without outriggers
Suspended Scaffolds No tie-back • Outriggers must be properly set and have safety tiebacks • Equipment must be regularly inspected and maintained. • Workers must have independent lifelines
Falling Object Protection 1926. 451(h) • Toe boards at edges of platforms • Use panels or screens when accessed from below • Barricade areas below • Use canopies where walkways cross underneath
Fall Protection in Lifts Scissors Lift Aerial Boom Lift Fall protection required. No fall protection required unless he gets off the floor
Ladder Types • Type I-AA ladders are extra heavy duty and can handle up to 375 lbs. • Type I-A ladders are heavy-duty and can handle up to 300 lbs. • Type I ladders can hold up to 250 lbs. • Type II ladders can hold 225 lbs. • Type III ladders are for light duty only and can hold up to 200 lbs.
Read the Warning Labels • Labels are there for a reason!
Proper Ladder Climbing • Use both hands to climb a ladder • Always face the ladder when climbing, descending or working • Avoid the top two steps of a stepladder and the top four rungs on other ladders
Don’t Lean a Step Ladder • The ladder is not designed to be leaned. • The angle of the steps is not level when set at 4: 1. • The support leg can contact the ground causing the step leg to kick out.
Do Not Stand On The Top Step!!! Obey the Labels!! NO!
Working Above Protections When employees work above railings, they must be protected from falling over the railings.
Extra Guardrails
Proper Access Ladders • Ladders should be set at 1 horizontal to 4 vertical • Ladders must be secured • Ladder access ways must be guarded • Ladders must extend 3' above the landing surface, or an adequate grabrail must be provided
Access Ways • Offset guardrails are recommended • Watch for tripping hazards at tops of ladders and stairs
Bridges
Cap or Beam Setting
Falls While Decking Leading edges must be protected
Bridge Fall Protection • Bridge edges must be protected • When working over water flotation devices must be worn
Equipment • Do not jump from equipment • Use three point contact at all times • Be sure of your footing • Do not strain your shoulders • Be sure steps are clear of mud and ice
Proper Seats • Everyone must be in a proper seat with a seat belt. • No riding on steps or running boards!
Incident Free • Planning – Planning for fall protection in advance – Have appropriate equipment available. • Training – Workers exposed to falls must be properly trained. – Workers must be properly trained to erect scaffolds. – Workers must be trained in proper ladder use. • Inspection – Fall arrest equipment must be inspected before each use. – Scaffolds must be inspected by a competent person. – Ladders must be inspected.
Incident Free • Oversight – Evaluate proper use of fall protection systems. – Assure competent persons are overseeing scaffold erection and use. • Lessons learned – Investigate all falls. – Develop root causes of fall accidents. – Communicate needed changes based on the information obtained. • Re-evaluate – Fall plans after each project