FAFSA Step by Step Guide WHAT IS THE

FAFSA: Step by Step Guide

WHAT IS THE FAFSA? The FAFSA is a financial aid application that all students must submit to qualify for federal aid. This aid includes grants, student loans, work-study programs and any other help that comes from the government. Colleges typically use your FAFSA to calculate your financial aid package for the year. Even if you don’t think you qualify for federal financial aid, you might want to complete your FAFSA anyhow. You could be eligible for something you didn’t expect, potentially lowering the cost of your education. For instance, nearly 60% of applicants who applied for federal aid in 2015– 2016 qualified for a Pell Grant — a federal grant given to students based on financial need.
 is time-consuming. But once you get")
The Free Application for Federal Student Aid (FAFSA) is time-consuming. But once you get started, you might be surprised to find it isn't as difficult as you expected. You can usually complete your entire application online in about 30 to 45 minutes if you have all of your information at hand.

STEP 1: Get your documents together. • The documents you will need to complete your FAFSA depend on your citizenship and financial independence. Most students will need: • Your Social Security card or number. • Your driver’s license, if you have one. • You and your parents’ previous year’s federal income tax returns (2018). • You and your parents’ previous year’s W-2 forms. • Bank statements for you and your parents. • Records of you and your parents’ previous year’s untaxed income. • Your parent’s investment records and other business records.

STEP 2: Both you and your parent must create an FSA ID. An FSA ID is a username and password that gives you access to Federal Student Aid's online systems and can serve as your legal signature. Only create an FSA ID using your own personal information and for your own exclusive use. You are NOT authorized to create an FSA ID on behalf of someone else, including a family member.

• STUDENT: An FAFSA ID is a username and password you need to sign the FAFSA form online. To get an FSA ID, go to http: //studentaid. ed. gov/sa/fafsa/filling-out/fsaid. You will need to use a different email address than your parent's email address. It takes about 10 minutes to create and FSA ID. • PARENT: You need to create your own FSA ID in order to sign your child's FAFSA form online. Create an FSA ID at http: //studentaid. ed. gov/sa/fafsa/filling-out/fsaid. You will need to use a different email address than your student's email address. • Some of the most common FAFSA errors occur when the student and parent mix up their FSA IDs. If you don't want your financial aid to be delayed, it's extremely important that each parent and each student create his or her own FSA ID and that they do not share it with ANYONE, even each other.
 • It")
STEP 3: Start the FAFSA form at fafsa. gov. (https: //fafsa. gov/) • It is recommended that the student start the FAFSA form using the instructions below. • Go to fafsa. gov (https: //fafsa. gov/). • Click "Enter your FSA ID. " Then enter your username and password, and click "NEXT. "

§ Choose which FAFSA form you'd like to complete: • 2019 -2020 FAFSA form if you will be attending college during the summer of 2020. • 2020 -2021 FAFSA form if you will be attending college between July 1, 2020 and June 30, 2021. • Both if you will be attending college during both summer and beginning in the fall of 2020. Remember, the FAFSA form is not a one-time thing. You must complete a FAFSA for each school year.

Create a save key. Unlike the FSA ID, the save key is meant to be shared. A save key is a temporary password that allows you and your parent(s) to "pass" the FAFSA form back and forth. It also allows you to save the FAFSA form and return to it later. This is especially helpful if you and your parent are not in the same place.

STEP 4: Fill out the Student Demographics Section This is information such as your name, address, date of birth, social security number, etc. If you log into the FAFSA form with your FSA ID, a lot of your personal information will be prepopulated to save you time. Make sure you enter your personal information exactly as it appears on your Social Security Card. NO NICKNAMES. PARENTS: Remember that the FAFSA form is the student's application, not yours. When the FAFSA form says "you" or "your, " it is referring to the student. Pay attention to whether you are being asked for student or parent information. When in doubt, there is a banner on the left side which will indicate whether you're on a student or parent page.

In the School Selection section, add every school you are considering, even if you haven't applied or been accepted yet. STEP 5: List the schools to which you want your FAFSA information sent. It doesn't hurt your application to add more schools; colleges can't see the other schools you've added. In fact, you don't even have to remove schools if you later decide not to apply or attend. If you don't end up applying or getting accepted to a school, the school can just disregard your FAFSA form. But you can remove schools at any time to make room for new schools. You can add up to 10 schools at a time.

STEP 6: Answer the dependency status questions. • In the dependency status section, you will be asked a series of specific questions to determine whether you are required to provide parent information on the FAFSA form. • The dependency guidelines are set by Congress and are different from those used by the Internal Revenue Service (IRS). You are required to report parent information until you are over the age of 23. You will be required to report information on the parent who provides the most support for you. • If you're determined to be an independent student, you won't have to provide parent information and you can skip the next step.

• If you answer yes to any of the questions below, you’re considered an independent student for the purposes of the FAFSA. How to tell if you count as dependent or independent • Will you be 24 or older by December 31 st of the school year you need financial aid for? • Will you be working on a master’s or doctoral degree? • Are you married? Divorced? Separated? • Are you providing at least half of support costs for any children or other dependents that live with you? • Have your parents died since you turned 13? • Have you been in foster care or a ward or dependent of the court since you turned 13? • Are you an emancipated minor or in a court-appointed legal guardianship? • Are you a homeless unaccompanied youth or at risk of becoming homeless? • Are you currently serving in the US armed forces (excluding training)? • Are you a veteran?
")
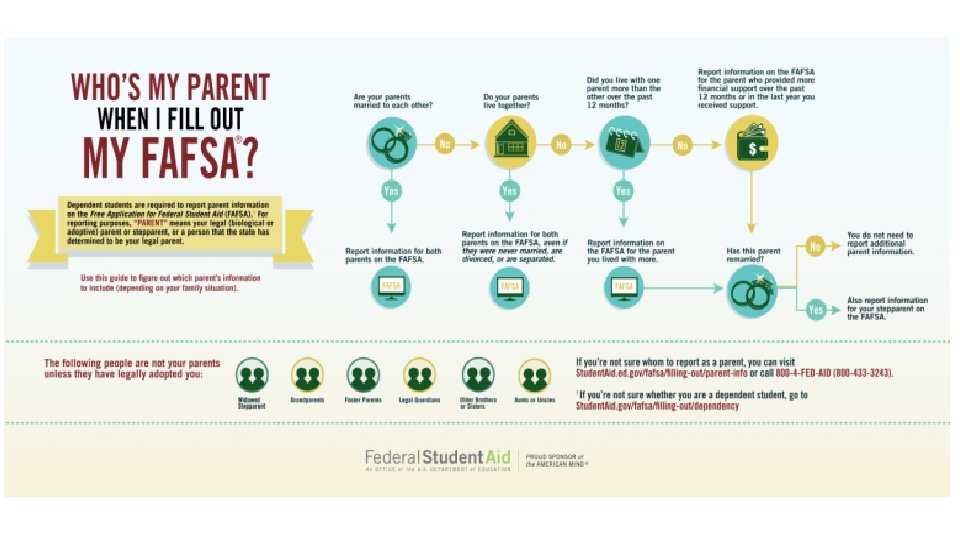
STEP 7: Fill out the Parent Demographics section. Ø This is where your parent(s) will provide basic demographic information. Remember that it doesn't matter if you don't live with your parent(s); you still must report information about them if you were determined to be a dependent student in the step above. Ø Determining which parent to choose can also be tricky. If your parents are still married or live together, both parents must complete this section. If they live separately, ask the parent you’ve stayed with more in the past year (or gives you the most financial support, if you haven’t stayed with either). If that parent has remarried, your stepparent must also complete the parent information on your FAFSA.
 will")
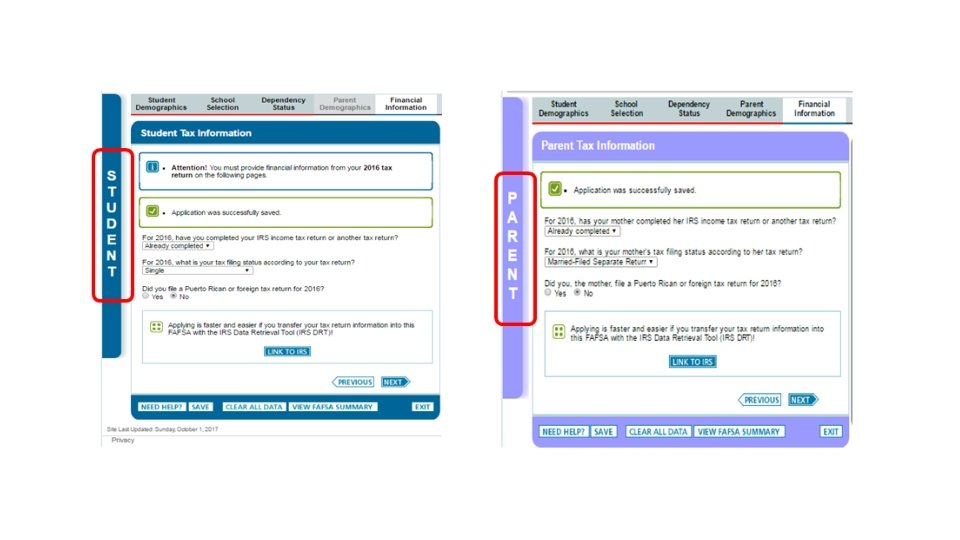
STEP 8: Supply your financial information. Here is where you and your parent(s) will provide your financial information. This step is incredibly simple if you use the Data Retrieval Tool (DRT). The IRS DRT allows you to import your IRS tax information into the FAFSA form with just a few clicks. Using this tool also may reduce the amount of paperwork you need to provide to your school. So if you are eligible, use it!


• To access the tool, indicate that you have "already completed" taxes on the student or parent finances page. If you are eligible, you will see a "LINK TO IRS" button. Choose that option and follow the prompts. • The information transferred from the IRS will not be displayed, but you will get a confirmation message letting you know that the transfer was successful. You will also know which items have been transferred from the IRS because you will see "Transferred from the IRS" in place of the answer fields. • Make sure to answer all other questions.

STEP 9: SIGN AND SUBMIT YOUR FAFSA FORM. • YOU ARE NOT FINISHED WITH THE FAFSA FORM UNTIL YOU AND YOUR PARENT SIGN IT. • The quickest and easiest way to sign your FAFSA form is online with your FSA ID. • If you (the student) logged in to the FAFSA form with your FSA ID, you won't need to provide it again on this page, but your parent will still need to sign before you can completely submit.

TIPS • Make sure you and your parent don't mix up your FSA IDs. This is one of the most common errors. • If you have siblings, your parent can use the same FSA ID to sign FAFSA forms for all of his or her children. • It is recommended signing the FAFSA form with an FSA ID because it's the fastest way to get your FAFSA form processed. However, you can mail in a signature page. From the sign and submit page, select "Other options to sign and submit" and then choose "Print A Signature Page. "

I'm finished! What's next? After you submit your application, FAFSA shares your information with the schools you listed on the application, your state’s higher education agency and higher education agencies in the states of schools that you applied for. Three days after you submit your application, FSA sends you an SAR (Student Aid Report) containing all of the data you submitted in your application, excluding any tax information provided by the IRS. Now is your chance to carefully check it for any mistakes. You can fix any mistakes you find by logging back in to your application and saving your changes.

v. After your school receives your information, it sends you a financial aid award letter that explains how much funding you’re eligible to receive for that period. When you receive your award letter depends on when you apply and how your school’s financial aid office works. Typically, you’ll get it anywhere between the winter before your courses begin to just before you start classes. v. Select which type of aid you want to accept, starting with the financing options that you don’t have to pay off — grants, scholarships and workstudy. When it comes to accepting loans, look at federal student loans before state or local government loans. Consider saving private student loans for when you’ve run out of federal funding. v. If you think you should have been offered more aid, you can also write a financial aid appeal letter to ask the school to reconsider your package.

CONGRATULATIONS! You have completed the FAFSA! If you have questions, be sure to ask!!! This Photo by Unknown author is licensed under CC BY-NC-ND.
- Slides: 24