Experience with bump bonding ATLAS Particle physics Richard

Experience with bump bonding ATLAS Particle physics Richard Bates University of Glasgow STFC Bump-bonding meeting, DL 15/5/12

Contents • ATLAS present build – Selex - Indium – IZM – Sn. Pb solder • IBL – IZM • VTT • Thin ROIC • Support wafer – Experience • Recent QA meeting at CERN is a good source of reference for FC work – https: //indico. cern. ch/conference. Other. Views. py? view=standar d&conf. Id=148944

Present ATLAS build

Some module numbers • Modules – Required: 1744 all approxly the same • Planar n-in-n silicon sensor (n+-n-p+) – 250 μm thick on 6 inch wafer – active area: 16. 4 x 60. 8 mm 2 • FE-I 3 ROIC – – – 16 FE-I 3 readout chips per silicon sensor/module 180 μm thick cover 7. 2 x 10. 8 mm 2 (2880 pixel cells) each Each pixel 50 μm x 400 μm in size 8 inch wafer • FE-I 3 bonds – – Bump bond pad 24 μm Bond pad pitch 50 μm minimum 16 * 2880 = 46080 bumps per module Only connection between ROIC and sensor
 and Selex (Rome)")
Bump bond suppliers and processes • 2 suppliers: IZM (Berlin) and Selex (Rome)
 94.")
Disconnected pixels • • 0. 1% disconnected pixels (76980 bumps in 1697 modules) 94. 8% in Indium bumped modules Most at FE-I 3 edges Large areas in Indium from a small number of modules

Interconnect resistance • Advantage of indium bumps: lower flip-chip temperature • Significant difference is interconnection electrical R – Solder bumps have a constant resistance of about 0. 5 Ω – Indium bumps resistance ~10 Ω. Increase up to 500 kΩ observed on ~10% indium bumps. Caused by In 2 O 3 oxidation layers on bumps can be broken by applying a 3 V bias voltage to electronics. • Bump resistances have to be kept small to avoid a significant contribution to the FE preamplifier noise.

Problems with Solder Assemblies

Problems with Indium Assemblies

Summary • • • 80. 3 M bumpbonds with 50 μm pitch Solder & Indium bumps - different electrical resistance (different noise) X-ray & electrical quality control Disconnected Bumps main reason (0. 1%) for dead pixels Large disconnected areas grow with thermal cycling, especially for Indium bonds and FE edges suffer worst disconnections Particle contamination (dicing) create shorts and hot-spots Many possibilities for mechanical stress on FEs and sensors Overall good yields, especially with rework possibility Indium Modules Solder Fraction (%) Modules Total Fraction (%) 1157 Modules Fraction (%) Assembled 1468 2625 Rejected 172 11. 7 35 3. 0 207 7. 9 Accepted (Total) 1296 88. 3 1122 97. 0 2418 92. 1 Accepted as delivered 1101 75. 0 1035 89. 5 2136 81. 4 Accepted after reworking 195 13. 3 87 7. 5 282 10. 7

ATLAS IBL - IZM • New challenges – Reduced mass of system and higher occupancy drives design • FE-I 4 chip FE-I 3 FE-I 4 Pixel size (μm x μm) 50 x 400 50 x 250 Pixel array 18 x 160 80 x 336 Chip size (mm x mm) 7. 6 x 10. 8 20. 2 x 19. 0 – Minimum bump pitch still 50 μm – Making single (3 D) and double (Planar) chip modules – Thinner ASIC • IZM doing the processing • Only 286 Modules in 1 -2 years and only just coping with supply for IBL

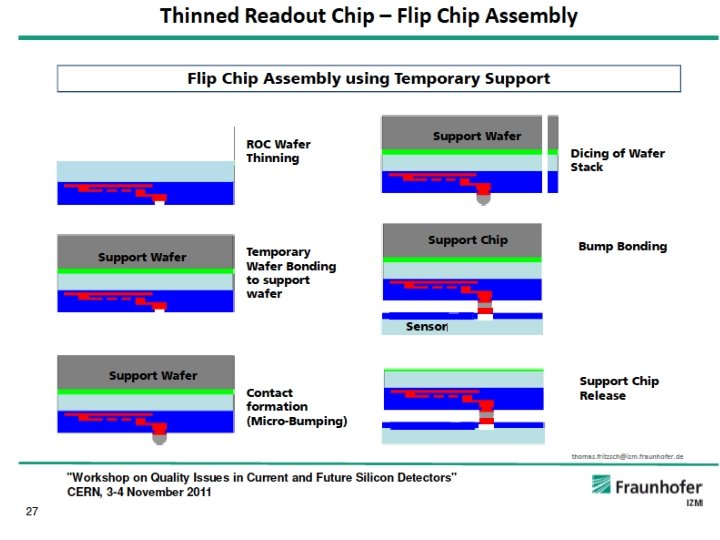
Thin ROIC • Established thinning process: – 1. Mechanical wafer grinding – 2. Stress relief: • Polishing • Wet chemical etching • Plasma etching 90μm thin ATLAS FE-I 3 ROC Bi-Metallic effect causes bowing in thin ROIC wafer

Solution • Edge bonds lift – Curling of ROIC • Addition of glass support wafer Glass support wafer 90 μm ROIC Glass wafer attached with glue and removed with UV light
 • Working")
VTT • New to ATLAS • 10 years + of experience (ALICE/Medipix) • Working closely with us for UK ATLAS upgrade R&D • Discussing flip-chip and TSV work with ATLAB • VTT and STFC/John Lipp are in collaboration for process development • Broad customer base and board process range – Indium solder, higher temperature lead solder – Active in TSV, thin module development, slim edge sensors

VTT processes • Solder bumping using electroplating in a single mask processes • 200 mm wafer processing • Ti. W/Cu seed layer – UBM (step 2) • Photolithography (step 3) • Electroplating steps – Ni or Cu is typically used as UBM (step 4) – Solder is deposited on top of UBM (step 5) • Solder alloys: Sn. Ag(<5%), In. Sn (low MP solder), Sn. Pb (eutectic) & Sn • Photoresist is stripped and seed layers are wet etched away (steps 6 -8) • Solder reflow– a flux-free process (step 9) – Solder reflow done in reducing gas ambient – no flux residues

Wafer thinning – after bumps • Front side protection/planarization: – UV-curable back grinding tape laminated on bumped wafer. • Back grinding using diamond wheels with two different grit sizes (coarse + fine). • Defect layer left by mechanical grinding is removed by wet chemical etching or CMP • Thickness down to 150 μm (Chemical Mechanical (200 -mm/8” wafers). Polishing). thickness variation (TTV) • Protective tape is UV-exposed • Total with protective tape < 5 μm and delaminated. over wafer. • Post-grinding defect layer Next to develop thinner ROIC and etching improves mechanical sensor capability strength of die.

ALICE modules ALICE 1/LHCb readout chip process ALICE sensor chip process • Readout wafer size 200 mm x 725 μm • Bumping with eutectic solder: • Detector wafer size 125 mm x 200 μm • Bump pad metallization: • Ti. W/Cu/Ni(3 μm)/eut. Sn. Pb(3 μm) • Dicing to chip size of 70. 7 mm x 13. 9 mm – Ti. W/Cu/Ni(3 μm)/eut. Sn. Pb(13 μm) • Bump pitch: x = 50 μm / y = 400 μm • Wafer thinning to 150 μm • Dicing to chip size of 13. 7 mm x 15. 9 mm • Picking of known good die • Number of bumps/chip: 8, 192

Hybridized ALICE assembly • Five ALICE 1/LHCb readout chips flip chip bonded on ALICE 1 detector ladder chip • Assembly reflow using formic acid oven • Chip-to-substrate distance: 20 μm • Total number of bumps/assembly: 40, 960

Back up

Sensor Details

Step 1: UBM deposition • IZM To ensure good adhesion, at IZM, the wafers are sputter etched before sputtering of an adhesion layer (200 nm Ti. W) and the plating base (300 nm Cu) by electroplating. Photoresist is spin coated on the wafer and patterned by exposure to UV light through a high precision contact mask followed by an etching process. A wettable UBM (5 μm Cu) is plated followed by an 100 -200 nm gold oxidation protection layer. • Selex At AMS photosensitive photoresist is spin coated on the wafers and patterned with the conventional photolithography process described above. A proprietary UBM is deposited.
 is electroplated.")
Step 2: Deposition of bumps • IZM Solder (37% Pb 63% Sn) is electroplated. It remains as 30 μm high cylindrical bumps after photoresist removal. The cylindrical bumps turn, caused by surface tension, into spherical bumps during a first reflow process. • Selex The UMB is cleaned with a plasma etching process immediately before the deposition of indium, obtained by electron beam evaporation of indium under vacuum (~ 10 -6 Torr). The photoresist is removed by a wet lift-off process and indium cylinders of about 20 μm in diameter and ~8 μm in height remain.

Steps 3 & 4: Thinning & dicing of ROIC • Step 3: IZM and Selex Since many processing steps of the bump deposition are hard to carry out with thinned and fragile wafers, thinning takes place after bump deposition. The FE wafers are completely coated with a thick photoresist layer to protect the bumps. They are thinned to ~ 180 μm by backside mechanical grinding at GDSI (Grinding and Dicing Services Inc. , Sunnyvale, CA, USA) • Step 4: IZM and Selex The fragile wafers are diced immediately after thinning to minimize the risk of braking by handling. To ensure that FE chips have not been damaged the diced and bumped single chips are held by custom carriers and tested with probe stations.

Step 5: Flip chipping ROIC to Sensor • IZM Photoresistive protection cover layers are removed by the described liftoff process. At IZM all 16 FEs are tacked together to the sensor UBM by solder flux using a precision pick and place bonder. The entire bare module is placed in a reflow oven. It undergoes a 4 minutes heating cycle with a maximum temperature of 240°C for a few seconds in an activated atmosphere. The bumps and the UBM are solder merged. Caused by surface tension of the bump balls the FEs align themselves. • Selex A single automated machine is used to precisely align, flip and bond the FEs one-by-one onto the sensor. The bonding process itself is a thermo compression at 90°C for a couple of minutes with an applied force of 25 N per FE. Since no self alignment happens for indium bumps, the alignment and planarity of the applied pressure have to be more accurate than for solder bumps.
- Slides: 25