
EXPEDIENT DRAINAGE OVERVIEW Plan and design adequate drainage





















- Slides: 104
EXPEDIENT DRAINAGE
OVERVIEW Plan and design adequate drainage Types of drainage systems Purpose of adequate drainage Maintaining a drainage system
OBJECTIVES Terminal Learning Objectives Enabling Learning Objectives
METHOD / MEDIA Lecture method Power point Demonstration Practical application
EVALUATION Written exam
SAFETY / CEASE TRAINING Classroom Instruction No safety concerns for this period of instruction Inclement weather plan Fire exit plan
QUESTIONS? Are there any questions concerning: What will be taught? How it will be taught? How the student will be evaluated?
SOURCES OF WATER Precipitation Interception Infiltration Ground Water
PRECIPITATION Rain Fall Snow Fall/Melt Humidity
INTERCEPTION Interception is the process of vegetation absorbing the water before it reaches the soil. Once the holding capacity of the vegetation has been reached, the soil will then start receiving water.
INFILTRATION Infiltration is the waters ability to penetrate the soil surface. The following factors affect the process of infiltration: Vegetation presence or lack there of. Soil type. (some soil types retain water more than others. ) Slope of terrain.
GROUND WATER Surface water: Surface water is retained in the top soil. (depended upon vegetation and soil type. ) Sub-surface water: Water that is present below the ground. (water table). Capillary water: The water that seeps to the surface.
QUESTIONS? Any questions? Questions for you!!
ESTIMATING WATER RUNOFF Methods of estimating water runoff Hasty Field Estimate
HASTY METHOD The hasty method is used when an existing stream crosses or interferes with your construction site. Certain measures must be taken to avoid possible water damage to your construction site. Using the following formula, we can determine the “Area of Waterway” (AW)
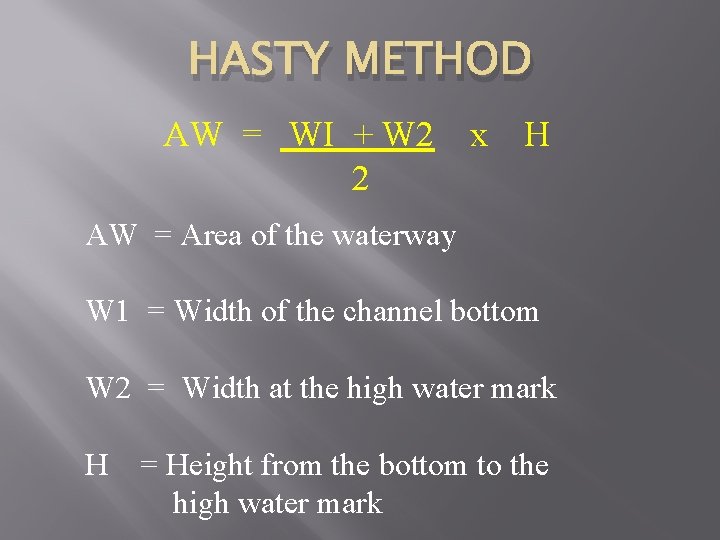
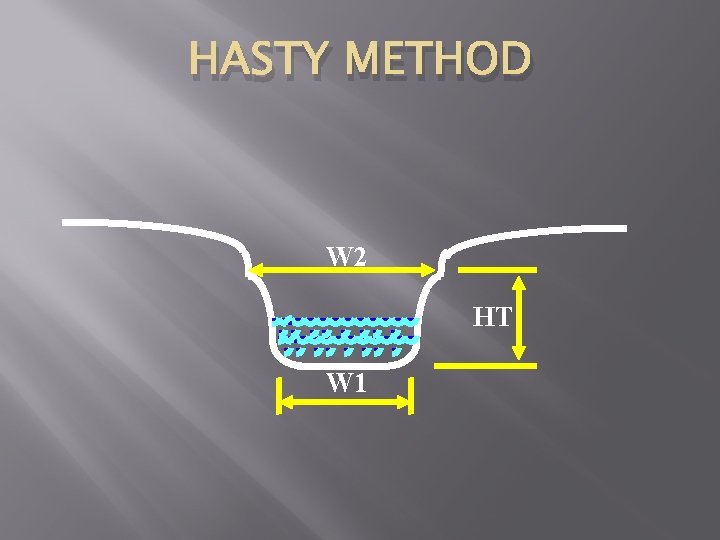
HASTY METHOD AW = WI + W 2 2 x H AW = Area of the waterway W 1 = Width of the channel bottom W 2 = Width at the high water mark H = Height from the bottom to the high water mark
HASTY METHOD W 2 HT W 1
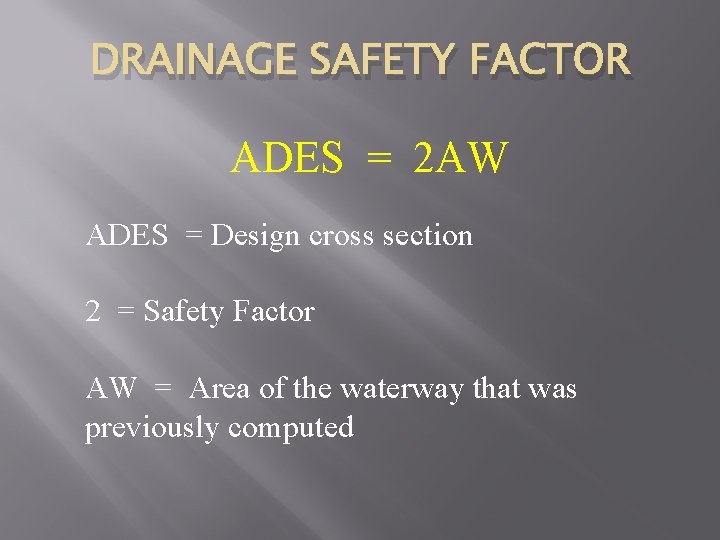
DRAINAGE SAFETY FACTOR ADES = 2 AW ADES = Design cross section 2 = Safety Factor AW = Area of the waterway that was previously computed
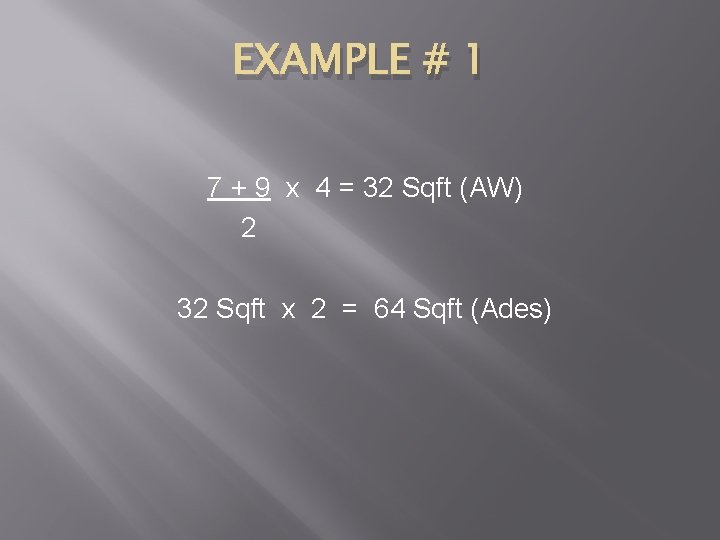
EXAMPLE # 1 7 + 9 x 4 = 32 Sqft (AW) 2 32 Sqft x 2 = 64 Sqft (Ades)
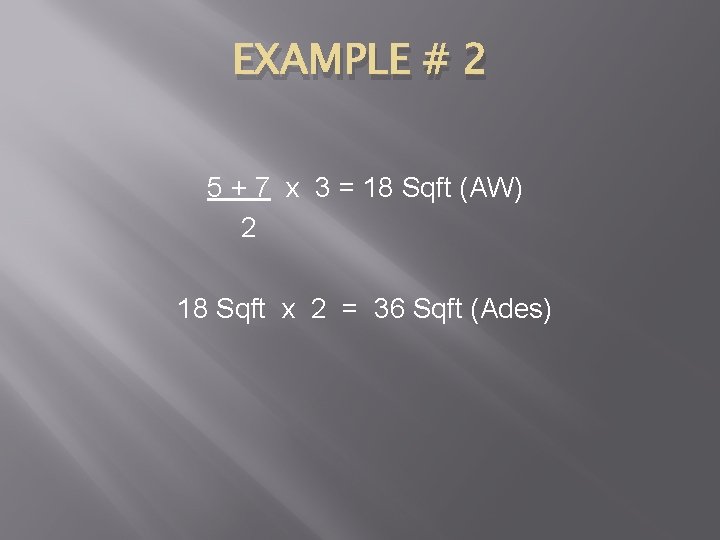
EXAMPLE # 2 5 + 7 x 3 = 18 Sqft (AW) 2 18 Sqft x 2 = 36 Sqft (Ades)
COMPLETE HANDOUTS 1 & 2 PRACTICAL APPLICATION
REVIEW Review handouts #1 and #2 Take a Break
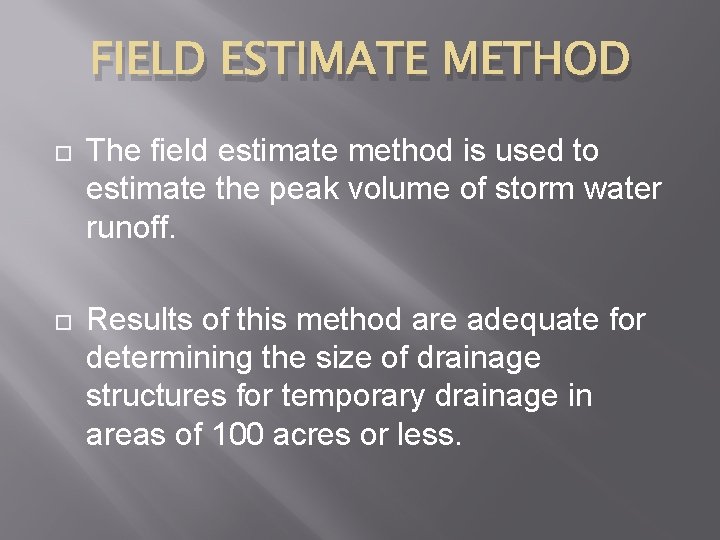
FIELD ESTIMATE METHOD The field estimate method is used to estimate the peak volume of storm water runoff. Results of this method are adequate for determining the size of drainage structures for temporary drainage in areas of 100 acres or less.
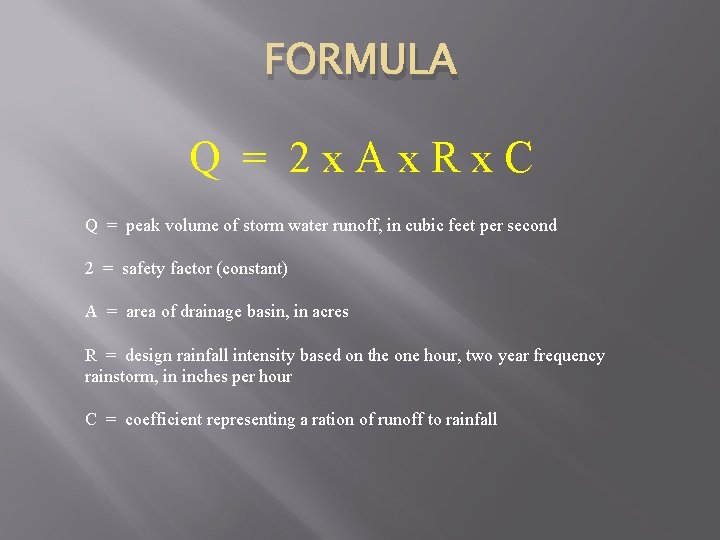
FORMULA Q = 2 x. Ax. Rx. C Q = peak volume of storm water runoff, in cubic feet per second 2 = safety factor (constant) A = area of drainage basin, in acres R = design rainfall intensity based on the one hour, two year frequency rainstorm, in inches per hour C = coefficient representing a ration of runoff to rainfall
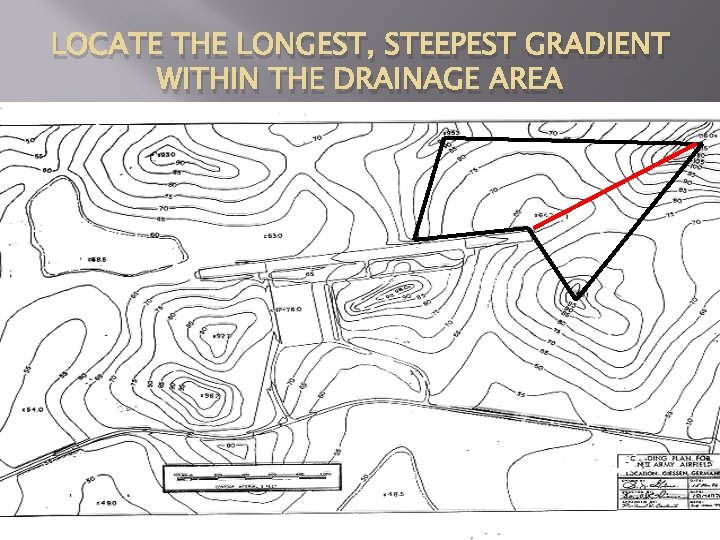
DRAINAGE AREA The fastest and most preferred method for determining the size of the drainage area is the stripper method The first step is called delineation. (Done on a topographic map)
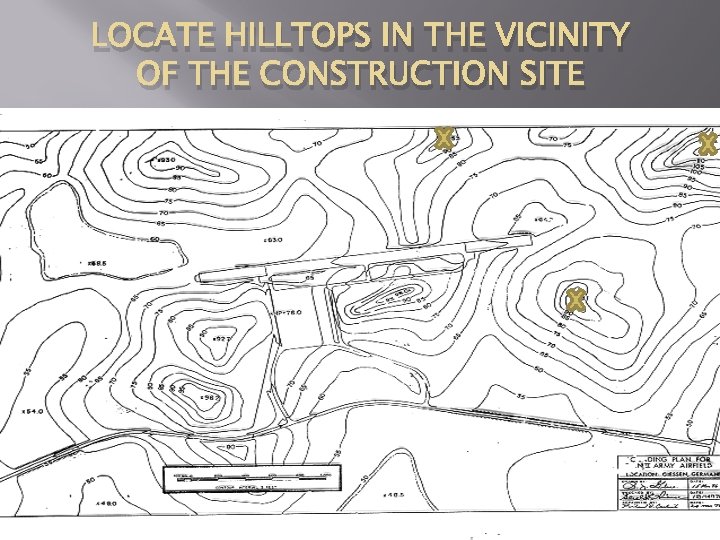
LOCATE HILLTOPS IN THE VICINITY OF THE CONSTRUCTION SITE
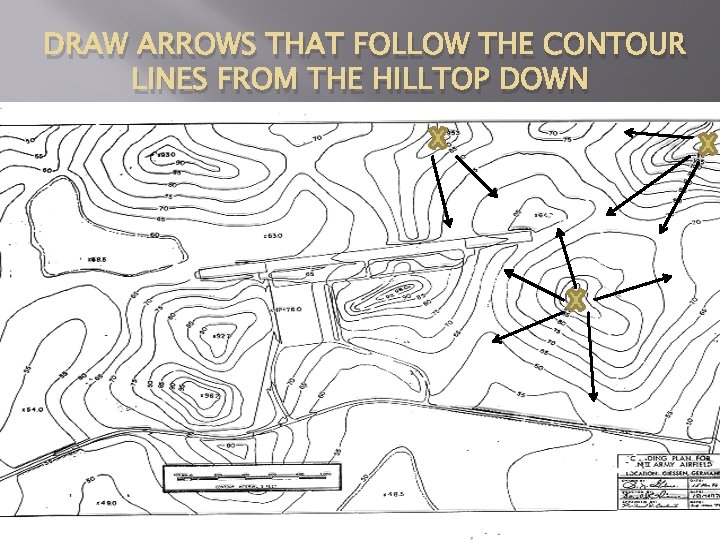
DRAW ARROWS THAT FOLLOW THE CONTOUR LINES FROM THE HILLTOP DOWN
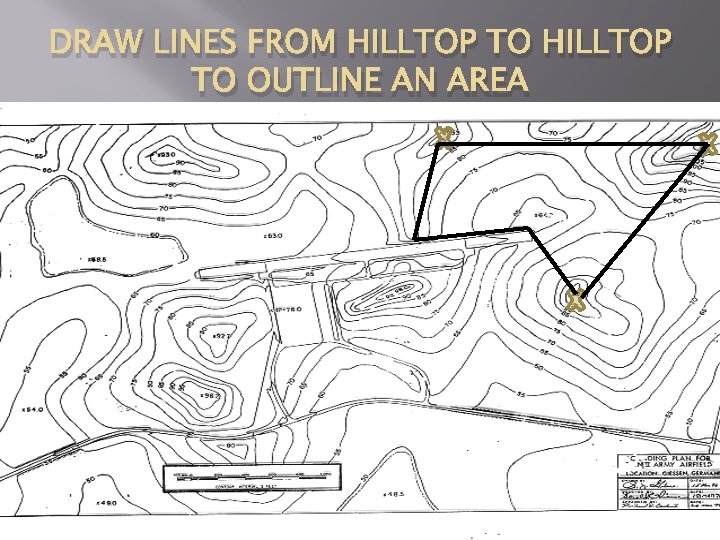
DRAW LINES FROM HILLTOP TO OUTLINE AN AREA
LOCATE THE LONGEST, STEEPEST GRADIENT WITHIN THE DRAINAGE AREA
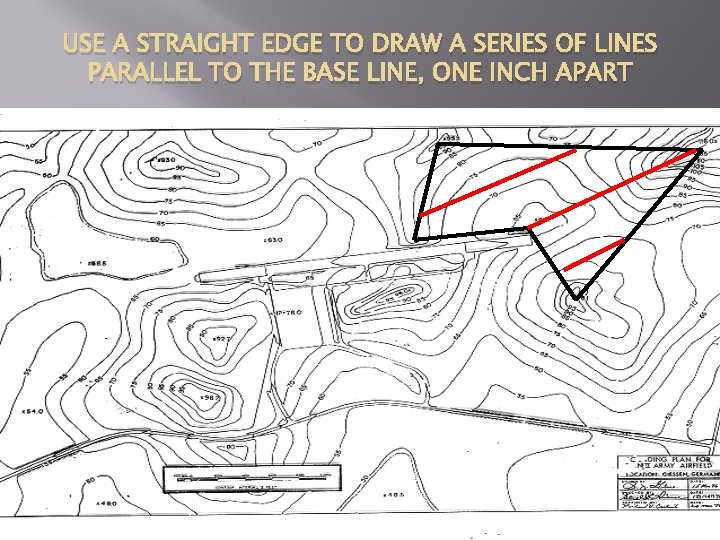
USE A STRAIGHT EDGE TO DRAW A SERIES OF LINES PARALLEL TO THE BASE LINE, ONE INCH APART
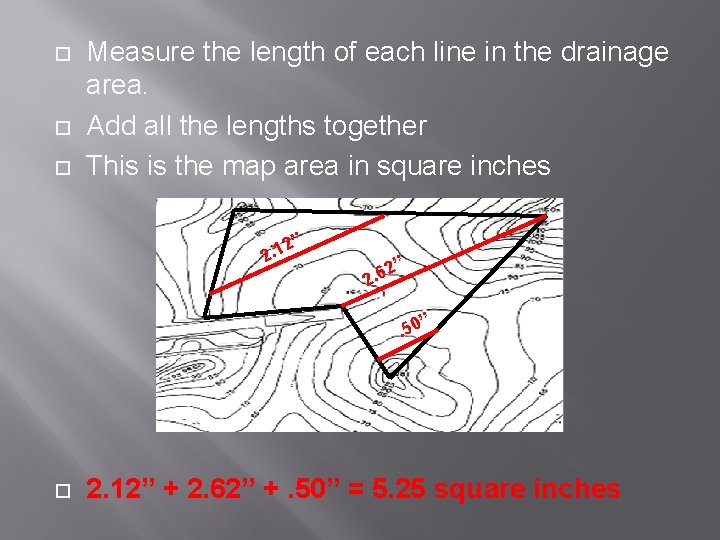
Measure the length of each line in the drainage area. Add all the lengths together This is the map area in square inches ” 2 2. 1 ” 2 2. 6 ” . 50 2. 12” + 2. 62” +. 50” = 5. 25 square inches
CONVERSION (INCHES TO ACRES) For a more accurate determination, you can draw the lines ¼” or ½” apart from the base line. If ¼” spacing is used, you must take total length of lines and divide by 4. If ½” spacing is used, you must take total length of lines and divide by 2.
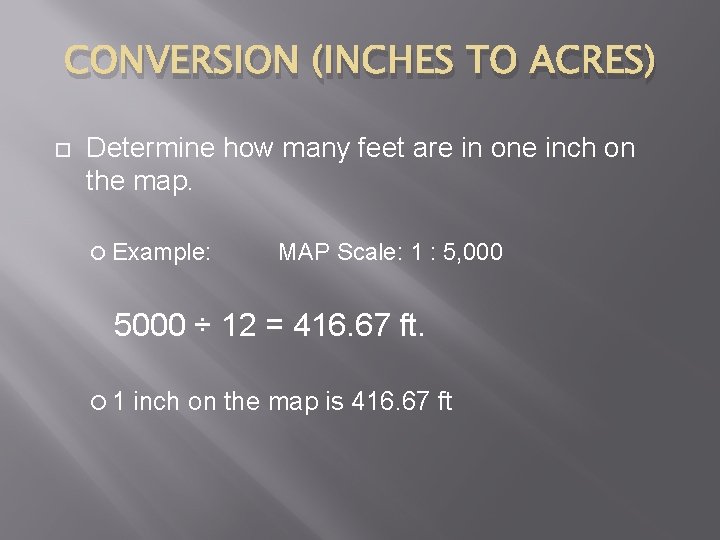
CONVERSION (INCHES TO ACRES) Determine how many feet are in one inch on the map. Example: MAP Scale: 1 : 5, 000 5000 ÷ 12 = 416. 67 ft. 1 inch on the map is 416. 67 ft
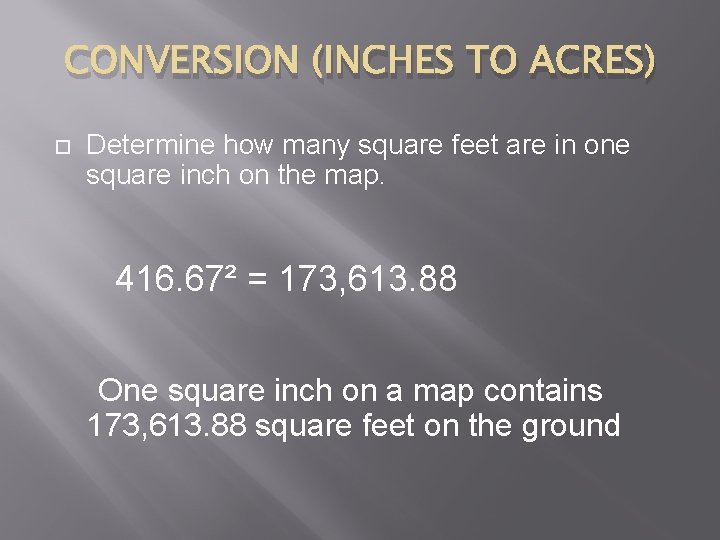
CONVERSION (INCHES TO ACRES) Determine how many square feet are in one square inch on the map. 416. 67² = 173, 613. 88 One square inch on a map contains 173, 613. 88 square feet on the ground
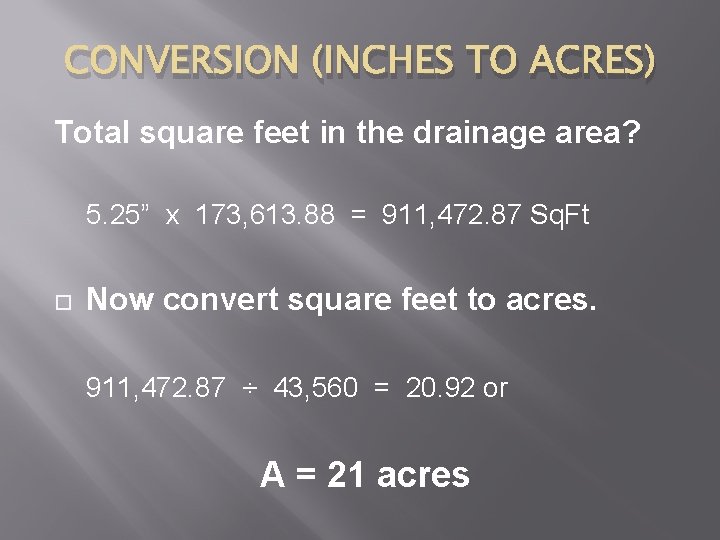
CONVERSION (INCHES TO ACRES) Total square feet in the drainage area? 5. 25” x 173, 613. 88 = 911, 472. 87 Sq. Ft Now convert square feet to acres. 911, 472. 87 ÷ 43, 560 = 20. 92 or A = 21 acres
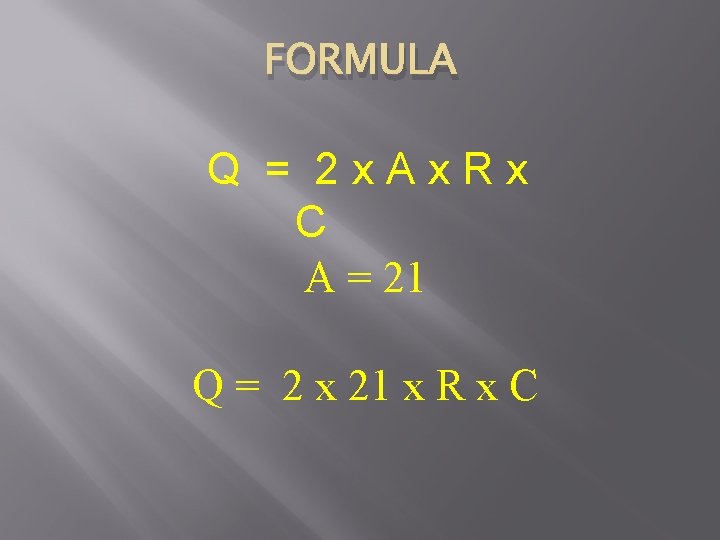
FORMULA Q = 2 x. Ax. Rx C A = 21 Q = 2 x 21 x R x C
DEMONSTRATION Example on page 6 of the student handout Follow along with the demonstration
Practical Application Perform the Practical Exercise Worksheet #1
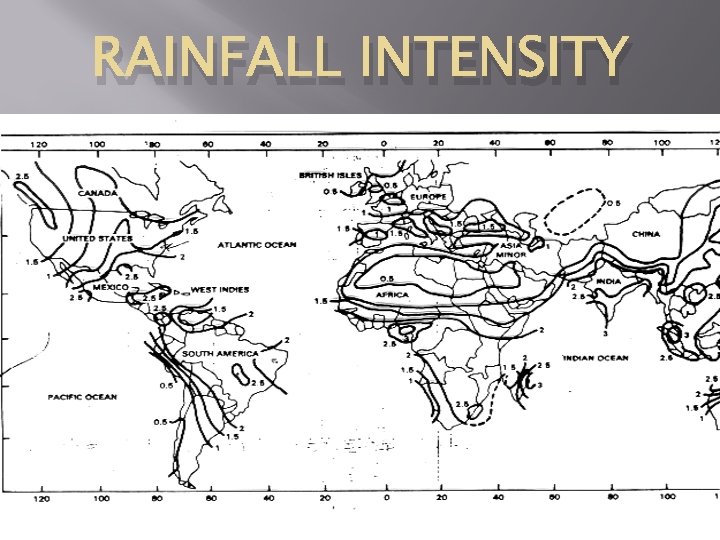
RAINFALL INTENSITY
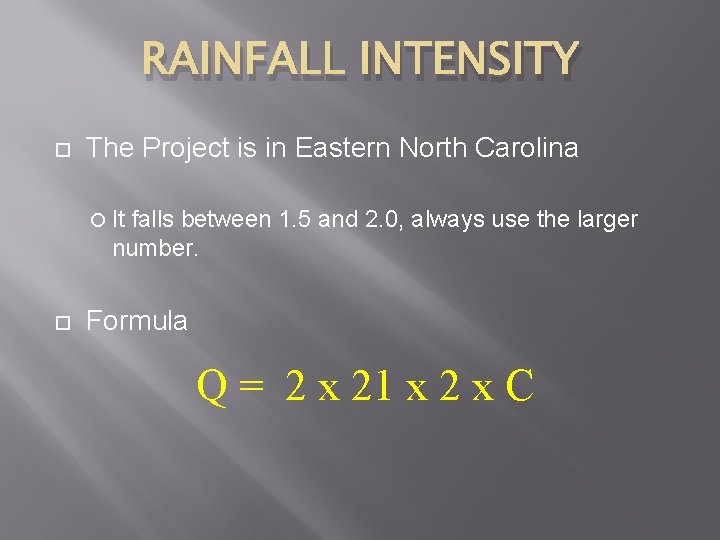
RAINFALL INTENSITY The Project is in Eastern North Carolina It falls between 1. 5 and 2. 0, always use the larger number. Formula Q = 2 x 21 x 2 x C
RUNOFF COEFFICIENT The ratio of runoff to rainfall. The amount of water expected to drain from an area as the result of a specific amount of rainfall. It is expressed as a decimal. There are three primary factors that affect the percentage; Soil type Surface cover slope
SOIL TYPE Porous soil - A large portion of the soil will infiltrate leading to a smaller runoff coefficient Man made surfaces – Like asphalt, concrete, and compacted gravel or macadam will result in a higher runoff coefficient
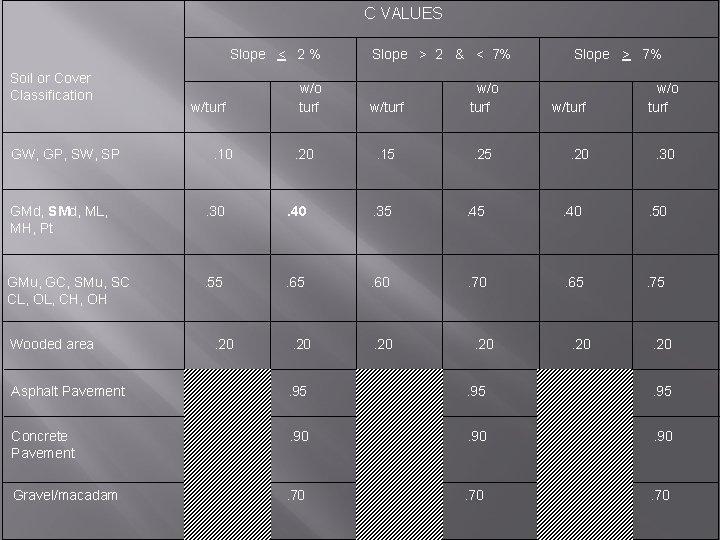
SURFACE COVER To use table 6 -1, you need to understand the following terms Without Turf – Is ground that is completely bare With Turf – Is ground that is covered with vegetation. If the area has some vegetation but is not completely covered, use the higher without turf value
SLOPE As terrain becomes steeper, water flows sooner and more rapidly. This allows less time for infiltration to occur and results in the C value becoming larger for the natural cover or soil categories.
USCS Use the Unified Soil Classification System (USCS) to select the PREDOMINANT soil type. This will be needed for the left column of table 6 -1 (the next slide). If the area is wooded or covered with asphalt, concrete, gravel or macadam simply lookup the “C” value in the left hand column.
FINDING THE RUNOFF COEFFICIENT
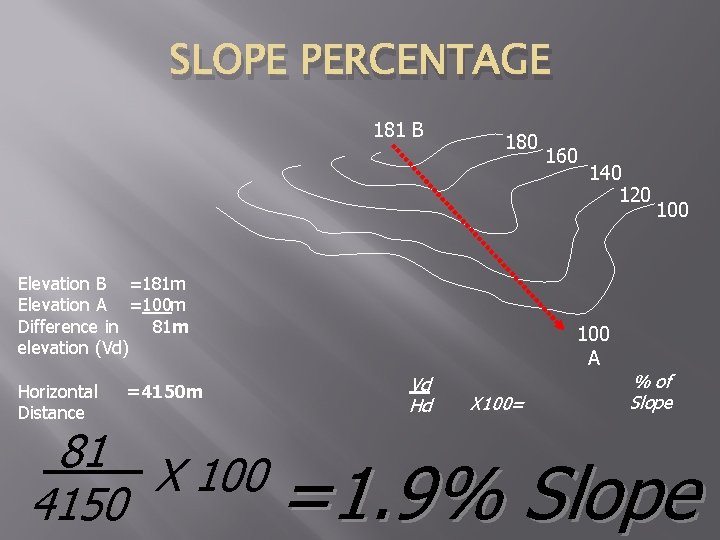
SLOPE PERCENTAGE Indentify the slope on the map. Find the difference from the top to the bottom of the slope
SLOPE PERCENTAGE 181 B 180 Elevation B =181 m Elevation A =100 m Difference in 81 m elevation (Vd) Horizontal Distance =4150 m 81_ X 100 4150 160 140 120 100 A Vd Hd X 100= 100 % of Slope =1. 9% Slope
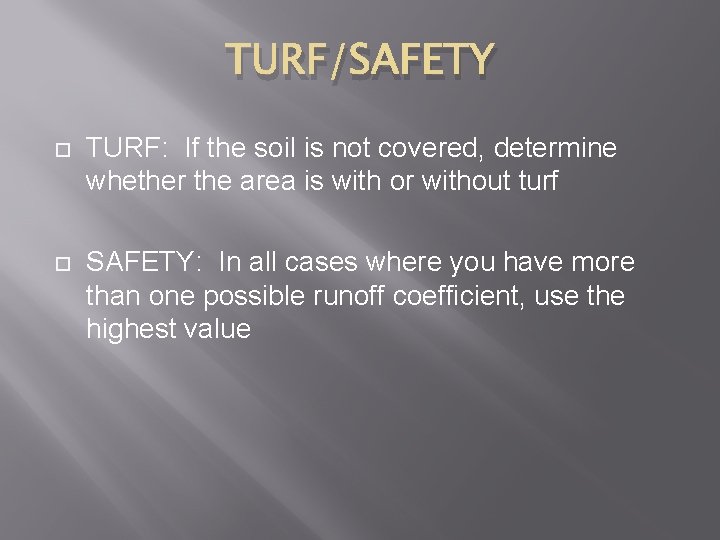
TURF/SAFETY TURF: If the soil is not covered, determine whether the area is with or without turf SAFETY: In all cases where you have more than one possible runoff coefficient, use the highest value
C VALUES Slope < 2 % Soil or Cover Classification GW, GP, SW, SP w/turf. 10 w/o turf. 20 Slope > 2 & < 7% w/turf w/o turf . 15 . 25 Slope > 7% w/turf. 20 w/o turf. 30 GMd, SMd, ML, MH, Pt . 30 . 40 . 35 . 40 . 50 GMu, GC, SMu, SC CL, OL, CH, OH . 55 . 60 . 70 . 65 . 75 Wooded area . 20 Asphalt Pavement . 95 Concrete Pavement . 90 Gravel/macadam . 70
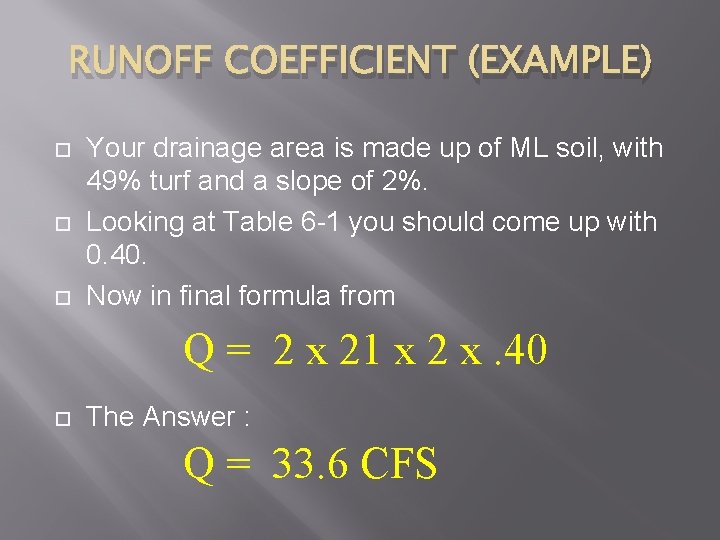
RUNOFF COEFFICIENT (EXAMPLE) Your drainage area is made up of ML soil, with 49% turf and a slope of 2%. Looking at Table 6 -1 you should come up with 0. 40. Now in final formula from Q = 2 x 21 x 2 x. 40 The Answer : Q = 33. 6 CFS
WATERWAY AREA Expedient culvert and ditch design is based on the waterway area. The hasty method deals with waterway area. The field estimate method deals with peak volume of storm water runoff (Q).
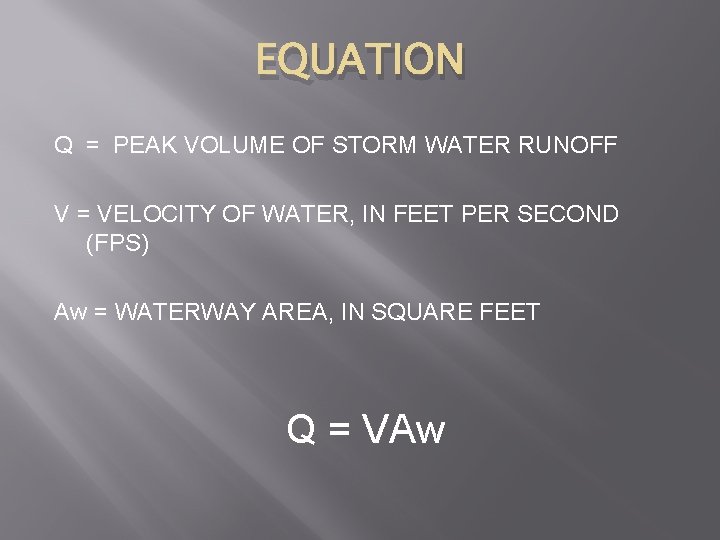
EQUATION Q = PEAK VOLUME OF STORM WATER RUNOFF V = VELOCITY OF WATER, IN FEET PER SECOND (FPS) Aw = WATERWAY AREA, IN SQUARE FEET Q = VAw
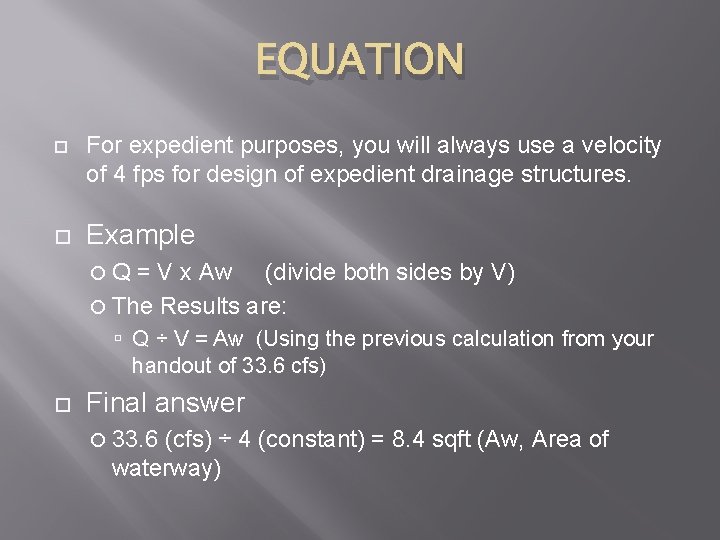
EQUATION For expedient purposes, you will always use a velocity of 4 fps for design of expedient drainage structures. Example Q = V x Aw (divide both sides by V) The Results are: Q ÷ V = Aw (Using the previous calculation from your handout of 33. 6 cfs) Final answer 33. 6 (cfs) ÷ 4 (constant) = 8. 4 sqft (Aw, Area of waterway)
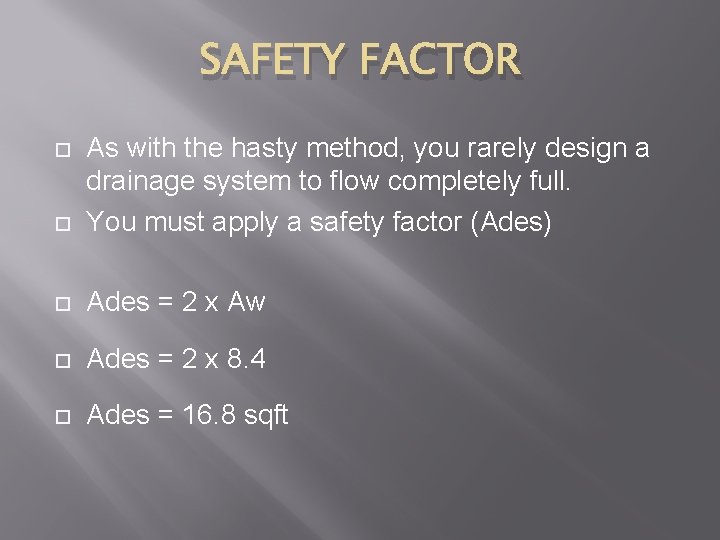
SAFETY FACTOR As with the hasty method, you rarely design a drainage system to flow completely full. You must apply a safety factor (Ades) Ades = 2 x Aw Ades = 2 x 8. 4 Ades = 16. 8 sqft
DEMONSTRATION AND PRACTICAL APPLICATION
QUESTIONS? ?
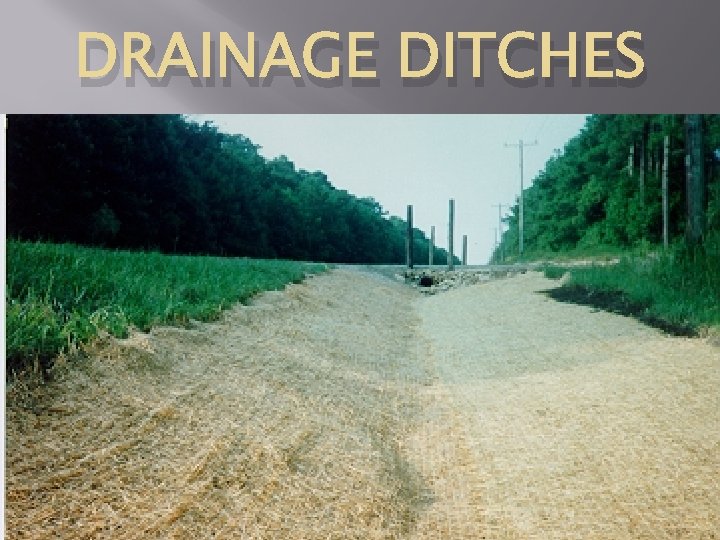
DRAINAGE DITCHES
TRIANGULAR V-DITCHES Triangular (V) ditches are used to move small amounts of water. Q ≤ 60 cfs or Aw ≤ 15 sqft
TRIANGULAR V-DITCHES SYMMETRICAL Both sides of the ditch are inclined equally NON_SYMMETRICAL Each side of the ditch are inclined differently Ensure the appropriate side-slope ratio is selected to serve its designed purpose. If the side walls are too step it invites excessive corrosion and ditch clogging.
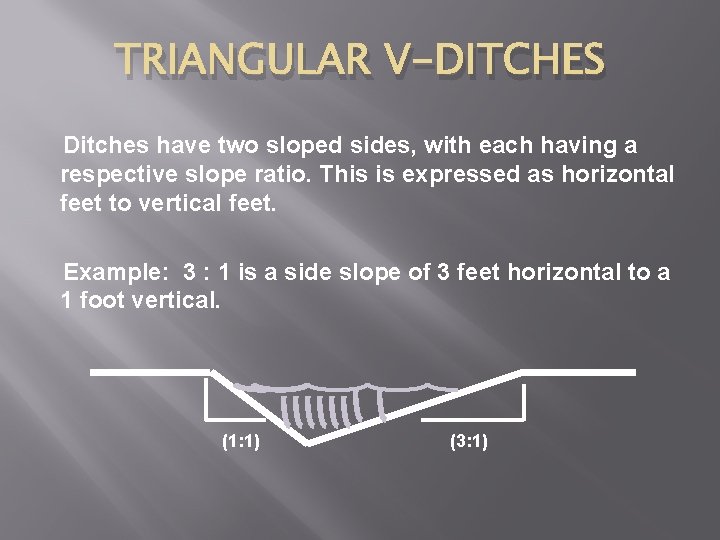
TRIANGULAR V-DITCHES Ditches have two sloped sides, with each having a respective slope ratio. This is expressed as horizontal feet to vertical feet. Example: 3 : 1 is a side slope of 3 feet horizontal to a 1 foot vertical. (1: 1) (3: 1)
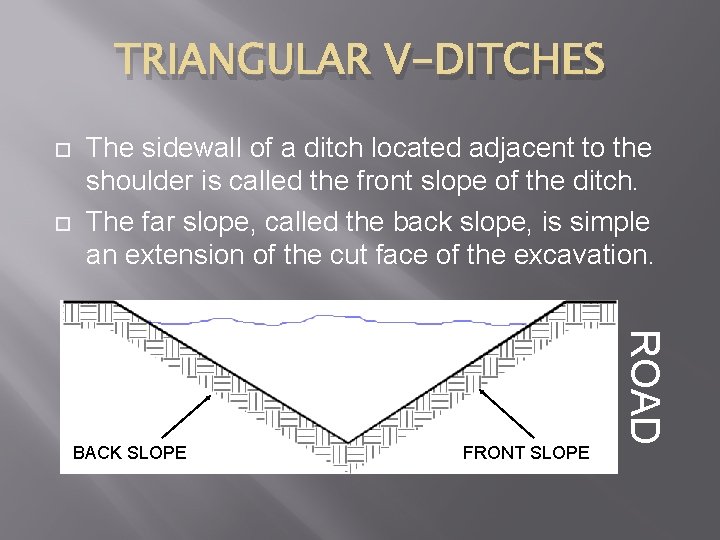
TRIANGULAR V-DITCHES The sidewall of a ditch located adjacent to the shoulder is called the front slope of the ditch. The far slope, called the back slope, is simple an extension of the cut face of the excavation. FRONT SLOPE ROAD BACK SLOPE
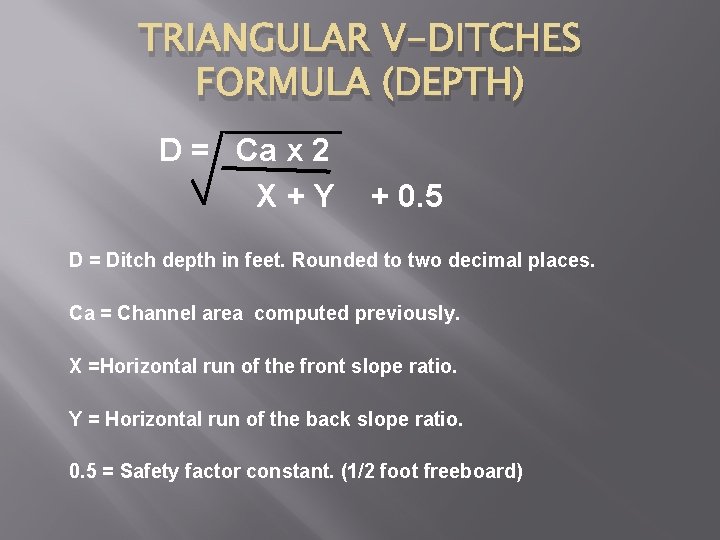
TRIANGULAR V-DITCHES FORMULA (DEPTH) D = Ca x 2 X+Y + 0. 5 D = Ditch depth in feet. Rounded to two decimal places. Ca = Channel area computed previously. X =Horizontal run of the front slope ratio. Y = Horizontal run of the back slope ratio. 0. 5 = Safety factor constant. (1/2 foot freeboard)
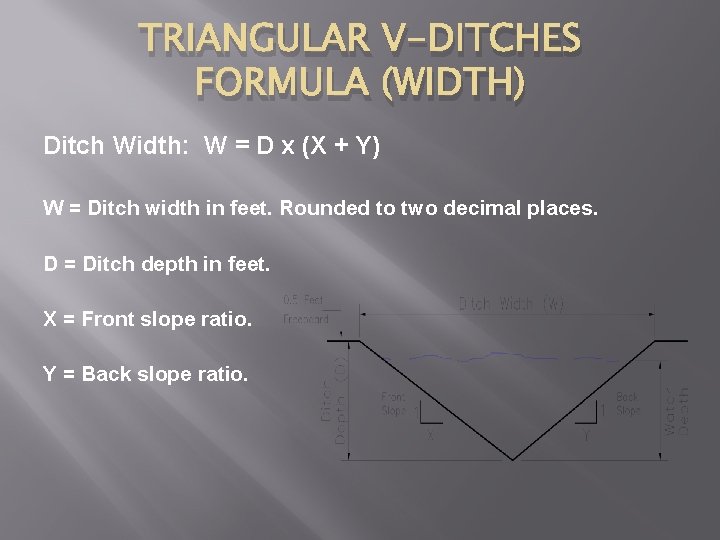
TRIANGULAR V-DITCHES FORMULA (WIDTH) Ditch Width: W = D x (X + Y) W = Ditch width in feet. Rounded to two decimal places. D = Ditch depth in feet. X = Front slope ratio. Y = Back slope ratio.
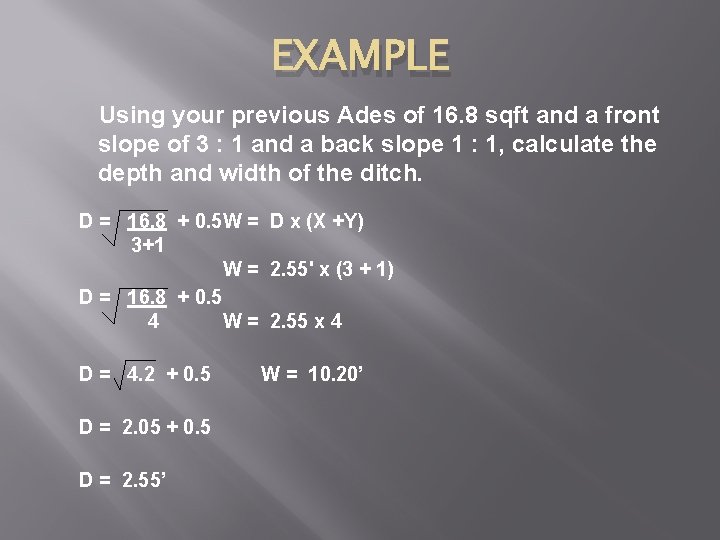
EXAMPLE Using your previous Ades of 16. 8 sqft and a front slope of 3 : 1 and a back slope 1 : 1, calculate the depth and width of the ditch. D = 16. 8 + 0. 5 W = D x (X +Y) 3+1 W = 2. 55' x (3 + 1) D = 16. 8 + 0. 5 4 W = 2. 55 x 4 D = 4. 2 + 0. 5 D = 2. 05 + 0. 5 D = 2. 55’ W = 10. 20’
PRACTICAL APPLICATION Triangular Ditch Calculations Worksheet
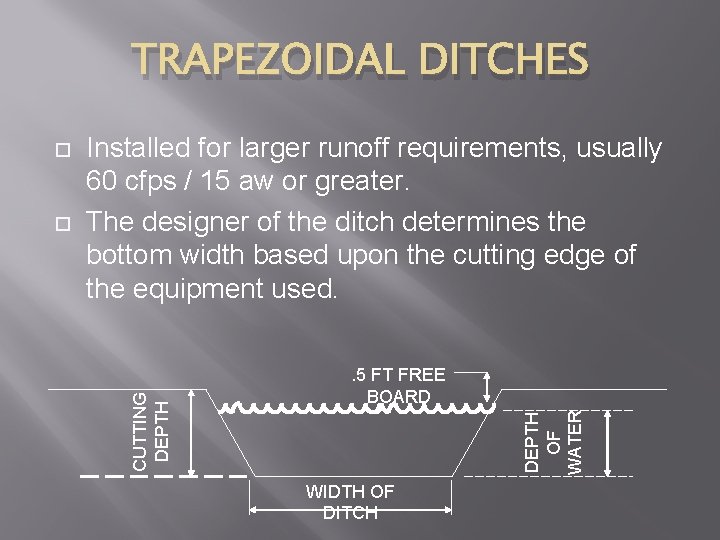
TRAPEZOIDAL DITCHES . 5 FT FREE BOARD DEPTH OF WATER Installed for larger runoff requirements, usually 60 cfps / 15 aw or greater. The designer of the ditch determines the bottom width based upon the cutting edge of the equipment used. CUTTING DEPTH WIDTH OF DITCH
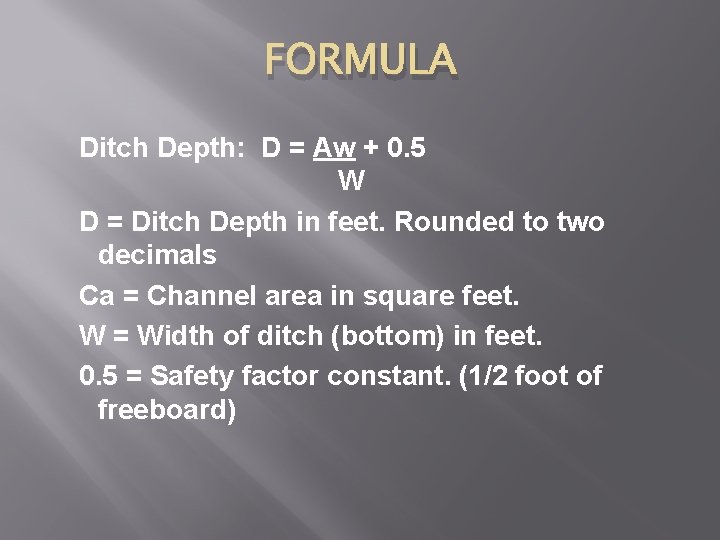
FORMULA Ditch Depth: D = Aw + 0. 5 W D = Ditch Depth in feet. Rounded to two decimals Ca = Channel area in square feet. W = Width of ditch (bottom) in feet. 0. 5 = Safety factor constant. (1/2 foot of freeboard)
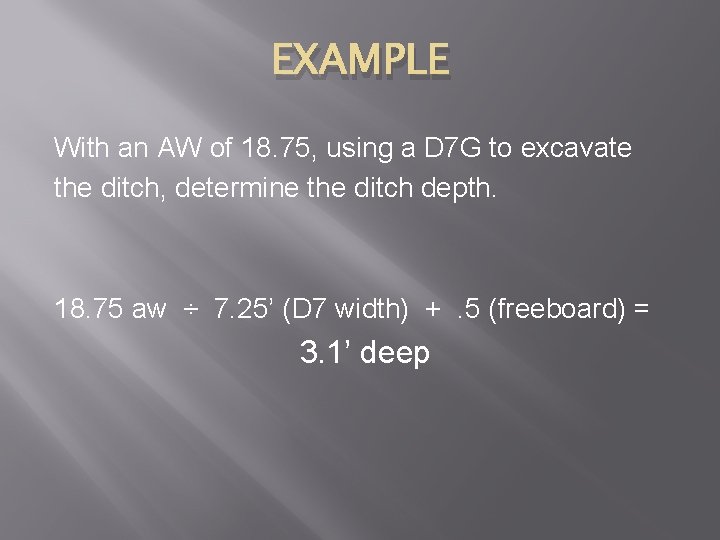
EXAMPLE With an AW of 18. 75, using a D 7 G to excavate the ditch, determine the ditch depth. 18. 75 aw ÷ 7. 25’ (D 7 width) +. 5 (freeboard) = 3. 1’ deep
PRACTICAL APPLICATION Trapezodial Ditch worksheet
EROSION CONTROL
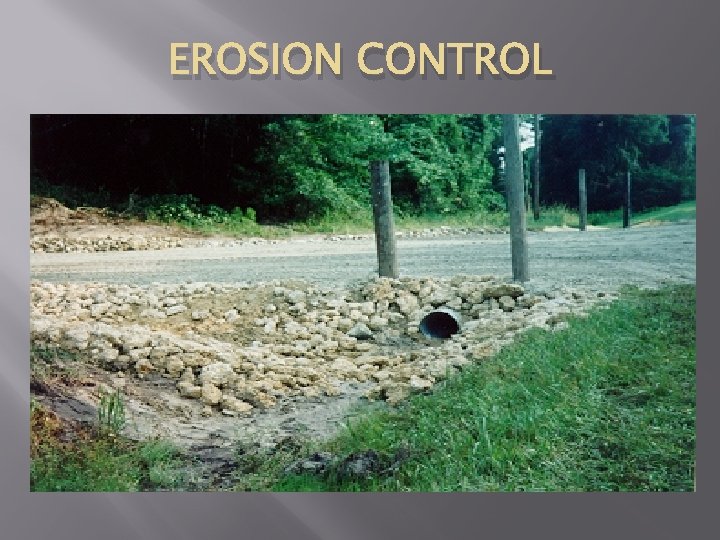
EROSION CONTROL METHODS There are several methods of erosion control. The desirable gradient for a ditch is between 05 and 2%. Ditches larger than 2% will require erosion control. Examples: Ditch Linings Check Dams
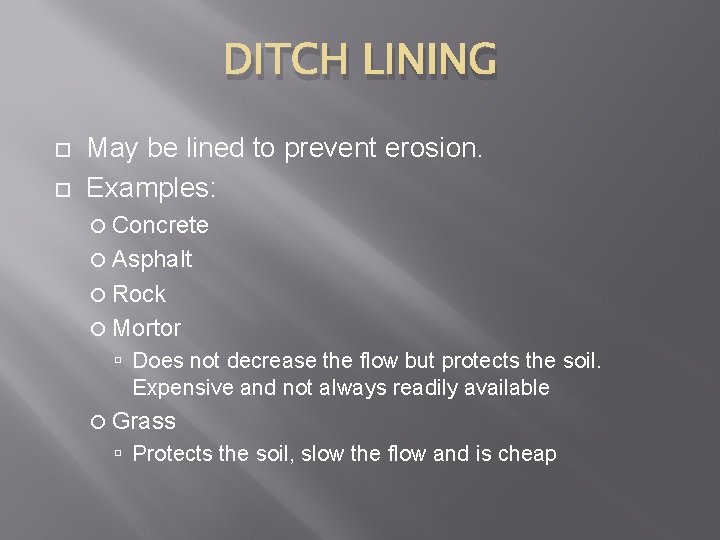
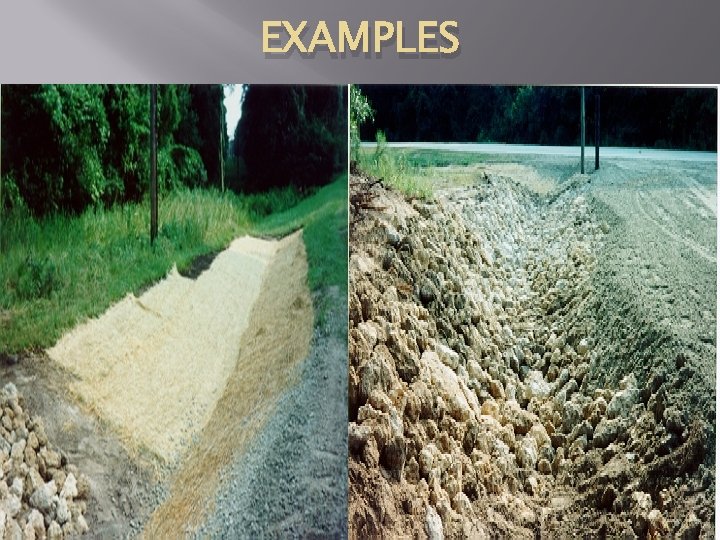
DITCH LINING May be lined to prevent erosion. Examples: Concrete Asphalt Rock Mortor Does not decrease the flow but protects the soil. Expensive and not always readily available Grass Protects the soil, slow the flow and is cheap
EXAMPLES
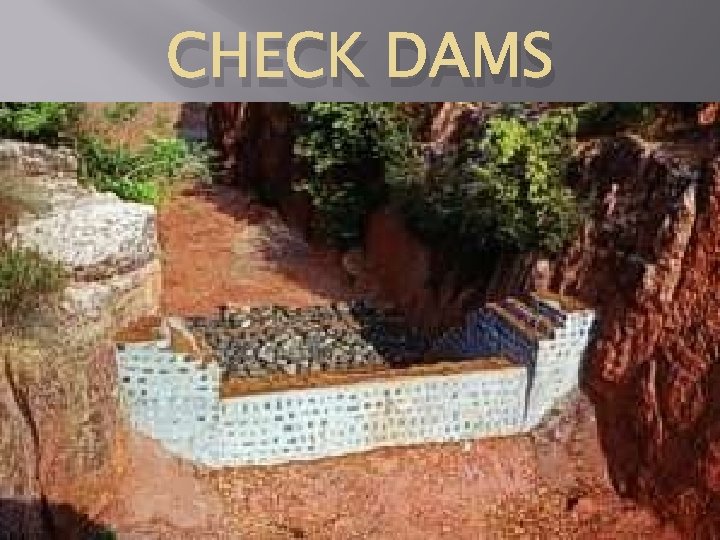
CHECK DAMS
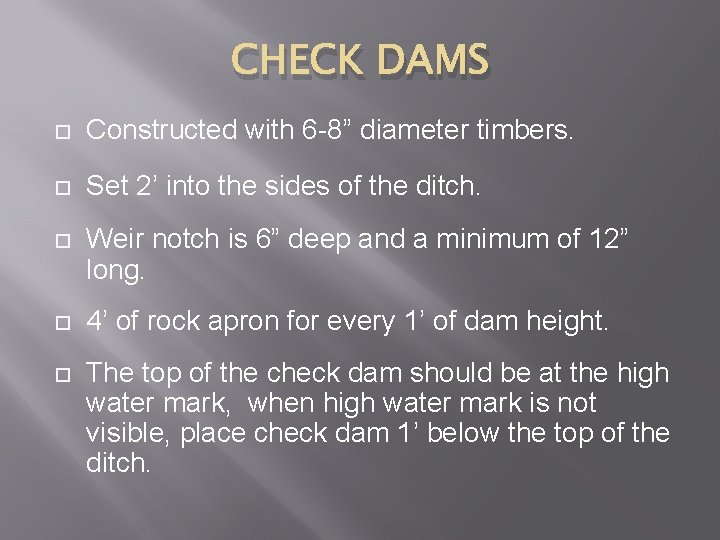
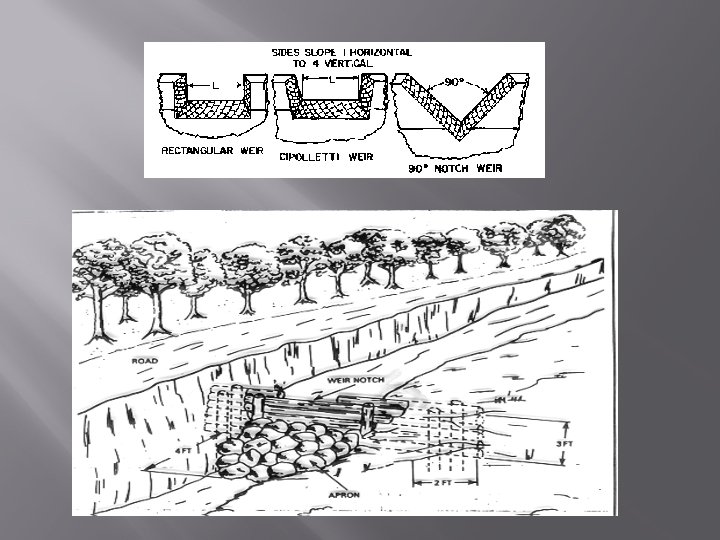
CHECK DAMS Constructed with 6 -8” diameter timbers. Set 2’ into the sides of the ditch. Weir notch is 6” deep and a minimum of 12” long. 4’ of rock apron for every 1’ of dam height. The top of the check dam should be at the high water mark, when high water mark is not visible, place check dam 1’ below the top of the ditch.
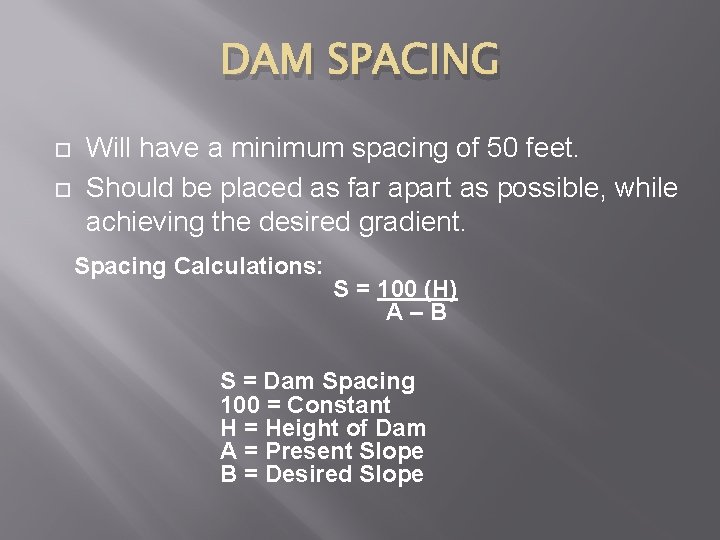
DAM SPACING Will have a minimum spacing of 50 feet. Should be placed as far apart as possible, while achieving the desired gradient. Spacing Calculations: S = 100 (H) A–B S = Dam Spacing 100 = Constant H = Height of Dam A = Present Slope B = Desired Slope
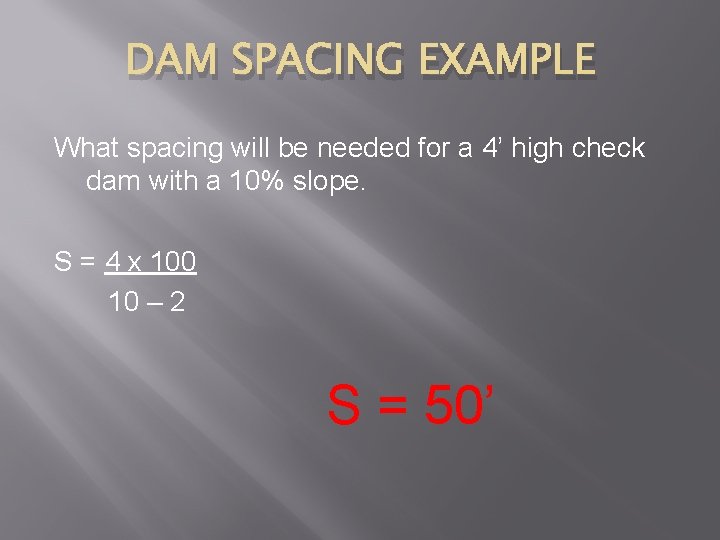
DAM SPACING EXAMPLE What spacing will be needed for a 4’ high check dam with a 10% slope. S = 4 x 100 10 – 2 S = 50’
QUESTIONS
CULVERTS Two classifications Permanent (refer back to the Military Roads class) Expedient Different types of material used Corrugated metal Concrete Vitrified Clay (VC) Polyvinyl Chloride (PVC) Timber Ect.
CULVERTS Timber Box Good workmanship Large timber Strong enough to support heaviest vehicle traffic Minimum of 12” cover Corrugated Metal Pipe Culvert (CMP) 8”-72” diameter Shipped in 26” long half sections Bolted in every hole
CULVERTS Concrete pipe Comes in any size Comes in different shapes (circle, square, etc) Overall strength Smooth interior surface Higher amount of water flow Transportation considerations
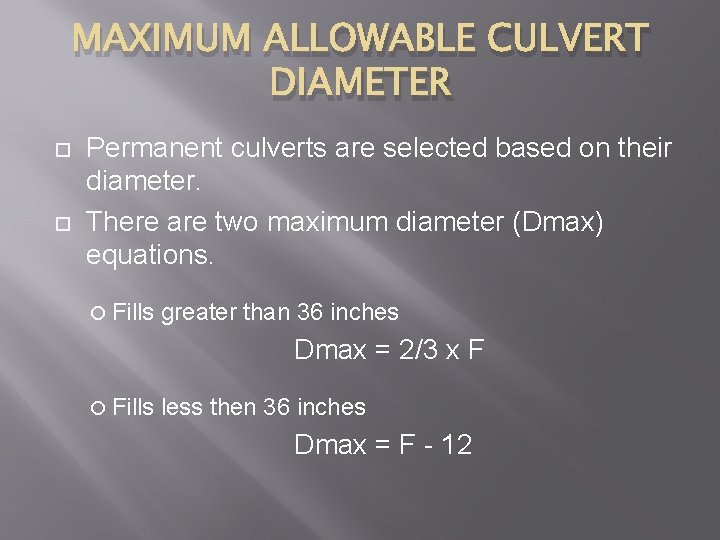
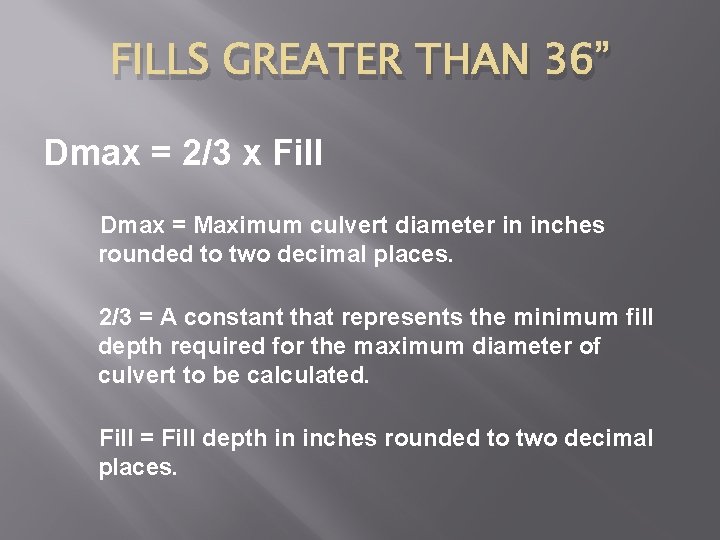
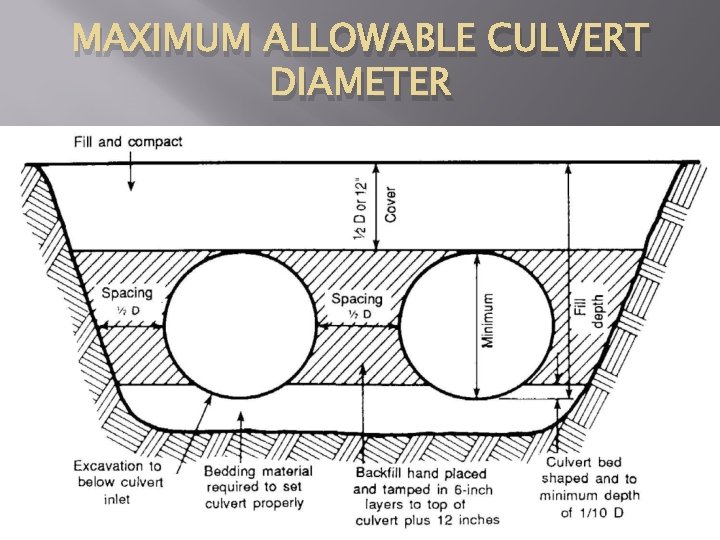
MAXIMUM ALLOWABLE CULVERT DIAMETER Permanent culverts are selected based on their diameter. There are two maximum diameter (Dmax) equations. Fills greater than 36 inches Dmax = 2/3 x F Fills less then 36 inches Dmax = F - 12
FILLS GREATER THAN 36” Dmax = 2/3 x Fill Dmax = Maximum culvert diameter in inches rounded to two decimal places. 2/3 = A constant that represents the minimum fill depth required for the maximum diameter of culvert to be calculated. Fill = Fill depth in inches rounded to two decimal places.
MAXIMUM ALLOWABLE CULVERT DIAMETER
MAXIMUM ALLOWABLE CULVERT DIAMETER
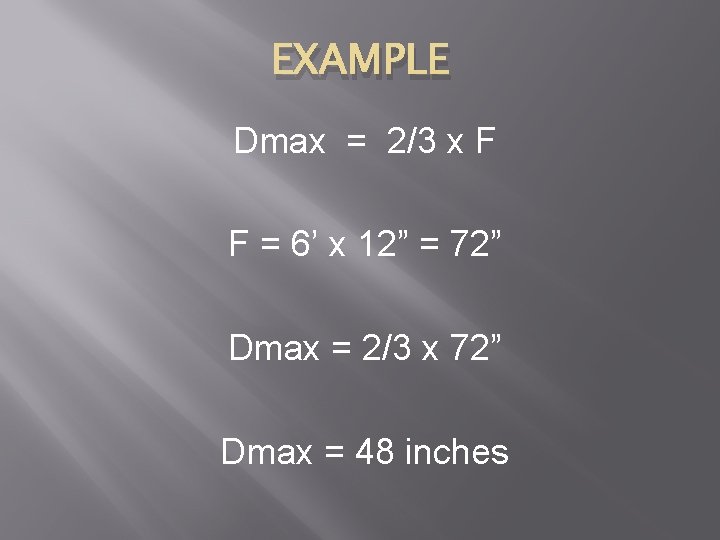
EXAMPLE Dmax = 2/3 x F F = 6’ x 12” = 72” Dmax = 2/3 x 72” Dmax = 48 inches
PRACTICAL APPLICATION Complete the DMAX worksheet
CULVERT MATERIALS Several Factors Economical Number Culvert Order Diameter of pipe required Length
ECONOMICAL DIAMETER You want to save material. Put in the least amount of culverts. They need to equal or exceed the design area. Manpower requirements
PIPES REQUIRED To find the most economical size, you must divide the design area by the end area of several different pipe sizes. Use the largest pipe that satisfies the fill and cover requirements as a starting point. Work your way down in size until the amount of pipes needed changes. Once changed, we have reached and passed our optimal design. Go back to the prior number and pipe demision.
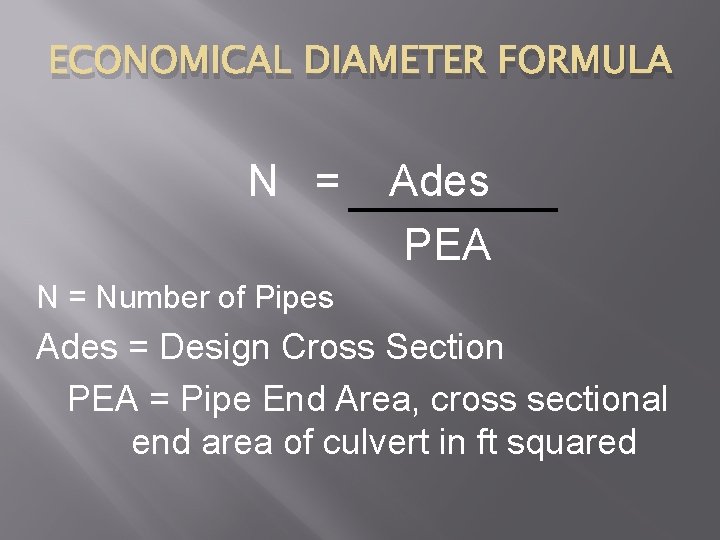
ECONOMICAL DIAMETER FORMULA N = Ades PEA N = Number of Pipes Ades = Design Cross Section PEA = Pipe End Area, cross sectional end area of culvert in ft squared
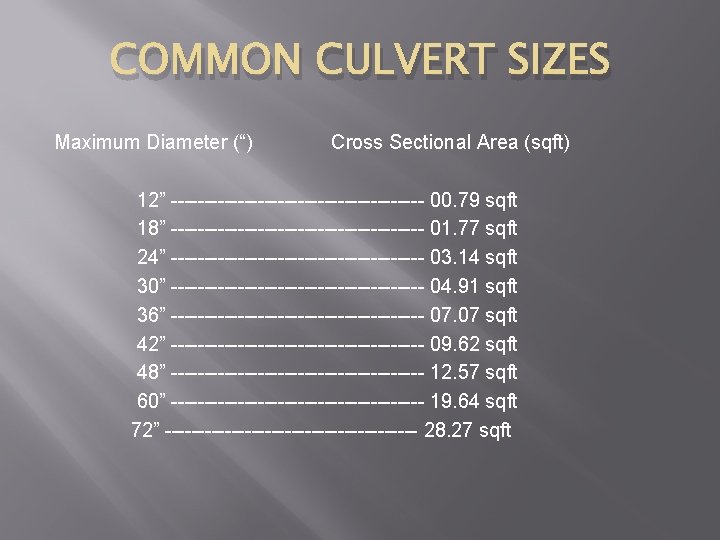
COMMON CULVERT SIZES Maximum Diameter (“) Cross Sectional Area (sqft) 12” ------------------- 00. 79 sqft 18” ------------------- 01. 77 sqft 24” ------------------- 03. 14 sqft 30” ------------------- 04. 91 sqft 36” ------------------- 07. 07 sqft 42” ------------------- 09. 62 sqft 48” ------------------- 12. 57 sqft 60” ------------------- 19. 64 sqft 72” ------------------- 28. 27 sqft
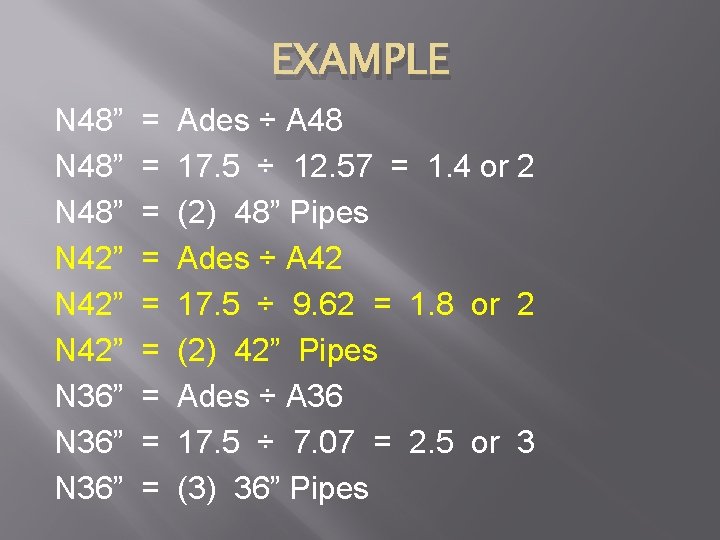
EXAMPLE N 48” N 42” N 36” = = = = = Ades ÷ A 48 17. 5 ÷ 12. 57 = 1. 4 or 2 (2) 48” Pipes Ades ÷ A 42 17. 5 ÷ 9. 62 = 1. 8 or 2 (2) 42” Pipes Ades ÷ A 36 17. 5 ÷ 7. 07 = 2. 5 or 3 (3) 36” Pipes
CULVERT LENGTH Now that we’ve determined that we will need (2) 42” diameter culverts, we must now calculate the culvert length. Use the following formula to do so: (DL x SL) + ROADWAY WIDTH + (DR x SR) = CL Culvert Length Note: After calculating culvert length, ensure you round up to an even number.
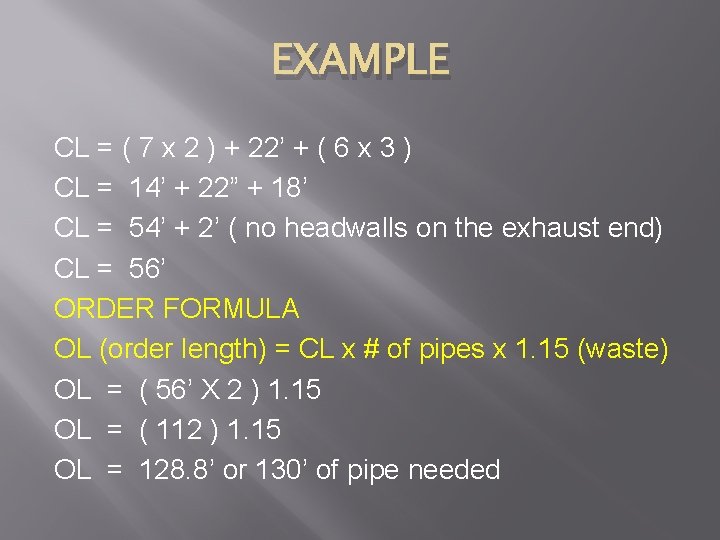
EXAMPLE CL = ( 7 x 2 ) + 22’ + ( 6 x 3 ) CL = 14’ + 22” + 18’ CL = 54’ + 2’ ( no headwalls on the exhaust end) CL = 56’ ORDER FORMULA OL (order length) = CL x # of pipes x 1. 15 (waste) OL = ( 56’ X 2 ) 1. 15 OL = ( 112 ) 1. 15 OL = 128. 8’ or 130’ of pipe needed
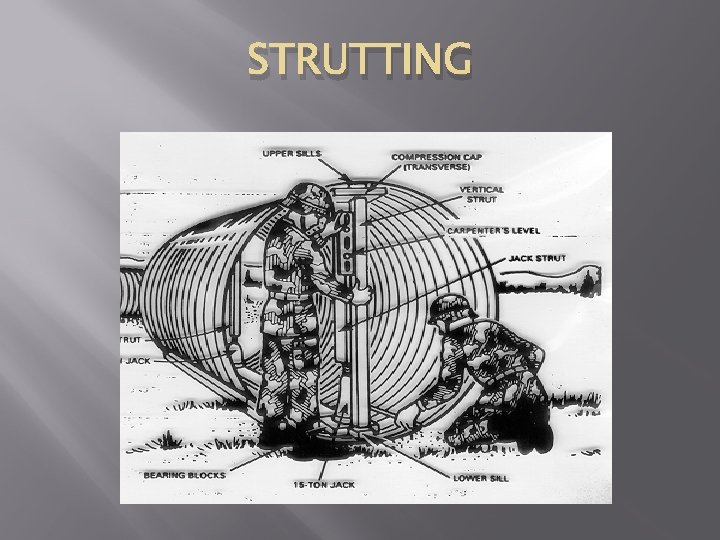
STRUTTING
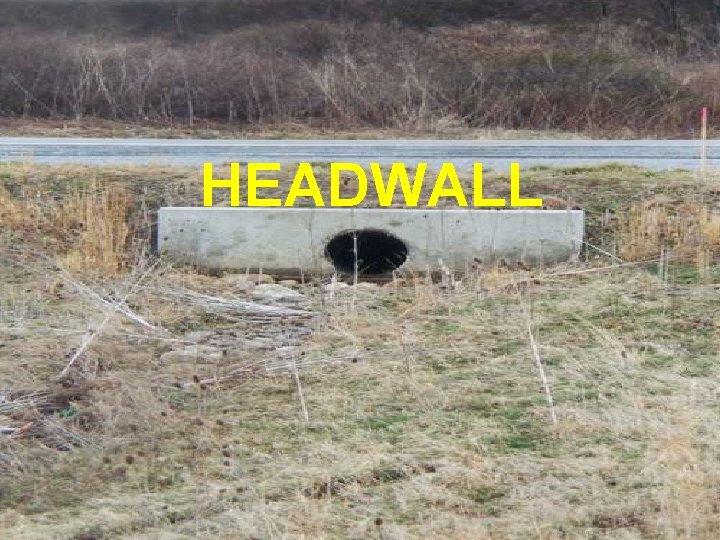
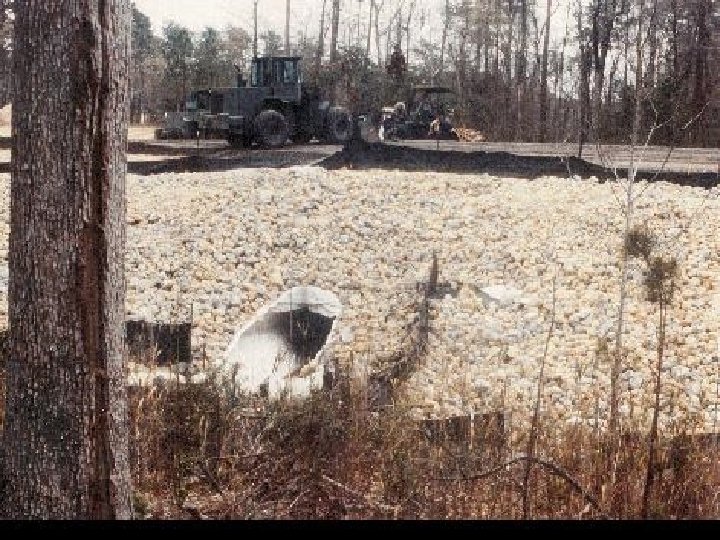
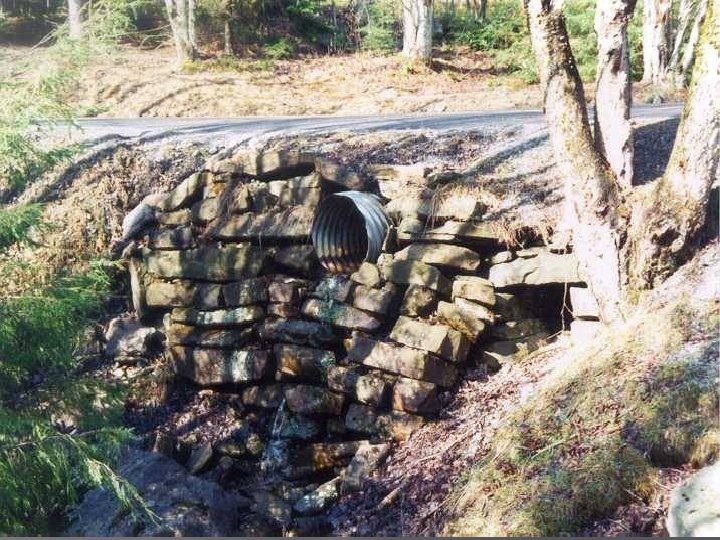
HEADWALL
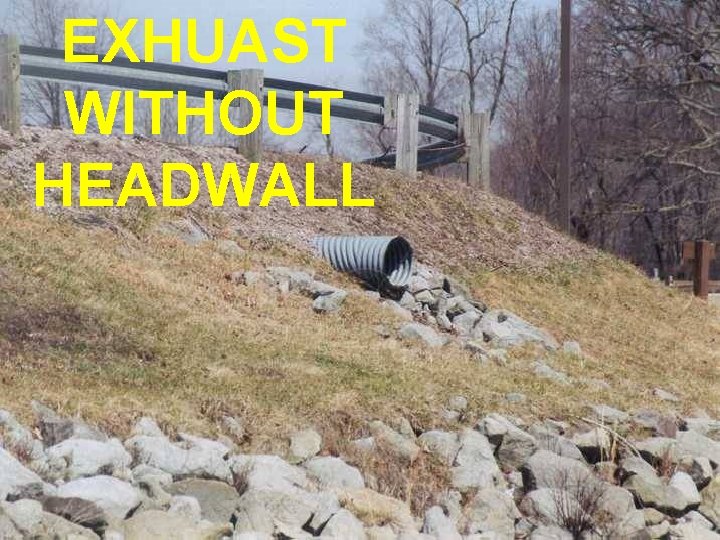
EXHUAST WITHOUT HEADWALL
QUESTIONS