EXODONTIA Exodontia The ideal tooth extraction is the


 Founder of Singapore")


 According to their working principle 1. Lever principle – Straight elevator")


- Slides: 64
EXODONTIA
Exodontia The ideal tooth extraction is the painless removal of the whole tooth, or tooth-root, with minimal trauma to the investing tissues, so that the wound heals uneventfully & no postoperative prosthetic complication is created.
“ 7 Minimum Essentials” Sir Thomas Stamford Raffles (1781 – 1826) Founder of Singapore Radiograph Anesthetic Forceps & elevators Flap tray Light Efficient assistance Suction apparatus Sir Thomas Stamford Raffles 1781 - 1826
Basic Methods 1. Closed/ Forceps / Intra-alveolar method 2. Open/ Trans- alveolar method.
Closed/ Forceps / Intra-alveolar method
Armamentarium
Armamentarium For simple closed extraction. Equipment for local anesthesia. 2. Elevators-for reflection of soft tissue and luxation. 3. Forceps for removal of teeth. 4. Guaze, saline&suction. 1.
PERIOSTEAL ELEVATORS 1. Moons probe A thin flat instrument with small working tip at right angle to handle Tip is narrow and sharp Used to separate mucoperiosteum around the tooth prior to extraction. 2. Woodson periosteal elevator 3. Molt No. 9 periosteal elevator 4. Howarth elevator
MOLT’S No. 9 PERIOSTEAL ELEVATOR It has a broad flat end on one side and sharp pointed triangular one on the other side. Uses 1. Pointed end used to release dental papilla around teeth (by prying motion). 2. Broad end used for elevating the mucoperiosteal flap from bone (by push stroke). 3. Can be used as soft tissue retractor.
Elevators 1. Handle – usually large in size to facilitate a good grip, may be at a line or at right angle to shank (cross bar / T – bar) 2. Shank – should be strong enough to withstand transmit forces 3. Blade – its working tip transmits forces to tooth / root / bone, can vary in size and shape
Classification A) According to their working principle 1. Lever principle – Straight elevator -- Crane pick elevator 2. Wheel & axel -- Potts elevator -- Winter elevator -- Cryers -- Winter cryers 3. Wedge principle – Apexo elevators -- Apical elevators
DENTAL FORCEPS Instruments designed to deliver the tooth from socket Parts – handle, hinge & beaks Handle Usually of adequate size so that can deliver sufficient pressure and leverage Have a serrated surface to allow a positive grip and prevent slippage Usually straight but may be curved on occasion
Handles are held in two ways 1. Maxillary forceps are held with palm underneth the forceps 2. Mandibular forceps are held with the palm on top of forceps Hinge Connects handle to the beak and transfers and concentrates forces to the beaks Two kinds of forceps according to hinge 1. American – hinge and handles in horizontal direction 2. English – hinge and handles in vertical direction (with hand held in vertical direction).
1. 2. Beaks Designed to adapt closely to tooth root at CEJ (not crown), thus there are different kind of beaks for single / two / three rooted teeth Width of beak may vary, narrow for incisors and broader for molars Usually angled so that can be placed parallel to long axis of tooth with handle in a comfortable position For maxillary forcep – beaks parallel to handle For mandibular forcep – beaks perpendicular to handle Have serrations on inner aspect to allow a better grip
Surgeon Preparation Surgeons must prevent accidental injury or transmission of infection to their patients or to themselves. To prevent this transmission, surgical gloves, surgical mask, and eyewear with side shields are reqiured. required.
Patient Preparation For patient: 1. A sterile disposable towel drape should be put across the patient's chest. 2. Proper oral hygiene is very important before extraction
Patient Position For a maxillary extraction the chair should be tipped backward and maxillary occlusal plane is at 60 degrees to the floor. The height of the dental chair should be 8 cm below the shoulder level of the operator. For the extraction of mandibular teeth, the patient should be positioned in a more upright position the occlusal plane is parallel to the floor. The chair should be 16 cm or 6 inches below the level of operators elbow.
Surgeon Position For all maxillary teeth, anterior mandibular teeth & teeth of the 3 rd quadrant the dentist is to the front and right (and to the left, for lefthanded dentists) of the patient. For the teeth of the IVth quadrant the dentist is positioned behind and to the right (or to the left, for left-handed dentists) of the patient
Position of Operator
Light Good illumination of the operator field is an absolute essential for successful extraction of teeth. “You have to see well what you do in order to do well what you see” G. C Ingham
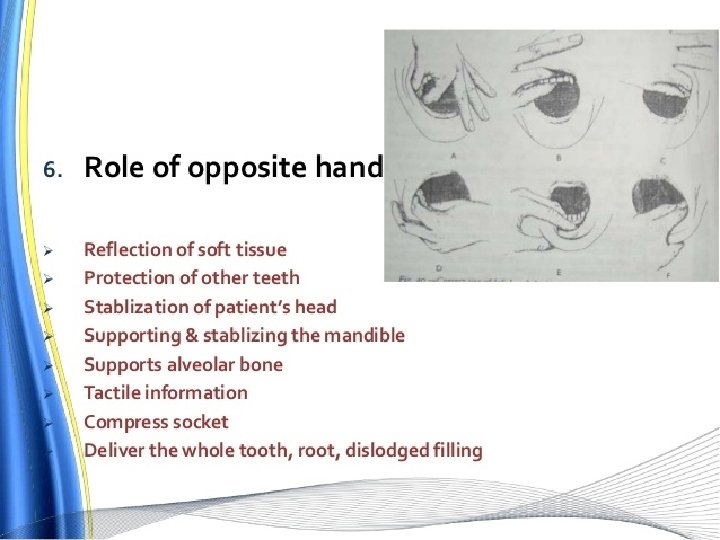
Position of supporting hand
SUPPORTING HAND POSITION MAXILLA
SUPPORTING HAND POSITION MANDIBLE
Mechanical principles of extraction Expansion of bony socket The use of lever and fulcrum The insertion of the wedge
Principles Of Extraction Expansion Of Bony Socket: Bone is relatively elastic so it is possible to expand the bony socket and remove the teeth. This is done by holding the tooth in the apical end and moved with the help forceps causing the expanison of the bony socket.
Wedge Principle This is done by wedging the elevator or beaks of the forceps between the tooth& socket in peidontal ligament space. This displaces the tooth occlusally and the instrument can further be pushed into the socket to displace the tooth further till it can be removed completely.
LEVER PRINCIPLE
WEDGE PRINCIPLE
BASIC PRINCIPLES FORCEPS TECHNIQUE q Beaks should be seated as far apically as possible without compression of the soft tissues. q. Beaks of the forceps as parallel as possible to the long axis of the tooth. q. Application of excessive force should be avoided.
Major motions applied by forceps on teeth: • Apical Force: This is the first force generated and causes expansion of bony socket. • Buccal Force: This helps to expand the buccal cortical plate of the tooth socket. • Lingual Force: Causes expansion of the lingual plate. • Rotational Force: Teeth with single conical roots are extracted by these force causes internal expansion of socket and helps in movement of teeth. • Tractional Force: Forces finally applied to remove the tooth completely out of the socket.
Requirments For Closed Extraction 3 fundamental requirments 1. Adequate access and visualisation of field of surgery. 2. An unimpeded pathway for removal of tooth. 3. Use of controlled force to luxate and remove the teeth.
Procedure For Extraction 1. Positioning of the patient. 2. Administration of local aneasthesia. 3. Loosening and luxation of soft tissue attachment from the tooth. 4. Adaptations of forceps to the teeth. 5. Luxation of the teeth by forceps. 6. Removal of teeth.
Loosening of soft tissue attachement around the tooth: • It is done using the no: 9 peioteal elevator. The instrument has sharp pointed end and boader rounded end. The ponted end is used to begin periosteal reflection and reflect dental papillae. • The pointed end is used in a prying motion to elevate dental papillae between the teeth or attached gingiva around the tooth.
Luxation Of Teeth using Dental Elevator Usually done with straight elevator or no: 9 molt elevator. The straight elevator is inserted perpendicular to the inter dental space after reflection of inter dental papillae. The elevator is then turned in such a way that the inferior position of blade rests on alveolar bone and the superior portion of the blade is turned toward the tooth to be extracted. Strong, slow, steady, forceful turning of the handle moves the tooth in a posterior direction, which results in some expansion of alveolar bone and tearing of peridontal ligament.
Adaptation of Forceps To the Teeth Beaks of forceps are adapted anatomically to the tooth 12 mm apical to the cervical line that is to the root surface so that the beaks grasps the root underneath the loosened soft tissue. Lingual beak is usually seated first. Beaks must be held parallel to the long axis. The beaks acts as wedges to dilate the crestal bone on the buccal and lingual aspects.
APPLICATION OF FORCEP BLADES
Luxation Of Teeth With Forceps The major portion of the force is directed towards the thinnest and therefore weakest bone. Thus in maxilla and all but the molar teeth in the mandible, the major movment is labial and buccal. The surgeon uses slow steady force to displace the tooth bucally. The tooth is then moved again towards the opposite direction with slow deliberate strong pressure. Buccal and lingual pressure continue to expand the alveolar socket.
Basic forces used to mobilize the tooth Apical pressure Buccal force Lingual force Rotational force Traction force
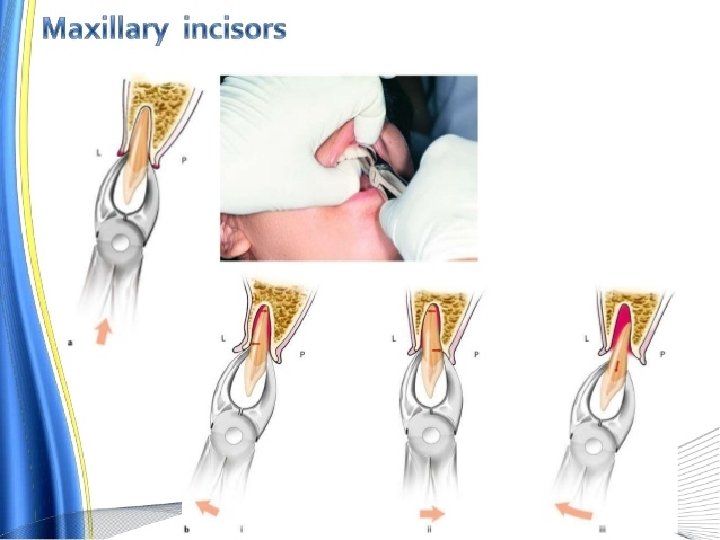
Specific Technique For Each Tooth Maxillary Incisor Teeth: • Extracted with maxillary anterior forceps. • Left hand grasp on alveolar process. • Forceps seated as far as apicaly possible. • Initial movement in labial direction, a less vigorous palatal force is then used, followed by rotational force • Left index finger reflects the soft tissue & thumb rests on alveolar process.
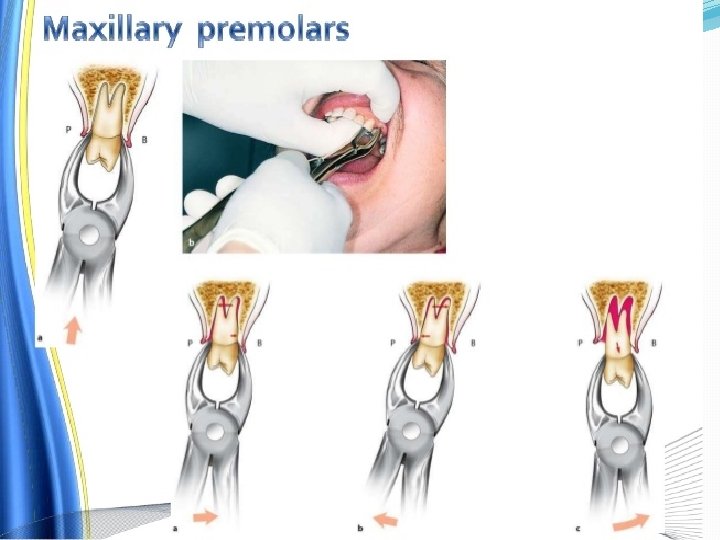
Maxillary 1 st Premolar: • Common root fracture occurs with this case (Rotational force should be avoided) • Should be luxated as much as possible with straight elevator. • Has 2 thin roots. • Firm apical pressure is applied to lower centre of rotation as far as possible and to expand crestal bone. • Buccal pressure is applied initially to expand buccocortical plate. Apices of the roots are pushed lingually and are therefore subjected to fracture • Tooth is delivered in buccolingual direction with combination of buccal and tractional forces
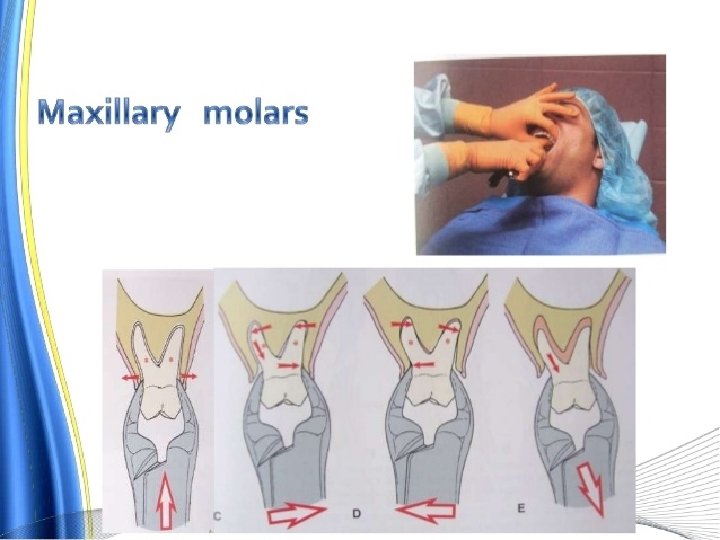
Maxillary Molars: • It has 3 large and relatively strong roots. • Paired forceps no. 53 R and 53 L are used. • Luxation begins with a strong buccal force. • Lingual pressure are used moderately. • Teeth is delivered in buccolingual direction. Ø Maxillary Second Molar: Anatomy of the teeth is similiar to maxillary 1 st molar & extraction procedure is similiar
Maxillary 3 rd molar: Has conical roots and is usually extracted with no: 210 s forceps which is universal forceps used for both right and left molars.
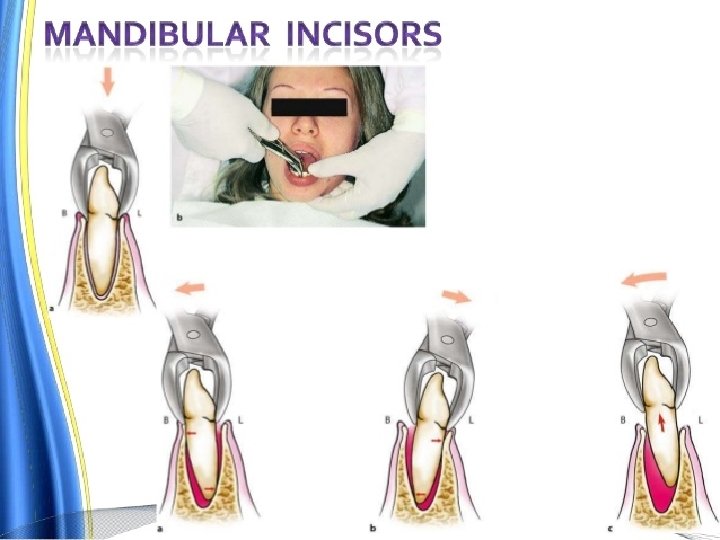
Mandibular Teeth Mandibular Incisors and Canine: • Both the teeth are similiar in shape with incisor being shorter and slightly thinner and canine root being longer. • Fine roots with flattened sides • Alveolar bone is quite thin in labial and lingual side. • Lower universal no: 151 forceps are used. • Moderate labial force followed by lingual force is used to expand the bone. • Tooth is delivered in labial incisal direction.
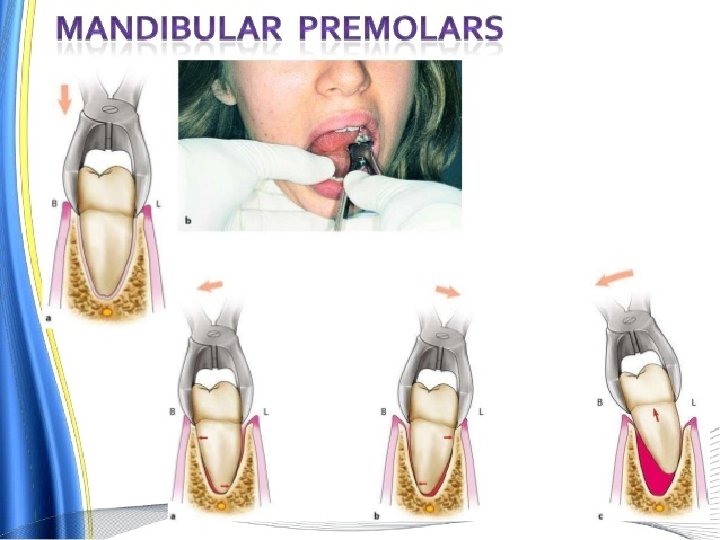
Mandibular Premolars: • They are easiest teeth to remove. • The overlying bone is thin on the buccal aspect and somewhat heavier on lingual side. • Lower universal no 151 forceps is used. • Buccal force followed by slight lingual pressure is used for luxation.
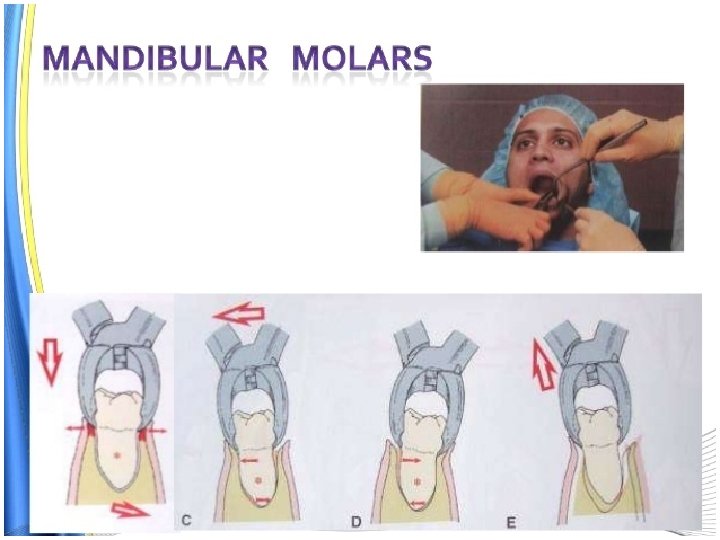
Mandibular Molars: Have 2 roots flattened mesiodistally No 17 forceps is used. If tooth roots are closely bi furcated no: 23 or cow horn forceps can be used. Figure of 8 with strong buccal and lingual motion is used to expand the socket & the tooth is delivered in the buccoocclusal direction • Teeth is delivered in buccolingual direction. Ø Mandibular 3 rd Molar: • The 3 rd molar is deliverd in linguo occlusal direction.
Removal Of Teeth From The Socket Once the alveolar bone has expanded sufficiently and the tooth has been luxated a slight tractional force usually directed bucally can be used.
Post Extraction Care Irrigate the site with saline. Remove the tissue tags and granulation tissue from the soft tissue of the site. Compress the alveolar bone with finger pressure. Suture if necessary at the papillae bordering the extraction site and across the middle of the site. Stop the bleeding by placing a guaze pack covering the socket and the instruct the patient to apply gentle and continous presuure by bitting on the guaze for at least 30 minutes.
Instructions To The Patients Bite firmly the guaze pack over the surgical area for at least 30 mints. Dont spit or suck as it will promote bleeding. If bleeding continues in home, advice the patient to place a guaze pad or cold wet teabag over the area and bite firmly for 30 mins. Avoid rubbing the areas with tongue. Do not smoke for 24 hrs as it may intefere with healing Do not rinse or brush the tooth for 12 hrs.
Diet & Pain Relief After extraction have liquid or soft diet high in protein. Drink a large amount of water and fruit juices. Avoid hot food for the first 24 hrs after surgery Anti inflammatory analgesics should be preffered. Warm saline rinses and gentle brushing should be advised from the next day.
Policy for leaving root fragments 3 conditions must exist for a tooth to be left in the alveolar process • Root fragment must be small • Root deeply embedded in bone • Root must not be infected
Risks is considered greater when Removal of root will cause excessive destruction of surrounding tissue Removal of root endangers vital structures Attempts of recovering the root can displace it into the maxillary sinus or tissue spaces
Surgical plan for full mouth extraction Maintain the anterior teeth Maintain the vertical dimension Best to perform surgery in opposing quadrants
Multiple extractions – Order of Extraction Maxillary teeth should be removed first • Infiltration anesthesia has more rapid onset • Debris may fall into empty sockets of lower teeth • Teeth removed with a major component of buccal force • Disadvantage – hemorrhage may interfere with visualization
Multiple extractions – Order of Extraction Extract the most posterior teeth first 2 teeth most difficult to remove are the first molar and canine Sequence: 8, 7, 5, 4, 2, 1, 6, 3