Examination Patient interview Intraoral and extraoral evaluation Observation

Examination • Patient interview • Intraoral and extraoral evaluation • Observation of the patient’s plaque control techniques • Charting (including but not limited to gingival margin line, mucogingival junction, • tooth mobility, fremitus, probing depth measurements, furcation involvement) • Evaluation of the presence of plaque and calculus (distribution and location) • Dental analysis (restorations, caries, defective restorations, attrition, occlusal analy • Radiographic findings • Intraoral and extraoral photographs • Study casts

Patient’s Expectations n “What are your goals and objectives in our office? ” n “How may we help you? ”

Baseline Vitals n Blood pressure n Pulse n Respirations n Body mass index


Dental History n Discuss your experiences with previous dental care n Has the patient been exposed to preventive dentistry before? n How often does the patient brush and floss their teeth? n Has the patient had previous periodontal care? If so what, and how often have they been seen for periodontal maintenance in the past? n How long has it been since their last periodontal maintenance visit? n A periodontal history should be obtained including history of bleeding gums, changes in tooth position, tooth pain, halitosis, and reasons for previous tooth loss.

Daily Oral Hygiene Habits n Ask the patient to demonstrate toothbrush and flossing technique so that you have a baseline of the patient’s dexterity and knowledge of their home-care techniques. n Ask about the frequency of the patient’s home-care habits and what the patient uses to maintain their oral health. n This step is critically important in knowing your patient’s understanding and use of dental hygiene instrumentation. n It is critical to do this prior to the intraoral examination so that a baseline of patient home care is obtained, and as the examination is being done, the findings can be related to what was visualized when the patient demonstrated their techniques. Hygiene instruction should follow the completion of the examination.

Oral Habits n Does the patient clench, grind, use toothpicks, suck thumb, etc.

Extraoral Exam

Intraoral Examination

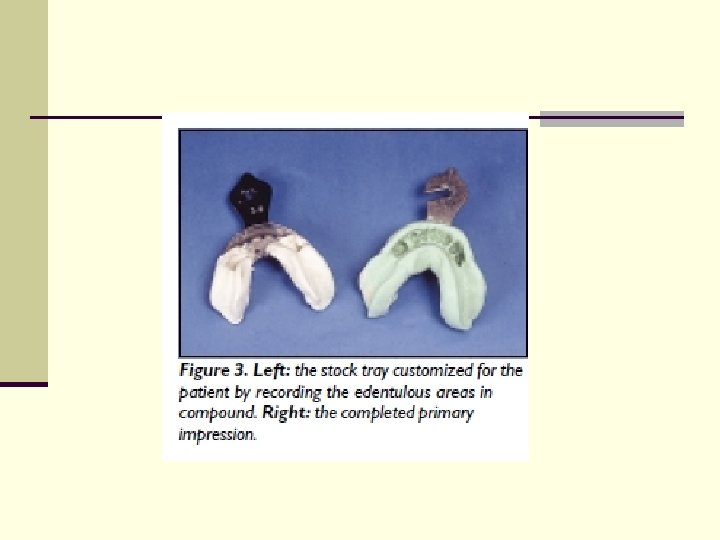
FIRST APPOINTMENT n The one-step impression technique is recommended for single-entry impressions for the edentulous patient. We find that it is the most predictable impression technique on the market for edentulous arches.

Making the impression •
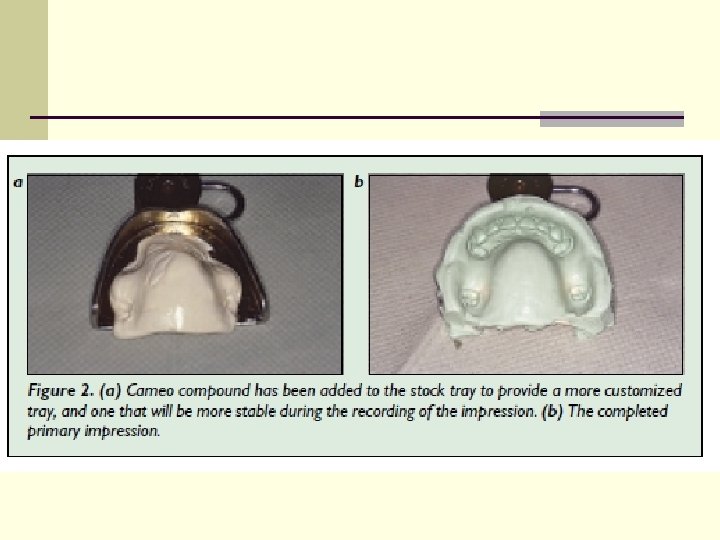

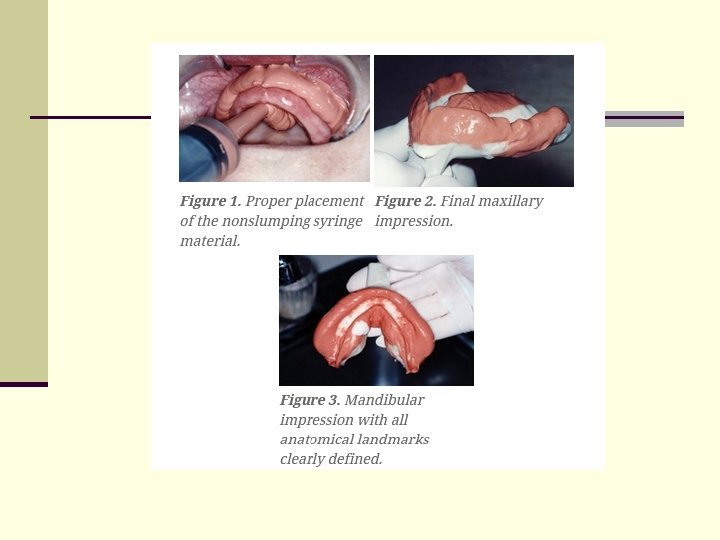
n The syringe material is first placed into the sulcus prior to the tray material being seated (Figure 1). This technique ensures accurate and full extensions of the impression material deep into the sulcus and other crucial anatomical landmarks, such as the retromolar pads and hamular notches (Figures 2 and 3). The syringe material’s viscosity is such that it causes no displacement or compression of the tissue. Both the syringe and tray material unite intraorally to form a perfectly detailed impression. The thixotropic tray material allows the dentist full control over the movement of the material, thus eliminating the gag sensations for the patient.
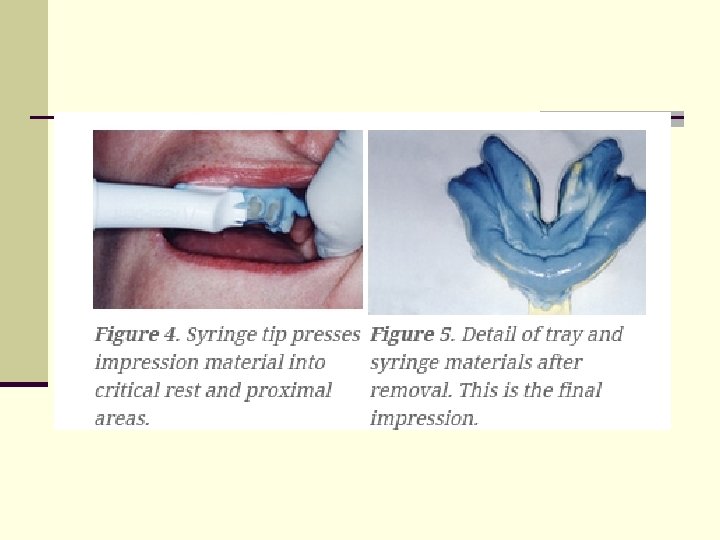

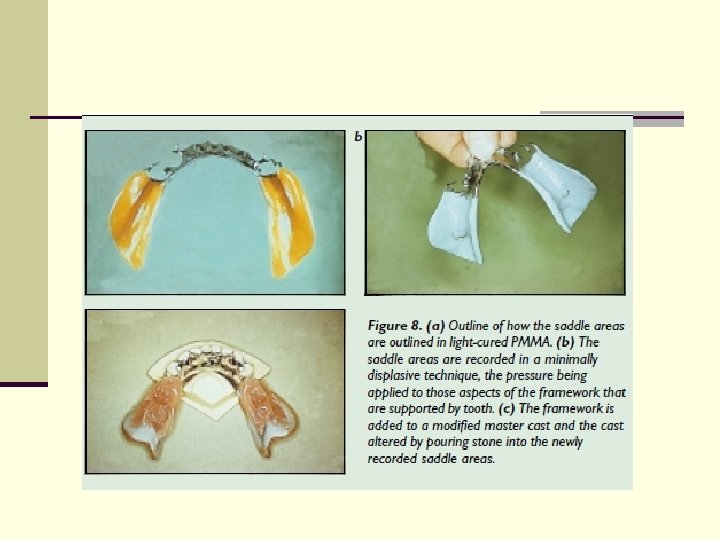
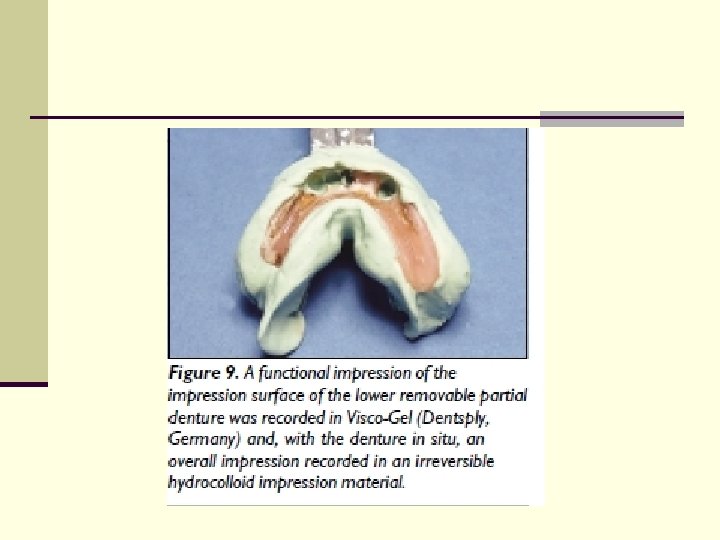
n When taking impressions for partial dentures, Accu-Dent System 2 is used. The materials and trays are formulated differently for this system, and an additional syringe tip is provided for the delivery system, which greatly assists accurate placement of the syringe material over the occlusal surfaces of the natural dentition. This feature captures exceptional detail of rest preps and proximal surfaces of teeth for accurate framework fabrication 3 (Figure 4). The tray material is then placed in a way similar to Accu-Dent System 1, and both tray and syringe material merge upon seating (Figure 5). In addition to partial denture impressions, we find Accu-Dent System 2 particularly useful for immediate dentures and athletic mouth guards.

Rules of making the impression

Centric Tray Registration

n Another procedure that we recommend during the impression- taking appointment is the use of the Centric Tray (Figure 6) (Ivoclar North America). The Centric Tray is made of rigid plastic material, and is designed to take a double-arch registration simultaneously. The Centric Tray is used to record a preliminary vertical and centric jaw registration at the same impression appointment. This gives the technician the opportunity to mount the models on an articulator prior to the fabrication of the wax bite rims. This handy instrument can save a lot of valuable chair time and frustration for the next appointment.
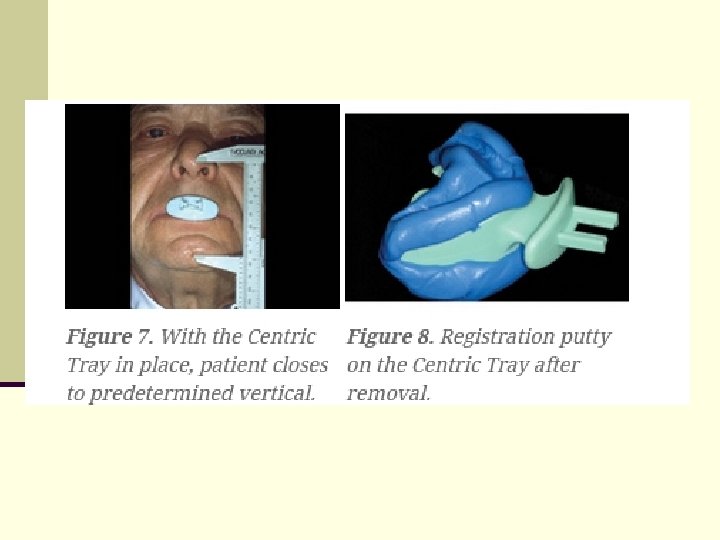

n n n An approximate vertical dimension position is determined by using the patient’s existing dentures (if available). The patient is asked to close with the dentures inserted, and the distance between a pen dot on the patient’s nose and their chin is noted. The measurement is adjusted if necessary to better approximate the desired vertical dimension in the new dentures. The dentures are removed and the unloaded Centric Tray is tried in, and the procedures are rehearsed with the patient. Both sides of the centric tray are loaded with regular or fast-set Virtual impression putty (Ivoclar Vivadent). Normally, two scoops of base and two scoops of catalyst are sufficient. The patient is instructed to close slowly while being chin-guided into the centric jaw position. The patient is asked to stop closing once the predetermined vertical is reached (Figure 7). After the material has set, remove the Centric Tray from the mouth and check the record for proper registration of the ridges (Figure 8). It is not imperative to capture the full extension of the ridges with the Centric Tray registration, as the technician will require only to the first molar region to effectively mount the models into the articulator. The Accu-Dent System 1 tray material can be used as an alternative to the VPS putty. This is essential when the natural dentition has significant undercut or when a fixed partial denture is present. The Centric Tray handle is also compatible with the Universal Transferbow (face bow) (Ivoclar Vivadent). Therefore, a face bow record can also be taken at this appointment if desired. This procedure is optional. At the end of the first appointment you will have the final Accu-Dent maxillary and mandibular impressions, the Centric Tray record, and the face bow registration (optional).

Laboratory Procedures

n Prior to the second appointment the laboratory has mounted the casts and fabricated denture bases with occlusal wax rims. The accurate placement of the casts into the Centric Tray record is facilitated by trimming excess material from the preliminary bite with a sharp scalpel blade. This will allow the technician to place the casts accurately into the indentations of the Virtual putty inside the Centric Tray. Proceed to mount casts on an articulator of choice (Figure 9). The fabrication by the laboratory of maxillary and mandibular light-cured denture bases with occlusal wax rims is greatly facilitated by having the casts premounted using the Centric Tray registration.
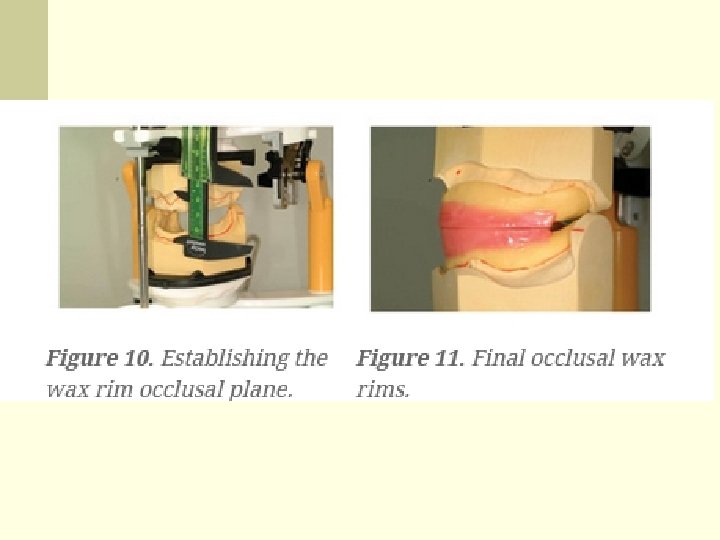

n The wax rim occlusal plane is established by bisecting the intervestibular distance (measured from the deepest point of the mucolabial fold in the region of the central incisors [Figure 10] for the anterior reference point, and marking the upper third of the retromolar triangle for the posterior reference point [Figure 11]).

SECOND APPOINTMENT n n When tried in the patient’s mouth, the preliminary mounting of the casts ensures the dentist that the wax rim occlusion will be very close to that of the Centric Tray registration taken in appointment one, significantly reducing valuable chair time. In addition, the dentist and the technician have an opportunity to evaluate the vertical dimension, jaw relationship, preprosthetic surgery considerations, implant options, etc, early into the treatment. Once again, while the existing dentures are in the mouth, place a pen dot on the tip of the nose and chin of the patient. Add or subtract to this measurement if necessary to reestablish the desired vertical that was established in appointment one. Remove the existing dentures and place the upper occlusal rim in the mouth. Check for proper lip support and incisal length. You may use a Fox plane to ensure a correct interpupillary line and alatragus line (Campers plane).

n Bite registration procedure n The bite registration captures the static occlusion. It is imperative to register the correct static occlusion. The dentist should give some advice to reach this position.

n The correct bite is reached when : n the teeth close "where they meet best" n the bite is "heaviest" on the back teeth n the bite is evenly spread over all the back teeth n there is little weight on the front teeth n this position can be reached after the tip of the tongue touches the back part of the oral palate (the "roof of the mouth") n this position can be reached after the patient swallows n other factors can also be considered

Making the wax bases
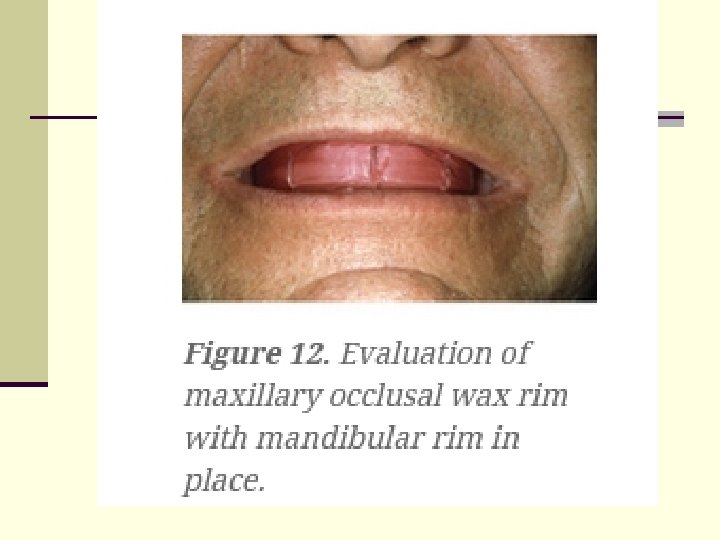

n n n The maxillary occlusal rim is tried in and marked for important information to assist the technician in the setup. When the patient is asked to smile, the midline and the high lip line (smile line) are marked. When the patient’s mouth is at rest, the corners of the mouth are marked to assist in the placement of the maxillary cuspids. We suggest that the mandibular bite rim be inserted at this time to help support the cheeks and lips while evaluating the maxillary occlusal wax rim (Figure 12). Once you have tested the occlusal rims in the patient’s mouth for proper centric position and you are satisfied with the vertical dimension, remove the bite rims and place keyways in the area of the second bicuspid or first molar region bilaterally in both the maxillary and mandibular occlusal rims. These small vshaped indentations are captured in the bite registration material, allowing the technician to replace the occlusal rims in their exact position should the registration be dislodged from the rims during shipping. Return the occlusal rims to the patient’s mouth and, with a fast-setting VPS bite registration paste (Virtual bite registration), syringe the material starting distal of the keyway placed in the mandibular occlusal wax rim, syringing in a continuous line to the opposite side, to the distal of the other keyway. Ask the patient to close and hold for the recommended set time. With Virtual material, the set time is 45 seconds. Note: The Shore hardness of the registration material should be at least 80 to ensure adequate rigidity and stability of the record. Check the vertical dimension once again and be sure it is at the desired measurement. Remove bite rims from the patient’s mouth, separately or together. If separately, they can easily be repositioned in the exact position because of the keyways placed in the wax rims.

Anterior Tooth Selection n n Encourage your patient to bring in pictures from previous years. Or better yet, ask her to bring in her partner or a family member during this appointment and allow them to make the decision about anterior teeth together. The patient’s existing dentures can also serve as an invaluable source of information. Before making any changes to the size and shape of the anterior teeth, first ask patients if they would like a change in their appearance. They may like the shape of their existing denture’s anterior teeth. In such cases, it is recommended that an impression of the upper denture be made and sent to the dental laboratory for study purposes. It is usually best if the shade of the teeth is chosen by the patient. Most times, our patients want a whiter smile. This is sometimes a paradoxical decision for some patients: they say that they want a white smile but they don’t want the dentures to look like dentures. We have found the Chromascop (Ivoclar Vivadent) shade guide to be an excellent educational tool for demonstrating basic “hues” and “value” information to the patient. If only minimal information can be obtained from the patient, the task of anterior tooth selection can be accomplished by the laboratory technician using the maxillary model analysis technique as described in detail in the OPA (Occlusal Plane Analyzer) manual (Ivoclar Vivadent). The tooth selection can then be verified by the dentist at the next appointment.

Posterior Tooth Selection n The selection of “flatter” cusp angles for posterior teeth is a popular contemporary concept of denture occlusion because of the reduction of lateral forces to the residual ridges, ensuring more denture stability and retention. Unfortunately, most tooth moulds with flat or flatter cusp designs are aesthetically unacceptable to the patient. However, there are two new denture tooth lines that have recently been introduced by Ivoclar Vivadent—Ortholingual and Orthoplane—that satisfy the biomechanical requirements of flatter occlusion without sacrificing aesthetics or function.
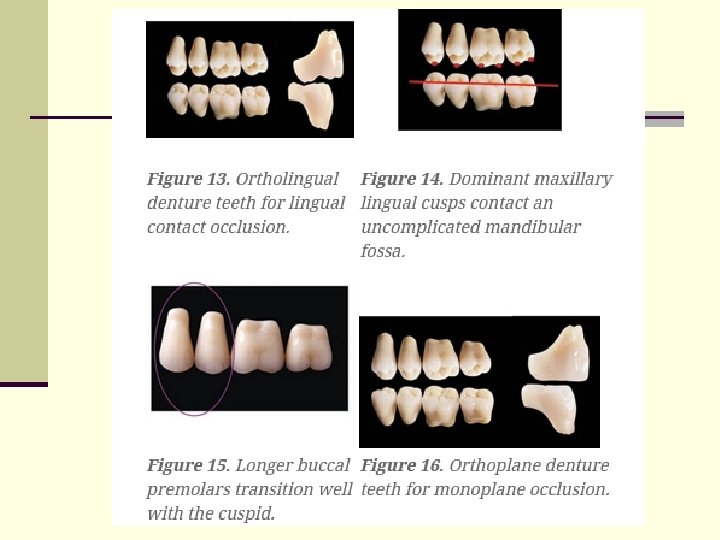
 occlusion (Figure 13).")
The Ortholingual mould has been designed specifically for lingualized (lingual contact) occlusion (Figure 13). The upper lingual cusps are dominant and the lower occlusal fossa is shallow and uncomplicated (Figure 14). This mortar-andpestle form of occlusion has many advantages. 4 -6 In particular, it reduces lateral forces due to the minimal occlusal contacting surfaces and shallow cusp angles. In addition, it is a tooth form that is easy to set up and equilibrate, it eliminates cheek biting, and it satisfies the aesthetic demands of the patient. The longer buccal face of the premolars provides a pleasant transition from the cuspids, eliminating poor aesthetics at the maxillary buccal smile line (Figure 15). The double cross-linked resin chemistry also provides a very wear-resistant surface. n The Orthoplane tooth mould provides a monoplane option for those patients who require a zero-degree occlusal scheme (Figure 16). The aesthetics of this mould are exceptional for a non-cusped tooth form. Also, the mandibular mould has been designed to articulate with the ortholingual maxillary mould to create a lingualized (lingual contact) occlusal variation (Figure 17). n

Laboratory Procedure

n The posterior mandibular teeth are positioned using a tooth setup template (2 D template), which is a component of the Stratos 200 articulation system (BPS). This particular template is simple to use since it is attached to the upper member of the articulator. The template ensures that the mandibular posterior teeth are set bilaterally symmetrical on a predetermined anteroposterior (curve of Spee) and mesiolateral curve (curve of Wilson). This greatly facilitates the positioning of the maxillary posterior teeth and the subsequent balanced occlusion (Figure 18). The (fast set) ridge lap design of the Ortholingual and Orthoplane tooth moulds (Figure 19) also significantly decrease time- consuming cervical adjustment during the setup procedure.

THIRD APPOINTMENT n n At the wax try-in appointment it is always best to have the patient bring in a partner or family member for additional input. How often has a denture been finished according to a patient’s desires, only to be criticized by family members once the patient gets home? If the patient chooses not to have someone else give an opinion at the wax try-in appointment, then the responsibility must be assumed entirely by the patient; reiterate this once again. You can tell your patient it’s just like choosing eyeglasses; some people need the opinion of others to make a final decision. The occlusion should also be carefully examined at this appointment. If necessary, another centric occlusal record should be taken. After the try-in, the setup should be checked on the articulator and the necessary corrections made.

FOURTH APPOINTMENT n n n When the patient and the dentist have accepted the wax try-in, instructions need to be given to the laboratory technician in order to finish the dentures for insertion. The SR Ivocap system (Ivoclar Vivadent) is a continuous injection heat polymerization system that compensates for chemical shrinkage of the acrylic resin during polymerization, avoids an increase in the vertical dimension, and significantly reduces the movement of teeth, reducing your chairside adjustments significantly. 7 It has been our experience that dentures processed with SR Ivocap require significantly fewer sore spot adjustments, retention and stability are enhanced, and the number of postinsertion adjustments are reduced dramatically. Because the polymer is completely saturated into the monomer during the mechanical mixing of the acrylic, the denture base material is void of micro- porosities, thus resisting the colonization of organisms on the tissue contacting surfaces, which can cause denture stomatitis and malodor. In addition, the Ivocap acrylic resin is a high-impact material and is cadmium-free. With proper communication between dentist, technician and patient, the insertion appointment can be a rewarding, positive experience for everyone (Figure 20). The choice of premium materials and reliable techniques greatly increases our chance for success. Also, the importance of having the patient involved in the clinical process cannot be overemphasized. A few minutes spent with educational materials provides the answers to many of the patient’s concerns, and provides her with the feeling that she is involved with her treatment.

References n n n n 1. Douglass CW, Shih A, Ostry L. Will there be a need for complete dentures in the United States in 2020? J Prosthet Dent. 2002; 87: 5 -8. 2. Massad JJ, Connelly ME, Davis B. The Static impression technique for removable prosthodontics. Postgraduate Dentistry (a supplement to the Compendium). 2000; 7: 3 -7. 3. Turbyfill W. Impression techniques for removable partial dentures. Gen Dent. 2001; 49: 358 -364. 4. Massad JJ, Connelly ME. A simplified approach to optimizing denture stability with lingualized occlusion. Compend Contin Educ Dent. 2000; 21: 555 -558, 560, 562. 5. Parr GR, Ivanhoe JR, Lingualized occlusion: an occlusion for all reasons. Dent Clin North Am. 1996; 40: 103 -112. 6. Lang BR, Razzoog ME. Lingualized integration: tooth molds and an occlusal scheme for edentulous implant patients. Implant Dent. 1992; 1: 204 -211. 7. Sykora O, Sutow E. Practical assessment of a continuous injection denture processing technique (SRIvocap). Quintessence Dent Technol. 1988; 147 -154.

The end
- Slides: 47