Exadata Setup Installation X 2 2 quarter rack


 Infrastructure & Governance")
 Infrastructure & Governance")
 * 최신버전의 Onecommand 보다 한단계 아래버전")
 Infrastructure & Governance")


 Infrastructure &")


 Infrastructure & Governance")


 - 초기")


 ☞ 노드검증을 통해 Network 구성확인 및 설치")
 Infrastructure &")


 ☞ 보안픽스를 적용 (MGMT_VIEW, DIP 같은 계정을")

 ☞ Exadata 의 환경을 안전하게 보호 (root의 ssh key")


 /opt/oracle. Support. Tools/diagnostics.")


 Enter n to")
 커스터마이징된 Logical volume 생성 lvm lvcreate -n LVDb.")


- Slides: 69
Exadata Setup & Installation X 2 -2 quarter rack image version : 11. 2. 3. 3. 0 Oracle Database : 11. 2. 0. 4 ver. 1. 2 Infrastructure & Governance
1. Oracle One. Command Utility 소개 • Oracle One. Command 는 Exadata machine를 구성하기 위해 사용되는 유틸리티로 설치과 환경 구성을 위해 사용되는 각종 Script과 명령어 들의 집합이라고 이해하면 된다. • 실제 구성작업에 사용되는 Onecommand 의 실행방법은 아래와 같다. 1. 1번 DB node 에 root 로 로그인 2. cd /opt/oracle. Support. Tools/onecommand 3. Release 버전별 수행되는 명령어가 조금씩 상이하다. ■ For Oracle Database 11 g Release 2 (11. 2. 0. 2). /deploy 112. sh -l ■ For Oracle Database 11 g Release 2 (11. 2. 0. 3) Patch 16921136 까지. /deploy 11203. sh –l ■ For Oracle Database 11 g Release 2 (11. 2. 0. 3) Patch 17256841 부터 ~ 현재. /install. sh –l 참고 : Exadata 와 관련된 Guide 문서 ( Exadata Database Machine Owner's Guide, Exadata Storage Server Software User's Guide 등) 는 Onecommand 를 다운받아 압축을 해제후 config 폴더안에 E 13877_01. zip 라는 문서번호로 압축되어 있다. http: //dosc. oracle. com Document Library 를 통해 Download 못함 Infrastructure & Governance
- Exadata의 Base Document (MOS ID 888828. 1) Infrastructure & Governance
- Exadata의 Base Document (MOS ID 888828. 1) Infrastructure & Governance
- Exadata의 Base Document (MOS ID 888828. 1) * 최신버전의 Onecommand 보다 한단계 아래버전 사용 권장(Bug 등) !! Infrastructure & Governance
- Exadata의 Base Document (MOS ID 888828. 1) Infrastructure & Governance
2. Exadata Deployment Assistant 는 Exadata Rack Configuration file을 generate 하기 위한 Tool 이며 Deplymenent Assistant 를 통해 입력된 정보는 Onecommand 와 함께 자동화되어 Configuration file을 생성해 낸다. 이 또한 Onecommand 의 패치 버전별로 수행되는 방법이 상이하다. ■ 기존방식 Onecommand Patch 16921136 까지 (Excel) Excel sheet 를 이용하여 직접 Oracle Exadata Database Machine Configurator 를 작성하여 파일 생성 ■ 최근 방식 Onecommand Patch 17256841 부터 ~ 현재 (Java-Based). /config. sh or config. cmd 참고 : Deploynet Assistant 는 Windows용 Onecommand 를 Down 받아 사용하는 것이 편리하다. Infrastructure & Governance
1. Welcome Infrastructure & Governance
2. Customer Details Infrastructure & Governance
3. Hardware Selection Infrastructure & Governance
4. Define Customer Networks Infrastructure & Governance
5. Client Ethenet Network Infrastructure & Governance
6. Infini. Band Network Infrastructure & Governance
7. Backup Network (X 4 -2 의 경우 active-active 로 backup 구성) Infrastructure & Governance
8. Identify Computer node OS Infrastructure & Governance
9. Review and Edit Management and Private Networks Infrastructure & Governance
10. Define Clusters Infrastructure & Governance
11. Cluster 1 Infrastructure & Governance
11. Cluster 1 Infrastructure & Governance
12. Revie and Edit SCAN, Client, VIP and optional Backup networks Infrastructure & Governance
13. Cell Alerting Infrastructure & Governance
14. Oracle Config. Manager Infrastructure & Governance
15. Auto Service Request Infrastructure & Governance
16. Grid Control Agent Infrastructure & Governance
17. generate Infrastructure & Governance
- generate 된 File List (Windows에서 작업한 경우 파일을 FTP로 전송) Infrastructure & Governance
- gtplus-gt-Installation. Template. html Tip : 해당파일의 하단을 참고하여 /etc/hosts 파일에 Network 정보 입력 (Copy&Paste) Infrastructure & Governance
Exadata Database Installation X 2 -2 quarter rack image version : 11. 2. 3. 3. 0 Oracle Database : 11. 2. 0. 4 Infrastructure & Governance
■ 사전작업 : Reclaiming Disk Space - OS선택후 다른 OS에서 사용하고 있는 미사용영역 free 작업 진행 (또한 exadata image upgrade or re-image 후 필요한 작업이다) - 구성확인 /opt/oracle. Support. Tools/reclaimdisks. sh -check Linux RAID 1 Before Solaris RAID 1 Infrastructure & Governance
■ 사전작업 : Reclaiming Disk Space - 작업후 RAID 5 로 변경됨 /opt/oracle. Support. Tools/reclaimdisks. sh -free -reclaim Linux RAID 5 After Infrastructure & Governance
■ 사전 작업 : Reclaiming Disk Space ☞ Rebooting 후 Console에서 진행사항 확인 ☞ 소요시간 : 1시간 30분 Infrastructure & Governance
■ 사전 작업 : Applyconfig. sh 적용 (reclaim 작업을 선행하여야 실행 가능) - 초기 Default IP 등으로 작업하였을 경우, 실제 사이트의 Network 정보로 Update 하기위 한 경우 등 사용한다. cd /opt/oracle. Support. Tools/firstconf #. /applyconfig. sh -preconf /opt/oracle. Support. Tools/onecommand/gtplus-gtpreconf_rack_0. csv -dbm-node-ips quarter - applyconfig. sh 를 실행하면 DB node 와 Cell node 에 Network 환경적용을 수행하고 모 든 서버를 REBOOT 시킨다. Infrastructure & Governance
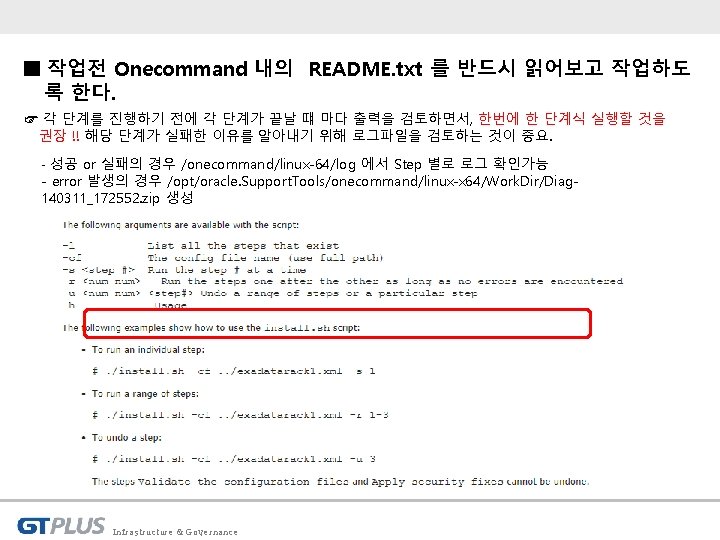
■ 작업전 /opt/oracle. Support. Tools/onecommand/linux-x 64/Work. Dir 위치에 설치이미지 FTP Upload (Image version 에 맞추어 특정 버전을 요구하므로 반드시 README. txt 을 숙지하도록 한다) 1. Oracle Database 11 g Release 2 (11. 2. 0. 4) Patch Set 3 p 13390677_112040_PLATFORM_1 of 7. zip p 13390677_112040_PLATFORM_2 of 7. zip p 13390677_112040_PLATFORM_3 of 7. zip 2. 패치 17904156: QUARTERLY DATABASE PATCH FOR EXADATA (JAN 2014 11. 2. 0. 4. 3) p 17904156_112040_Linux-x 86 -64. zip 3. OPatch release 11. 2. 0. 3. 5 or later p 6880880_112000_Linux-x 86 -64. zip 4. 패치 18035057: THIS IS ONECOMMAND TRACKING BUG FOR JANUARY BP/PSU p 18035057_112331_Linux-x 86 -64. zip Infrastructure & Governance
■ 작업전 Onecommand 내의 README. txt 를 반드시 읽어보고 작업하도 록 한다. cd /opt/oracle. Support. Tools/onecommand/linux-x 64 Infrastructure & Governance
Step 1. Validate Configuration File (undo 불가) ☞ 노드검증을 통해 Network 구성확인 및 설치 미디어확인, 파라미터와 deployment 파일을 확인 Infrastructure & Governance
Step 2. Setup Required Files ☞ 설치 미디어 압축해제 (/opt/oracle. Support. Tools/onecommand/Software) Infrastructure & Governance
Step 3. Create Users ☞ 오라클 계정과 그룹생성 Infrastructure & Governance
Step 4. Setup Cell Connectivity ☞ cellip. ora , cellinit. ora 파일 생성 Infrastructure & Governance
Step 5. Verify Infiniband Calibrate Cells ☞ Cell. CLI calibrate 명령으로 셀 디스크를 확인 (셀 디스크의 성능 특성을 테스트함) Infrastructure & Governance
Step 6. Create Cell Disks ☞ Cell Disk 생성 Infrastructure & Governance
Step 7. Create Grid Disks ☞ Grid Disk 생성 Infrastructure & Governance
Step 8. Install Cluster Software ☞ Grid Infrastructure 의 Silent 설치 Infrastructure & Governance
Step 9. Initialize Cluster Software ☞ post-installation 을 위한 root. sh 를 수행, OCR/VOTING Disk 생성 후 클러스터 실행 Infrastructure & Governance
Step 10. Install Database Software ☞ Database Software 의 Silent 설치 Infrastructure & Governance
Step 11. Relink Database with RDS ☞ Interconnect 를 위한 RDS 프로토롤 구성 Infrastructure & Governance
Step 12. Create ASM Diskgroups ☞ asmca 를 실행하여 ASM 디스크 그룹을 생성 (DATA, RECO 등) Infrastructure & Governance
Step 13. Create Databases ☞ dbca 실행으로 Database 생성 Infrastructure & Governance
Step 14. Apply Security Fixes (undo 불가) ☞ 보안픽스를 적용 (MGMT_VIEW, DIP 같은 계정을 DROP 등 ) 후 CRS 재기동 Infrastructure & Governance
Step 15. Create Installation Summary ☞ Install Report 파일 생성 Infrastructure & Governance
Step 16. Resecure Machine (Optional) ☞ Exadata 의 환경을 안전하게 보호 (root의 ssh key 제거 및 password aging) Infrastructure & Governance
Step 16 을 수행했을 경우 Reboot Infrastructure & Governance
Exadata OS Backup & Recovery X 2 -2 quarter rack image version : 11. 2. 3. 3. 0 Oracle Database : 11. 2. 0. 4 Infrastructure & Governance
■ Exadata DB 서버 OS 백업 및 복구 개요 전제 조건 – Exadata DB서버의 eth 0~eth 3으로 접속 가능한 NFS가 필요함. – ILOM 웹 UI에 접속이 가능하여야 함. �스냅샷 기반 백업 수행 �Restore system from NFS backup archive 옵션 또는 Interactive Diagnostics Shell로 복구 수행 Infrastructure & Governance
■ Default 파티션에 대한 스냅샷 기반 백업 1. 백업파일를 저장하기 위한 NFS 마운트 수행 mkdir -p /root/tar mount -t nfs -o ro, intr, soft, proto=tcp, nolock ip_address: /nfs_location/ /root/tar 2. root_snap 스냅샷 생성 lvcreate -L 1 G -s -n root_snap /dev/VGExa. Db/LVDb. Sys 1 mkdir /root/mnt mount /dev/VGExa. Db/root_snap /root/mnt -t ext 3 3. u 01_snap 스냅샷 생성 lvcreate -L 5 G -s -n u 01_snap /dev/VGExa. Db/LVDb. Ora 1 mkdir -p /root/mnt/u 01 mount /dev/VGExa. Db/u 01_snap /root/mnt/u 01 -t ext 3 4. 백업 파일 생성 cd /root/mnt tar -pjcvf /root/tar/mybackup. tar. bz 2 * /boot --exclude tar/mybackup. tar. bz 2 > /tmp/backup_tar. bz 2. stdout 2> /tmp/backup_tar. bz 2. stderr bzip 2(. bz 2) 만 가능하며, 18 GB에 대해 6. 8 GB로 압축되고 50분 소요됨. 5. 스냅샷 삭제 및 NFS Umount umount /root/mnt/u 01, umount /root/mnt /bin/rm -rf /root/mnt lvremove /dev/VGExa. Db/root_snap , lvremove /dev/VGExa. Db/u 01_snap umount /root/tar Infrastructure & Governance
■ Default 파티션에 대한 복구 1. ILOM의 가상 CD-ROM으로 부팅 1) /opt/oracle. Support. Tools/diagnostics. iso 파일을 PC에 복사 2) 웹브라우져에서 http: //ILOM_IPAddress 로그인 후 Remote Control tab > Remote Console > Devices > CD-ROM image > 복사한 diagnostic. iso 파일 선택 3) Remote Control tab > Host Control > CDROM 선택 및 Save 클릭 2. Restore system from NFS backup archive Choose from following by typing letter in '()': (e)nter interactive diagnostics shell. Must use credentials from Oracle support to login (reboot or power cycle to exit the shell), (r)estore system from NFS backup archive, Select: r Are you sure (y/n) [n]: y 3. Enter path to NFS backup archive Enter path to the backup file on the NFS server in format: <ip_address_of_the_NFS_share>: /<path>/<archive_file> For example, 10. 10. 10: /export/operating_system. tar. bz 2 NFS line: ip_address: /nfs_location/mybackup. tar. bz 2 IP Address of this host: DB_Server_IPAddress Netmask of this host: DB_Server_Netmask Default gateway: DB_Server_Default. Gateway The backup file could be created either from LVM or non-LVM based compute node versions below 11. 2. 1. 3. 1 and 11. 2. 2. 1. 0 or higher do not support LVM based partitioning use LVM based scheme(y/n): y 4. ILOM의 CD-ROM image 체크해제 및 reboot Infrastructure & Governance
■ 커스터마이징된 파티션에 대한 스냅샷 기반 백업 1. root_snap 및 u 01_snap 스냅샷 생성 (Default 파티션에 대한 백업 참조) 2. u 02_snap 스냅샷 생성 lvcreate -L 5 G -s -n u 02_snap /dev/VGExa. Db/LVDb. Ora 2 mkdir -p /root/mnt/u 02 mount /dev/VGExa. Db/u 02_snap /root/mnt/u 02 -t ext 3 3. gzip(. gz) 백업 파일 생성 cd /root/mnt tar -pzcvf /root/tar/mybackup. tar. gz * /boot --exclude tar/mybackup. tar. gz > /tmp/backup_tar. stdout 2> /tmp/backup_tar. stderr gzip(. gz) : 18 GB에 대해 7. 4 GB로 압축되고 20분 소요 4. 스냅샷 삭제 (Default 파티션에 대한 백업 참조) lvremove /dev/VGExa. Db/u 02_snap Infrastructure & Governance
■ 커스터마이징된 파티션에 대한 복구 1. ILOM의 가상 CD-ROM으로 부팅 (Default 파티션에 대한 백업 참조) 2. Restore system from NFS backup archive Choose from following by typing letter in '()': (e)nter interactive diagnostics shell. Must use credentials from Oracle support to login (reboot or power cycle to exit the shell), (r)estore system from NFS backup archive, Select: e localhost login: root Password: -sh-3. 1# 3. Boot 파티션 생성 umount /mnt/cell fdisk /dev/sda 1) Enter d to remove the partitions that will be recreated. 2) Enter n to create a new partition. 3) Enter 1 for the partition number. 4) Enter 1 for the first cylinder 5) Enter 15 for the last cylinder. 6) Enter t, then 83 to select the type of Linux. The t toggles the partition number, and 83 selects the type of Linux. 7) Enter a to set the bootable flag for the boot partition. Infrastructure & Governance
■ 커스터마이징된 파티션에 대한 복구 4. Second primary partition 생성 1) Enter n to create a new partition. 2) Enter 2 for the partition number. 3) Enter 16 for the first cylinder 4) Press Enter to select the default for the last cylinder. 5) Enter t, and then 8 e to select LVM. 6) Enter p to print the new partition information. 7) Enter w to write the information to disk. 5. Logical Volume 재구성 1) Physical volume 및 Volume group 생성 lvm pvcreate /dev/sda 2 lvm vgcreate VGExa. Db /dev/sda 2 2) Default Logical volume 생성 lvm lvcreate -n LVDb. Sys 1 -L 30 G VGExa. Db mkfs. ext 3 /dev/VGExa. Db/LVDb. Sys 1 e 2 label /dev/VGExa. Db/LVDb. Sys 1 DBSYS lvm lvcreate -n LVDb. Swap 1 -L 24 G VGExa. Db mkswap -L SWAP /dev/VGExa. Db/LVDb. Swap 1 lvm lvcreate -n LVDb. Ora 1 -L 100 G VGExa. Db mkfs. ext 3 /dev/VGExa. Db/LVDb. Ora 1 e 2 label /dev/VGExa. Db/LVDb. Ora 1 DBORA Infrastructure & Governance
■ 커스터마이징된 파티션에 대한 복구 3) 커스터마이징된 Logical volume 생성 lvm lvcreate -n LVDb. Ora 2 -L 100 G VGExa. Db mkfs. ext 3 /dev/VGExa. Db/LVDb. Ora 2 e 2 label /dev/VGExa. Db/LVDb. Ora 2 DBORA 2 6. Logical Volume 마운트 1) Default Logical volume 마운트 mount /dev/VGExa. Db/LVDb. Sys 1 /mnt -t ext 3 mkdir /mnt/u 01 /mnt/boot mount /dev/VGExa. Db/LVDb. Ora 1 /mnt/u 01 -t ext 3 mount /dev/sda 1 /mnt/boot -t ext 3 2) 커스터마이징된 Logical volume 마운트 mkdir /mnt/u 02 mount /dev/VGExa. Db/LVDb. Ora 2 /mnt/u 02 -t ext 3 7. NFS 마운트 ifconfig eth 1 DB_Server_IPAddress netmask DB_Server_Netmask up route add -net 0. 0 netmask 0. 0 gw DB_Server_Default. Gateway mkdir -p /root/mnt mount -t nfs -o ro, intr, soft, proto=tcp, nolock ip_address: /nfs_location /root/mnt Infrastructure & Governance
■ 커스터마이징된 파티션에 대한 복구 8. 복구 수행 tar -pzxvf /root/mnt/mybackup. tar. gz -C /mnt 9. 마운트 해제 및 /boot 마운트 cd / umount /mnt/u 01 umount /mnt/u 02 umount /mnt/boot umount /mnt mkdir /boot mount /dev/sda 1 /boot -t ext 3 10. boot loader 재구성 및 Reboot grub find /I_am_hd_boot (1) root (hd 0, 0) setup (hd 0) quit Infrastructure & Governance
Exadata Cell Re-image X 2 -2 quarter rack image version : 11. 2. 3. 3. 0 Oracle Database : 11. 2. 0. 4 Infrastructure & Governance
■ Cell Image 생성 1. 이미지를 임의 디렉토리에 업로드 한다. 2. 압축해제한다. tar -pxvf cell. Image. Maker_11. 2. 1. 3. 1_LINUX. X 64_100818. 1 -1. x 86_64. tar 3. 압축해제한 디렉토리에 /dl 180 디렉토리가 생성된다. • Cell node image extracts to dl 180 (X 4275) • DB node image extracts to dl 360 (X 4170) 4. USB(Size 4 G이상) 를 Cell Node 의 USB port에 삽입한다 (/dev/sdb 1 으로 인식되며 format 된다. ) 5. make. Image. Media. sh 실행 예) make. Image. Media. sh –preconf /opt/oracle. Support. Tools/onecommand/ preconf-11 -2 -1 -1 -0. csv -nodisktests Infrastructure & Governance
■ make. Image. Media. sh 실행 Infrastructure & Governance
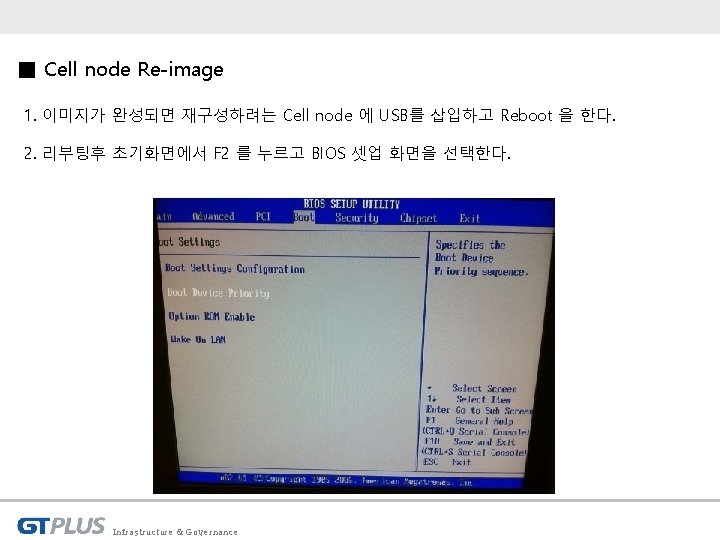
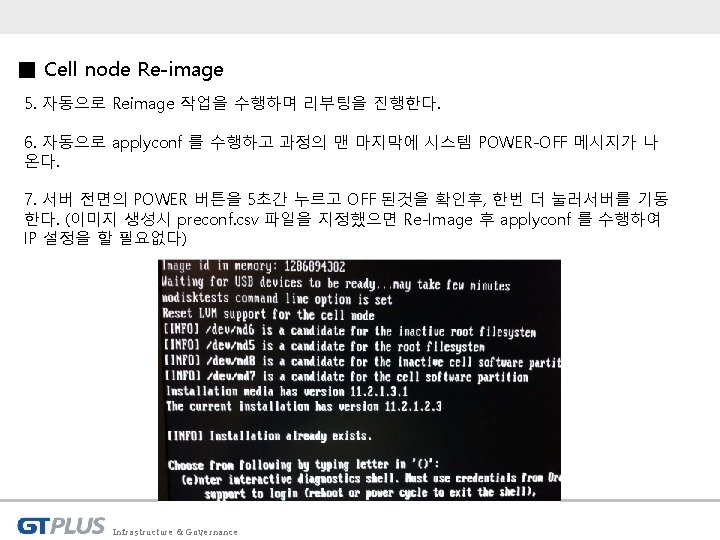
■ Cell node Re-image 3. Boot from USB 를 선택하고 저장한후 재부팅한다. -> Rescue mode 의 암호 입력요청시 : sos 1 exadata 4. USB로 부팅하고 Prompt 가 나타나면 물음에 순차적으로 R, Y, Y 를 입력한다. Infrastructure & Governance
Infrastructure & Governance