ERT 249 Computer Aided Design CAD For Biosystem
 For Biosystem Engineering Prepared By: Samera binti Samsuddin")
ERT 249 Computer Aided Design (CAD) For Biosystem Engineering Prepared By: Samera binti Samsuddin Sah Email: samera@unimap. edu. my Phone: 04 -9798835/013 -7004537

Learning Outcomes APPLY geometric construction techniques to create engineering drawings using CAD. CREATE completes 2 -D and 3 -D drawings pertaining to geometric transformations, projections and multiple views. CREATE curve, surfaces and geometric models
 • TEST 2 = 20% •")
Assessment and Grading EXAMINATION • TEST 1 (40%) • TEST 2 = 20% • QUIZZES COURSEWORK • ASSIGNMENTS (60%) • PROJECT = 10% = 20% = 30%
 Definition Design Process Contribution CAD to Design")
Introduction Engineering Drawing Computer Aided Design (CAD) Definition Design Process Contribution CAD to Design History Design Format Software Advantage Capability Limitation Basic information include in drawing

Engineering Drawing An engineering drawing, a type of technical drawing, is created within the technical drawing discipline, and used to fully and clearly define requirements for engineered items. Drawing is the universal language of engineering. The main purpose of engineering drawings is to communicate to other engineers, machinists, etc. A formal and precise way of information about the shape, size, features and precision of physical objects. Giving all of the information needed to make the product and being accurate in that information is the main goal.
 Also known as Computer-aided drafting and design (CADD) Describe the")
Computer Aided Design (CAD) Also known as Computer-aided drafting and design (CADD) Describe the use of computer program to create design and engineering applications. The computer process of making engineering drawings and technical documents more closely related to drafting.

Computer Aided Design Computer software CAD Geometric Modelling Tools in design process The integration of computer software and geometric model to serve the design process

Design Process 1. Problem definition • Design starts with problems 2. Design specification • eg. Ergonomic (one person handling), load etc 3. Literature work • Search internally and externally (patent, field study etc) 4. Concept development • Development of the concept 5. Final concept selection • Select the final concept to develop 6. Detail design • Detailing the design, Design for Assembly (DFA) can be applied here 7. Prototyping • Physical model or virtual object 8. Documentation • Engineering drawing and design report

Contribution of CAD in design Conceptualization • Geometric modeling, manipulation and visualization Analysis • Analysis package, Finite Element Analysis (FEA), optimization, customized program Prototyping • Modeling, assemblies, animation Communication • Engineering drawing, documentation

History 1970 s : CAD spread widely in other sectors; film, animation, typographic etc 1963 : Modeled in 3 D by T. E Johnson. • Early apllication - car and aerospace companies 1962: SKETCHPAD system developed by Ivan Sutherland, MIT (2 D graphic). • For the first time, designer can interact with the computer graphically, before computer used for numerical analysis

Evolution of CAD Computer graphics Computer aided drawing and drafting Computer aided design

Design Formats 2 -D Drawings • Two-dimensional • Having length and width/height dimensions • View of object appear in flat form • Often dimensioned and contain notes and text describe features and details of the part, map or plan. • Identical to drawing created to manual drafting technique. 3 -D Solid Models • Describe both the interior and exterior of a part • Constructed differently depending on the software • Some software allow you to produce basic solid model using tools including solid primitive.

3 D Geometric Primitives Point; Line Segment; Polygon; Polyhedron; Curved Surface; Solid Object, etc.

CAD Software Product Autodesk, Inc Auto. CAD Autodesk Civil 3 -D Autodesk Architectural Desktop Solid. Works Corporation Solid. Works 3 -D Design Software Graphisoft Archi. CAD Design/Building Series

Advantages of CAD 1. 4. Better work rather than traditional drafting methods that use rulers, squares, and compasses. For example, designs can be altered without erasing and redrawing. 2. CAD systems also offer “zoom” features whereby a designer can magnify certain elements of a model to facilitate inspection. 3. Computer models are typically three dimensional and can be rotated on any axis, enabling the designer to gain a fuller sense of the object. CAD systems also lend themselves to modeling cutaway drawings, in which the internal shape of a part is revealed.

Advantages of CAD Drafting stage Design stage • Increased accuracy • Increased drawing speed • Easy to revise • Availability of drawing libraries • Built-in several analysis tools • Better presentation (Easy to visualize) - Pan, rotate, animate, shade, texture

CAD Capability 1. Draw 5. Layer concept 4. Object snap 2. Modify 3. Dimension
 3. Parts or product information is")
Limitation of CAD (within scope of drawing creation) 3. Parts or product information is completely given Good engineering drawings must have the following characteristics 1. Information is clearly presented 2. Information can be used in manufacturing of part
 To create a good engineering drawings")
Limitation of CAD (within scope of drawing creation) To create a good engineering drawings YOU MUST do the following tasks yourself. • Apply a proper line weight and style • Select a necessary view • Decide the appropriate place of dimensions • Select an appropriate section techniques (if necessary)
 No CADD software can create a")
Limitation of CAD (within scope of drawing interpretation) No CADD software can create a pictorial view from an orthographic multiview. • Because they are frequently used technical document. • Therefore, YOU MUST prepare yourself for interpreting (or visualizing) them when you become ENGINEER.

Basic Information Included in a Drawing Projected Views: • Show as many sides as needed for completeness. Cross Sections: • A view that is good for showing interior features. Table: • Lower right corner, with material information, part name, designer etc Dimension: • These are the most important and most complicated part of the drawing. There is more to it than just the numerical values!

Projected Views

A Table Example

Dimensions tell how far it is from one point on an object to another point. There also Radial, Diameter and Angular Dimensions. The most basic type is called a Linear Dimension because it gives the straight-line distance from one point to another. Dimensions have four basic components: • Dimension Text • Dimension Line and Arrows • Extension Lines • Gap
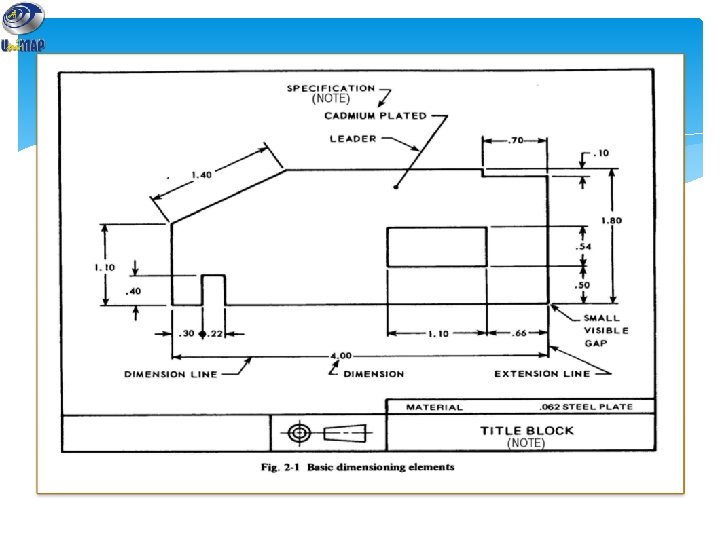

A Dimensioning Example

More basic information Standard Code Lines Scaling

Standard Code Full name Country Code Thailand มอก. สำนกงานมาตรฐานผลตภณฑอตสาหกรรม USA ANSI American National Standard Institute Japan JIS Japanese Industrial Standard UK BS British Standard Australia AS Australian Standard Germany DIN Deutsches Institut für Normung ISO International Standards Organization

Basic Line Types of Lines Appearance Name according to application Continuous thick line Visible line Continuous thin line Dimension line Extension line Leader line Dash thick line Hidden line Chain thin line Center line

Meaning of Lines Visible lines represent features that can be seen in the current view Hidden lines represent features that can not be seen in the current view Center line represents symmetry, path of motion, centers of circles, axis of axisymmetrical parts Dimension and Extension lines indicate the sizes and location of features on a drawing

Example : Line conventions in engineering drawing

Line Convention Precedence of coincide lines. Hidden line drawing. Center line drawing.

Precedence of Line Order of importance Visible line Hidden line Center line

Hidden Line Practice Hidden line should join a visible line, except it extended from the visible line. Leave space Join Correct No !

Hidden Line Practice Hidden line should join a visible line, except it extended from the visible line. Leave space Correct No !

Hidden Line Practice Hidden line should intersect to form L and T corners. L T Correct No !

Hidden Line Practice Hidden arcs should start on a center line.

Centre Line Practice In circular view, short dash should cross at the intersections of center line. For small hole, center line is presented as thin continuous line. Center line should not extend between views. Leave space

Centre Line Practice Leave the gap when centerline forms a continuation with a visible or hidden line Center line should always start and end with long dash. Leave space

Scaling is used to depict objects on paper that are either larger or smaller than the paper. • If the object is larger than the paper, then the views of the object are scaled Down • If the object is smaller than the paper, then the views of the object are scaled Up • If the object fits on the paper, then the views are depicted at Full scale (1: 1)

Drawing Sheet A 4 • Trimmed paper of a size A 0 ~ A 4. A 3 • Standard sheet size (JIS) A 2 A 4 A 3 A 2 A 1 A 0 A 1 210 x 297 x 420 x 594 x 841 x 1189 (Dimensions in millimeters) A 0
 c 2. Type Y")
Orientation of drawing sheet 1. Type X (A 0~A 4) c 2. Type Y (A 4 only) d Drawing space c Title block Drawing space c Border lines d Sheet size A 4 A 3 A 2 A 1 A 0 c (mm) d (mm) 10 25 20 25 Title block

The end…
- Slides: 44