EPOCH 1000 Series Procedure Linear Scan and Cscan



- Slides: 47

EPOCH 1000 Series Procedure Linear Scan and C-scan

Presentation Contents u Feature Overview u Beam Setup and Calibration: 0 Degree Linear Scan u Demonstration Procedure: 0 Degree Linear Scan u Beam Setup and Calibration: Angle Linear Scan u Demonstration Procedure: Angle Linear Scan u Beam Setup and Calibration: 0 Degree C-scan u Demonstration Procedure: 0 Degree C-scan u C-scan Setup: A-scan Storage and View

Feature Overview

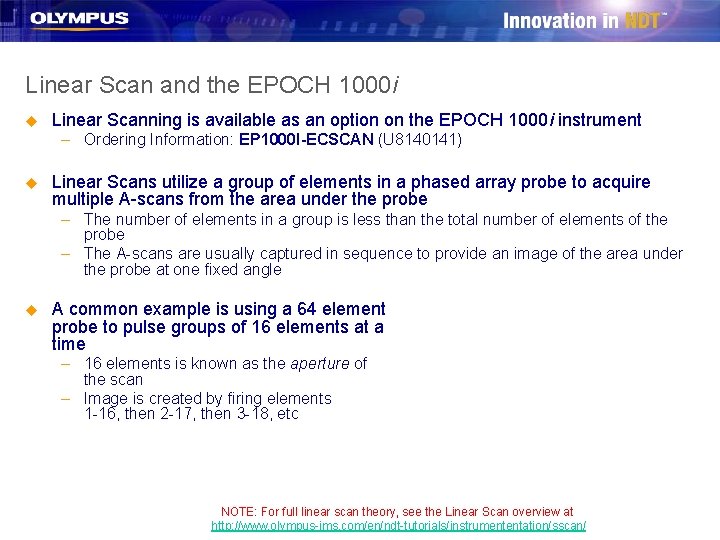
Linear Scan and the EPOCH 1000 i u Linear Scanning is available as an option on the EPOCH 1000 i instrument – Ordering Information: EP 1000 I-ECSCAN (U 8140141) u Linear Scans utilize a group of elements in a phased array probe to acquire multiple A-scans from the area under the probe – The number of elements in a group is less than the total number of elements of the probe – The A-scans are usually captured in sequence to provide an image of the area under the probe at one fixed angle u A common example is using a 64 element probe to pulse groups of 16 elements at a time – 16 elements is known as the aperture of the scan – Image is created by firing elements 1 -16, then 2 -17, then 3 -18, etc NOTE: For full linear scan theory, see the Linear Scan overview at http: //www. olympus-ims. com/en/ndt-tutorials/instrumententation/sscan/

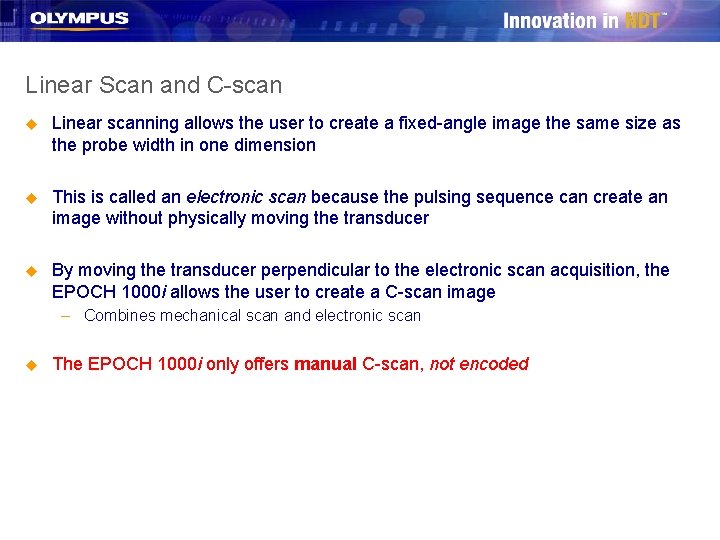
Linear Scan and C-scan u Linear scanning allows the user to create a fixed-angle image the same size as the probe width in one dimension u This is called an electronic scan because the pulsing sequence can create an image without physically moving the transducer u By moving the transducer perpendicular to the electronic scan acquisition, the EPOCH 1000 i allows the user to create a C-scan image – Combines mechanical scan and electronic scan u The EPOCH 1000 i only offers manual C-scan, not encoded

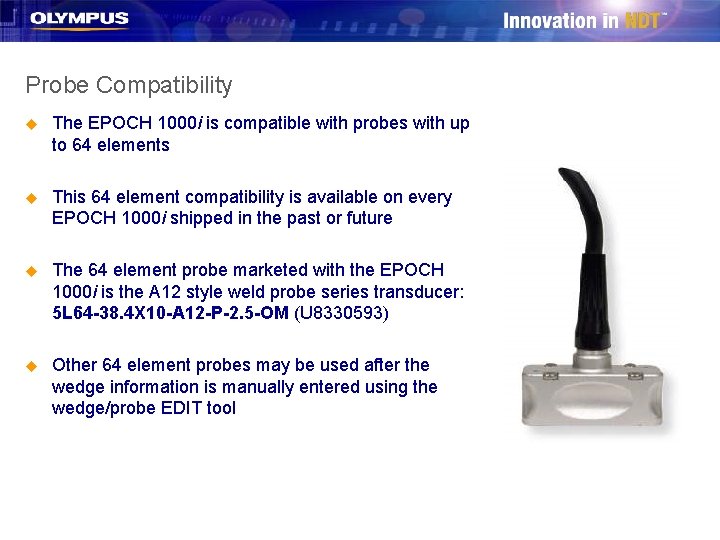
Probe Compatibility u The EPOCH 1000 i is compatible with probes with up to 64 elements u This 64 element compatibility is available on every EPOCH 1000 i shipped in the past or future u The 64 element probe marketed with the EPOCH 1000 i is the A 12 style weld probe series transducer: 5 L 64 -38. 4 X 10 -A 12 -P-2. 5 -OM (U 8330593) u Other 64 element probes may be used after the wedge information is manually entered using the wedge/probe EDIT tool

Linear Scan and C-scan Sales Strategy u Even with linear scan and/or C-scan capabilities, the EPOCH 1000 i is still a manual inspection instrument u Manual C-scans help provide information about a wide area of the test piece quickly through imaging, but still requires the user to manually prove up a potential defect u Target markets are: – – – Corrosion mapping Delaminations in composites, plastics and other materials (aerospace) Bond/Disbond applications Weld inspection (fixed angle Linear scan at 45, 60 or 70) Crack Detection (fixed angle Linear scan at 45, 60 or 70)

Beam Setup and Calibration: 0 Degree Linear Scan

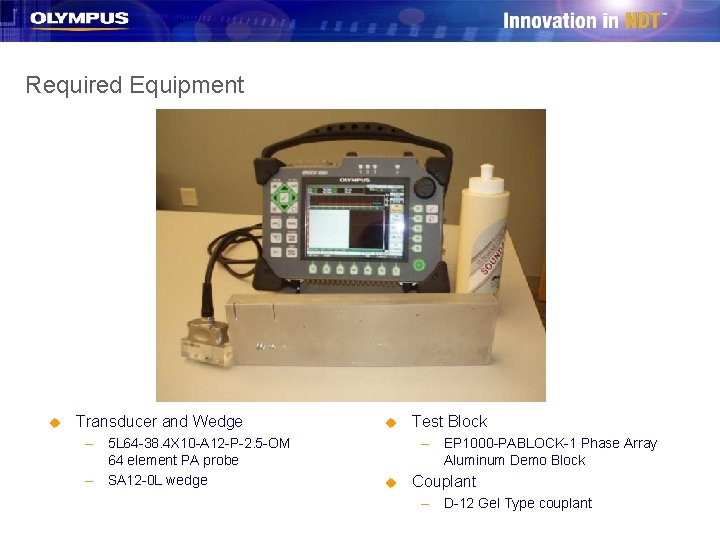
Required Equipment u Transducer and Wedge – 5 L 64 -38. 4 X 10 -A 12 -P-2. 5 -OM 64 element PA probe – SA 12 -0 L wedge u Test Block – EP 1000 -PABLOCK-1 Phase Array Aluminum Demo Block u Couplant – D-12 Gel Type couplant

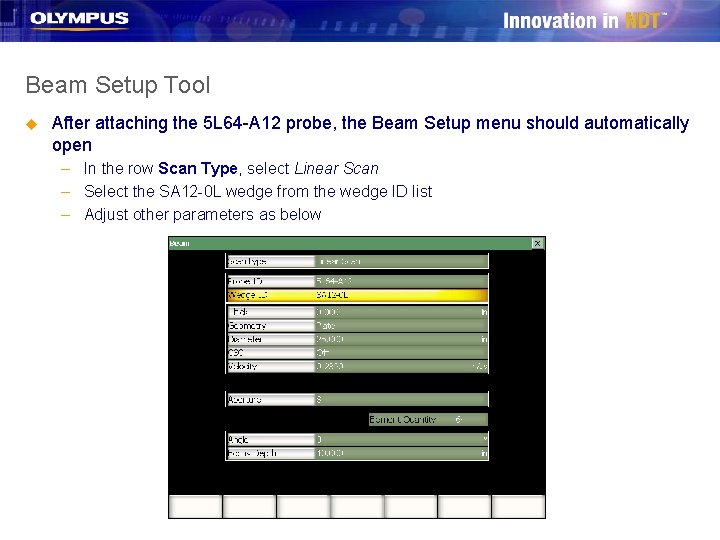
Beam Setup Tool u After attaching the 5 L 64 -A 12 probe, the Beam Setup menu should automatically open – In the row Scan Type, select Linear Scan – Select the SA 12 -0 L wedge from the wedge ID list – Adjust other parameters as below

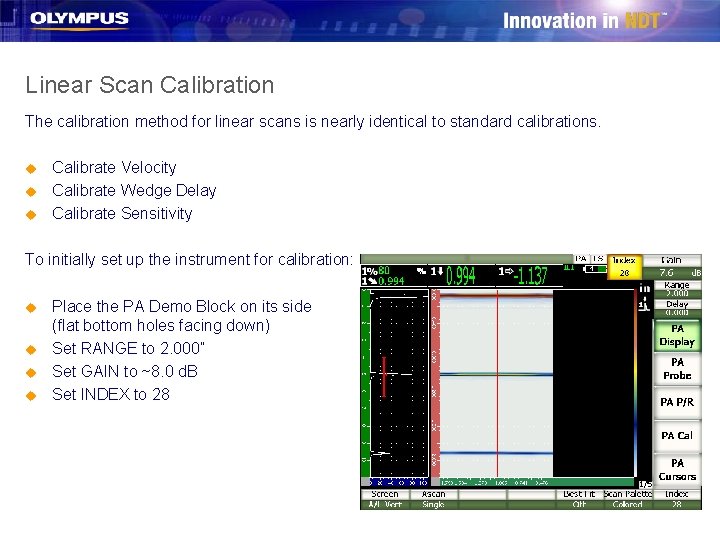
Linear Scan Calibration The calibration method for linear scans is nearly identical to standard calibrations. u u u Calibrate Velocity Calibrate Wedge Delay Calibrate Sensitivity To initially set up the instrument for calibration: u u Place the PA Demo Block on its side (flat bottom holes facing down) Set RANGE to 2. 000” Set GAIN to ~8. 0 d. B Set INDEX to 28

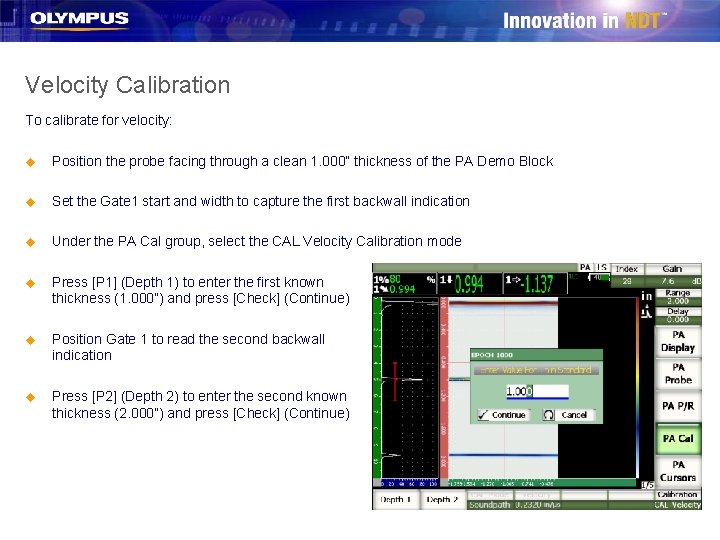
Velocity Calibration To calibrate for velocity: u Position the probe facing through a clean 1. 000” thickness of the PA Demo Block u Set the Gate 1 start and width to capture the first backwall indication u Under the PA Cal group, select the CAL Velocity Calibration mode u Press [P 1] (Depth 1) to enter the first known thickness (1. 000”) and press [Check] (Continue) u Position Gate 1 to read the second backwall indication u Press [P 2] (Depth 2) to enter the second known thickness (2. 000”) and press [Check] (Continue)

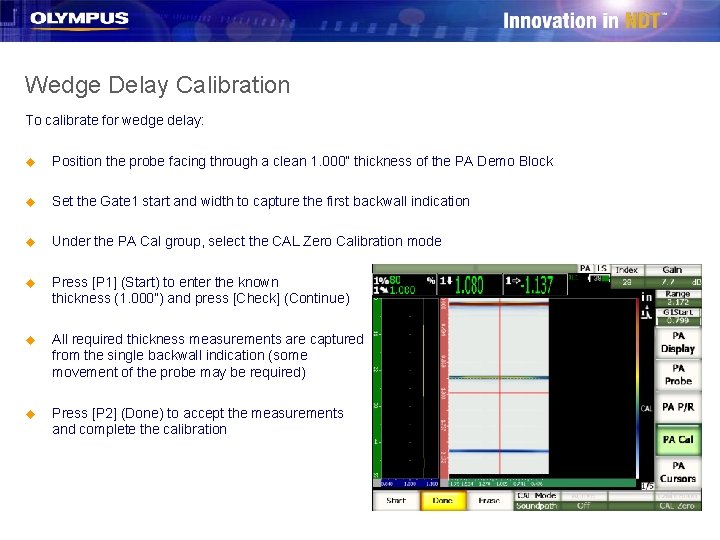
Wedge Delay Calibration To calibrate for wedge delay: u Position the probe facing through a clean 1. 000” thickness of the PA Demo Block u Set the Gate 1 start and width to capture the first backwall indication u Under the PA Cal group, select the CAL Zero Calibration mode u Press [P 1] (Start) to enter the known thickness (1. 000”) and press [Check] (Continue) u All required thickness measurements are captured from the single backwall indication (some movement of the probe may be required) u Press [P 2] (Done) to accept the measurements and complete the calibration

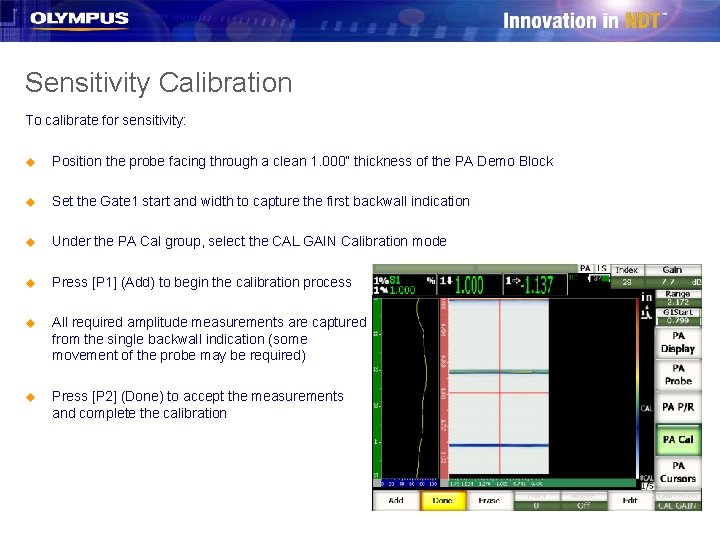
Sensitivity Calibration To calibrate for sensitivity: u Position the probe facing through a clean 1. 000” thickness of the PA Demo Block u Set the Gate 1 start and width to capture the first backwall indication u Under the PA Cal group, select the CAL GAIN Calibration mode u Press [P 1] (Add) to begin the calibration process u All required amplitude measurements are captured from the single backwall indication (some movement of the probe may be required) u Press [P 2] (Done) to accept the measurements and complete the calibration

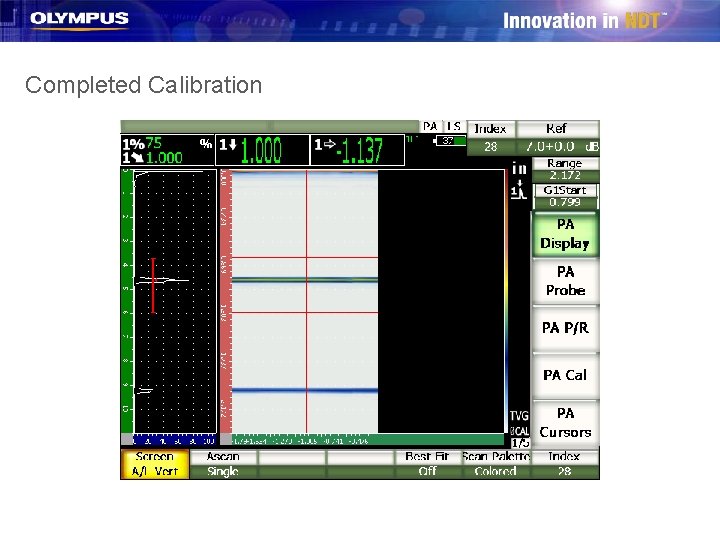
Completed Calibration

Demonstration Procedure: 0 Degree Linear Scan

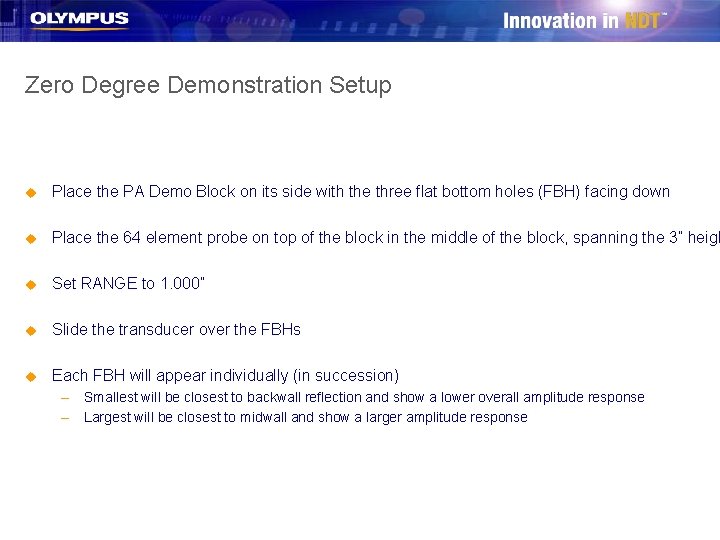
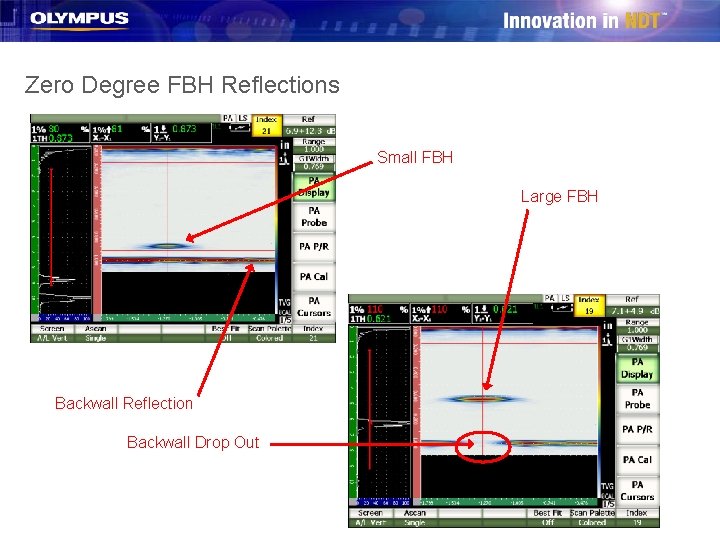
Zero Degree Demonstration Setup u Place the PA Demo Block on its side with the three flat bottom holes (FBH) facing down u Place the 64 element probe on top of the block in the middle of the block, spanning the 3” heigh u Set RANGE to 1. 000” u Slide the transducer over the FBHs u Each FBH will appear individually (in succession) – Smallest will be closest to backwall reflection and show a lower overall amplitude response – Largest will be closest to midwall and show a larger amplitude response

Zero Degree FBH Reflections Small FBH Large FBH Backwall Reflection Backwall Drop Out

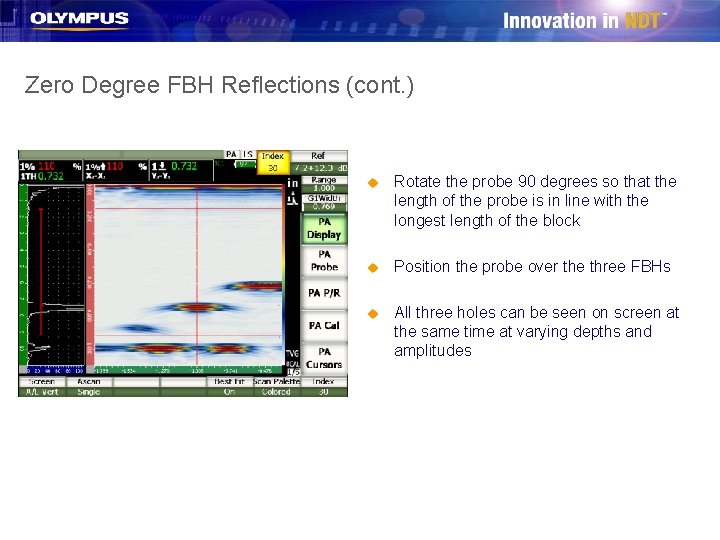
Zero Degree FBH Reflections (cont. ) u Rotate the probe 90 degrees so that the length of the probe is in line with the longest length of the block u Position the probe over the three FBHs u All three holes can be seen on screen at the same time at varying depths and amplitudes

Linear Scan Sizing Cursors Since a zero degree linear scan shows true depth of flaws, as well as providing an electronic scan of indexes that properly scale the imaged defects, phased array sizing cursors can be used to establish sizing of flaws that are visible on screen u Press the FREEZE key u Use the PA Cursors group menu to adjust X and Y cursor positions – P 1 and P 4 toggle the X and Y cursors ON and OFF – P 2, P 3, P 5, and P 6 adjust cursor positions u To find the HEIGHT of the FBH – Position the Y 1 cursor to intersect the peak amplitude of the FBH indication – Position the Y 2 cursor to intersect the peak amplitude of the backwall indication – Use the Y 2 -Y 1 digital measurement to establish the height of the FBH Y 1 Cursor Y 2 Cursor

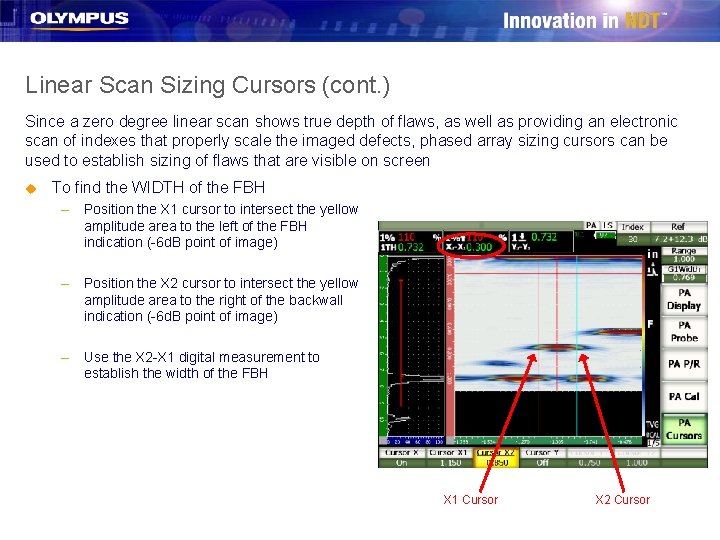
Linear Scan Sizing Cursors (cont. ) Since a zero degree linear scan shows true depth of flaws, as well as providing an electronic scan of indexes that properly scale the imaged defects, phased array sizing cursors can be used to establish sizing of flaws that are visible on screen u To find the WIDTH of the FBH – Position the X 1 cursor to intersect the yellow amplitude area to the left of the FBH indication (-6 d. B point of image) – Position the X 2 cursor to intersect the yellow amplitude area to the right of the backwall indication (-6 d. B point of image) – Use the X 2 -X 1 digital measurement to establish the width of the FBH X 1 Cursor X 2 Cursor

Beam Setup and Calibration: Angle Linear Scan

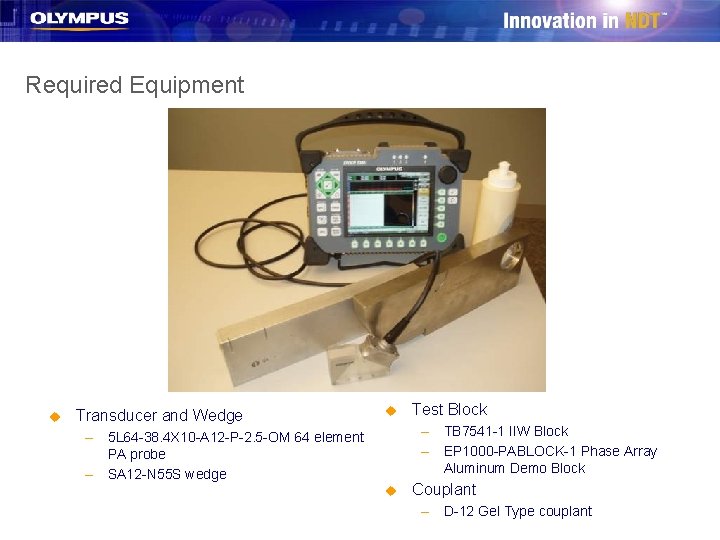
Required Equipment u Transducer and Wedge u Test Block – TB 7541 -1 IIW Block – EP 1000 -PABLOCK-1 Phase Array Aluminum Demo Block – 5 L 64 -38. 4 X 10 -A 12 -P-2. 5 -OM 64 element PA probe – SA 12 -N 55 S wedge u Couplant – D-12 Gel Type couplant

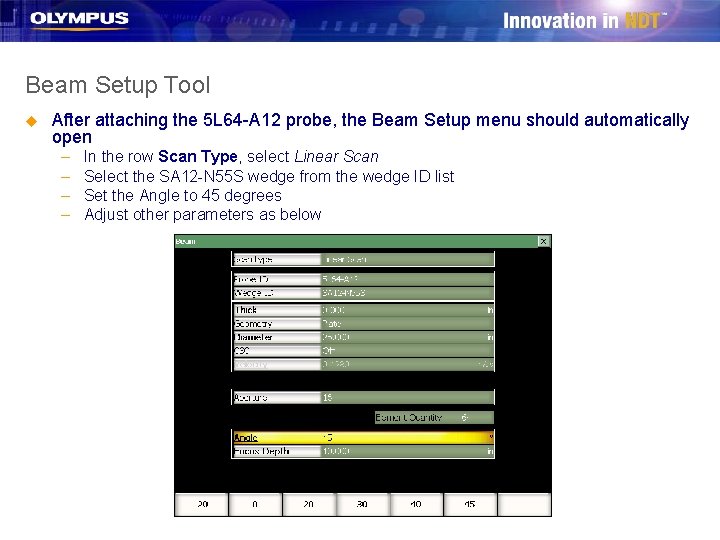
Beam Setup Tool u After attaching the 5 L 64 -A 12 probe, the Beam Setup menu should automatically open – – In the row Scan Type, select Linear Scan Select the SA 12 -N 55 S wedge from the wedge ID list Set the Angle to 45 degrees Adjust other parameters as below

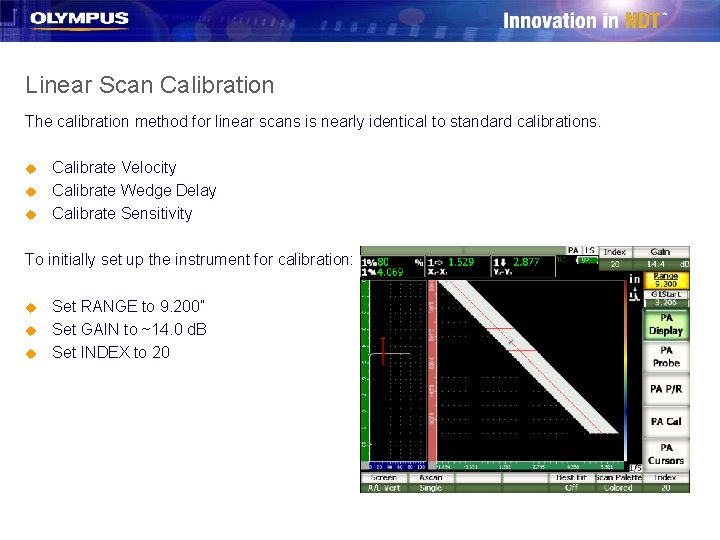
Linear Scan Calibration The calibration method for linear scans is nearly identical to standard calibrations. u u u Calibrate Velocity Calibrate Wedge Delay Calibrate Sensitivity To initially set up the instrument for calibration: u u u Set RANGE to 9. 200” Set GAIN to ~14. 0 d. B Set INDEX to 20

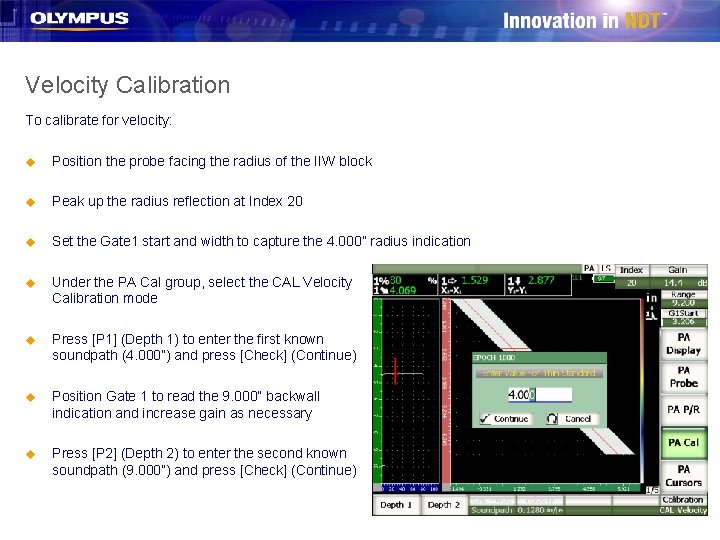
Velocity Calibration To calibrate for velocity: u Position the probe facing the radius of the IIW block u Peak up the radius reflection at Index 20 u Set the Gate 1 start and width to capture the 4. 000” radius indication u Under the PA Cal group, select the CAL Velocity Calibration mode u Press [P 1] (Depth 1) to enter the first known soundpath (4. 000”) and press [Check] (Continue) u Position Gate 1 to read the 9. 000” backwall indication and increase gain as necessary u Press [P 2] (Depth 2) to enter the second known soundpath (9. 000”) and press [Check] (Continue)

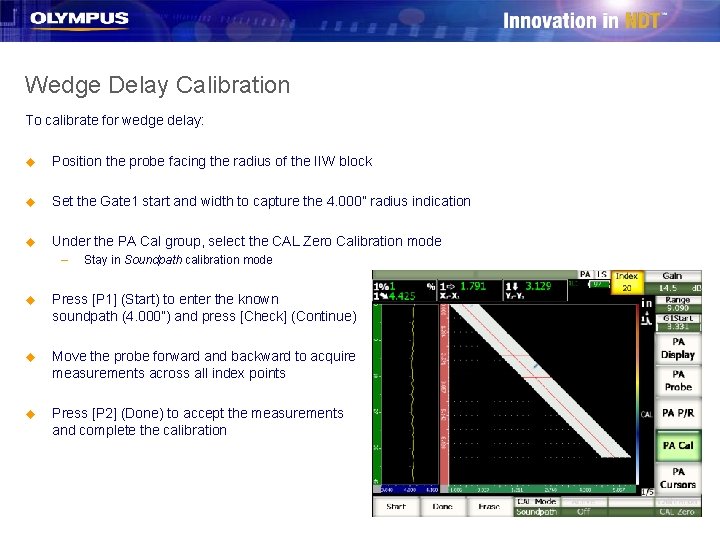
Wedge Delay Calibration To calibrate for wedge delay: u Position the probe facing the radius of the IIW block u Set the Gate 1 start and width to capture the 4. 000” radius indication u Under the PA Cal group, select the CAL Zero Calibration mode – Stay in Soundpath calibration mode u Press [P 1] (Start) to enter the known soundpath (4. 000”) and press [Check] (Continue) u Move the probe forward and backward to acquire measurements across all index points u Press [P 2] (Done) to accept the measurements and complete the calibration

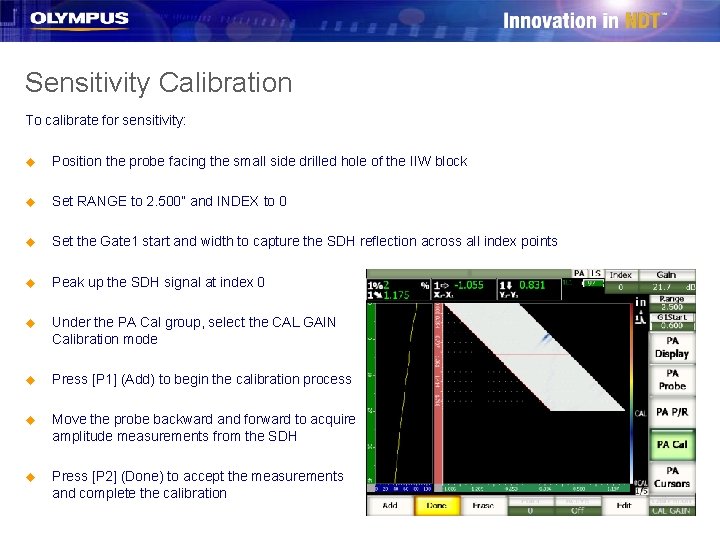
Sensitivity Calibration To calibrate for sensitivity: u Position the probe facing the small side drilled hole of the IIW block u Set RANGE to 2. 500” and INDEX to 0 u Set the Gate 1 start and width to capture the SDH reflection across all index points u Peak up the SDH signal at index 0 u Under the PA Cal group, select the CAL GAIN Calibration mode u Press [P 1] (Add) to begin the calibration process u Move the probe backward and forward to acquire amplitude measurements from the SDH u Press [P 2] (Done) to accept the measurements and complete the calibration

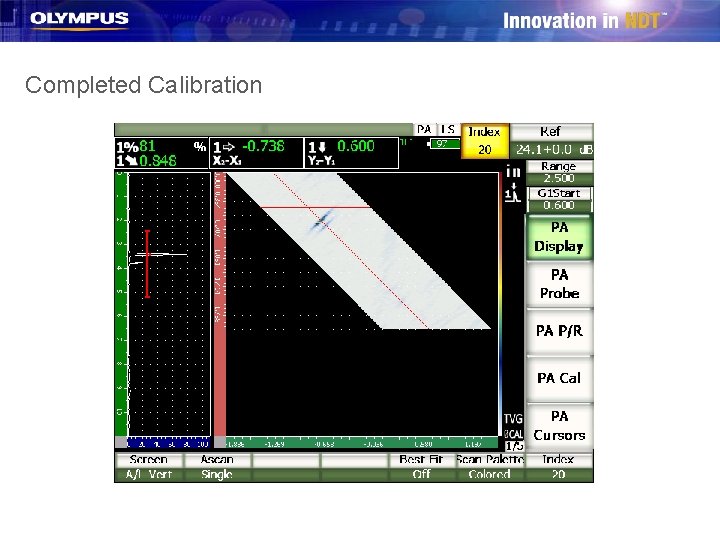
Completed Calibration

Demonstration Procedure: Angle Linear Scan

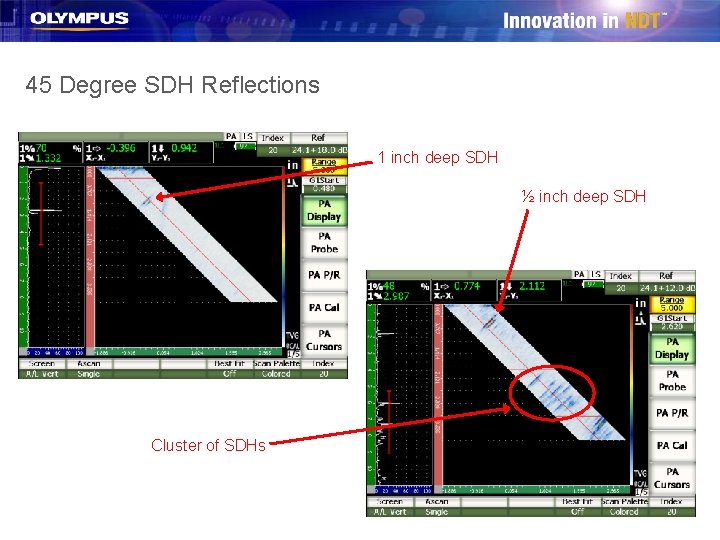
45 Degree Demonstration Setup u Place the probe on top of the PA Demo Block on the opposite side from the cluster of SDHs u Set RANGE to 5. 000” u Slide the probe across the top of the block u Each SDH will appear individually and move horizontally across the screen at varying depths u The cluster of SDHs will be visible at a depth of around 3. 000”

45 Degree SDH Reflections 1 inch deep SDH ½ inch deep SDH Cluster of SDHs

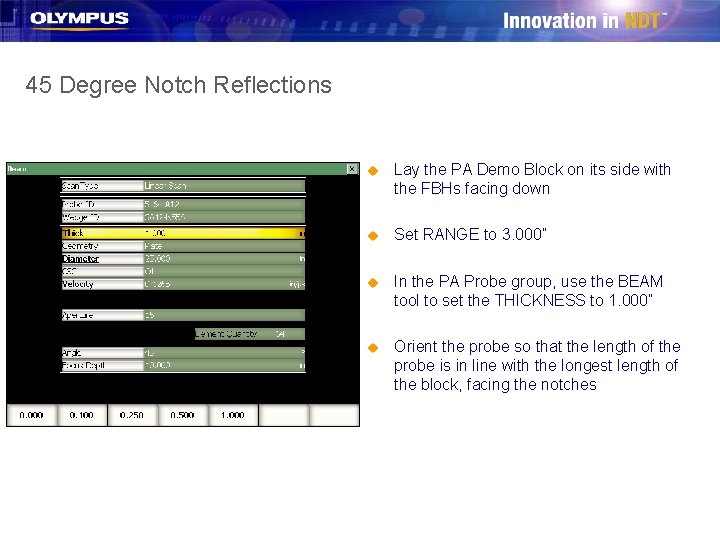
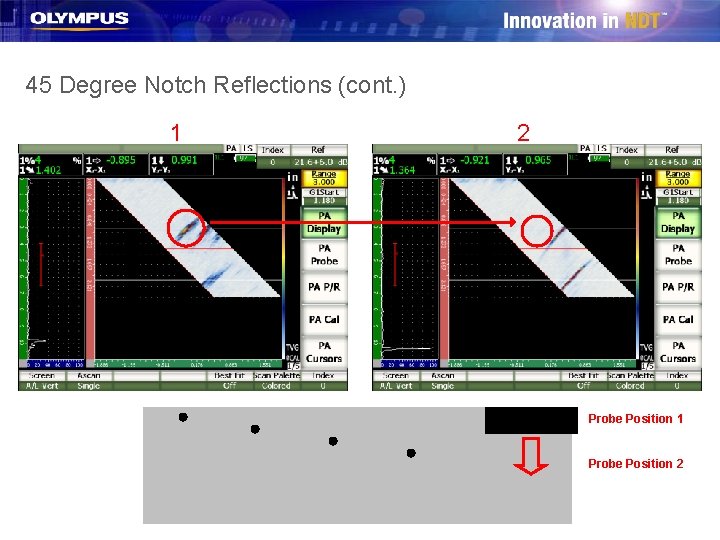
45 Degree Notch Reflections u Lay the PA Demo Block on its side with the FBHs facing down u Set RANGE to 3. 000” u In the PA Probe group, use the BEAM tool to set the THICKNESS to 1. 000” u Orient the probe so that the length of the probe is in line with the longest length of the block, facing the notches

45 Degree Notch Reflections (cont. ) u Move the probe forward and backward along the length of the block to detect the corner trap of each notch – The corner trap will occur along the first leg indicator on screen u Position the probe so the probe front is just over the edge of the block and the side of the probe is aligned with the long edge of the block containing the notches – Two reflections appear » Corner trap of notch » Corner trap of edge u Move the probe from the side of the block to the middle – The notch corner trap drops out – The edge corner trap remains

45 Degree Notch Reflections (cont. ) 1 2 Probe Position 1 Probe Position 2

Beam Setup and Calibration: 0 Degree C-scan

Required Equipment u Transducer and Wedge – 5 L 64 -38. 4 X 10 -A 12 -P-2. 5 -OM 64 element PA probe – SA 12 -0 L wedge u Test Block – EP 1000 -PABLOCK-1 Phase Array Aluminum Demo Block u Couplant – D-12 Gel Type couplant

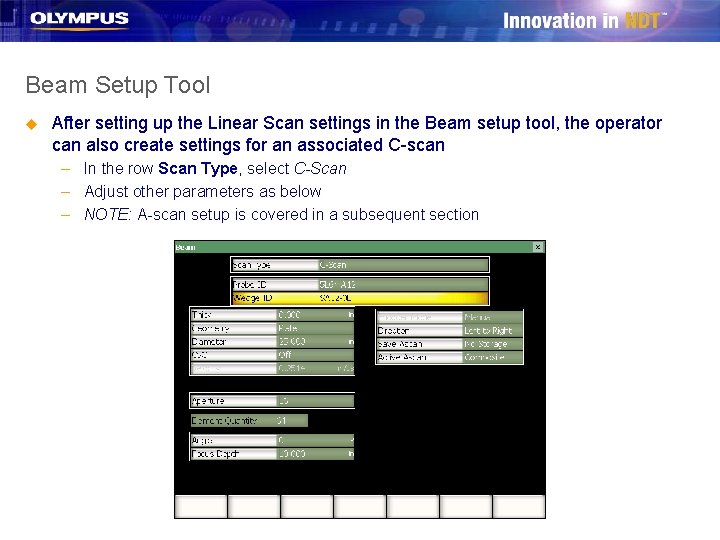
Beam Setup Tool u After setting up the Linear Scan settings in the Beam setup tool, the operator can also create settings for an associated C-scan – In the row Scan Type, select C-Scan – Adjust other parameters as below – NOTE: A-scan setup is covered in a subsequent section

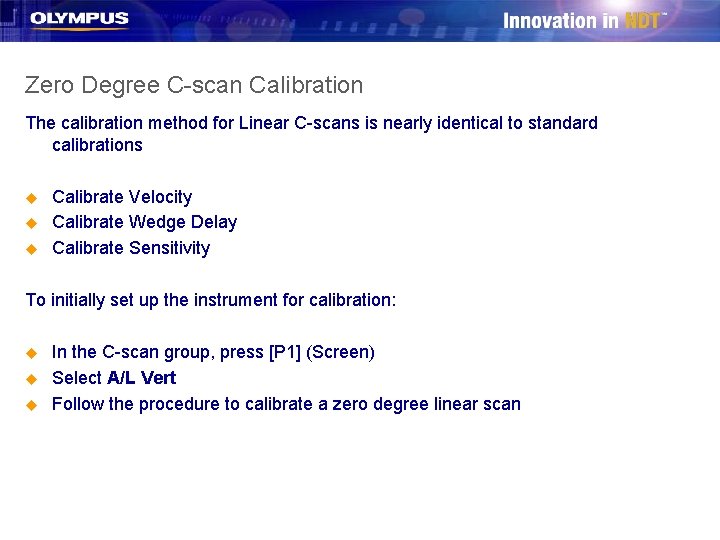
Zero Degree C-scan Calibration The calibration method for Linear C-scans is nearly identical to standard calibrations u u u Calibrate Velocity Calibrate Wedge Delay Calibrate Sensitivity To initially set up the instrument for calibration: u u u In the C-scan group, press [P 1] (Screen) Select A/L Vert Follow the procedure to calibrate a zero degree linear scan

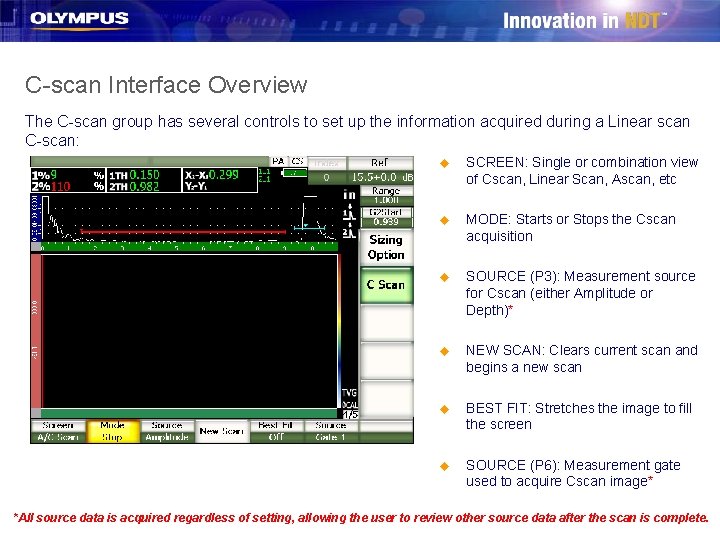
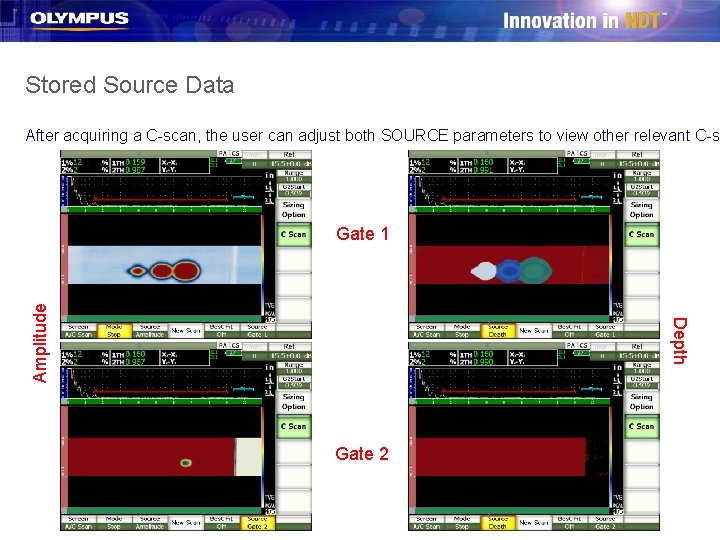
C-scan Interface Overview The C-scan group has several controls to set up the information acquired during a Linear scan C-scan: u SCREEN: Single or combination view of Cscan, Linear Scan, Ascan, etc u MODE: Starts or Stops the Cscan acquisition u SOURCE (P 3): Measurement source for Cscan (either Amplitude or Depth)* u NEW SCAN: Clears current scan and begins a new scan u BEST FIT: Stretches the image to fill the screen u SOURCE (P 6): Measurement gate used to acquire Cscan image* *All source data is acquired regardless of setting, allowing the user to review other source data after the scan is complete.

Demonstration Procedure: 0 Degree C-scan

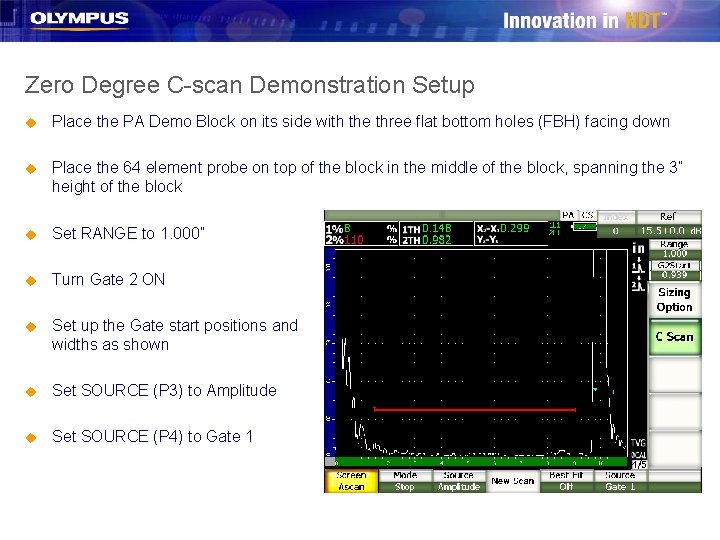
Zero Degree C-scan Demonstration Setup u Place the PA Demo Block on its side with the three flat bottom holes (FBH) facing down u Place the 64 element probe on top of the block in the middle of the block, spanning the 3” height of the block u Set RANGE to 1. 000” u Turn Gate 2 ON u Set up the Gate start positions and widths as shown u Set SOURCE (P 3) to Amplitude u Set SOURCE (P 4) to Gate 1

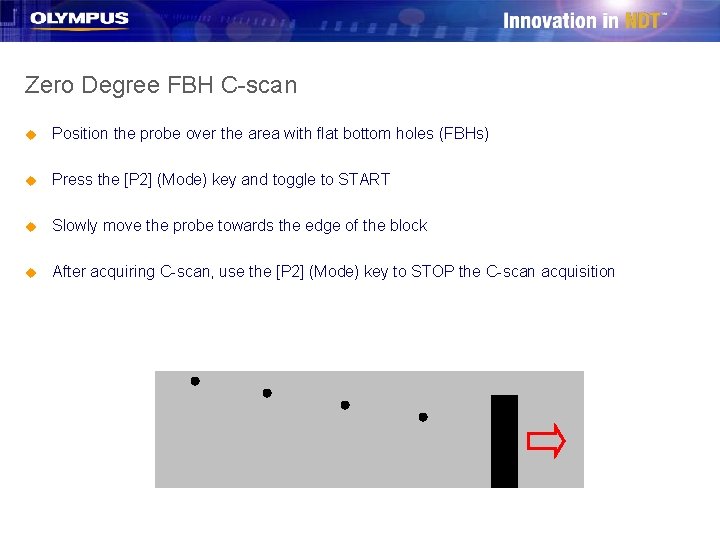
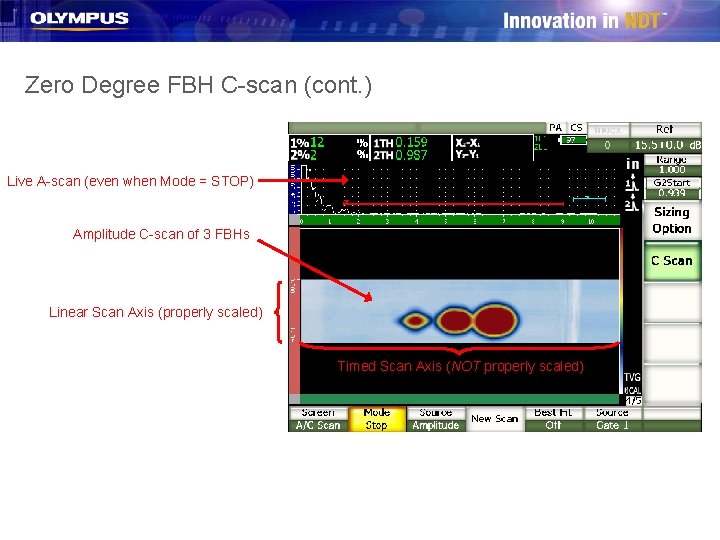
Zero Degree FBH C-scan u Position the probe over the area with flat bottom holes (FBHs) u Press the [P 2] (Mode) key and toggle to START u Slowly move the probe towards the edge of the block u After acquiring C-scan, use the [P 2] (Mode) key to STOP the C-scan acquisition

Zero Degree FBH C-scan (cont. ) Live A-scan (even when Mode = STOP) Amplitude C-scan of 3 FBHs Linear Scan Axis (properly scaled) Timed Scan Axis (NOT properly scaled)

Stored Source Data After acquiring a C-scan, the user can adjust both SOURCE parameters to view other relevant C-s Depth Amplitude Gate 1 Gate 2

C-scan Setup: A-scan Storage and View

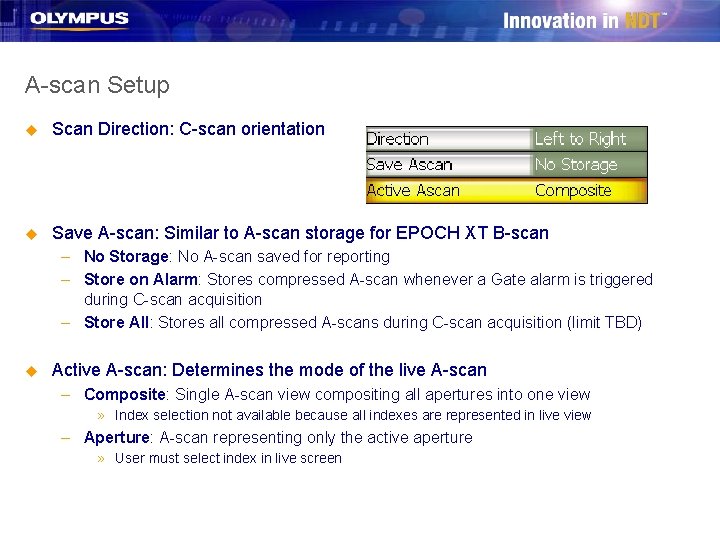
A-scan Setup u Scan Direction: C-scan orientation u Save A-scan: Similar to A-scan storage for EPOCH XT B-scan – No Storage: No A-scan saved for reporting – Store on Alarm: Stores compressed A-scan whenever a Gate alarm is triggered during C-scan acquisition – Store All: Stores all compressed A-scans during C-scan acquisition (limit TBD) u Active A-scan: Determines the mode of the live A-scan – Composite: Single A-scan view compositing all apertures into one view » Index selection not available because all indexes are represented in live view – Aperture: A-scan representing only the active aperture » User must select index in live screen