Engineering Drawing N 1 Module 1 Drawing terminology
- Slides: 33

Engineering Drawing N 1

Module 1: Drawing terminology, abbreviations and Computer-aided Design (CAD) INTRODUCTION Engineering drawing is a type of technical drawing that is used to clearly and fully define the individual requirements for engineered items. The requirements are usually described in the form of drawn visual pictures. www. futuremanagers. com

Module 1: Drawing terminology, abbreviations and Computer-aided Design (CAD) (continued) PLOTTERS AND PRINTERS USED IN ENGINEERING DRAWING Printers come in different sizes and capabilities. Thermal and laser printers are the most common types of printers used with recent technology. A plotter is a printing device that draws images on a computer, on printable material. www. futuremanagers. com

Module 1: Drawing terminology, abbreviations and Computer-aided Design (CAD) (continued) STORAGE DEVICES A storage device is computer hardware used to electronically store information and data files. It serves as the memory of the computer where information is stored to be used at a later stage. www. futuremanagers. com

Module 1: Drawing terminology, abbreviations and Computer-aided Design (CAD) (continued) BACKUP SYSTEMS A backup system is the storage device with data files that can be used to repair and restore computer data to their original form. Backup systems allow the user to select files and types of data that they want to back up. www. futuremanagers. com

Module 2: Drawing equipment and techniques DRAWING INSTRUMENTS USED IN ENGINEERING DRAWING There are many different types of instruments used for engineering drawings such as: • Drawing boards; • Scale rulers; • Drawing paper; • Pair of compasses and divider; • Pencils; • Drawing clamps or masking tape; • Erasers; • Protractors; and • T- and set squares; • Stencils and templates. www. futuremanagers. com

Module 2: Drawing equipment and techniques (continued) LINE TYPES All engineering drawings are required to meet a certain standard, which includes the line types used to make a drawing. Different types of lines are used to indicate different aspects of a drawing, and these are called line conventions. www. futuremanagers. com

Module 2: Drawing equipment and techniques (continued) ALPHANUMERICAL PRINTING Alphanumerical printing is the printing of letters and numbers in a systematic way to add information on the drawing. Alphanumerical printing is done freehand with an H or 2 H pencil and in between two faint lines, called guidelines. www. futuremanagers. com

Module 3: Freehand drawing INSTRUMENTS USED IN FREEHAND DRAWING The drawing instruments used in freehand drawing are pencil, paper and eraser. These instruments come in different sizes and shapes. Choosing the right material for freehand drawing has an impact on the overall quality of the drawing. www. futuremanagers. com

Module 3: Freehand drawing (continued) ASPECTS OF FREEHAND DRAWING Every drawn sketch or figure has to meet certain standards, such as: • Proportionality; • Correctness; • Neatness; and • Accuracy. www. futuremanagers. com

Module 3: Freehand drawing (continued) TECHNIQUES IN FREEHAND DRAWING A neat freehand drawing can be done in three steps – basic shapes, slight detail, fill in detail to complete the picture. • Small circles can be drawn freehand using squares or triangles. • Freehand large circles require a piece of paper called the trammel. • Arcs can be drawn with templates or by hand. • Grid paper can help you develop the necessary skills to be able to draw in freehand. www. futuremanagers. com

Module 4: Geometric construction BISECTING A LINE SEGMENT Bisecting a line is to draw a line perpendicular to the original line that cuts the line perfectly in two. A perpendicular line is a line which meets another line to form a right angle. www. futuremanagers. com

Module 4: Geometric construction (continued) BISECTING AN ANGLE Bisecting an angle means to divide an angle into two equal angles. To bisect an angle, you will need a ruler, a compass, a pencil, a protractor and drawing paper. www. futuremanagers. com

Module 4: Geometric construction (continued) CONSTRUCTING A PERPINDICULAR LINE A perpendicular line is a line which meets another line to form a right angle or a 90°angle. You will need a ruler, a compass, a pencil and paper to construct a perpendicular line. www. futuremanagers. com

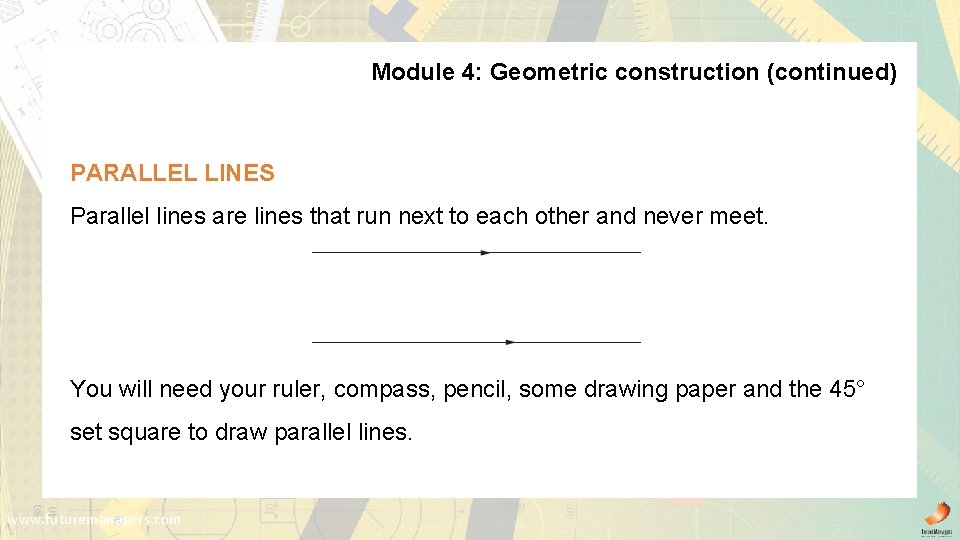
Module 4: Geometric construction (continued) PARALLEL LINES Parallel lines are lines that run next to each other and never meet. You will need your ruler, compass, pencil, some drawing paper and the 45° set square to draw parallel lines. www. futuremanagers. com

Module 4: Geometric construction (continued) CONSTRUCTING A CIRCLE THROUGH THREE GIVEN POINTS Step 1: Label three given points 1, 2 and 3. Connect them with straight lines. Step 2: Draw the perpendicular bisector of each line. Step 3: The centre of the circle is where these two perpendicular bisectors meet. To draw the circle, place the needle point of the compass at the point of intersection and the pencil point at any of the three points – 1, 2 or 3. Then use the compass to draw the circle. www. futuremanagers. com

Module 4: Geometric construction (continued) CONSTRUCTING ARCS In engineering products, the bends of items such as piping are not sharp corners, but round, smooth bends or arcs. Arcs can be constructed from: • Lines that form an acute angle; • Lines that form a right angle; • Lines that form an obtuse angle; • An arc and a line; and • Two other arcs. www. futuremanagers. com

Module 4: Geometric construction (continued) TRANSFERRING A GIVEN ANGLE To transfer a given angle means to take an angle and move it to another line. www. futuremanagers. com

Module 4: Geometric construction (continued) DIVIDING A LINE SEGMENT INTO AN AMOUNT OF EQUAL SEGMENTS A line segment is a part of a line. In order to divide the unknown length of a line segment into an amount of equal segments you will need a ruler, a pencil and a compass. www. futuremanagers. com

Module 4: Geometric construction (continued) CONSTRUCTION OF DIFFERENT ANGLES It is important for you to know how to draw the following shapes accurately: • An equilateral triangle: a three sided shape where all the sides are the same length and all the angles are the same. • A square: a figure with four equal straight sides and four right angles. • A hexagon: a figure with six straight sides and six angles. • An octagon: a figure with eight straight sides and eight angles. • An ellipse: a regular oval shape. www. futuremanagers. com

Module 5: Reproduction drawing SCALE Scale is used to make a drawing larger or smaller relative to its original size. Scale is used when a component is too large to fit easily onto a sheet of drawing paper or when the component is too small for the drawing to be read easily. Scale is expressed as a ratio between the size of the drawing and the actual size of the component such as 1: 5. www. futuremanagers. com

Module 5: Reproduction drawing (continued) GEOMETRIC PLAIN FIGURES Every kind of shape in this section is a polygon. A polygon is a closed shape with three or more straight sides. www. futuremanagers. com

Module 6: First-Angle Orthographic Projection (CAD) PRINCIPLES OF FIRST-ANGLE ORTHOGRAPHIC PROJECTION Orthographic projection requires the projection of a three-dimensional object onto an imaginary plane, resulting in the creation of a two-dimensional shape. This shape is dependent on the location of the plane and the direction from which the object is being observed. www. futuremanagers. com

Module 6: First-Angle Orthographic Projection (CAD) (continued) PROJECTION METHODS In order to draw a 3 -view engineering drawing you need to learn how to correctly project the top and left-hand views from the front view. There are two ways to do this: • The 45° line method; and • The circular arc method. www. futuremanagers. com

Module 6: First-Angle Orthographic Projection (CAD) (continued) STEPS TO SET UP AN ORTHOGRAPHIC PROJECTION DRAWING 1. Select the correct size paper, 2. Calculate the total dimensions of the drawing, 3. Place the front view on the paper, 4. Construct the top and left views, 5. Add the dimensions to your drawing, 6. Add the title, scale and projection symbols to the drawing. www. futuremanagers. com

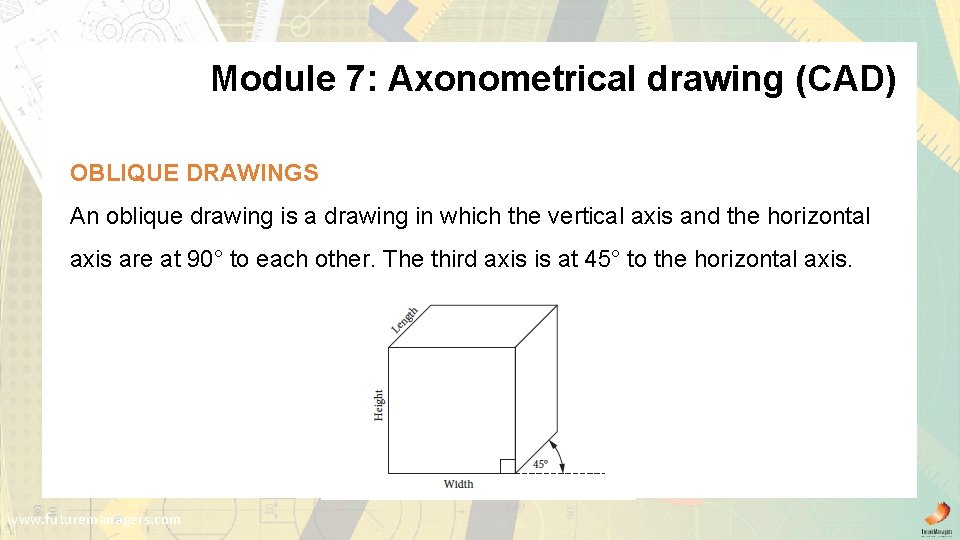
Module 7: Axonometrical drawing (CAD) OBLIQUE DRAWINGS An oblique drawing is a drawing in which the vertical axis and the horizontal axis are at 90° to each other. The third axis is at 45° to the horizontal axis. www. futuremanagers. com

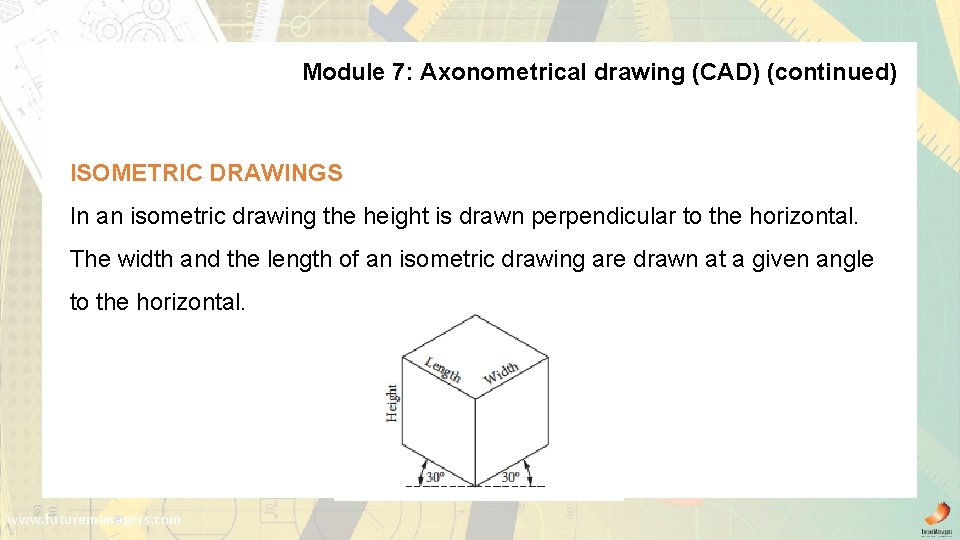
Module 7: Axonometrical drawing (CAD) (continued) ISOMETRIC DRAWINGS In an isometric drawing the height is drawn perpendicular to the horizontal. The width and the length of an isometric drawing are drawn at a given angle to the horizontal. www. futuremanagers. com

Module 8: Orthographic projection of prisms and pyramids PRISMS AND PYRAMIDS A prism is a geometrical solid object that has two identical faces and multiple sides that are parallelograms. Unlike a prism, a pyramid only has one base. The sides are triangular faces that join at the top to form a tip or apex, which is a vertex. All the sides of a pyramid are also flat, which means that it has no curves. www. futuremanagers. com

Module 8: Orthographic projection of prisms and pyramids (continued) TYPES OF PRISMS AND PYRAMIDS Examples of prisms: Examples of pyramids: • Triangular prism; • Triangular pyramids; • Cube; • Square pyramids; • Square prism; • Hexagonal pyramids; • Hexagonal prism; • Octagonal pyramids; • Octagonal prism; • Cone. • Cylinder. www. futuremanagers. com

Module 8: Orthographic projection of prisms and pyramids (continued) DRAWING OF FIRST-ANGLE ORTHOGRAPHIC PROJECTIONS OF OBJECTS • You should project objects with their axes perpendicular to the horizontal plane and parallel to the vertical plane first. • You should draw secondary views with normal outlines, should show hidden details where required, and add the symbol for first-angle orthographic projection. www. futuremanagers. com

Module 9: Sectional drawing of single items SECTIONING Some of the uses and advantages of sectioning are as follows: • It makes details of an object clearer. • It shows the internal features of an object. • It reduces the amount of hidden lines, or gets rid of them completely. • It allows for the dimensioning of internal features. www. futuremanagers. com

Module 9: Sectional drawing of single items (continued) TYPES OF SECTIONAL VIEWS There several ways of revealing the internal parts of an object. Two methods you could use are the: • The cross-section method involves cutting away a section of an object with the use of a cutting plane. • The assembly method involves separating or taking apart an object’s parts (in layers) so that you can reveal its internal parts. www. futuremanagers. com

Module 9: Sectional drawing of single items (continued) APPLYING SECTIONING TECHNIQUES TO SECTIONAL VIEWS • In sectioning, cutting plane lines are used to indicate where the cutting planes of an object are. • Sectional views are mainly identified by sectioning lines, which are also known as hatching lines (hatching or cross-hatching). www. futuremanagers. com