Engineering Drawing FEC 204 Projections of Lines Rizvi
- Slides: 15

Engineering Drawing (FEC 204) Projections of Lines Rizvi College of Engineering Department of Mechanical Engineering Prof. Ameya Nadkarni

Projections of Lines • Course Outcome applied: CO 1 and CO 2 • Topic Weightage: 9 Marks (1 question) Introduction: A line is formed by connecting 2 points together. So, if we know the locations of both the points then we can trace the position of the line with respect to the reference planes. The Front View & Top View of the same line can be plotted, using locus of both end points. Rizvi College of Engineering Department of Mechanical Engineering Prof. Ameya Nadkarni

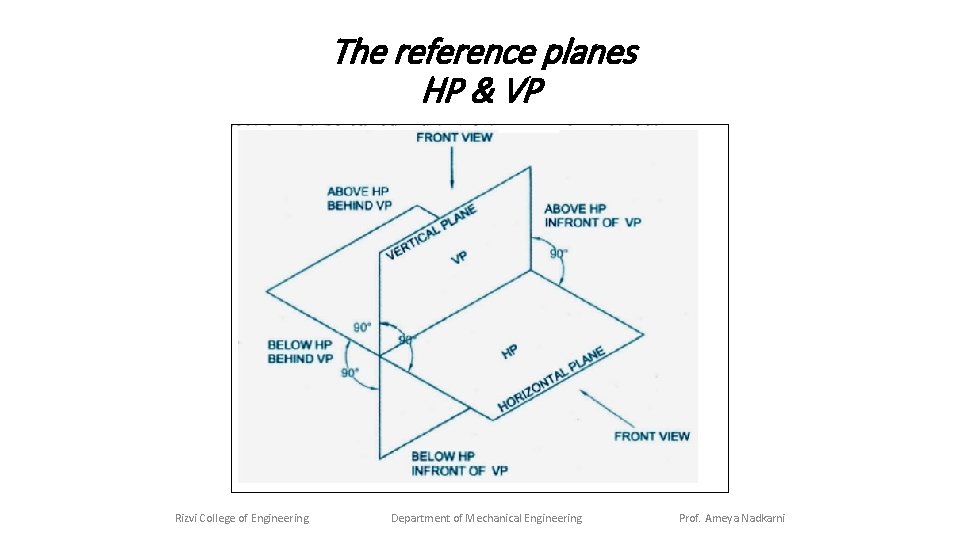
The reference planes HP & VP Rizvi College of Engineering Department of Mechanical Engineering Prof. Ameya Nadkarni

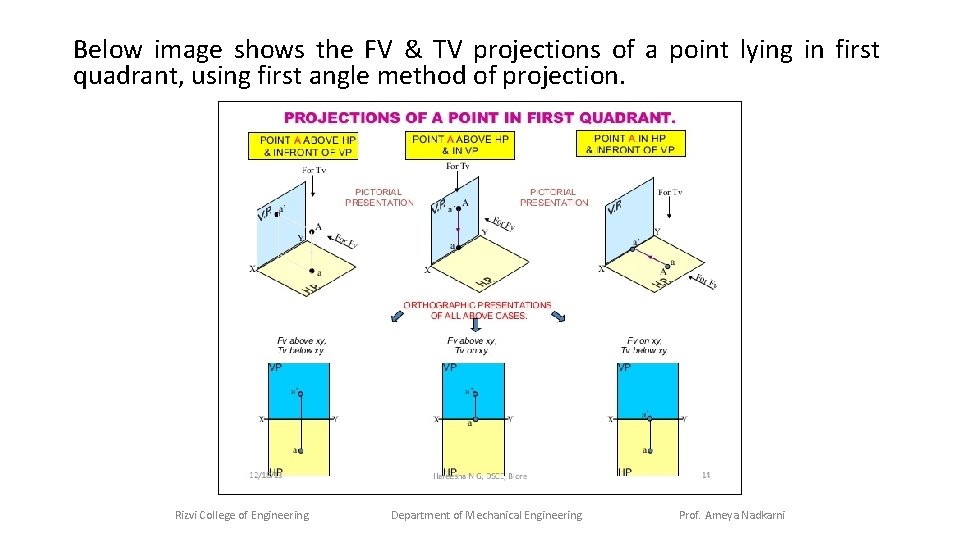
Projections of Points A point, being the smallest geometric entity can lie anywhere in space. Hence, we use a 3 -dimensional system to describe its coordinates when it comes to its position. But in Engineering Drawing, we use the two reference planes HP and VP, with the 4 -quadrant system to best describe its position. Illustration of the same is shown in the previous slide. Rizvi College of Engineering Department of Mechanical Engineering Prof. Ameya Nadkarni

Below image shows the FV & TV projections of a point lying in first quadrant, using first angle method of projection. Rizvi College of Engineering Department of Mechanical Engineering Prof. Ameya Nadkarni

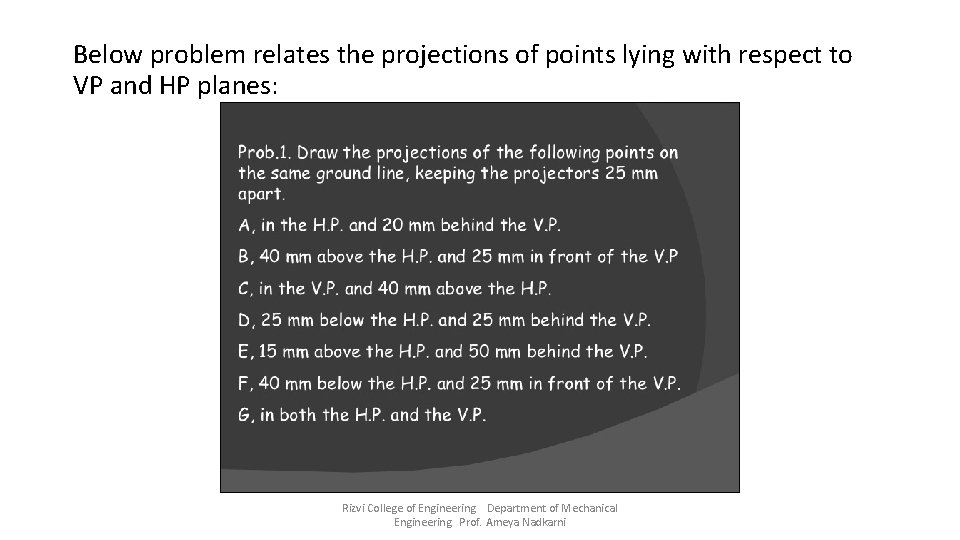
Below problem relates the projections of points lying with respect to VP and HP planes: Rizvi College of Engineering Department of Mechanical Engineering Prof. Ameya Nadkarni

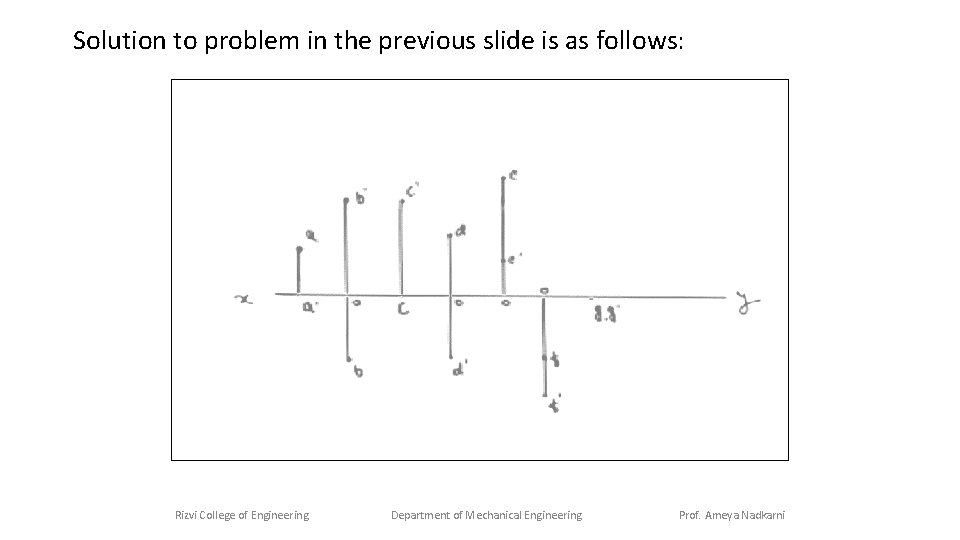
Solution to problem in the previous slide is as follows: Rizvi College of Engineering Department of Mechanical Engineering Prof. Ameya Nadkarni

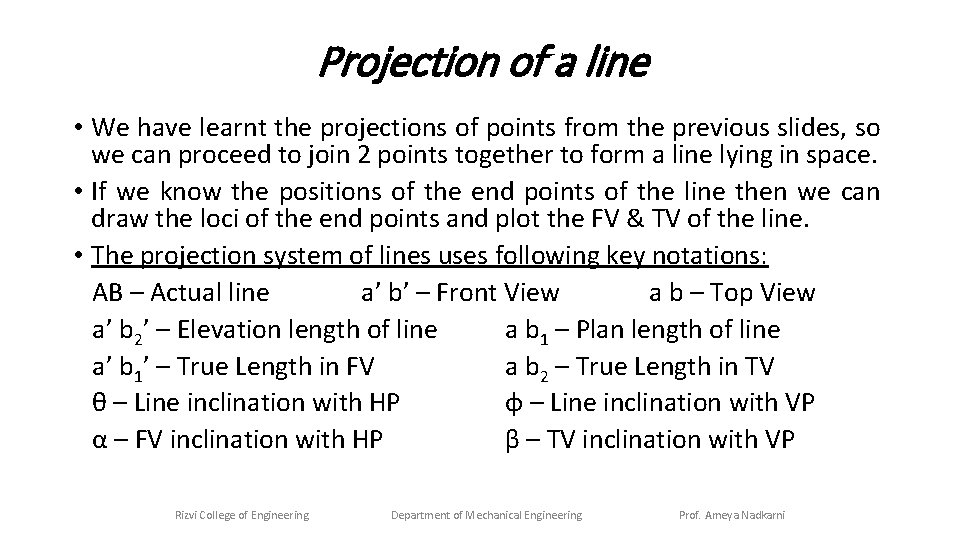
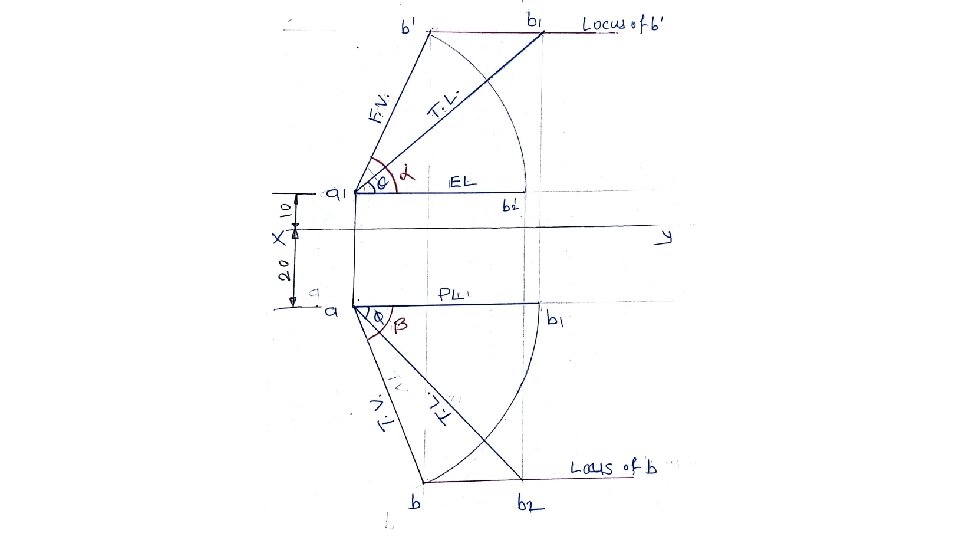
Projection of a line • We have learnt the projections of points from the previous slides, so we can proceed to join 2 points together to form a line lying in space. • If we know the positions of the end points of the line then we can draw the loci of the end points and plot the FV & TV of the line. • The projection system of lines uses following key notations: AB – Actual line a’ b’ – Front View a b – Top View a’ b 2’ – Elevation length of line a b 1 – Plan length of line a’ b 1’ – True Length in FV a b 2 – True Length in TV θ – Line inclination with HP ɸ – Line inclination with VP α – FV inclination with HP β – TV inclination with VP Rizvi College of Engineering Department of Mechanical Engineering Prof. Ameya Nadkarni

Rizvi College of Engineering Department of Mechanical Engineering Prof. Ameya Nadkarni

Position and notations of the line Based on above notations, 4 cases arise for any line: 1. A line parallel to both HP and VP 2. A line parallel to VP and inclined at θ to HP 3. A line parallel to HP and inclined at ɸ to VP 4. A line inclined both to HP at θ and to VP at ɸ Rizvi College of Engineering Department of Mechanical Engineering Prof. Ameya Nadkarni

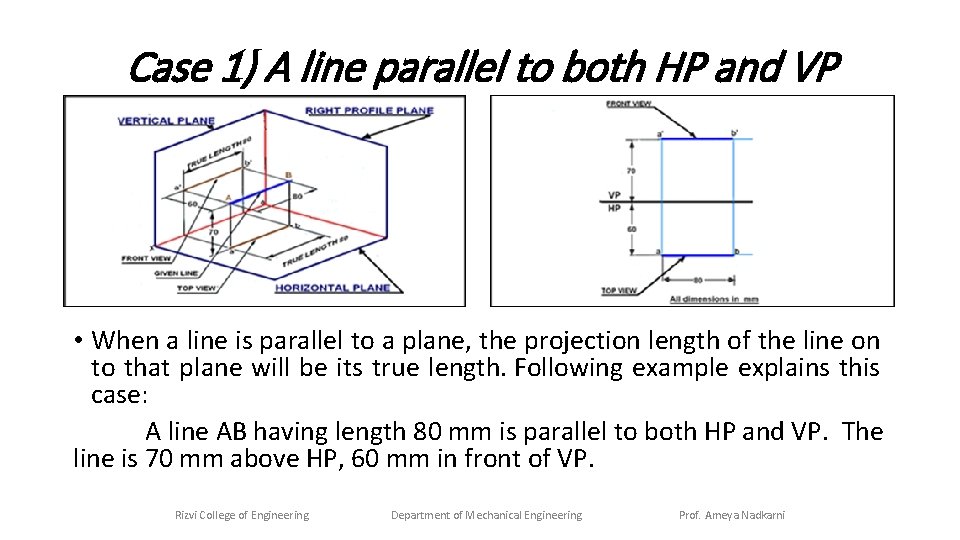
Case 1) A line parallel to both HP and VP • When a line is parallel to a plane, the projection length of the line on to that plane will be its true length. Following example explains this case: A line AB having length 80 mm is parallel to both HP and VP. The line is 70 mm above HP, 60 mm in front of VP. Rizvi College of Engineering Department of Mechanical Engineering Prof. Ameya Nadkarni

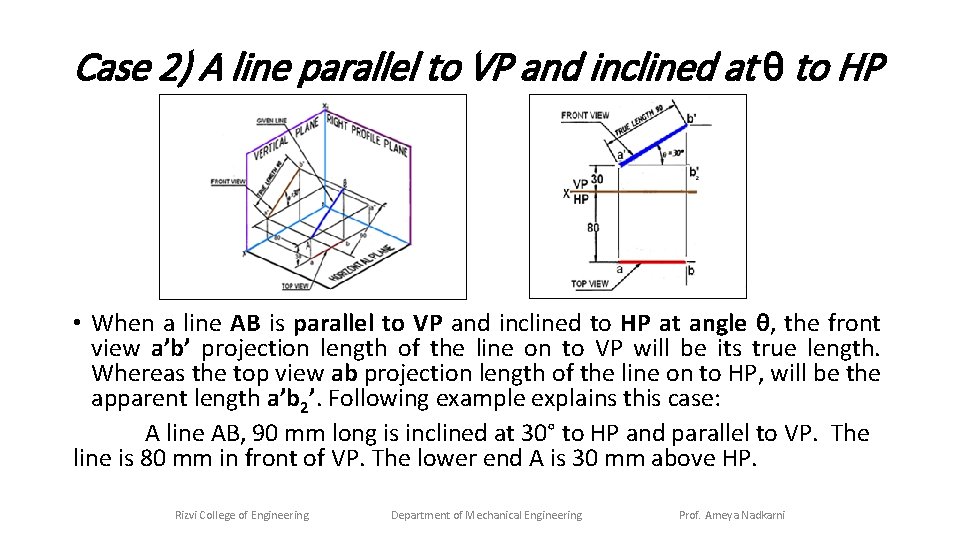
Case 2) A line parallel to VP and inclined at θ to HP • When a line AB is parallel to VP and inclined to HP at angle θ, the front view a’b’ projection length of the line on to VP will be its true length. Whereas the top view ab projection length of the line on to HP, will be the apparent length a’b 2’. Following example explains this case: A line AB, 90 mm long is inclined at 30° to HP and parallel to VP. The line is 80 mm in front of VP. The lower end A is 30 mm above HP. Rizvi College of Engineering Department of Mechanical Engineering Prof. Ameya Nadkarni

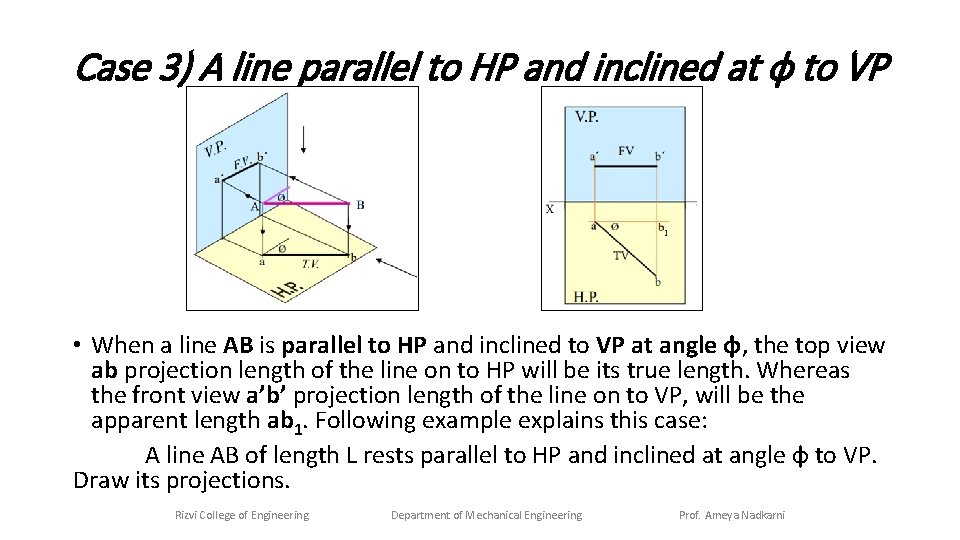
Case 3) A line parallel to HP and inclined at ϕ to VP • When a line AB is parallel to HP and inclined to VP at angle ɸ, the top view ab projection length of the line on to HP will be its true length. Whereas the front view a’b’ projection length of the line on to VP, will be the apparent length ab 1. Following example explains this case: A line AB of length L rests parallel to HP and inclined at angle ɸ to VP. Draw its projections. Rizvi College of Engineering Department of Mechanical Engineering Prof. Ameya Nadkarni

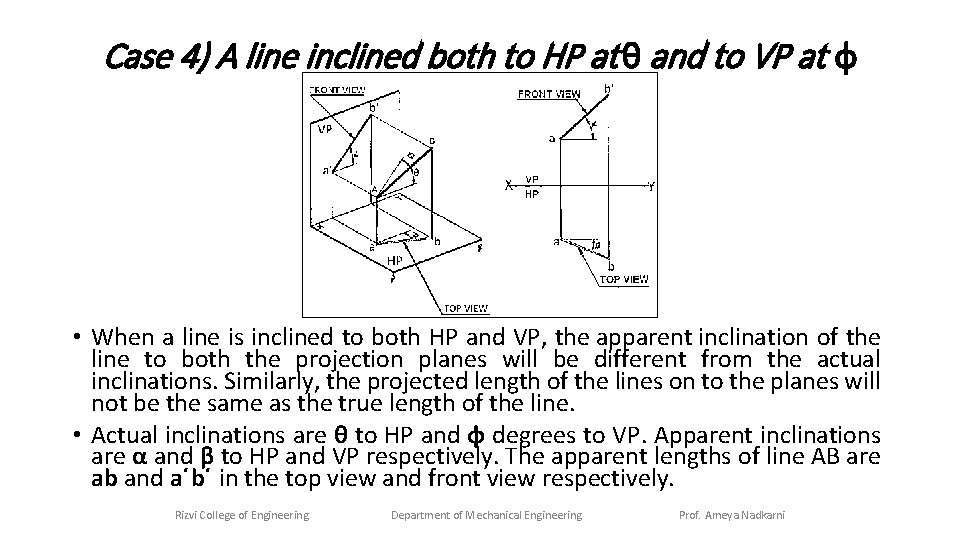
Case 4) A line inclined both to HP at θ and to VP at ϕ • When a line is inclined to both HP and VP, the apparent inclination of the line to both the projection planes will be different from the actual inclinations. Similarly, the projected length of the lines on to the planes will not be the same as the true length of the line. • Actual inclinations are θ to HP and ɸ degrees to VP. Apparent inclinations are α and β to HP and VP respectively. The apparent lengths of line AB are ab and a΄b΄ in the top view and front view respectively. Rizvi College of Engineering Department of Mechanical Engineering Prof. Ameya Nadkarni

Thank You Rizvi College of Engineering Department of Mechanical Engineering Prof. Ameya Nadkarni