Engi 1504 Graphics Lecture 5 Sectioning and Dimensioning

- Slides: 46

Engi 1504 – Graphics Lecture 5: Sectioning and Dimensioning l Sectioning an object – Sectioning symbols – Locating sections – conventions l Dimensioning l Class assignment 5 Course: Engineering Graphics 1504 Memorial University of Newfoundland Sheet 1

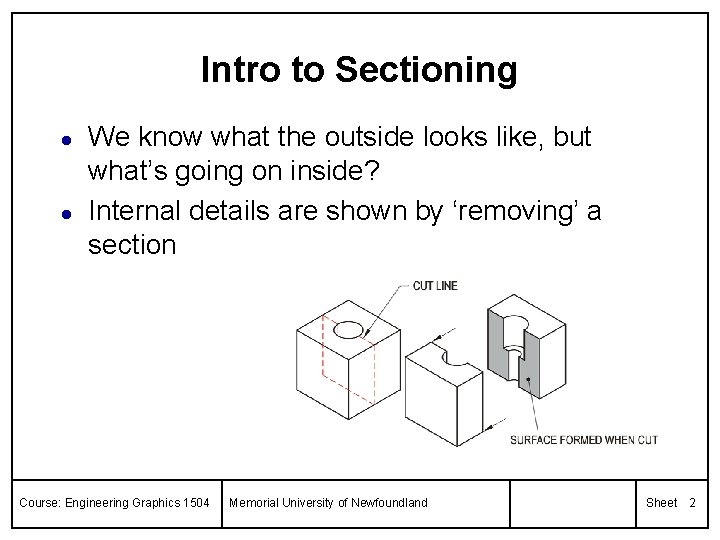
Intro to Sectioning l l We know what the outside looks like, but what’s going on inside? Internal details are shown by ‘removing’ a section Course: Engineering Graphics 1504 Memorial University of Newfoundland Sheet 2

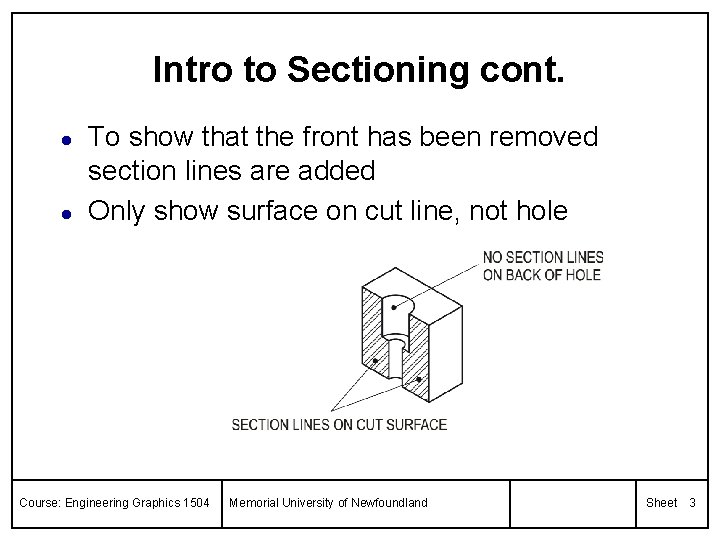
Intro to Sectioning cont. l l To show that the front has been removed section lines are added Only show surface on cut line, not hole Course: Engineering Graphics 1504 Memorial University of Newfoundland Sheet 3

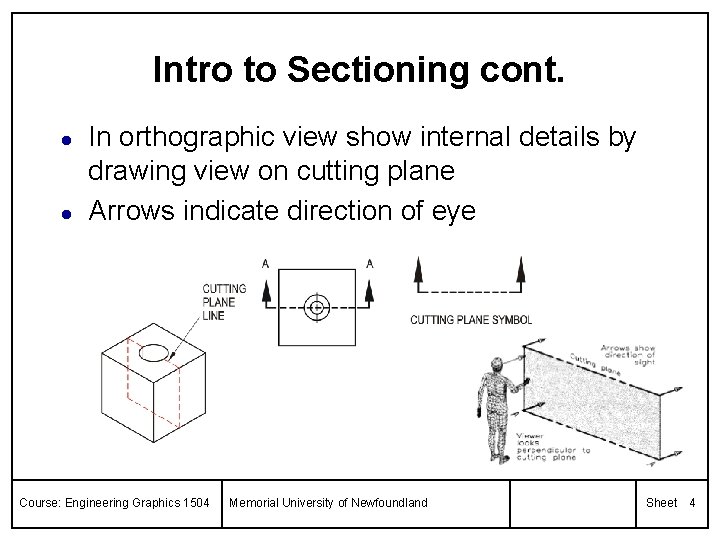
Intro to Sectioning cont. l l In orthographic view show internal details by drawing view on cutting plane Arrows indicate direction of eye Course: Engineering Graphics 1504 Memorial University of Newfoundland Sheet 4

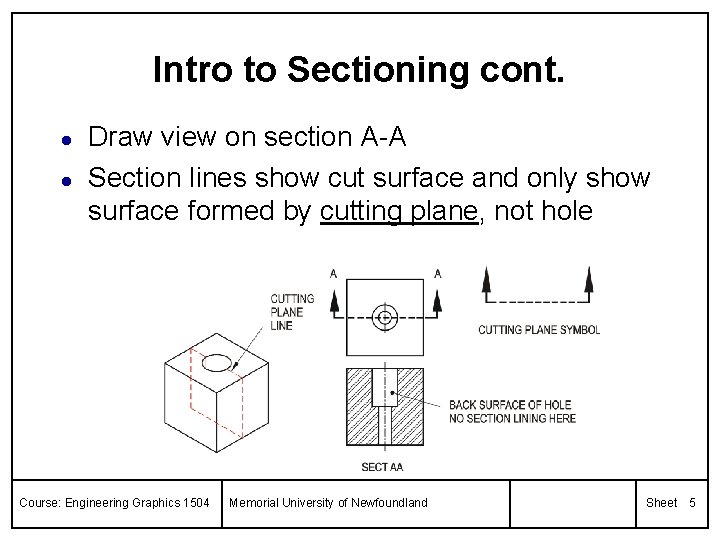
Intro to Sectioning cont. l l Draw view on section A-A Section lines show cut surface and only show surface formed by cutting plane, not hole Course: Engineering Graphics 1504 Memorial University of Newfoundland Sheet 5

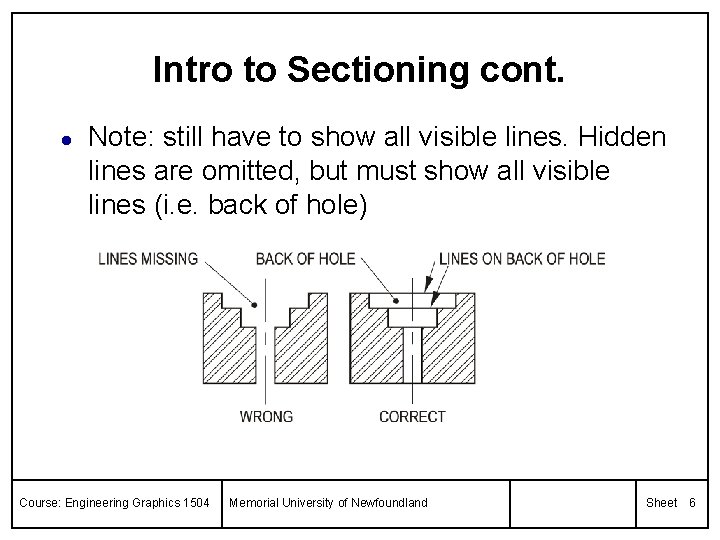
Intro to Sectioning cont. l Note: still have to show all visible lines. Hidden lines are omitted, but must show all visible lines (i. e. back of hole) Course: Engineering Graphics 1504 Memorial University of Newfoundland Sheet 6

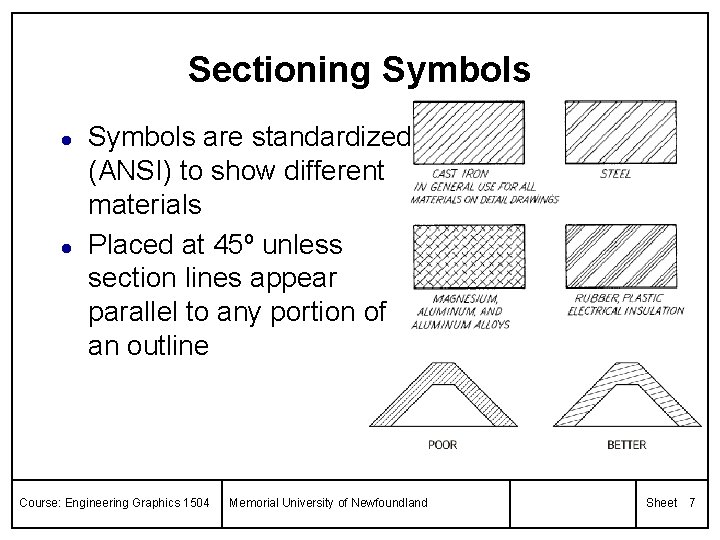
Sectioning Symbols l l Symbols are standardized (ANSI) to show different materials Placed at 45º unless section lines appear parallel to any portion of an outline Course: Engineering Graphics 1504 Memorial University of Newfoundland Sheet 7

Locating Sections l l l Locate section to show the required internal details Sections can be taken anywhere and need not be taken through middle of object. Examples include: – – – Full section Half section Offset section Revolved section Removed section Course: Engineering Graphics 1504 Memorial University of Newfoundland Sheet 8

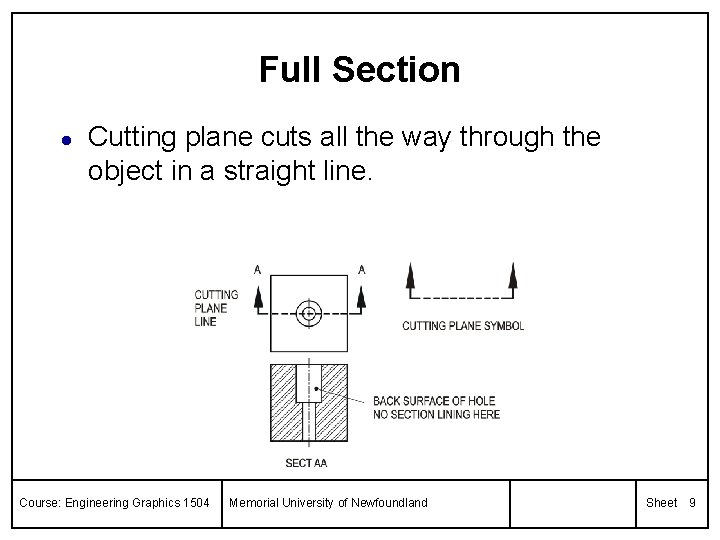
Full Section l Cutting plane cuts all the way through the object in a straight line. Course: Engineering Graphics 1504 Memorial University of Newfoundland Sheet 9

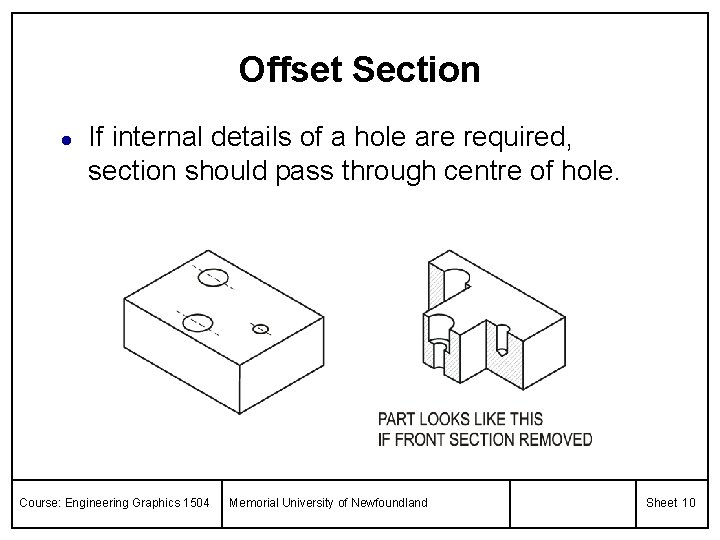
Offset Section l If internal details of a hole are required, section should pass through centre of hole. Course: Engineering Graphics 1504 Memorial University of Newfoundland Sheet 10

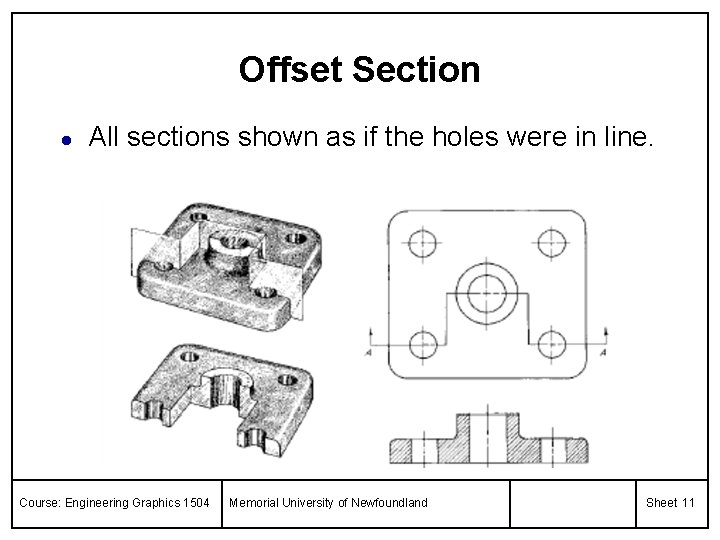
Offset Section l All sections shown as if the holes were in line. Course: Engineering Graphics 1504 Memorial University of Newfoundland Sheet 11

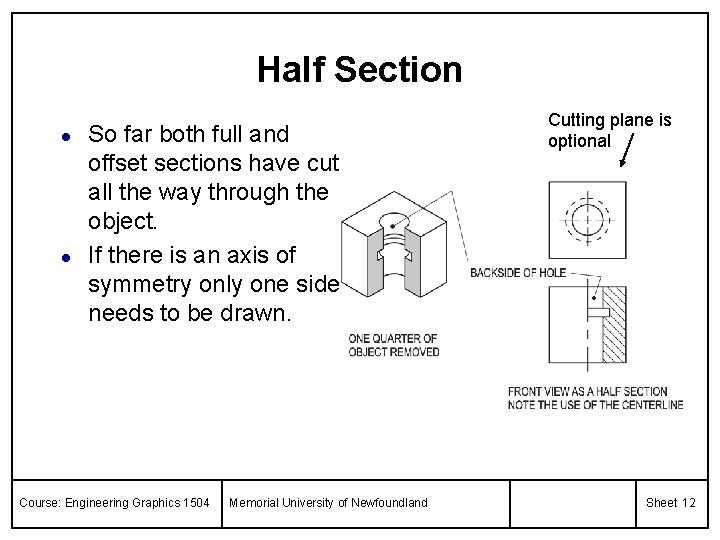
Half Section l l So far both full and offset sections have cut all the way through the object. If there is an axis of symmetry only one side needs to be drawn. Course: Engineering Graphics 1504 Memorial University of Newfoundland Cutting plane is optional Sheet 12

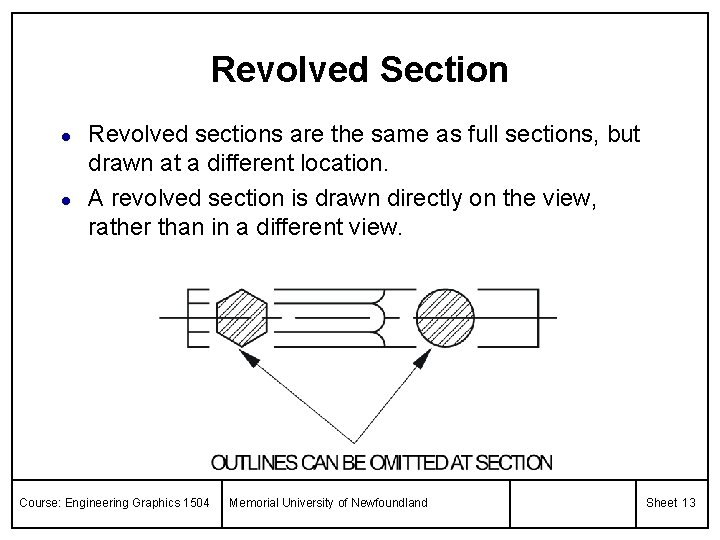
Revolved Section l l Revolved sections are the same as full sections, but drawn at a different location. A revolved section is drawn directly on the view, rather than in a different view. Course: Engineering Graphics 1504 Memorial University of Newfoundland Sheet 13

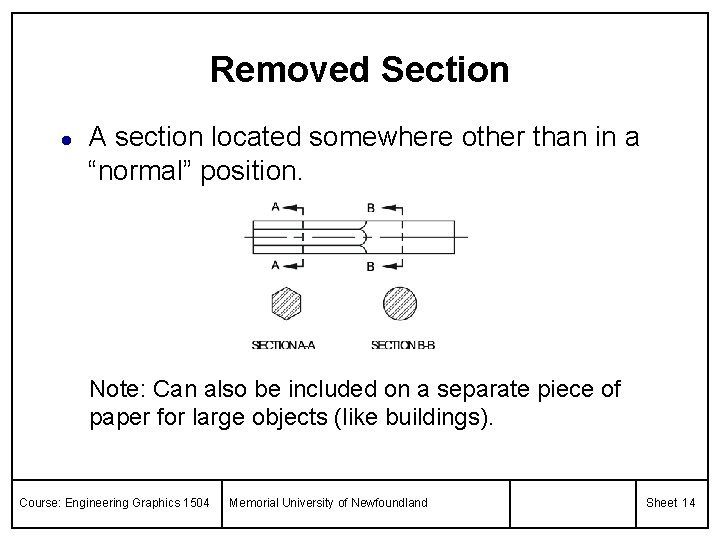
Removed Section l A section located somewhere other than in a “normal” position. Note: Can also be included on a separate piece of paper for large objects (like buildings). Course: Engineering Graphics 1504 Memorial University of Newfoundland Sheet 14

Conventions to make life easier l l Some features are simplified to make them easier to draw and not shown as they would actually appear. Important to know these conventions in order to understand a drawing. Course: Engineering Graphics 1504 Memorial University of Newfoundland Sheet 15

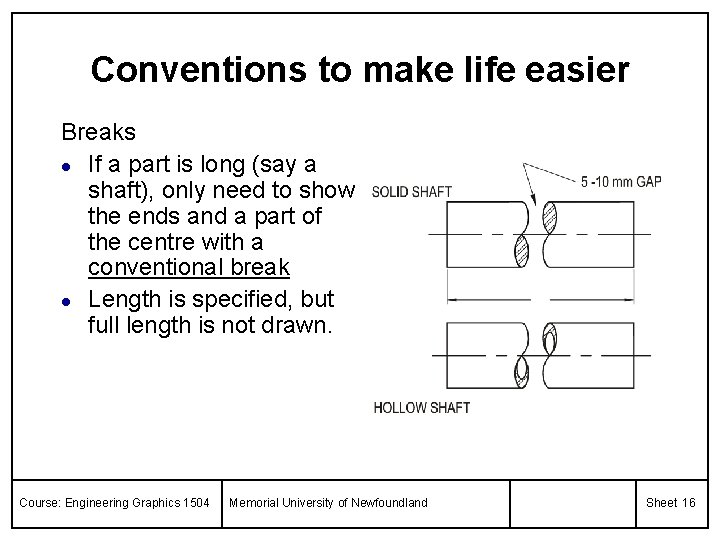
Conventions to make life easier Breaks l If a part is long (say a shaft), only need to show the ends and a part of the centre with a conventional break l Length is specified, but full length is not drawn. Course: Engineering Graphics 1504 Memorial University of Newfoundland Sheet 16

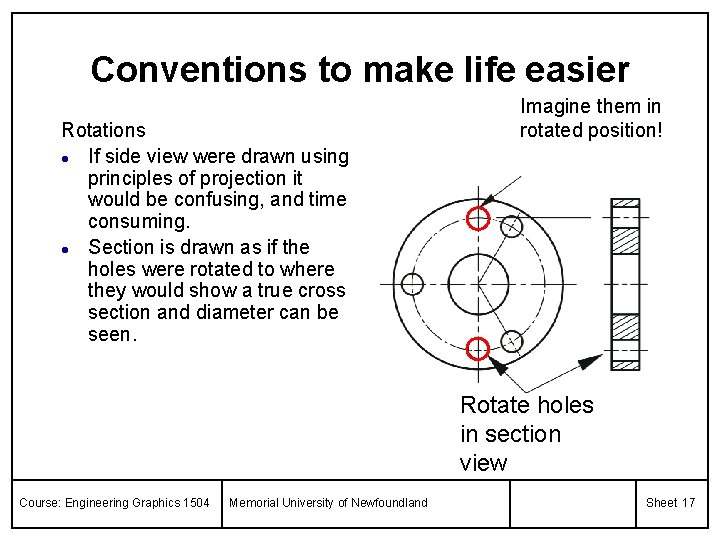
Conventions to make life easier Rotations l If side view were drawn using principles of projection it would be confusing, and time consuming. l Section is drawn as if the holes were rotated to where they would show a true cross section and diameter can be seen. Imagine them in rotated position! Rotate holes in section view Course: Engineering Graphics 1504 Memorial University of Newfoundland Sheet 17

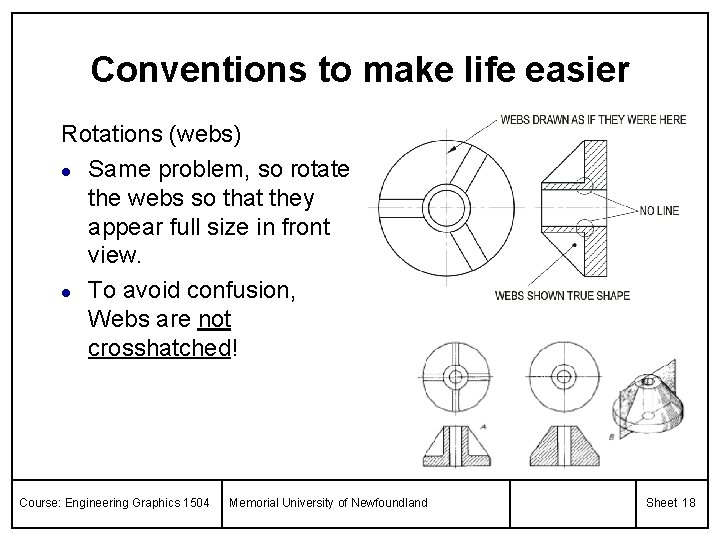
Conventions to make life easier Rotations (webs) l Same problem, so rotate the webs so that they appear full size in front view. l To avoid confusion, Webs are not crosshatched! Course: Engineering Graphics 1504 Memorial University of Newfoundland Sheet 18

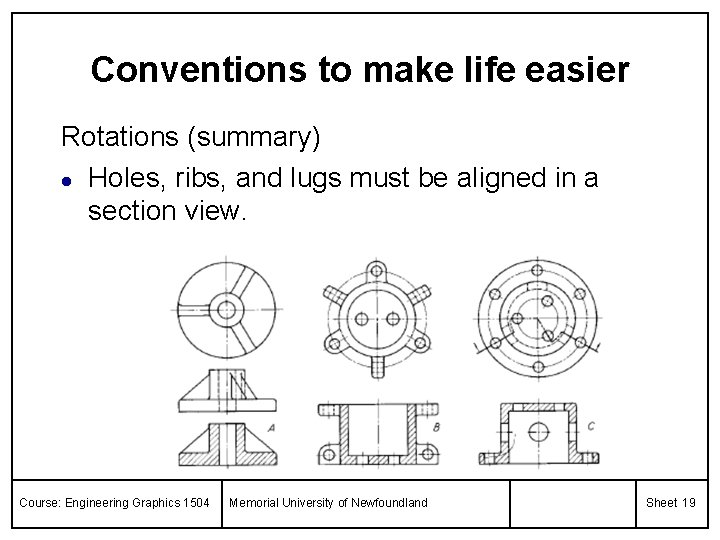
Conventions to make life easier Rotations (summary) l Holes, ribs, and lugs must be aligned in a section view. Course: Engineering Graphics 1504 Memorial University of Newfoundland Sheet 19

Break Time l Take 5 minute break Course: Engineering Graphics 1504 Memorial University of Newfoundland Sheet 20

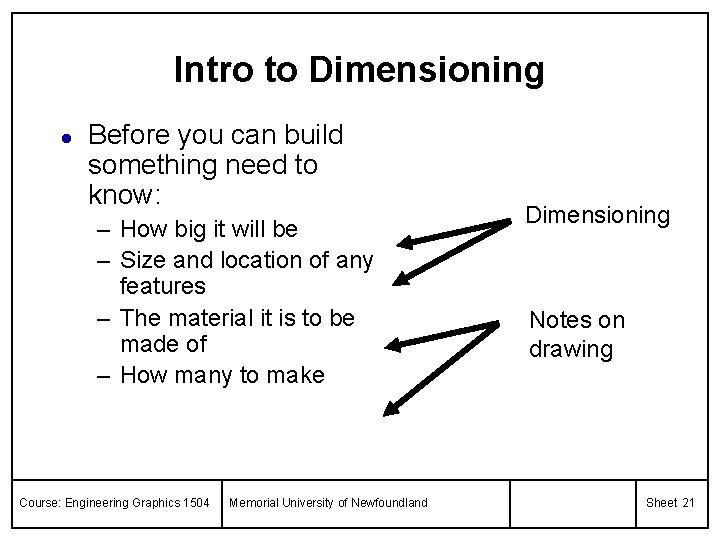
Intro to Dimensioning l Before you can build something need to know: – How big it will be – Size and location of any features – The material it is to be made of – How many to make Course: Engineering Graphics 1504 Memorial University of Newfoundland Dimensioning Notes on drawing Sheet 21

Intro to Dimensioning cont. l l l Various organizations publish standard methods for dimensioning and tolerancing engineering documents Canadian Standards Association (CSA) B 78. 2 American Society of Mechanical Engineers Standard Dimensioning and Tolerancing (ASME) Y 14. 5 M Course: Engineering Graphics 1504 Memorial University of Newfoundland Sheet 22

Intro to Dimensioning cont. Units l SI units. Common linear unit is mm (e. g. 5 mm) l Imperial units. Customary linear unit is the decimal inch (0. 25 in) l If all dimensions are in either millimetres or inches, the symbol after each dimension can be omitted. Put a note on the drawing: ALL DIMENSIONS IN MILLIMETRES Course: Engineering Graphics 1504 Memorial University of Newfoundland Sheet 23

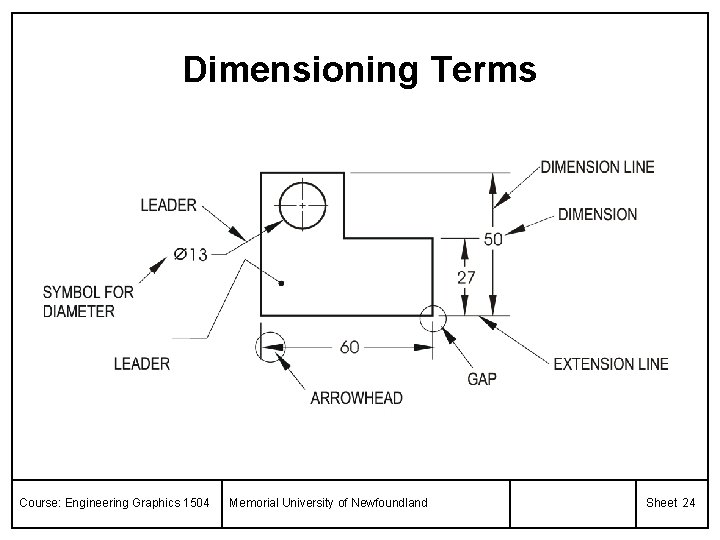
Dimensioning Terms Course: Engineering Graphics 1504 Memorial University of Newfoundland Sheet 24

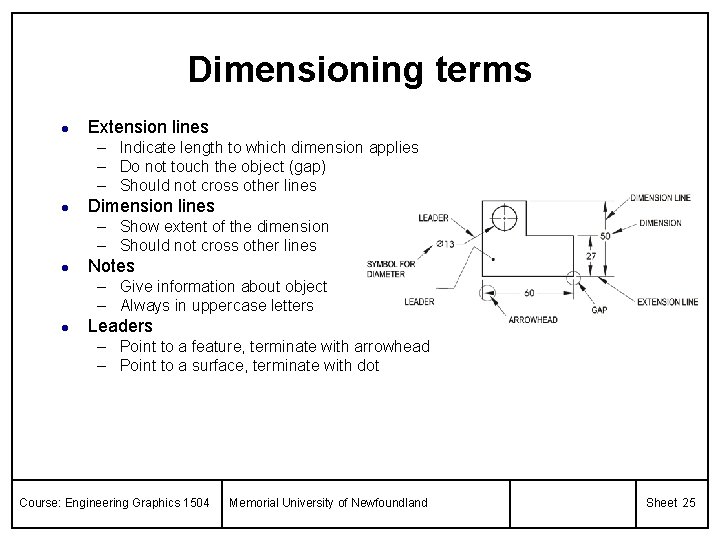
Dimensioning terms l Extension lines – Indicate length to which dimension applies – Do not touch the object (gap) – Should not cross other lines l Dimension lines – Show extent of the dimension – Should not cross other lines l Notes – Give information about object – Always in uppercase letters l Leaders – Point to a feature, terminate with arrowhead – Point to a surface, terminate with dot Course: Engineering Graphics 1504 Memorial University of Newfoundland Sheet 25

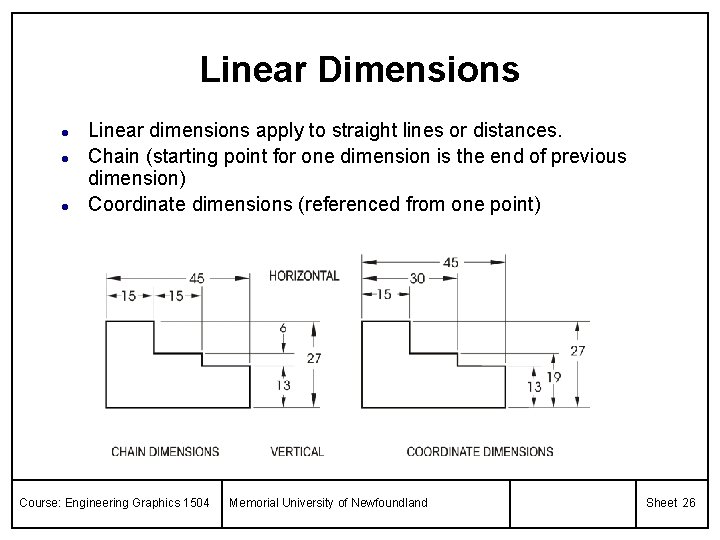
Linear Dimensions l l l Linear dimensions apply to straight lines or distances. Chain (starting point for one dimension is the end of previous dimension) Coordinate dimensions (referenced from one point) Course: Engineering Graphics 1504 Memorial University of Newfoundland Sheet 26

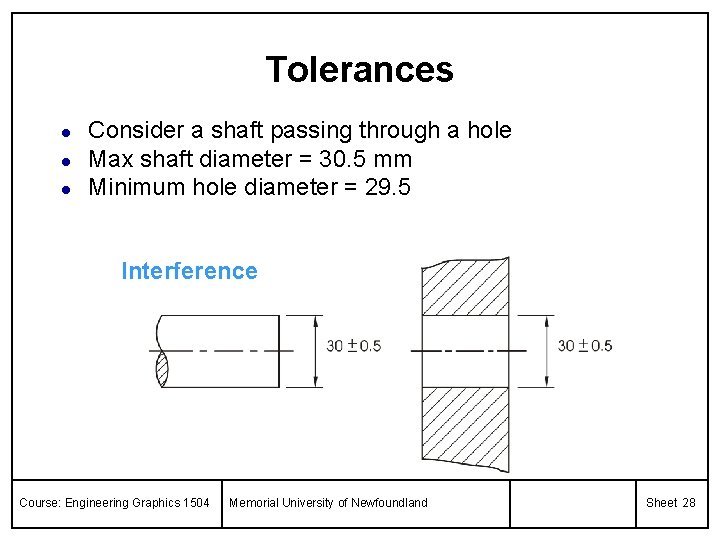
Tolerances l l l Tolerance is the maximum amount by which a length can vary and still be acceptable. In general, the smaller the tolerance, the more it will cost to manufacture But parts still must fit together! Course: Engineering Graphics 1504 Memorial University of Newfoundland Sheet 27

Tolerances l l l Consider a shaft passing through a hole Max shaft diameter = 30. 5 mm Minimum hole diameter = 29. 5 Interference Course: Engineering Graphics 1504 Memorial University of Newfoundland Sheet 28

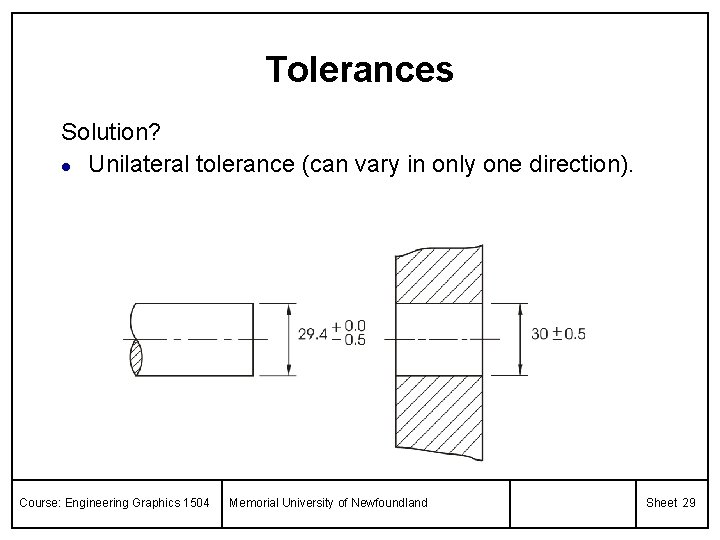
Tolerances Solution? l Unilateral tolerance (can vary in only one direction). Course: Engineering Graphics 1504 Memorial University of Newfoundland Sheet 29

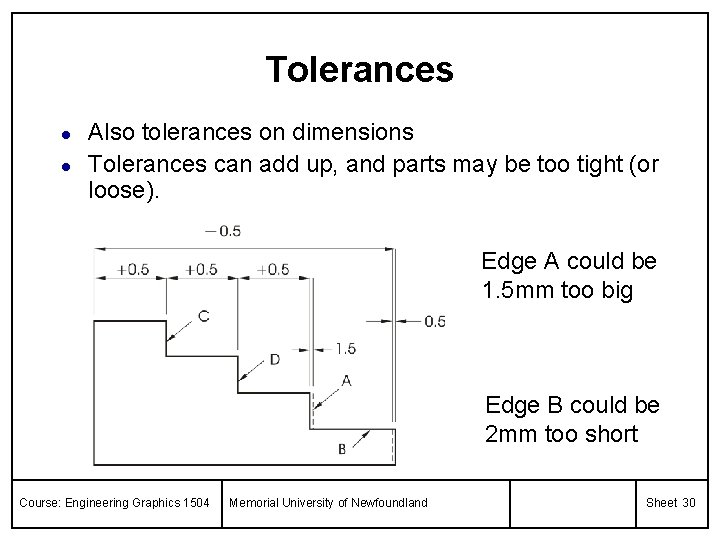
Tolerances l l Also tolerances on dimensions Tolerances can add up, and parts may be too tight (or loose). Edge A could be 1. 5 mm too big Edge B could be 2 mm too short Course: Engineering Graphics 1504 Memorial University of Newfoundland Sheet 30

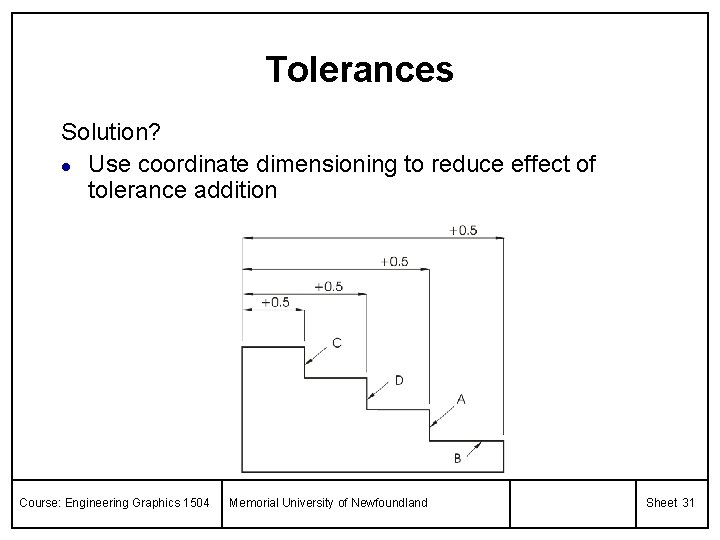
Tolerances Solution? l Use coordinate dimensioning to reduce effect of tolerance addition Course: Engineering Graphics 1504 Memorial University of Newfoundland Sheet 31

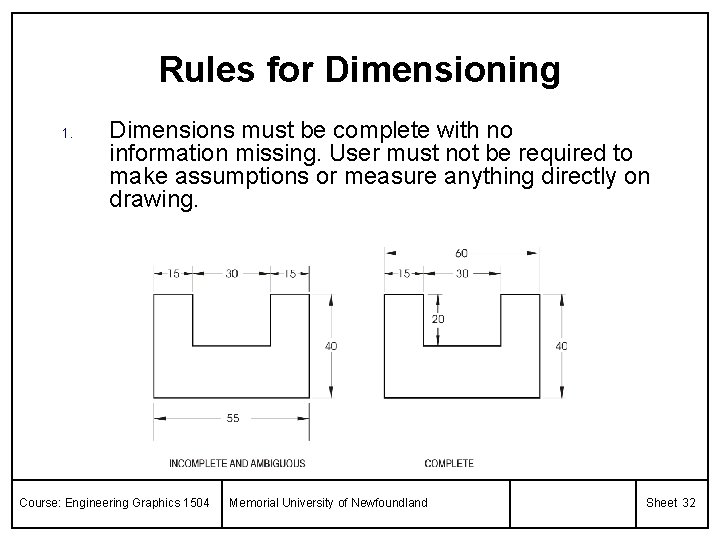
Rules for Dimensioning 1. Dimensions must be complete with no information missing. User must not be required to make assumptions or measure anything directly on drawing. Course: Engineering Graphics 1504 Memorial University of Newfoundland Sheet 32

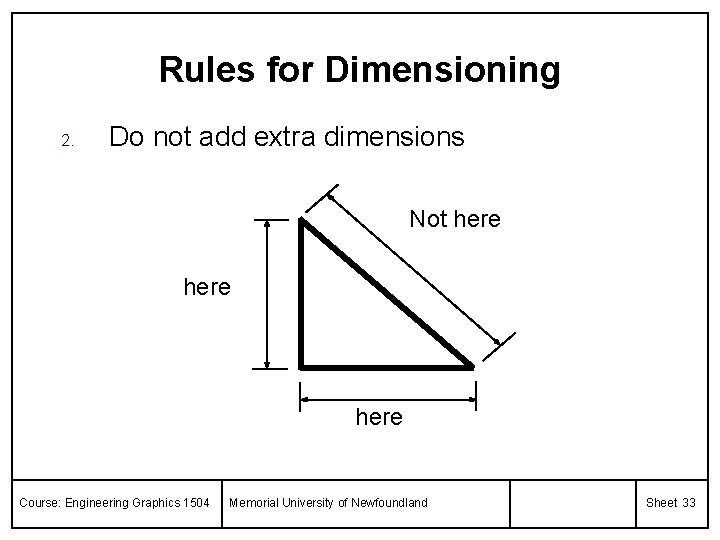
Rules for Dimensioning 2. Do not add extra dimensions Not here Course: Engineering Graphics 1504 Memorial University of Newfoundland Sheet 33

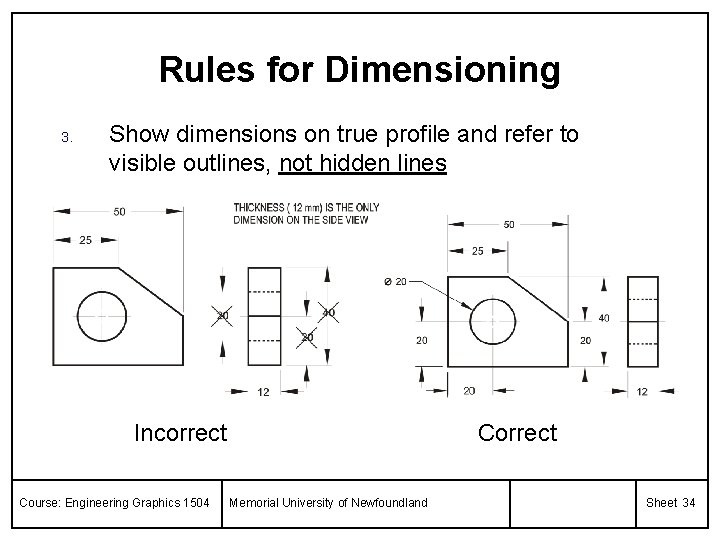
Rules for Dimensioning 3. Show dimensions on true profile and refer to visible outlines, not hidden lines Incorrect Course: Engineering Graphics 1504 Correct Memorial University of Newfoundland Sheet 34

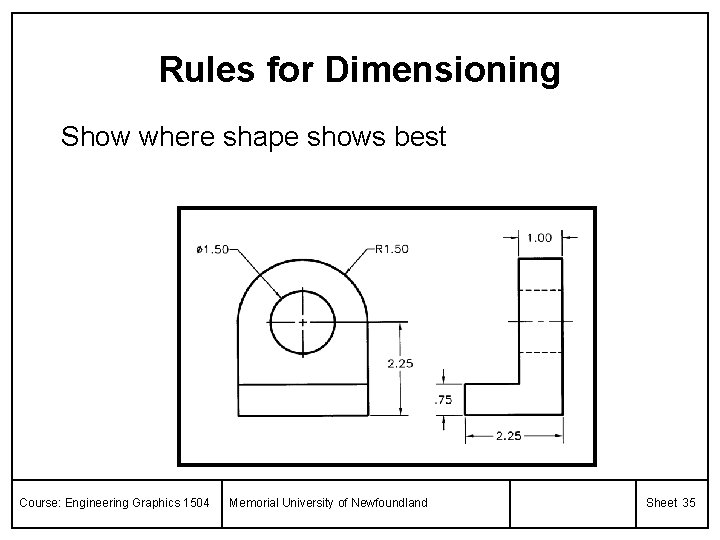
Rules for Dimensioning Show where shape shows best Course: Engineering Graphics 1504 Memorial University of Newfoundland Sheet 35

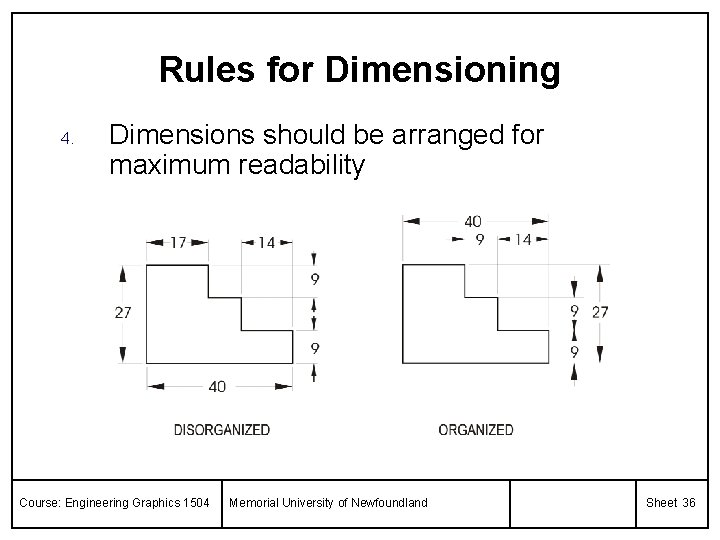
Rules for Dimensioning 4. Dimensions should be arranged for maximum readability Course: Engineering Graphics 1504 Memorial University of Newfoundland Sheet 36

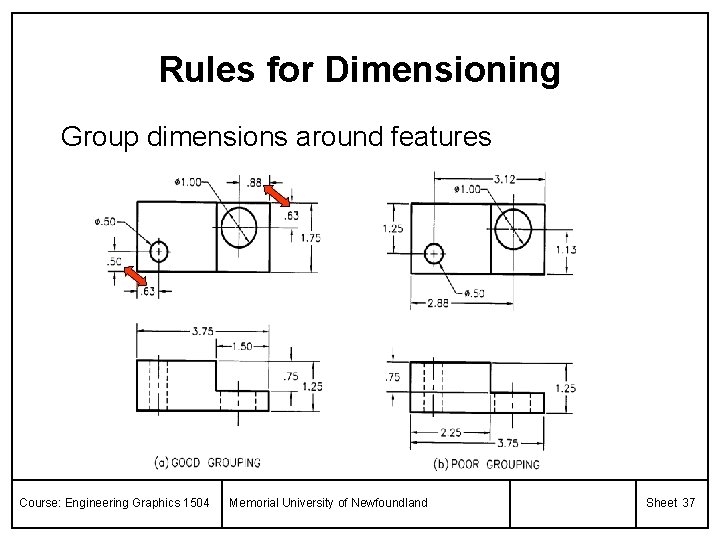
Rules for Dimensioning Group dimensions around features Course: Engineering Graphics 1504 Memorial University of Newfoundland Sheet 37

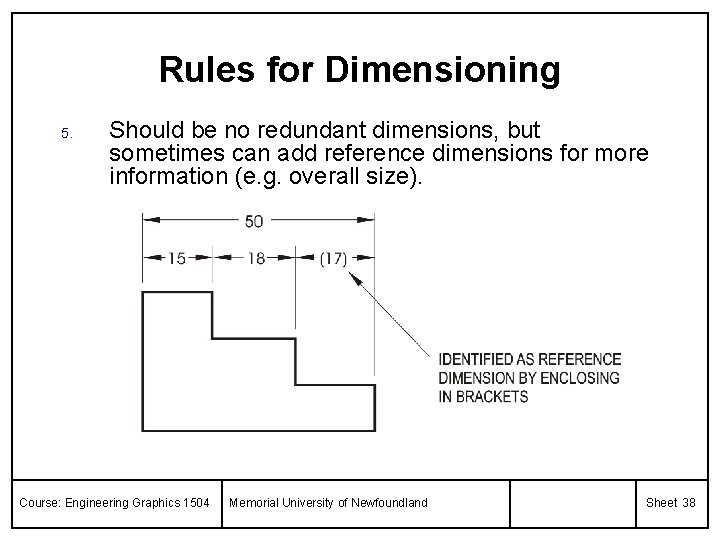
Rules for Dimensioning 5. Should be no redundant dimensions, but sometimes can add reference dimensions for more information (e. g. overall size). Course: Engineering Graphics 1504 Memorial University of Newfoundland Sheet 38

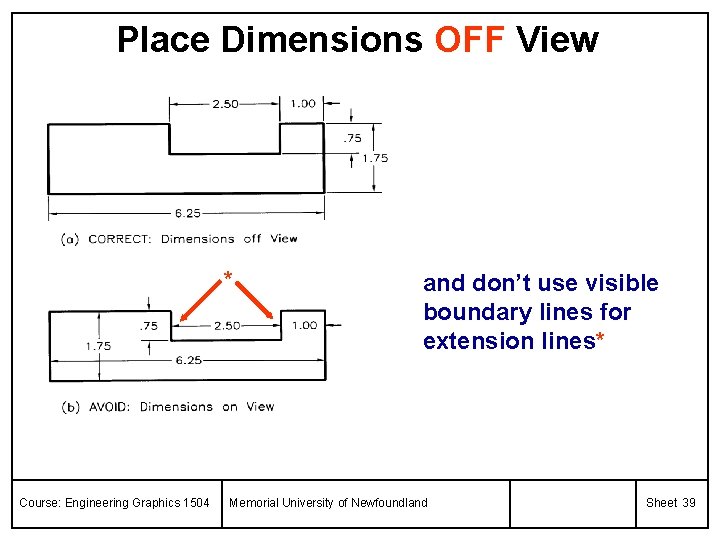
Place Dimensions OFF View * Course: Engineering Graphics 1504 and don’t use visible boundary lines for extension lines* Memorial University of Newfoundland Sheet 39

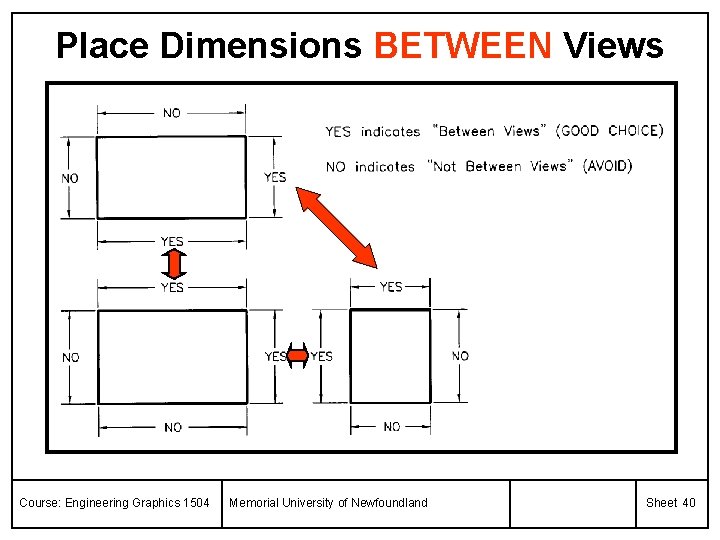
Place Dimensions BETWEEN Views Course: Engineering Graphics 1504 Memorial University of Newfoundland Sheet 40

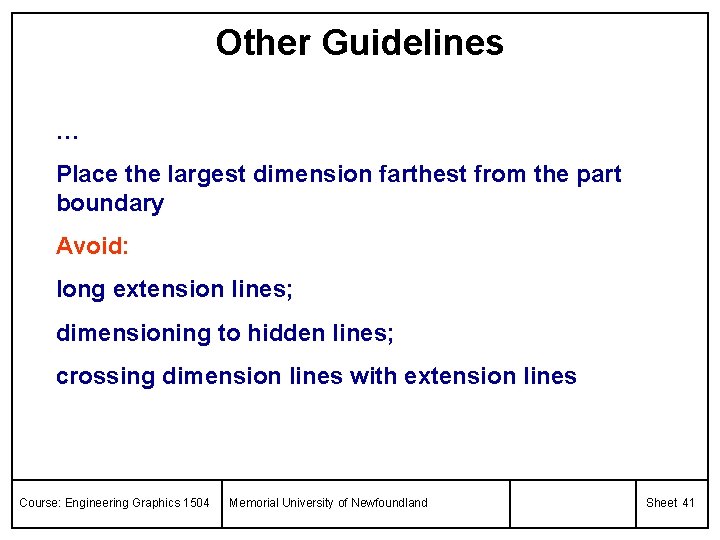
Other Guidelines … Place the largest dimension farthest from the part boundary Avoid: long extension lines; dimensioning to hidden lines; crossing dimension lines with extension lines Course: Engineering Graphics 1504 Memorial University of Newfoundland Sheet 41

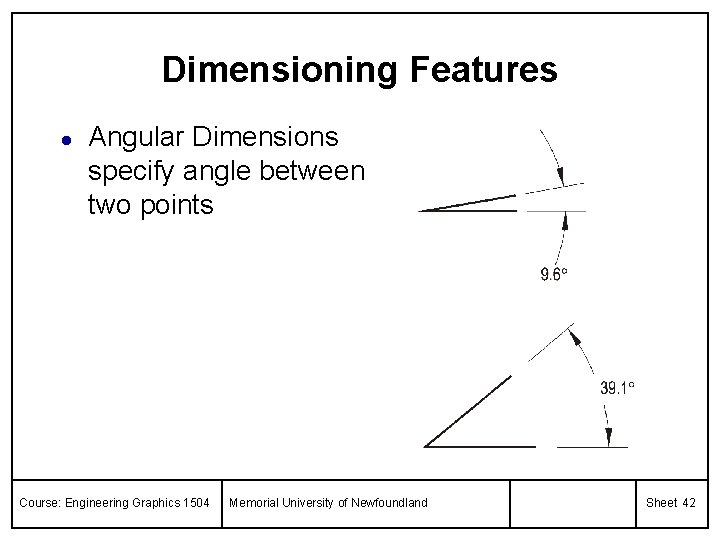
Dimensioning Features l Angular Dimensions specify angle between two points Course: Engineering Graphics 1504 Memorial University of Newfoundland Sheet 42

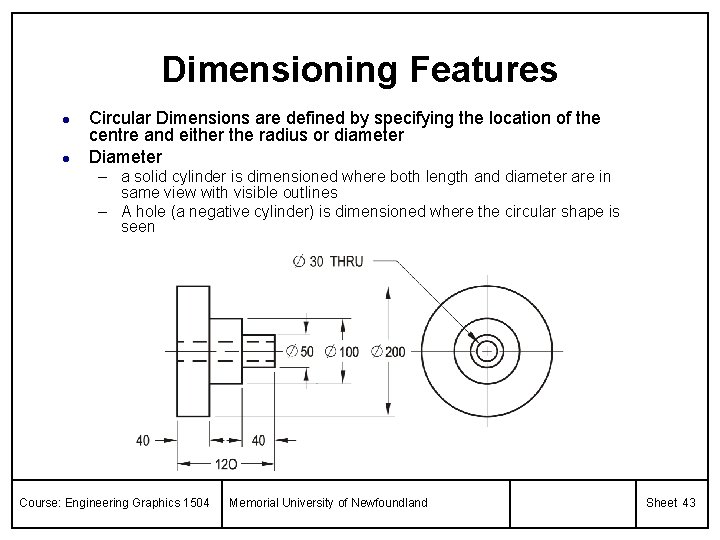
Dimensioning Features l l Circular Dimensions are defined by specifying the location of the centre and either the radius or diameter Diameter – a solid cylinder is dimensioned where both length and diameter are in same view with visible outlines – A hole (a negative cylinder) is dimensioned where the circular shape is seen Course: Engineering Graphics 1504 Memorial University of Newfoundland Sheet 43

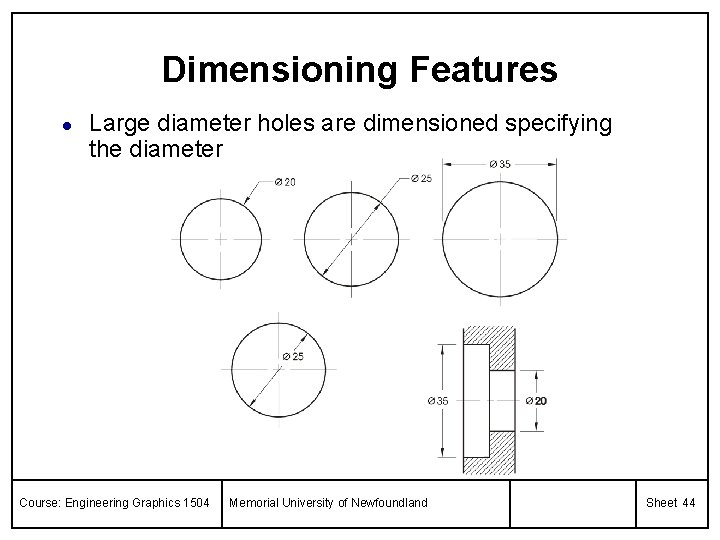
Dimensioning Features l Large diameter holes are dimensioned specifying the diameter Course: Engineering Graphics 1504 Memorial University of Newfoundland Sheet 44

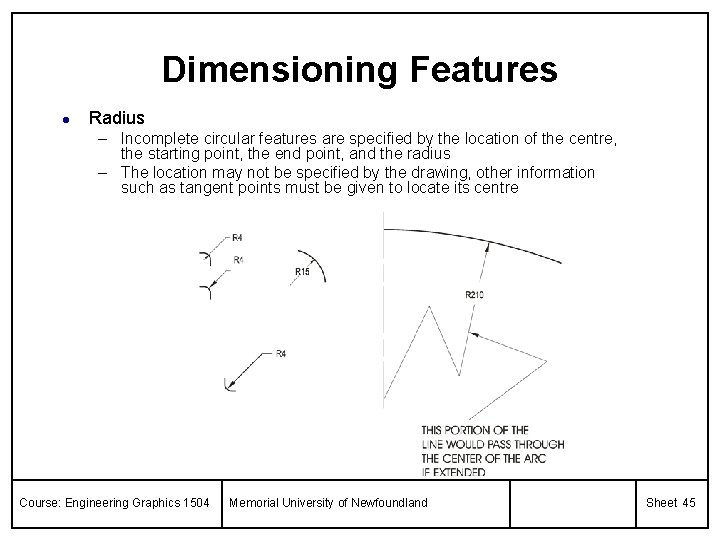
Dimensioning Features l Radius – Incomplete circular features are specified by the location of the centre, the starting point, the end point, and the radius – The location may not be specified by the drawing, other information such as tangent points must be given to locate its centre Course: Engineering Graphics 1504 Memorial University of Newfoundland Sheet 45

Assignment #5 l l In your workbook, complete question 32 in Chapter 3. Note: the question is fairly simple, so make sure it is neat and complete. Course: Engineering Graphics 1504 Memorial University of Newfoundland Sheet 46