ENGG 1100 Introduction to Engineering Design Introduction to
- Slides: 29

ENGG 1100 Introduction to Engineering Design Introduction to Engineering Drawing Professor Yunhui Liu Dept. of Mechanical and Automation Engineering Spring, 2014 MAE Dept. , The Chinese University of Hong Kong 1

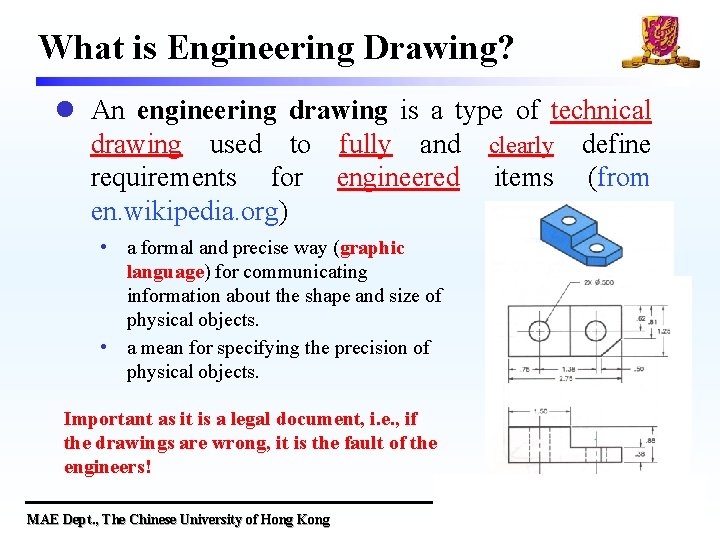
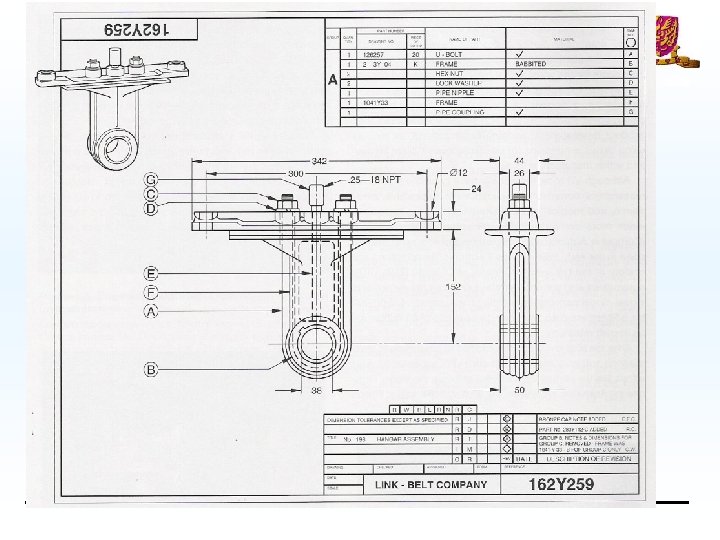
What is Engineering Drawing? l An engineering drawing is a type of technical drawing used to fully and clearly define requirements for engineered items (from en. wikipedia. org) • a formal and precise way (graphic language) for communicating information about the shape and size of physical objects. • a mean for specifying the precision of physical objects. Important as it is a legal document, i. e. , if the drawings are wrong, it is the fault of the engineers! MAE Dept. , The Chinese University of Hong Kong 2


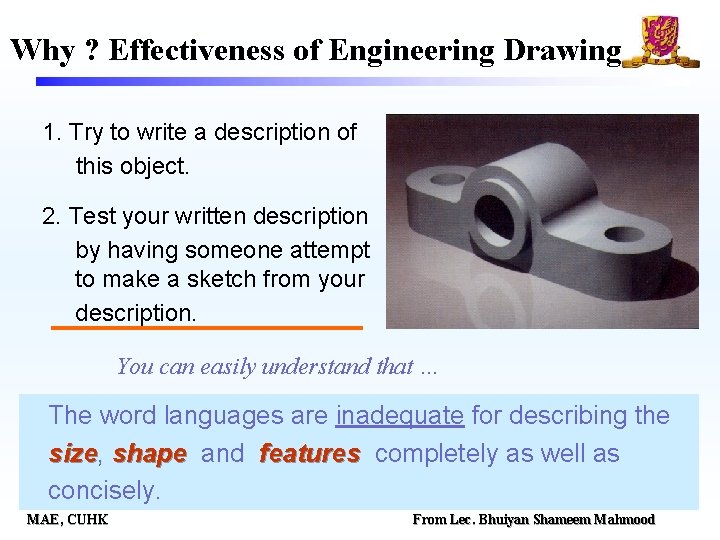
Why ? Effectiveness of Engineering Drawing 1. Try to write a description of this object. 2. Test your written description by having someone attempt to make a sketch from your description. You can easily understand that … The word languages are inadequate for describing the size, size shape and features completely as well as concisely. MAE, CUHK From Lec. Bhuiyan Shameem Mahmood

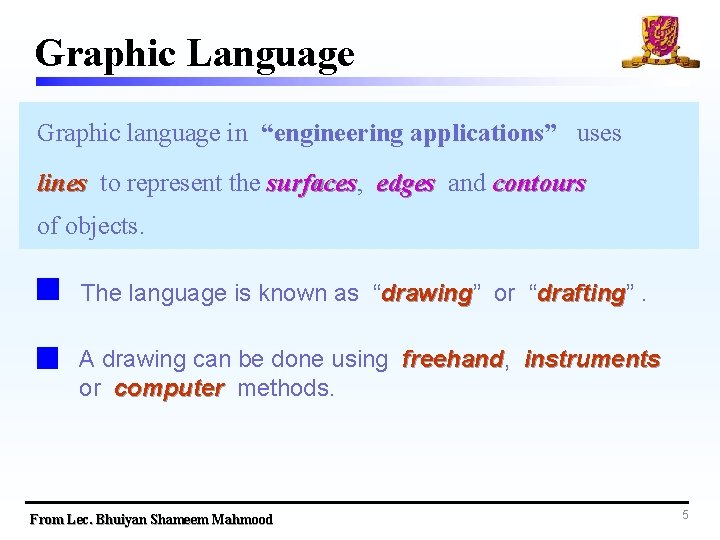
Graphic Language Graphic language in “engineering applications” uses lines to represent the surfaces, surfaces edges and contours of objects. The language is known as “drawing” drawing or “drafting” drafting. A drawing can be done using freehand, freehand instruments or computer methods. From Lec. Bhuiyan Shameem Mahmood 5

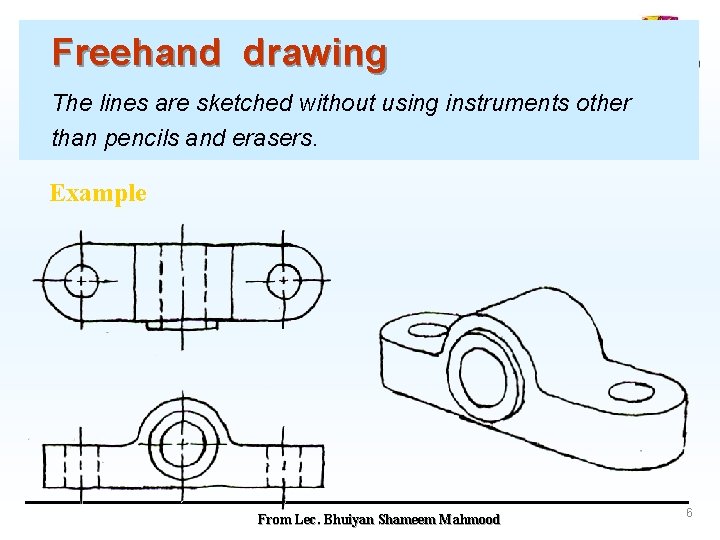
Freehand drawing The lines are sketched without using instruments other than pencils and erasers. Example From Lec. Bhuiyan Shameem Mahmood 6

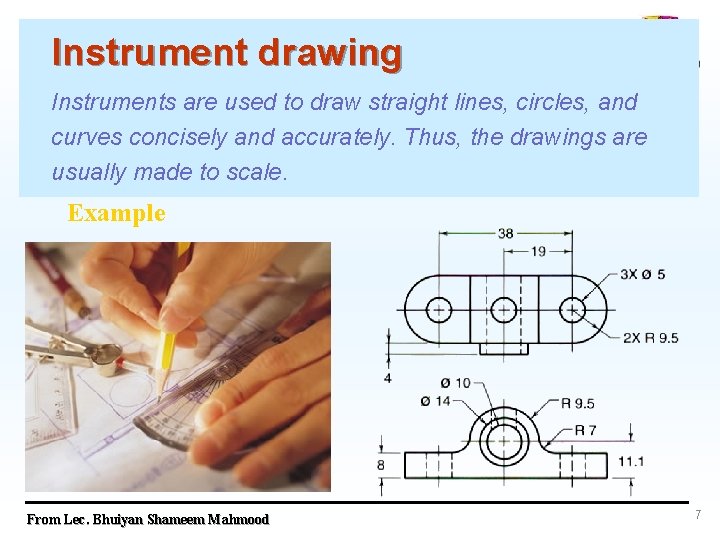
Instrument drawing Instruments are used to draw straight lines, circles, and curves concisely and accurately. Thus, the drawings are usually made to scale. Example From Lec. Bhuiyan Shameem Mahmood 7

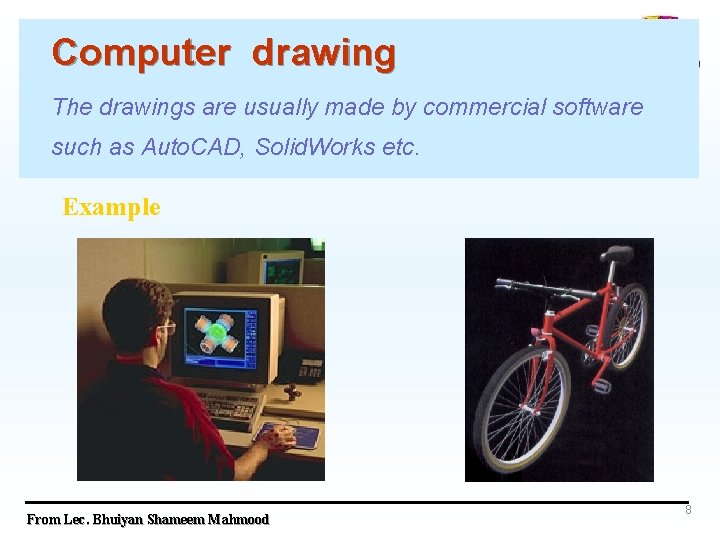
Computer drawing The drawings are usually made by commercial software such as Auto. CAD, Solid. Works etc. Example From Lec. Bhuiyan Shameem Mahmood 8

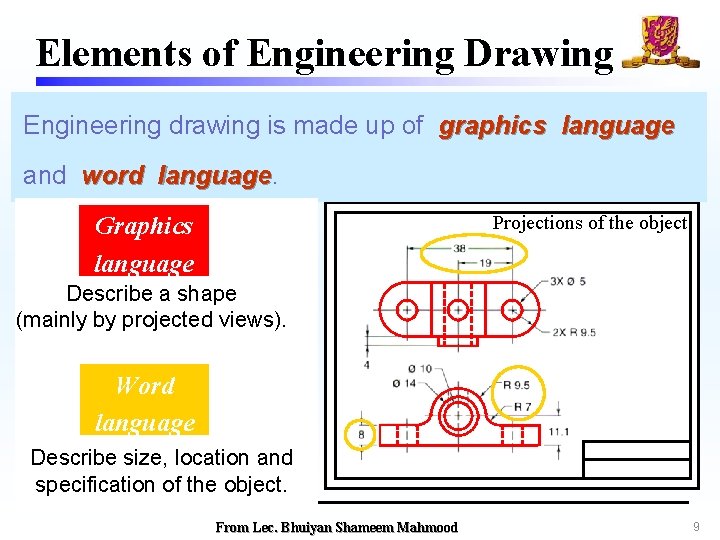
Elements of Engineering Drawing Engineering drawing is made up of graphics language and word language Graphics language Projections of the object Describe a shape (mainly by projected views). Word language Describe size, location and specification of the object. From Lec. Bhuiyan Shameem Mahmood 9

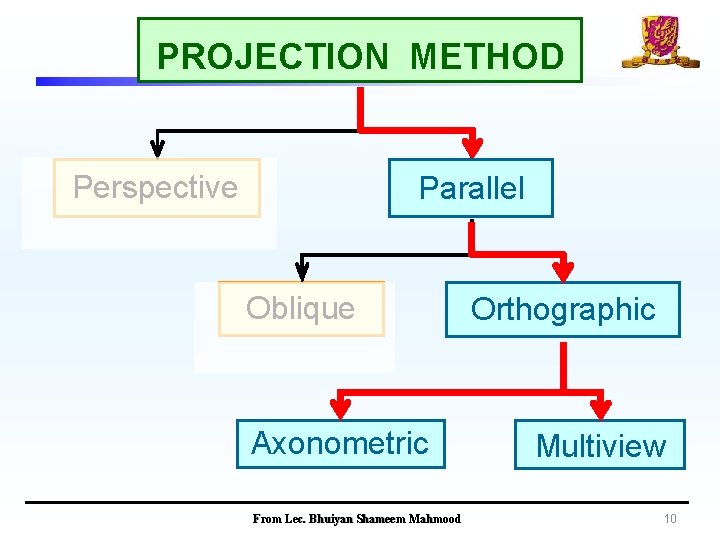
PROJECTION METHOD Perspective Parallel Oblique Axonometric From Lec. Bhuiyan Shameem Mahmood Orthographic Multiview 10

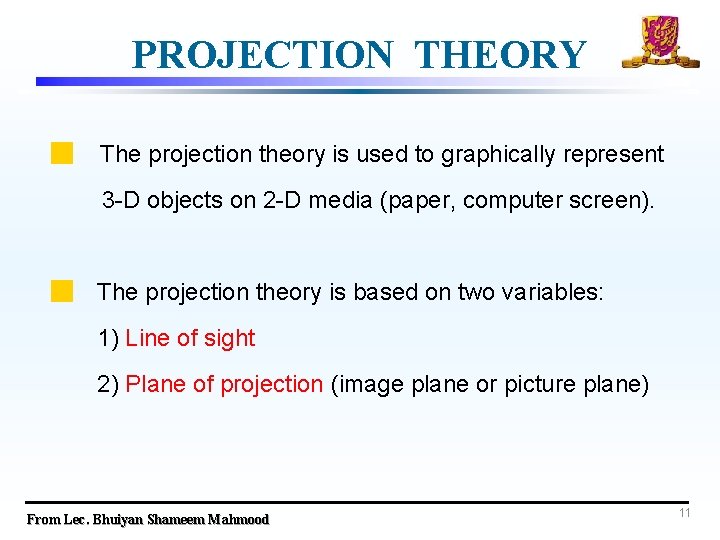
PROJECTION THEORY The projection theory is used to graphically represent 3 -D objects on 2 -D media (paper, computer screen). The projection theory is based on two variables: 1) Line of sight 2) Plane of projection (image plane or picture plane) From Lec. Bhuiyan Shameem Mahmood 11

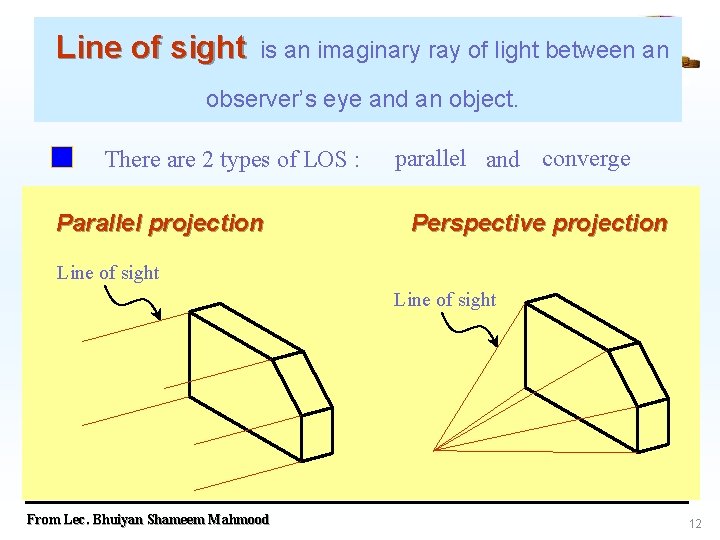
Line of sight is an imaginary ray of light between an observer’s eye and an object. There are 2 types of LOS : Parallel projection parallel and converge Perspective projection Line of sight From Lec. Bhuiyan Shameem Mahmood 12

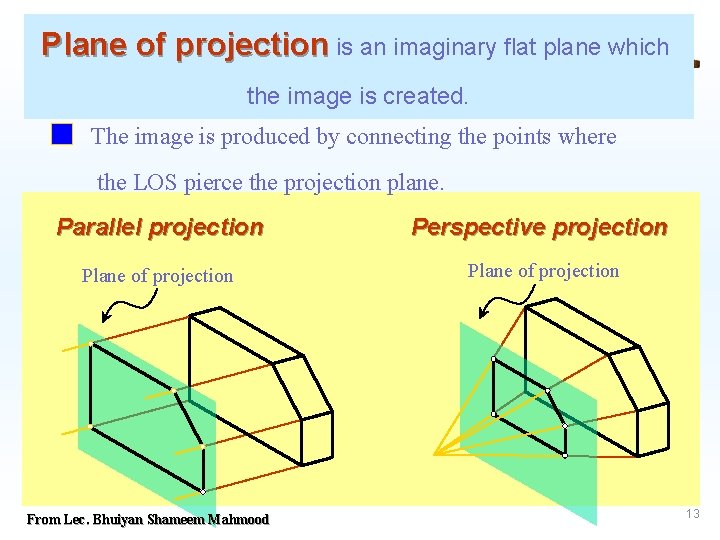
Plane of projection is an imaginary flat plane which the image is created. The image is produced by connecting the points where the LOS pierce the projection plane. Parallel projection Perspective projection Plane of projection From Lec. Bhuiyan Shameem Mahmood 13

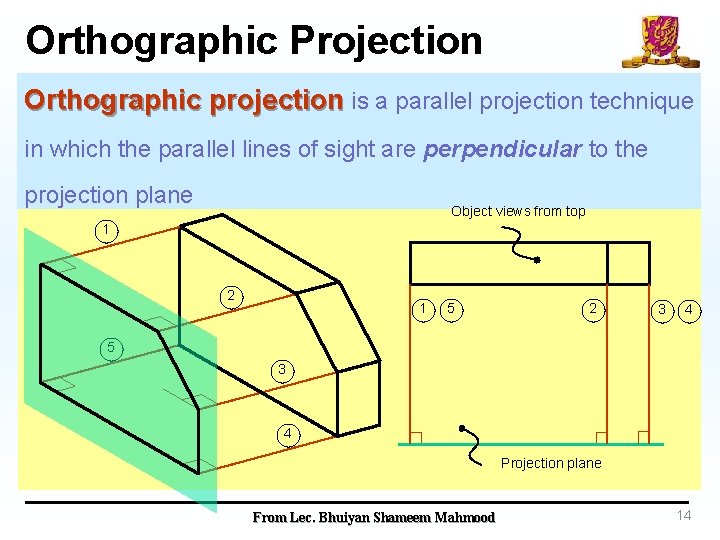
Orthographic Projection Orthographic projection is a parallel projection technique in which the parallel lines of sight are perpendicular to the projection plane Object views from top 1 2 1 5 2 3 4 5 3 4 Projection plane From Lec. Bhuiyan Shameem Mahmood 14

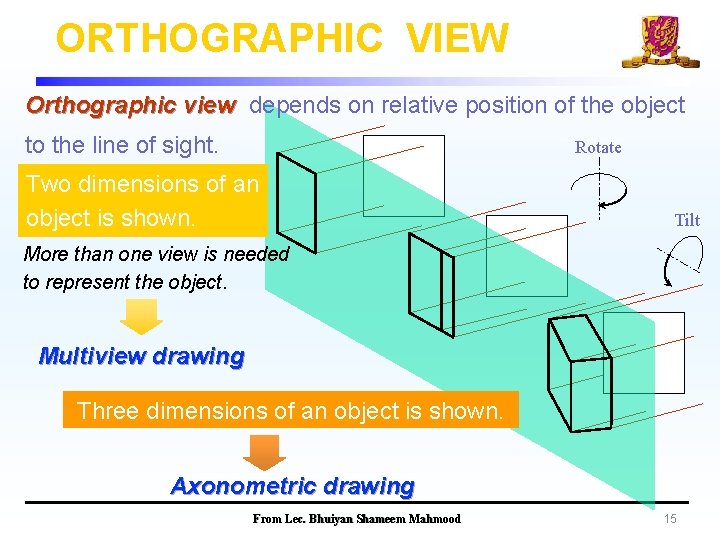
ORTHOGRAPHIC VIEW Orthographic view depends on relative position of the object to the line of sight. Rotate Two dimensions of an object is shown. Tilt More than one view is needed to represent the object. Multiview drawing Three dimensions of an object is shown. Axonometric drawing From Lec. Bhuiyan Shameem Mahmood 15

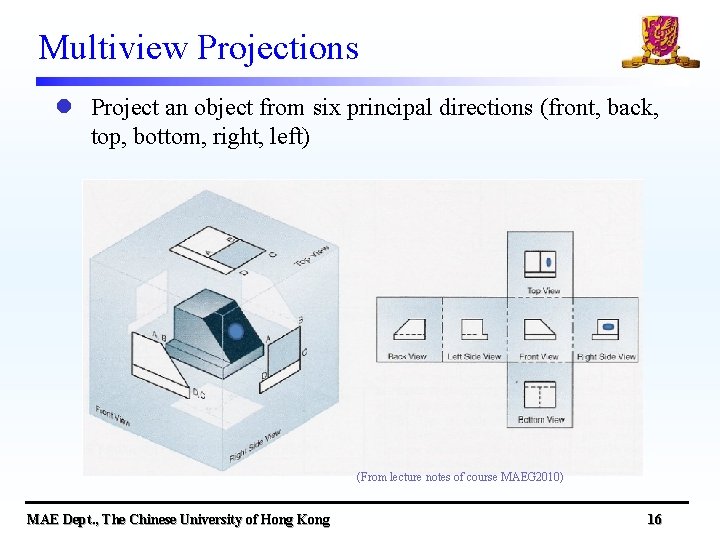
Multiview Projections l Project an object from six principal directions (front, back, top, bottom, right, left) (From lecture notes of course MAEG 2010) MAE Dept. , The Chinese University of Hong Kong 16

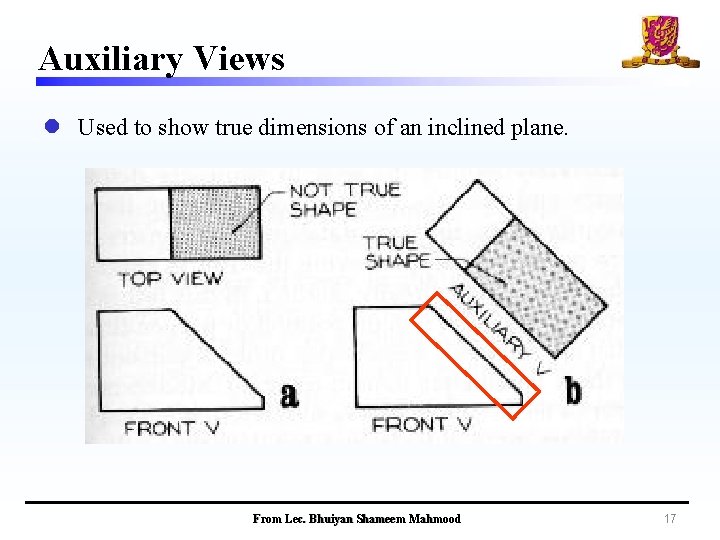
Auxiliary Views l Used to show true dimensions of an inclined plane. From Lec. Bhuiyan Shameem Mahmood 17

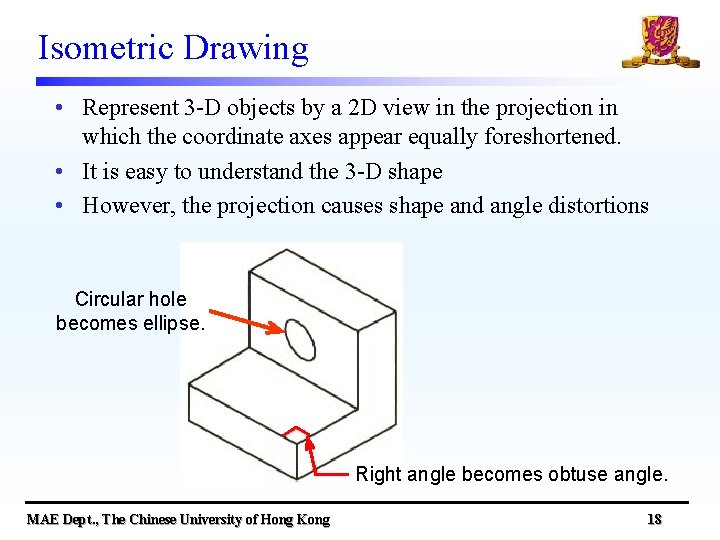
Isometric Drawing • Represent 3 -D objects by a 2 D view in the projection in which the coordinate axes appear equally foreshortened. • It is easy to understand the 3 -D shape • However, the projection causes shape and angle distortions Circular hole becomes ellipse. Right angle becomes obtuse angle. MAE Dept. , The Chinese University of Hong Kong 18

Drawing Standards are set of rules that govern how technical drawings are represented. Drawing standards are used so that drawings convey the same meaning to everyone who reads them. From Lec. Bhuiyan Shameem Mahmood 19

Drawing Standards l Standards on Ø Ø Ø Ø Sizes and Format of Drawings Lines Scales Projection methods Presentation of view and sections Lettering Dimensioning … MAE Dept. , The Chinese University of Hong Kong 20

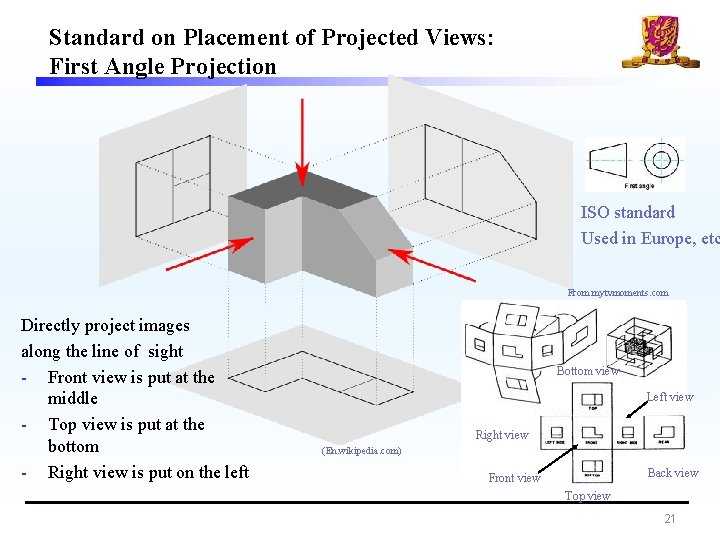
Standard on Placement of Projected Views: First Angle Projection ISO standard Used in Europe, etc From mytvmoments. com Directly project images along the line of sight - Front view is put at the middle - Top view is put at the bottom - Right view is put on the left Bottom view Left view Right view (En. wikipedia. com) Back view Front view Top view 21

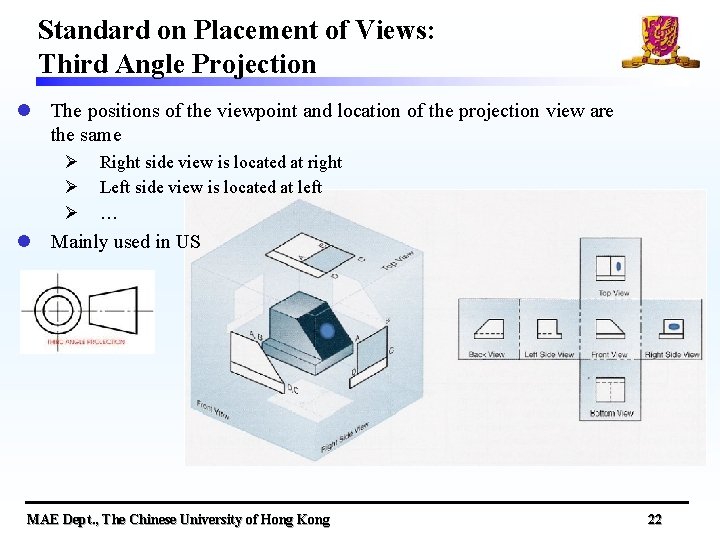
Standard on Placement of Views: Third Angle Projection l The positions of the viewpoint and location of the projection view are the same Ø Ø Ø Right side view is located at right Left side view is located at left … l Mainly used in US MAE Dept. , The Chinese University of Hong Kong 22

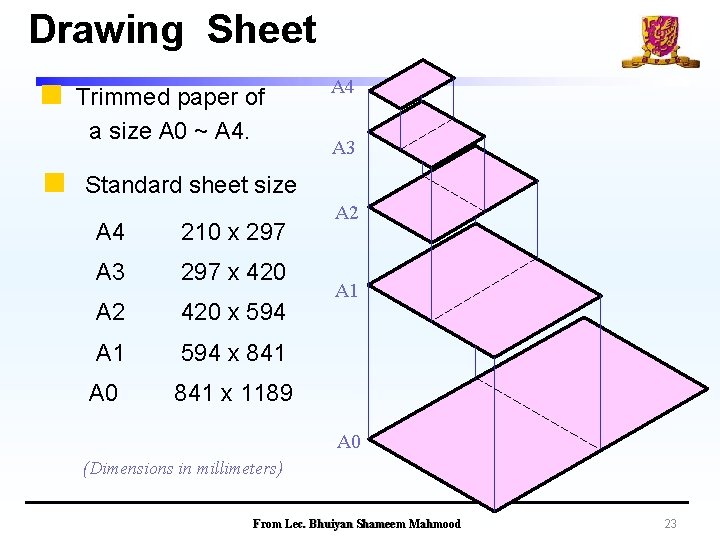
Drawing Sheet Trimmed paper of a size A 0 ~ A 4 A 3 Standard sheet size A 4 210 x 297 A 3 297 x 420 A 2 420 x 594 A 1 594 x 841 A 0 841 x 1189 A 2 A 1 A 0 (Dimensions in millimeters) From Lec. Bhuiyan Shameem Mahmood 23

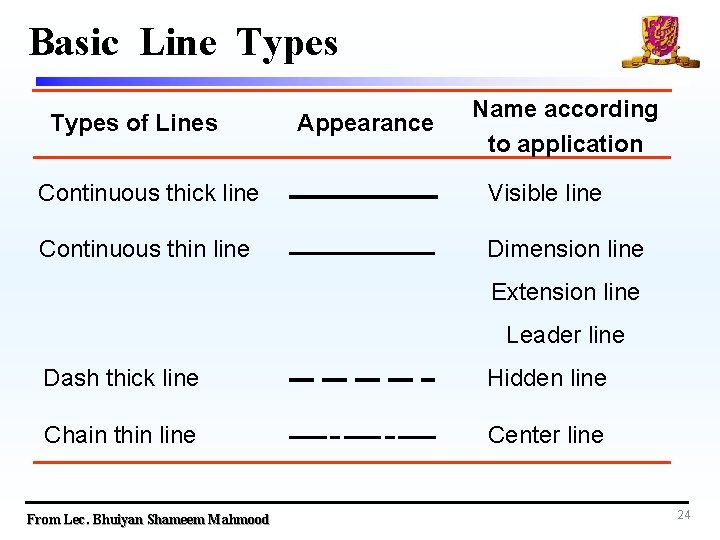
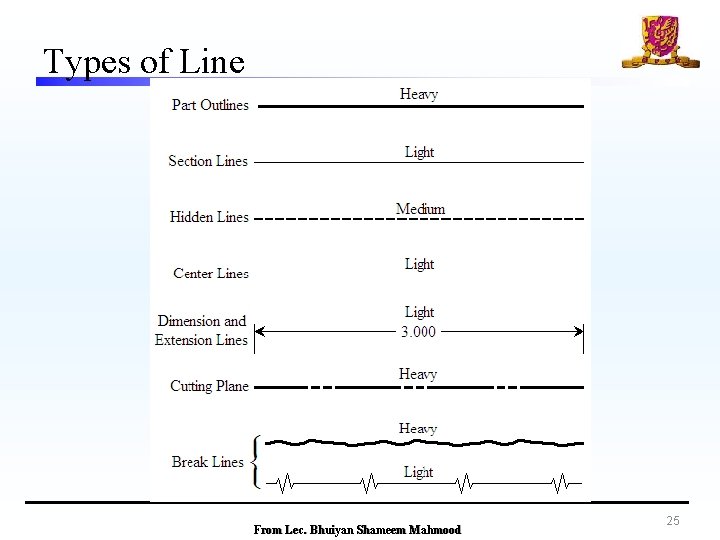
Basic Line Types of Lines Appearance Name according to application Continuous thick line Visible line Continuous thin line Dimension line Extension line Leader line Dash thick line Hidden line Chain thin line Center line From Lec. Bhuiyan Shameem Mahmood 24

Types of Line From Lec. Bhuiyan Shameem Mahmood 25

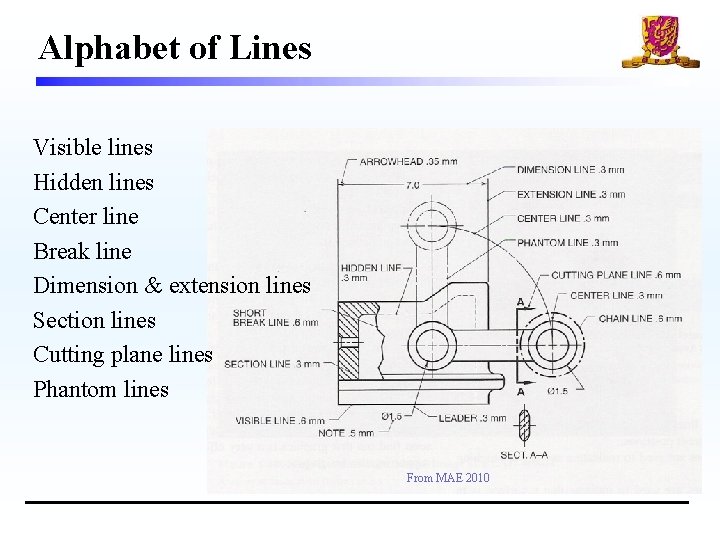
Alphabet of Lines Visible lines Hidden lines Center line Break line Dimension & extension lines Section lines Cutting plane lines Phantom lines From MAE 2010

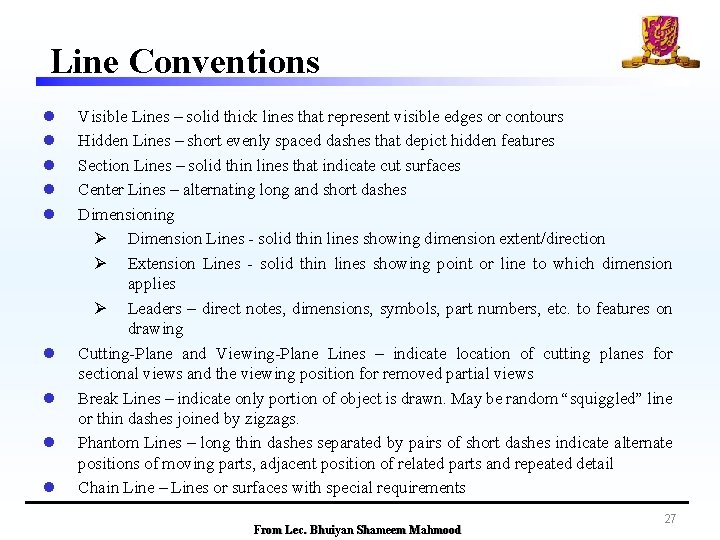
Line Conventions l l l l l Visible Lines – solid thick lines that represent visible edges or contours Hidden Lines – short evenly spaced dashes that depict hidden features Section Lines – solid thin lines that indicate cut surfaces Center Lines – alternating long and short dashes Dimensioning Ø Dimension Lines - solid thin lines showing dimension extent/direction Ø Extension Lines - solid thin lines showing point or line to which dimension applies Ø Leaders – direct notes, dimensions, symbols, part numbers, etc. to features on drawing Cutting-Plane and Viewing-Plane Lines – indicate location of cutting planes for sectional views and the viewing position for removed partial views Break Lines – indicate only portion of object is drawn. May be random “squiggled” line or thin dashes joined by zigzags. Phantom Lines – long thin dashes separated by pairs of short dashes indicate alternate positions of moving parts, adjacent position of related parts and repeated detail Chain Line – Lines or surfaces with special requirements From Lec. Bhuiyan Shameem Mahmood 27

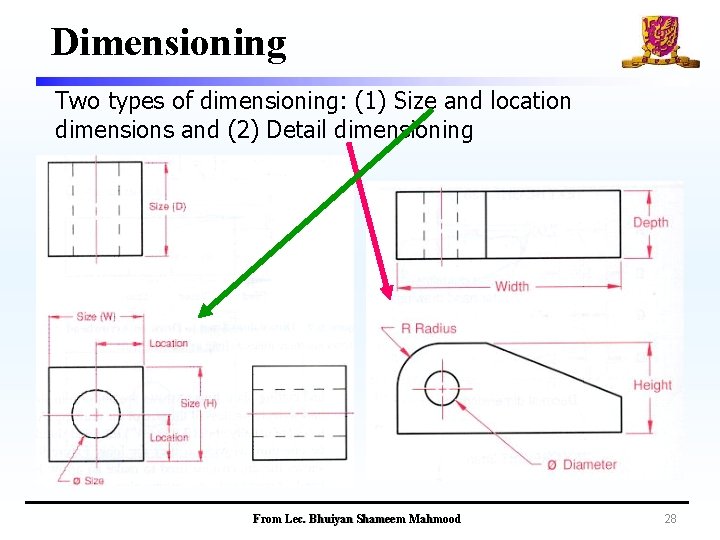
Dimensioning Two types of dimensioning: (1) Size and location dimensions and (2) Detail dimensioning From Lec. Bhuiyan Shameem Mahmood 28

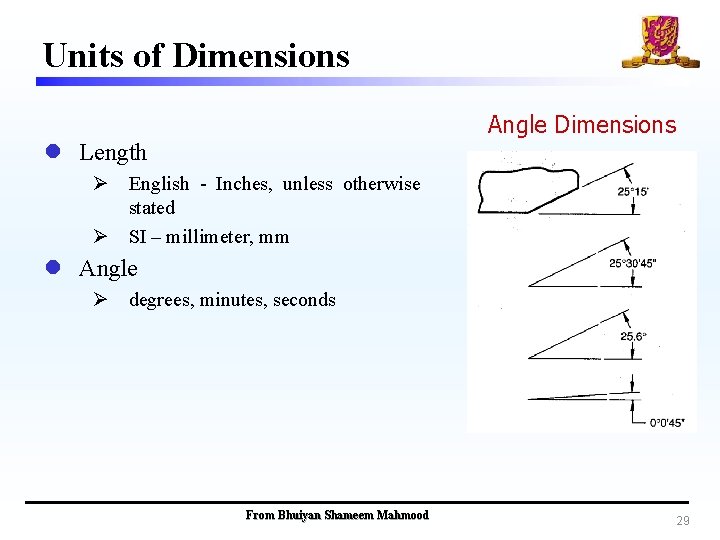
Units of Dimensions Angle Dimensions l Length Ø English - Inches, unless otherwise stated Ø SI – millimeter, mm l Angle Ø degrees, minutes, seconds From Bhuiyan Shameem Mahmood 29