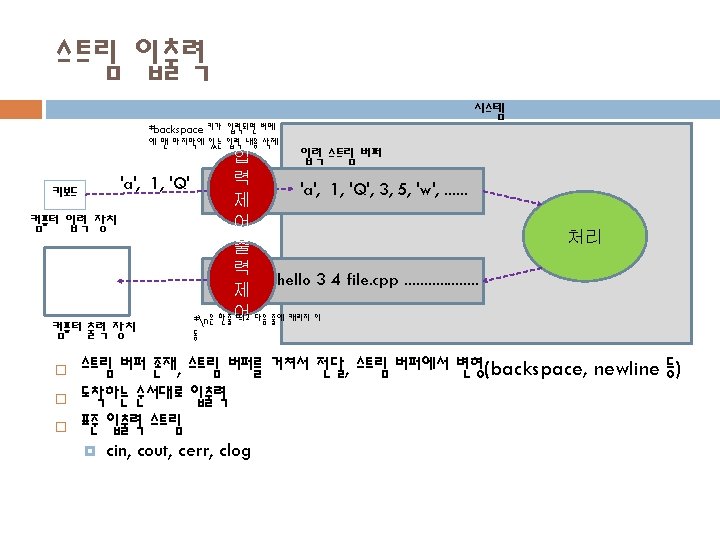
endl new line include iostream using namespace std

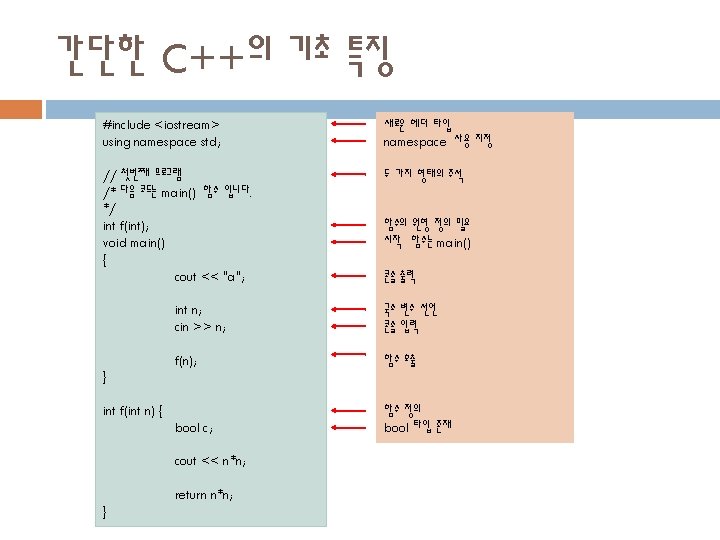


 #include <iostream> using namespace std; class")

;")


")


 {a= x; }")
 {a =")
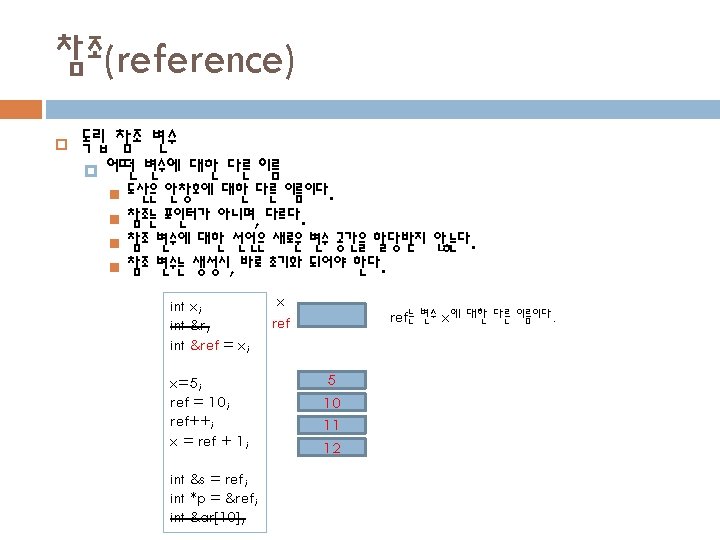
 this 는 포인터이다. this는 멤버 메소드가 호출될 때 전달되는 묵시적")

 call by reference void neg(int p) {")
 { Seat. Type *p; p =")

;")
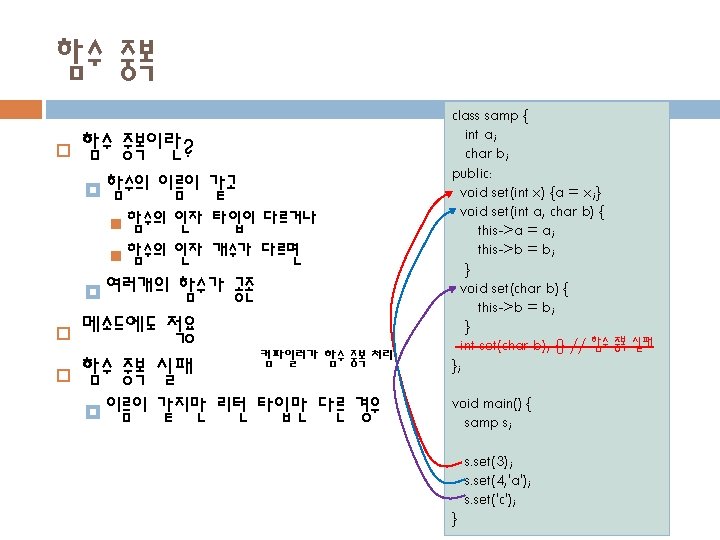
 함수 중복은 정상, 함수 호출의 모호성 float f(float x); //1 f(float x);")
 함수 중복 자체의 모호성 void f(int x); //1 x); void f(int &x);")
 함수의 선언문 void main() {")

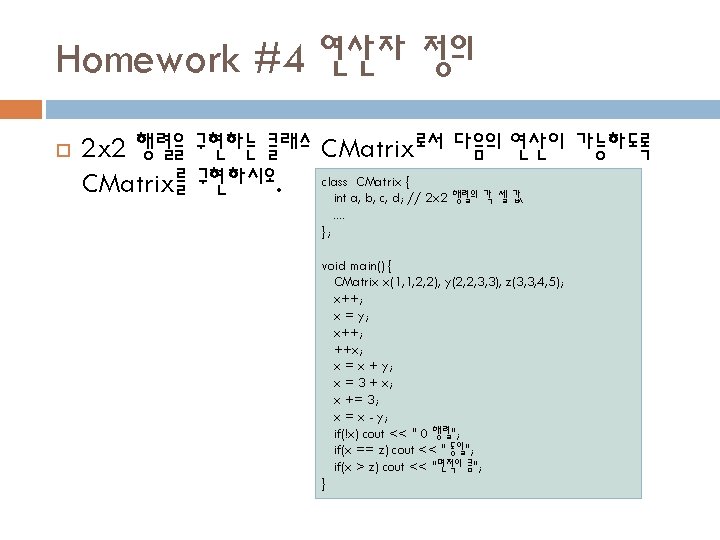
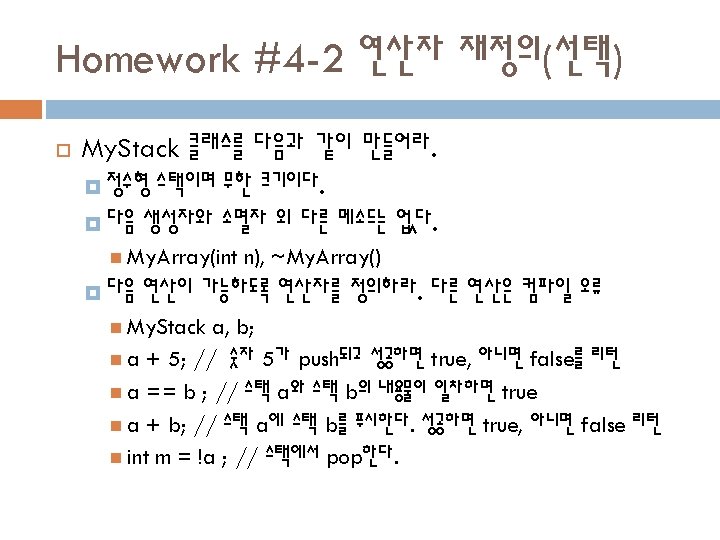

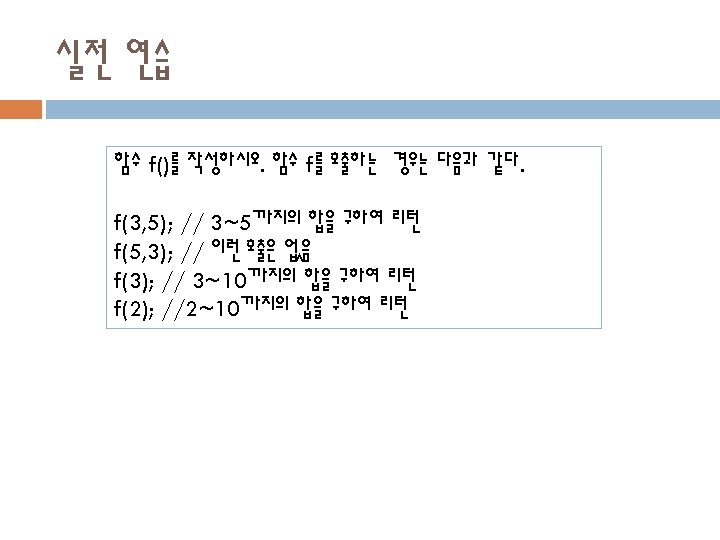
이 가능하도록 연산자 작 성 이름 학번 // 실행결과는 다음과 같다.")

 Derived 1(3, 5) void main() { Derived")
 { cout << \"const\"; } ~Base()")
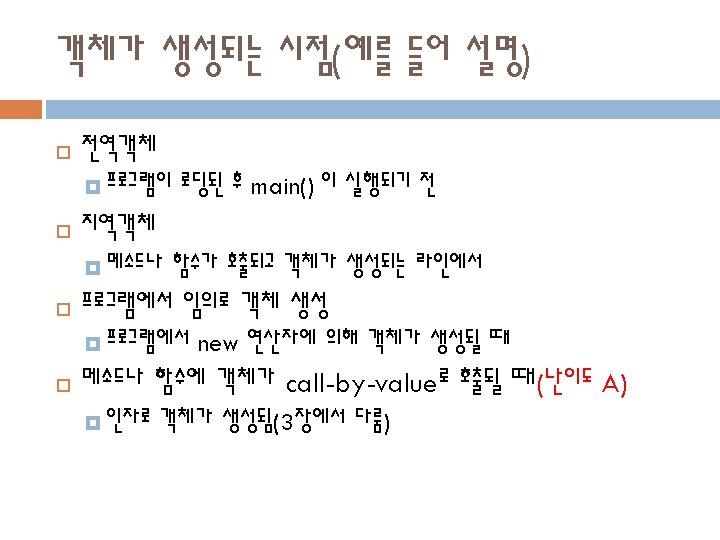
 화살표는 다중 상속에 따른 생성자 호출 관계를 보여줌 class Base 1")


")

")
 class ostream { public: ostream& operator")
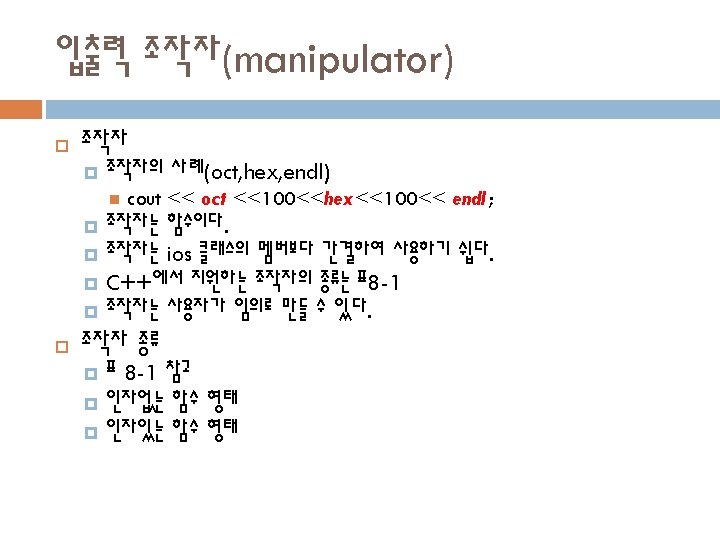
 { cout << Arrow << n; } 조작자 함수의")
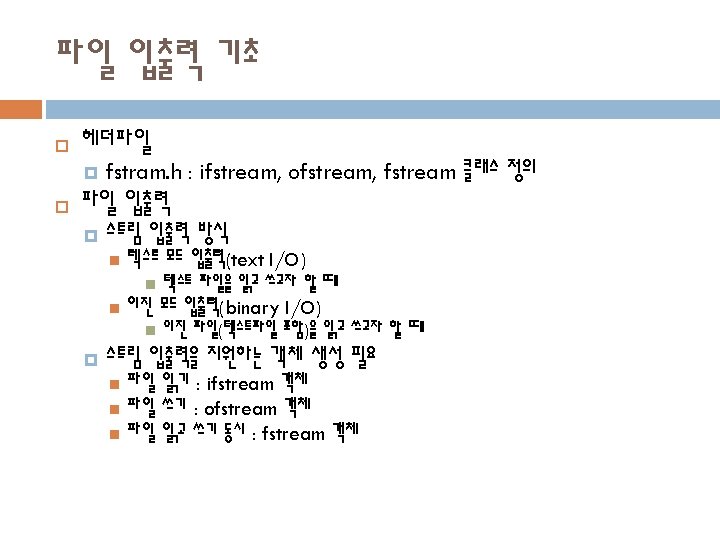

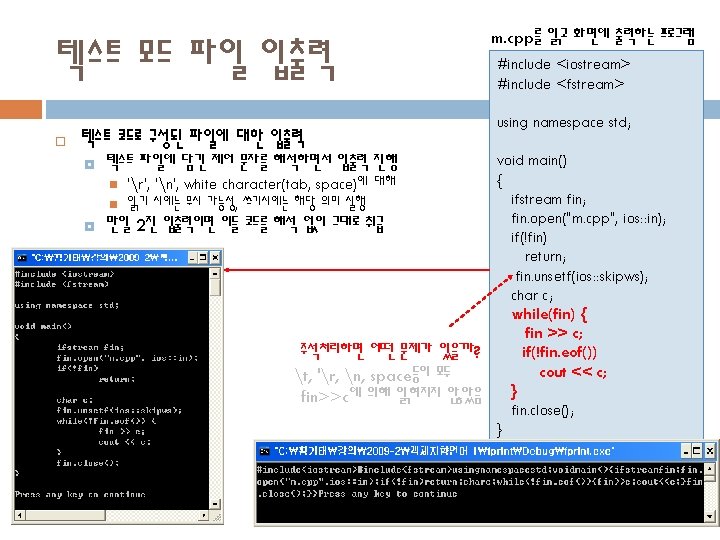
 #include <iostream> #include <fstream> using namespace std; void")

/write()/gcount()를 이용한 블럭 읽 기/쓰기 #include <iostream> #include <fstream> 512 512 using namespace std;")
 { ifstream")


 {")
 Rect draw() Line Circle")
 class DObject { protected: DObject* next; public:")
 DObject *p DObject draw() class DObject { protected: DObject* next; public:")
와 일반 함수 두 경우 void swap(float& a, float& b) { float temp; temp")

![일반 클래스 template <class TYPE> class Stack { TYPE stck[100]; int tos; void push(TYPE](https://slidetodoc.com/presentation_image/284c050ccca47099184ee260abbcb072/image-135.jpg "일반 클래스 template <class TYPE> class Stack { TYPE stck[100]; int tos; void push(TYPE")

 { //cout")
 { cout")
 {")
 { cout")
; void")
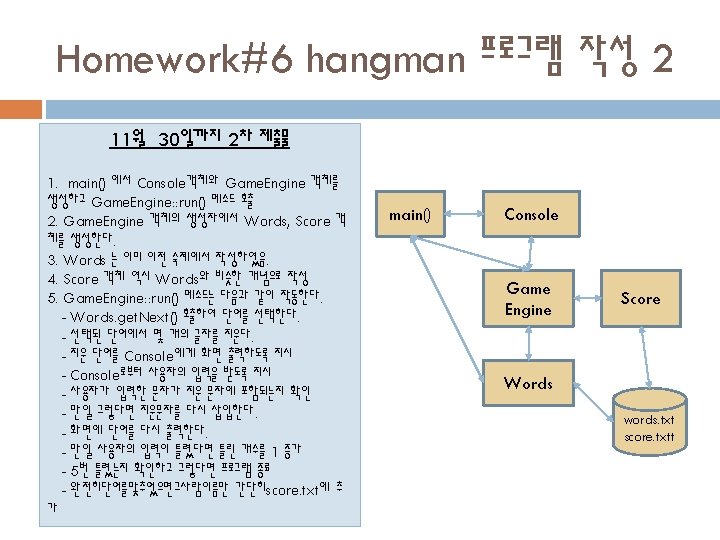
- Slides: 142
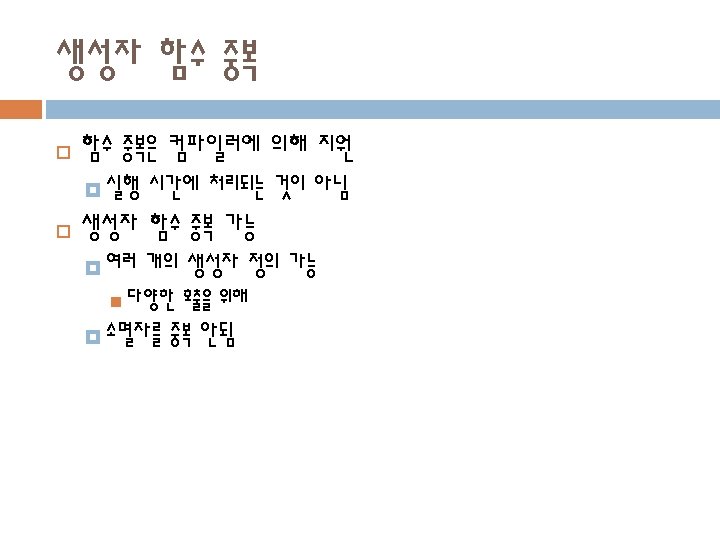
생성자 예 생성자 정의 생성자 구현 endl은 new line 생성자 호출 #include <iostream> using namespace std; class my. Class { int a; public: void my. Class(); void show(); } my. Class: : my. Class() { a =10; } void my. Class: : show() { cout << “a=“ << a << endl; } void main() { my. Class obj; // 객체 생성됨 obj. show(); }
소멸자 예 소멸자 정의 소멸자 구현 #include <iostream> using namespace std; class my. Class { int a; public: void my. Class(); void ~my. Class(); void show(); } my. Class: : my. Class() { a =10; } my. Class: : ~my. Class() { cout <<“dest. . ”; } void my. Class: : show() { cout << “a=“ << a << endl; } void main() { my. Class obj; // 객체 생성됨 obj. show(); 소멸자 호출 }
매개변수를 갖는 생성자 정의 - 두 개의 생성자 정의 - 함수 중복됨 매개 변수 있는 생성자 구현 매개변수 없는 생성자 호출 매개변수 있는 생성자 호출 #include <iostream> using namespace std; class my. Class { int a; public: my. Class(); my. Class(int x); void show(); } my. Class: : my. Class() { a =10; } my. Class: : my. Class(int x) { a =x; } void my. Class: : show() { cout << “a=“ << a << endl; } void main() { my. Class obj; my. Class obj 2(55); 동일한 표현 my. Class obj 2 = my. Class(55); obj. show(); obj 2. show(); }
상속 예 private, protected 도 가능, 상속방법이 달라짐(7장) #include <iostream> using namespace std; class B { int n; public: void set. N(int i); int get. N(); } class D : public B { int m; public: void set. M(int i); int get. M(); } void B: : set. N(int i) { n = i; } int B: : get. N() { return n; } void D: : set. M(int i) { m = i; } int D: : get. M() { return m; } void main() { B b; D d; cout << b. get. N() << d. get. M(); } n set. N() get. N() m set. M() get. M() b d main() 실행 중 생성된 객체 인스턴스
객체 포인터 객체의 멤버 접근 객체. 멤버 객체포인터->멤버 객체 포인터 정의 객체 포인터 얻기 포인터로 멤버 호출 #include <iostream> using namespace std; class my. Class { int a; public: my. Class(); void show(); } my. Class: : my. Class() { a =10; } void my. Class: : show() { cout << “a=“ << a << endl; } void main() { my. Class obj; my. Class* p; p = &obj; obj. show(); p->show(); }
구조체와 클래스 관계 예 class B { public: int n; void set. N(int i); int get. N(); private: int m; } struct B { int n; void set. N(int i); int get. N(); private: int m; } void B: : set. N(int i) { n = i; } int B: : get. N() { return n; } 동일 void B: : set. N(int i) { n = i; } int B: : get. N() { return n; } #include <iostream> using namespace std; void main() { struct B b; b. m = 10; b. set. N(5); cout << b. get. N(); }
자동 인라인 함수 예 자동 인라인 함수 #include <iostream> using namespace std; class my. Class { int a; public: my. Class(); void show() { cout << “a=“ << a << endl; }; } my. Class: : my. Class() { a =10; } void main() { my. Class obj; obj. show(); }
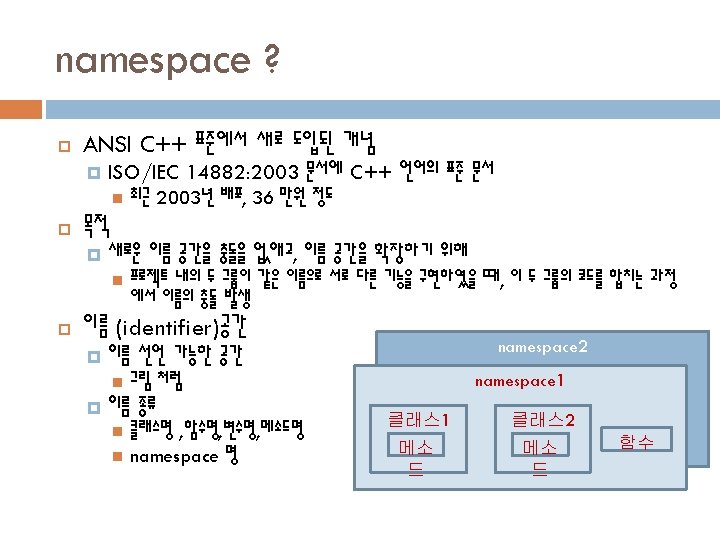
namespace 만들고 사용하기 파일 A namespace 생성 변수, 함수, 클래스, 구조체 등 포함 가능 전역공간 age namespace에 추가 코드 제공 (동일 파일 혹은 다른 파일로) namespace Project. A { int age; void run(); int add(int a) { return a + 1; }; class Engine { int a; }; struct Data { int name; int age; }; } int age; namespace Project. A { void run() {. . . } } 파일 B + namespace Project. A { void stop() {. . . . } } using은 namespace공간의 이름을 간소하게 사용하도록 컴파일러가 주는 지시어 using namespace Project. A; void main() { cin >> age; Engine e = new Engine(); } using Project. A: : age; void main() { cin >> age; Project. A: : Engine e = new Project. A: : Engine(); } #include <파일A> #include <파일B> void main() { cin >> age; // 전역공간 age cin>>Project. A: : age; //namespace Project. A의 age }
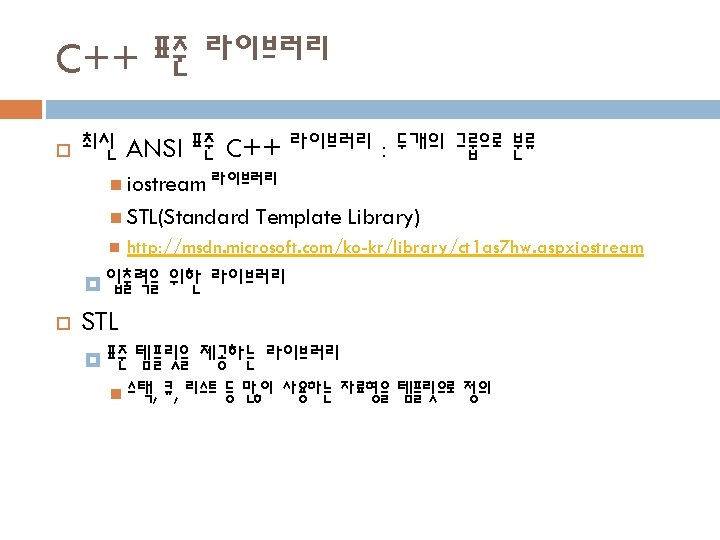
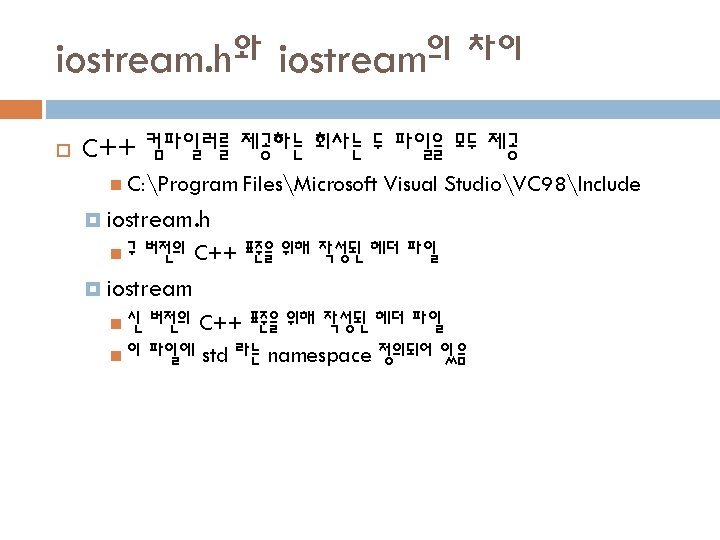
namespace std와 ANSI 표준의 include 구버전의 C++ 표준 컴파일러 #include <iostream. h> void main() { cout << "a"; } 최근 버전의 C++ 표준 컴파일러 #include <iostream> using namespace std void main() { cout << "a"; } #include <iostream> void main() { std: : cout << "a"; } iostream 헤더 파일 내에 namespace srd가 정의되어 있 음 #include <iostream. h> void main() { std: : cout << "a"; } 오류 발생 1examplesm. cpp(13) : error C 2653: 'std' : is not a class or namespace name
iostream 파일과 yvals. h 파일 iostream 내부적으로 include _STD_BEGIN // OBJECTS static ios_base: : Init _Ios_init; extern _CRTIMP istream cin; extern _CRTIMP ostream cout; extern _CRTIMP ostream cerr, clog; // CLASS _Winit class _CRTIMP _Winit { public: _Winit(); ~_Winit(); private: static int _Init_cnt; }; // WIDE OBJECTS static _Winit _Wios_init; extern _CRTIMP wistream wcin; extern _CRTIMP wostream wcout, wcerr, wclog; _STD_END . . . #if defined(__cplus) #define _STD_BEGIN #define _STD_END. . . yvals. h std: : namespace std { };
Pre Quiz - my. Rect에 필요한 멤버 작성 이름 #include <iostream> using namespace std; 학번 class my. Rect { int w; int h; public: }; void main() { my. Rect obj 1; my. Rect obj 2(5, 4); obj 1. square(); obj 2. square(); } // 실행결과는 다음과 같다. 1 20 20소멸 1소멸 class my. Rect { int w; int h; public: my. Rect() { w = h = 1; } my. Rect(int a, int b) { w = a; h = b; } ~my. Rect() { cout << w*h << "소멸"<< endl; } void square() { cout << w*h<<endl; } } };
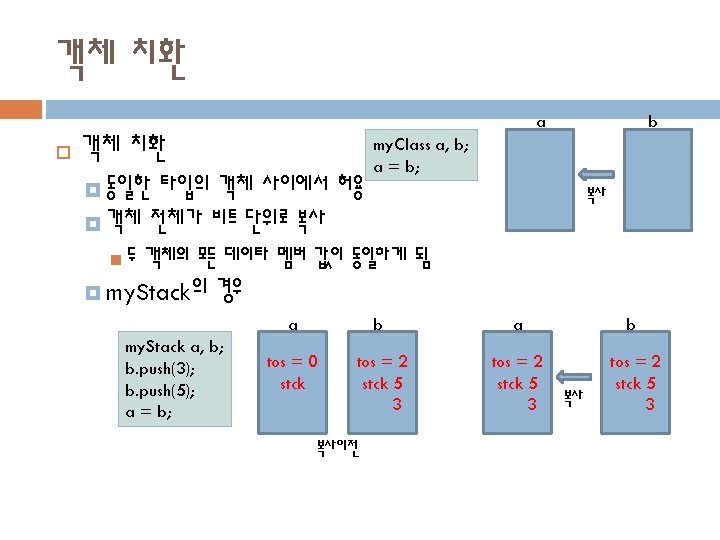
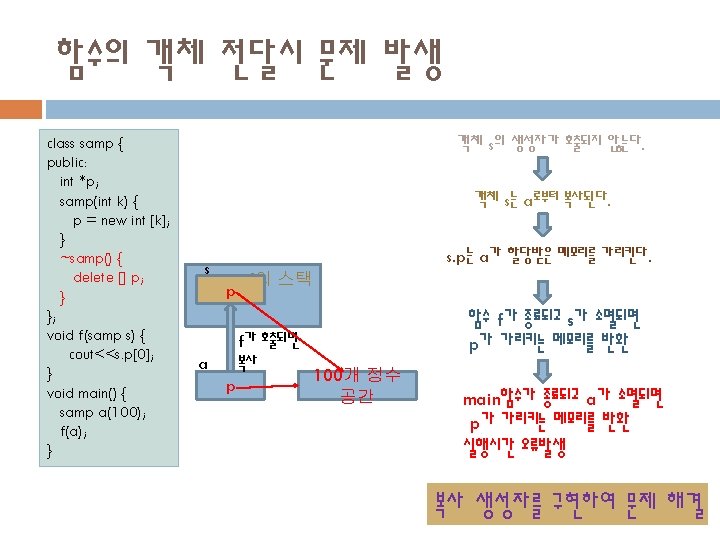
객체치환에 있어 유의할 사항 #include <iostream> using namespace std; class my. String { char *p; int len; public: my. String(char* s) { p = new char [strlen(s)+1]; strcpy(p, s); len = strlen(p); } ~my. String() { delete [] p; } void show() { cout << p; } }; void main() { my. String a("kitae"), b("hansung"); a = b; } a p len = 5 b p len = 7 a p len = 7 b "kitae" "hansung" "kitae" 복사 p len = 7 "hansung" main() 함수가 종료하는 순간 객체 b가 먼저 사라지고 다음 a가 사라질 때 소멸자에서 실행시간 오류 발생 객체 치환의 해결 방법 : 연사자(=) 중복, 복사 생성자
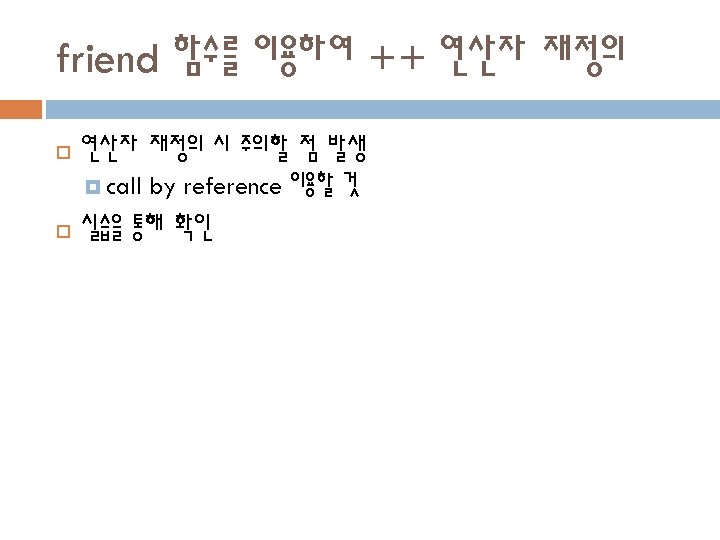
프렌드 함수 프렌드 함수란? 클래스이 멤버 함수가 아님 클래스에 어떤 함수를 프렌드로 선언가능 프렌드 함수는 선언된 클래스의 모든 멤버에 접근 가능 is. Even은 객체 a의 멤버 n에 접근할 수 없다. 다른 클래스의 멤버이거나 단순 함수 private 멤버에 접근할 필요가 있는 함수를 friend로 선언 class my. Class { int n; public: my. Class(int k) { n = k; } }; bool is. Even(my. Class a) { if(a. n % 2 == 0) return true; else return false; } void ejal main() { my. Class m(5); cout << is. Even(m); } class my. Class { int n; public: my. Class(int k) { n = k; } friend bool is. Even(my. Class a); }; bool is. Even(my. Class a) { if(a. n % 2 == 0) return true; else return false; } void main() { my. Class m(5); cout << is. Even(m); } is. Even은 객체 a의 멤버 n에 접근할 수 있다.
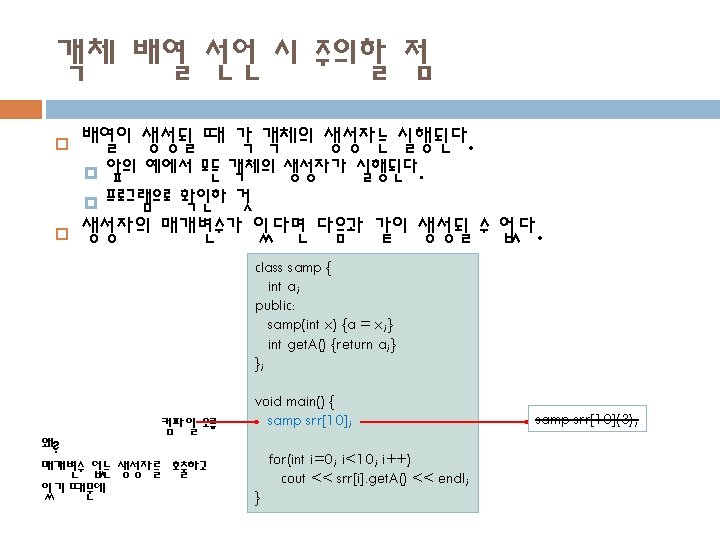
객체 배열 a a=0 a a=1 a a=2 a a=3 a a=4 a a=5 a a=6 for(int i=0; i<10; i++) srr[i]. set. A(i); for(int i=0; i<10; i++) cout << srr[i]. get. A() << endl; a a=7 a a=8 이 프로그램의 실행 결과는? a a=9 객체도 배열로 사용 가능 하다. class samp { int a; public: void set. A(int x) {a = x; } int get. A() {return a; } }; 객체배열 선언 void main() { int arr[10]; samp srr[10]; 객체 배열 사용 }
객체 배열 초기화 class samp { int a; public: samp(int x) {a= x; } int get. A() {return a; } }; samp srr[4] = { samp(-1), samp(2), samp(3), samp(4) }; void main() { 동일한 표현 samp srr[4] = {-1, 2, 3, 4}; for(int i=0; i<4; i++) cout << srr[i]. get. A() << endl; samp srr[4][2] = {-1, 2, 3, 4, 5, 6, 7, 8}; for(int i=0; i<4; i++) { cout << srr[i][0]. get. A() << ‘ ‘; cout << srr[i][1]. get. A() << endl; } 이차원 배열 선언 samp srr[4] = { samp(-1), samp(2), samp(3), samp(4), samp(5), samp(6), samp(7), samp(8) }; 이차원 배열 사용 } a = -1 a=2 a=3 a=4 이 프로그램의 실행 결과는?
객체 포인터 class samp { int a; public: void set. A(int x) {a = x; } int get. A() {return a; } }; 객체 포인터 선언 void main() { samp srr[10]; samp *p; p = &srr[0]; for(int i=0; i<10; i++) { p->set. A(i); p++; } p = srr; for(int i=0; i<10; i++) { cout << p->get. A() << endl; p++; } 객체 포인터에 값 치환 객체 포인터 사용 } 동일한 표현 for(int i=0; i<10; i++) { p[i]. get. A(i); } 동일한 표현 p = &srr[0];
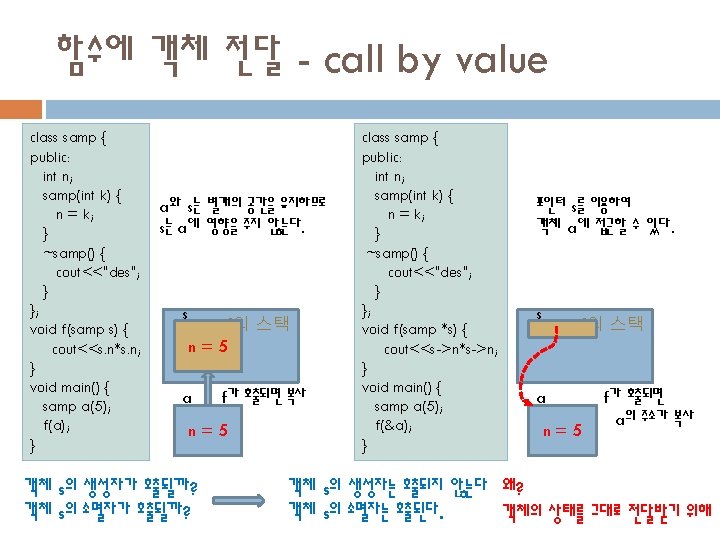
this 포인터(이 객체의 주소) this 는 포인터이다. this는 멤버 메소드가 호출될 때 전달되는 묵시적 인자(매개변수, 즉 로칼 변수)이다. 비정적 (non static) 멤버 메소드에만 전달된다. this는 무엇에 대한 주소인가? 호출되는 멤버 함수가 소속된 객체의 주소이다. class samp { int a; public: samp(int x) {this->a = x; } void set. A(int x) {this->a = x; } int get. A() {return this->a; } }; void main() { samp ob(3); ob. set. A(5); ob. get. A(); } 컴파일 class samp { int a; public: samp(samp *this, int x) {this->a = x; } void set. A(samp *this, int x) {this->a = x; } int get. A(samp *this) {return this->a; } }; void main() { samp ob(3); ob. set. A(&ob, 5); ob. get. A(&ob); }
this는 로칼 변수, 자기 객체의 주소 ob 1 class samp { int a; public: samp(samp *this, int x) {this->a = x; } void set. A(samp *this, int x) {this->a = x; } int get. A(samp *this) {return this->a; } }; void main() { samp ob 1(3); samp ob 2(3); samp ob 3(3); ob 1. set. A(&ob 1, 5); ob 2. set. A(&ob 2, 6); ob 3. set. A(&ob 3, 7); } a. . . void set. A(samp* this, . . ) {this->a = x; }. . . ob 2 a. . . void set. A(samp* this, . . ) {this->a = x; }. . . ob 3 a. . . void set. A(samp* this, . . ) {this->a = x; }. . .
call by reference call by value(포인터 이용) call by reference void neg(int p) { p = -p; } void neg(int *p) { *p = -*p; } void neg(int &p) { p = -p; } void main() { int n = 5; neg(n); void main() { int n = 5; neg(&n); void main() { int n = 5; neg(n); cout << n; } } } 예상 출력 결과는? p 5 -5 n 5 p neg스택 main스택 n -5 p neg스택 5 main스택 neg스택 n -5 5 main스택 p는 n의 다른 이름
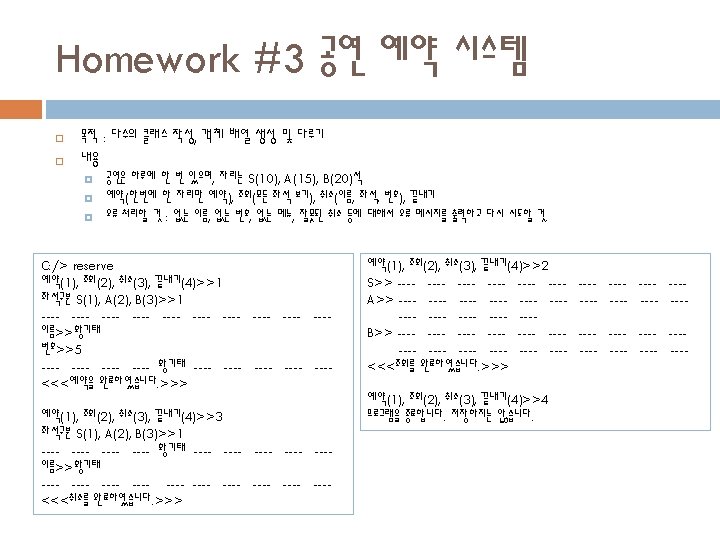
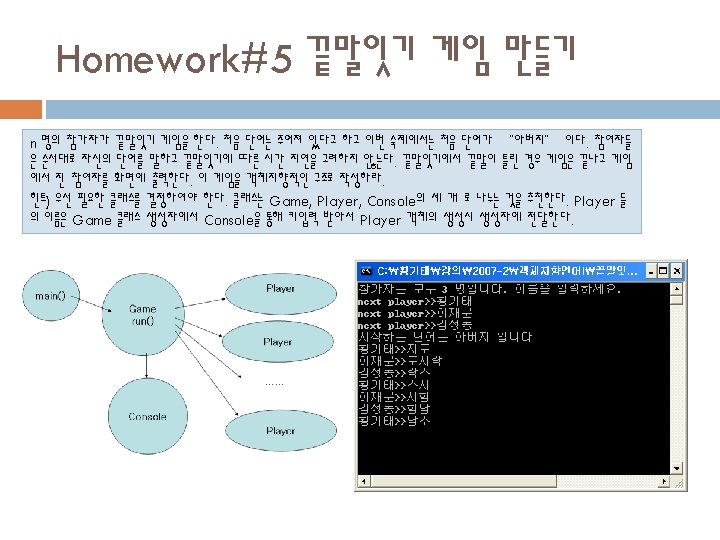
Homework #3 공연 예약 시스템 힌트 void main() { Seat. Type *p; p = new Seat. Type(); p[0]. set. Type(‘S’, 10); // S 타입 p[1]. set. Type(‘A’, 15); // A 타입 p[2]. set. Type(‘B’, 20); // B 타입 // 콘솔에서 사용자와 대화하고 필요한 // Seat. Type에 대해 필요한 기능을 호출. . . . . p[0]. reserve(); . . class Seat. Type { char type; Seat* p. Seat; public: Seat. Type(); ~Seat. Type(); void set. Type(char type, int num); bool reserve() { // 콘솔로부터 사용자에게서 이름과 번호를 알아내고 p. Seat[5]. reserve(이름); } bool cancel(); bool show(); }; class Seat { char *name; public: Seat(); ~Seat(); void cancel(); void reserve(char *); bool match(char *); }; delete [] p; } Seat. Type main() 함 수 Seat
Pre Quiz - samp클래스에 틀린 부분은? 이름 학번 #include <iostream> using namespace std; class samp { int a; public: samp(int a) {this->a = a; } void set. A(int x) {a = x; } int get. A() {return a; } }; void main() { samp srr[10]; samp *p; /* 이곳에 실행 결과와 동일한 결과가 나도록 코딩하시요. */ } // 실행결과는 다음과 같다. 0 1 2. . . 9 class samp { int a; public: samp(int a) {this->a = a} void set. A(int x) {a = x; } int get. A() {return a; } }; p = &srr[0]; for(int i=0; i<10; i++) { p->set. A(i); p++; } p = srr; for(int i=0; i<10; i++) { cout << p->get. A() << endl; p++; }
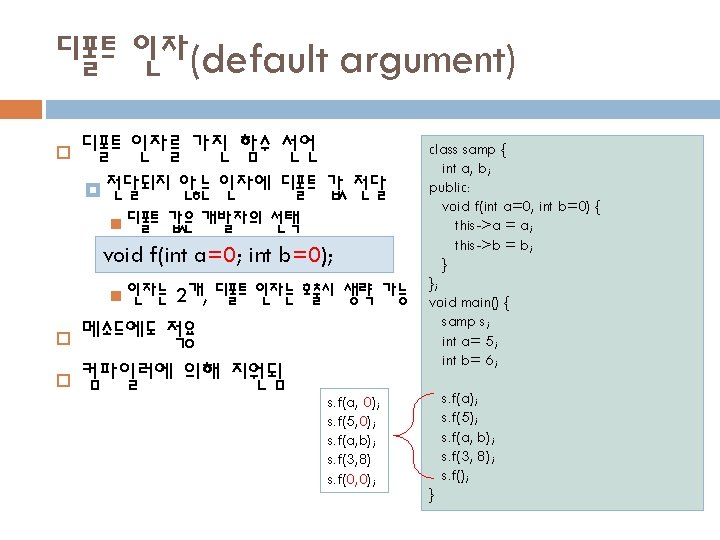
디폴트 인자 사용시 유의 사항 디폴트 인자들은 정상 인자보다 오른쪽에서만 사용 void g(int a); void s(int a, int b=0); void p(int a, int b, int c=0); void r(int a, int b=0, int c=0); void f(int a=0; int b=0); void w(int a; int b=0, int c);
함수중복의 모호성(1) 함수 중복은 정상, 함수 호출의 모호성 float f(float x); //1 f(float x); double f(double d); //2 double f(double d); void f(unsigned char c); //1 f(unsigned c); void f(char c); //2 f(char c); void main() { { main() float a= 5. 0; double b= 5. 0; f(a); // 1 f(5. 0); //2 f(5. 0); f(b); //2 f(10); // 모호 } } void main() { { main() f('c'); //2 f(86); // 모호 } }
함수중복의 모호성(2) 함수 중복 자체의 모호성 void f(int x); //1 x); void f(int &x); //2 void f(int [] p); void f(int *p); // 두 함수는 동일한 것 void main() { { main() int x[10]; f(x); } } void main() { { main() int aint =a 5; = 5; f(a); // 모호 } } void f(int a); //1 a); void f(int a, inta, b=0); //2 int b=0); void main() { { main() f(3, 5); //2 f(3); // 모호 } }
함수의 주소, 중복함수의 주소 변수 fp를 선언하는 선언문 space() 함수의 선언문 void main() { void (*fp)(int); void space(int); void (*fp 2)(int, char); void space(int, char); space(10. '*'); space(10); fp에 space 함수의 주소 지정 space 함수 호출 변수 fp 2를 선언하는 선언문 space() 함수의 선언문 fp = space; fp(5); fp 2 = space; fp 2(10, '*'); fp = space; fp(5); } } void space(int count) { for(int i=0; i<count; i++) cout <<' '; } fp 2에 space(int, char) 함수의 주소 지정 space 함수 호출 void space(int count) { for(int i=0; i<count; i++) cout <<' '; } void space(int count, char c) { for(int i=0; i<count; i++) cout <<c; } 이 두 함수를 디폴트 인자를 가진 함수 하나로 구성할 수 있을까?
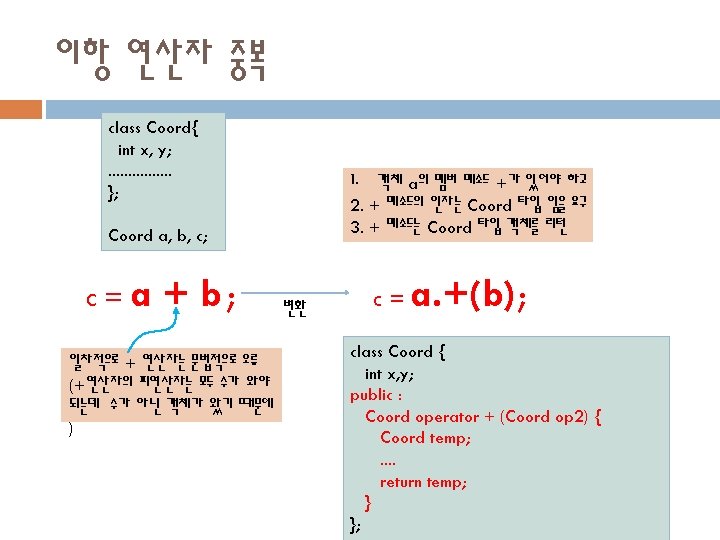
연산자 중복에 대한 질문 하나, friend 필요성 b=a+1; b=1+a; class Coord { int x, y; friend Coord operator +(int n, Coord a); }; Coord operator + (int n, Coord a) { Coord temp; temp. x = n + a. x; temp. y = n + a. y; return temp; } b=a. +(1); 변환 변환 수정 b=1. +(a); b=+(1, a); class Coord { int x, y; }; Coord operator + (int n, Coord a) { Coord temp; temp. x = n + a. x; x, y는 private 멤버 temp. y = n + a. y; return temp; }
Pre Quiz - main()이 가능하도록 연산자 작 성 이름 학번 // 실행결과는 다음과 같다. 3 3 3. . . 3 #include <iostream> using namespace std; class Array { int num[10] public: Array() {} Array(int n) { for(int i=0; i<10; i++) num[i] = n; ; } void show() { for(int i=0; i<10; i++) cout << num[i]; } }; 수정된 Array 클래스 혹은 기타 첨부된 부분을 이곳에 작성하시 오. class Array { // 아래의 부분을 첨가합니다. friend Array operator + (int n, array a); }; Array operator+(int n, Array a) { Array temp; void main() { Array a(1), b(2); b = 2 + a; b. show(); } for(int i=0; i<10; i++) temp. num[i] = a. num[i]+n; return temp; }
기본 클래스에 대한 접근 제어 Derived 1은 Base의 멤버들 상속받은 때 모두 원래 있는 속성을 그대로 물려받는다. class Derived 1 : public Base { int y; public: void set. Y(int y) {this->y = y; } void show() {cout << x << m<<y; } }; void main() { Derived 1 d; d. m = 6; d. x = 5; d. y = 10; d. set. X(10); d. set. Y(20); } Derived 2은 Base의 멤버들 상속받은 때 모두 private 속성으로 재 설정한다. class Derived 2 : private Base { int y; public: void set. Y(int y) {this->y = y; } void show() {cout << x <<m<< y; } }; void main() { Derived 2 d; d. m = 6; d. x = 5; d. y = 10; d. set. X(10); d. set. Y(20); } class Base { int x; protected: int m; public: void set. X(int x) {this->x = x; } void show() {cout << x; } }; Derived 3은 Base의 멤버들 상속받은 때 모두 protected 속성으로 재 설정한다. class Derived 3 : protected Base { int y; public: void set. Y(int y) {this->y = y; } void show() {cout << x <<m<< y; } }; void main() { Derived 3 d; d. m=6; d. x = 5; d. y = 10; d. set. X(10); d. set. Y(20); }
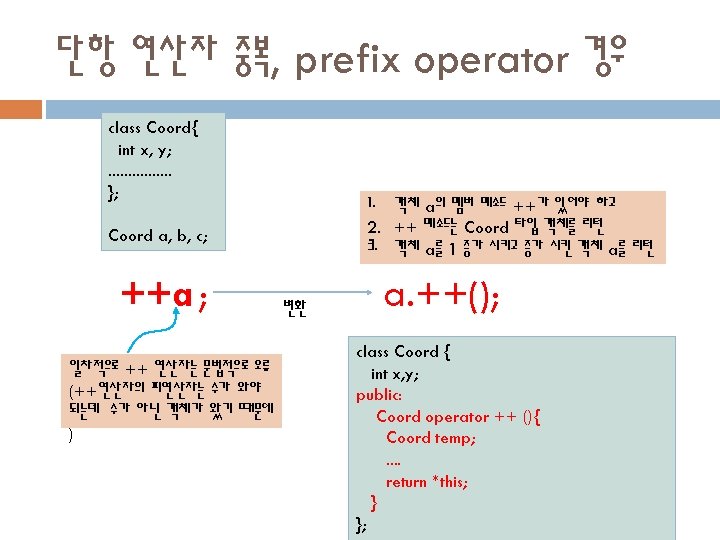
상속 관계의 클래스의 생성자 인자 처리 Base(3) Derived 1(3, 5) void main() { Derived 2 d 2(3, 5); } class Base { int x; public: Base(int x) { this->x = x; } }; class Derived 1 : public Base { int y; public: Derived 1 (int x, int y) : Base(x+5) { this->y = y; } }; class Derived 2 : public Derived 1{ int m; public: Derived 2(int x, int y) : Derived 1(x, y) { m = x*y; } };
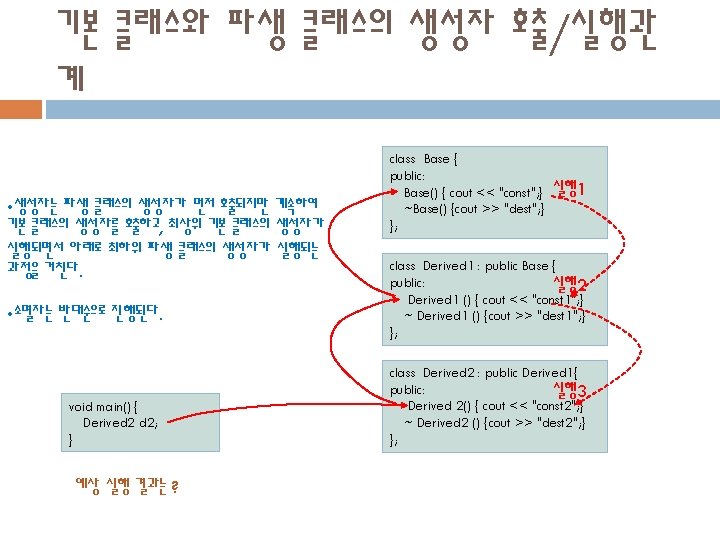
생성자 호출의 디폴트 class Base { public: Base() { cout << "const"; } ~Base() {cout >> "dest"; } }; 실행1 class Derived 1 : public Base { public: 실행2 Derived 1 () : Base() { cout << "const 1"; } ~ Derived 1 () {cout >> "dest 1"; } }; void main() { Derived 2 d 2; } class Derived 2 : public Derived 1{ public: Derived 2() : Derived 1() { cout << "const 2"; } ~ Derived 2 () {cout >> "dest 2"; } }; 실행3
다중 상속(Multiple Inheritance) 화살표는 다중 상속에 따른 생성자 호출 관계를 보여줌 class Base 1 class Base 2 3 5 class Derived 1 : public Base 1 class Derived 2 : public Base 2 2 4 다중 상속문 예 class Derived 3 : public Derived 1, Derived 2 Base 2 Derived 2 멤버 Base 1 1 멤버 멤버 Derived 1 멤버 void main() { Derived 3 d; } Derived 3 멤버 객체 d main()에서 객체 d 내에 public 멤버들을 모두 접근할 수 있음
다중 상속의 문제점 class Base { public: int x; }; 3 Base의 멤버가 이중으로 객체에 삽입되는 문제점. 동일한 x를 접근하는 프로그램이 서로 다른 x에 접근하는 결과를 낳게되어 잘못된 실행 오류가 발생된다. 5 class Derived 1 : public Base class Derived 2 : public Base 2 다중 상속문 4 class Derived 3 : public Derived 1, Derived 2 Base 1 void main() { Derived 3 d; d. x = 10 ; } 멤버(int x) Derived 2 멤버 Base ? 멤버(int x) Derived 1 멤버 Derived 3 멤버 객체 d
다중 상속의 해결 방법 1: 범위지정연산자 사용 class Base { public: int x; }; 3 프로그램 내에서 x에 접근할 때마다 클래스 이름으로 범위를 지정하는 방법 사용 d. Derived: : x = 10 5 class Derived 1 : public Base class Derived 2 : public Base 2 다중 상속문 4 class Derived 3 : public Derived 1, Derived 2 Base 1 void main() { Derived 3 d; d. Derived 1: : x = 10 ; } 멤버(int x) Derived 2 멤버 Base 멤버(int x) Derived 1 멤버 Derived 3 멤버 객체 d
다중 상속의 해결 방법 2: 가상 기본 클래스 class Base { public: int x; }; 3 • 5 번 과정을 실행할 때 이미 Base의 객체들이 만들어 졌는지 확인하고 이미 만들어진 Base 객체를 상속받도록 하는 가상 상속을 이용 • 실제 사용 예 : ios, istream, ostream, iostream 5 class Derived 1 : virtual public Base class Derived 2 : virtual public Base 2 다중 상속문 4 class Derived 3 : public Derived 1, Derived 2 1 void main() { Derived 3 d; d. x = 10 ; } Derived 2 멤버 Base 멤버(int x) Derived 1 멤버 Derived 3 멤버 객체 d
삽입자와 cout 삽입자 : << 연산자 삽입자를 가진 문장 첫 << 연산 실행의 결과로 cout 객체 리 턴 두번째 << 연산 실행 cout << 'a' << 123; class ostream { public: ostream& operator <<(char c); }; cout. <<('a') cout<<123 cout. <<(123) class ostream { public: ostream& operator <<(char c); ostream& operator <<(int n); };
새로운 삽입자 정의 class My. Class { friend ostream& <<(ostream& stream, My. Class ob) ; }; class My. Class { //. . . }; void main() { My. Class obj; cout <<obj<<3; } } ostream & <<(ostream& stream , My. Class ob) { //. . . return stream; } cout. <<(obj); <<(cout, obj); ostream 객체의 복사본에 작업을 하면 안되므로 call-by-reference 사용
추출자와 cin 삽입자 : << 연산자 char m; int n; 삽입자를 가진 문장 cin >> m >> n; 첫 >> 연산 실행의 결과로 cout 객체 리 턴 두번째 >> 연산 실행 class istream { public: istream& operator >>(char &c); }; cin. >>(m) cin>>n cin. >>(n) class istream { public: istream& operator >>(char &c); istream& operator >>(int &n); };
새로운 추출자 정의 class My. Class { friend istream& <<(istream& stream, My. Class& ob) ; }; class My. Class { //. . . }; void main() { My. Class obj, obj 2; cin >>obj>>obj 2; } } istream& <<(istream& stream , My. Class& ob ) { //. . . return stream; } cin. <<(obj); <<(cin, obj); istream 객체의 복사본에 작업 을 하면 안되므로 call-byreference 사용 My. Class 객체의 복사본에 작 업을 하면 안되므로 call-byreference 사용
조작자가 호출되는 과정 cout << endl; cout. <<(endl) class ostream { public: ostream& operator <<(osream& (* -f)(stream&)); }; ostream& ostream: : operator<<(ostream& (* _f)(ostream&)) { (*_f)(*this); // this는 cout 객체 return *this; } ostream& endl(ostream& _outs) // _outs 는 cout 객체 { return _outs << 'n' << flush; } cout 객체
새로운 조작자 작성하기 void main() { cout << Arrow << n; } 조작자 함수의 원형 ostream& XXX(ostream& _outs) { //원하는 작업 수행 return _outs; } istream& XXX(istream& _ins) { //원하는 작업 수행 return _ins; } 화면 결과 ---->3 ostream& Arrow(ostream& strm) { strm << "---->"; return strm; } void main() { cin >> Arrow >> n; } 화면 결과 ---->3 istream& Arrow(istream& strm) { cout << "---->"; return strm; }
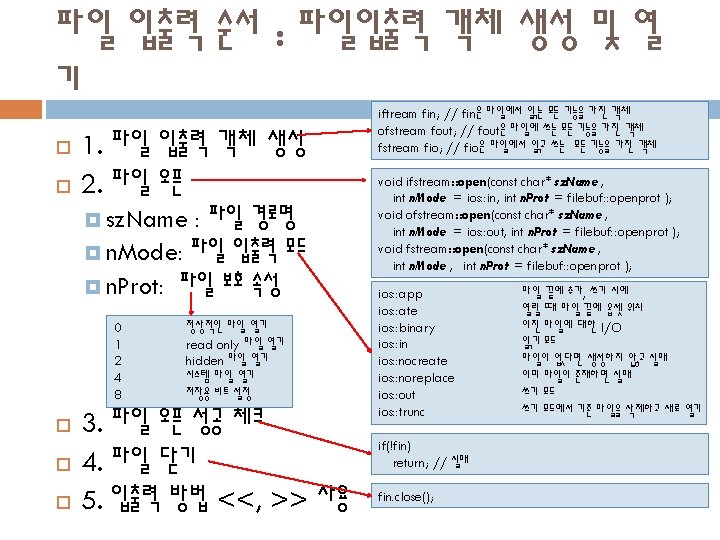
파일 입출력 객체 생성 및 열기 예 #include <iostream> #include <fstream> using namespace std; void main() { ofstream fout; fout. open("m. txt", ios: : out); if(!fout) return; m. txt 파일 kitae hwang void main() { ifstream fin; fin. open("m. txt", ios: : in); if(!fin) return; fout << "kitae hwang"; fout. close(); cout << "성공"; char buf[512]; fin >> buf; fin. close(); cout << buf; } }
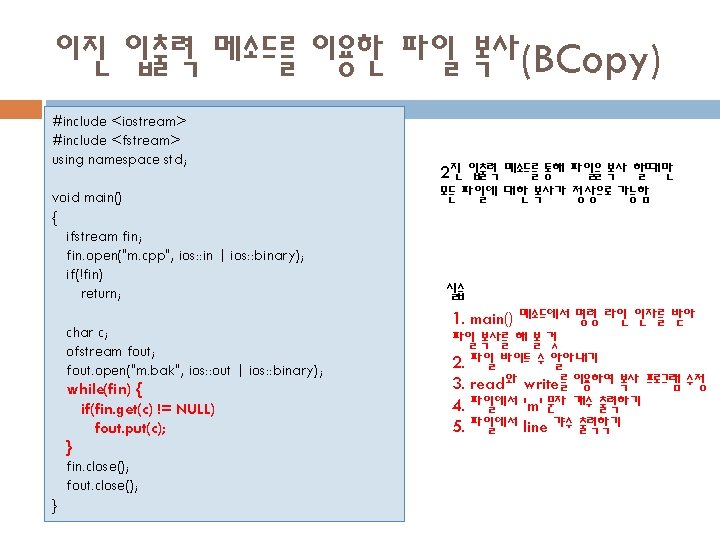
텍스트 입출력 메소드를 이용한 파일 복사(TCopy) #include <iostream> #include <fstream> using namespace std; void main() { ifstream fin; fin. open("m. cpp", ios: : in); if(!fin) return; char c; fin. unsetf(ios: : skipws); ofstream fout; fout. open("m. bak", ios: : out); fin에 eof를 만났다는 플래그가 세팅되어 있지 않다면 while(fin) { fin >> c; if(!fin. eof()) fout << c; } fin. close(); fout. close(); 이 문장 실행 당시 eof를 만나면 c 변수에는 아무 변화도 없으며 fin 내부에 eof를 만났음을 표시하는 플래그에 표시됨 } 이 프로그램으로 한글 파일을 복사할 수 있 을까? no
Pre Quiz - 텍스트 파일의 라인 수 출력 이름 학번 "m. cpp" 파일의 라인 수를 출력 하는 프로그램을 작성하시오 #include <iostream> #include <fstream> using namespace std; void main() { ifstream fin; fin. open("m. cpp", ios: : binary); if(!fin) return; } // 실행결과는 다음과 같다. m. cpp 34 라인 #include <iostream> #include <fstream> using namespace std; void main() { ifstream fin; fin. open("m. cpp", ios: : in); if(!fin) return; int count=0; char c; while(fin) { fin. get(c); if(fin. eof()) { count++; break; } if(c == 'n') count++; } int count=0; char c; fin. unsetf(ios: : skipws); while(fin) { fin>>c; if(fin. eof()) { count++; break; } if(c == 'n') count++; } cout << "m. cpp" << count <<"라인" << endl; fin. close(); }
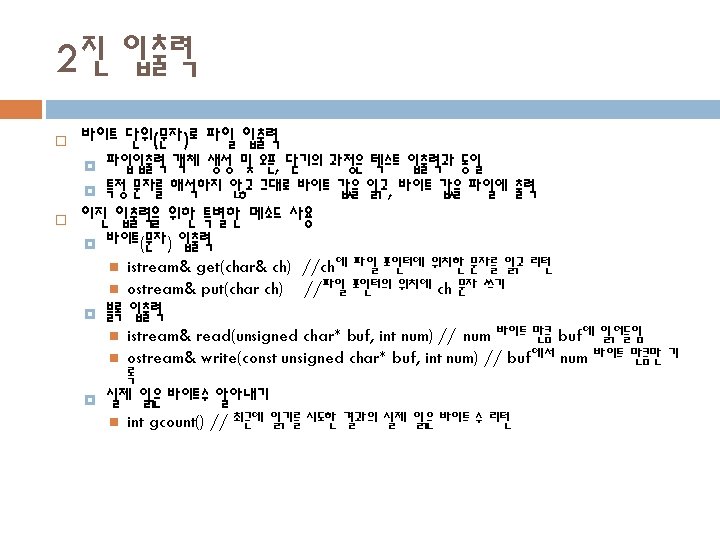
read()/write()/gcount()를 이용한 블럭 읽 기/쓰기 #include <iostream> #include <fstream> 512 512 using namespace std; void main() { ifstream fin; fin. open("m. cpp", ios: : in | ios: : binary); if(!fin) return; 89 512 Bytes ofstream fout; fout. open("m. bak", ios: : out | ios: : binary); char buf[512]; while(fin) { fin. read(buf, 512); int n = fin. gcount(); if(n == 0) break; // eof fout. write(buf, n); if(n < 512) break; // eof } fin. close(); fout. close(); } fin. gcount() : 최근에 읽은 바이트 수
파일 크기 알아내기 #include <iostream> #include <fstream> using namespace std; void main() { ifstream fin; fin. open("m. cpp", ios: : in | ios: : binary); if(!fin) return; fin. seekg(0, ios: : end); // 파일 읽기 포인터 이동 cout << fin. tellg(); // 파일 읽기 포인터의 위치 fin. close(); } 파일 읽기 포인 터
파생 클래스의 포인터에 대한 복습 #include <iostream> #include <fstream> using namespace std; class Base { public: void f(); }; class Derived : public Base { public: void f(); }; void main() { Base *p, *q; Base b; Derived d; p = &b; // 합법 q = &d; // 합법 p->f(); // q->f(); // Base: : f() 호출 d. f(); // Derived: : f() 호출 } Base f() Base b f() p Derived q d p. 322 예제 학습
#include <iostream> #include <fstream> using namespace std; class Base { public: void f() { cout << "Base" << endl; } }; class Base. Virtual { public: virtual void f() { cout << "Base. Virtual" << endl; } }; class Der : public Base { public: void f() { cout << "Der" << endl; } }; class Der. Virtial : public Base. Virtual { public: void f() { cout << "Der. Virtual" << endl; } }; void main() { Der a; Der. Virtual b; Base *p; Base. Virtual *q; a Base * p 정적 바인딩 f() Base p->f() p = &a; p->f(); Der q = &b; q->f(); } Base. Virtual * q 컴파일러시 체크 p->f() b f() Base. Virtual 런타임시 동적 바인딩 f() 실행 결과 Base Der. Virtual * 함수로 변경하여 보면 정적 바인딩을 할 수 없음이 분명해짐 Der. Virtual
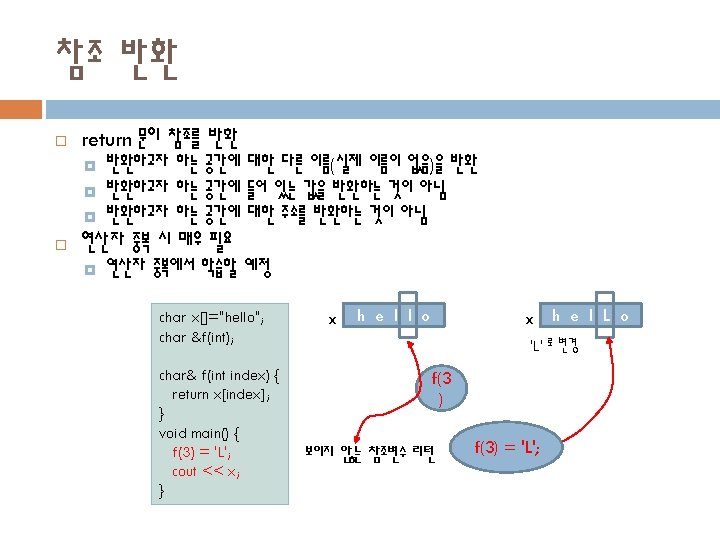
파생 클래스와 기본 클래스의 포인터 사용 Line *p Line draw() Rect draw() Line Circle draw() Line, Rect, Circle 클래스에 다음 객체를 위한 포인터 변수의 타입을 설정하기 힘듬 DObject DObject *p draw() Line class DObject { protected: DObject* next; }; draw() Line Rect Line, Rect, Circle 클래스눈 모두 DObject를 상속받음. draw() Circle
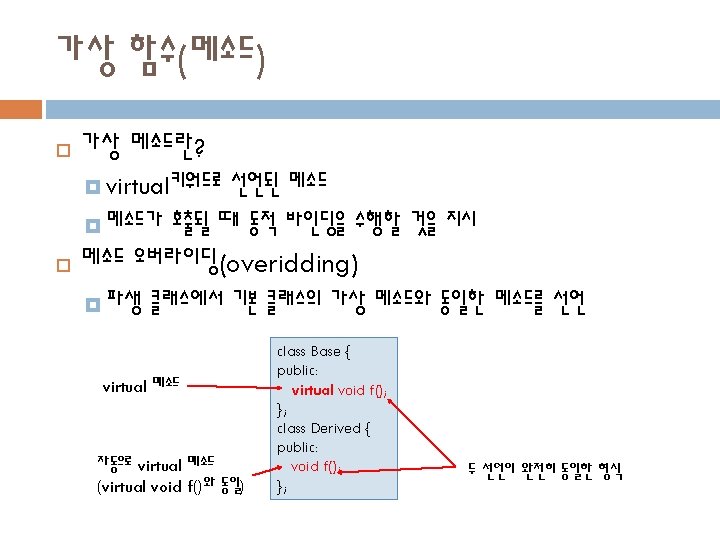
가상 함수의 사용 DObject *p DObject draw() class DObject { protected: DObject* next; public: virtual void draw() {} }; DObject draw() Line DObject draw() Line Rect draw() Circle class Line : public DObject { public void draw() { cout << "Line"; } }; class Rect : public DObject { public void draw() { cout << "Rect"; } }; class Circle : public DObject { public void draw() { cout << "Circle"; } }; Line, Rect, Circle 클래스눈 모두 DObject를 상속받음. 모든 도형의 draw() 메소드를 호출하여 그림 기리기 DObject *p; while(p) { p->draw(); p = p->next; }
추상 클래스(Abstract Class) DObject *p DObject draw() class DObject { protected: DObject* next; public: virtual void draw()=0; }; DObject draw() Line Rect DObject draw() Circle class Line : public DObject { class Rect : public DObject { class Circle : public DObject { • DObject는 추상클래스 public void draw() { • draw()는 순수가상함수 cout << "Line"; cout << "Rect"; cout << "Circle"; • 하나이상의 순수가상함수를 } }; }; }; 가지면 추상클래스가 됨 Line, Rect, Circle 클래스눈 모두 DObject를 상속받음. • 추상클래스의 객체 생성 불 DObject *p; 가 while(p) { • 추상클래스를 상속받는 클래스 모든 도형의 draw() 메소드를 p->draw(); 에서 draw()를 구현하지 호출하여 그림 기리기 p = p->next; 않으면 역시 추상 클래스가 } 됨
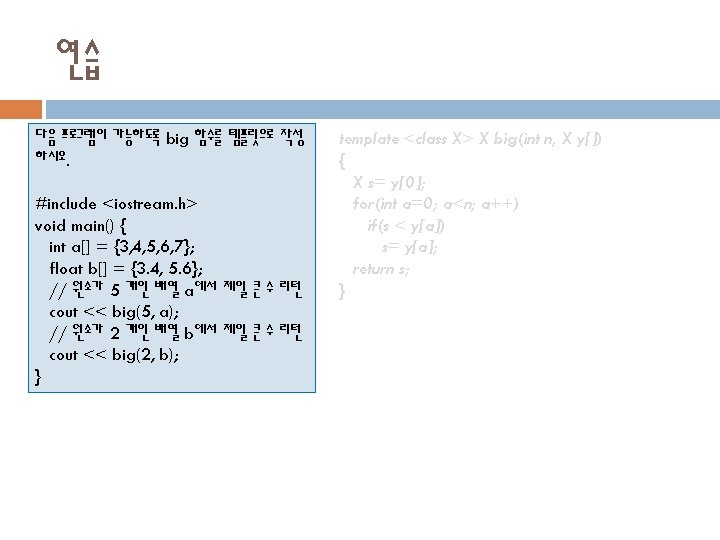
일반화(Generic)와 일반 함수 두 경우 void swap(float& a, float& b) { float temp; temp = a; a = b; b = temp; } 일반 함수(Generic Function) 일반 클래스(Generic Class) 필요성 알고리즘은 동일, 데이타 타입이 다른 함수나 클래스 를 중복 선언하는 부담을 줄이기 위해 void swap(int& a, int& b) { int temp; temp = a; a = b; b = temp; } 일반화 시킨 함수나 클래스 작성 일반화 방법 float char int void swap(char& a, char& b) { char temp; temp = a; a = b; b = temp; } template 으로 정의 template <class TYPE> void swap(TYPE& a, TYPE& b) { 컴파일러는 template으로부터 TYPE temp; = a; 함수 코드를 생성하고 이들을 다시 컴파일 temp a = b; b = temp; }
일반형이 두 개 이상인 일반화도 가능 template <class TYPE 1, class TYPE 2> TYPE 2 Calc(TYPE 1& a, TYPE 2& b) { TYPE 2 res, s, t; s = (TYPE 2)a; t = b; res = s + t; return res; } void main() { int n = Calc(2, 5); double d = Calc(3, 5. 5); cout << Calc(3. 3, 5. 5); // 출력되는 값은? float f = Calc(3. 3, 2); int k = Calc(4. 4, 10); }
일반 클래스 template <class TYPE> class Stack { TYPE stck[100]; int tos; void push(TYPE a); TYPE pop(); }; template <class TYPE> void Stack<TYPE>: : push(TYPE a) { // 잘 작성 } template <class TYPE> TYPE Stack<TYPE>: : pop() { // 잘 작성 } void main() { Stack<int> pp; pp. push(3); cout <<pp. pop(); // 다음의 것들도 모두 가능함 Stack<char> c; Stack<double> d; Stack<int *> x; class addr { public: char name[10]; char zip[10]; }; Stack<addr> r; }
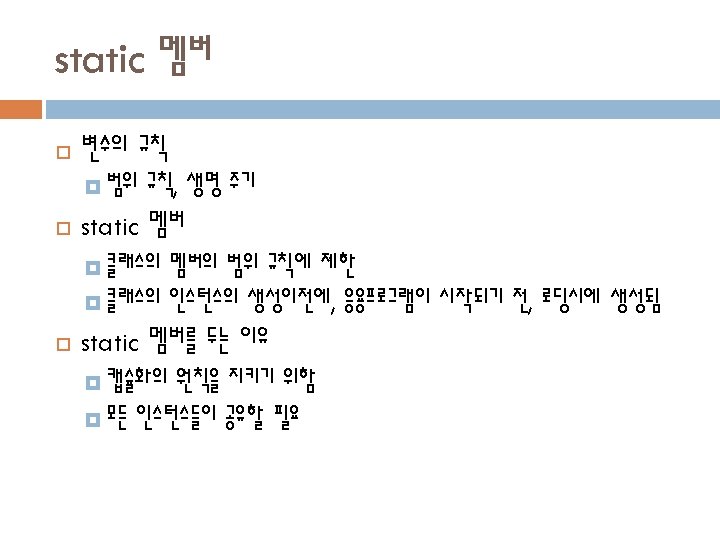
static 멤버 class Demo { static int count; int n; public: static void set. Count(count) { this->count = count; n = 5; // non static 멤버 접근 안됨 } static int get. Count() {return count; } void set. N(int n) {this->n = n; } }; class Demo { int n; public: static int count; void set. N(int n) {this->n = n; } }; int Demo: : count=5; void main() { Demo: : count=8; Demo a, b; a. set. N(4); b. count=7; Demo: : count++; cout << a. count; } int count 5 8 7 8 n=4 set. N() a 반드시 count 변수의 공간 선언 int Demo: : count; 객체 a, b가 생기기전에 이미 생성 void main() { Demo: : count=8; Demo a, b; a. set. N(4); b. set. Count(7); Demo: : set. Count(8); cout << a. get. Count(); count 멤버에 접근하는 방법 1 count 멤버에 접근하는 방법 2 결과는? } n=? set. N() b count는 private
C 컴파일러의 심볼 이름 붙이기 #include <iostream. h> m. c void f() { //cout << "f"; } void g(); void main() { f(); g(); } C 컴파일 m. obj void _f { cout << "f"; } void _g; void _main { _f(); _g(); } 컴파일 후에 심볼의 이름이 바뀌어 obj 파일에 저장됨 Compiling. . . m. c Linking. . . m. obj : error LNK 2001: unresolved external symbol _g Debug/link. C. exe : fatal error LNK 1120: 1 unresolved externals Error executing link. exe.
C++ 컴파일러의 심볼 이름 붙이기 #include <iostream. h> m. cpp void f() { cout << "f"; } void f(int n) {} void g(); void main() { f(); g(); } C++ 컴파일 m. obj void ? f@@YAXH { cout << "f"; } void ? g@@YAXXZ; void _main { ? f@@YAXH (); ? g@@YAXXZ(); } 컴파일 후에 심볼의 이름이 바뀌어 obj 파일에 저장됨 Compiling. . . m. cpp Linking. . . m. obj : error LNK 2001: unresolved external symbol "void __cdecl g(void)" (? g@@YAXXZ) Debug/link. C. exe : fatal error LNK 1120: 1 unresolved externals Error executing link. exe.
C++ 컴파일러가 중복 함수 이름 처리 #include <iostream. h> m. cpp void f() { cout << "f"; } void f(int n); void g(); void main() { f(3); f(); g(); } C++ 컴파일 m. obj void ? f@@YAXH { cout << "f"; } void ? f@@YAXH@Z; void ? g@@YAXXZ; void _main { ? f@@YAXH@Z(3); ? f@@YAXXZ (); ? g@@YAXXZ(); } Compiling. . . m. cpp Linking. . . m. obj : error LNK 2001: unresolved external symbol "void __cdecl g(void)" (? g@@YAXXZ) m. obj : error LNK 2001: unresolved external symbol "void __cdecl f(int)" (? f@@YAXH@Z) Debug/link. C. exe : fatal error LNK 1120: 2 unresolved externals Error executing link. exe. Why? 왜 C++ 컴파일러는 이름붙이는 방법이 복잡한가? 메소드 중복 때문에 같은 이름의 메소드도 인자에 따라 서로 다른 것으로 인식되어야 하기 때문에
C++과 C 언어의 링킹 실패 m. cpp #include <iostream. h> void f() { cout << "f"; } void f(int n) {} void g(); void main() { f(); g(); } void g() { cout << "g"; } g. c C 컴파일 g. obj void _g() { cout << "g"; } C++ 컴파일 void ? g@@YAXXZ() { cout << "g"; } C++컴파일 m. obj void ? f@@YAXH { cout << "f"; } void ? g@@YAXXZ; void _main { ? f@@YAXH (); ? g@@YAXXZ(); } 컴파일 후에 심볼의 이름이 바뀌어 obj 파일에 저장됨 링킹 링킹 g. cpp 링킹 g. obj
C++과 C 언어의 링킹 성공 m. cpp #include <iostream. h> extern C g(); void f() { cout << "f"; } void f(int n) {} void g(); void main() { f(); g(); } #include <iostream. h> g. c void g() { cout << "g"; } C 컴파일 g. obj void _g() { cout << "g"; } C++컴파일 m. obj void ? f@@YAXH { cout << "f"; } void _g; void _main { ? f@@YAXH (); _g(); } 컴파일 후에 심볼의 이름이 바뀌어 obj 파일에 저장됨 링킹 링킹