Encoding Data in e PDS BY ALFREDO C
 BY ALFREDO C. MEDRANO Planning Officer III ILOCOS NORTE")
(Encoding Data in e. PDS) BY ALFREDO C. MEDRANO Planning Officer III ILOCOS NORTE DIVISION

Note: You can only Log in if you have already received Username and Password in your registered Email that you have submitted to the HR (Personnel) Section Type the e. HIRS Website: fo. ehris. deped. gov. ph in the address bar

Tutorials For the first Log in, Type the Username and password that you have received in your Email Open the e. HRIS Website, then Log in

Account name DASHBOARD OF THE EHRIS
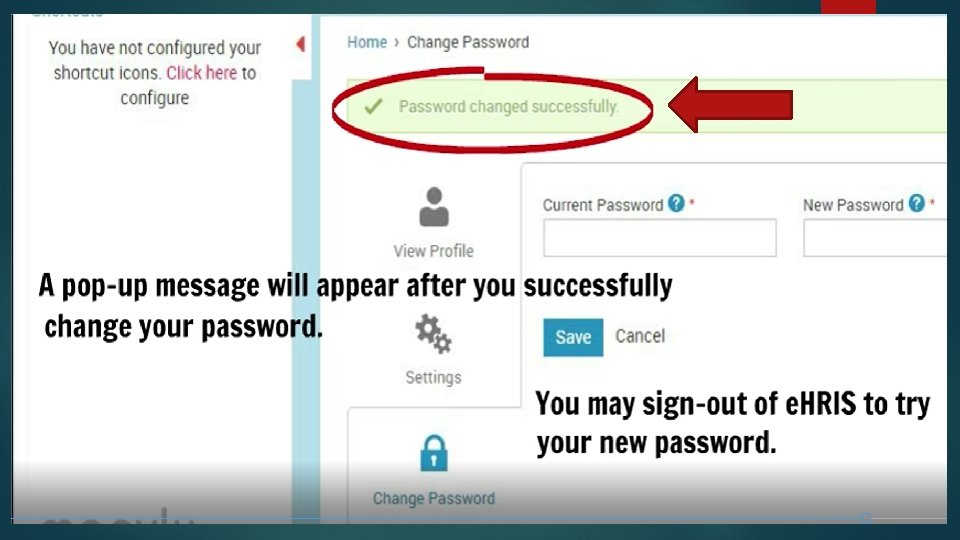
 Select (2) Click your name then Select Change Password")
Click (1) Select (2) Click your name then Select Change Password

Re-Enter your New Password
 Click Self Service Tab, then Select My Details to encode e. PDS Data")
(1) Click Self Service Tab, then Select My Details to encode e. PDS Data

This is the e. PDS Page
")
e. PDS Data Tab Note: Only HR Personnel can edit this Page (Official Tab)
 (1) Click Personal Information Tab, then Click Edit to Enter data")
(2) (1) Click Personal Information Tab, then Click Edit to Enter data

Click Fill out the required {*} filled but even not required but if you have data then fill out then click Save
 (1) Click Contact Information Tab, then Click Edit to Enter data")
(2) (1) Click Contact Information Tab, then Click Edit to Enter data

Click Fill out the required filled {*} then click Save
 Action Column Click Family Tab, then Click Add to Enter data")
Click (1) Action Column Click Family Tab, then Click Add to Enter data

Click here to open Calendar Click Fill out the required filled {*}then click Save

Click Add again to Enter another data, after that, click Education Tab

Click Add to Enter data

Fill out the required {*} filled then click Save

Click Add to Enter again another data, after that, Click Civil Service Eligibility

Click Add to Enter data

Fill out the required {*} filled then click Save

Click Add to Enter again another data, after that, Click Work Experience

Click Add to Enter data

Fill out the required {*} filled then click Save

Click Add to Enter another data, after that Click Voluntary Work

Click Add to Enter data

Fill out the required {*} filled then click Save

Click Add to Enter another data, after that, Click Learning & Development tab

Click Add to Enter data

Fill out the required {*} filled then click Save

Click Add to Enter another data, after that, Click Other Information

Click Add to Enter data

Fill out the required {*} filled then click Save

Click Add to Enter another data, after that, Click Questionnaire Tab
, Click Yes or No, if Yes, type the")
Answer all the Questions (1 -12), Click Yes or No, if Yes, type the details

Click Yes or No, if Yes, type the details, then Click Save Click
 (1) Click Reference Tab, then Click Add to Enter data")
(2) (1) Click Reference Tab, then Click Add to Enter data

Fill out the required {*} filled then click Save

Click Add to Enter another data until 3 references to be considered completed

Click Update to Change Contact Details Indicator Click to Display and Download PDS

EHRIS SETTINGS
")
How to Reset Account if you forgot your Password Click Activate Account/Reset Password (1) Click (2)

Open email and copy the temporary / new password, then use this password to log in using the same username
 To upload Picture, Click the Account Name, select View Profile")
Click (1) To upload Picture, Click the Account Name, select View Profile

Click Upload photo then select in your Gallery you want to upload

Click Select photo in your Gallery, then Click Open Click Update to save
, Click Self Service, Click Account Name, then Select")
Click To add shortcut (My Details), Click Self Service, Click Account Name, then Select Settings

Drag My Details here to create Shortcut

Click Save to create Shortcut

Click Shortcut of My Details is already created, you can directly click the Shortcut to open e. PDS Page

Account name To Logout, Click Account Name, then select Logout

ANY QUESTIONS? ? ?

WORKSHOP PROPER and Checking of outputs
- Slides: 55