Employee Self Service An Introduction to Premier ESS


- Slides: 42
Employee Self Service An Introduction to Premier ESS
ESS allows the manager to access own information stored within the payroll as well as perform certain managerial functions. Some of the added functionalities include: Approving, declining or parking requests. Impersonating users with limited access to ESS. Running different leave reports. Remember to switch on the “Out-of-Office” function when the manager is unavailable to deal with transactions. Remember: the manager uses his/her profile for own purposes as well as to perform managerial duties. Each manager will have access to more functions than the normal user.
How to deal with transactions assigned to you: When a request has been submitted, the approver will receive an email similar to the one shown below. All transactions will appear in the manager’s “inbox”. There are 2 ways to access your inbox: 1. By logging into Ess. 2. By clicking on the email link.
Manager Summary screen: Managers may login to their own profile and view added functions: o o o Inbox Reports Impersonation
Access your inbox by clicking on Home >> View Inbox.
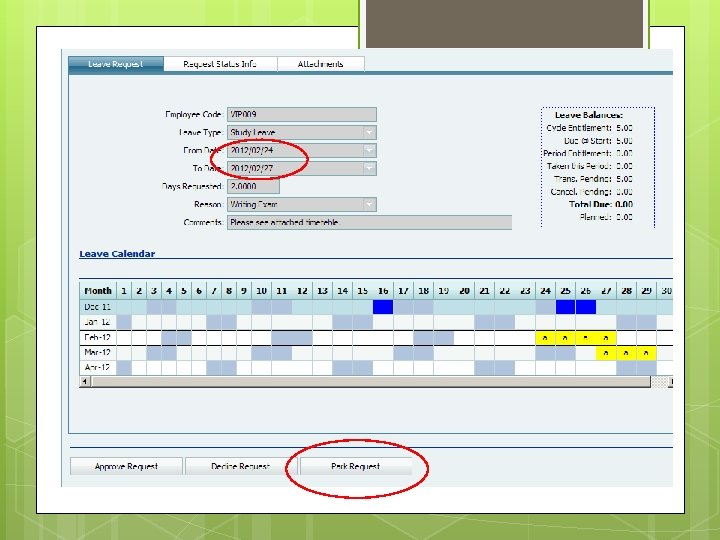
There are four ways to deal with transactions: 1. 2. 3. 4. Reassign Requests – if you want to reassign the request to another approver to deal with. Approver Requests – if you are happy with the whole transaction and would like to approve it. Decline Requests – if you are not happy with the transactions and do not want to approve it. Park Requests – if you are unsure about how you want to deal with this transaction.
1. Reassign request You may reassign a request to another approver by clicking on the “Reassign Request” link to the right hand side of the transaction. This will open a dropdown menu with other approvers. Select a new approver and write a small comment before clicking on “Update”.
What if you do not want to reassign the transaction? You will be able to view the details of a transactions by clicking on “View” on the left hand side of the transaction.
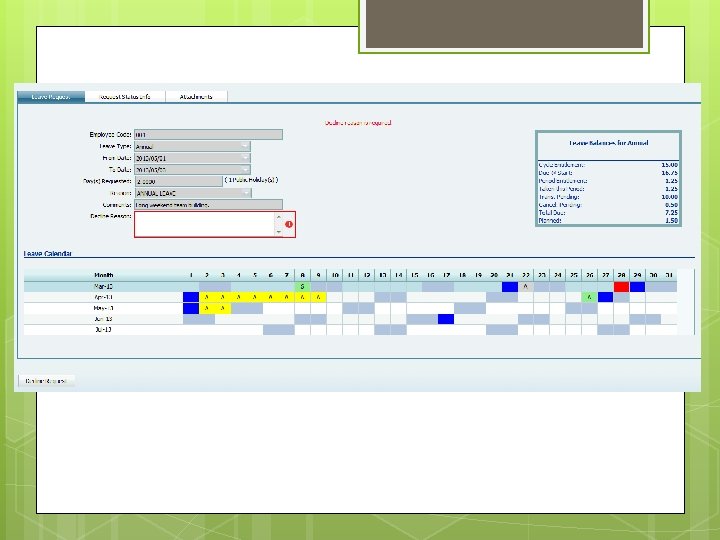
2. Leave Approval Tip: You can tick the “Send the leave Event to my Calendar” to update our Outlook calendar.
3. Decline transaction If you are not satisfied with the entire transaction or the attachment provided, you can decline the transaction by clicking on the “Decline” button at the bottom of the screen. Remember to enter a “Decline Reason” as this is compulsory. This reason will also appear on the user’s notification email.
4. Parking This function allows the manager to place a future transaction on hold if unsure on how to deal with the transaction. Ess will assign a parking expiration date to the transaction 30 days before the transaction takes place. NB! Parking is only for future transactions that takes place 30 days or longer from the submission date.
How to approve Overtime
Approvers may “View” all Overtime details as it was entered by the user, but approvers may not make any changes or do corrections on behalf of users.
How to approve Overtime
How to approve Claims
Approvers may “View” all Claims details as it was entered by the user, but approvers may not make any changes or do corrections on behalf of users.
How to approve Overtime
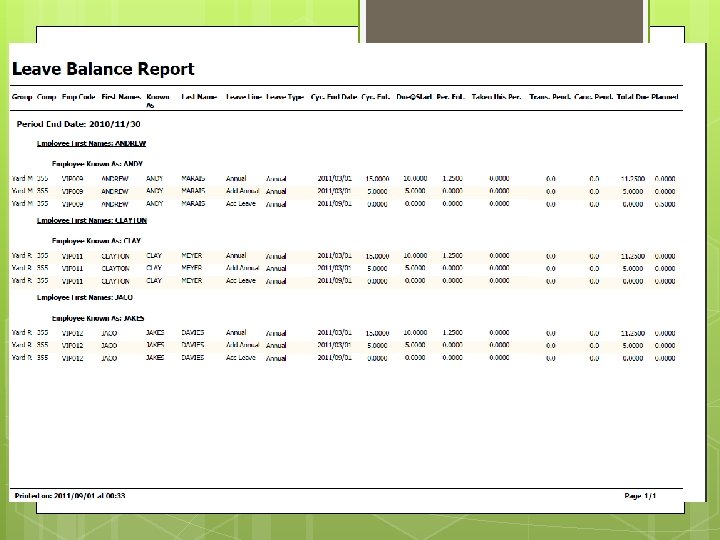
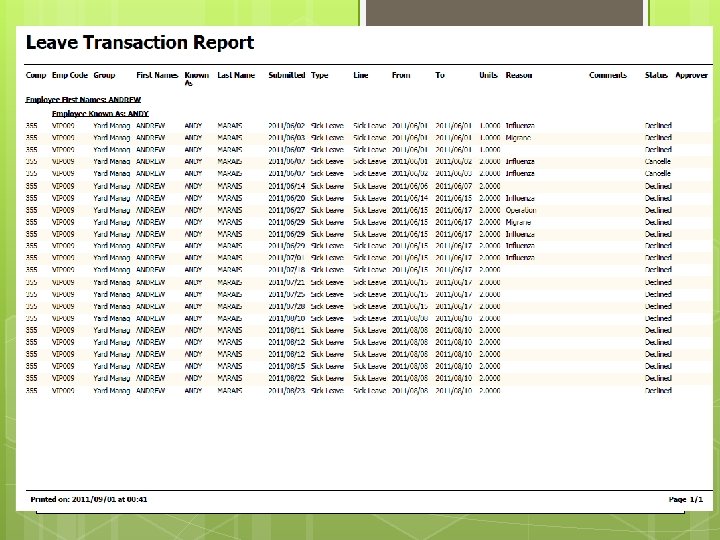
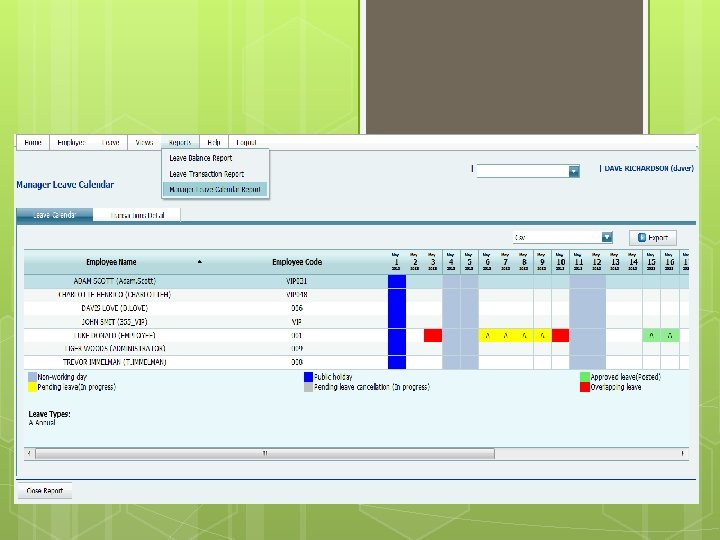
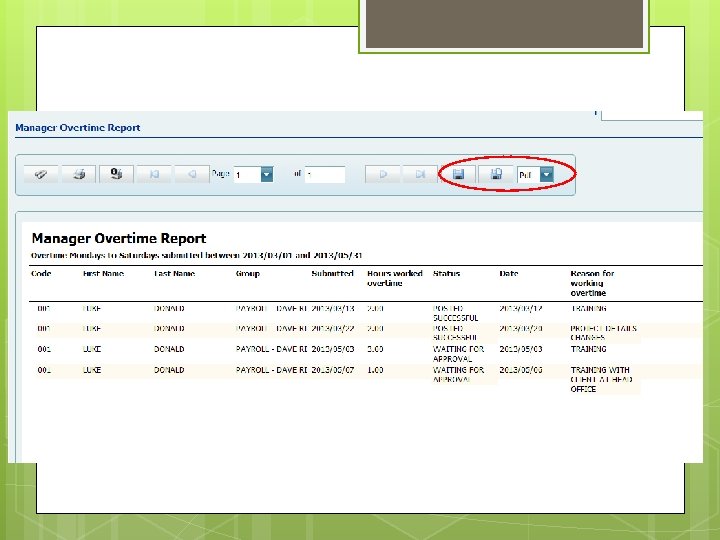
Reports Managers may run 3 different leave reports, an overtime report and a claims to include the data of the users that report to them: • to • to Leave Balance Report reflect leave balances of all users. Leave Transactions Report reflect all transactions in the history or current workflow. Manager Leave Calendar reflect all leave taken during a specific pay period. Overtime Report reflect all the overtime applied for during a specific period. Claims Report reflect all the claims applied for during a specific period.
How to run a report on ESS: 1. Click on “Report” 2. Select the report that you would like to run. 3. Select the Group that you would like to include in report. 4. Select the Leave Type that you would like to include in report. 5. If you want, you may select a specific Leave Line e. g. Accrued Annual Leave. 6. If you want, you may select one or more Employees only to appear on the report. 7. Choose a different Filter if you would like to include terminated or deactivated users. 8. Depending on the type of report, you may select a date range for the data that you would like to reflect on the report. 9. Under Options you may design the structure of your report. 10. Once you set up all the criteria for your report, you may click on View Report.
Leave Balance Report This report shows the leave balances off all users.
Leave Transactions Report This report shows all the leave transactions in the history or current workflow.
Manager Leave Calendar This reports shows all leave taking during a specific pay period and can only be run one month at a time.
Overtime Report
Claims Report
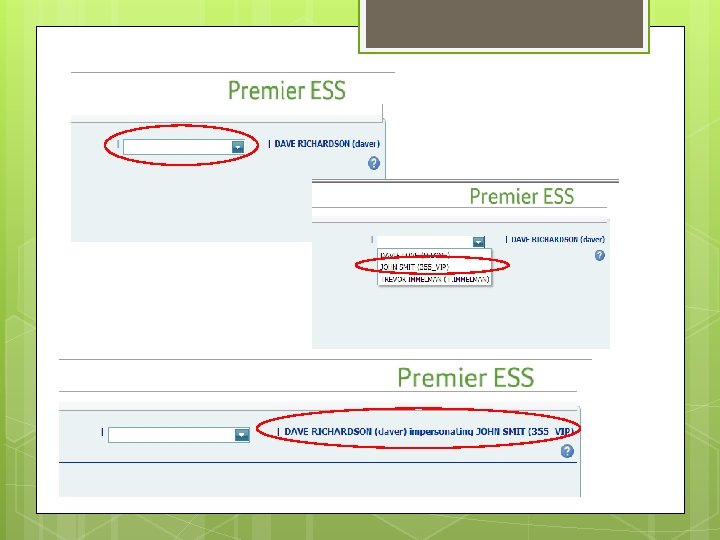
Impersonation Managers that need to impersonate some of their staff, needs to be set up to do so by the ESS Administrator. 1 Manager may impersonate multiple users, but 1 User may only be impersonated by a single manager. Impersonation is designed to accommodate: • • A user that does not know how to use a computer. A user that does not have access to his/her own email address.
1. View the relevant transaction from your inbox. 2. Click on the Attachment tab to the top of the transaction screen How to view attachments Tip: You may attached documents on behalf of users
How to impersonate a user: • Click on the dropdown menu next to your name • Select the relevant user from the dropdown list. • Apply for the relevant transaction on behalf of the user as you would do your own application. • Once you are finished impersonating the relevant user, click on Impersonate again. • Click on another impersonated user’s name or on your own name to return to your own profile.
“Out-of-Office” function. The “Out-of-Office” function allows the manager to nominate an approver to handle transactions in time of absence from work. You will find the “Out-of-Office” functions when you click on Home >> My Settings
The manager has the function to send the nominated approver an email to notify him/her of the task at hand. Once you nominate another approver to take over your duties, the system will keep the dates in mind and send all relevant transactions to the nominated approver. The original manager will still receive all the email notification.
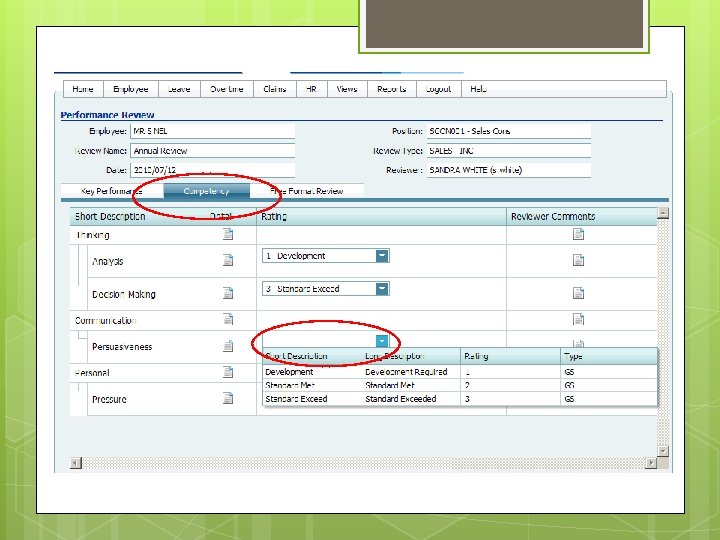
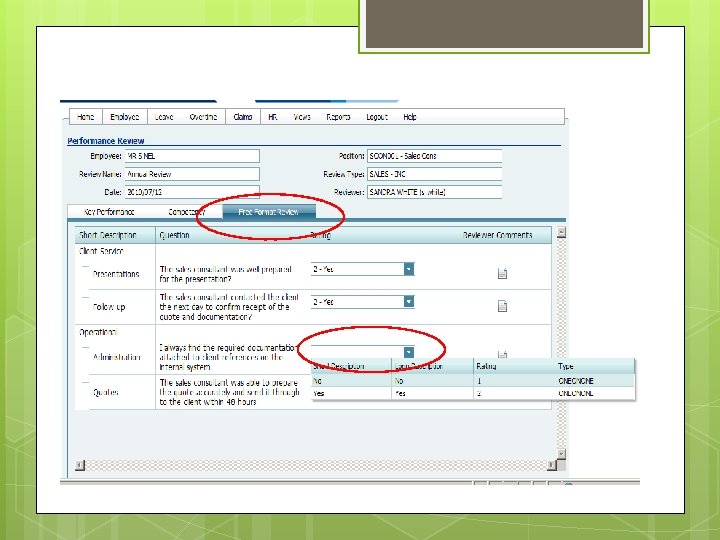
Performance Review You will receive an email notification that you have one or more performance reviews to complete.
Click on “View” to access your employee’s Performance Review
Click on the Key Performance tab, Competency tab and Free Format Review tab to select the dropdown menu under “Rating” to rate their Key Performances, Competency and to complete their Free Format Review.
Help If help is required, the manager can make use of the “Help” function. This function has different user guides, manuals and a search option. You can find this by clicking on “Help”.