
Early Childhood Special Education ECSE A student guide



- Slides: 35
Early Childhood Special Education (ECSE) A student guide on how to create, publish and submit your Professional Portfolio in Taskstream Part 1 of 2 **Please view the instructional guide as a slideshow** Three Important Steps: 1. CREATE your Portfolio. Slides 10 thru 21. 2. PUBLISH your Portfolio to the web. Slides 22 thru 26. 3. SUBMIT your Portfolio’s web url as the assignment. Slides 27 thru 33. 1
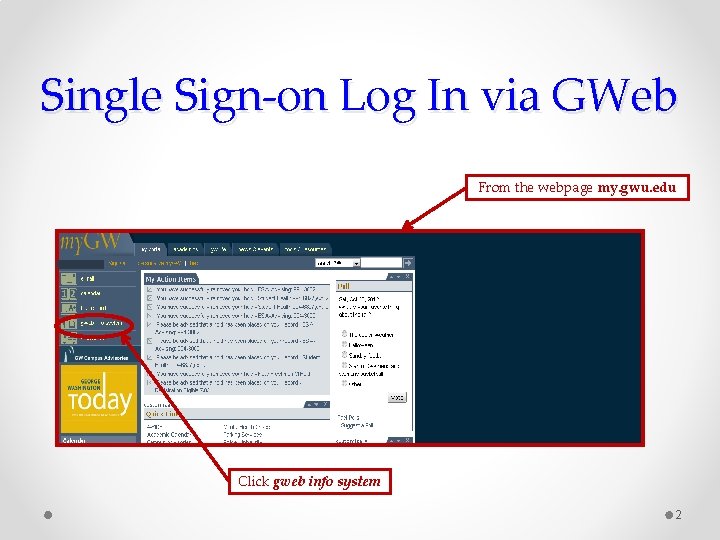
Single Sign-on Log In via GWeb From the webpage my. gwu. edu Click gweb info system 2
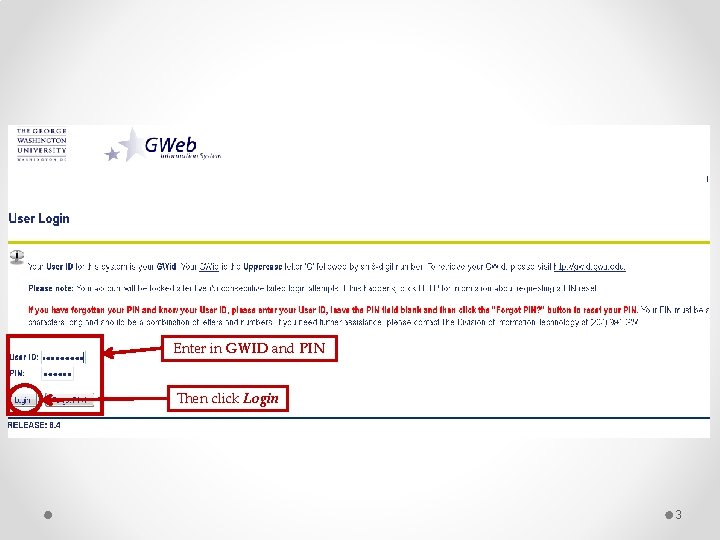
Enter in GWID and PIN Then click Login 3
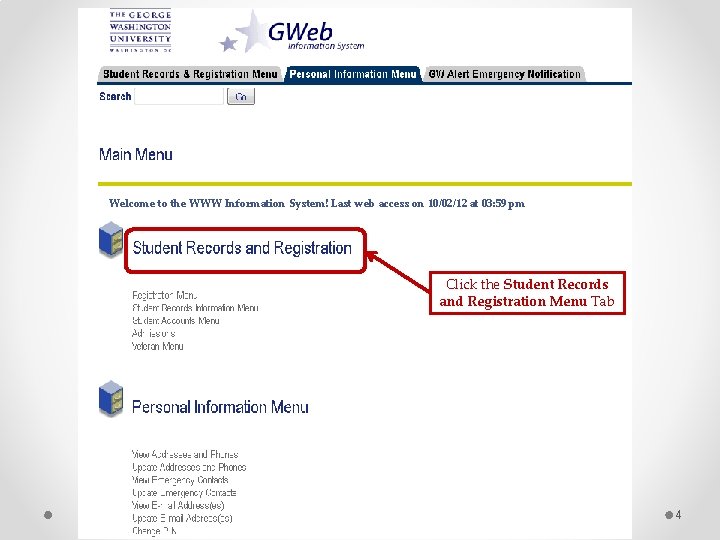
Welcome to the WWW Information System! Last web access on 10/02/12 at 03: 59 pm Click the Student Records and Registration Menu Tab 4
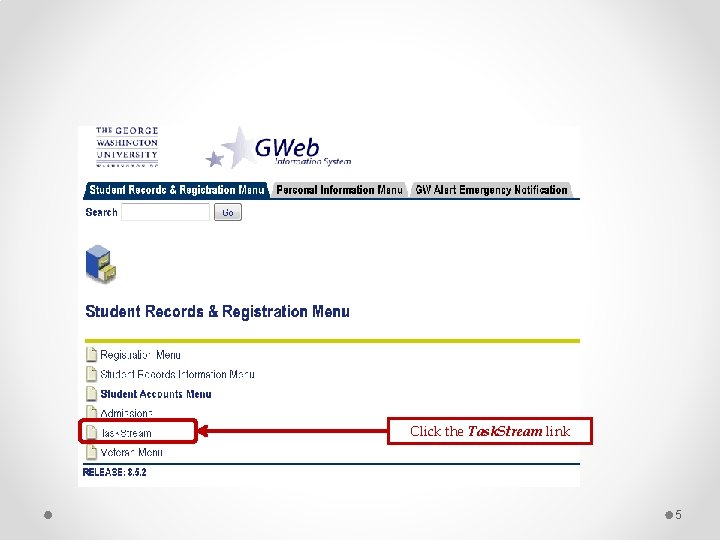
Click the Task. Stream link 5
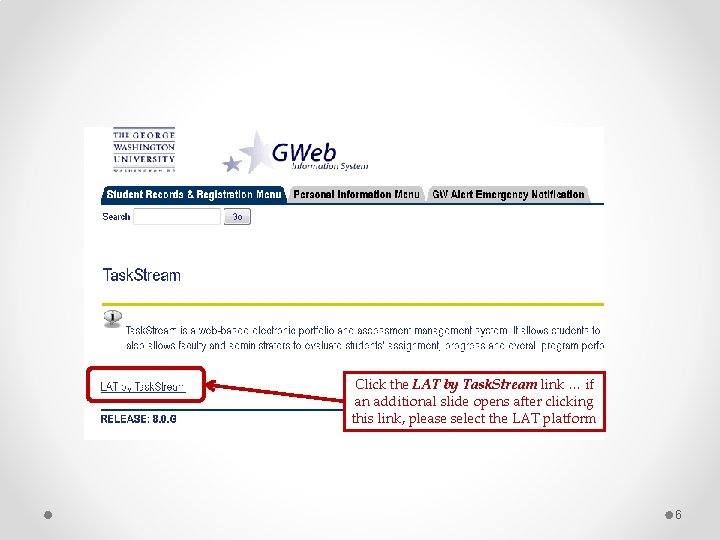
Click the LAT by Task. Stream link … if an additional slide opens after clicking this link, please select the LAT platform 6
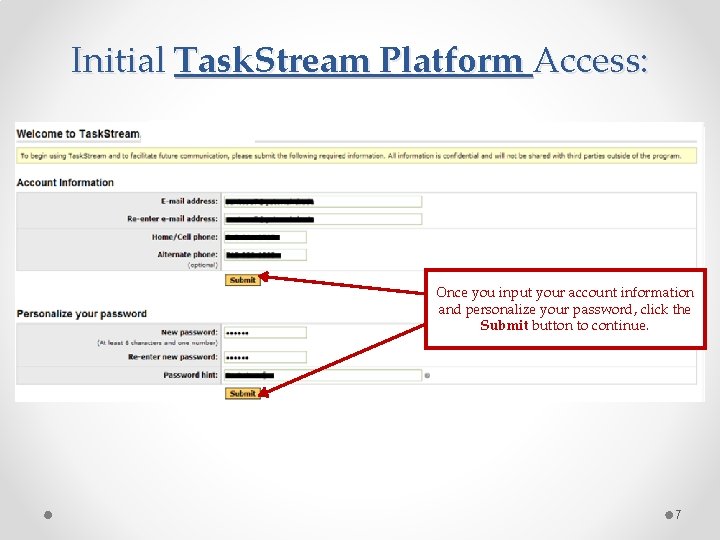
Initial Task. Stream Platform Access: Once you input your account information and personalize your password, click the Submit button to continue. 7
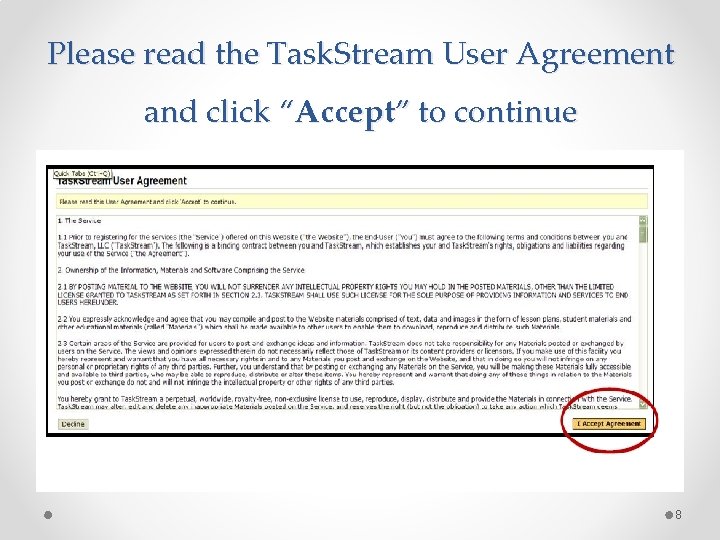
Please read the Task. Stream User Agreement and click “Accept” to continue 8
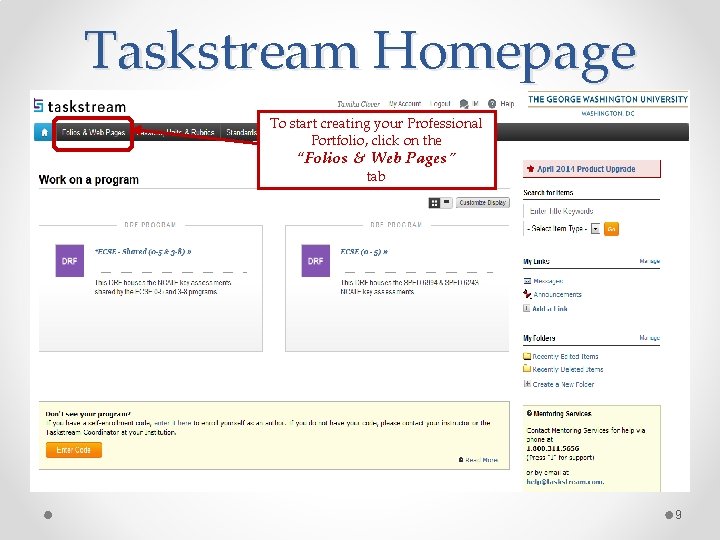
Taskstream Homepage To start creating your Professional Portfolio, click on the “Folios & Web Pages” tab 9
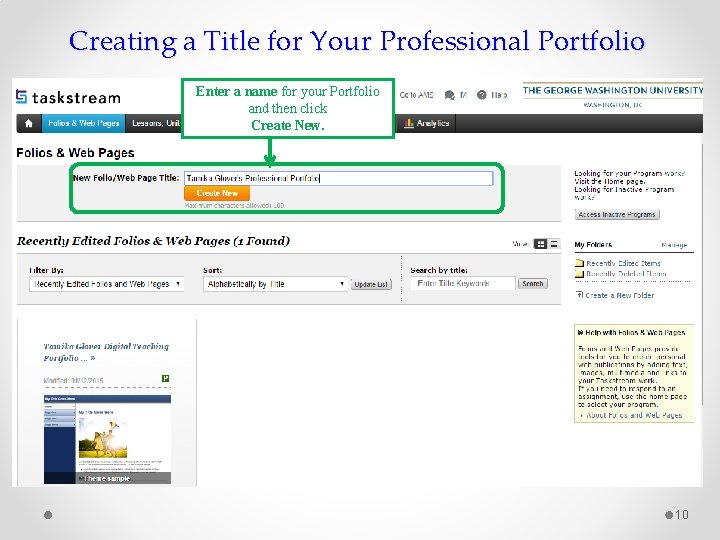
Creating a Title for Your Professional Portfolio Enter a name for your Portfolio and then click Create New. 10
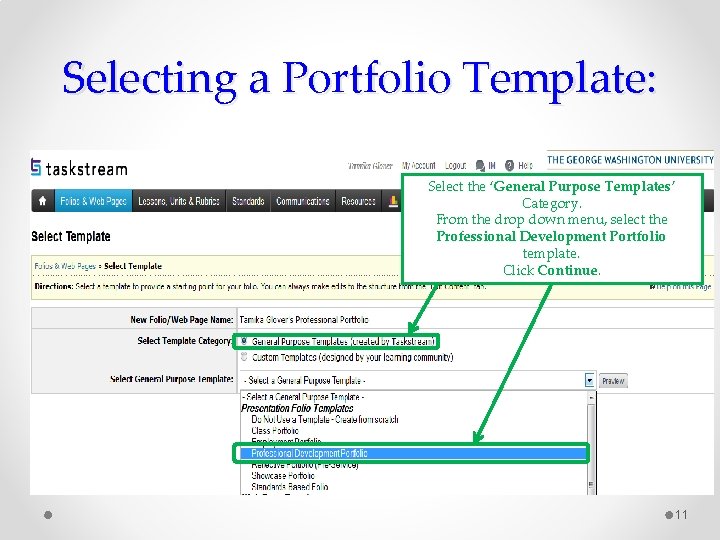
Selecting a Portfolio Template: Select the ‘General Purpose Templates’ Category. From the drop down menu, select the Professional Development Portfolio template. Click Continue. 11
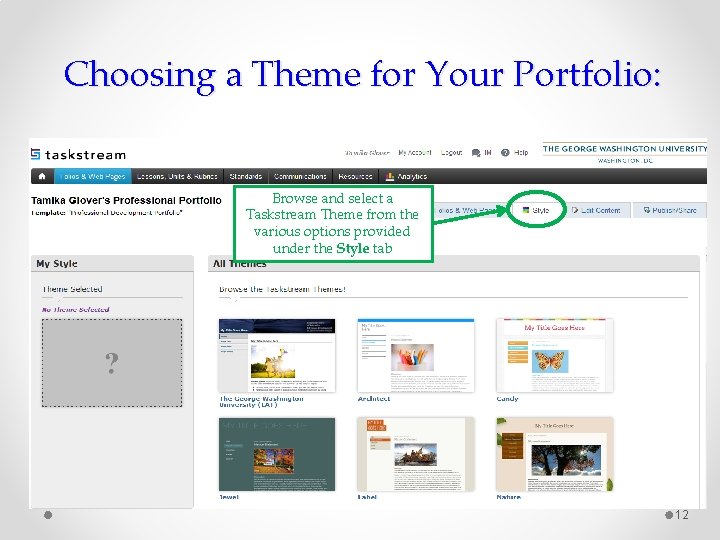
Choosing a Theme for Your Portfolio: Browse and select a Taskstream Theme from the various options provided under the Style tab 12
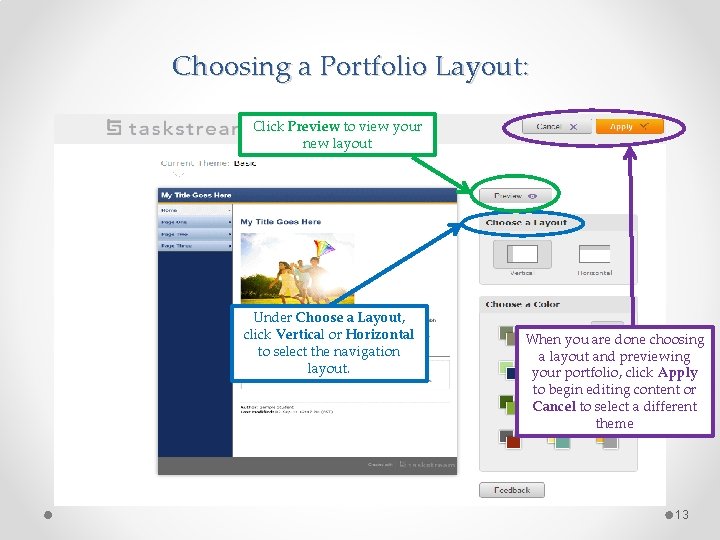
Choosing a Portfolio Layout: Click Preview to view your new layout Under Choose a Layout, click Vertical or Horizontal to select the navigation layout. When you are done choosing a layout and previewing your portfolio, click Apply to begin editing content or Cancel to select a different theme 13
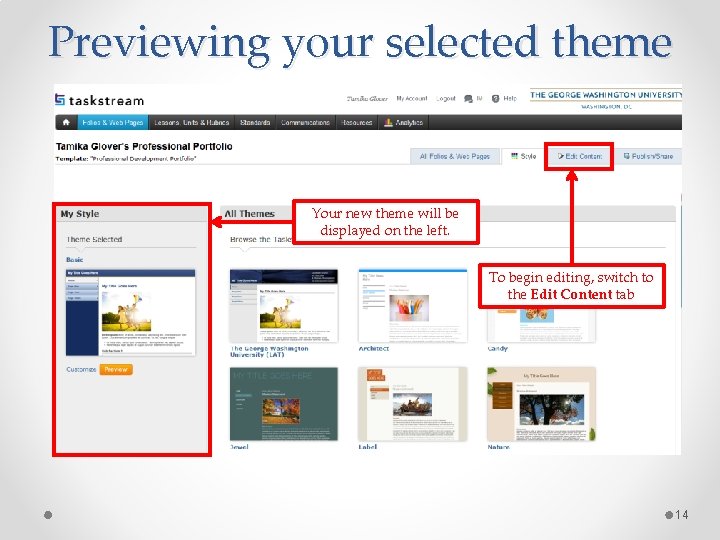
Previewing your selected theme Your new theme will be displayed on the left. To begin editing, switch to the Edit Content tab 14
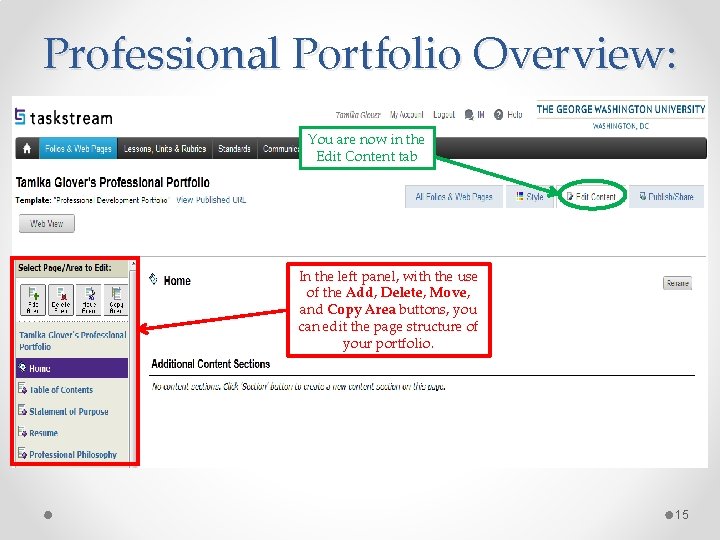
Professional Portfolio Overview: You are now in the Edit Content tab In the left panel, with the use of the Add, Delete, Move, and Copy Area buttons, you can edit the page structure of your portfolio. 15
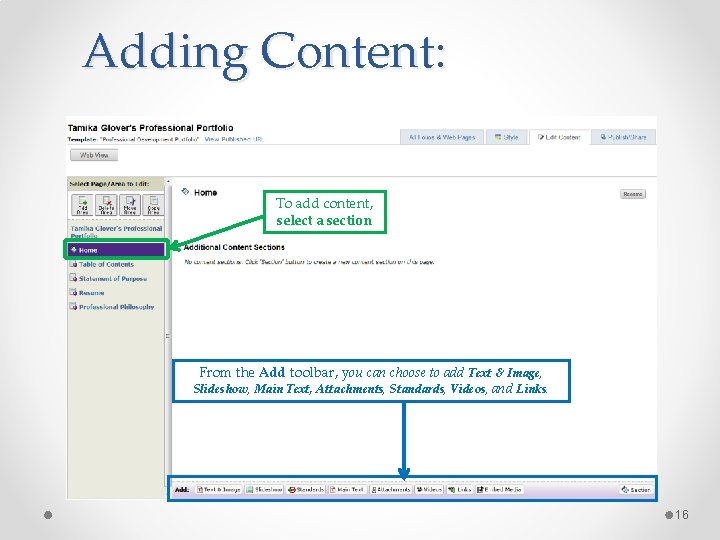
Adding Content: To add content, select a section From the Add toolbar, you can choose to add Text & Image, Slideshow, Main Text, Attachments, Standards, Videos, and Links. 16
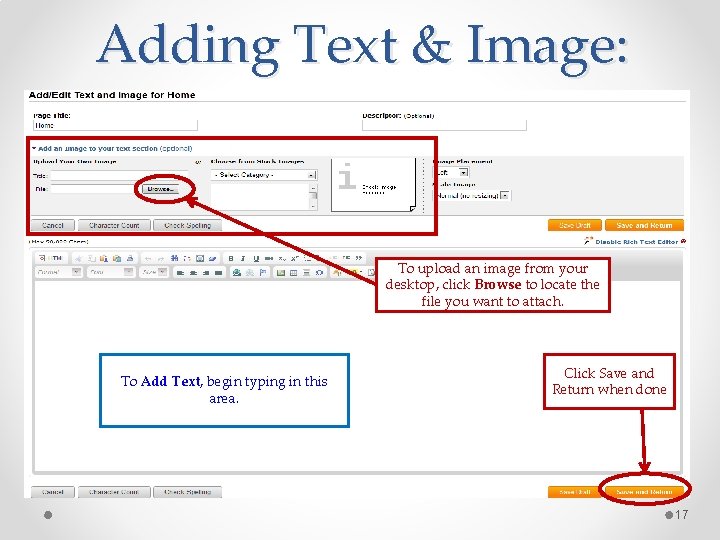
Adding Text & Image: To upload an image from your desktop, click Browse to locate the file you want to attach. To Add Text, begin typing in this area. Click Save and Return when done 17
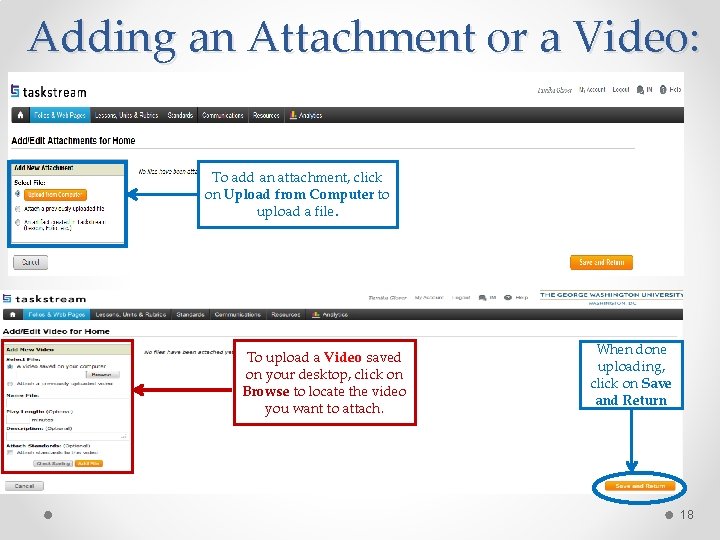
Adding an Attachment or a Video: To add an attachment, click on Upload from Computer to upload a file. To upload a Video saved on your desktop, click on Browse to locate the video you want to attach. When done uploading, click on Save and Return 18
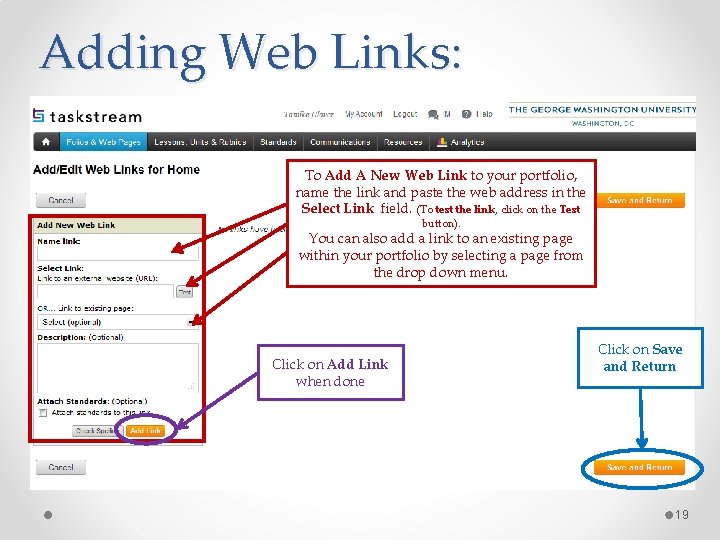
Adding Web Links: To Add A New Web Link to your portfolio, name the link and paste the web address in the Select Link field. (To test the link, click on the Test button). You can also add a link to an existing page within your portfolio by selecting a page from the drop down menu. Click on Add Link when done Click on Save and Return 19
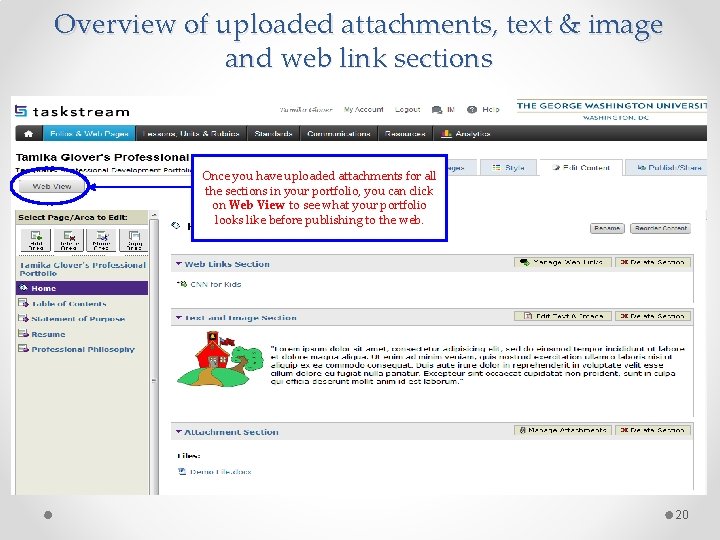
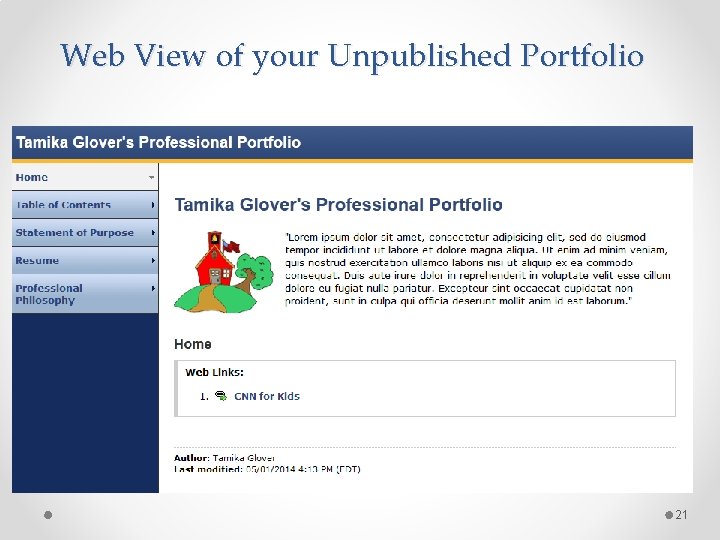
Overview of uploaded attachments, text & image and web link sections Once you have uploaded attachments for all the sections in your portfolio, you can click on Web View to see what your portfolio looks like before publishing to the web. 20
Web View of your Unpublished Portfolio 21
Next Step: Publishing Your Professional Portfolio! Publish your portfolio to the Internet via a customized web address that you create. 22
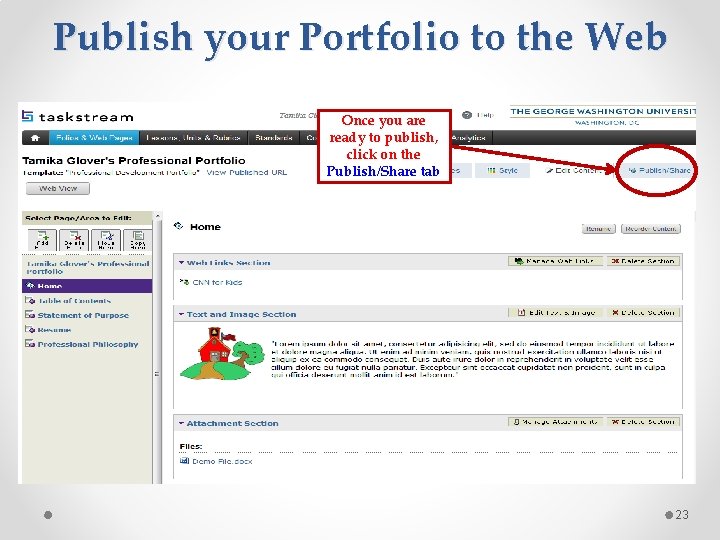
Publish your Portfolio to the Web Once you are ready to publish, click on the Publish/Share tab 23
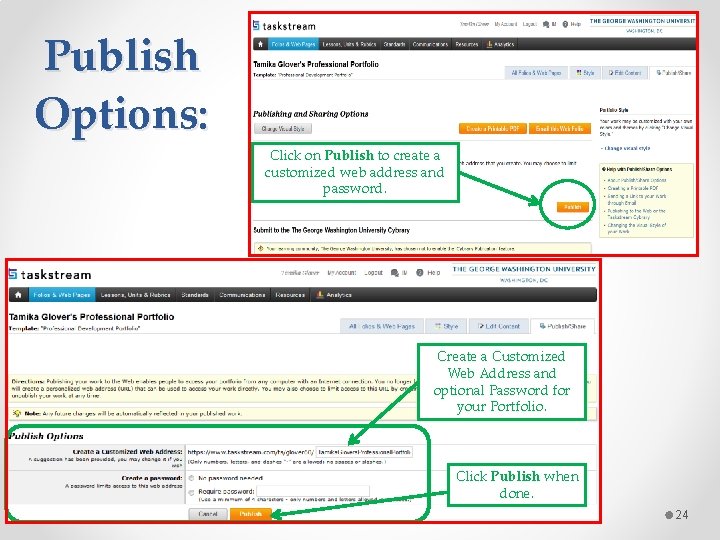
Publish Options: Click on Publish to create a customized web address and password. Create a Customized Web Address and optional Password for your Portfolio. Click Publish when done. 24
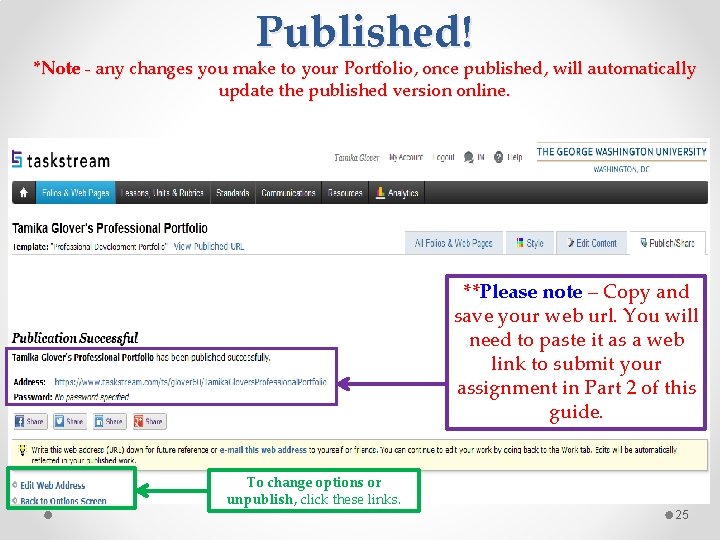
Published! *Note - any changes you make to your Portfolio, once published, will automatically update the published version online. **Please note – Copy and save your web url. You will need to paste it as a web link to submit your assignment in Part 2 of this guide. To change options or unpublish, click these links. 25
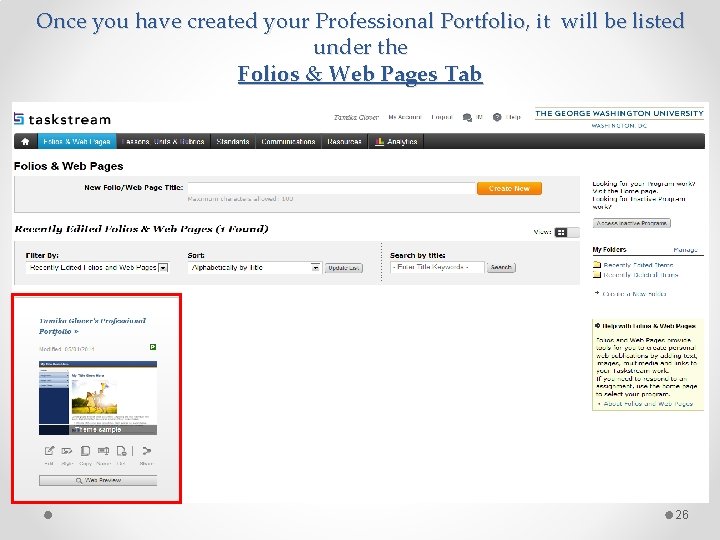
Once you have created your Professional Portfolio, it will be listed under the Folios & Web Pages Tab 26
How to submit your Professional Portfolio Web Url as an assignment Part 2 of 2 27
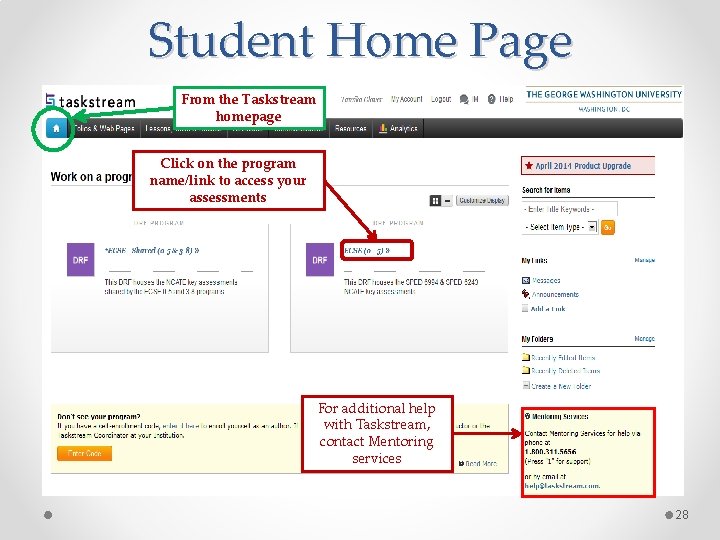
Student Home Page From the Taskstream homepage Click on the program name/link to access your assessments For additional help with Taskstream, contact Mentoring services 28
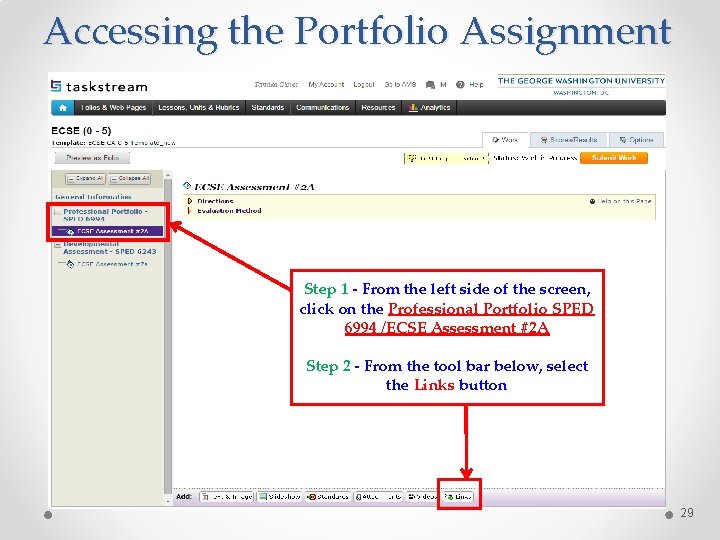
Accessing the Portfolio Assignment Step 1 - From the left side of the screen, click on the Professional Portfolio SPED 6994 /ECSE Assessment #2 A Step 2 - From the tool bar below, select the Links button 29
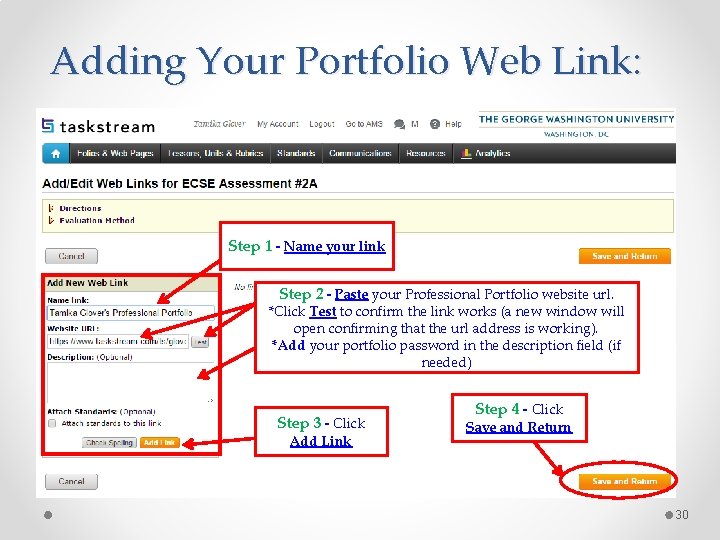
Adding Your Portfolio Web Link: Step 1 - Name your link Step 2 - Paste your Professional Portfolio website url. *Click Test to confirm the link works (a new window will open confirming that the url address is working). *Add your portfolio password in the description field (if needed) Step 3 - Click Add Link Step 4 - Click Save and Return 30
LAST STEP: Submit Your Work! 31
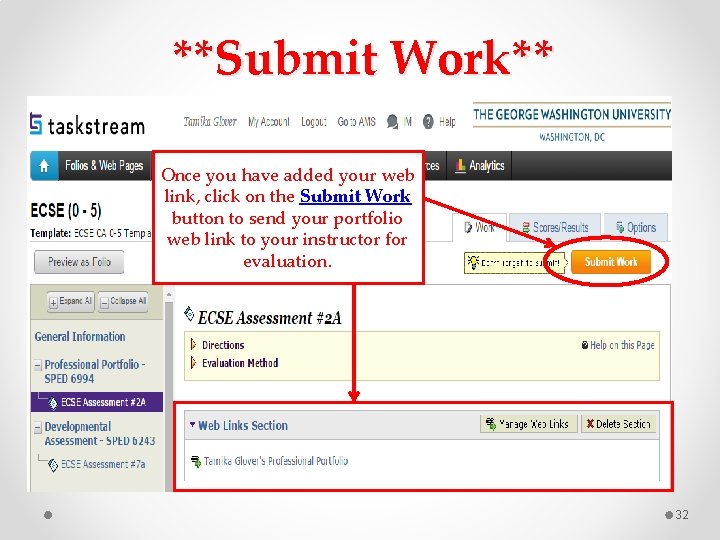
**Submit Work** Once you have added your web link, click on the Submit Work button to send your portfolio web link to your instructor for evaluation. 32
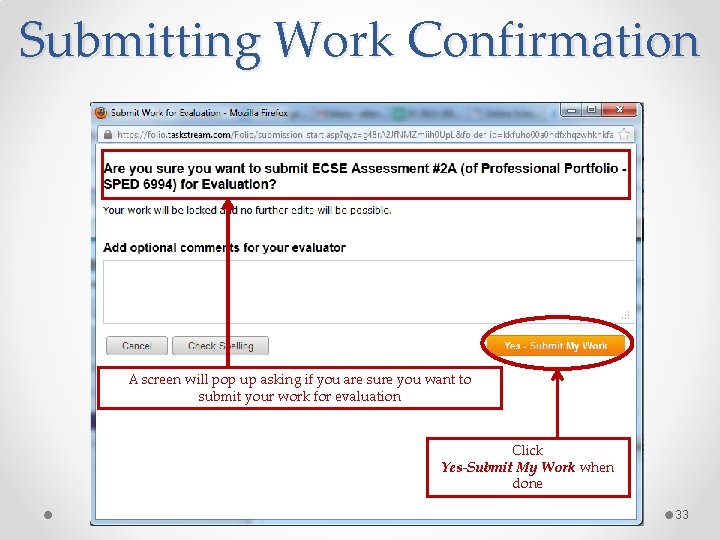
Submitting Work Confirmation A screen will pop up asking if you are sure you want to submit your work for evaluation Click Yes-Submit My Work when done 33
CONGRATULATIONS!! YOU HAVE SUCCESSFULLY SUBMITTED YOUR PROFESSIONAL PORTFOLIO FOR EVALUATION 34
Thank you! For additional assistance, feel free to contact: Task. Stream’s Mentoring Services department by calling 1 -800 -311 -5656 or email help@taskstream. com Or the GSEHD Task. Stream Administrators, Leslie J. Ward, Ed. D. , and Ellen Wanjiru by calling 202 -994 -0359 or emailing oppats@gwu. edu 35