DUNE APA Design Overview for Technical Design Review
- Slides: 52

DUNE APA Design Overview for Technical Design Review July 13&14, 2016 Lee Greenler University of Wisconsin Physical Sciences Lab

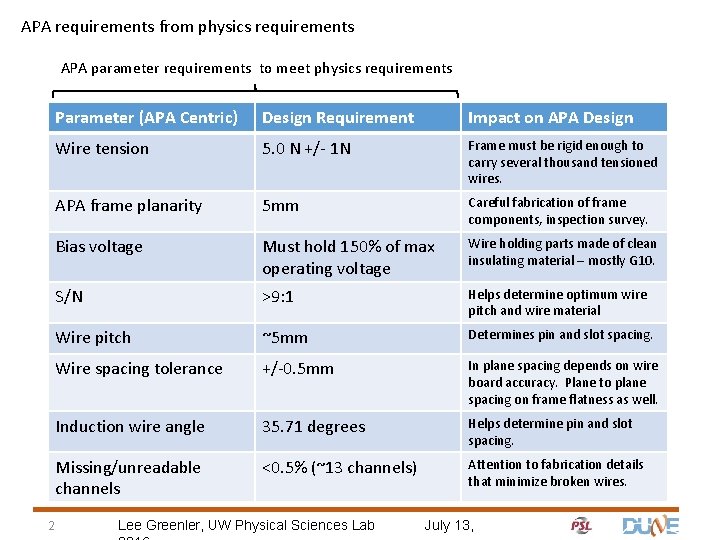
APA requirements from physics requirements APA parameter requirements to meet physics requirements 2 Parameter (APA Centric) Design Requirement Impact on APA Design Wire tension 5. 0 N +/- 1 N Frame must be rigid enough to carry several thousand tensioned wires. APA frame planarity 5 mm Careful fabrication of frame components, inspection survey. Bias voltage Must hold 150% of max operating voltage Wire holding parts made of clean insulating material – mostly G 10. S/N >9: 1 Helps determine optimum wire pitch and wire material Wire pitch ~5 mm Determines pin and slot spacing. Wire spacing tolerance +/-0. 5 mm In plane spacing depends on wire board accuracy. Plane to plane spacing on frame flatness as well. Induction wire angle 35. 71 degrees Helps determine pin and slot spacing. Missing/unreadable channels <0. 5% (~13 channels) Attention to fabrication details that minimize broken wires. Lee Greenler, UW Physical Sciences Lab July 13,

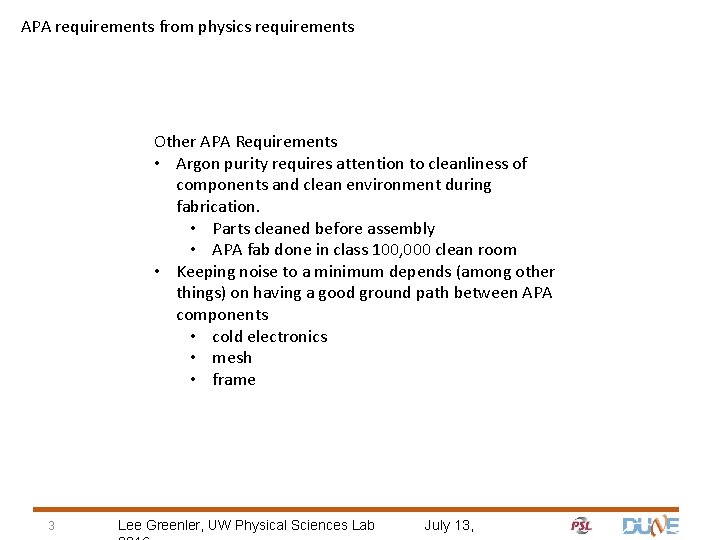
APA requirements from physics requirements Other APA Requirements • Argon purity requires attention to cleanliness of components and clean environment during fabrication. • Parts cleaned before assembly • APA fab done in class 100, 000 clean room • Keeping noise to a minimum depends (among other things) on having a good ground path between APA components • cold electronics • mesh • frame 3 Lee Greenler, UW Physical Sciences Lab July 13,

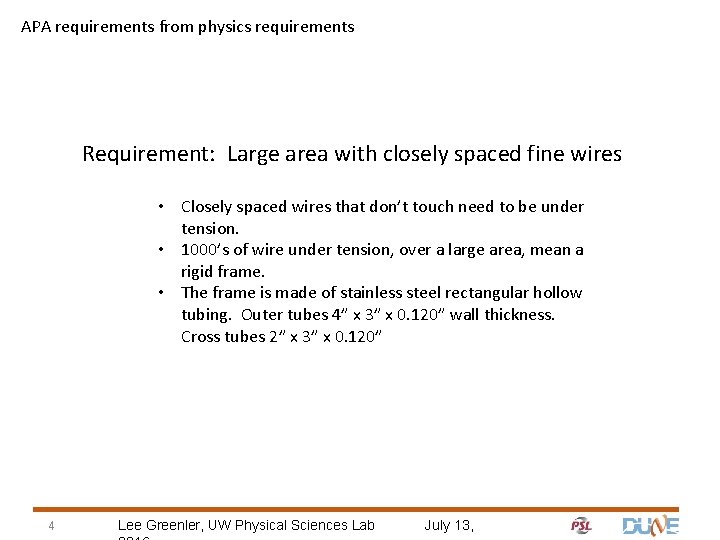
APA requirements from physics requirements Requirement: Large area with closely spaced fine wires • Closely spaced wires that don’t touch need to be under tension. • 1000’s of wire under tension, over a large area, mean a rigid frame. • The frame is made of stainless steel rectangular hollow tubing. Outer tubes 4” x 3” x 0. 120” wall thickness. Cross tubes 2” x 3” x 0. 120” 4 Lee Greenler, UW Physical Sciences Lab July 13,

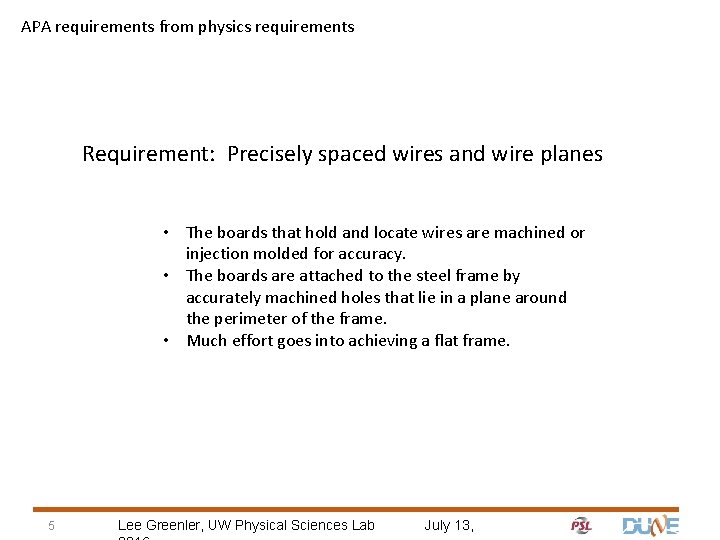
APA requirements from physics requirements Requirement: Precisely spaced wires and wire planes • The boards that hold and locate wires are machined or injection molded for accuracy. • The boards are attached to the steel frame by accurately machined holes that lie in a plane around the perimeter of the frame. • Much effort goes into achieving a flat frame. 5 Lee Greenler, UW Physical Sciences Lab July 13,

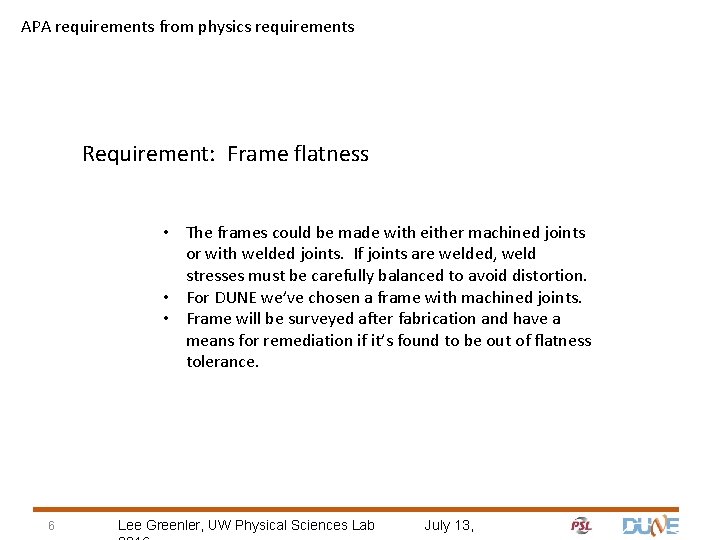
APA requirements from physics requirements Requirement: Frame flatness • The frames could be made with either machined joints or with welded joints. If joints are welded, weld stresses must be carefully balanced to avoid distortion. • For DUNE we’ve chosen a frame with machined joints. • Frame will be surveyed after fabrication and have a means for remediation if it’s found to be out of flatness tolerance. 6 Lee Greenler, UW Physical Sciences Lab July 13,

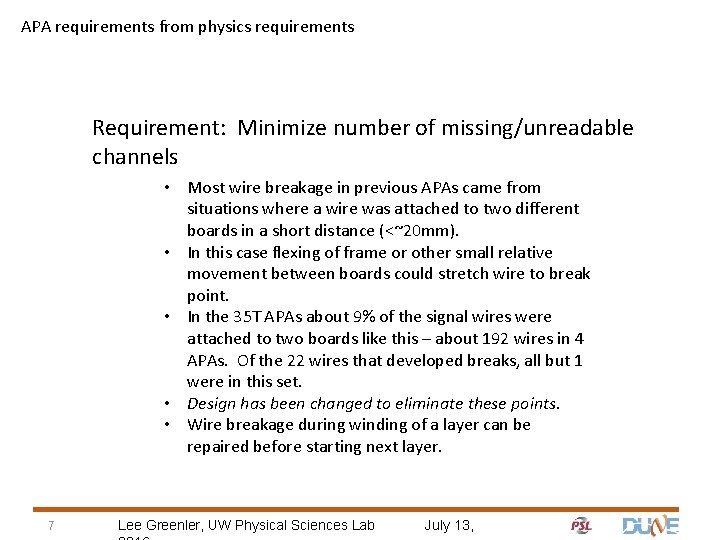
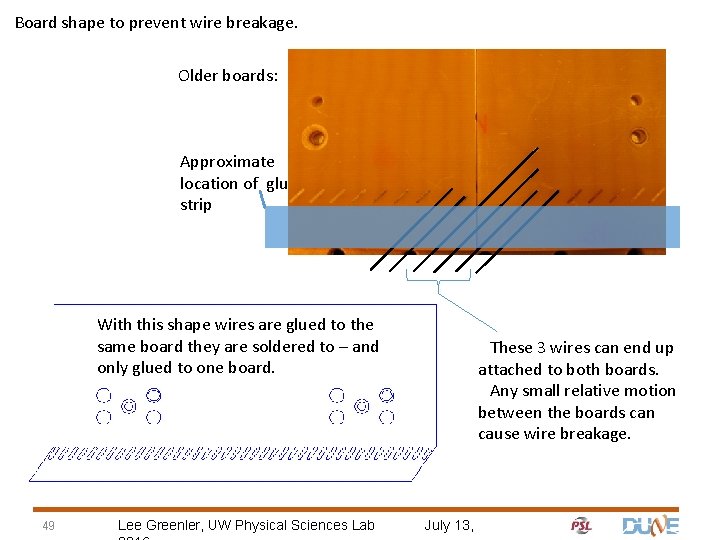
APA requirements from physics requirements Requirement: Minimize number of missing/unreadable channels • Most wire breakage in previous APAs came from situations where a wire was attached to two different boards in a short distance (<~20 mm). • In this case flexing of frame or other small relative movement between boards could stretch wire to break point. • In the 35 T APAs about 9% of the signal wires were attached to two boards like this – about 192 wires in 4 APAs. Of the 22 wires that developed breaks, all but 1 were in this set. • Design has been changed to eliminate these points. • Wire breakage during winding of a layer can be repaired before starting next layer. 7 Lee Greenler, UW Physical Sciences Lab July 13,

APA requirements from physics requirements Requirement: Wire position accuracy • Addressed later in talk 8 Lee Greenler, UW Physical Sciences Lab July 13,

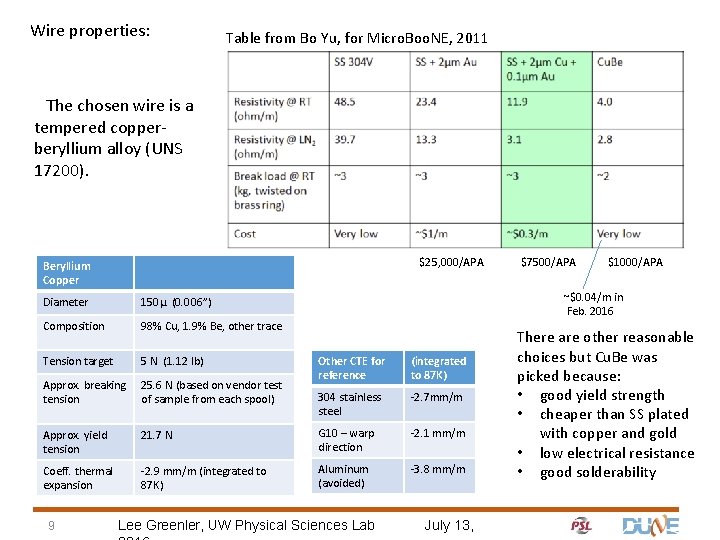
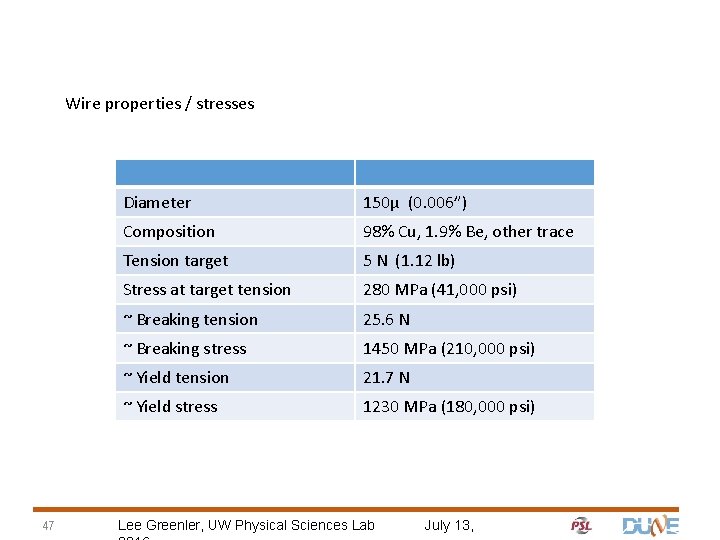
Wire properties: Table from Bo Yu, for Micro. Boo. NE, 2011 The chosen wire is a tempered copperberyllium alloy (UNS 17200). $25, 000/APA Beryllium Copper Diameter 150μ (0. 006”) Composition 98% Cu, 1. 9% Be, other trace Tension target 5 N (1. 12 lb) Approx. breaking tension 25. 6 N (based on vendor test of sample from each spool) Approx. yield tension Coeff. thermal expansion 9 $7500/APA $1000/APA ~$0. 04/m in Feb. 2016 Other CTE for reference (integrated to 87 K) 304 stainless steel -2. 7 mm/m 21. 7 N G 10 – warp direction -2. 1 mm/m -2. 9 mm/m (integrated to 87 K) Aluminum (avoided) -3. 8 mm/m Lee Greenler, UW Physical Sciences Lab July 13, There are other reasonable choices but Cu. Be was picked because: • good yield strength • cheaper than SS plated with copper and gold • low electrical resistance • good solderability

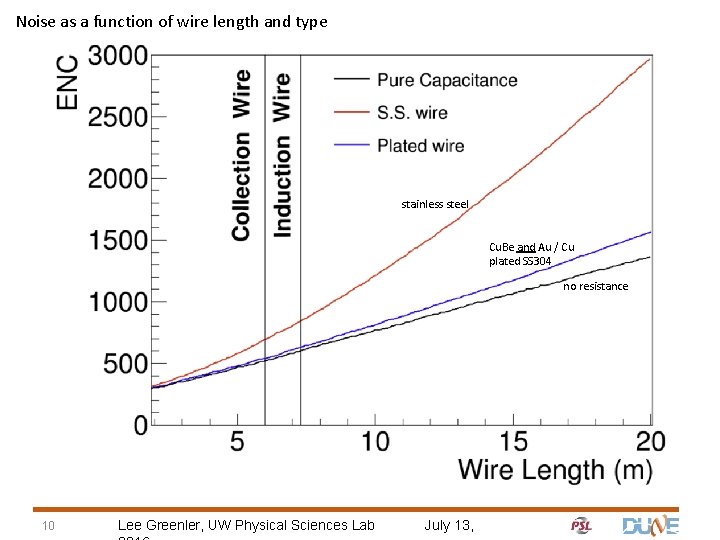
Noise as a function of wire length and type stainless steel Cu. Be and Au / Cu plated SS 304 no resistance 10 Lee Greenler, UW Physical Sciences Lab July 13,

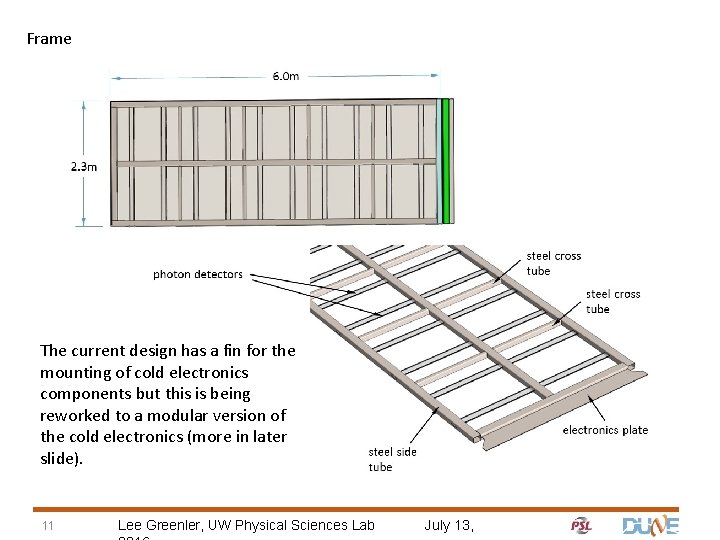
Frame The current design has a fin for the mounting of cold electronics components but this is being reworked to a modular version of the cold electronics (more in later slide). 11 Lee Greenler, UW Physical Sciences Lab July 13,

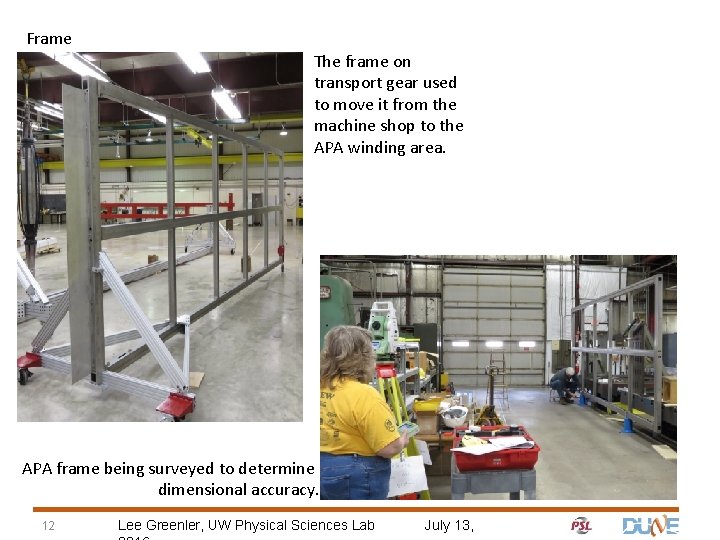
Frame The frame on transport gear used to move it from the machine shop to the APA winding area. APA frame being surveyed to determine dimensional accuracy. 12 Lee Greenler, UW Physical Sciences Lab July 13,

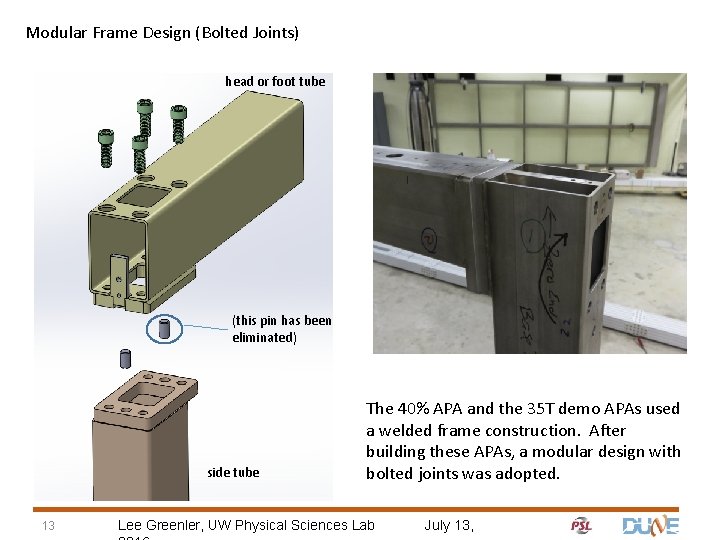
Modular Frame Design (Bolted Joints) head or foot tube (this pin has been eliminated) side tube 13 The 40% APA and the 35 T demo APAs used a welded frame construction. After building these APAs, a modular design with bolted joints was adopted. Lee Greenler, UW Physical Sciences Lab July 13,

Modular Frame Design (Bolted Joints) Keeping a large steel frame flat during welding takes great care – including many turns from side to keep the amount of weld balanced. This is a time-consuming process. With the modular approach, connection pads are still welded to the tubes but they are machined flat and square after welding. This ensures good alignment of the mating tubes. Also, at this point the welding is being done to a tube instead of an entire frame. It also: • makes handling/storing of pieces between welding and clean assembly easier because it can be done as separate pieces. • allows easier replacement of a part found to be defective (no grinding apart of welded joints). • allows for shimming in welded joints to fine tune dimensions and alignment. • makes gas backing easier during welding if necessary. • allows correction of frame that’s out-of-flatness-spec by loosening and retightening the appropriate joints – or even replacing a tube. 14 Lee Greenler, UW Physical Sciences Lab July 13,

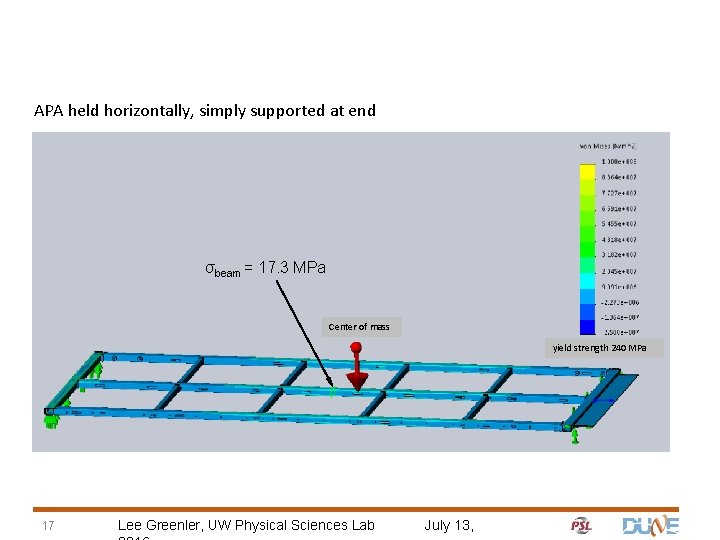
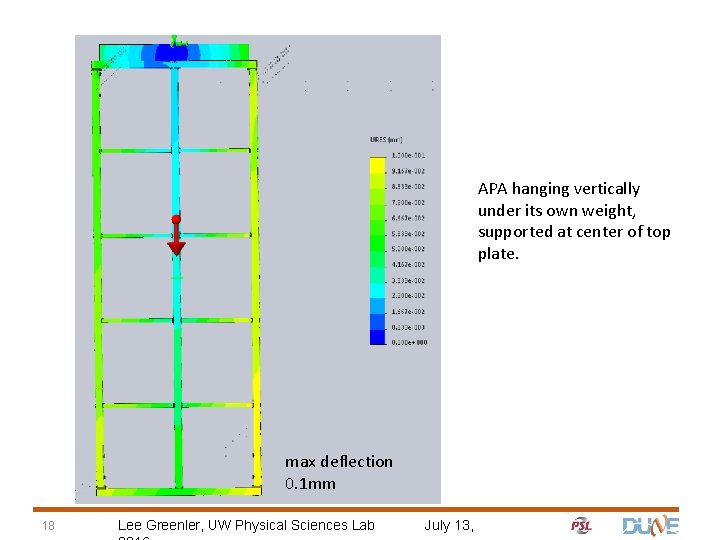
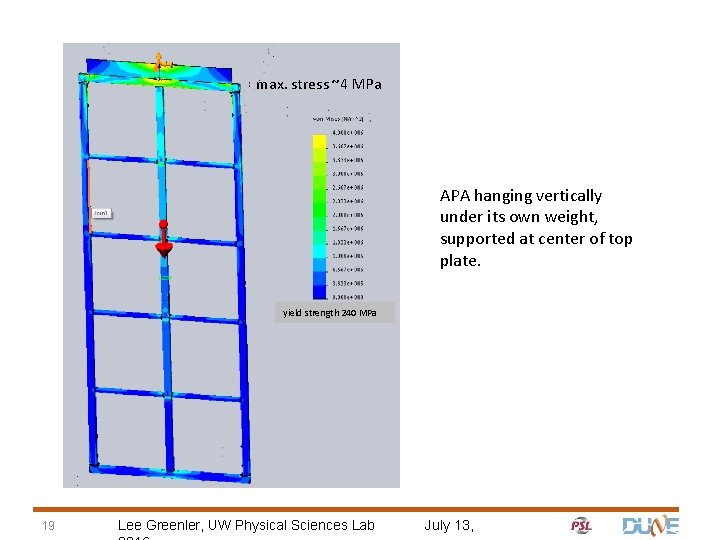
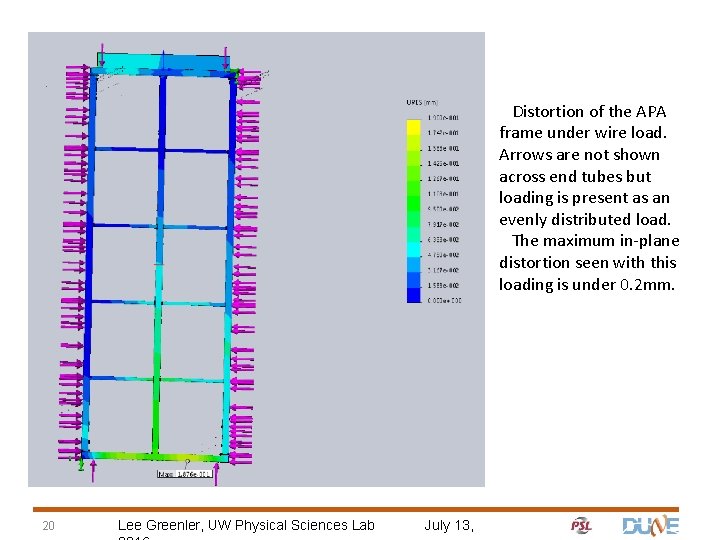
Finite Element Analyses Of the finite element analyses (FEA) and hand calculations done to the APA frame the cases of most interest are: • The APA supported horizontally by its ends – its ends allowed to rotate. This is the weakest orientation of the APA and it’s put in this position at times during fabrication. • Hanging under its own weight by a single support at the top center. This is its normal installed position. • The effect on the frame of compression from the wires. 15 Lee Greenler, UW Physical Sciences Lab July 13,

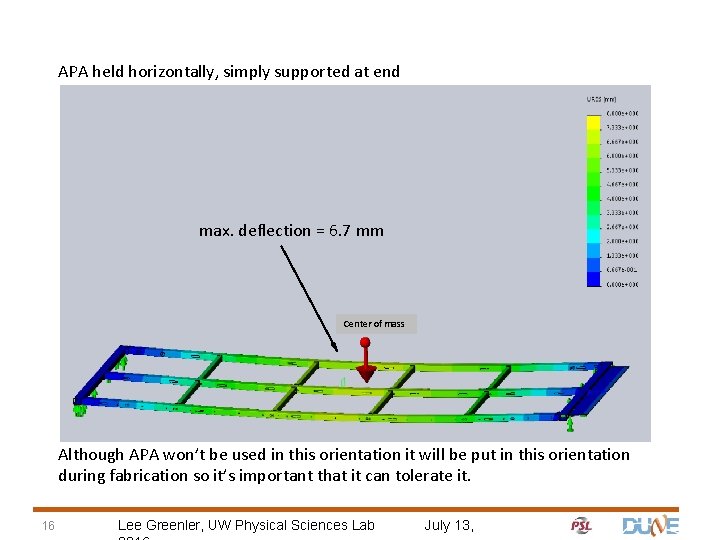
APA held horizontally, simply supported at end max. deflection = 6. 7 mm Center of mass Although APA won’t be used in this orientation it will be put in this orientation during fabrication so it’s important that it can tolerate it. 16 Lee Greenler, UW Physical Sciences Lab July 13,

APA held horizontally, simply supported at end σbeam = 17. 3 MPa Center of mass yield strength 240 MPa 17 Lee Greenler, UW Physical Sciences Lab July 13,

APA hanging vertically under its own weight, supported at center of top plate. max deflection 0. 1 mm 18 Lee Greenler, UW Physical Sciences Lab July 13,

max. stress ~4 MPa APA hanging vertically under its own weight, supported at center of top plate. yield strength 240 MPa 19 Lee Greenler, UW Physical Sciences Lab July 13,

Distortion of the APA frame under wire load. Arrows are not shown across end tubes but loading is present as an evenly distributed load. The maximum in-plane distortion seen with this loading is under 0. 2 mm. 20 Lee Greenler, UW Physical Sciences Lab July 13,

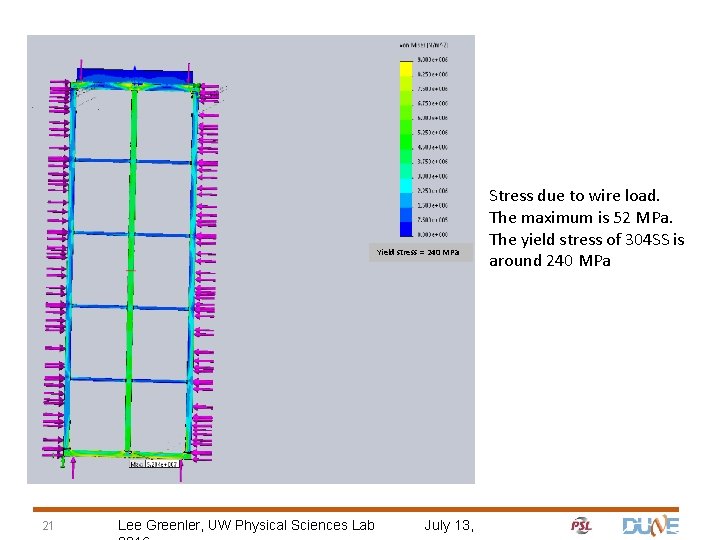
Yield stress = 240 MPa 21 Lee Greenler, UW Physical Sciences Lab July 13, Stress due to wire load. The maximum is 52 MPa. The yield stress of 304 SS is around 240 MPa

Buckling (e. g. the collapse of a tall thin column overloaded at the top): Although the compressive long direction load has raised concern about buckling, that is not an issue here: • The loads at opposite ends do not remain collinear as the frame deforms (like they do in the usual buckling cases) because the wires are constrained to stay close to the surface of the APA – eliminating the buckling mechanism. • If the frame were to start to bow, tilting of the boards that hold the wires would cause a change in wire tension strongly countering that bowing – opposite of the reinforcing sort of effect that leads to buckling. 22 Lee Greenler, UW Physical Sciences Lab July 13,

Frame distortion Specifications have been set for flatness of the APA frame and for deviations in wire to wire spacing as well as spacing between wire planes. Wire-to-wire and plane-to-plane spacing depends on accurate machining and location of the wire holding boards. Out-of-flatness of the frame can also cause a variation in wire plane spacing. The relationship is complicated. The frame material itself, stainless steel rectangular hollow tubing, is not a precision item. We’ve found suppliers that routinely provide better than average quality tubing. The APA has also been designed to minimize the effect of crookedness in the tubing on accurate location of the wire holding boards. 23 Lee Greenler, UW Physical Sciences Lab July 13,

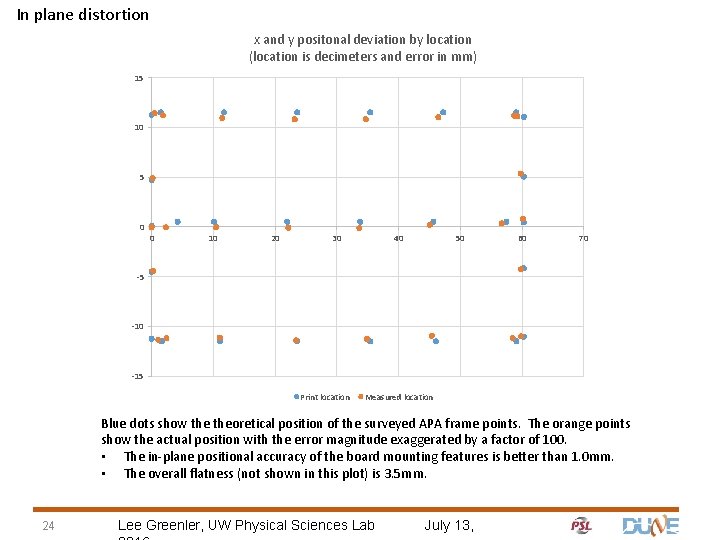
In plane distortion x and y positonal deviation by location (location is decimeters and error in mm) 15 10 5 0 0 10 20 30 40 50 60 70 -5 -10 -15 Print location Measured location Blue dots show theoretical position of the surveyed APA frame points. The orange points show the actual position with the error magnitude exaggerated by a factor of 100. • The in-plane positional accuracy of the board mounting features is better than 1. 0 mm. • The overall flatness (not shown in this plot) is 3. 5 mm. 24 Lee Greenler, UW Physical Sciences Lab July 13,

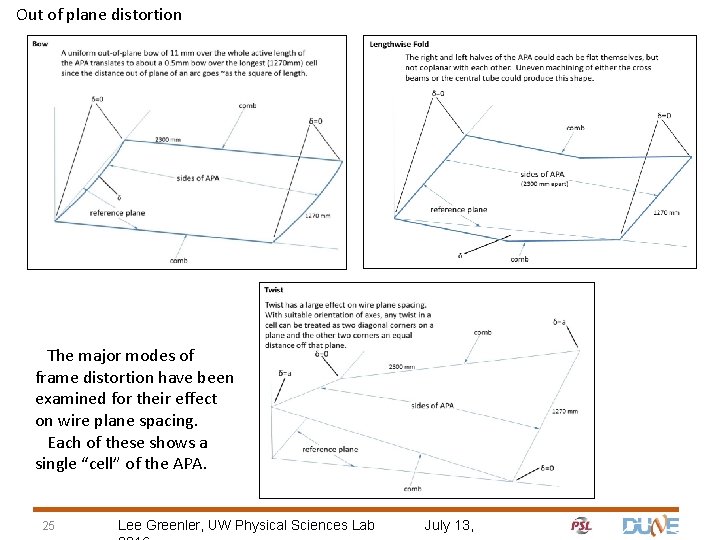
Out of plane distortion The major modes of frame distortion have been examined for their effect on wire plane spacing. Each of these shows a single “cell” of the APA. 25 Lee Greenler, UW Physical Sciences Lab July 13,

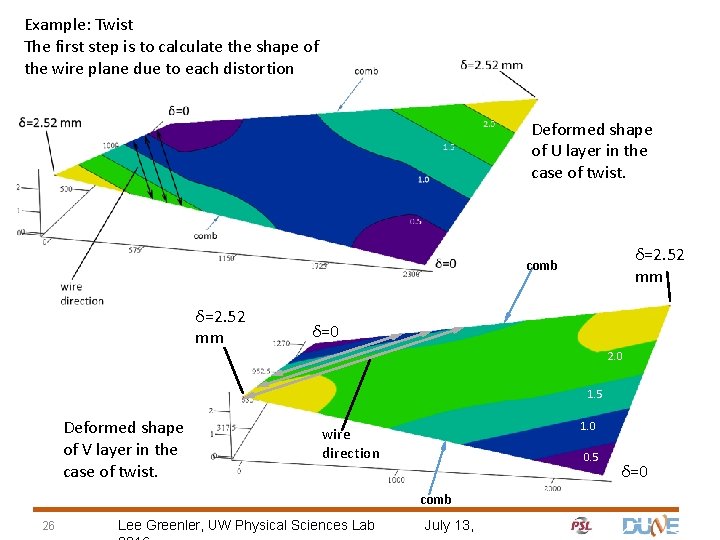
Example: Twist The first step is to calculate the shape of the wire plane due to each distortion Deformed shape of U layer in the case of twist. δ=2. 52 mm comb δ=2. 52 mm δ=0 2. 0 1. 5 Deformed shape of V layer in the case of twist. 1. 0 wire direction 0. 5 comb 26 Lee Greenler, UW Physical Sciences Lab July 13, δ=0

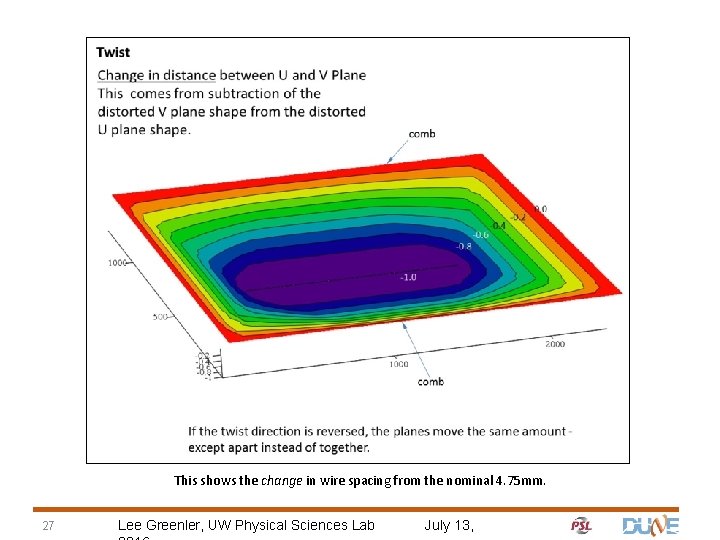
This shows the change in wire spacing from the nominal 4. 75 mm. 27 Lee Greenler, UW Physical Sciences Lab July 13,

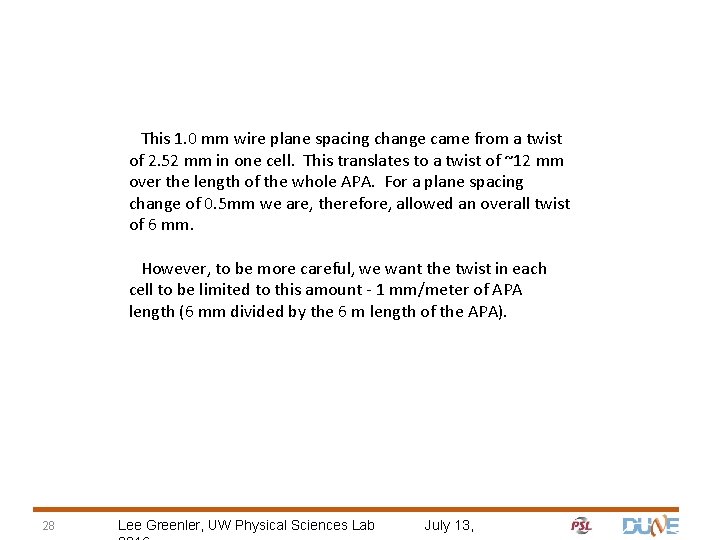
This 1. 0 mm wire plane spacing change came from a twist of 2. 52 mm in one cell. This translates to a twist of ~12 mm over the length of the whole APA. For a plane spacing change of 0. 5 mm we are, therefore, allowed an overall twist of 6 mm. However, to be more careful, we want the twist in each cell to be limited to this amount - 1 mm/meter of APA length (6 mm divided by the 6 m length of the APA). 28 Lee Greenler, UW Physical Sciences Lab July 13,

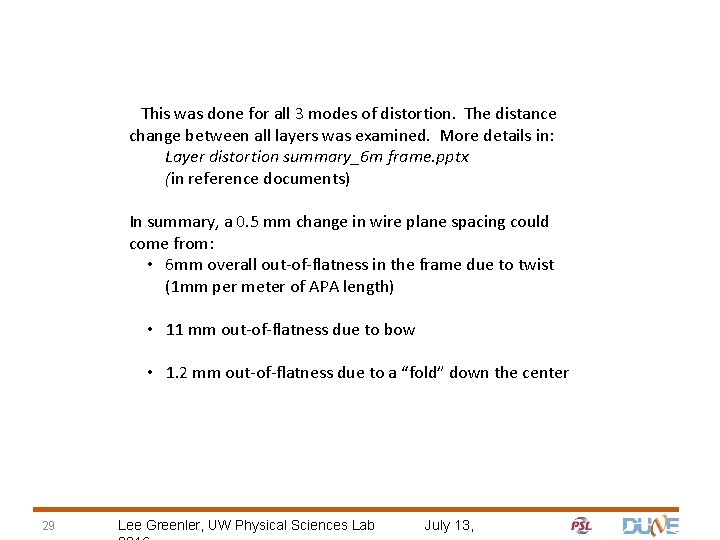
This was done for all 3 modes of distortion. The distance change between all layers was examined. More details in: Layer distortion summary_6 m frame. pptx (in reference documents) In summary, a 0. 5 mm change in wire plane spacing could come from: • 6 mm overall out-of-flatness in the frame due to twist (1 mm per meter of APA length) • 11 mm out-of-flatness due to bow • 1. 2 mm out-of-flatness due to a “fold” down the center 29 Lee Greenler, UW Physical Sciences Lab July 13,

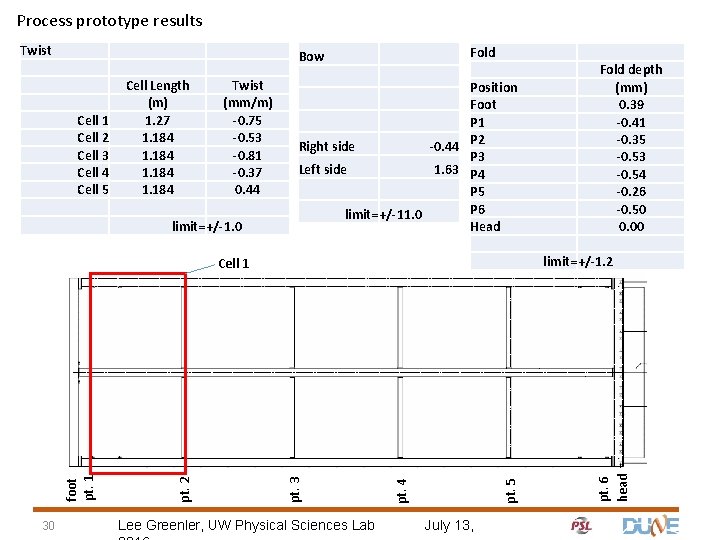
Process prototype results Fold Bow Cell 1 Cell 2 Cell 3 Cell 4 Cell 5 Cell Length (m) 1. 27 1. 184 Twist (mm/m) -0. 75 -0. 53 -0. 81 -0. 37 0. 44 limit=+/-1. 0 Position Foot P 1 P 2 Right side -0. 44 P 3 Left side 1. 63 P 4 P 5 P 6 limit=+/-11. 0 Head limit=+/-1. 2 Lee Greenler, UW Physical Sciences Lab pt. 5 pt. 4 pt. 3 pt. 2 foot pt. 1 Cell 1 30 Fold depth (mm) 0. 39 -0. 41 -0. 35 -0. 53 -0. 54 -0. 26 -0. 50 0. 00 July 13, pt. 6 head Twist

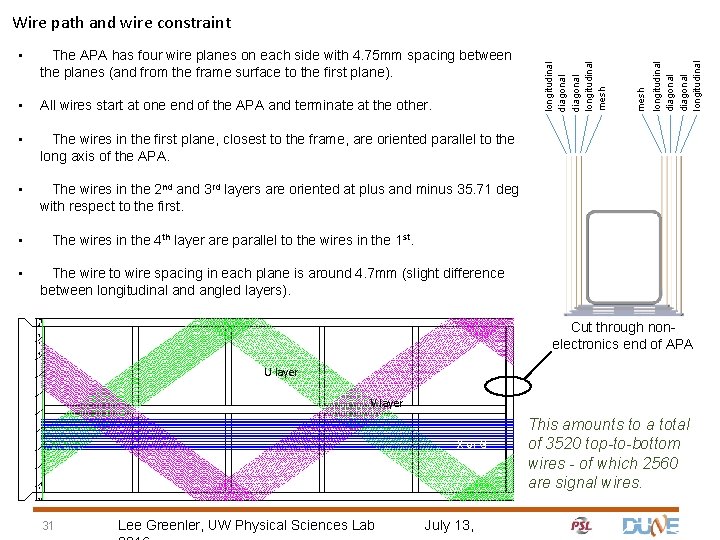
• All wires start at one end of the APA and terminate at the other. • The wires in the first plane, closest to the frame, are oriented parallel to the long axis of the APA. • The wires in the 2 nd and 3 rd layers are oriented at plus and minus 35. 71 deg with respect to the first. • • longitudinal diagonal longitudinal The APA has four wire planes on each side with 4. 75 mm spacing between the planes (and from the frame surface to the first plane). mesh • longitudinal diagonal longitudinal mesh Wire path and wire constraint The wires in the 4 th layer are parallel to the wires in the 1 st. The wire to wire spacing in each plane is around 4. 7 mm (slight difference between longitudinal and angled layers). Cut through nonelectronics end of APA U layer V layer X or G layer 31 Lee Greenler, UW Physical Sciences Lab July 13, This amounts to a total of 3520 top-to-bottom wires - of which 2560 are signal wires.

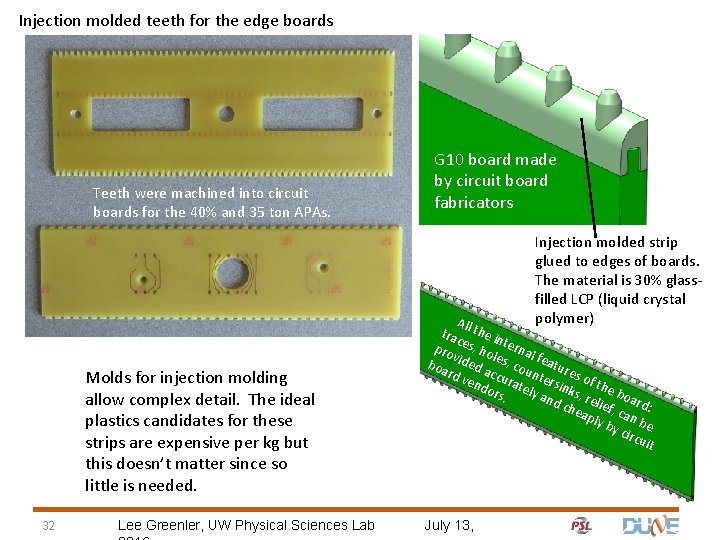
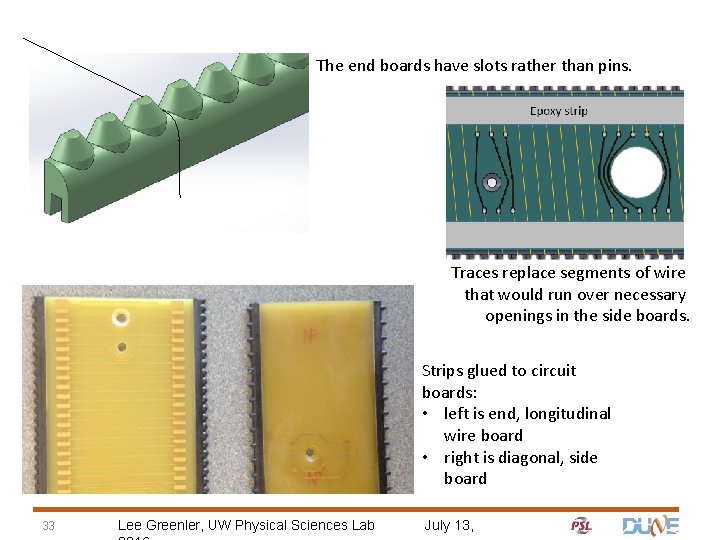
Injection molded teeth for the edge boards Teeth were machined into circuit boards for the 40% and 35 ton APAs. G 10 board made by circuit board fabricators Injection molded strip glued to edges of boards. The material is 30% glassfilled LCP (liquid crystal polymer) Molds for injection molding allow complex detail. The ideal plastics candidates for these strips are expensive per kg but this doesn’t matter since so little is needed. 32 Lee Greenler, UW Physical Sciences Lab Al trac l the in pro es, ho ternal l v boa ided a es, cou featur e rd v c n end curate tersin s of th e k ors ly a. nd s, relie board che : apl f, can y by be circ uit July 13,

The end boards have slots rather than pins. Traces replace segments of wire that would run over necessary openings in the side boards. Strips glued to circuit boards: • left is end, longitudinal wire board • right is diagonal, side board 33 Lee Greenler, UW Physical Sciences Lab July 13,

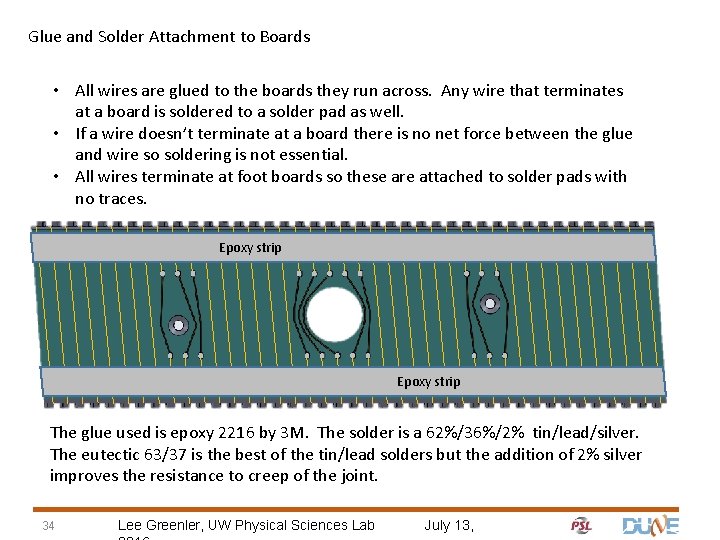
Glue and Solder Attachment to Boards • All wires are glued to the boards they run across. Any wire that terminates at a board is soldered to a solder pad as well. • If a wire doesn’t terminate at a board there is no net force between the glue and wire so soldering is not essential. • All wires terminate at foot boards so these are attached to solder pads with no traces. Epoxy strip The glue used is epoxy 2216 by 3 M. The solder is a 62%/36%/2% tin/lead/silver. The eutectic 63/37 is the best of the tin/lead solders but the addition of 2% silver improves the resistance to creep of the joint. 34 Lee Greenler, UW Physical Sciences Lab July 13,

Long term tension tests led us to increase the solder pad length from 3 mm to 7 mm between the 40% and the 35 T APAs. We also found that the 2216 epoxy must be thoroughly cured for maximum holding strength. Although it is hard after 12 -24 hours it takes 7 days to completely cure at room temperature (or a couple hours at 150 degrees F). After making these changes we ran more tests and got promising results. 35 Lee Greenler, UW Physical Sciences Lab July 13,

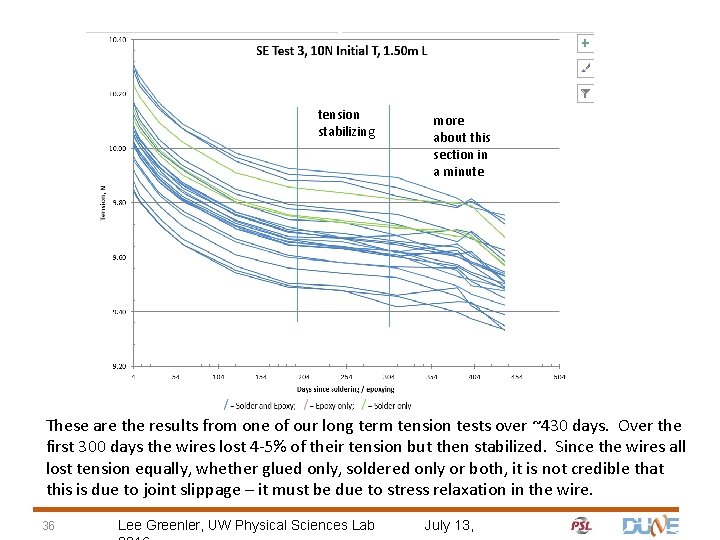
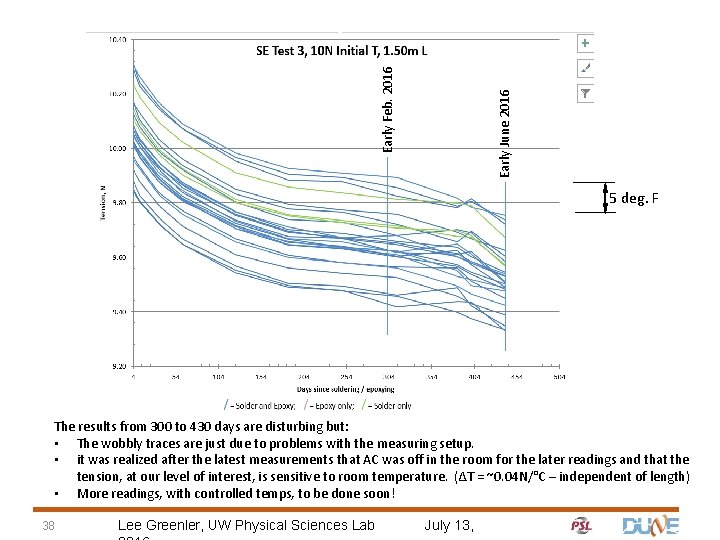
tension stabilizing more about this section in a minute These are the results from one of our long term tension tests over ~430 days. Over the first 300 days the wires lost 4 -5% of their tension but then stabilized. Since the wires all lost tension equally, whether glued only, soldered only or both, it is not credible that this is due to joint slippage – it must be due to stress relaxation in the wire. 36 Lee Greenler, UW Physical Sciences Lab July 13,

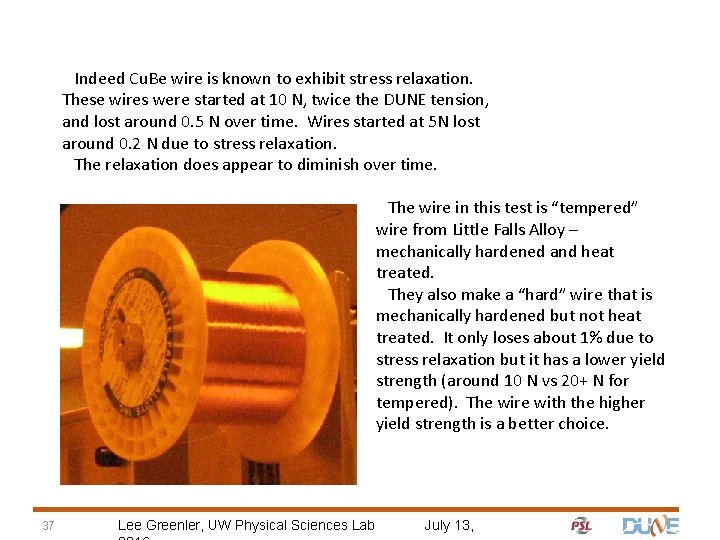
Indeed Cu. Be wire is known to exhibit stress relaxation. These wires were started at 10 N, twice the DUNE tension, and lost around 0. 5 N over time. Wires started at 5 N lost around 0. 2 N due to stress relaxation. The relaxation does appear to diminish over time. The wire in this test is “tempered” wire from Little Falls Alloy – mechanically hardened and heat treated. They also make a “hard” wire that is mechanically hardened but not heat treated. It only loses about 1% due to stress relaxation but it has a lower yield strength (around 10 N vs 20+ N for tempered). The wire with the higher yield strength is a better choice. 37 Lee Greenler, UW Physical Sciences Lab July 13,

Early June 2016 Early Feb. 2016 5 deg. F The results from 300 to 430 days are disturbing but: • The wobbly traces are just due to problems with the measuring setup. • it was realized after the latest measurements that AC was off in the room for the later readings and that the tension, at our level of interest, is sensitive to room temperature. (ΔT = ~0. 04 N/°C – independent of length) • More readings, with controlled temps, to be done soon! 38 Lee Greenler, UW Physical Sciences Lab July 13,

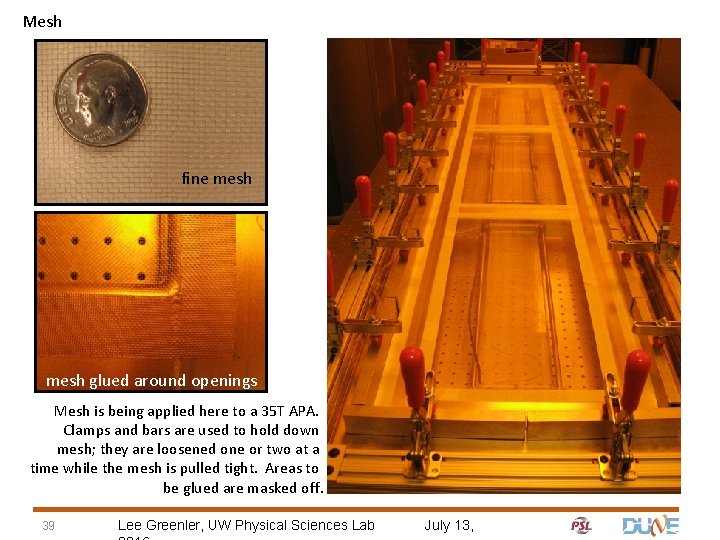
Mesh fine mesh glued around openings Mesh is being applied here to a 35 T APA. Clamps and bars are used to hold down mesh; they are loosened one or two at a time while the mesh is pulled tight. Areas to be glued are masked off. 39 Lee Greenler, UW Physical Sciences Lab July 13,

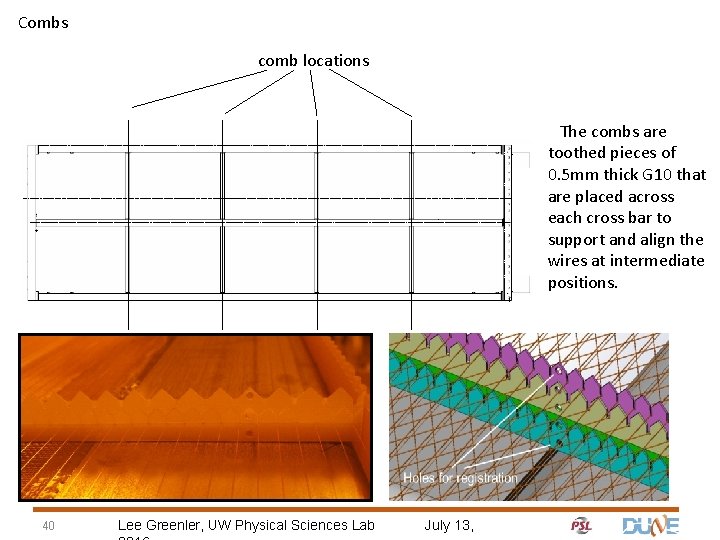
Combs comb locations The combs are toothed pieces of 0. 5 mm thick G 10 that are placed across each cross bar to support and align the wires at intermediate positions. 40 Lee Greenler, UW Physical Sciences Lab July 13,

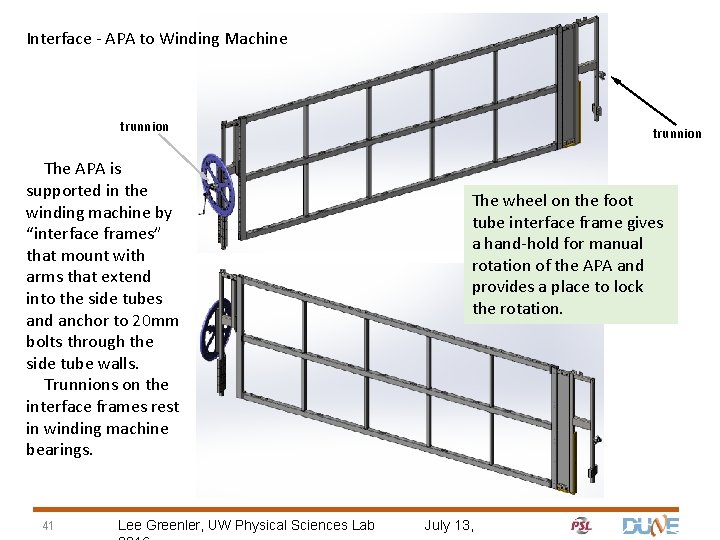
Interface - APA to Winding Machine trunnion The APA is supported in the winding machine by “interface frames” that mount with arms that extend into the side tubes and anchor to 20 mm bolts through the side tube walls. Trunnions on the interface frames rest in winding machine bearings. 41 Lee Greenler, UW Physical Sciences Lab trunnion The wheel on the foot tube interface frame gives a hand-hold for manual rotation of the APA and provides a place to lock the rotation. July 13,

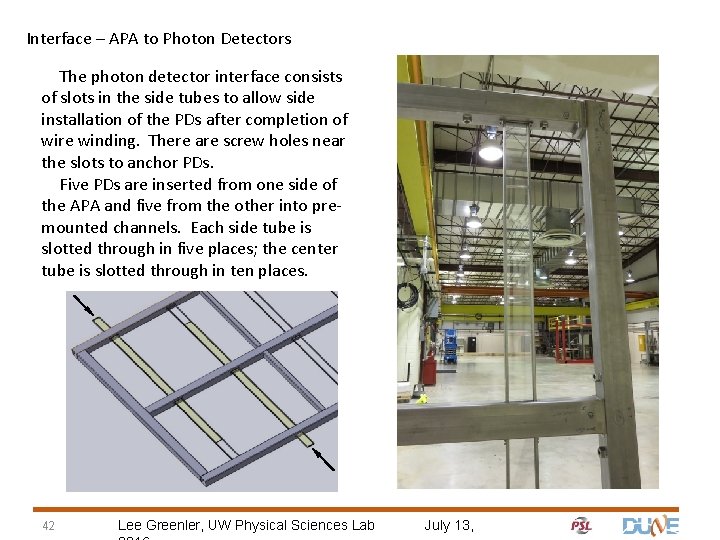
Interface – APA to Photon Detectors The photon detector interface consists of slots in the side tubes to allow side installation of the PDs after completion of wire winding. There are screw holes near the slots to anchor PDs. Five PDs are inserted from one side of the APA and five from the other into premounted channels. Each side tube is slotted through in five places; the center tube is slotted through in ten places. 42 Lee Greenler, UW Physical Sciences Lab July 13,

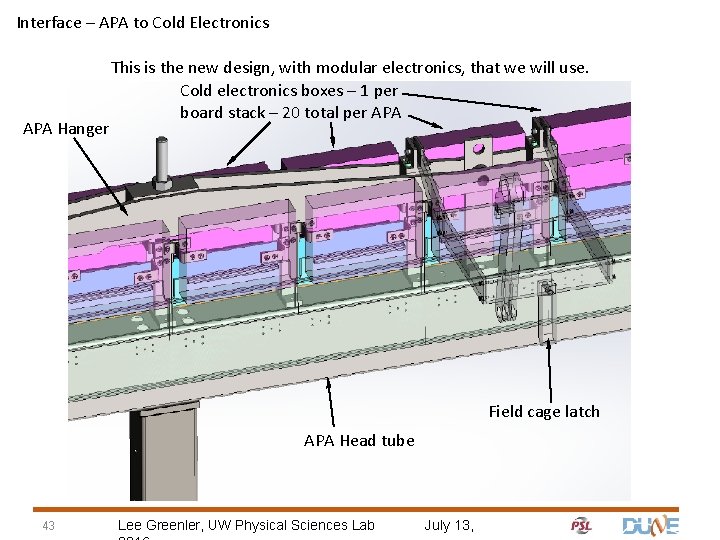
Interface – APA to Cold Electronics APA Hanger This is the new design, with modular electronics, that we will use. Cold electronics boxes – 1 per board stack – 20 total per APA Field cage latch APA Head tube 43 Lee Greenler, UW Physical Sciences Lab July 13,

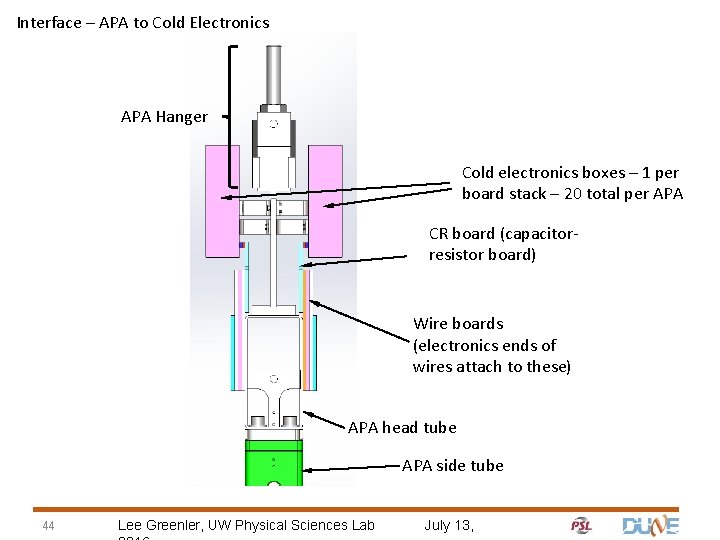
Interface – APA to Cold Electronics APA Hanger Cold electronics boxes – 1 per board stack – 20 total per APA CR board (capacitorresistor board) Wire boards (electronics ends of wires attach to these) APA head tube APA side tube 44 Lee Greenler, UW Physical Sciences Lab July 13,

Backup Slides 45 Lee Greenler, UW Physical Sciences Lab July 13,

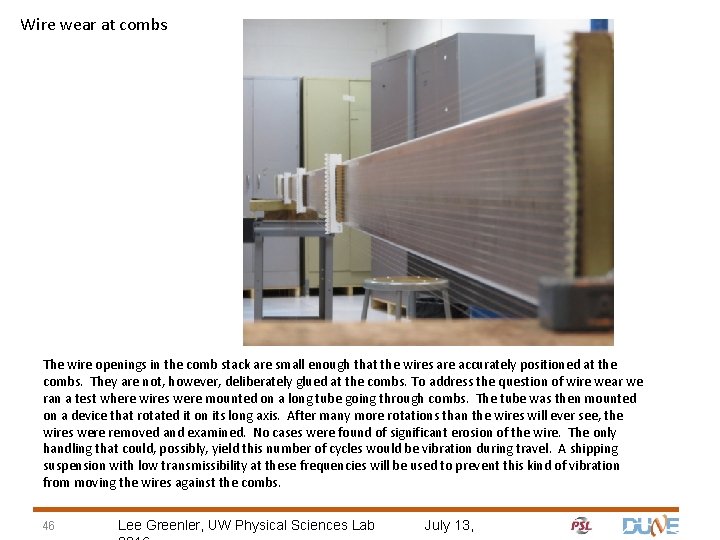
Wire wear at combs The wire openings in the comb stack are small enough that the wires are accurately positioned at the combs. They are not, however, deliberately glued at the combs. To address the question of wire wear we ran a test where wires were mounted on a long tube going through combs. The tube was then mounted on a device that rotated it on its long axis. After many more rotations than the wires will ever see, the wires were removed and examined. No cases were found of significant erosion of the wire. The only handling that could, possibly, yield this number of cycles would be vibration during travel. A shipping suspension with low transmissibility at these frequencies will be used to prevent this kind of vibration from moving the wires against the combs. 46 Lee Greenler, UW Physical Sciences Lab July 13,

Wire properties / stresses 47 Diameter 150μ (0. 006”) Composition 98% Cu, 1. 9% Be, other trace Tension target 5 N (1. 12 lb) Stress at target tension 280 MPa (41, 000 psi) ~ Breaking tension 25. 6 N ~ Breaking stress 1450 MPa (210, 000 psi) ~ Yield tension 21. 7 N ~ Yield stress 1230 MPa (180, 000 psi) Lee Greenler, UW Physical Sciences Lab July 13,

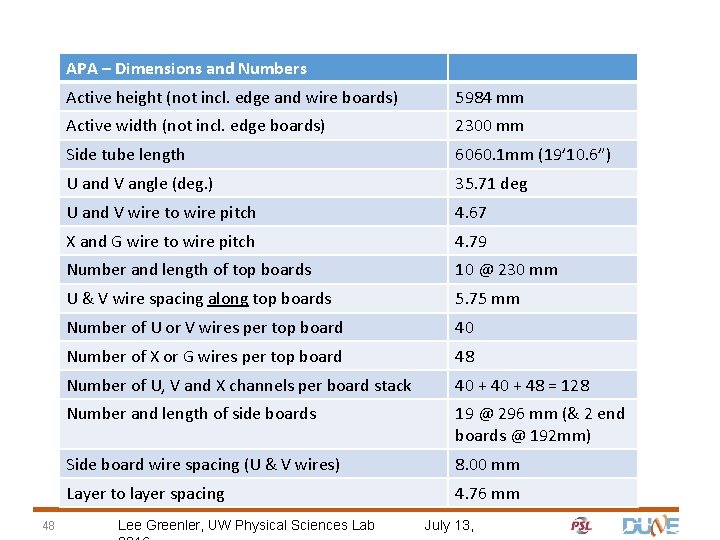
APA – Dimensions and Numbers 48 Active height (not incl. edge and wire boards) 5984 mm Active width (not incl. edge boards) 2300 mm Side tube length 6060. 1 mm (19’ 10. 6”) U and V angle (deg. ) 35. 71 deg U and V wire to wire pitch 4. 67 X and G wire to wire pitch 4. 79 Number and length of top boards 10 @ 230 mm U & V wire spacing along top boards 5. 75 mm Number of U or V wires per top board 40 Number of X or G wires per top board 48 Number of U, V and X channels per board stack 40 + 48 = 128 Number and length of side boards 19 @ 296 mm (& 2 end boards @ 192 mm) Side board wire spacing (U & V wires) 8. 00 mm Layer to layer spacing 4. 76 mm Lee Greenler, UW Physical Sciences Lab July 13,

Board shape to prevent wire breakage. Older boards: Approximate location of glue strip With this shape wires are glued to the same board they are soldered to – and only glued to one board. 49 Lee Greenler, UW Physical Sciences Lab These 3 wires can end up attached to both boards. Any small relative motion between the boards can cause wire breakage. July 13,

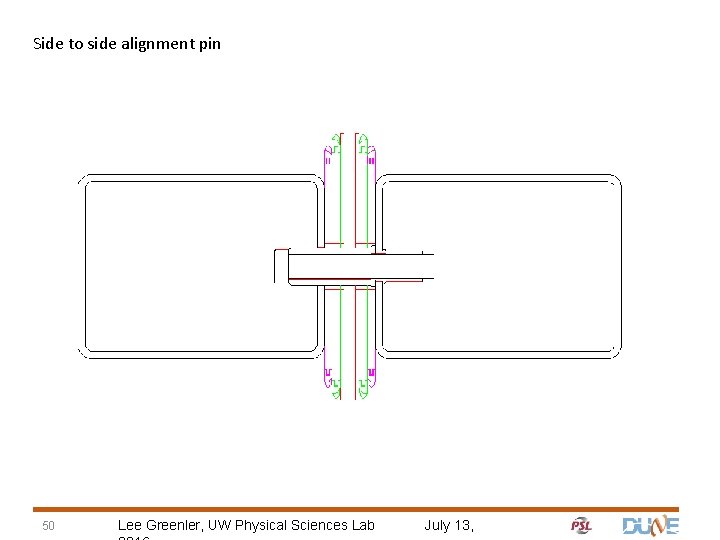
Side to side alignment pin 50 Lee Greenler, UW Physical Sciences Lab July 13,

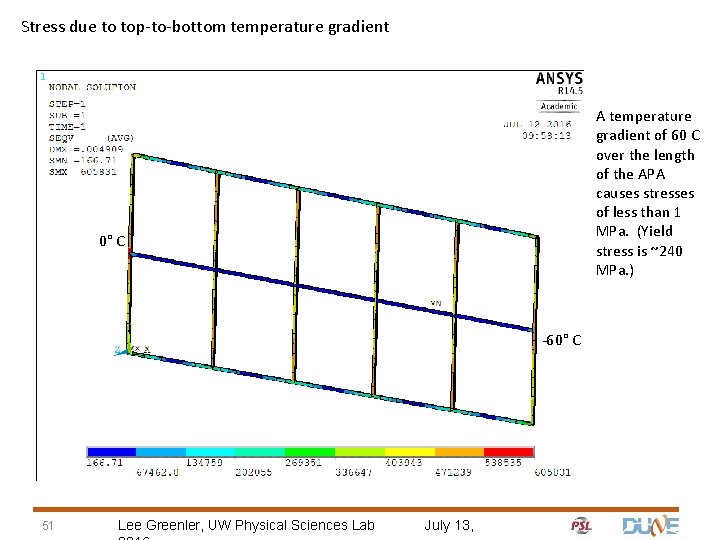
Stress due to top-to-bottom temperature gradient A temperature gradient of 60 C over the length of the APA causes stresses of less than 1 MPa. (Yield stress is ~240 MPa. ) 0° C -60° C 51 Lee Greenler, UW Physical Sciences Lab July 13,

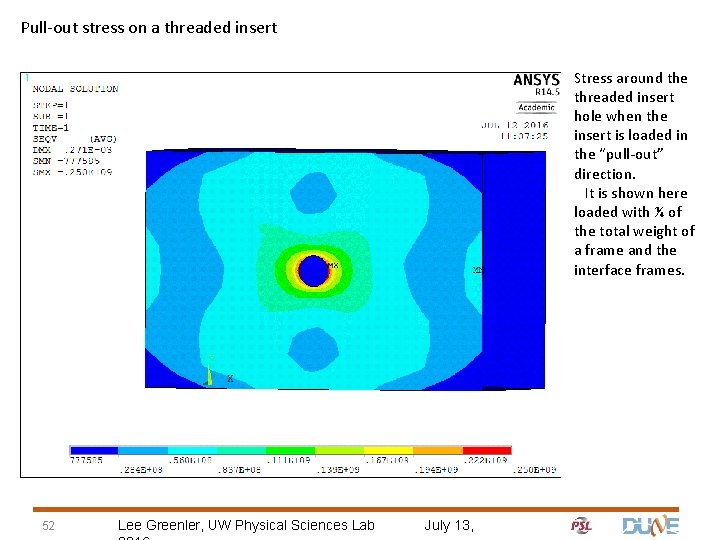
Pull-out stress on a threaded insert Stress around the threaded insert hole when the insert is loaded in the “pull-out” direction. It is shown here loaded with ¼ of the total weight of a frame and the interface frames. 52 Lee Greenler, UW Physical Sciences Lab July 13,