Dr Mohamed Mahmoud Nour Eldein Ph D Biochemistry

Dr/ Mohamed Mahmoud Nour Eldein Ph. D Biochemistry Assistant Professor of Biochemistry Faculty of Medicine Umm AL-Qura University

Laboratory Workflow Cycle

Clinical Laboratory Tests • 70% of a doctor’s information comes from laboratory test results obtained from a quality specimen: – Diagnose – Treatment – Monitoring • A lab result is only as good as the specimen received in the laboratory.

Definitions • Phlebotomy is derived from the Greek words phlebo, which relates to veins, and tomy, which relates to cutting. • Phlebotomy is the incision of a vein for the purpose of collecting blood • A phlebotomist is the individual who performs phlebotomy 4

5

Step-by-Step Approach cont’d 3 • Ask the patient to state his/her full name, spell the last name, and state • Always check the ID band on his/her date of birth. the arm or ankle to verify the • Ask the patient to verify name and hospital information on the requisition form • May require verbal verification • At least two to three verification by a nurse if patient is sedated items should be asked to ensure proper identification • The most important step in the venipuncture procedure!! • Properly identifying patients and specimens is probably the single most critical part of your job. • The consequences of misidentifying a specimen can be life threatening. • Always ask for the name and date of birth • Always verify at least two patient identifiers before proceeding 6

Supplies for Venipuncture • • • Gloves Tourniquet Alcohol prep pads Gauze pads Needle Evacuated tube holder or syringe Appropriate evacuated tubes Sharps container Adhesive bandage or tape Permanent marker or label Chapter 4 7

Blood Collection tubes • Glass or plastic tube with a rubber stopper. • Rubber stoppers of blood collection tubes are color coded. • Each type of stopper indicates a different additive or a different tube type. • Anticoagulants and/or other chemical additives. • It has a vacuum so that blood will flow into the tube.
 • EDTA to prevent clotting • Forms calcium salts to remove calcium")
LAVENDER (PURPLE) • EDTA to prevent clotting • Forms calcium salts to remove calcium • Hematology studies (CBC). • Should be completely filled • Must be inverted after filling

Pink • Potassium EDTA to prevent clotting • Forms calcium salts to remove calcium • Immunohematology studies • Must be inverted after filling

LIGHT BLUE • Sodium citrate. • Forms calcium salts to remove calcium • Coagulation (clotting) studies PT and PTT. • Must be completely filled • Must be inverted immediately after filling
 • Anticoagulants contain gel")
Light GREEN • lithium heparin • Plasma separating tube (PST) • Anticoagulants contain gel at the bottom • For tests requiring plasma such as chemistry

GREEN • Sodium or lithium heparin • Inactivates thrombin and thromboplastin • Anticoagulants contain gel at the bottom • For lithium level, use sodium heparin , for ammonia level, use sodium or lithium heparin

RED • No additives • Blood clots, serum separated by centrifugation • Blood bank tests, toxicology, serology and chemistries • Must not be inverted after filing

GRAY • Inhibitor for glycolysis + anticoagulant • Sodium Fluoride +potassium oxalate. • Antiglycolytic agent preserves glucose up to 5 days • glucose levels.
 • Contain gel at the bottom • Forms")
GOLD • Serum separator tube (SST) • Contain gel at the bottom • Forms clot quick and separate serum • For tests requiring serum • For Chemistries, Immunology and Serology

Blood Culture Bottles • Different blood culture bottles are used for aerobic, and pediatric collections.

Sizes and Expiration Dates • Adult: 3 - 10 ml • Pediatric 2 - 4 ml. • Tubes for fingersticks or heelsticks ½ or less

Syringes

Holders • A plastic holder must be used with the evacuated tube system.

Needles and Needle Components

Single Draw Needle • Single draw needles are of the type that fit on a syringe, and can be used only to fill the syringe to which they are connected.

Multiple Draw Needle • Used with vacuum collection tubes. • They have a retractable sheath over the portion of the needle that penetrates the blood tube.

Butterfly Needle • Winged infusion set • Difficult venipunctures including pediatric draws • Butterfly needles come attached to a small tube which may be connected to: • An evacuated tube holder, or A syringe. • 21, 23, or 25 gauge.

Tourniquets • Vein easier to SEE, FEEL, and PUNCTURE Sterilization

Bandaging Material

Gloves • Gloves must be worn for all procedures requiring vascular access. • Non-powdered latex gloves are most commonly used;

Hazardous waste disposal • All needles & other sharps must be disposed of in approved sharps disposal containers. • Other contaminated waste must be discarded in an appropriate biohazard bag or waste receptacle.

Differences Between Arteries And Veins

Site selection in Arm • Median cubital vein is the first choice because it is large, wellanchored and very less pain. • Cephalic vein is the second choice. It is large, but not as well anchored but may be more painful when punctured than the median cubital. • Basilic vein is the third choice. It is generally large and easy to palpate, but often not well anchored. It lies near the brachial artery and the median nerve, either of which could accidentally be punctured

Choose a site • The median cubital vein • If not accessible: Cephalic vein, or the Basilic vein. • If not accessible: veins on the back of the hand. • Use a much smaller needle for these hand veins.

Never draw from these areas 1 - Arm on side of Mastectomy. 2 - Edematous areas. 3 - Hematomas.

4 - Arm in which blood is being transfused. 5 - Scarred areas. 6 - Arms with fistulas or vascular grafts. 7 - Sites above an IV cannula.

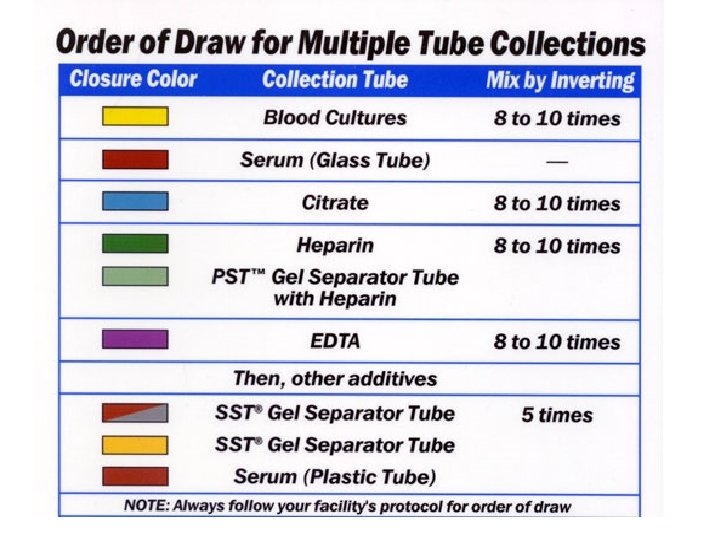
Recommended order of draw • Order of Draw – to avoid cross-contamination of additives between tubes • Yellow-Black top: Blood culture, this is always FIRST. • Red-top: non-additive. Use this before using tubes containing additives • Light-Blue top: Coagulation, contains sodium citrate • Last draw -additive tubes in this order • Dark-Green top: Used for Heparin • Lavender top: CBC • Gray-top: Glucose 34

Recommended order of draw 35

Important steps before collection • Identification of the patient • Labeling correctly: very important • Re-checking which test is required • Keeping ready all the necessary equipment : drawing of blood and bulbs for collection • Clean up the area before and after collection

Patient position • The patient should be made to sit comfortably in a chair and should position his arm on a slanting armrest, extending the arm straight from the shoulder without bending at the elbow. • Ensure patient's hand is closed, which makes the veins more prominent. • Do not ask the patient to ‘pump’ his/her hand 1. 1. Muscle contraction can introduce pre-analytical errors (eg elevated potassium)

• Screw the needle into the tube adapter • Insert the first tube to be collected into the tube adapter • Push the tube up to the adapter guideline Be careful not to push the tube too far, as this can result in loss of vacuum! Chapter 4 39

Applying the tourniquet: Apply the tourniquet, which will make the veins more visible and palpable • Tie the tourniquet just above the elbow. • Should be kept flat against the skin • The tourniquet should be tight enough to stop venous blood flow in the superficial arm veins. • Should be applied 3 to 4 inches above the venipuncture site • The tourniquet should be applied a maximum of 1 – 40 2 minutes.
 helps")
Cleansing the Site • Cleaning the site with an antiseptic (70% isopropyl alcohol) helps prevent microbial contamination • Cleanse the site concentric circles using • Allow alcohol to dry completely or use a gauze, but NEVER blow on the site 41

Use of Alcohol • Be sure to allow the alcohol to dry before attempting the venipuncture procedure. Wet alcohol entering the specimen can affect the laboratory results! 42

Selecting the Venipuncture Site Select a vein that is large and does not roll • Always examine the antecubital area first • Ask the patient to hold the arm still and make a fist • Use the tip of the index finger to palpate (examine by feel) the vein. This helps determine the size, depth, and direction of the vein. • Select a vein that is easily palpated, large enough to support good blood flow, and well-anchored by surrounding tissue. • Use a warm, moist compress for 3 to 5 minutes to increase 43 vein size if needed

Insert needle the needle bevel up

• Visually confirm the venipuncture site • Anchor the vein below the puncture site • Insert the needle at a 15 to 30 angle • Insert the evacuated tube • Gently push the tube onto the needle holder so that the catheter inside the needle holder penetrates the tube. • Blood flow should be visible at this point. 45

Needle Insertion Angle • Insertion at an angle of incidence of 15 – 30 degrees is recommended • Top Picture: Bevel of the needle is fully inserted in the lumen of the vein within 15 -30 degree angle. • Middle Picture: Needle angle is too steep. Increased potential for needle to completely penetrate the vein, resulting in formation of hematoma. X • Lower Picture: Needle angle is too shallow, causing bevel to rest on the wall of the vein. Increased potential for needle placement partially in the vein lumen and partially in tissue, again resulting in formation of hematoma. X

Collecting the Specimen • Hold the venipuncture equipment steady during the entire tube-filling procedure • Remember, the tourniquet should not be left on the arm longer than 1 minute during specimen collection • The amount of blood needed in the evacuated tube is determined by the amount of additive in the evacuated tube • Overfilling an evacuated tube is not possible unless the stopper is removed and blood is added 47

Collecting the Specimen Part 2 change tubes during • To collection, brace thumb against the flange of the holder and remove the tube with a pulling and twisting motion • Keep a firm grip in the needle holder while pressing down on the patients arm. • Use your other arm to interchange tubes. • Be sure to invert the tube 8 to 10 times to mix it if an additive is present in the tube 48

Removing the Needle • Check tourniquet is fully released and ensure patient's hand is open and relaxed • Remove the last tube from the holder and, with your other hand, prepare your gauze by folding it • Gently and quickly remove needle from the arm. • Place gauze directly over the area of needle insertion • After the needle is removed, apply gentle pressure over the site for 3 to 5 minutes, You may ask the patient to continue applying pressure until bleeding stops. • Keep arm extended and preferably raised; arm should not be bent as this increases the risk of hematoma formation. 49

Applying the Bandage • Check the patient’s arm after about three minutes to see if the bleeding has stopped • Tape or an adhesive bandage can be used to hold the pressure gauze on the site • The patient can remove the bandage after 15 minutes • Do not use tape on anyone with thin, fragile skin or on people with allergies to tape 50

Safe Re-cap Methods

Labeling the Specimen Computer-generated label OR Use a permanent marker to label Proper labeling generally includes: • • Patient’s name Clinical specimen Unique ID number Specimen type Date, time and place of collection Name/ initials of collector Your institution may provide bar coded computer generated labels

Labeling the Specimen Part 2 Remember always to label blood tubes after the blood is drawn • Actual time of collection is crucial in fasting specimen and in monitoring therapeutic drug levels. • To prevent mislabeling, do not label before or after you leave the patient. Only label at the time of specimen collection.

Plasma • Plasma – If a chemical agent or anticoagulant is added to prevent clotting, a blood sample can be separated by centrifugation into the cells and plasma. – Clear supernatant fluid with thrombosis inhibited. Most satisfactory sample. No changes occur in blood – Plasma cannot clot due to inactivation of certain vital necessary elements and will contain all coagulation factors. – Anti-coagulated whole blood is required for all tests performed in the hematology department – Plasma is required for all coagulation tests – PH, NH 4, RBC levels, Plasma cortisol, testosterone, globin, cholinesterase

Serum • Serum is produced when blood is drawn into a nonadditive tube and allowed to clot. – The blood cells become meshed in a fibrin clot. – Clear supernatant fluid devoid of any fibrin products – Serum contains essentially the same chemical constituents as plasma except that clotting factors have been used up to form the clot so will have NO coagulation factors. – Most enzymes, Biochemical LFT, KFT, S Electro. Serological : Widal, VDRL

The Blood Centrifuged Blood Specimens With and Without Anticoagulant, Respectively

Summary Of Venipuncture Technique 1. requisition form. 2. Greet the patient. 3. Identify the patient. 4. Reassure the patient and explain the procedure. 5. Prepare the patient. 6. Select equipment and supplies. 7. Wash hands and apply gloves. 8. Apply the tourniquet. 9. Select the venipuncture site. 10. Release the tourniquet. 11. Cleanse the site. 12. Assemble equipment.

Summary Of Venipuncture Technique 13. Reapply the tourniquet. 14. Confirm the venipuncture site. 15. Examine the needle. 16. Anchor the vein. 17. Insert the needle. 18. Push the evacuated tube completely into adapter. 19. Gently invert the specimens, as they are collected. 20. Remove the last tube from the adapter. 21. Release the tourniquet. 22. Place sterile gauze over the needle. 23. Remove the needle, and apply pressure. 24. Activate needle safety device.

Summary Of Venipuncture Technique 25. Dispose of the needle. 26. Label the tubes. 27. Examine the patient’s arm. 28. Bandage the patient’s arm. 29. Dispose of used supplies. 30. Remove and dispose of gloves. 31. Wash hands. 32. Complete any required paperwork. 33. Thank the patient. 34. Deliver specimens to appropriate locations.

PROBLEMS IN COLLECTING BLOOD SAMPLES BY VENIPUNCTURE

Unsuccessful Venipuncture Causes of Blood Collection Failure • Needle inserted too far • Insufficient vacuum in tube • Bevel on lower wall of the vein • Tourniquet too tight • Poor site selection (vein hard and sclerosed) • Patient fails to maintain “still” positioning Sometimes repositioning the needle will cause blood to flow. Do not “probe” or change the position of the needle while it is inserted.

Blood won’t flow • If you do not see blood flow, the tip of the needle: 1. 2. 3. 4. May not yet be within the vein. May have already passed through the vein. May have missed the vein entirely. May be pushed up against the inside wall of the vein.

Incomplete collection or no blood is obtained: • Change the position of the needle. Move it forward (it may not be in the lumen)

Incomplete collection or no blood is obtained: • or move it backward (it may have penetrated too far).

Incomplete collection or no blood is obtained: • Adjust the angle (the bevel may be against the vein wall).

Incomplete collection or no blood is obtained: • Loosen the tourniquet. It may be obstructing blood flow. • Try another tube. There may be no vacuum in the one being used. • Re-anchor the vein. Veins sometimes roll away from the point of the needle and puncture site.

Other Problems • A hematoma forms under the skin adjacent to the puncture site - release the tourniquet immediately and withdraw the needle. Apply firm pressure.
 rather than venous. Apply firm")
Other Problems • The blood is bright red (arterial) rather than venous. Apply firm pressure for more than 5 minutes

Complications Encountered in Venipuncture • • 1. 2. 3. 4. 5. 6. Special challenges of pediatric patients Additional complications: Echymoses (bruising) Syncope (fainting) Hematoma Failure to obtain a sample (fig. 2 -4) Petechiae Edema 3/11/2021

Complications Encountered in Venipuncture 7. Obesity 8. Intravenous Therapy 9. Hemoconcentration 10. Hemolysis 11. Burned, damaged, scarred veins are to be avoided 12. Seizures, tremors, vomiting, choking 13. Allergies to skin prep/tourniquet 70

Hemolysis • Hemolysis means the breakup of fragile red blood cells within the specimen, and the release of their hemoglobin and other substances, into the plasma. • A hemolyzed specimen can be recognized after it is centrifuged by the red color of the plasma.

HEMOLYSIS OF SAMPLES • • • Contact with water Excessive heat or cold Rigorous mechanical injury to RBS ( thin gauge ) Prolonged storage Using a too small needle for a relatively bigger vein Pulling a syringe plunger too rapidly Expelling blood vigorously into a tube, Shaking a tube of blood too hard. Hemolyzed samples will give erroneous results Hemolysis can cause falsely increased potassium, magnesium, iron, and ammonia levels, and other aberrant lab results.

PREVENTION OF HEMOLYSIS Equipment used to collect : absolutely dry Minimum constriction of limb Use correct gauge Collect slowly and steadily Remove needle and put immediately into the bulb • Easier if collection in Vacutainer • • •

Petechiae • Petechiae or a hematoma may develop if the tourniquet is left on too long, or if a needle has gone though the vein. • Any form of temporary or permanent disfigurement should be avoided. Be sure to remove the tourniquet in a timely manner. If a hematoma develops, apply firm pressure to the site. Chapter 4 74

Handling Syncope • Syncope can occur during a phlebotomy procedure. If this occurs, remove the tourniquet and needle, then call for help. • Lower the patient’s head and arms and place them between the patient’s knees. 75

Clots • Blood clots when the coagulation factors within the plasma are activated. • Blood starts to clot almost immediately after it is drawn unless it is exposed to an anticoagulant. • Clots within the blood specimen, even if not visible to the naked eye, will yield inaccurate results. Causes of Clots Inadequate mixing of blood anticoagulant Delay in expelling blood within a syringe into a collection tube

Insufficient volume • short draws will result in an incorrect ratio of blood to anticoagulant, and yield incorrect test results. • Short draws can be caused by: • A vein collapsing during phlebotomy. • The needle coming out of the vein before the collection tube is full. • Loss of collection tube vacuum before the tube is full.

Labeling Errorrs • Labeling errors are the most common cause of incorrect laboratory results. • If detected, the incorrectly labeled specimen will be rejected. • If undetected, it will produce incorrect results which might adversely affect your patient’s care.

Causes • Failure to follow proper patient identification procedure. • Failure to label the specimen completely and immediately after collection.
- Slides: 79