Docker study 1619 Dockerfile 1 Docker wordpress Dockerfile


- Slides: 14
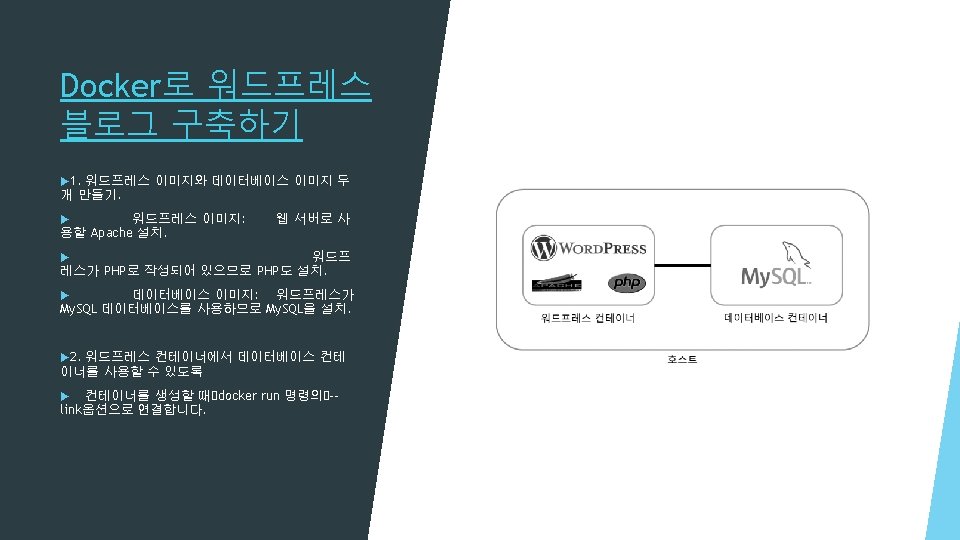
Docker study 16~19장
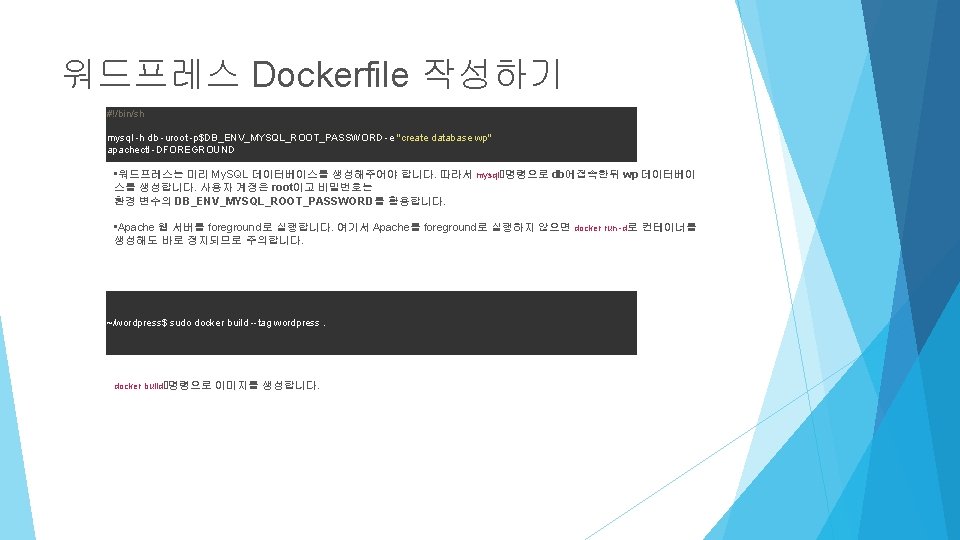
워드프레스 Dockerfile 작성하기 1. 먼저 워드프레스 Docker 이미지를 생성합니다. wordpress 디렉터리를 생성하고 다음 내용을 Dockerfile 로 저장. • dockerbook/Chapter 16/wordpress/Dockerfile ild --tag wordpress. ~$ mkdir wordpress ~$ cd wordpress
워드프레스 Dockerfile 작성하기 • FROM으로 ubuntu: 14. 04를 기반으로 이미지를 생성하도록 설정. • apt-get update로 패키지 목록을 최신 상태로 업데이트한 뒤 apache 2, php 5 -mysql, mysqlclient, wget을 설치. • wget으로 /var/www 디렉터리에 워드프레스 소스 파일을 다운로드한 뒤 압축을 해제. • sed로 /etc/apache 2/sites-enabled 디렉터리의 000 -default. conf 파일의 내용을 수정. • 웹 서버 기본 디렉터리를 /var/www/html에서 /var/www/wordpress로 바꿔서 워드프레스 소스를 사용할 수 있도록 합니다. • /var/www/wordpress 디렉터리의 wp-config-sample. php 파일을 wp-config. php 파일로 이름을 바꾼 뒤 sed로 DB 설정을 수정합니다. • DB_NAME에 wp를 설정합니다. • DB_USER에 root를 설정합니다. • DB_PASSWORD에 환경 변수의 DB_ENV_MYSQL_ROOT_PASSWORD를 사용하도록 설정합 니다. docker run 명령의 --link 옵션으로 컨테이너를 연결했을 때 연결한 컨테이너의 환경 변수는 <별 칭>_ENV_<환경 변수> 형식입니다. 우리는 컨테이너를 연결할 때 별칭을 db로 하고, 데이터베이스 컨 테이너에서 환경 변수는 MYSQL_ROOT_PASSWORD를 사용할 것이기 때문에 DB_ENV_MYSQL_ROOT_PASSWORD가 됩니다. • 컨테이너를 연결할 때 별칭을 db로 할 것이므로 DB_HOST에 db를 설정합니다. • entrypoint. sh 파일을 추가한 뒤 실행할 수 있도록 권한을 설정합니다. • ENTRYPOINT에 /entrypoint. sh 파일을 설정하여 컨테이너가 시작되었을 때 스크립트 파일을 실행합니다. 다음 내용을 entrypoint. sh로 저장합니다. FROM ubuntu: 14. 04 RUN apt-get update RUN apt-get install -y apache 2 php 5 -mysql-client wget WORKDIR /var/www RUN wget http: //ko. wordpress. org/wordpress-4. 0 -ko_KR. tar. gz -O - | tar -xz WORKDIR /etc/apache 2/sites-enabled RUN sed -i "s//var/www/html//var/www/wordpress/g" 000 -default. conf WORKDIR /var/www/wordpress RUN mv wp-config-sample. php wp-config. php RUN sed -i "s/'database_name_here'/'wp'/g" wp-config. php && sed -i "s/'username_here'/'root'/g" wp-config. php && sed -i "s/'password_here'/getenv('DB_ENV_MYSQL_ROOT_PASSWORD')/g" wp-config. php && sed -i "s/'localhost'/'db'/g" wp-config. php ADD entrypoint. sh /entrypoint. sh RUN chmod +x /entrypoint. sh ENTRYPOINT /entrypoint. sh
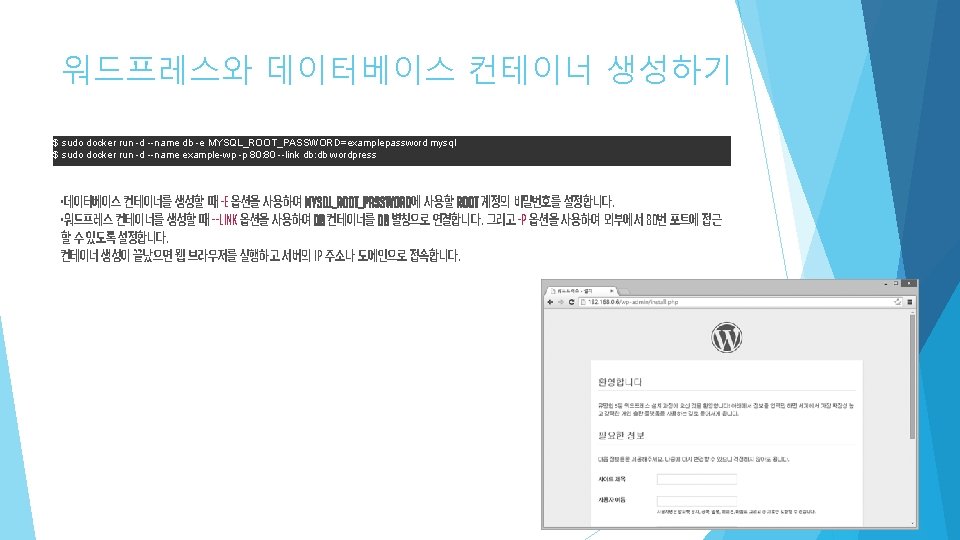
My. SQL 데이터베이스 Dockerfile 작성하기 • ENV로 환경 변수 DEBIAN_FRONTEND에 noninteractive를 반드시 설정합니다. • apt-get으로 My. SQL 패키지를 설치하면 사용자가 직접 root 비밀번호를 입력하는 부분이 나옵니다. 하지만, Docker 이미지를 생성할 때는 입력을 할 수가 없으므로 noninteractive를 설정하여 사용자 입력 없이 넘어가 야합니다. • apt-get update로 패키지 목록을 최신 상태로 업데이트합니다. • mysql-server/root_password를 debconf-set-selections에 설정하여 noninteractive로 넘어갔던 부분에 비밀번호 설정을 적용합니다. password 뒤에 실제로 사용할 비밀번호를 입력 해도 되지만, 우리는 docker run 명령에서 -e 옵션으로 비밀번호를 설정할 것이므로 아무것도 입력하지 않습니다. mysql-server/root_password_again password도 위와 동일합니다. apt-get install로 mysql-server 패키지를 설치합니다. • • • sed로 /etc/mysql 디렉터리의 my. cnf 파일 내용을 수정합니다. bind-address = 127. 0. 0. 1 부분을 bind-address = 0. 0으로 수정합니다. 이 부분을 수정하지 않으면 외부에서 My. SQL에 접속할 수 없습니다. • entrypoint. sh 파일을 추가한 뒤 실행할 수 있도록 권한을 설정합니다. • EXPOSE에 3306을 설정하여 3306번 포트에 접속할 수 있도록 합니다. • ENTRYPOINT에 /entrypoint. sh 파일을 설정하여 컨테이너가 시작되었을 때 스크립트 파일을 실행합니다. ~$ mkdir mysql ~$ cd mysql FROM ubuntu: 14. 04 ENV DEBIAN_FRONTEND noninteractive RUN apt-get update RUN echo "mysql-server/root_password" | debconf-set-selections RUN echo "mysql-server/root_password_again password" | debconf-set-selections RUN apt-get install -y mysql-server WORKDIR /etc/mysql RUN sed -i "s/127. 0. 0. 1/0. 0/g" my. cnf ADD entrypoint. sh /entrypoint. sh RUN chmod +x /entrypoint. sh EXPOSE 3306 ENTRYPOINT /entrypoint. sh
My. SQL 데이터베이스 Dockerfile 작성하기 • 환경 변수에 MYSQL_ROOT_PASSWORD가 없으면 데이터베이스를 실행하지 않고 빠져나옵니다. #!/bin/bash • mysql_install_db로 데이터베이스 파일을 설치합니다. if [ -z $MYSQL_ROOT_PASSWORD ]; then exit 1 • My. SQL root 계정의 비밀번호를 설정하는 SQL문을 /tmp/sql 파일로 저장합니다. 비밀번호는 환경 변수의 MYSQL_ROOT_PASSWORD에 저장된 값을 사용합니다. Dockerfile에서 비밀번호를 설정하지 않고 이곳에서 비밀번호를 설정하는 이유는 docker run 명령의 -e 옵션으로 비밀번호를 설정하기 위 해서입니다. -e 옵션으로 설정한 환경 변수 값은 CMD, ENTRYPOINT에서만 사용할 수 있습니다. • mysqld에 --bootstrap 옵션을 설정하고 /tmp/sql 파일을 입력하여 root 계정의 비밀번호를 설정합니다. 그 리고 /tmp/sql 파일은 삭제합니다. • 마지막으로 mysqld를 실행합니다. Apache와 마찬가지로 My. SQL도 foreground로 실행합니다. fi mysql_install_db --user mysql > /dev/null cat > /tmp/sql <<EOF USE mysql; FLUSH PRIVILEGES; GRANT ALL PRIVILEGES ON *. * TO 'root'@'%' WITH GRANT OPTION; UPDATE user SET password=PASSWORD("$MYSQL_ROOT_PASSWORD") WHERE user='root’; EOF =0 < /tmp/sql mysqld --bootstrap --verbose rm -rf /tmp/sql mysqld docker build 명령으로 이미지를 생성합니다. ~/mysql$ sudo docker build --tag mysql.
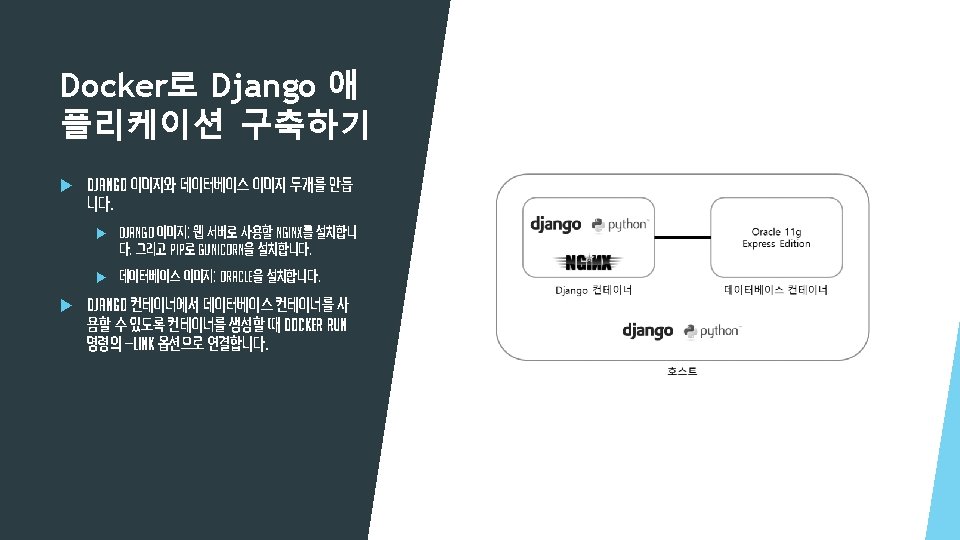
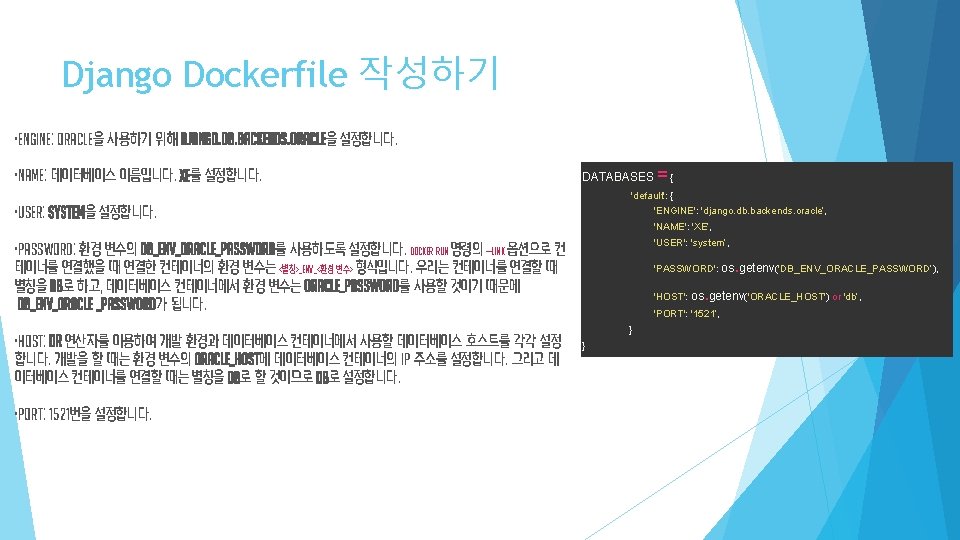
Django Dockerfile 작성하기 ~$ django-admin. py startproject exampleapp 디렉터리가 생성되었습니다. 앞에 설치한 Oracle 인스턴트 클라이언트 rpm 파일을 exampleapp 디렉터리 아래로 이동합니다. Django 이미지에도 Oracle 인스턴트 클라이언트를 설치해야 하므로 rpm 파일 이 필요합니다. $ mv oracle-instantclient 12. 1 -basic-12. 1. 0. 2. 0 -1. x 86_64. rpm exampleapp/ $ mv oracle-instantclient 12. 1 -devel-12. 1. 0. 2. 0 -1. x 86_64. rpm exampleapp/exampleapp 디렉터리 아래에 있는 settings. py 파일을 열고 다 음과 같이 수정합니다.
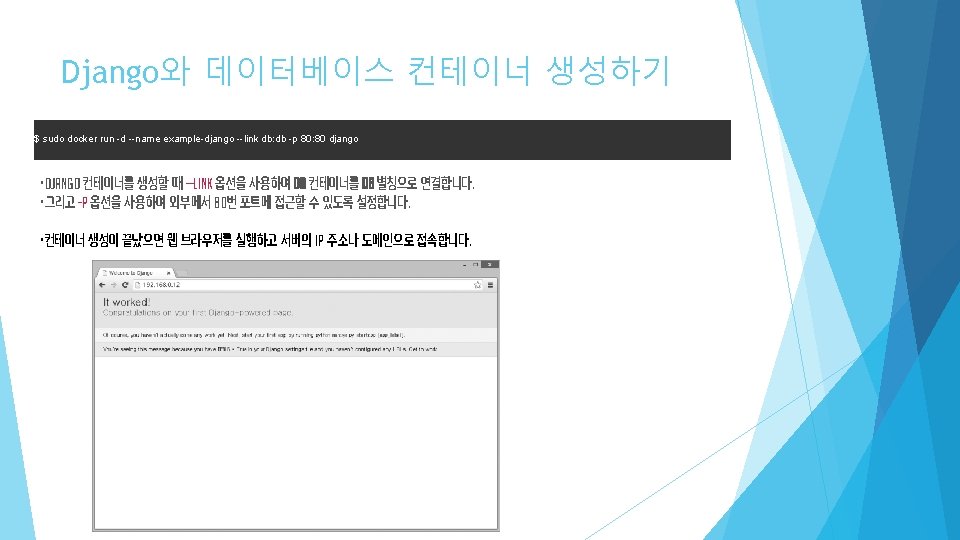
Django와 데이터베이스 컨테이너 생성하기 $ sudo docker run -d --name db -e ORACLE_PASSWORD=examplepassword oracle 데이터베이스 컨테이너를 생성할 때 -e 옵션을 사용하여 ORACLE_PASSWORD에 사용할 system 계정의 비밀번호를 설정합니다. Django 애플리케이션 디렉터리로 이동한 뒤 Django 데이터베이스를 초기화하고 관리자 계정을 설정합니다. ~$ export ORACLE_HOST=$(sudo docker inspect -f "{{. Network. Settings. IPAddress }}" db) ~$ export DB_ENV_ORACLE_PASSWORD=examplepassword ~$ cd exampleapp ~/exampleapp$. /manage. py syncdb Operations to perform: Apply all migrations: admin, contenttypes, auth, sessions Running migrations: Applying contenttypes. 0001_initial. . . OK Applying auth. 0001_initial. . . OK Applying admin. 0001_initial. . . OK Applying sessions. 0001_initial. . . OK You have installed Django's auth system, and don't have any superusers defined. Would you like to create one now? (yes/no): yes Username (leave blank to use 'pyrasis'): admin Email address: admin@example. com Password: <비밀번호 입력> Password (again): <비밀번호 입력> Superuser created successfully. • export 명령을 사용하여 환경 변수의 ORACLE_HOST에 db 컨테이너의 IP 주소를 설정합니다. • docker inspect 명령에서 -f 옵션을 사용하면 특정 항목만 출력할 수 있습니다. ”{{. Network. Settings. IPAddress }}”는 컨테이너의 IP 주소입니다. • export 명령을 사용하여 환경 변수의 DB_ENV_ORACLE_PASSWORD에 Oracle 데이터베이스 비밀번호를 설정 합니다. • manage. py syncdb를 실행하여 Django 데이터베이스를 초기화합니다. 관리자(superuser) 설정 부분이 나 오면 yes를 입력하고 관리자 계정과 이메일, 비밀번호를 설정합니다.