DNT 123 COMPUTER AIDED DRAFTING CREATING 2 D


- Slides: 67

DNT 123 COMPUTER AIDED DRAFTING CREATING 2 D DRAWING (GEOMETRIC CONSTRUCTION)

CONTENT 1. FORMATTING TEXT 2. 3. 4. 5. 6. 7. HATCHING POLYLINES LAYOUT TABS BLOCKS DIMENSIONING EXERCISES

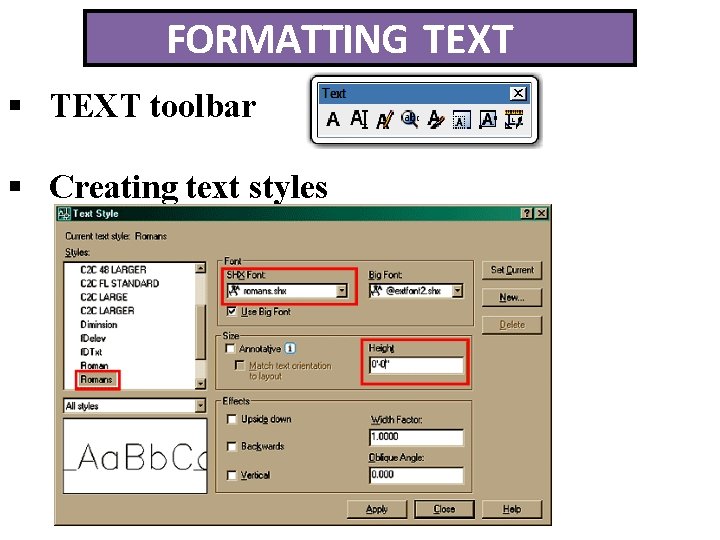
FORMATTING TEXT toolbar Creating text styles

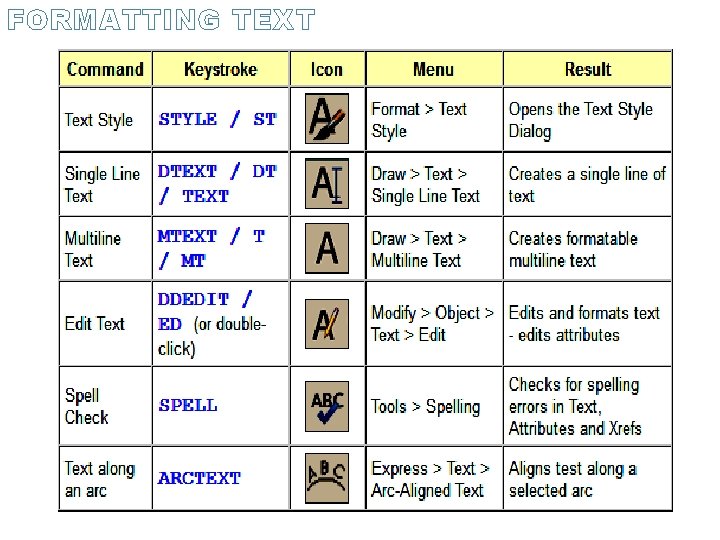
FORMATTING TEXT

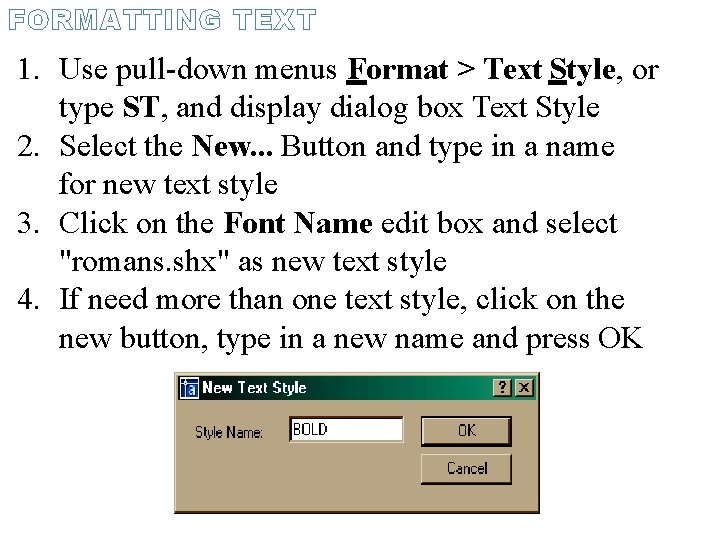
FORMATTING TEXT 1. Use pull-down menus Format > Text Style, or type ST, and display dialog box Text Style 2. Select the New. . . Button and type in a name for new text style 3. Click on the Font Name edit box and select "romans. shx" as new text style 4. If need more than one text style, click on the new button, type in a new name and press OK

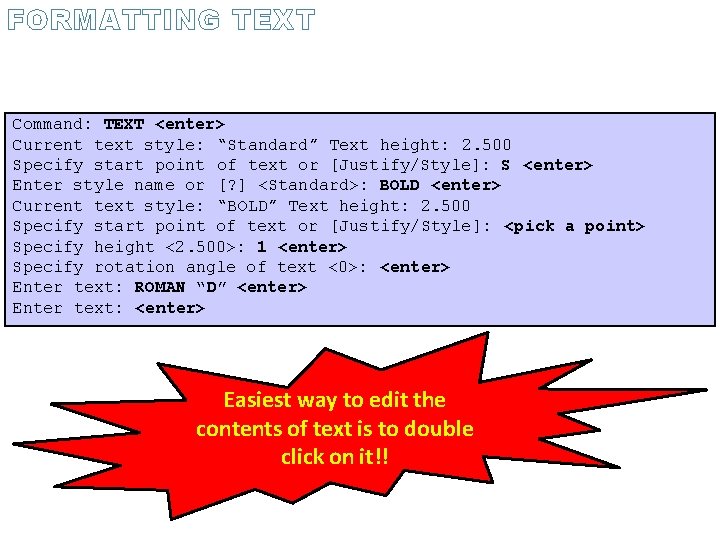
FORMATTING TEXT Command: TEXT <enter> Current text style: “Standard” Text height: 2. 500 Specify start point of text or [Justify/Style]: S <enter> Enter style name or [? ] <Standard>: BOLD <enter> Current text style: “BOLD” Text height: 2. 500 Specify start point of text or [Justify/Style]: <pick a point> Specify height <2. 500>: 1 <enter> Specify rotation angle of text <0>: <enter> Enter text: ROMAN “D” <enter> Enter text: <enter> Easiest way to edit the contents of text is to double click on it!!

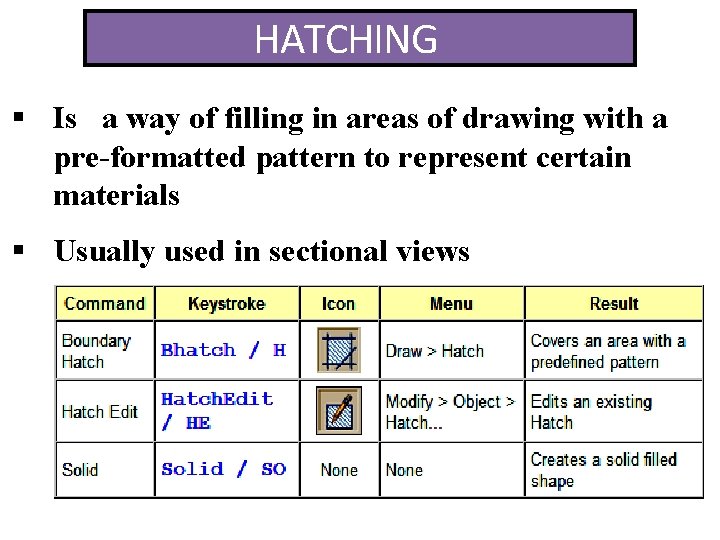
HATCHING Is a way of filling in areas of drawing with a pre-formatted pattern to represent certain materials Usually used in sectional views

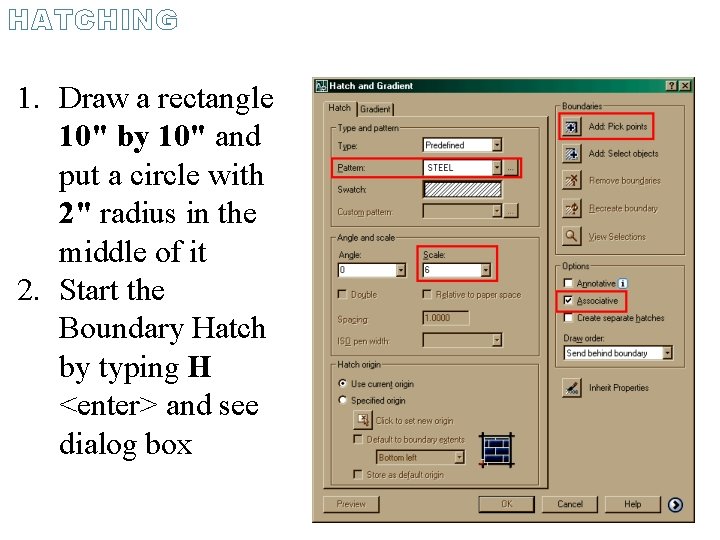
HATCHING 1. Draw a rectangle 10" by 10" and put a circle with 2" radius in the middle of it 2. Start the Boundary Hatch by typing H <enter> and see dialog box

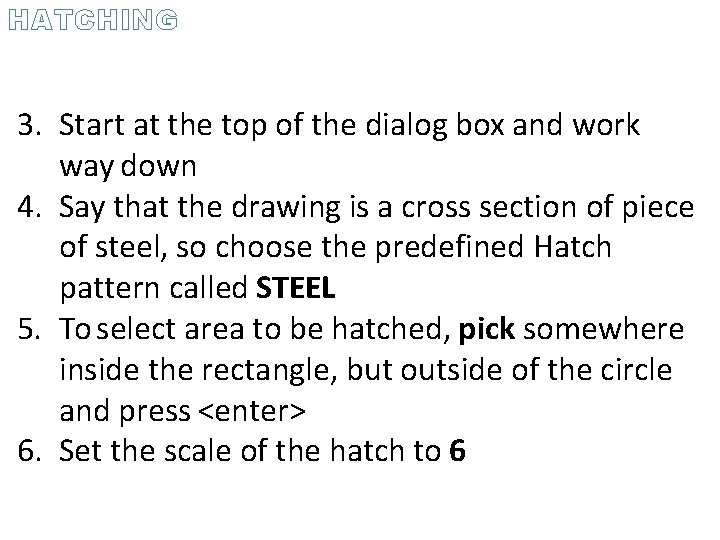
HATCHING 3. Start at the top of the dialog box and work way down 4. Say that the drawing is a cross section of piece of steel, so choose the predefined Hatch pattern called STEEL 5. To select area to be hatched, pick somewhere inside the rectangle, but outside of the circle and press <enter> 6. Set the scale of the hatch to 6

HATCHING 7. Pick on the "Associative“ 8. Hit the Preview button to see the image To edit the hatch, is either double-click on it or type in HE <enter>

POLYLINES Is an object consists of one or more line (or arc) segments Created using POLYLINE command by typing PL in command line Advantages: They can have width (constant or varying) They can consist of arcs and lines. They can be edited They can be joined together. They can be exploded into individual segments

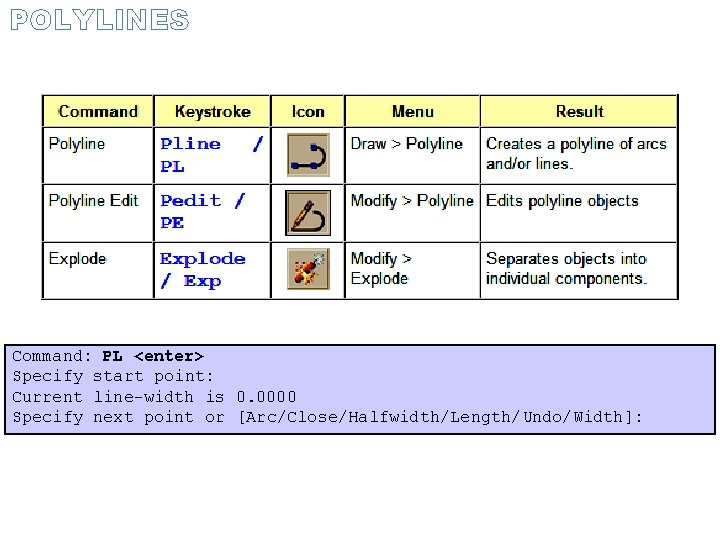
POLYLINES Command: PL <enter> Specify start point: Current line-width is 0. 0000 Specify next point or [Arc/Close/Halfwidth/Length/Undo/Width]:

POLYLINES Close option truly closes a polyline. A closed polyline is required for extruding into 3 -D space and other modifications Use the C option while drawing to complete the polyline, it will automatically be closed Spline option allows you to draw a shape of lines using arcs and/or straight lines and then change them into one flowing curve

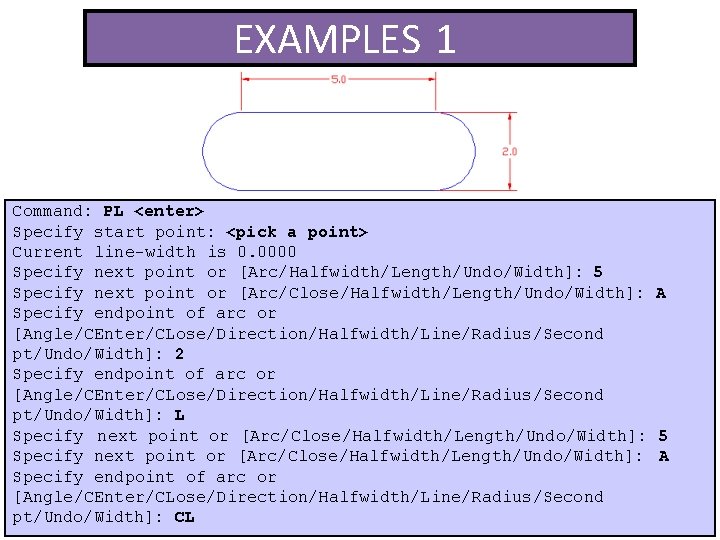
EXAMPLES 1 Command: PL <enter> Specify start point: <pick a point> Current line-width is 0. 0000 Specify next point or [Arc/Halfwidth/Length/Undo/Width]: 5 Specify next point or [Arc/Close/Halfwidth/Length/Undo/Width]: A Specify endpoint of arc or [Angle/CEnter/CLose/Direction/Halfwidth/Line/Radius/Second pt/Undo/Width]: 2 Specify endpoint of arc or [Angle/CEnter/CLose/Direction/Halfwidth/Line/Radius/Second pt/Undo/Width]: L Specify next point or [Arc/Close/Halfwidth/Length/Undo/Width]: 5 Specify next point or [Arc/Close/Halfwidth/Length/Undo/Width]: A Specify endpoint of arc or [Angle/CEnter/CLose/Direction/Halfwidth/Line/Radius/Second pt/Undo/Width]: CL

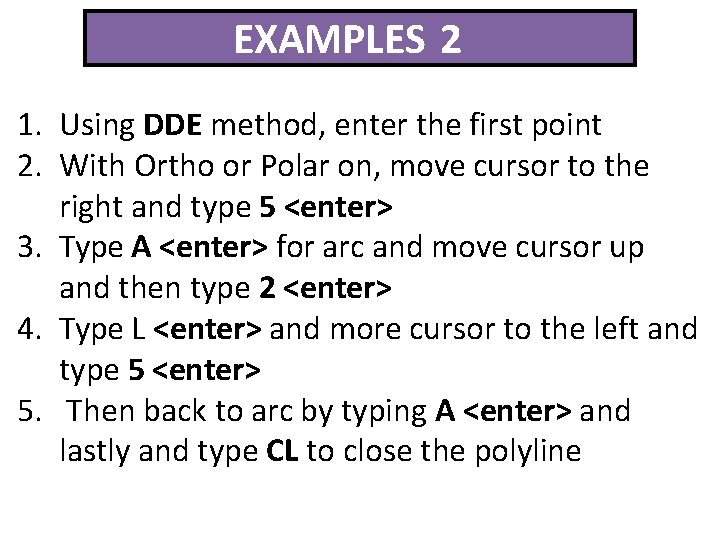
EXAMPLES 2 1. Using DDE method, enter the first point 2. With Ortho or Polar on, move cursor to the right and type 5 <enter> 3. Type A <enter> for arc and move cursor up and then type 2 <enter> 4. Type L <enter> and more cursor to the left and type 5 <enter> 5. Then back to arc by typing A <enter> and lastly and type CL to close the polyline

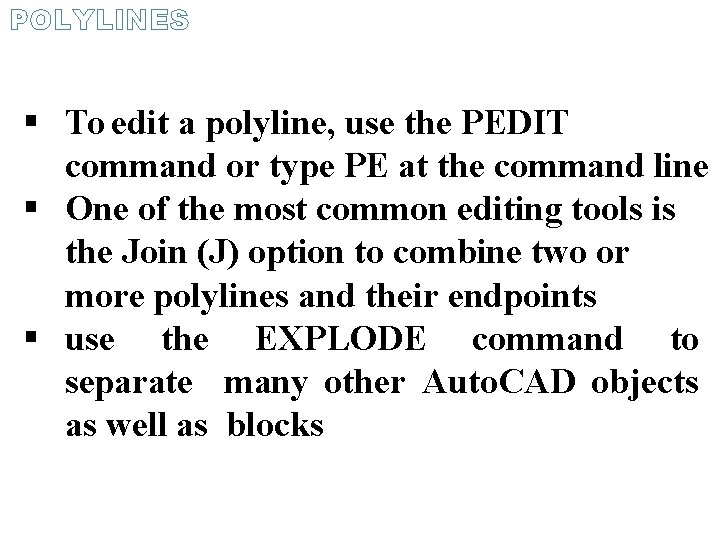
POLYLINES To edit a polyline, use the PEDIT command or type PE at the command line One of the most common editing tools is the Join (J) option to combine two or more polylines and their endpoints use the EXPLODE command to separate many other Auto. CAD objects as well as blocks

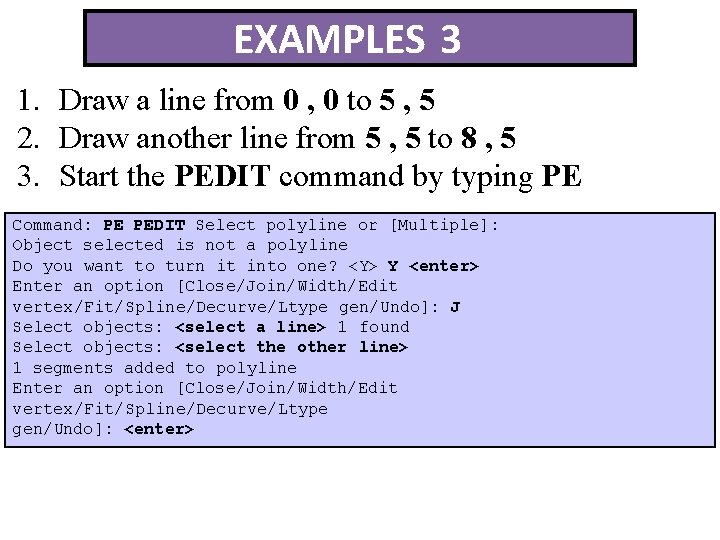
EXAMPLES 3 1. Draw a line from 0 , 0 to 5 , 5 2. Draw another line from 5 , 5 to 8 , 5 3. Start the PEDIT command by typing PE Command: PE PEDIT Select polyline or [Multiple]: Object selected is not a polyline Do you want to turn it into one? <Y> Y <enter> Enter an option [Close/Join/Width/Edit vertex/Fit/Spline/Decurve/Ltype gen/Undo]: J Select objects: <select a line> 1 found Select objects: <select the other line> 1 segments added to polyline Enter an option [Close/Join/Width/Edit vertex/Fit/Spline/Decurve/Ltype gen/Undo]: <enter>

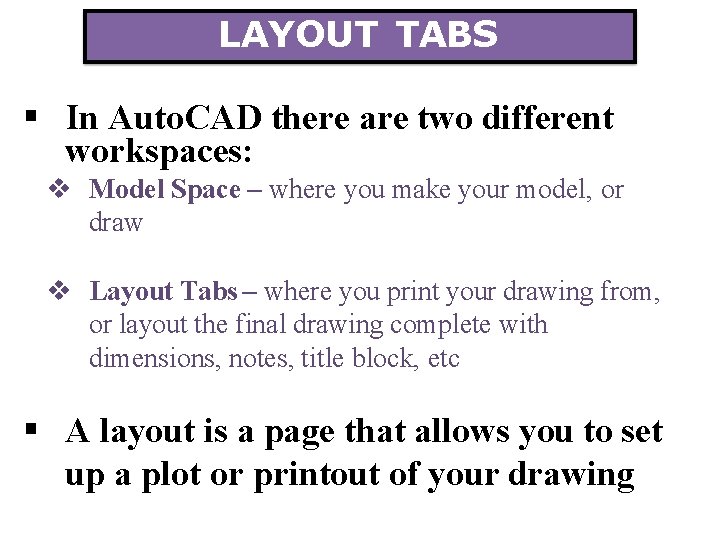
LAYOUT TABS In Auto. CAD there are two different workspaces: Model Space – where you make your model, or draw Layout Tabs – where you print your drawing from, or layout the final drawing complete with dimensions, notes, title block, etc A layout is a page that allows you to set up a plot or printout of your drawing

LAYOUT TABS

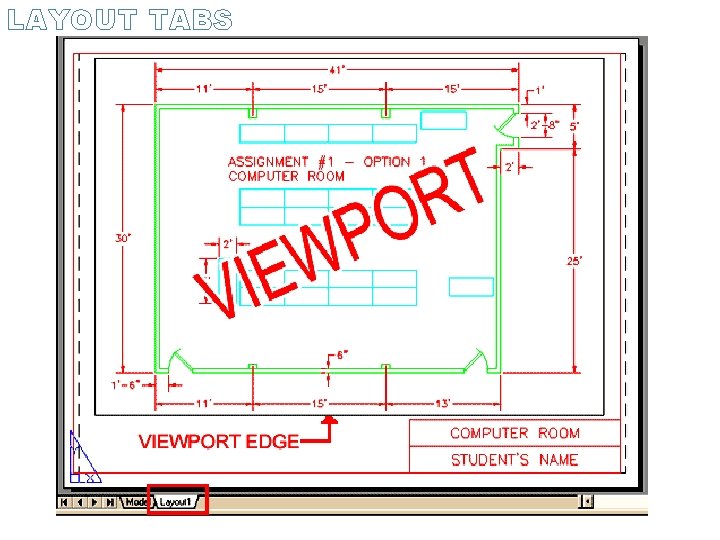
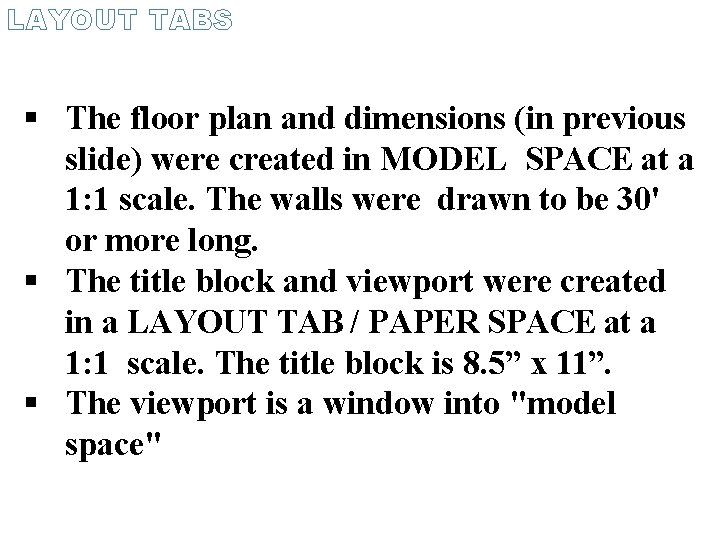
LAYOUT TABS The floor plan and dimensions (in previous slide) were created in MODEL SPACE at a 1: 1 scale. The walls were drawn to be 30' or more long. The title block and viewport were created in a LAYOUT TAB / PAPER SPACE at a 1: 1 scale. The title block is 8. 5” x 11”. The viewport is a window into "model space"

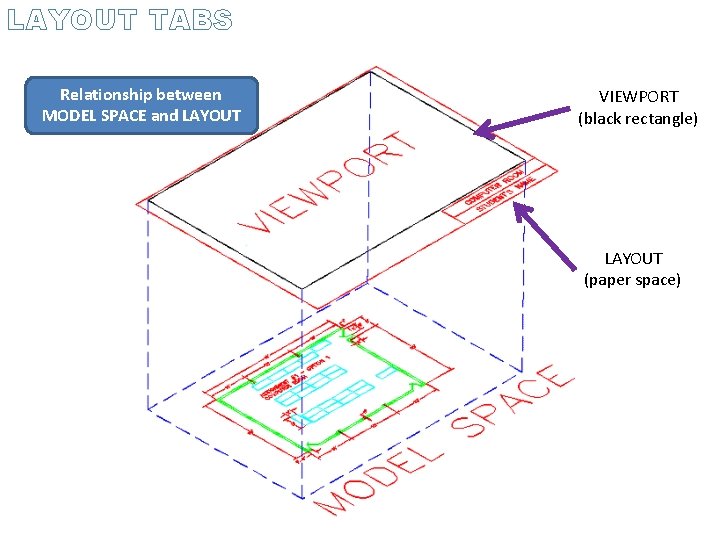
LAYOUT TABS Relationship between MODEL SPACE and LAYOUT VIEWPORT (black rectangle) LAYOUT (paper space)

LAYOUT TABS Think of paper space as being 'above' model space. To see through 'into' model space, you have to create a viewport via Make Viewport (MV) command. Think of a viewport as a window. As soon as you create the viewport, the window is closed and the extents of your drawing are displayed.

LAYOUT TABS You can see through it, but you can not 'touch' anything in model space To access to your objects in model space from paper space, you have to enter the viewport by typing MS <enter> Type in PS <enter> to 'close the window‘ The advantage of plotting from Layout (paper space) is that you can have many layouts from one drawing

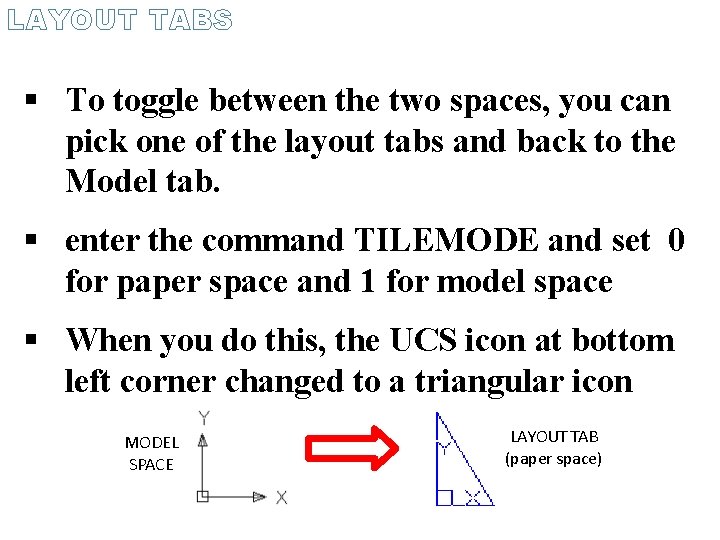
LAYOUT TABS To toggle between the two spaces, you can pick one of the layout tabs and back to the Model tab. enter the command TILEMODE and set 0 for paper space and 1 for model space When you do this, the UCS icon at bottom left corner changed to a triangular icon MODEL SPACE LAYOUT TAB (paper space)

EXAMPLE 4 1. Draw a simple title block (as previous slide) in the tab called Layout 1 at 1: 1 scale 2. Start with a 8. 5“ x 11" rectangle and offset it 0. 25" inside (erase the outer one) 3. Make a small rectangles for the text and add some text 4. Create a floating viewport as a 'window' into your model space

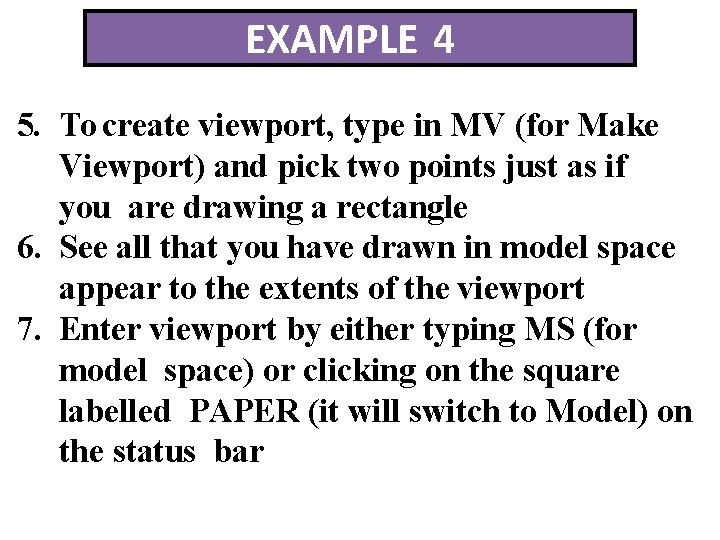
EXAMPLE 4 5. To create viewport, type in MV (for Make Viewport) and pick two points just as if you are drawing a rectangle 6. See all that you have drawn in model space appear to the extents of the viewport 7. Enter viewport by either typing MS (for model space) or clicking on the square labelled PAPER (it will switch to Model) on the status bar

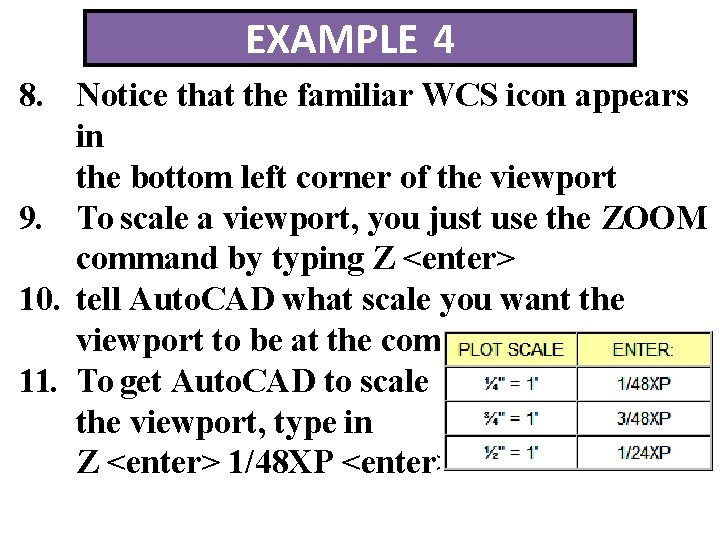
EXAMPLE 4 8. Notice that the familiar WCS icon appears in the bottom left corner of the viewport 9. To scale a viewport, you just use the ZOOM command by typing Z <enter> 10. tell Auto. CAD what scale you want the viewport to be at the command prompt 11. To get Auto. CAD to scale the viewport, type in Z <enter> 1/48 XP <enter>

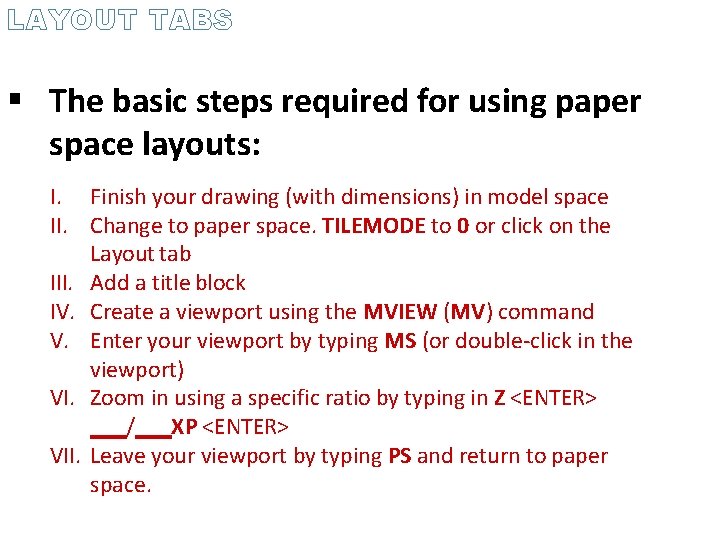
LAYOUT TABS The basic steps required for using paper space layouts: I. Finish your drawing (with dimensions) in model space II. Change to paper space. TILEMODE to 0 or click on the Layout tab III. Add a title block IV. Create a viewport using the MVIEW (MV) command V. Enter your viewport by typing MS (or double-click in the viewport) VI. Zoom in using a specific ratio by typing in Z <ENTER> / XP <ENTER> VII. Leave your viewport by typing PS and return to paper space.

LAYOUT TABS Remember to use paper space only for plotting Do not modify your model in paper space Return to true model space for any editing that you need to do Do not draw objects on the Layout screen that are part of the drawing

LAYOUT TABS Top 10 Viewport Tips: 1) You can create new layout tabs by right-clicking on an existing tabs and choosing New Layout. 2) You can rename a tab by right-clicking and choosing rename. 3) You can create viewports of various shapes by creating the object and then using the MV command with the Object option. 4) You can also choose to dimension in the Layout. This can be very convenient in Auto. CAD 2005. Your dimscale is 1 and all your dimensions are consistent. Try this out on a sample drawing. Auto. CAD will scale the dimension to size of the object in the viewport. 5) You can resize viewports with regular modifying commands and grips.

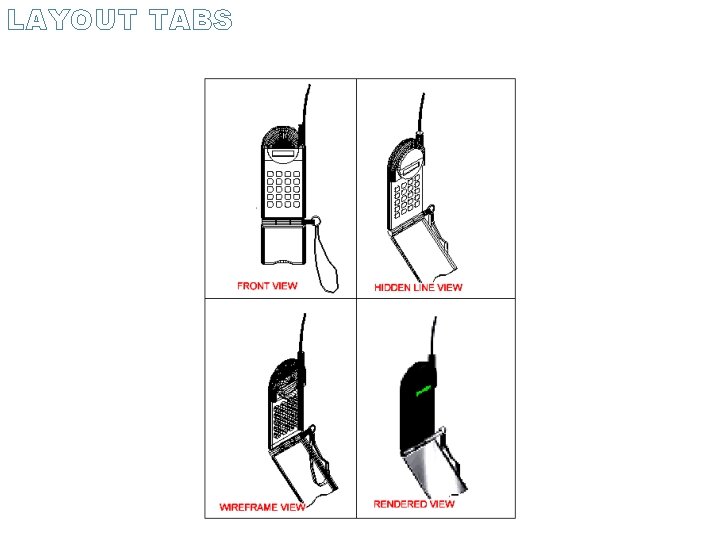
LAYOUT TABS Top 10 Viewport Tips (continue): 6) Put viewports on the layer called DEFPOINTS (created by dimensions) and they won't plot or put them on a separate layer with the plot option turned off. 7) To quickly find the zoom factor of your viewport, use the LIST command on it. 8) You can lock and unlock viewports by using the MV > L option. 9) You can freeze (turn off) layers in any viewport. 10) You can now have your viewports plot for 3 D drawings as wireframe, hidden line and rendered views when you plot this is great!

LAYOUT TABS

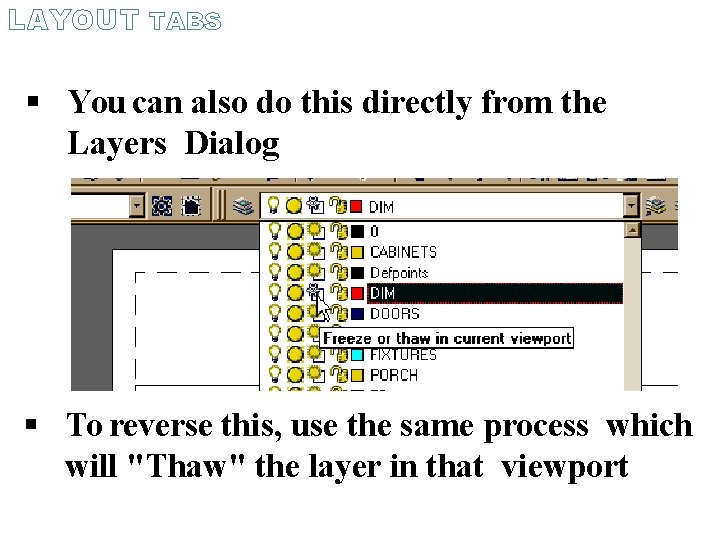
LAYOUT TABS To turn layers off in a viewport, you need to be on a Layout Tab and in Model Space of a viewport In the viewport, move your cursor to the layer droplist and select the layer you want off and hit the "Freeze in Viewport" icon for that layer, then click on the drawing area

LAYOUT TABS You can also do this directly from the Layers Dialog To reverse this, use the same process which will "Thaw" the layer in that viewport

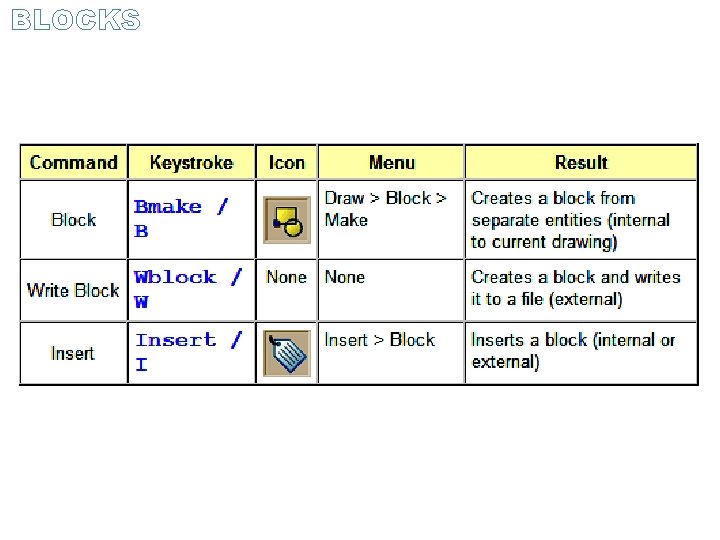
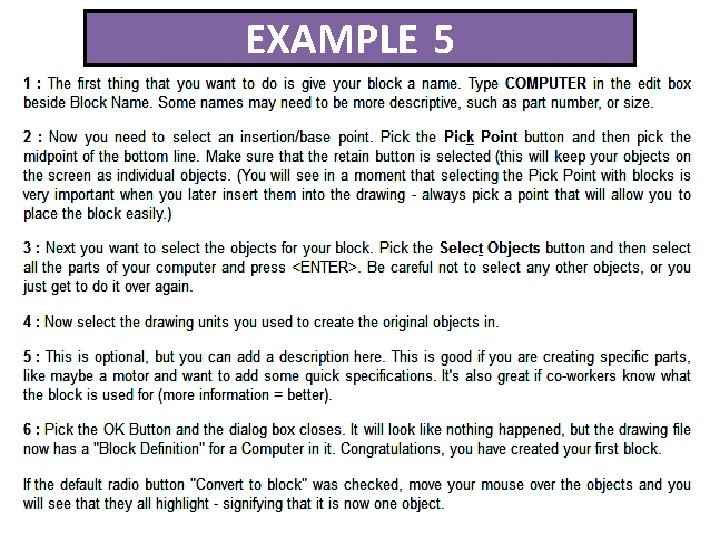
BLOCKS A BLOCK is a collection of objects (lines, arcs, circles, text, etc. ) that form a more complex entity (objects such as chair, door, window, computer, etc. ) Two types of blocks you can create; INTERNAL and EXTERNAL to current drawing

BLOCKS

BLOCKS The advantages to using blocks drawing: Blocks are a single entity. This means that you can modify (move, copy, rotate) a block by selecting only one object in it. You can build up a library of blocks consisting of the parts that you require many times in your workday. These blocks can be stored in a separate folder and even on a network so that all drafters have access to them. Using blocks can help keep your file size down. Auto. CAD stores block definitions in its database. When you insert a block, Auto. CAD only stores the name of the block, its location (insertion point), scale and rotation. This can be very noticeable in large drawing.

BLOCKS The advantages to using blocks drawing (continue): If you need to change something, you can redefine a block. For example, you draw a chair and turn it into a block. Later, you're told that the size of the chair has changed. Since you used a block you can redefine the block and all of your chairs are updated automatically. If you had drawn (or copied) 100 chairs in your drawing, you would have to manually change each one.

BLOCKS The advantages to using blocks drawing (continue): Blocks can also contain non-graphical information. This means text objects called attributes. For example, you have made blocks of different chairs. You can add information to the block such manufacturer, cost, weight, etc. This information stays with the block, but can also be extracted to a database or spreadsheet. This would be useful for things such as a bill of materials. Attributes can also be visible or invisible in your drawing. Another good use of attributes could be a title block. You can even easily add internet hyperlinks to blocks so you can connect a block to a page on a supplier's online catalog.

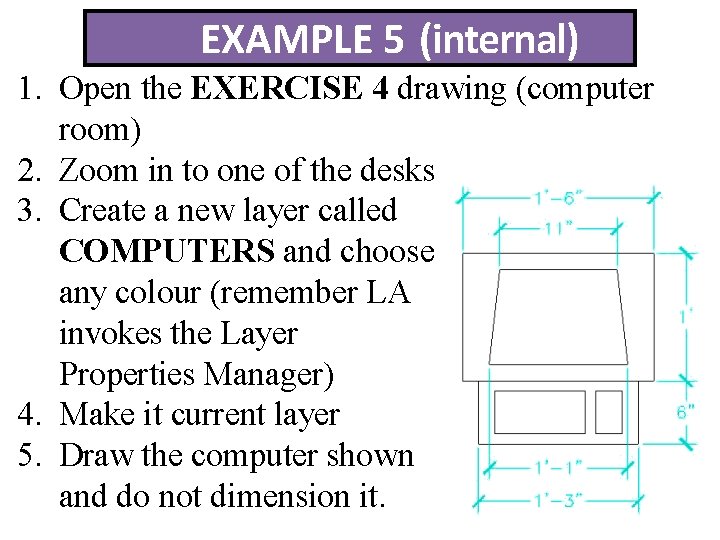
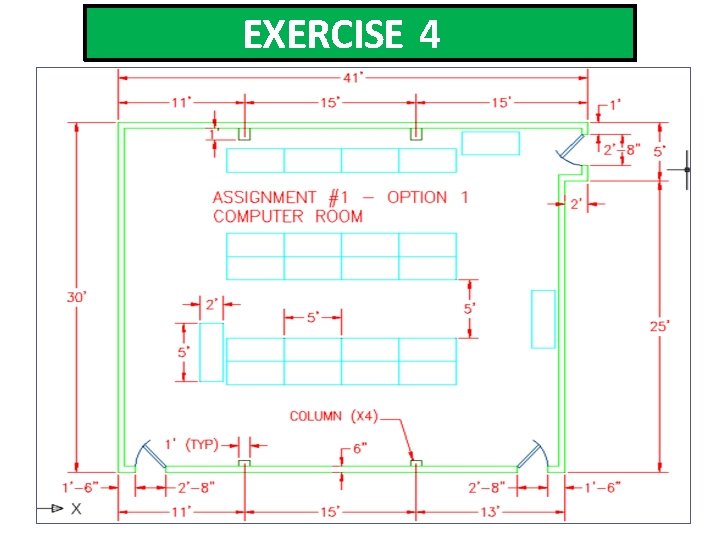
EXAMPLE 5 (internal) 1. Open the EXERCISE 4 drawing (computer room) 2. Zoom in to one of the desks 3. Create a new layer called COMPUTERS and choose any colour (remember LA invokes the Layer Properties Manager) 4. Make it current layer 5. Draw the computer shown and do not dimension it.

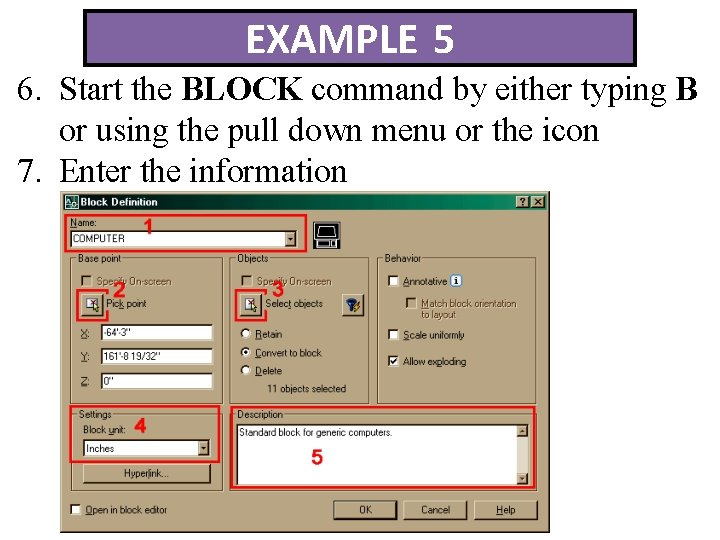
EXAMPLE 5 6. Start the BLOCK command by either typing B or using the pull down menu or the icon 7. Enter the information AIDED DRAFTING

EXAMPLE 5

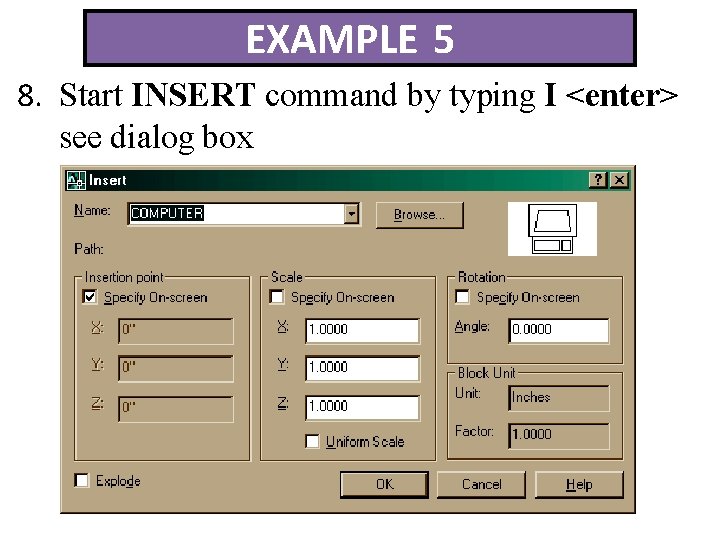
EXAMPLE 5 8. Start INSERT command by typing I <enter> see dialog box

EXAMPLE 5 9. Make sure that the Insertion Point - Specify On-screen box is checked, and the Explode button is not checked 10. The Scale - Specify On-screen should not be checked 11. Press the OK button 12. Pick anywhere on screen and see the block appear 13. Insert a computer on every desk 14. You can also copy the block instead of reinserting each time

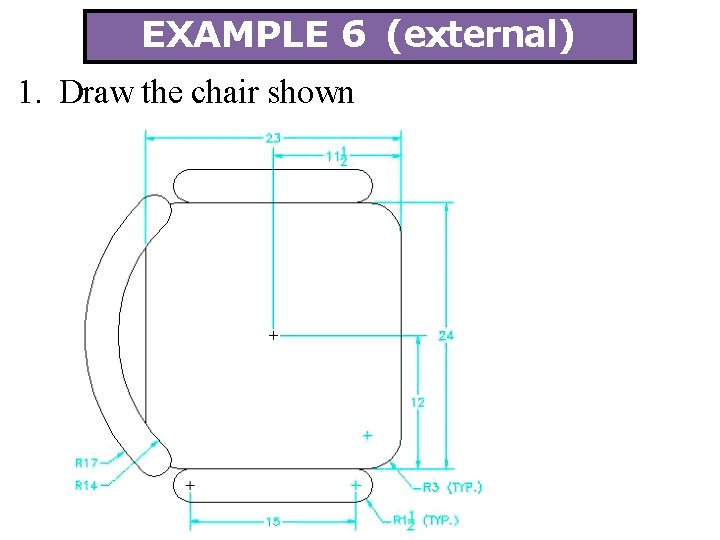
EXAMPLE 6 (external) 1. Draw the chair shown

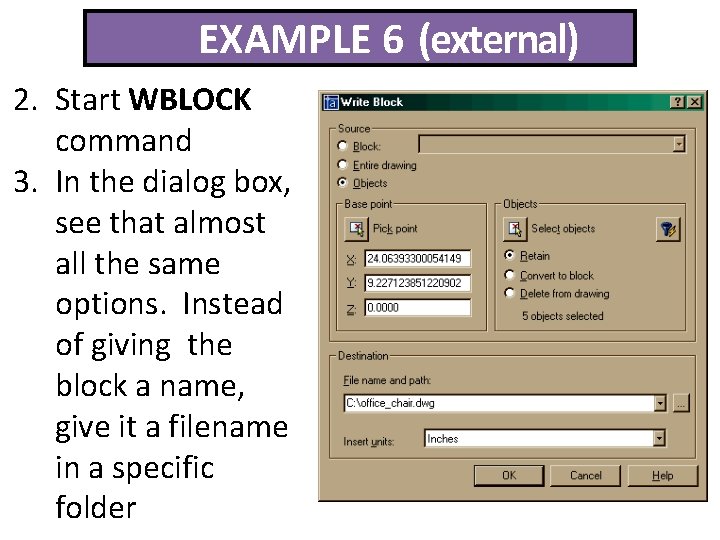
EXAMPLE 6 (external) 2. Start WBLOCK command 3. In the dialog box, see that almost all the same options. Instead of giving the block a name, give it a filename in a specific folder

EXAMPLE 6 (external) 4. Put the block in a logical path and give it a good, descriptive name 5. Use the same INSERT command to insert the chair (external object) 6. Use the Browse button to navigate to the folder where block is stored 7. Put some chairs in front of the desks

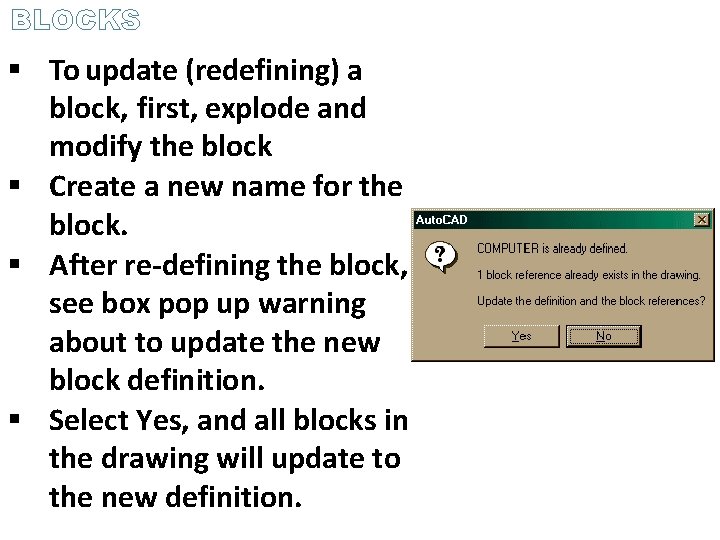
BLOCKS To update (redefining) a block, first, explode and modify the block Create a new name for the block. After re-defining the block, see box pop up warning about to update the new block definition. Select Yes, and all blocks in the drawing will update to the new definition.

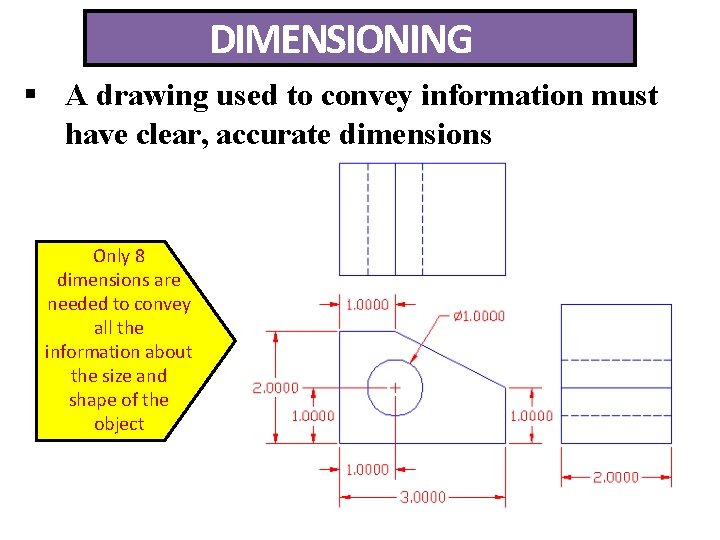
DIMENSIONING A drawing used to convey information must have clear, accurate dimensions Only 8 dimensions are needed to convey all the information about the size and shape of the object

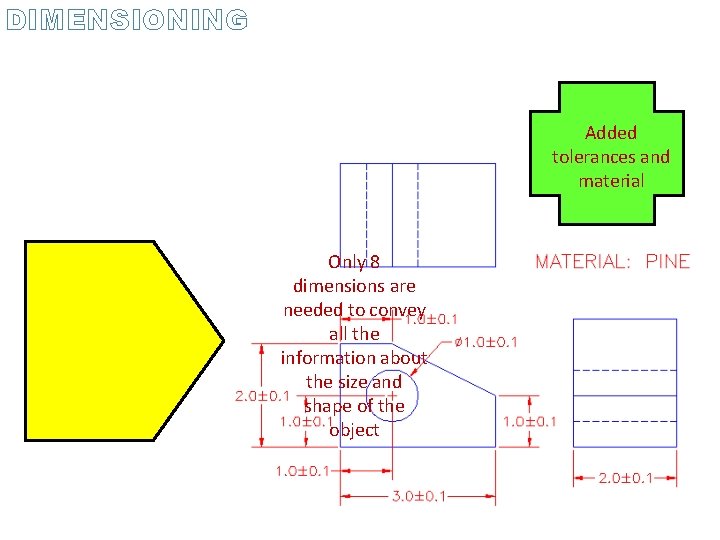
DIMENSIONING Added tolerances and material Only 8 dimensions are needed to convey all the information about the size and shape of the object

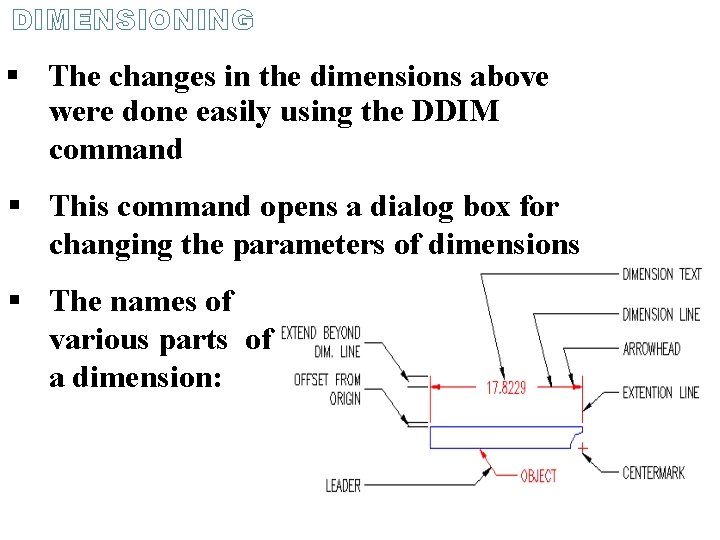
DIMENSIONING The changes in the dimensions above were done easily using the DDIM command This command opens a dialog box for changing the parameters of dimensions The names of various parts of a dimension:

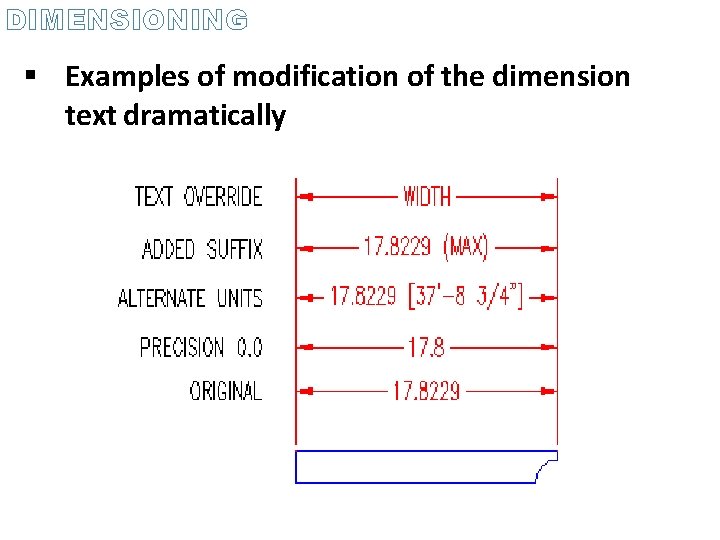
DIMENSIONING Examples of modification of the dimension text dramatically

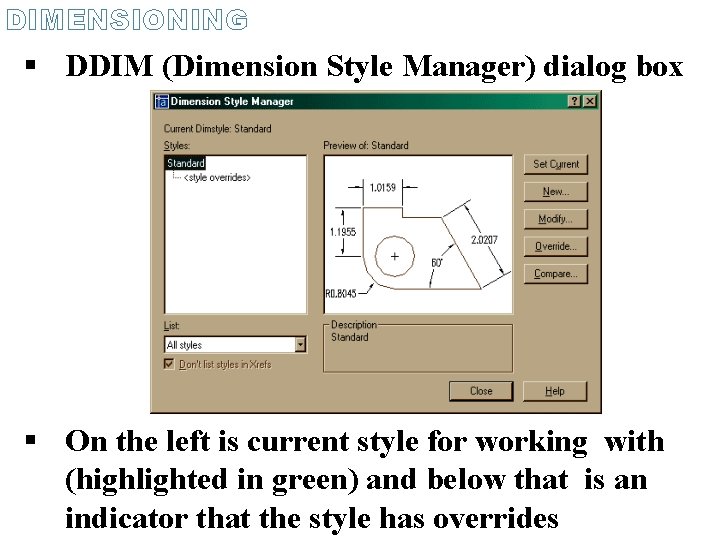
DIMENSIONING DDIM (Dimension Style Manager) dialog box On the left is current style for working with (highlighted in green) and below that is an indicator that the style has overrides

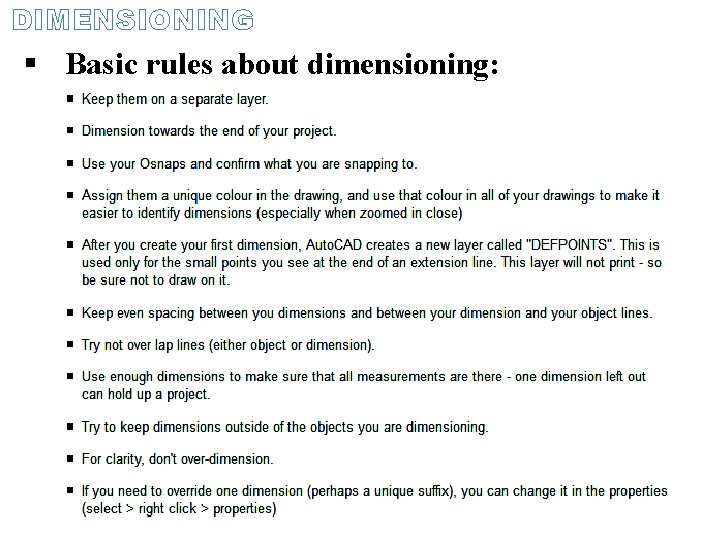
DIMENSIONING Basic rules about dimensioning:

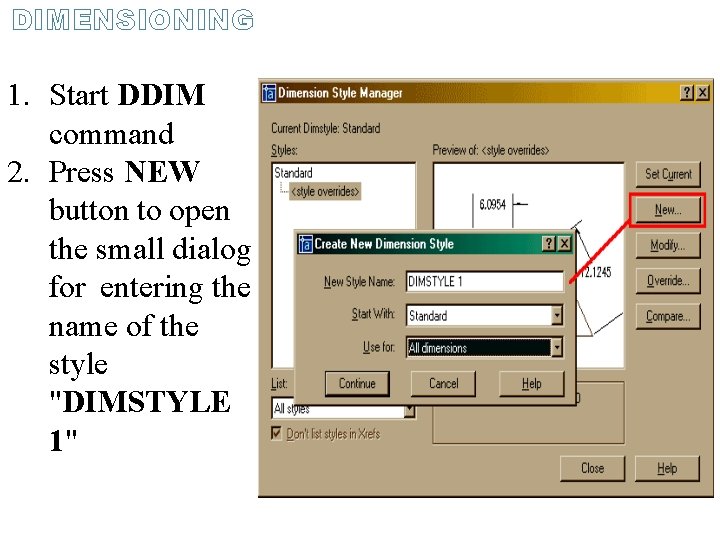
DIMENSIONING 1. Start DDIM command 2. Press NEW button to open the small dialog for entering the name of the style "DIMSTYLE 1"

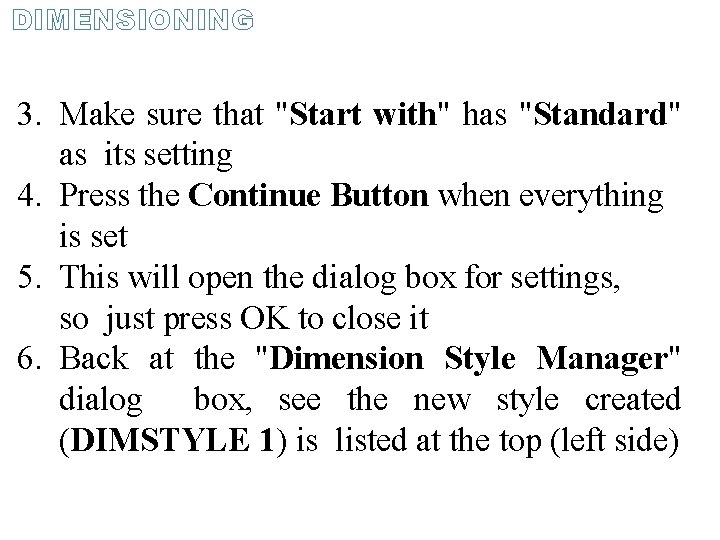
DIMENSIONING 3. Make sure that "Start with" has "Standard" as its setting 4. Press the Continue Button when everything is set 5. This will open the dialog box for settings, so just press OK to close it 6. Back at the "Dimension Style Manager" dialog box, see the new style created (DIMSTYLE 1) is listed at the top (left side)

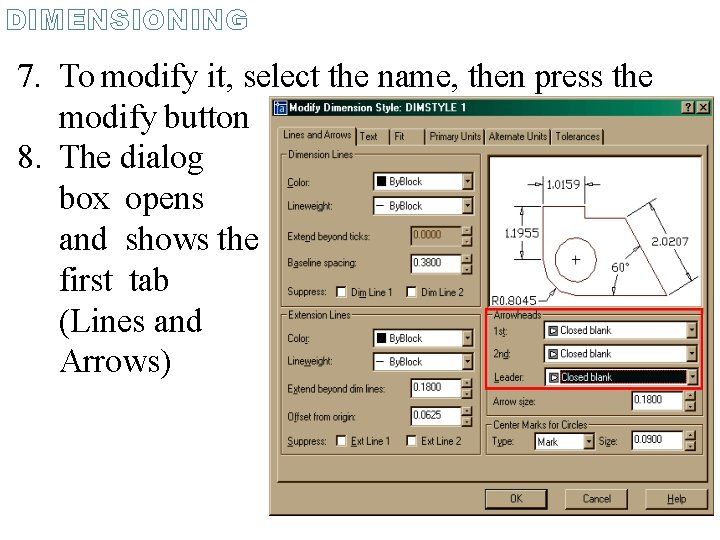
DIMENSIONING 7. To modify it, select the name, then press the modify button 8. The dialog box opens and shows the first tab (Lines and Arrows)

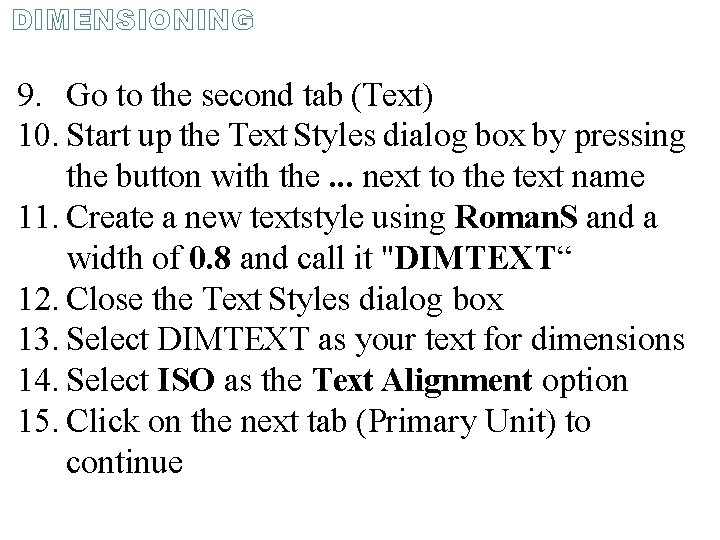
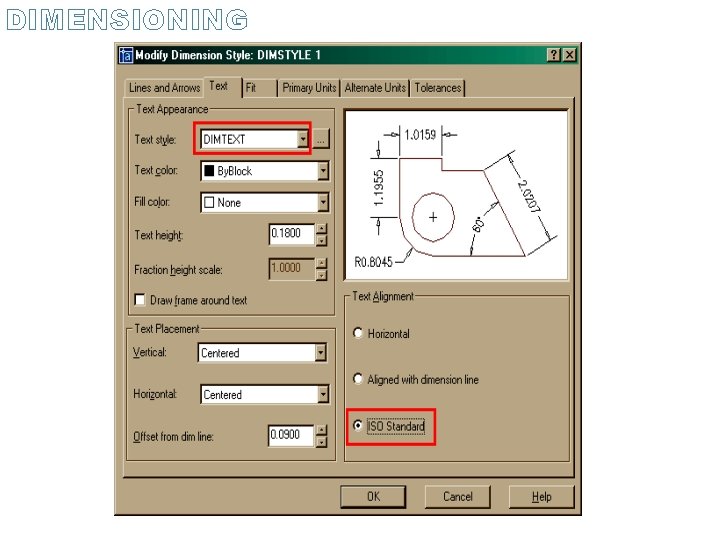
DIMENSIONING 9. Go to the second tab (Text) 10. Start up the Text Styles dialog box by pressing the button with the. . . next to the text name 11. Create a new textstyle using Roman. S and a width of 0. 8 and call it "DIMTEXT“ 12. Close the Text Styles dialog box 13. Select DIMTEXT as your text for dimensions 14. Select ISO as the Text Alignment option 15. Click on the next tab (Primary Unit) to continue

DIMENSIONING

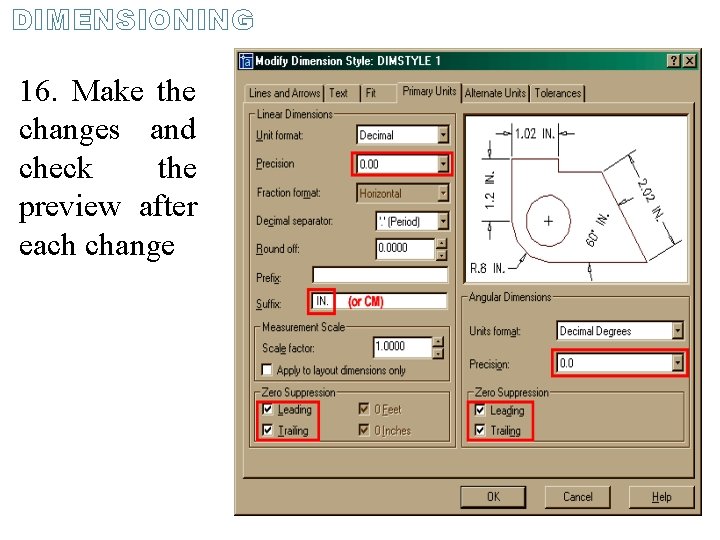
DIMENSIONING 16. Make the changes and check the preview after each change

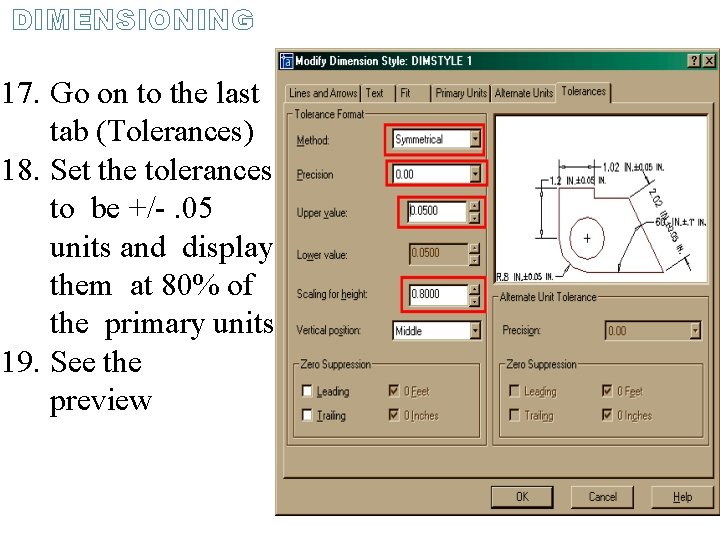
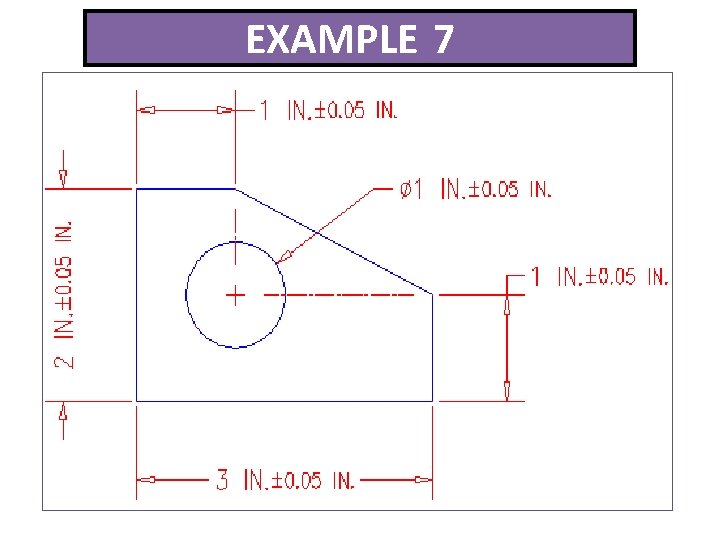
DIMENSIONING 17. Go on to the last tab (Tolerances) 18. Set the tolerances to be +/-. 05 units and display them at 80% of the primary units 19. See the preview

DIMENSIONING 20. Click OK to close the dialog box 21. At the original Dimension Style Manger, press the name of your new style, then click the "Make Current" button 22. Close the dialog box to go back to your workspace

EXAMPLE 7

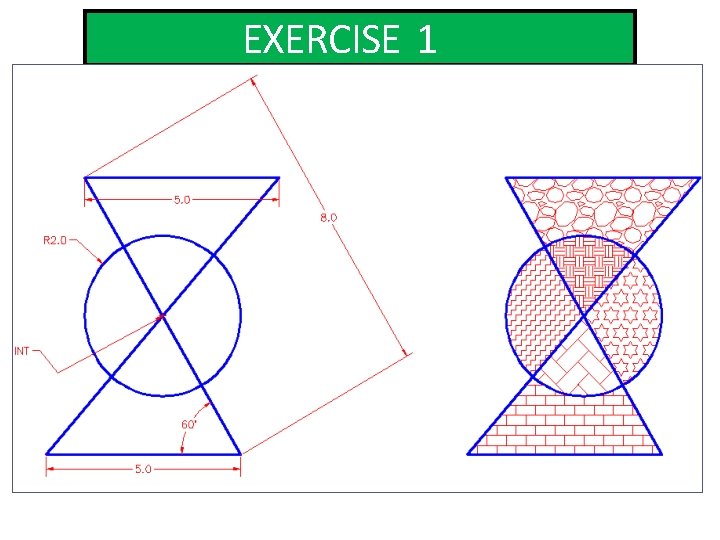
EXERCISE 1

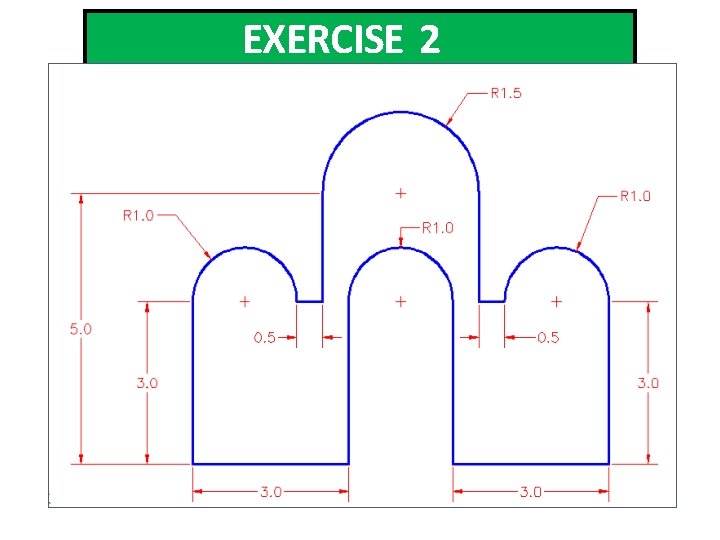
EXERCISE 2

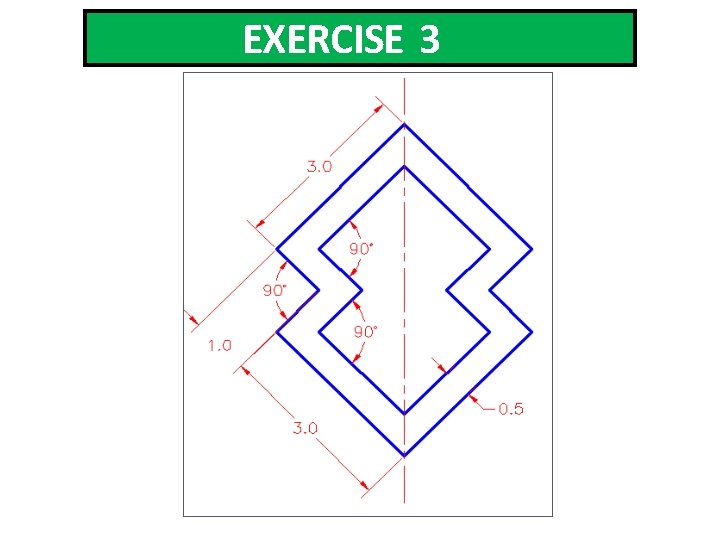
EXERCISE 3

EXERCISE 4