Dimensions and Tolerances Making things fit JEM171 Intro
- Slides: 48

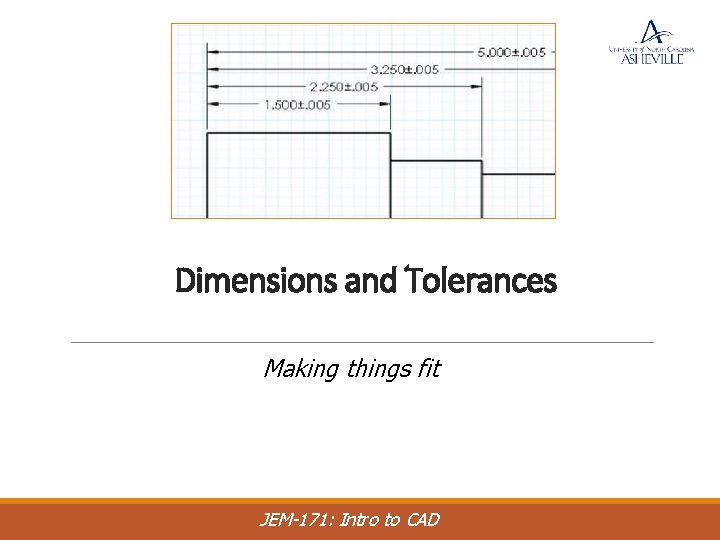
Dimensions and Tolerances Making things fit JEM-171: Intro to CAD

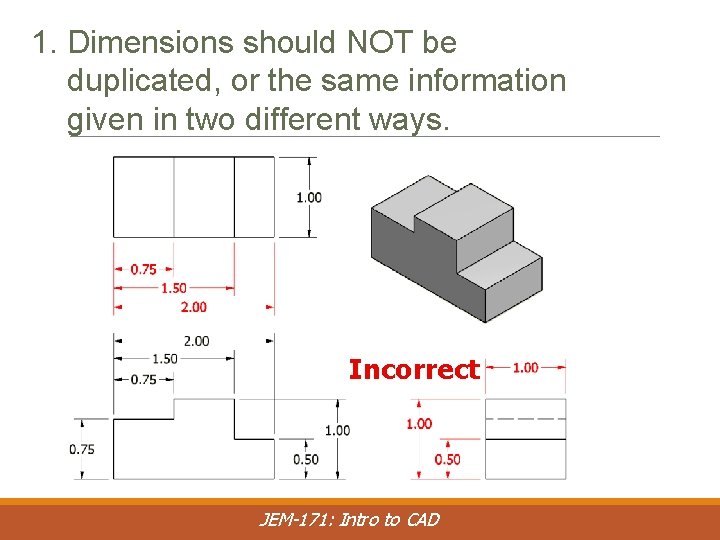
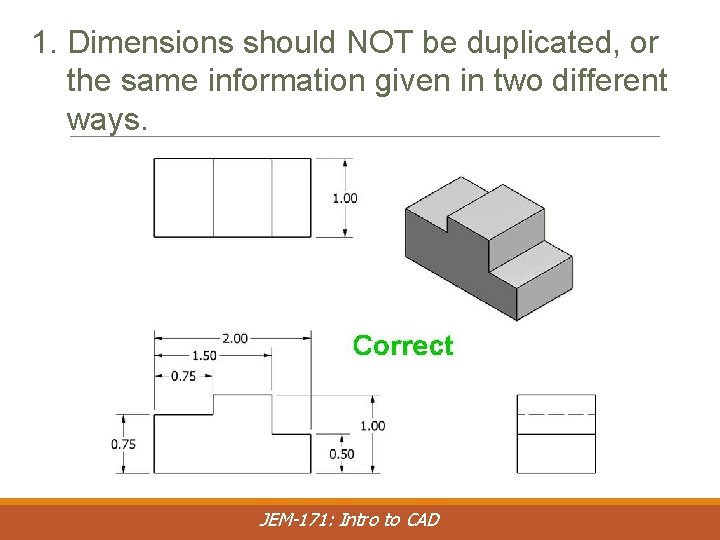
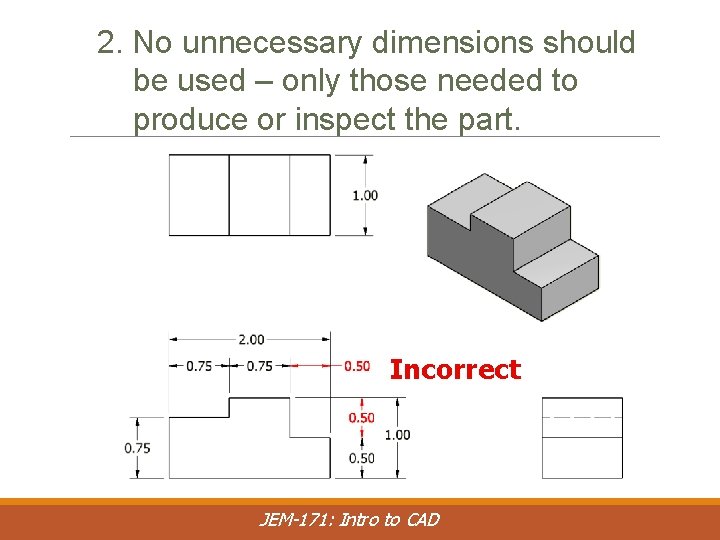
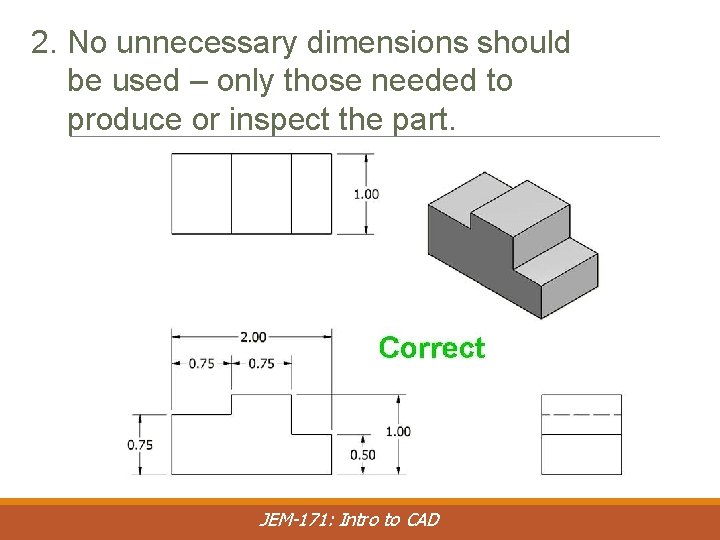
General rules of dimensioning (1) • Dimensions should NOT be duplicated, or the same information be given in two different ways. • No unnecessary dimensions should be used - only those needed to produce or inspect the part. • Dimensions should be placed at finished surfaces or important center lines. • Dimensions should be placed so that it is not necessary for the observer to calculate, scale, or assume any measurement. • Dimensions should be attached to the view that best shows the shape of the feature to be dimensioned. • Avoid dimensioning to hidden lines wherever possible. • Dimensions should not be placed on the object unless that is the only clear option. JEM-171: Intro to CAD

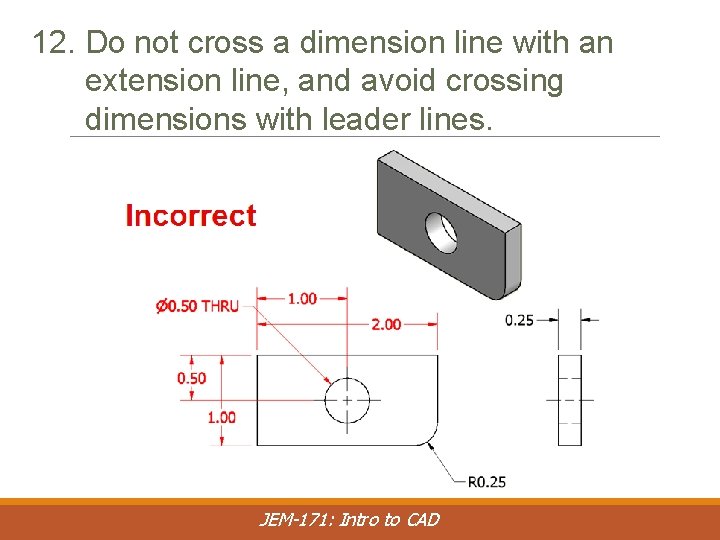
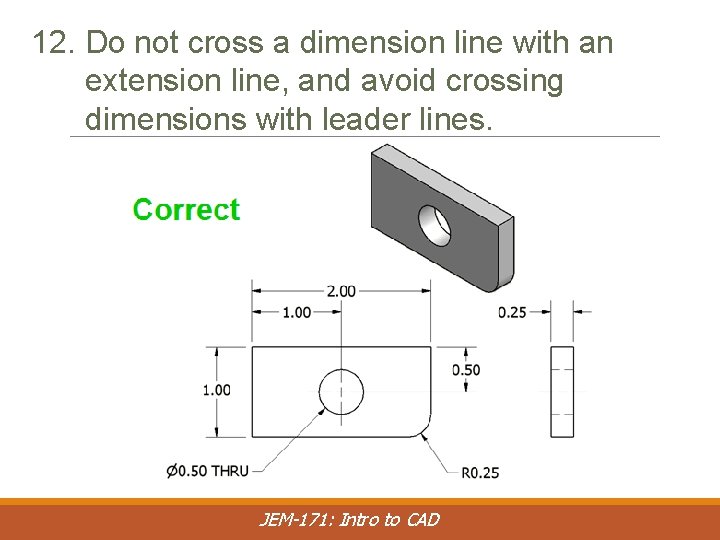
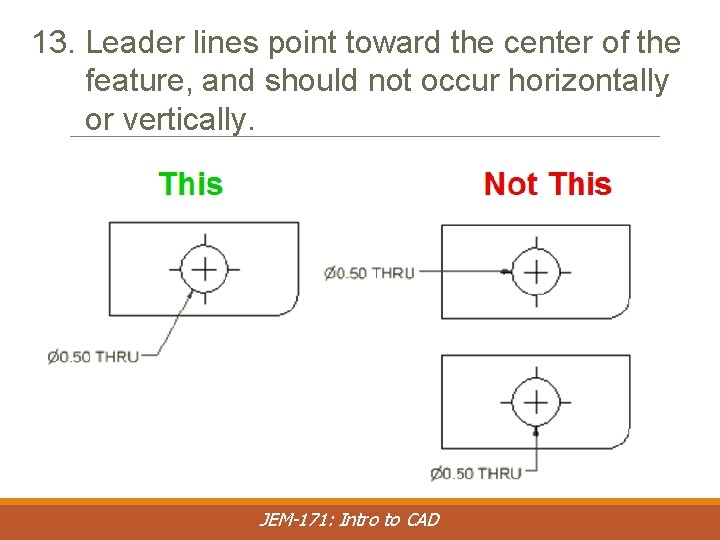
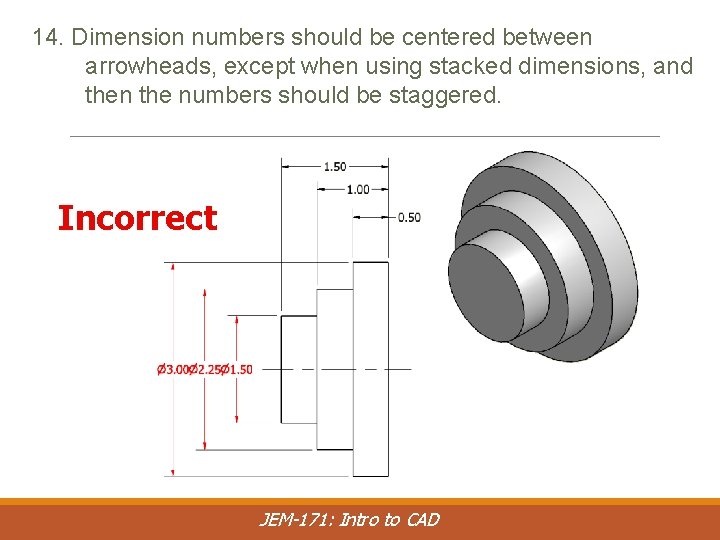
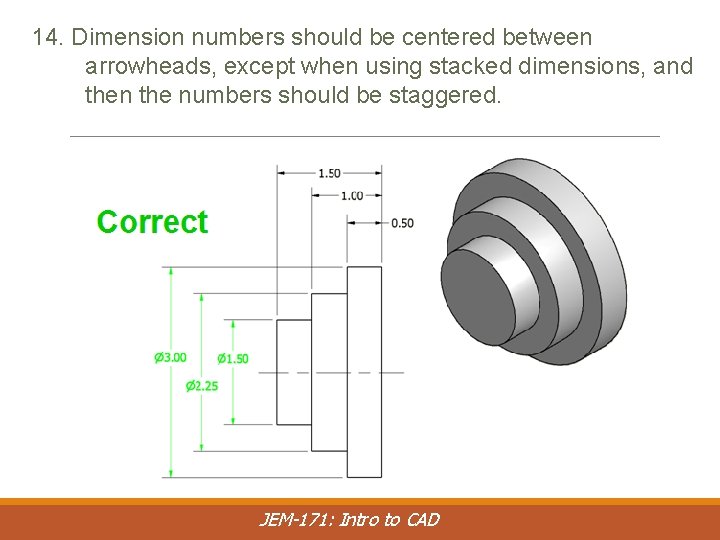
General rules of dimensioning (2) • Overall dimensions should be placed the greatest distance away from the object so that intermediate dimension can nest closer to the object to avoid crossing extension lines. • A dimension should be attached to only one view (i. e. , extension lines should not connect two views) • When possible, avoid crossing dimension lines. • When possible, avoid crossing extension lines. • A center line may be extended and used as an extension line. • Leaders should slope at a 30, 45 or 60 degree angle. • Dimension numbers should be centered between arrowheads, except when using stacked dimensions then the numbers should be staggered. JEM-171: Intro to CAD

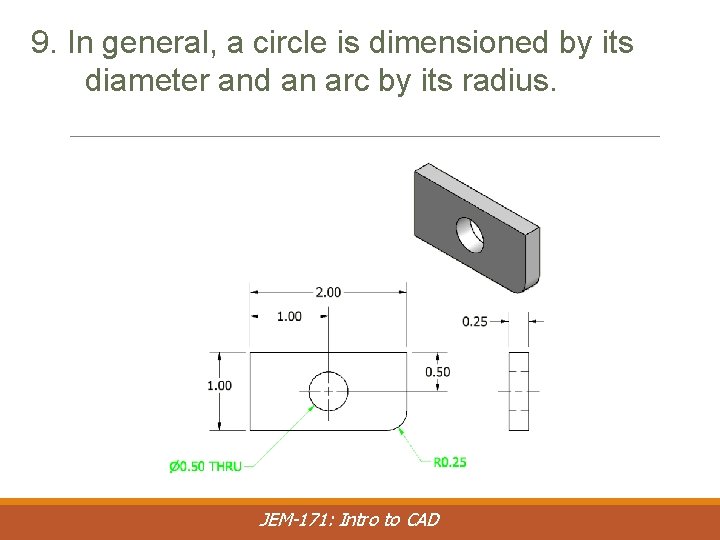
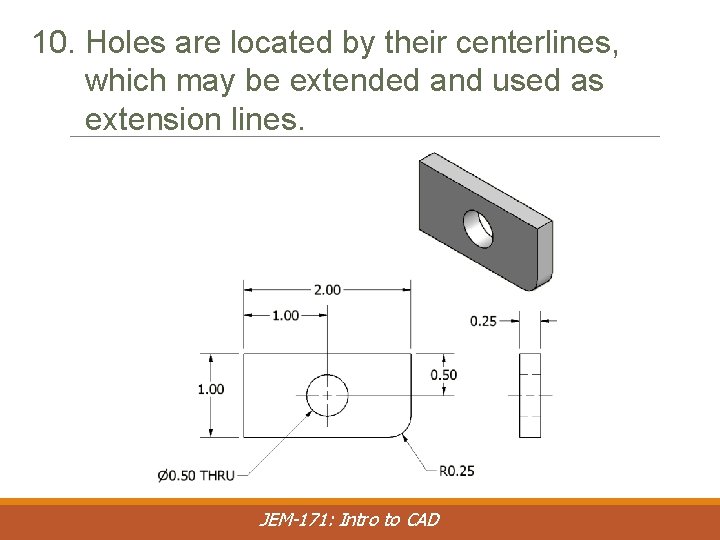
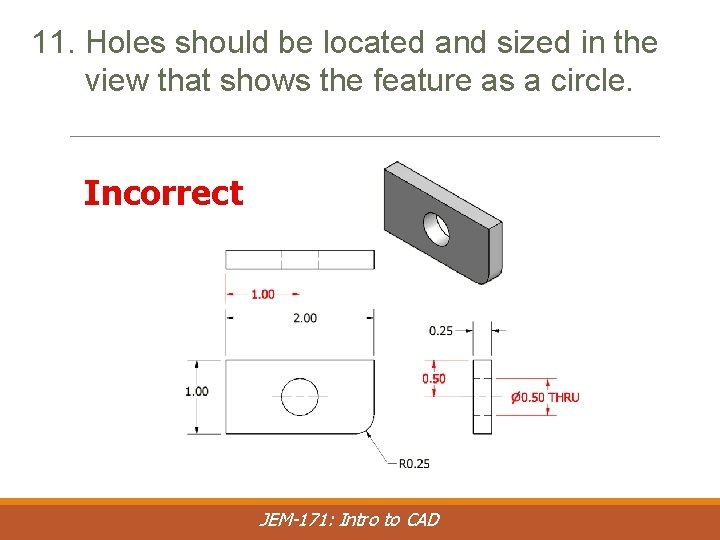
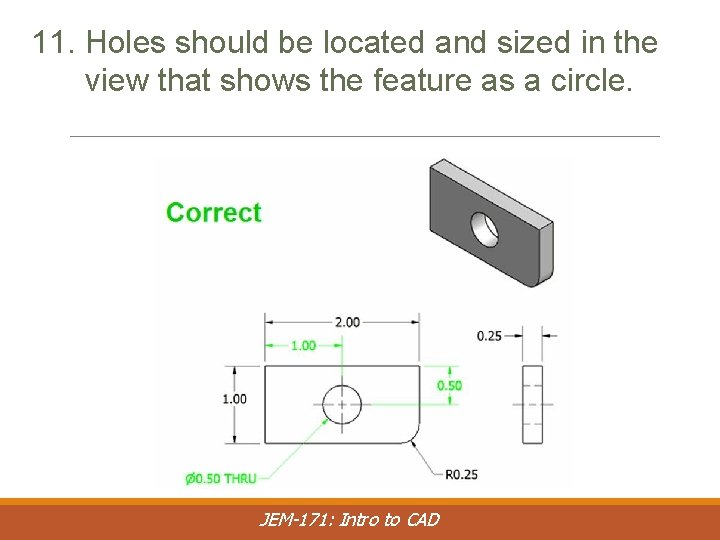
General rules of dimensioning (3) • In general, a circle is dimensioned by its diameter, an arc by its radius. • Holes should be located by their center lines. • Holes should be dimensioned in the view that shows the feature as a circle. • Extension lines start approximately 1/16" from the object and extend 1/8" past the last dimension. • The first dimension is approximately ½" from the object and spaced uniformly approximately 3/8" apart. JEM-171: Intro to CAD

1. Dimensions should NOT be duplicated, or the same information given in two different ways. Incorrect JEM-171: Intro to CAD

1. Dimensions should NOT be duplicated, or the same information given in two different ways. JEM-171: Intro to CAD

2. No unnecessary dimensions should be used – only those needed to produce or inspect the part. Incorrect JEM-171: Intro to CAD

2. No unnecessary dimensions should be used – only those needed to produce or inspect the part. JEM-171: Intro to CAD

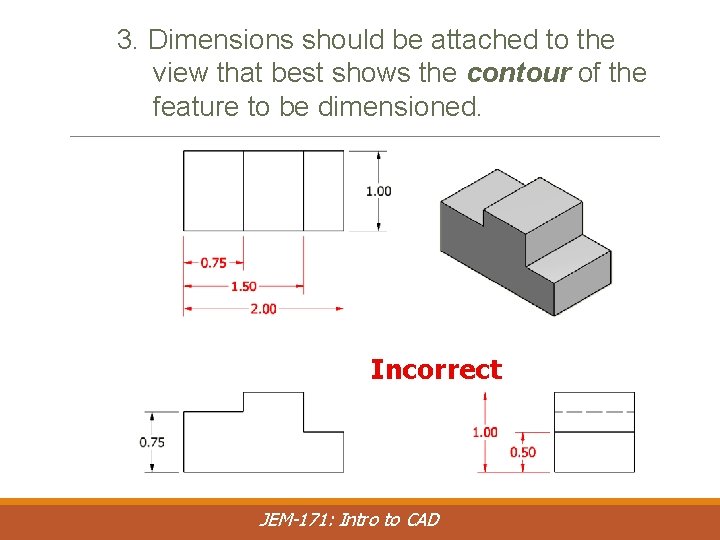
3. Dimensions should be attached to the view that best shows the contour of the feature to be dimensioned. Incorrect JEM-171: Intro to CAD

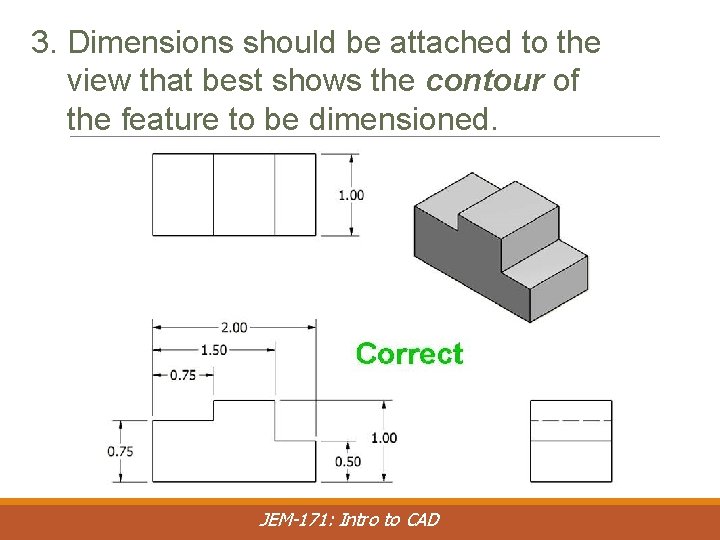
3. Dimensions should be attached to the view that best shows the contour of the feature to be dimensioned. JEM-171: Intro to CAD

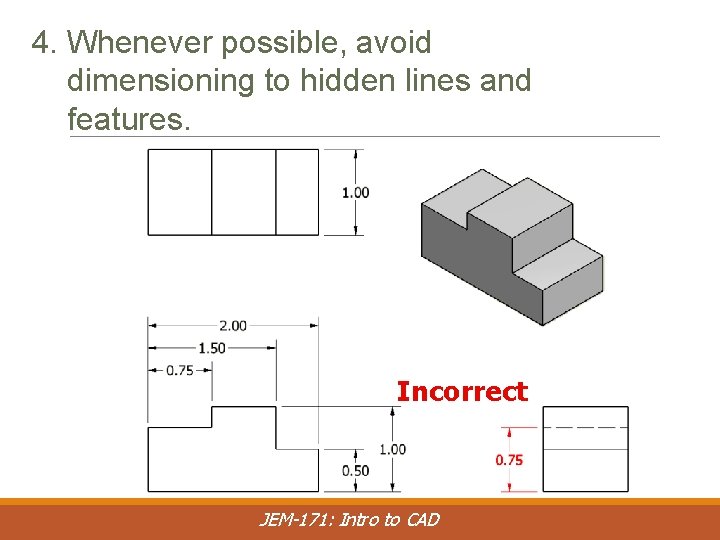
4. Whenever possible, avoid dimensioning to hidden lines and features. Incorrect JEM-171: Intro to CAD

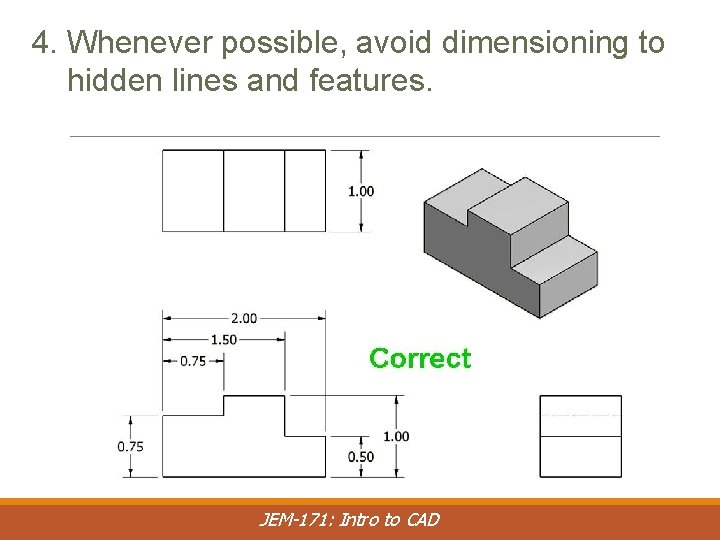
4. Whenever possible, avoid dimensioning to hidden lines and features. JEM-171: Intro to CAD

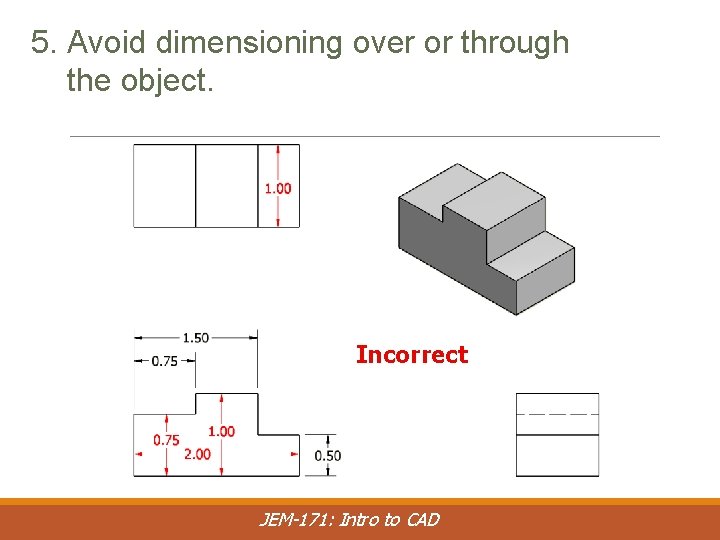
5. Avoid dimensioning over or through the object. Incorrect JEM-171: Intro to CAD

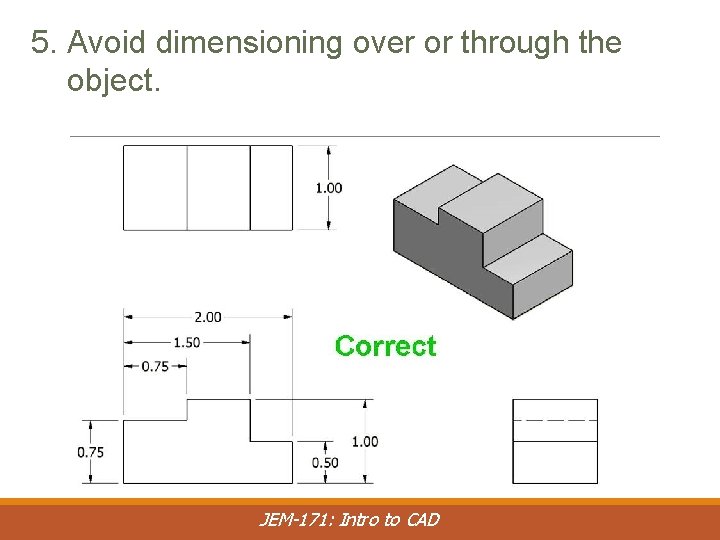
5. Avoid dimensioning over or through the object. JEM-171: Intro to CAD

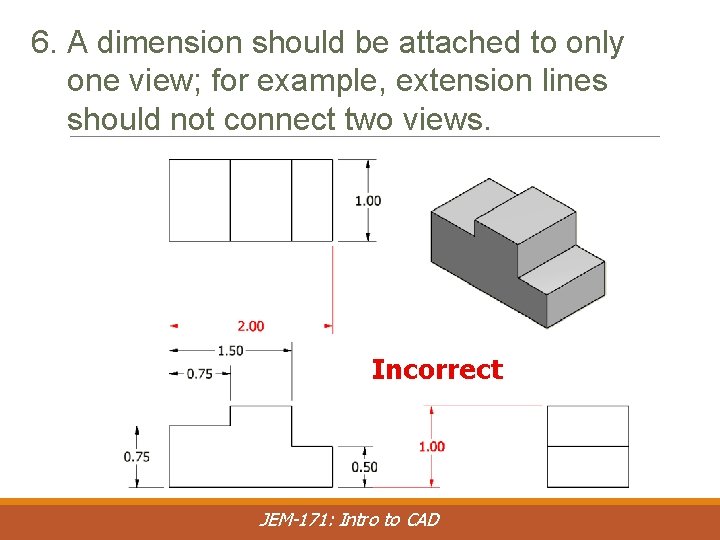
6. A dimension should be attached to only one view; for example, extension lines should not connect two views. Incorrect JEM-171: Intro to CAD

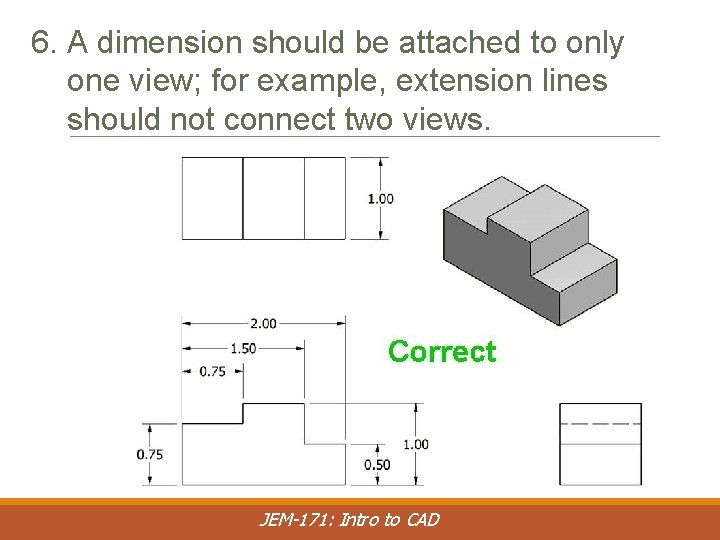
6. A dimension should be attached to only one view; for example, extension lines should not connect two views. JEM-171: Intro to CAD

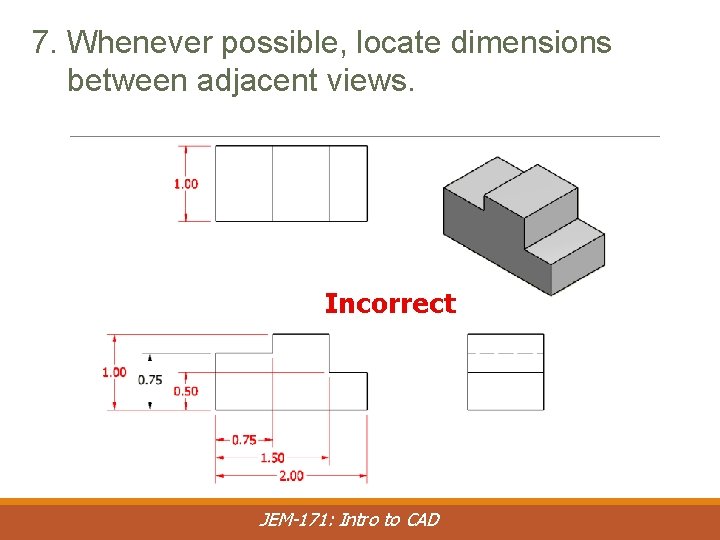
7. Whenever possible, locate dimensions between adjacent views. Incorrect JEM-171: Intro to CAD

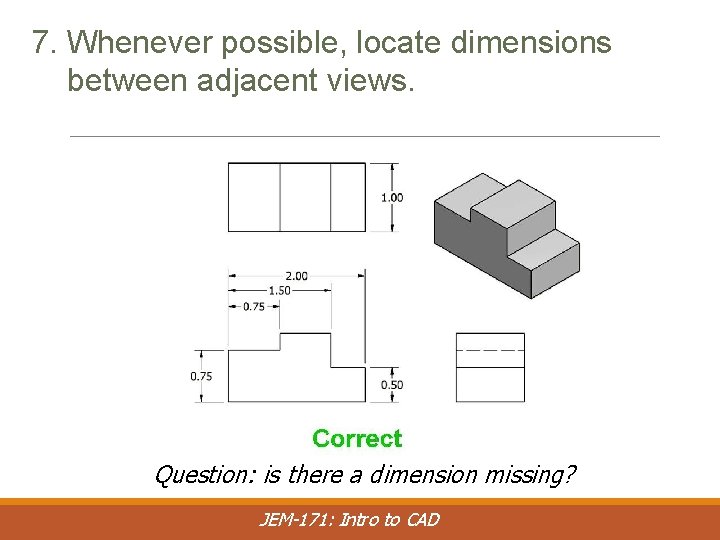
7. Whenever possible, locate dimensions between adjacent views. Question: is there a dimension missing? JEM-171: Intro to CAD

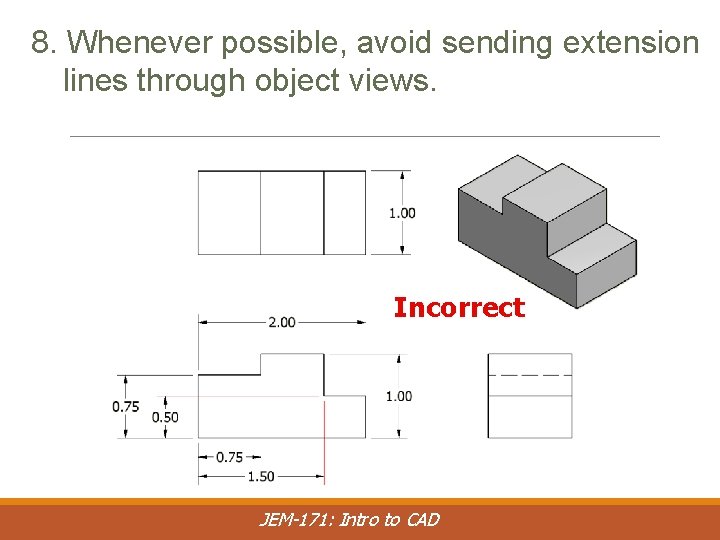
8. Whenever possible, avoid sending extension lines through object views. Incorrect JEM-171: Intro to CAD

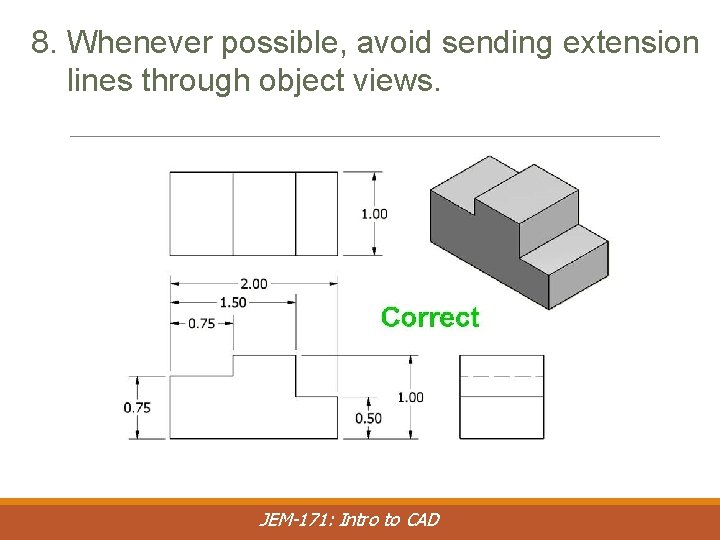
8. Whenever possible, avoid sending extension lines through object views. JEM-171: Intro to CAD

9. In general, a circle is dimensioned by its diameter and an arc by its radius. JEM-171: Intro to CAD

10. Holes are located by their centerlines, which may be extended and used as extension lines. JEM-171: Intro to CAD

11. Holes should be located and sized in the view that shows the feature as a circle. Incorrect JEM-171: Intro to CAD

11. Holes should be located and sized in the view that shows the feature as a circle. JEM-171: Intro to CAD

12. Do not cross a dimension line with an extension line, and avoid crossing dimensions with leader lines. JEM-171: Intro to CAD

12. Do not cross a dimension line with an extension line, and avoid crossing dimensions with leader lines. JEM-171: Intro to CAD

13. Leader lines point toward the center of the feature, and should not occur horizontally or vertically. JEM-171: Intro to CAD

14. Dimension numbers should be centered between arrowheads, except when using stacked dimensions, and then the numbers should be staggered. Incorrect JEM-171: Intro to CAD

14. Dimension numbers should be centered between arrowheads, except when using stacked dimensions, and then the numbers should be staggered. JEM-171: Intro to CAD

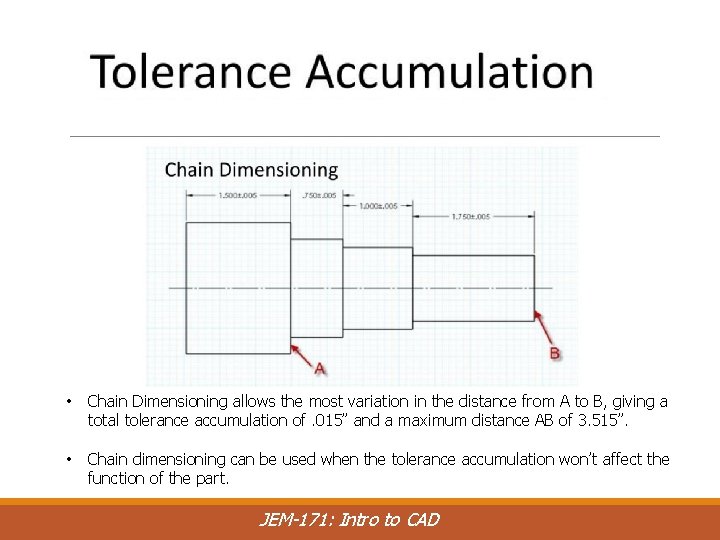
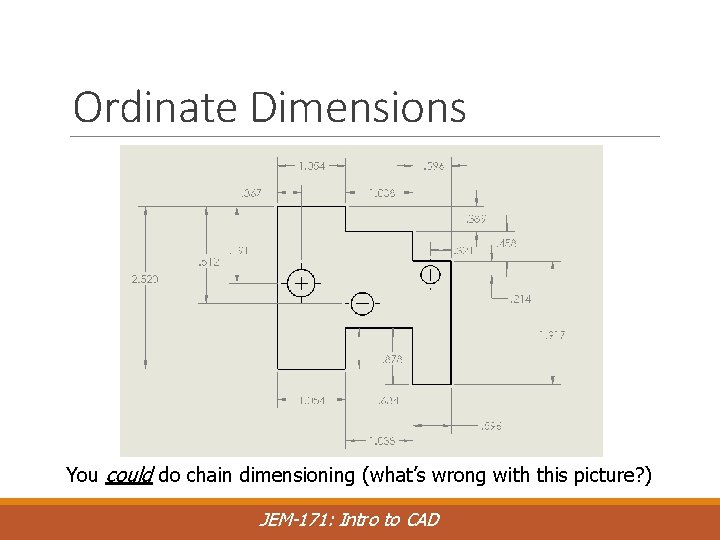
• Chain Dimensioning allows the most variation in the distance from A to B, giving a total tolerance accumulation of. 015” and a maximum distance AB of 3. 515”. • Chain dimensioning can be used when the tolerance accumulation won’t affect the function of the part. JEM-171: Intro to CAD

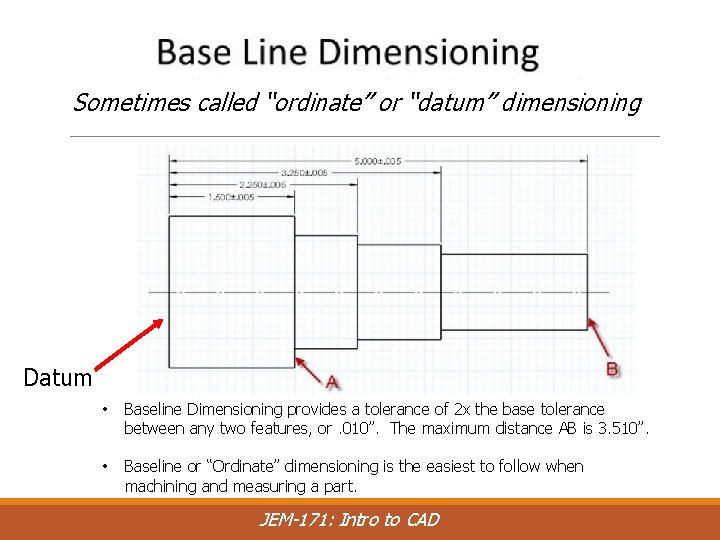
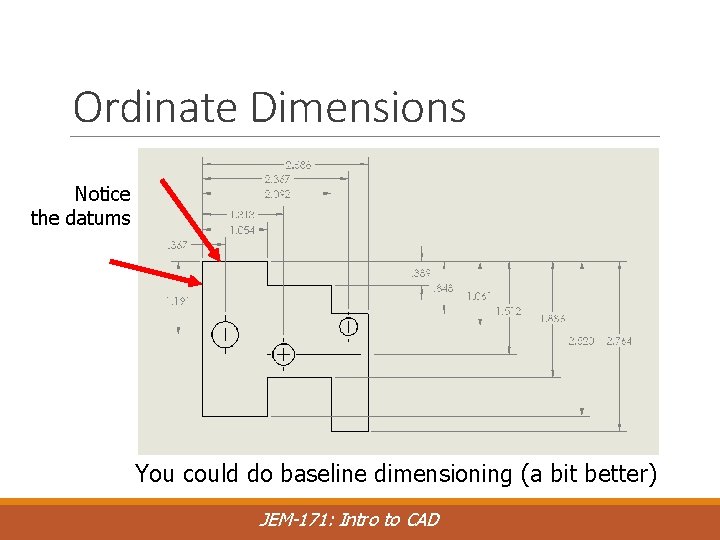
Sometimes called “ordinate” or “datum” dimensioning Datum • Baseline Dimensioning provides a tolerance of 2 x the base tolerance between any two features, or. 010”. The maximum distance AB is 3. 510”. • Baseline or “Ordinate” dimensioning is the easiest to follow when machining and measuring a part. JEM-171: Intro to CAD

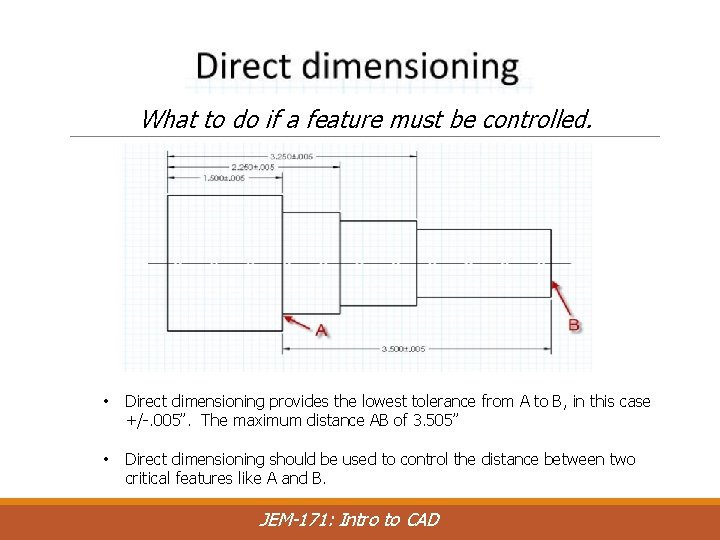
What to do if a feature must be controlled. • Direct dimensioning provides the lowest tolerance from A to B, in this case +/-. 005”. The maximum distance AB of 3. 505” • Direct dimensioning should be used to control the distance between two critical features like A and B. JEM-171: Intro to CAD

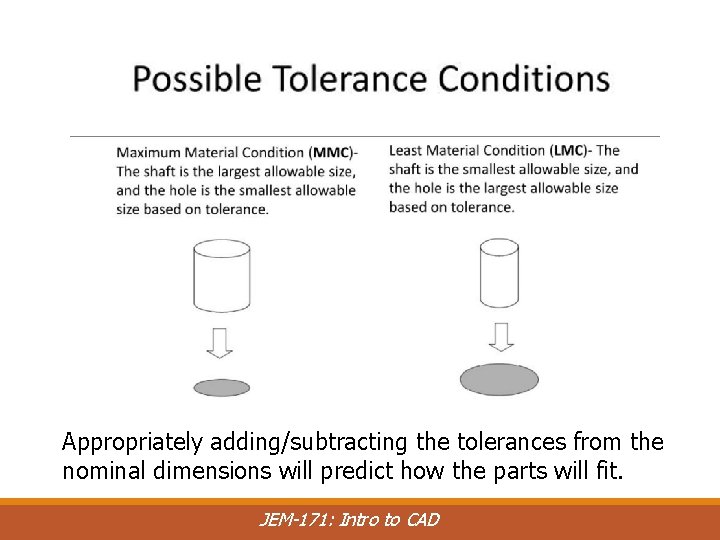
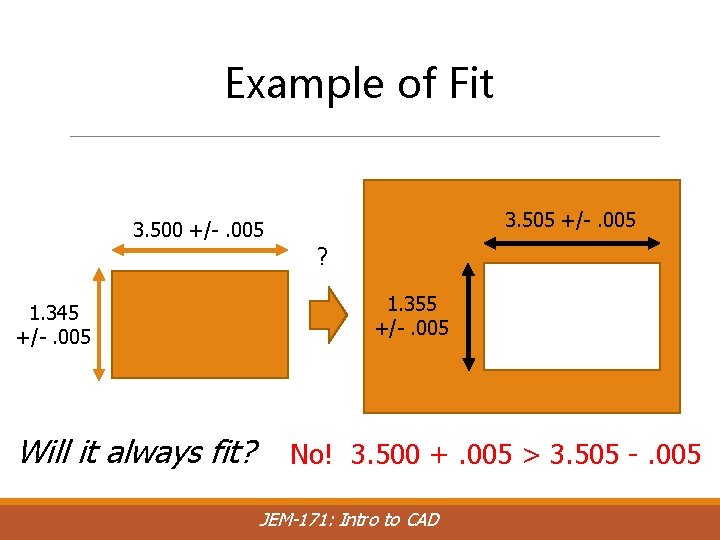
Appropriately adding/subtracting the tolerances from the nominal dimensions will predict how the parts will fit. JEM-171: Intro to CAD

Example of Fit 3. 505 +/-. 005 3. 500 +/-. 005 ? 1. 345 +/-. 005 Will it always fit? 1. 355 +/-. 005 No! 3. 500 +. 005 > 3. 505 -. 005 JEM-171: Intro to CAD

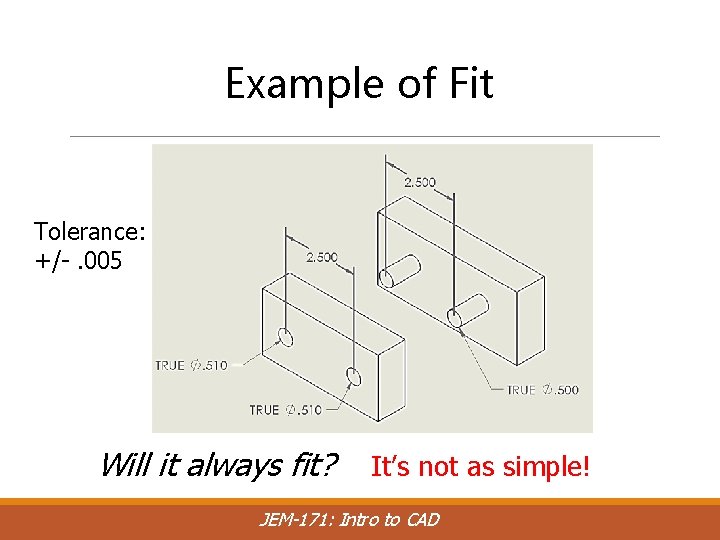
Example of Fit Tolerance: +/-. 005 Will it always fit? It’s not as simple! JEM-171: Intro to CAD

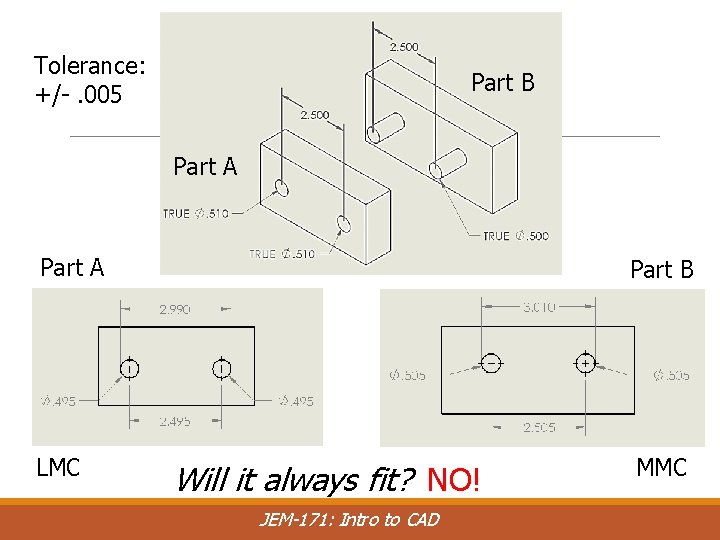
Tolerance: +/-. 005 Part B Example of Fit Part A Part B LMC MMC Will it always fit? NO! JEM-171: Intro to CAD

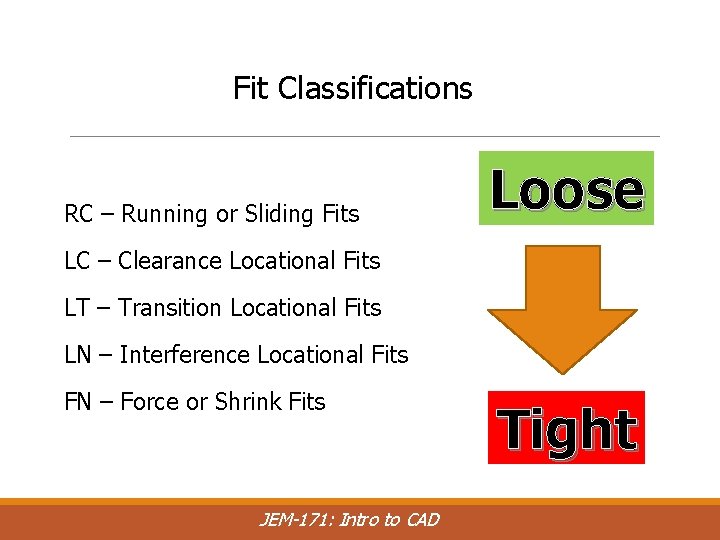
Fit Classifications RC – Running or Sliding Fits Loose LC – Clearance Locational Fits LT – Transition Locational Fits LN – Interference Locational Fits FN – Force or Shrink Fits JEM-171: Intro to CAD Tight

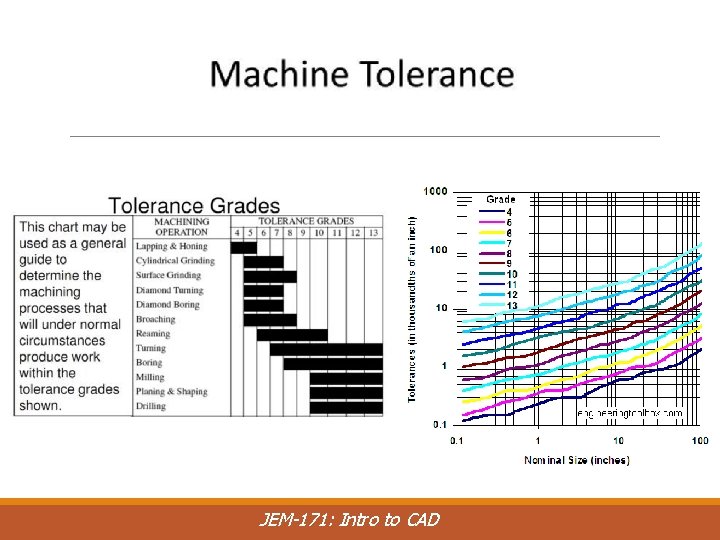
JEM-171: Intro to CAD

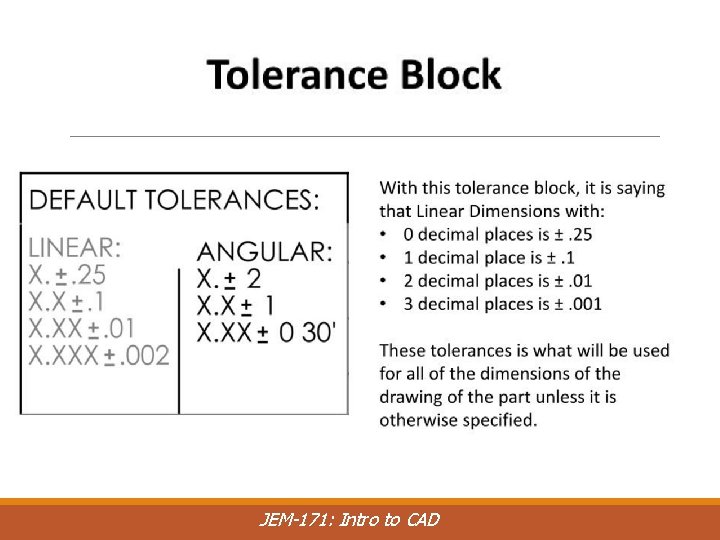
JEM-171: Intro to CAD

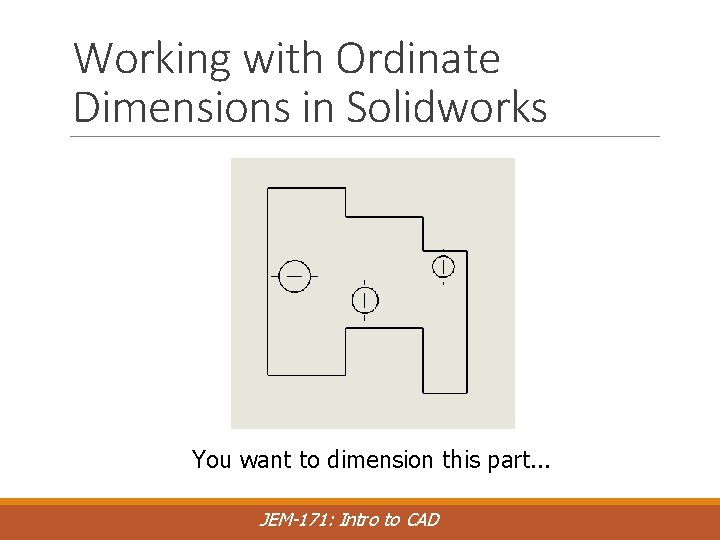
Working with Ordinate Dimensions in Solidworks You want to dimension this part. . . JEM-171: Intro to CAD

Ordinate Dimensions You could do chain dimensioning (what’s wrong with this picture? ) JEM-171: Intro to CAD

Ordinate Dimensions Notice the datums You could do baseline dimensioning (a bit better) JEM-171: Intro to CAD

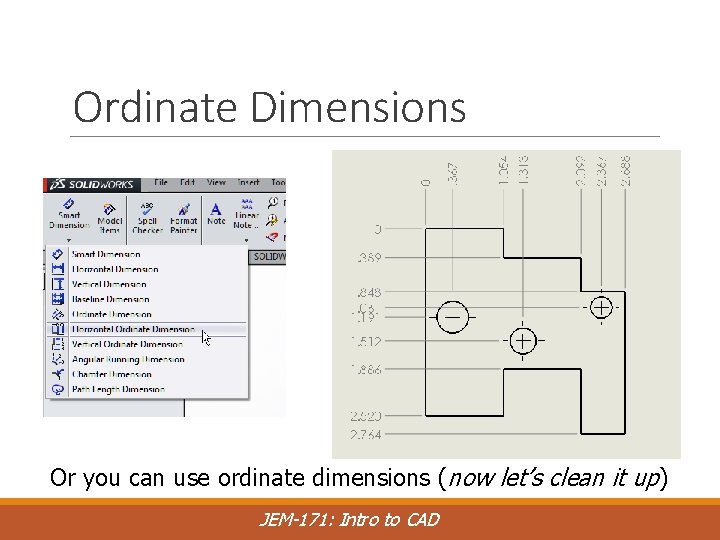
Ordinate Dimensions Or you can use ordinate dimensions (now let’s clean it up) JEM-171: Intro to CAD

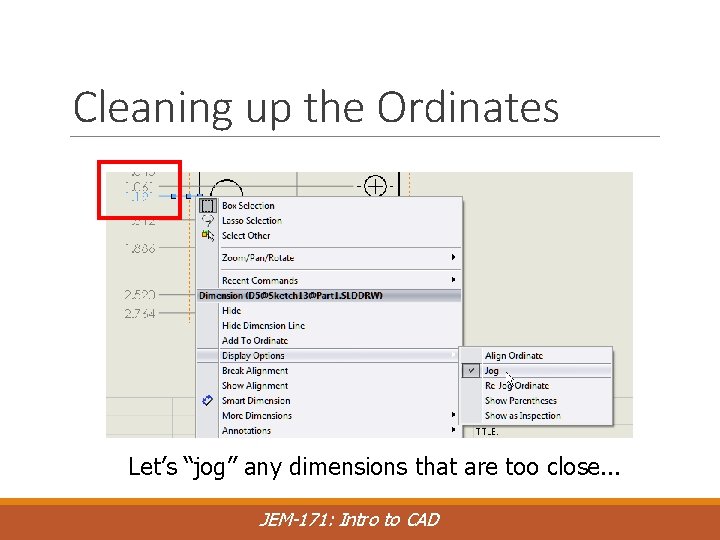
Cleaning up the Ordinates Let’s “jog” any dimensions that are too close. . . JEM-171: Intro to CAD

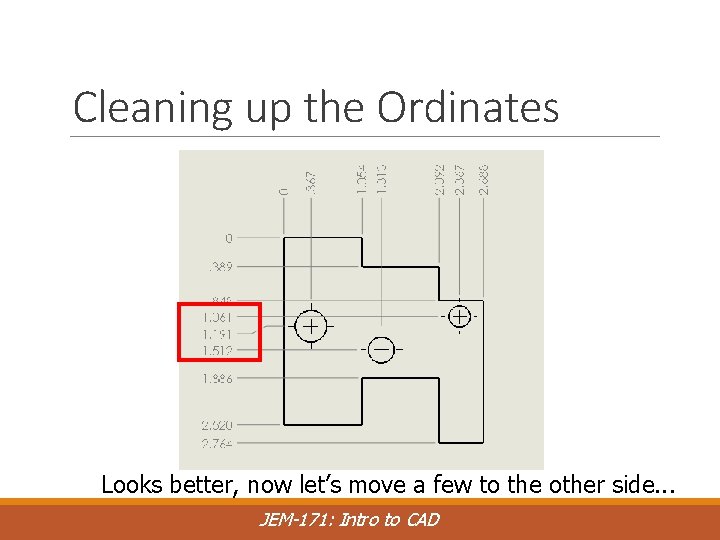
Cleaning up the Ordinates Looks better, now let’s move a few to the other side. . . JEM-171: Intro to CAD

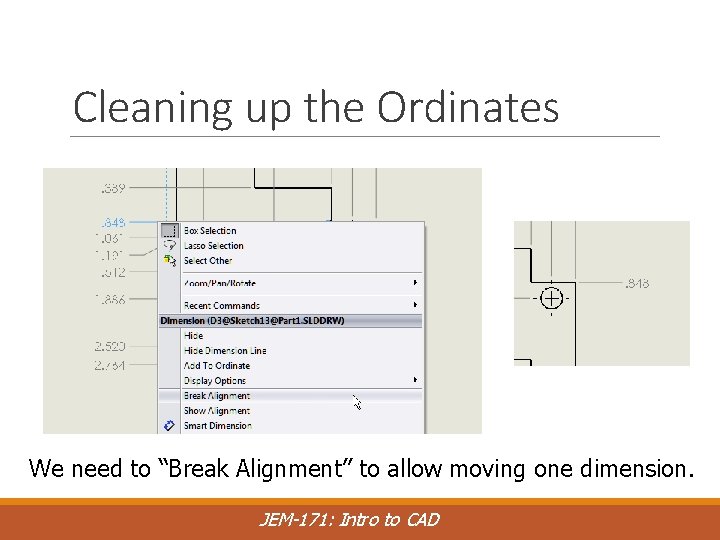
Cleaning up the Ordinates We need to “Break Alignment” to allow moving one dimension. JEM-171: Intro to CAD

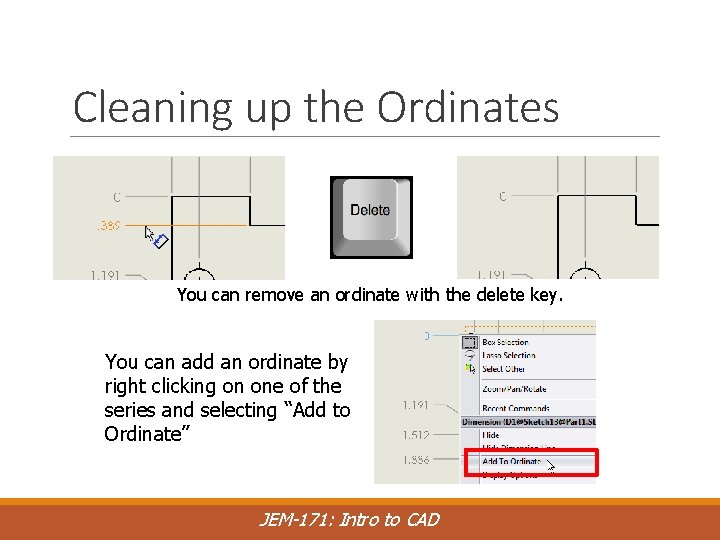
Cleaning up the Ordinates You can remove an ordinate with the delete key. You can add an ordinate by right clicking on one of the series and selecting “Add to Ordinate” JEM-171: Intro to CAD

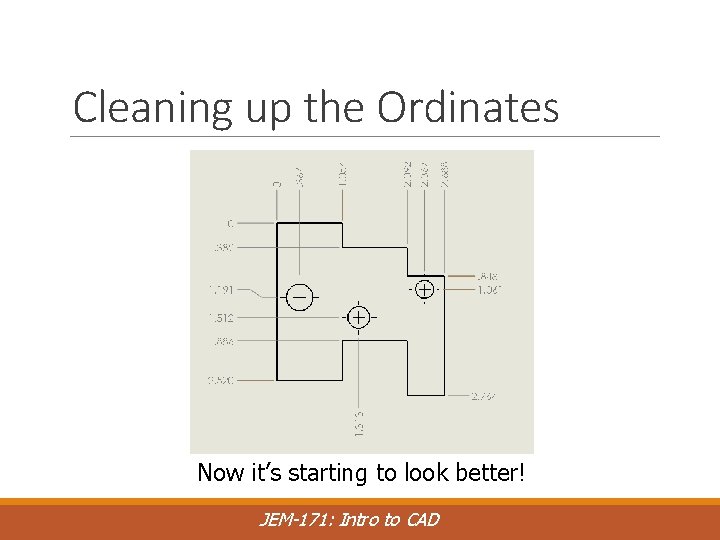
Cleaning up the Ordinates Now it’s starting to look better! JEM-171: Intro to CAD