Dial Indicator Shaft Alignment 2 Introductions n What
- Slides: 25

Dial Indicator 를 이용한 Shaft Alignment 의 이해와 절차

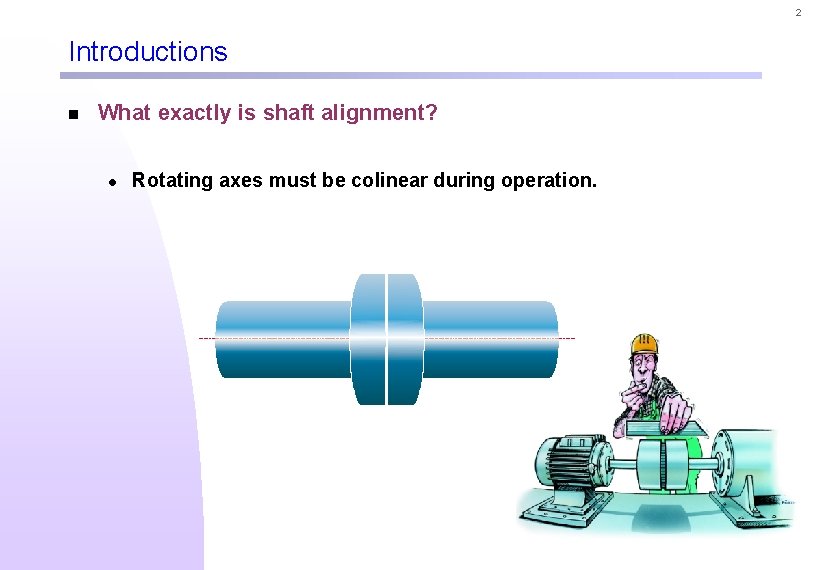
2 Introductions n What exactly is shaft alignment? l Rotating axes must be colinear during operation.

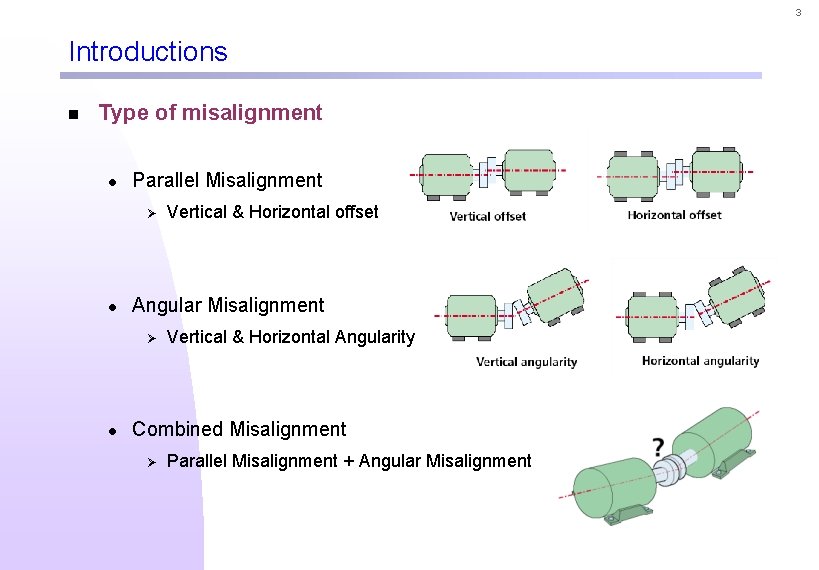
3 Introductions n Type of misalignment l Parallel Misalignment Ø l Angular Misalignment Ø l Vertical & Horizontal offset Vertical & Horizontal Angularity Combined Misalignment Ø Parallel Misalignment + Angular Misalignment

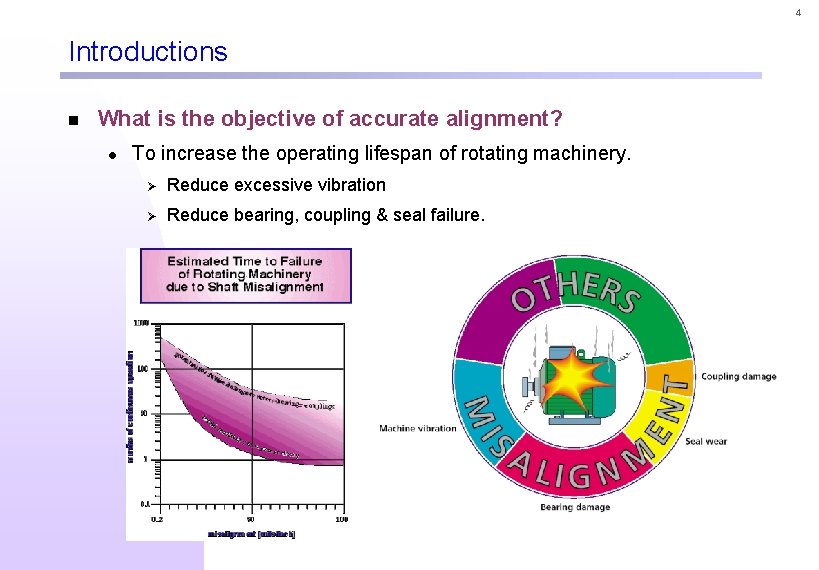
4 Introductions n What is the objective of accurate alignment? l To increase the operating lifespan of rotating machinery. Ø Reduce excessive vibration Ø Reduce bearing, coupling & seal failure.

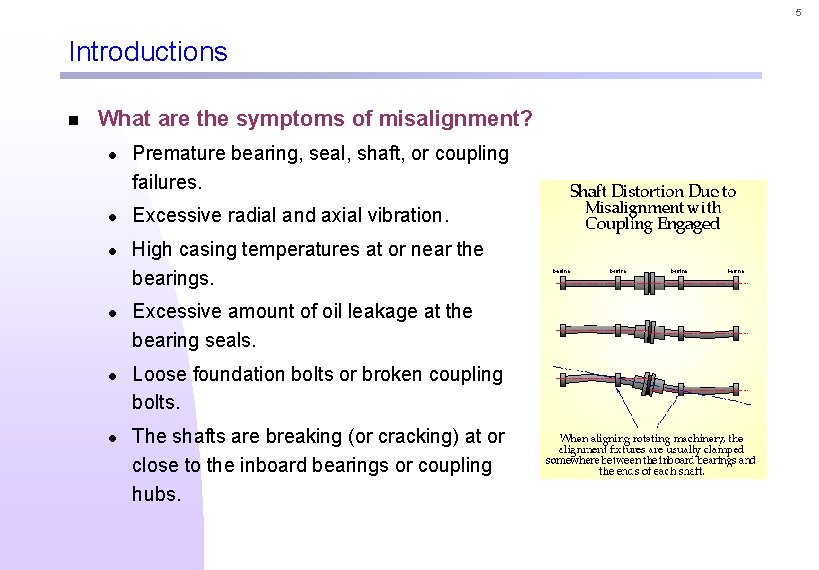
5 Introductions n What are the symptoms of misalignment? l l l Premature bearing, seal, shaft, or coupling failures. Excessive radial and axial vibration. High casing temperatures at or near the bearings. Excessive amount of oil leakage at the bearing seals. Loose foundation bolts or broken coupling bolts. The shafts are breaking (or cracking) at or close to the inboard bearings or coupling hubs.

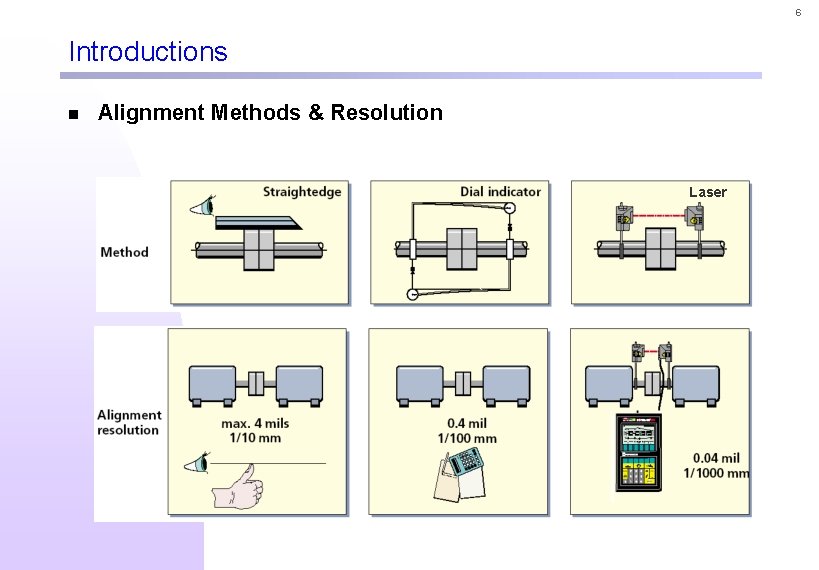
6 Introductions n Alignment Methods & Resolution Laser

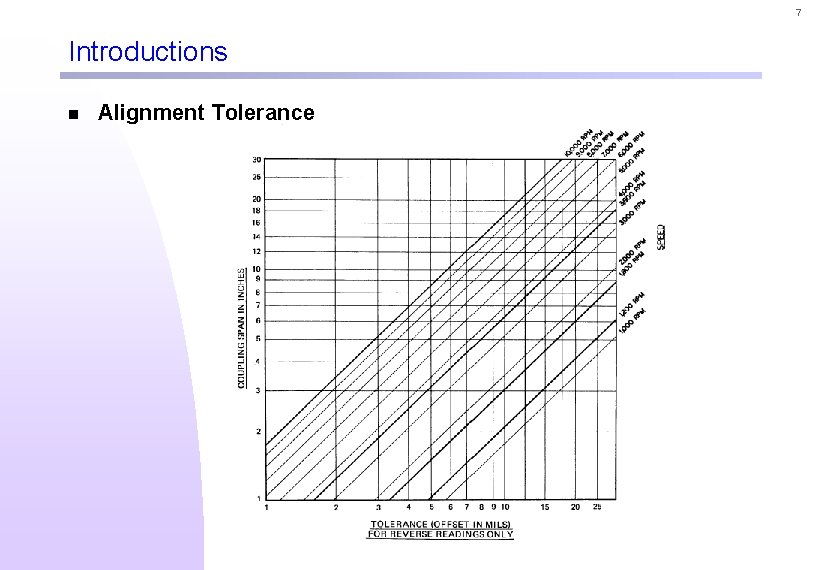
7 Introductions n Alignment Tolerance

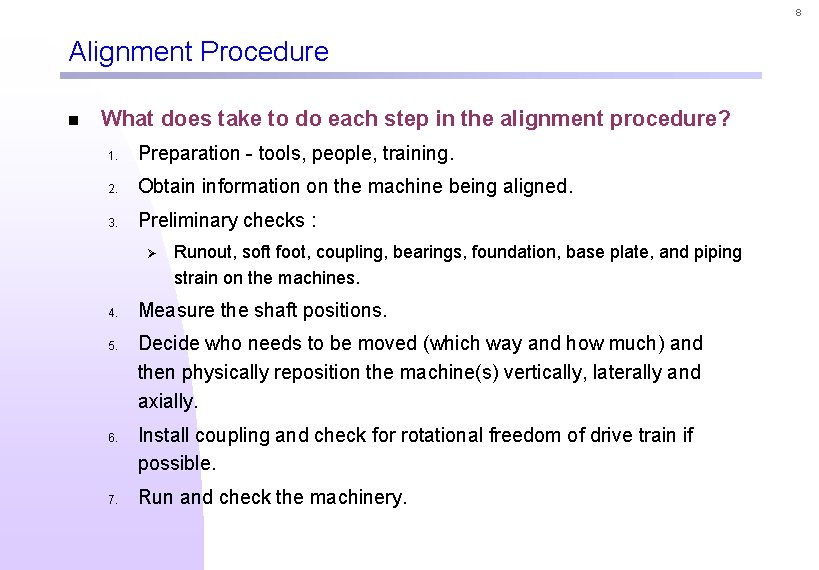
8 Alignment Procedure n What does take to do each step in the alignment procedure? 1. Preparation - tools, people, training. 2. Obtain information on the machine being aligned. 3. Preliminary checks : Ø 4. 5. 6. 7. Runout, soft foot, coupling, bearings, foundation, base plate, and piping strain on the machines. Measure the shaft positions. Decide who needs to be moved (which way and how much) and then physically reposition the machine(s) vertically, laterally and axially. Install coupling and check for rotational freedom of drive train if possible. Run and check the machinery.

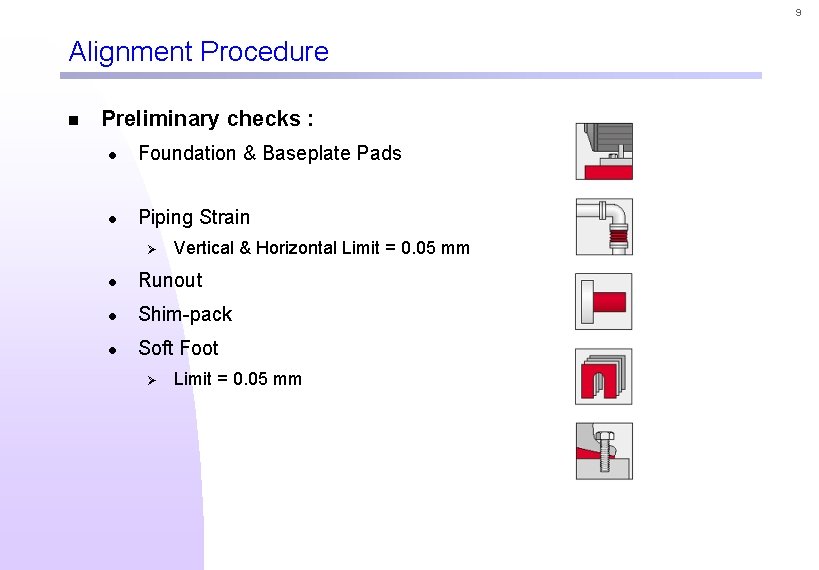
9 Alignment Procedure n Preliminary checks : l Foundation & Baseplate Pads l Piping Strain Ø Vertical & Horizontal Limit = 0. 05 mm l Runout l Shim-pack l Soft Foot Ø Limit = 0. 05 mm

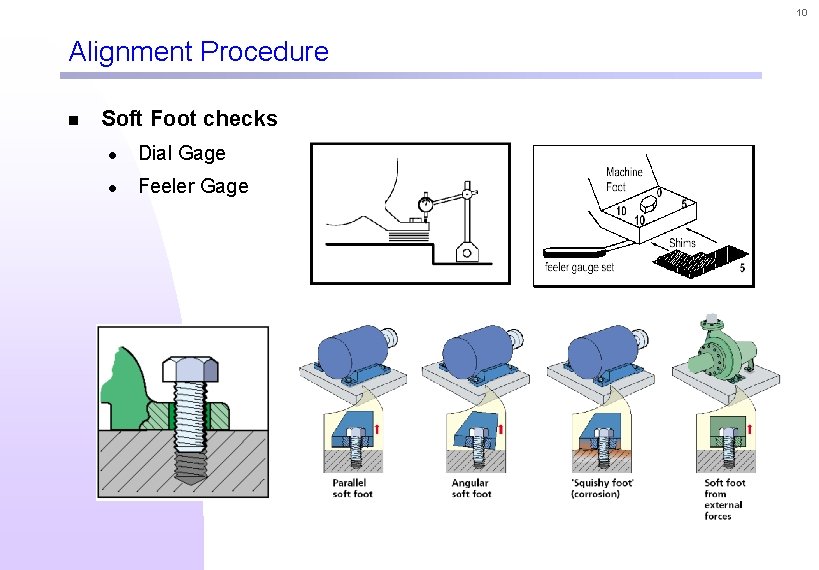
10 Alignment Procedure n Soft Foot checks l Dial Gage l Feeler Gage

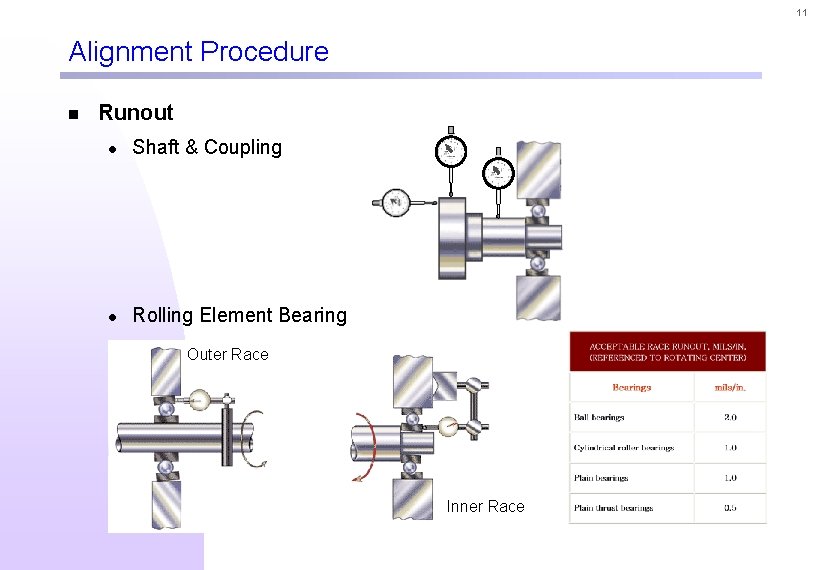
11 Alignment Procedure n Runout l Shaft & Coupling l Rolling Element Bearing Outer Race Inner Race

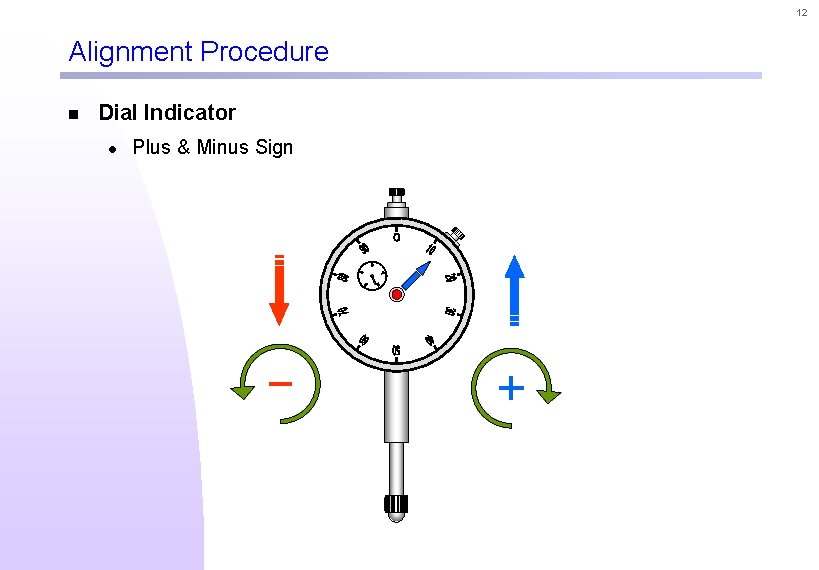
12 Alignment Procedure n Dial Indicator l Plus & Minus Sign

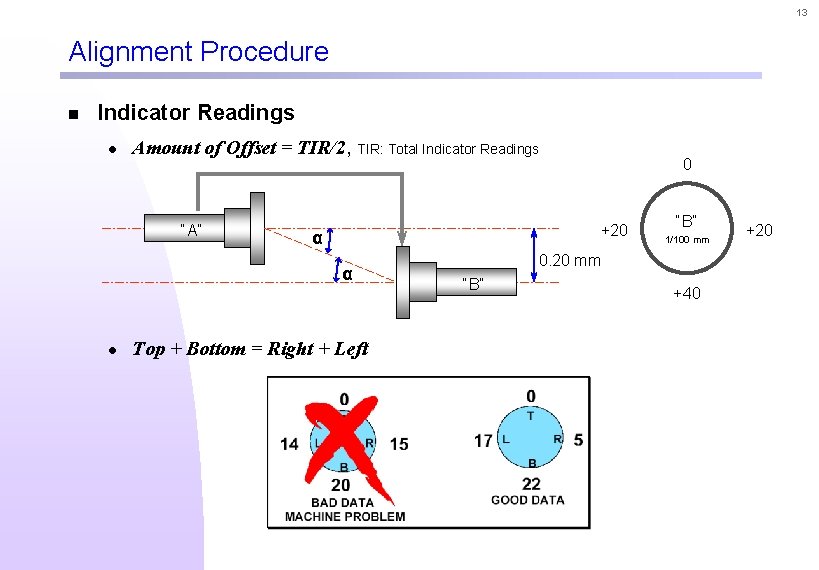
13 Alignment Procedure n Indicator Readings l Amount of Offset = TIR/2, TIR: Total Indicator Readings “A” +20 α α l 0 Top + Bottom = Right + Left “B” 1/100 mm 0. 20 mm “B” +40 +20

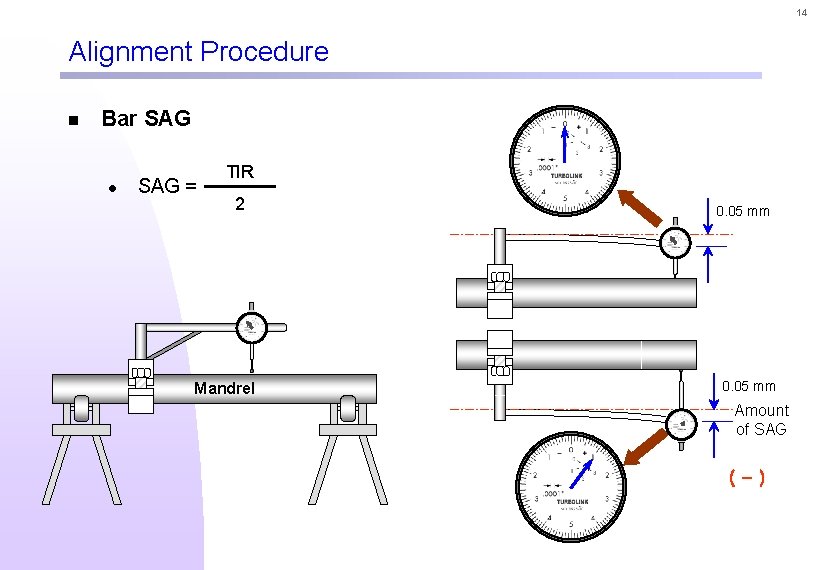
14 Alignment Procedure n Bar SAG l SAG = TIR 2 Mandrel 0. 05 mm Amount of SAG (-)

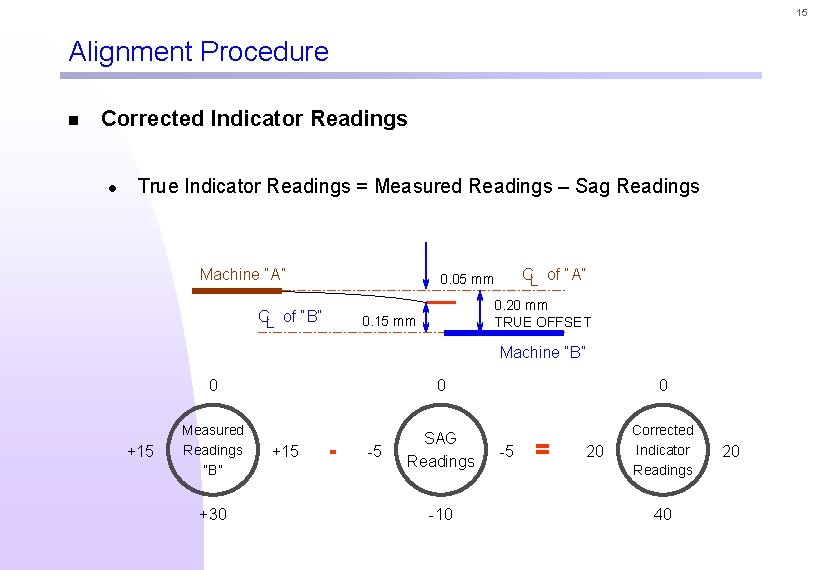
15 Alignment Procedure n Corrected Indicator Readings l True Indicator Readings = Measured Readings – Sag Readings Machine “A” CL of “A” 0. 05 mm CL of “B” 0. 20 mm TRUE OFFSET 0. 15 mm Machine “B” +15 0 0 0 Measured Readings “B” SAG Readings Corrected Indicator Readings +30 +15 - -5 -10 -5 = 20 40 20

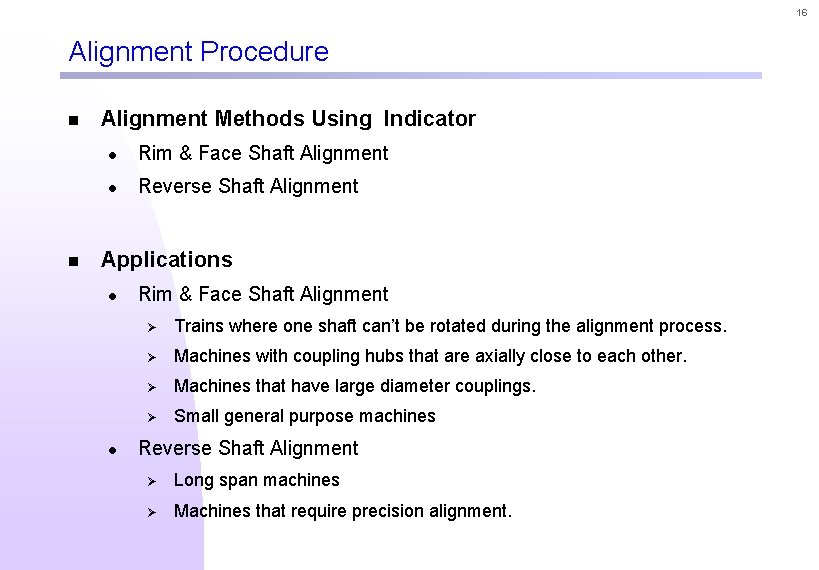
16 Alignment Procedure n n Alignment Methods Using Indicator l Rim & Face Shaft Alignment l Reverse Shaft Alignment Applications l l Rim & Face Shaft Alignment Ø Trains where one shaft can’t be rotated during the alignment process. Ø Machines with coupling hubs that are axially close to each other. Ø Machines that have large diameter couplings. Ø Small general purpose machines Reverse Shaft Alignment Ø Long span machines Ø Machines that require precision alignment.

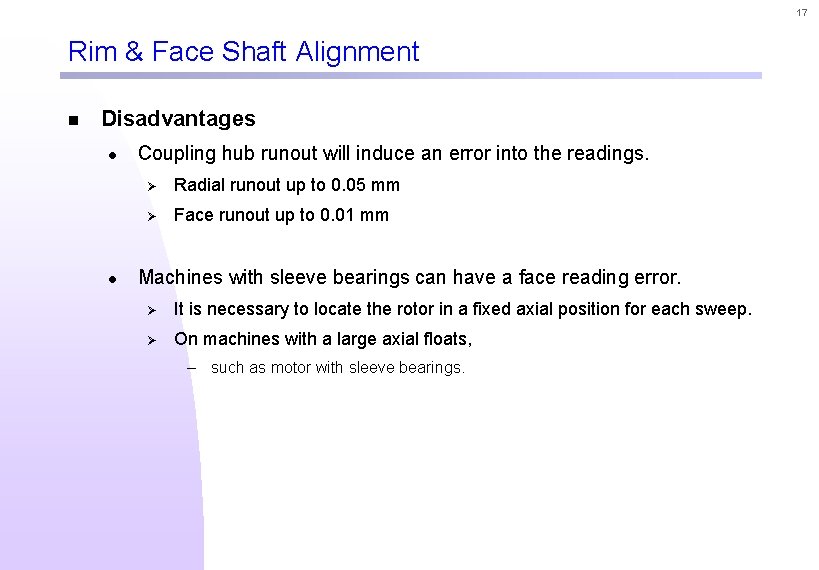
17 Rim & Face Shaft Alignment n Disadvantages l l Coupling hub runout will induce an error into the readings. Ø Radial runout up to 0. 05 mm Ø Face runout up to 0. 01 mm Machines with sleeve bearings can have a face reading error. Ø It is necessary to locate the rotor in a fixed axial position for each sweep. Ø On machines with a large axial floats, – such as motor with sleeve bearings.

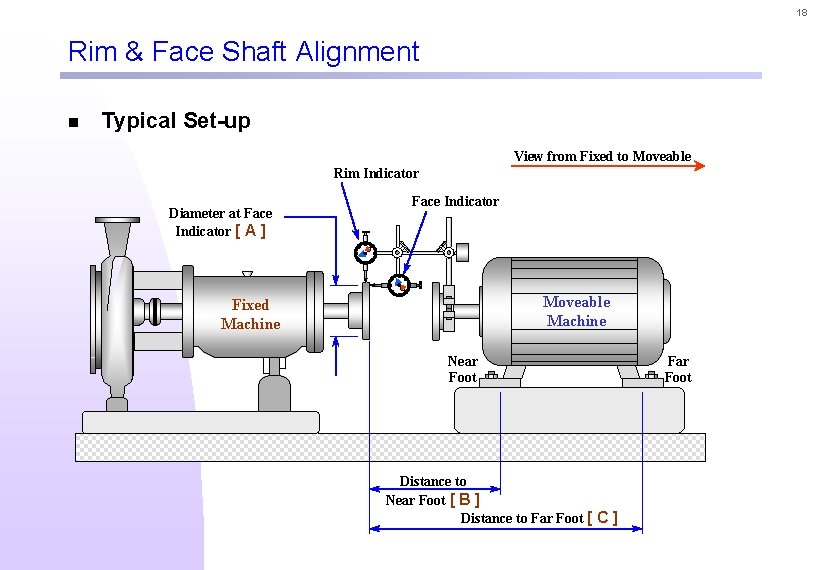
18 Rim & Face Shaft Alignment n Typical Set-up View from Fixed to Moveable Rim Indicator Diameter at Face Indicator [ A ] Face Indicator Moveable Machine Fixed Machine Near Foot Distance to Near Foot [ B ] Distance to Far Foot [ C ] Far Foot

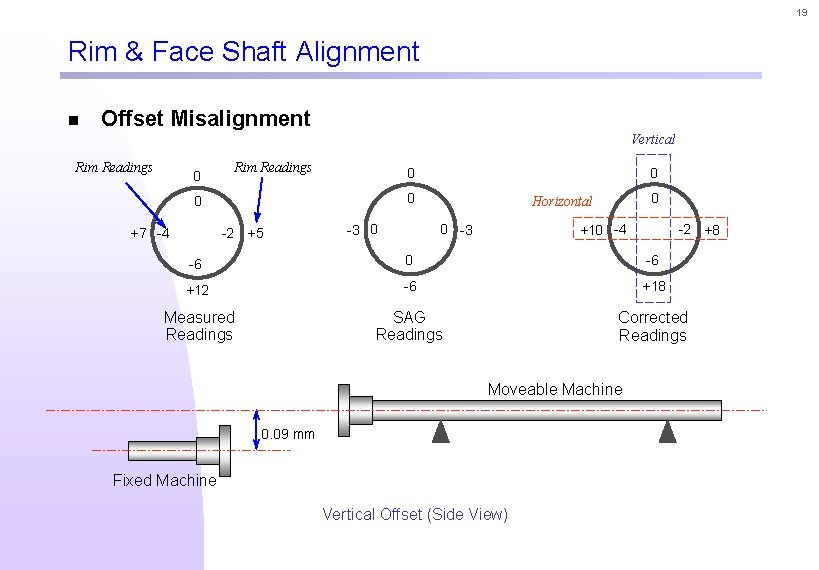
19 Rim & Face Shaft Alignment n Offset Misalignment Vertical Rim Readings 0 0 0 +7 -4 0 -2 +5 -3 0 0 Horizontal 0 -3 +10 -4 -2 +8 -6 0 -6 +12 -6 +18 Measured Readings SAG Readings Corrected Readings Moveable Machine 0. 09 mm Fixed Machine Vertical Offset (Side View)

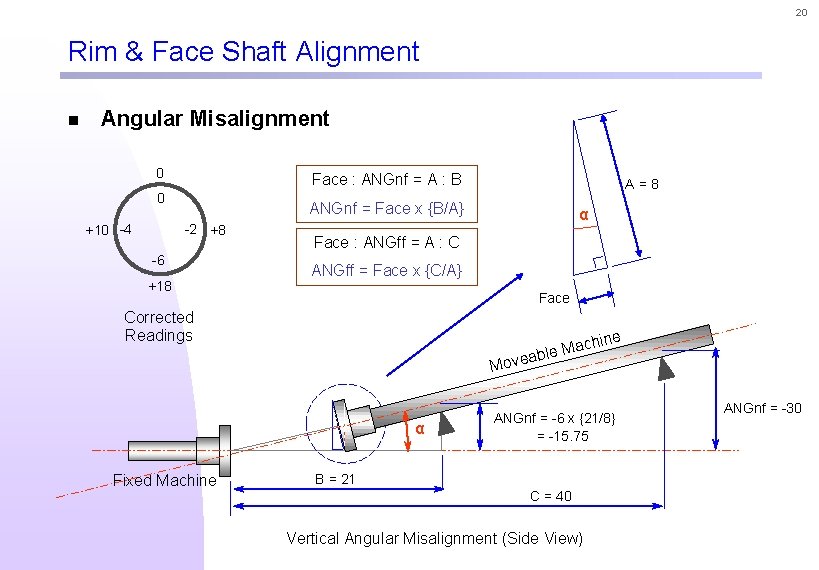
20 Rim & Face Shaft Alignment n Angular Misalignment 0 Face : ANGnf = A : B 0 +10 -4 A=8 ANGnf = Face x {B/A} -2 +8 -6 +18 α Face : ANGff = A : C ANGff = Face x {C/A} Face Corrected Readings ine Mach e l b a ove M α Fixed Machine α ANGnf = -6 x {21/8} = -15. 75 B = 21 C = 40 Vertical Angular Misalignment (Side View) ANGnf = -30

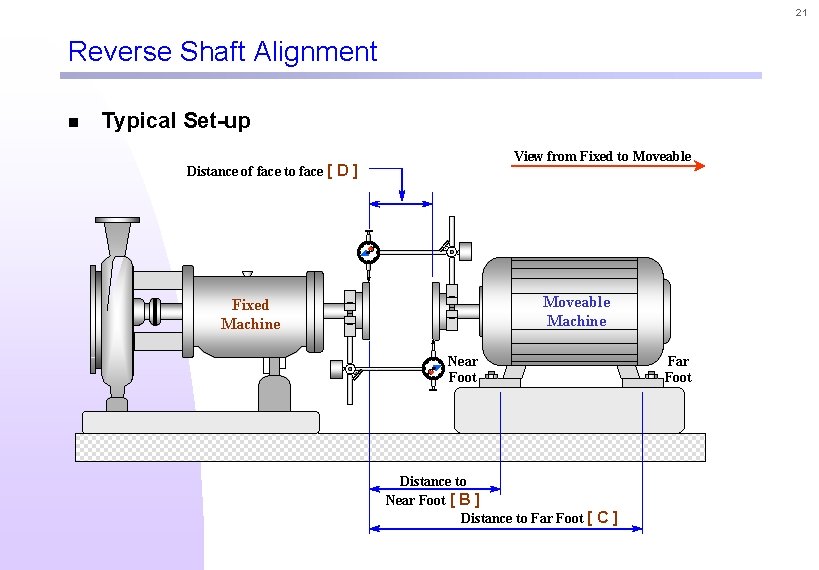
21 Reverse Shaft Alignment n Typical Set-up View from Fixed to Moveable Distance of face to face [ D ] Moveable Machine Fixed Machine Near Foot Distance to Near Foot [ B ] Distance to Far Foot [ C ] Far Foot

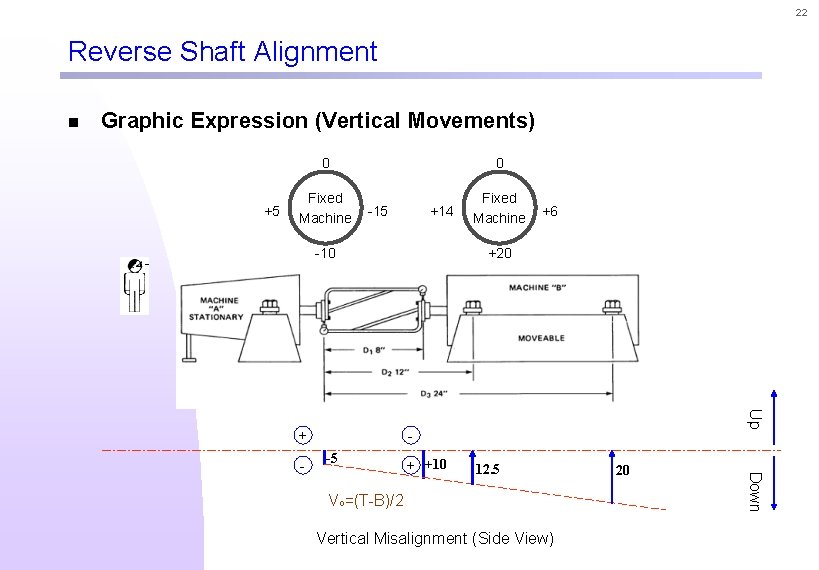
22 Reverse Shaft Alignment n Graphic Expression (Vertical Movements) 0 +5 Fixed Machine 0 -15 +14 -10 +20 -5 + +10 12. 5 Vo=(T-B)/2 Vertical Misalignment (Side View) 20 Down - +6 Up + Fixed Machine

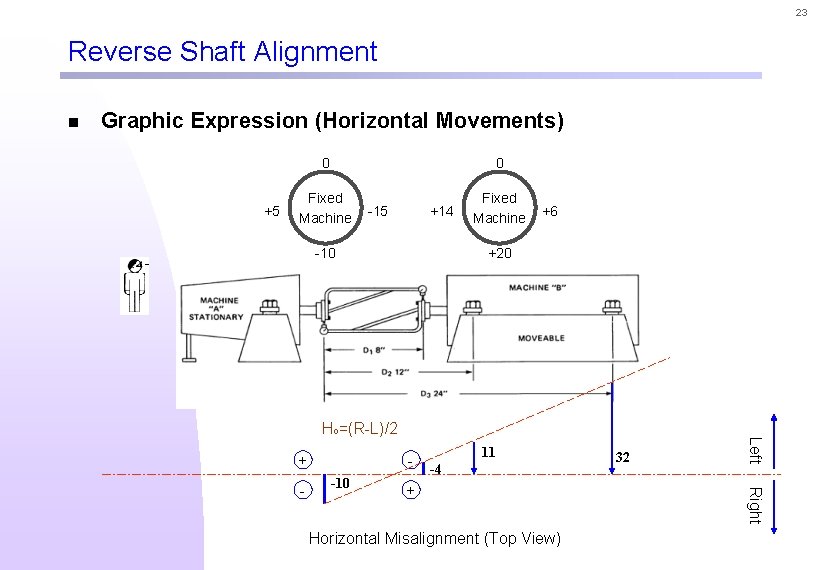
23 Reverse Shaft Alignment n Graphic Expression (Horizontal Movements) 0 +5 0 Fixed Machine -15 +14 -10 Fixed Machine +6 +20 Ho=(R-L)/2 -10 11 -4 + Horizontal Misalignment (Top View) 32 Right - - Left +

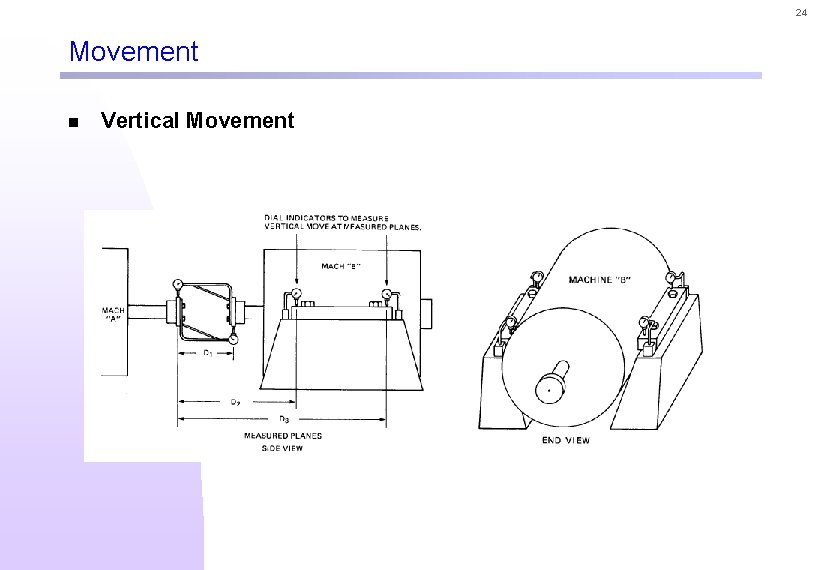
24 Movement n Vertical Movement

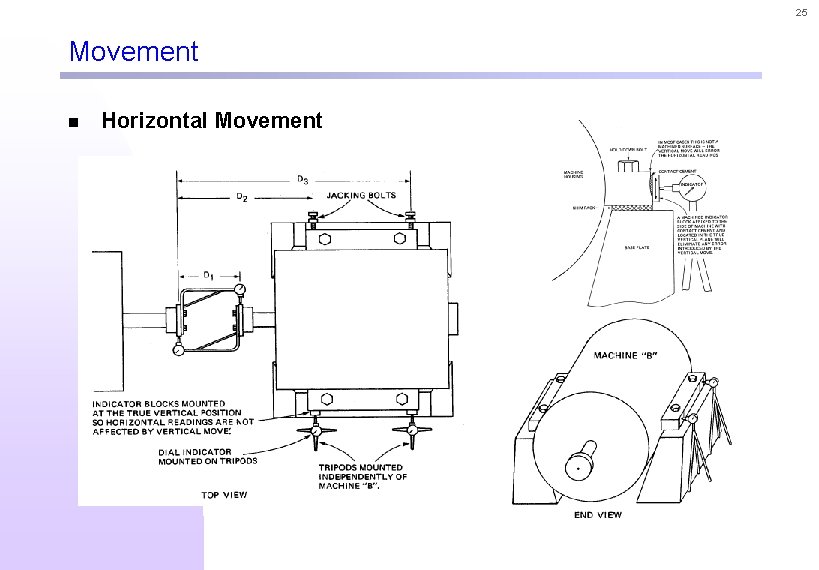
25 Movement n Horizontal Movement