Descriptive Geometry Nov 1 2017 Oblique Planes Isometric
Descriptive Geometry Nov 1, 2017

Oblique Planes Isometric View normal to oblique plane 2
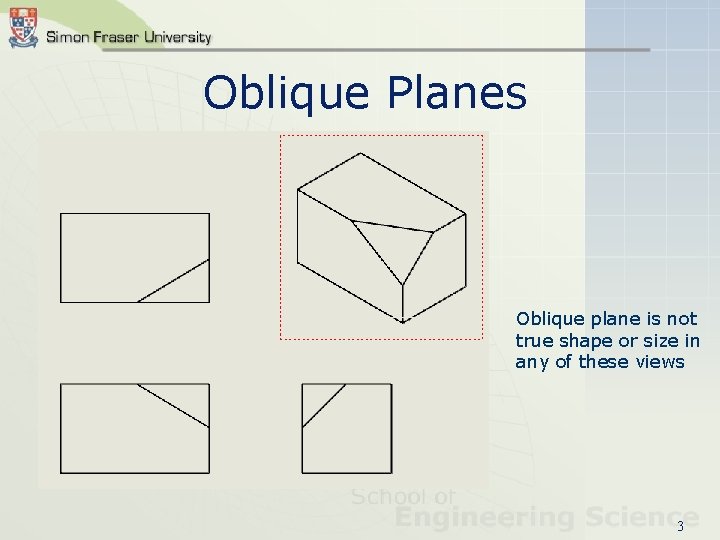
Oblique Planes Oblique plane is not true shape or size in any of these views 3
Learning Objectives w Recognize types of lines and planes w Find the length of a line using descriptive geometry w Find the true shape and size of a plane 4
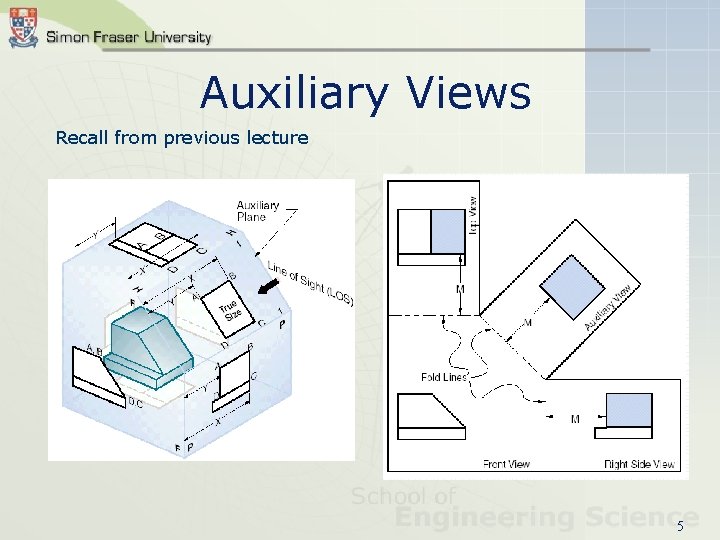
Auxiliary Views Recall from previous lecture 5
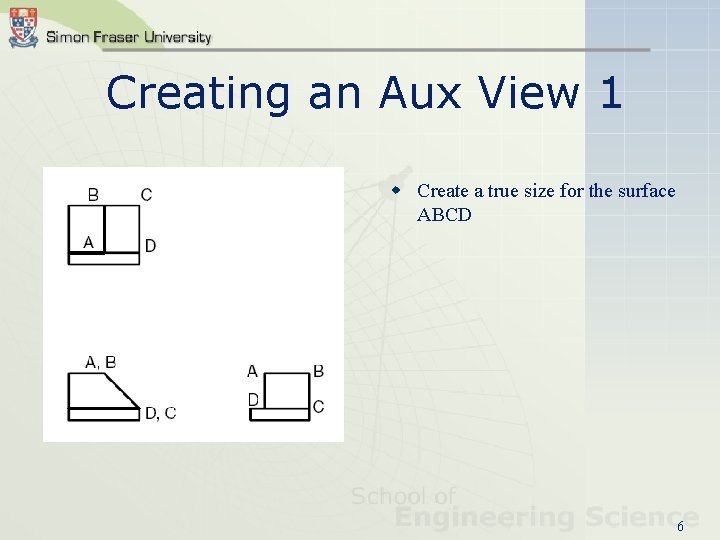
Creating an Aux View 1 w Create a true size for the surface ABCD 6
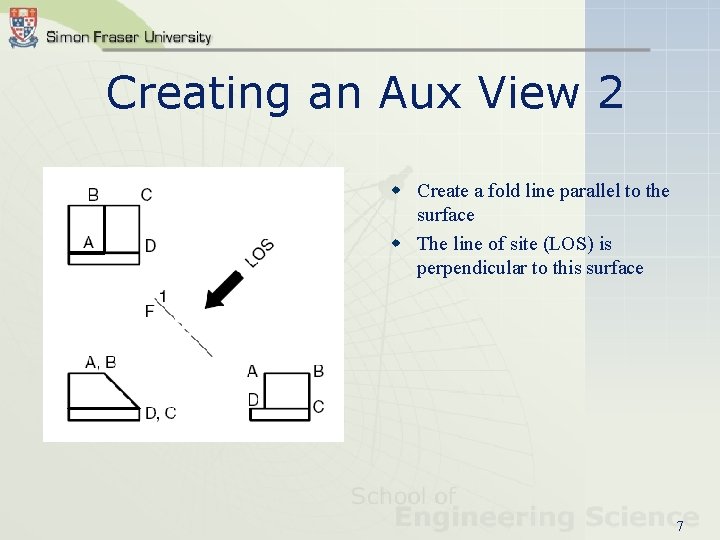
Creating an Aux View 2 w Create a fold line parallel to the surface w The line of site (LOS) is perpendicular to this surface 7
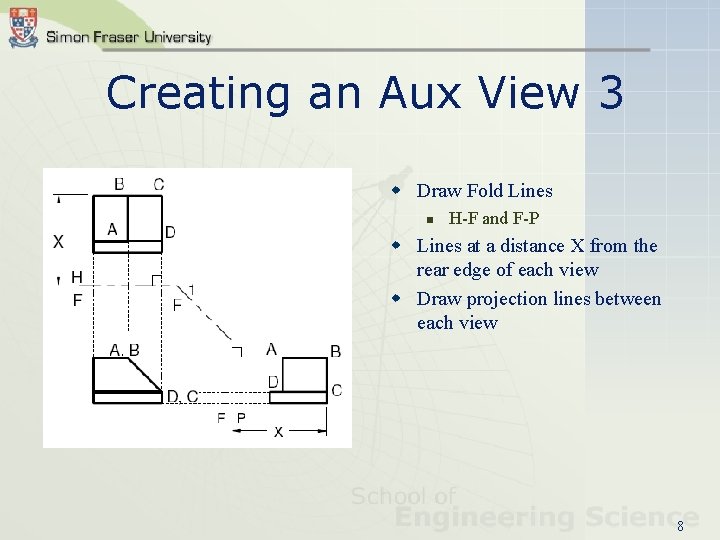
Creating an Aux View 3 w Draw Fold Lines n H-F and F-P w Lines at a distance X from the rear edge of each view w Draw projection lines between each view 8
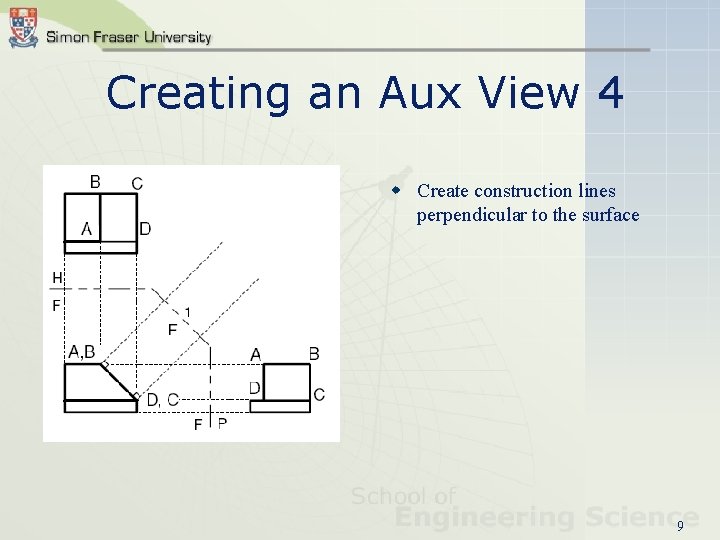
Creating an Aux View 4 w Create construction lines perpendicular to the surface 9
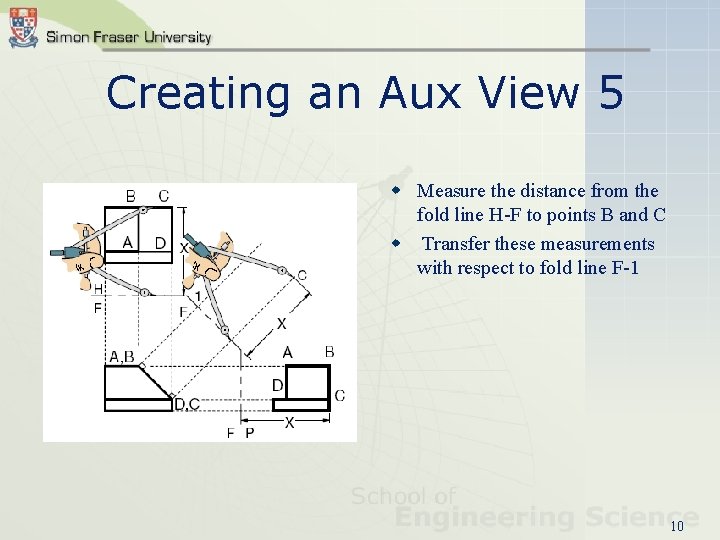
Creating an Aux View 5 w Measure the distance from the fold line H-F to points B and C w Transfer these measurements with respect to fold line F-1 10

Creating an Aux View 6 w Repeat the measurements for points A and D w Transfer into the Aux view 11
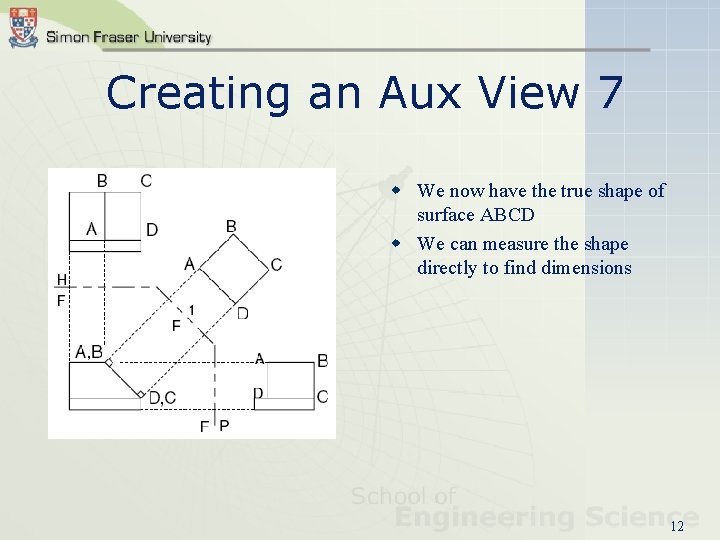
Creating an Aux View 7 w We now have the true shape of surface ABCD w We can measure the shape directly to find dimensions 12
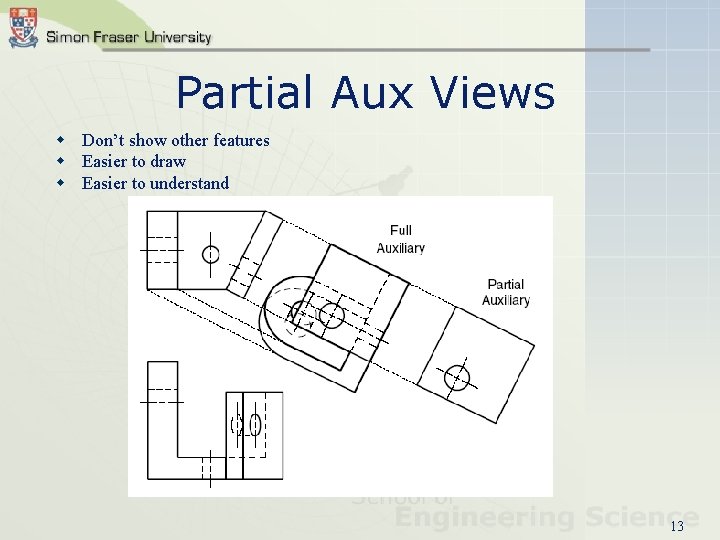
Partial Aux Views w Don’t show other features w Easier to draw w Easier to understand 13
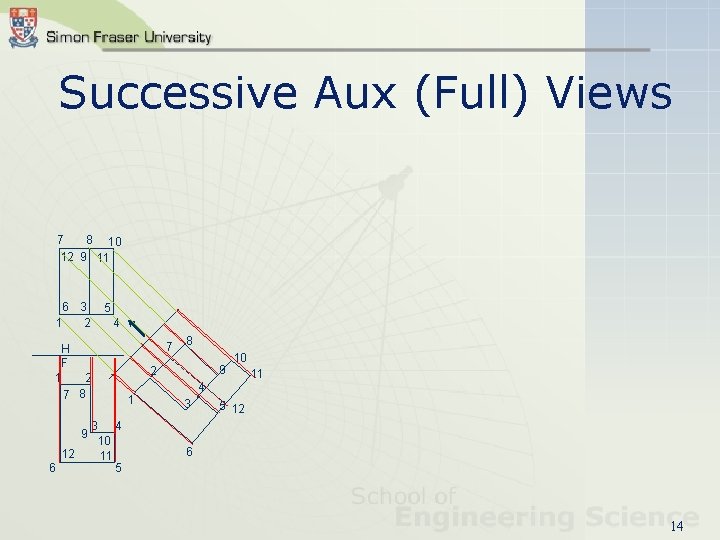
Successive Aux (Full) Views 7 8 10 12 9 11 6 3 1 2 5 4 H F 1 2 7 8 9 12 6 3 4 10 11 5 7 8 9 2 1 10 11 4 3 5 12 6 14
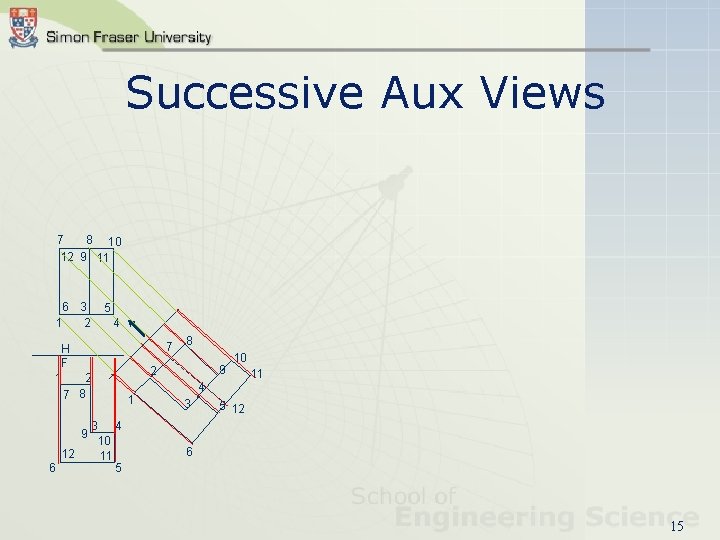
Successive Aux Views 7 8 10 12 9 11 6 3 1 2 5 4 H F 1 2 7 8 9 12 6 3 4 10 11 5 7 8 9 2 1 10 11 4 3 5 12 6 15
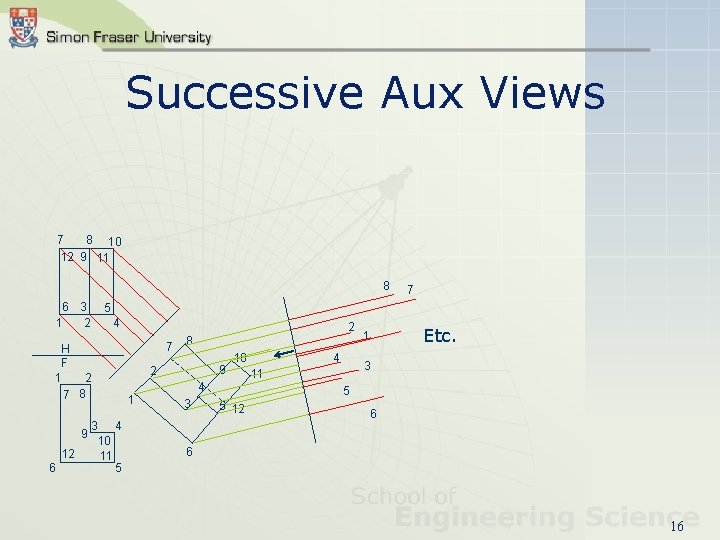
Successive Aux Views 7 8 10 12 9 11 8 6 3 1 2 7 5 4 H F 1 2 7 8 3 4 9 10 12 11 6 5 2 7 8 9 2 1 10 4 3 4 Etc. 1 3 11 5 5 12 6 6 16
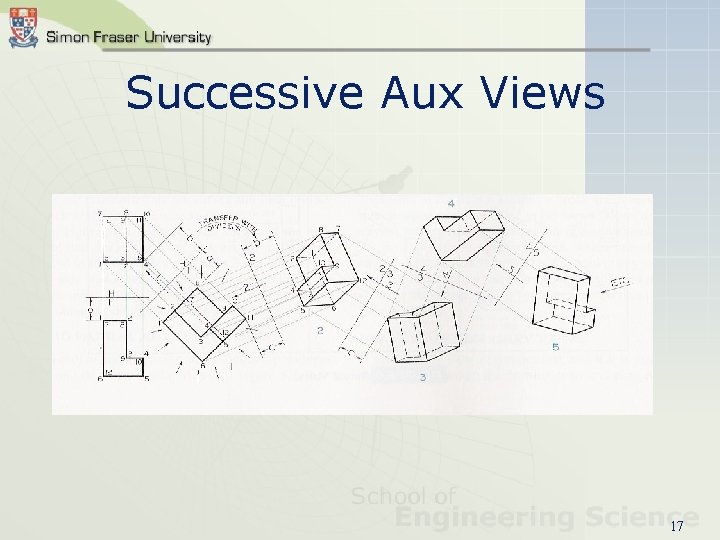
Successive Aux Views 17
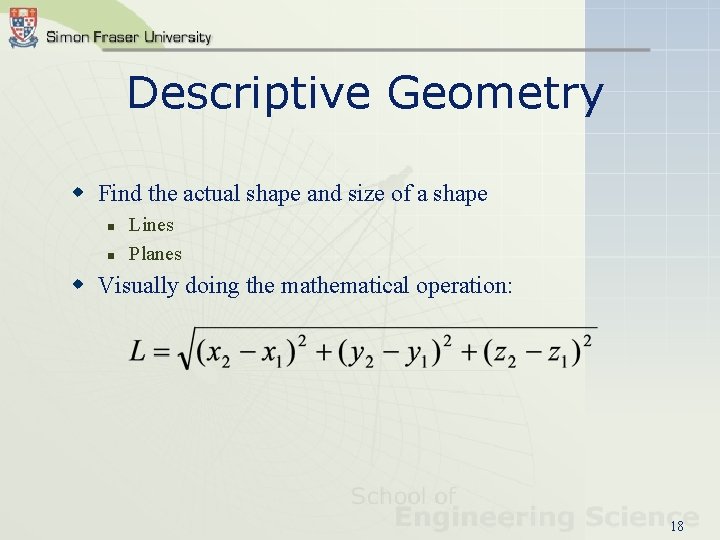
Descriptive Geometry w Find the actual shape and size of a shape n n Lines Planes w Visually doing the mathematical operation: 18
True Length of a Line w True length: a straight line distance between two points n If a line is positioned parallel to a projection plane and the line of site is perpendicular to that projection plane, the line will appear as a true length (see Auxiliary View Example) 19
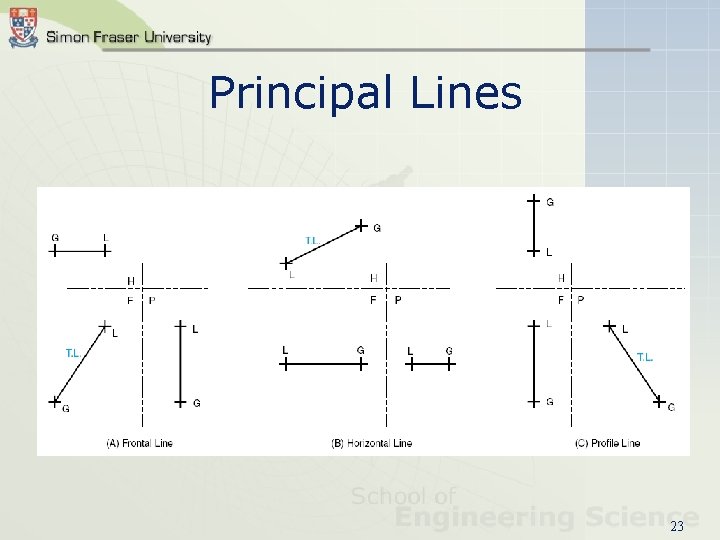
Types of Lines w Principal Line: Parallel to one of the principal projection planes n n n Frontal Line: Parallel to frontal plane Horizontal Line: Parallel to horizontal plane Profile Line: Parallel to profile plane w Oblique Line: Is not parallel to any of the principal projection planes 20
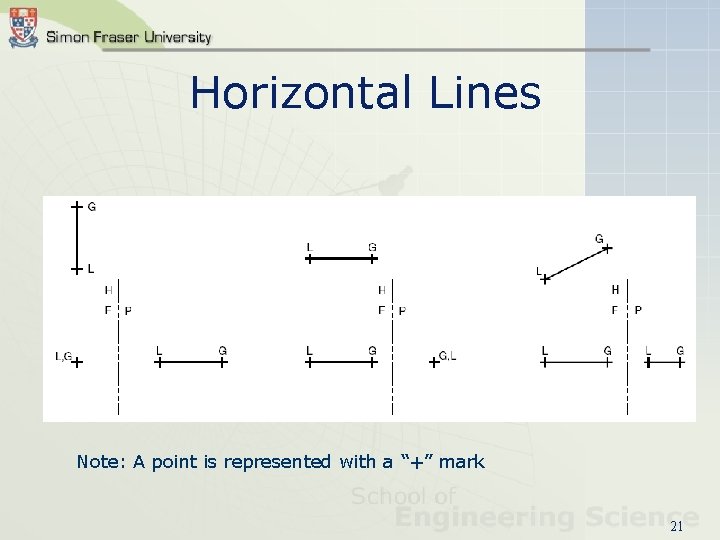
Horizontal Lines Note: A point is represented with a “+” mark 21
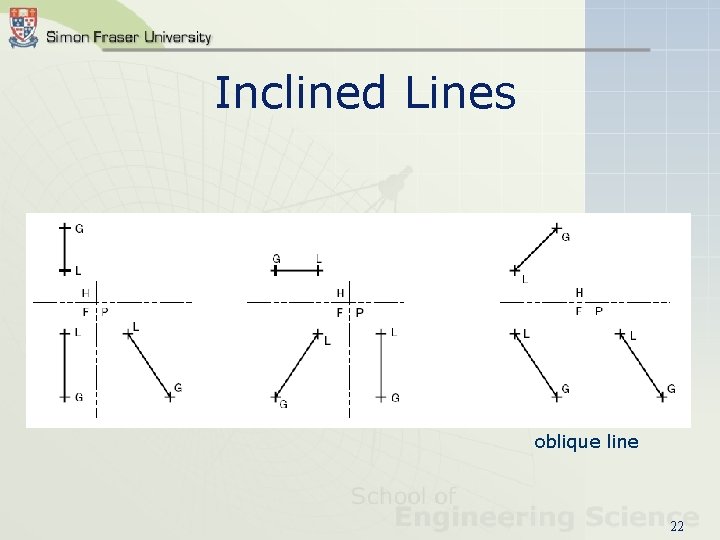
Inclined Lines oblique line 22
Principal Lines 23
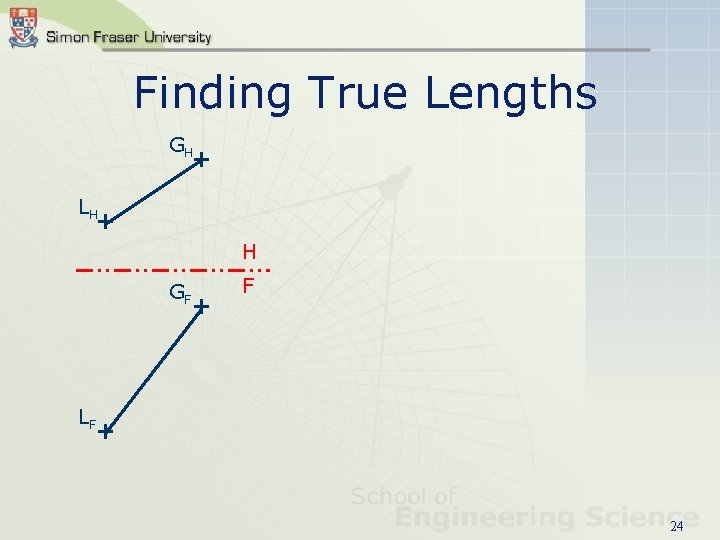
Finding True Lengths GH + LH + H GF + F LF + 24
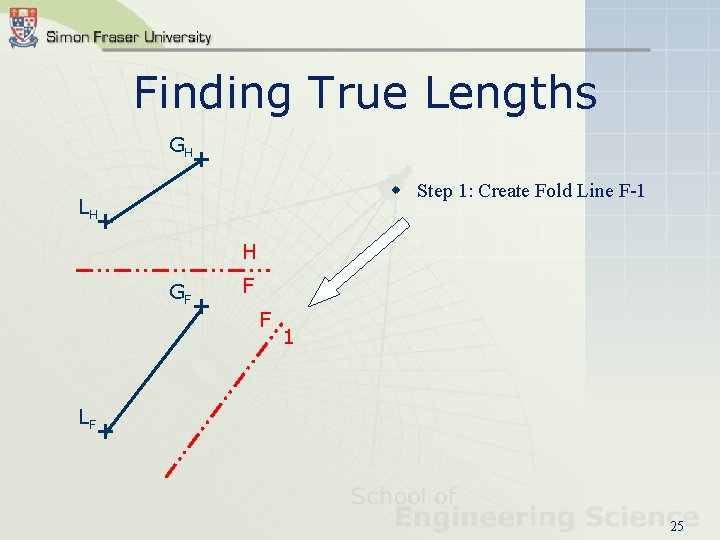
Finding True Lengths GH + w Step 1: Create Fold Line F-1 LH + H GF + F F 1 LF + 25

Finding True Lengths GH + w Step 1: Create Fold Line F-1 w Step 2: Draw perpendicular projectors from LF and GF to F-1 LH + H GF + F F 1 LF + 26
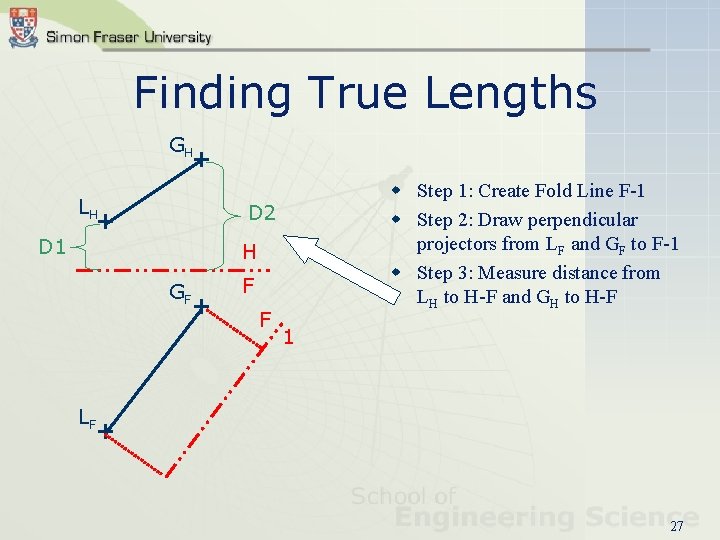
Finding True Lengths GH + LH D 1 w Step 1: Create Fold Line F-1 w Step 2: Draw perpendicular projectors from LF and GF to F-1 w Step 3: Measure distance from LH to H-F and GH to H-F D 2 + H GF + F F 1 LF + 27
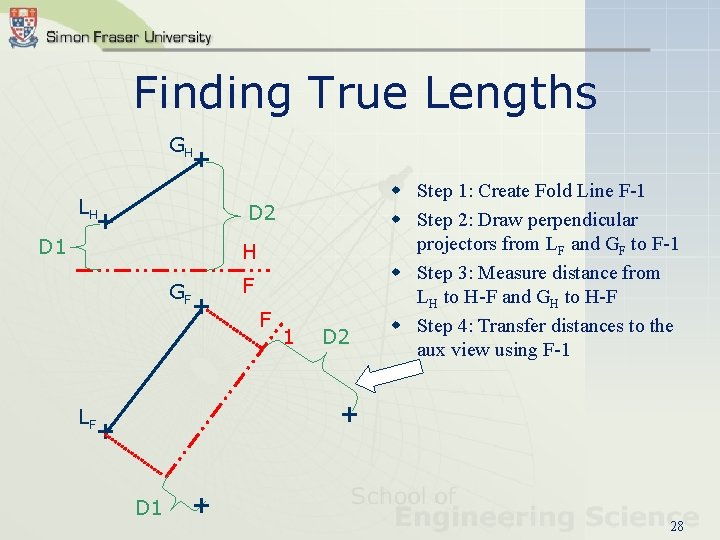
Finding True Lengths GH + LH D 1 D 2 + H GF + F F 1 D 2 w Step 1: Create Fold Line F-1 w Step 2: Draw perpendicular projectors from LF and GF to F-1 w Step 3: Measure distance from LH to H-F and GH to H-F w Step 4: Transfer distances to the aux view using F-1 + LF + D 1 + 28
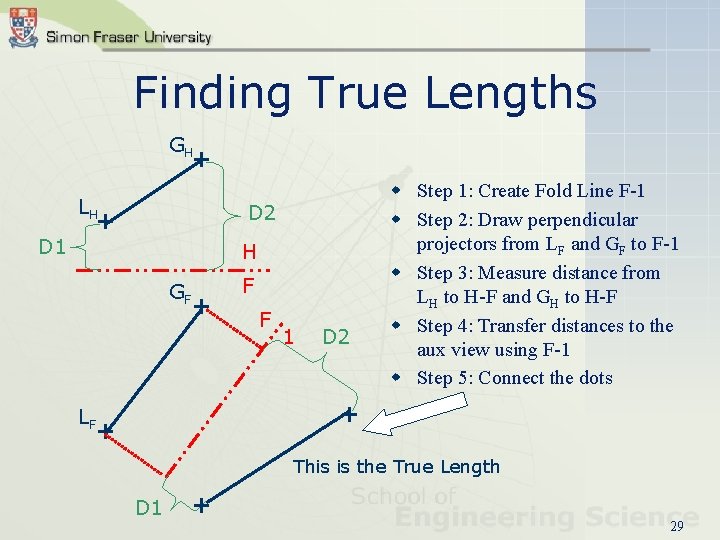
Finding True Lengths GH + LH D 1 D 2 + H GF + F F 1 D 2 w Step 1: Create Fold Line F-1 w Step 2: Draw perpendicular projectors from LF and GF to F-1 w Step 3: Measure distance from LH to H-F and GH to H-F w Step 4: Transfer distances to the aux view using F-1 w Step 5: Connect the dots + LF + This is the True Length D 1 + 29
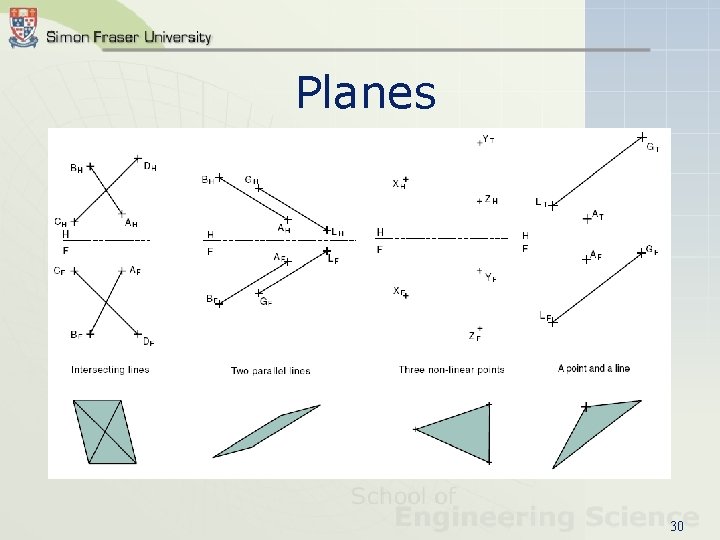
Planes 30
Types of Planes w Horizontal Plane: Appears as True Shape and Size (TSP) in top and bottom views. w Vertical Plane: Appears as an edge in top and bottom views. Can appear several ways in other views. w Profile Plane: Vertical Plane that is parallel to the profile projection plane. w Frontal Plane: Vertical Plane that is parallel to the frontal projection plane. w Inclined Plane: Perpendicular but not parallel to a principal projection plane. w Oblique: A plane that appears as a surface but is not TSP in every principal view. 31
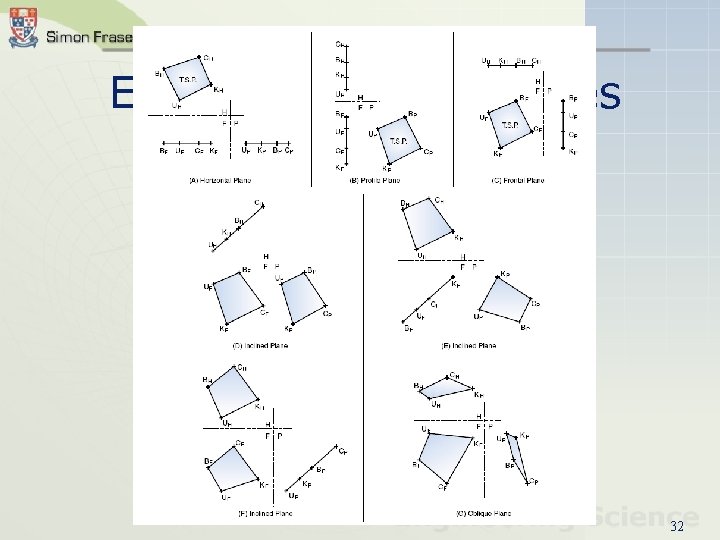
Examples of the Planes 32
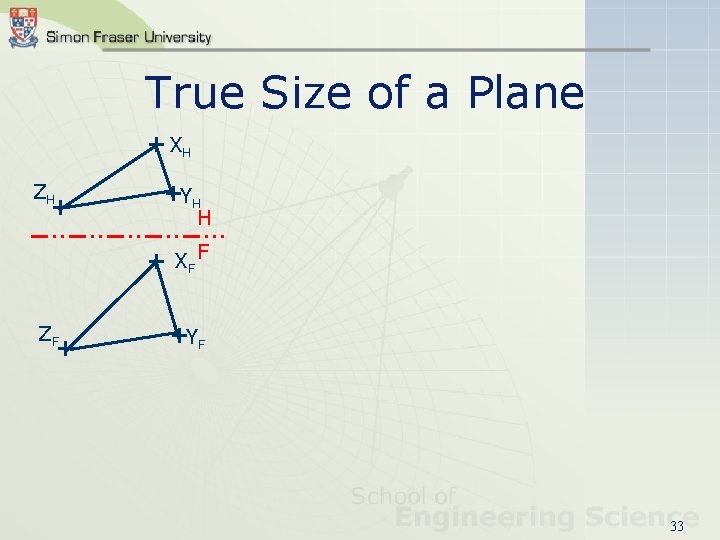
True Size of a Plane + XH ZH + +YH H + XF F ZF + +YF 33
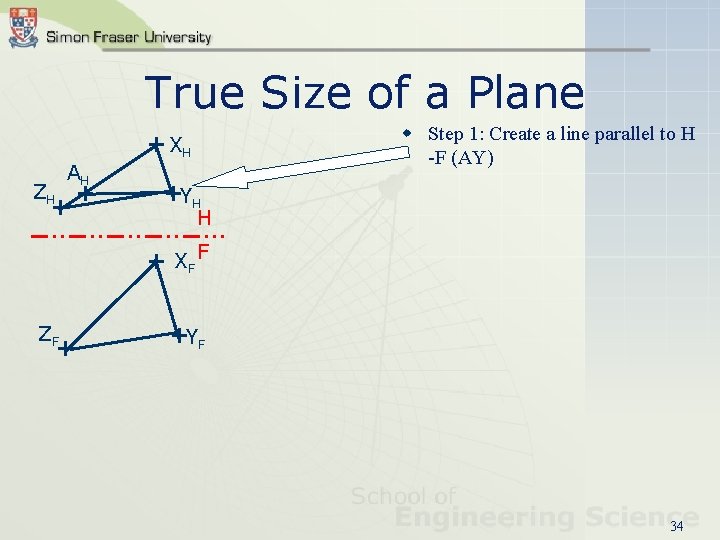
True Size of a Plane w Step 1: Create a line parallel to H -F (AY) + XH ZH AH + + +YH H + XF F ZF + +YF 34
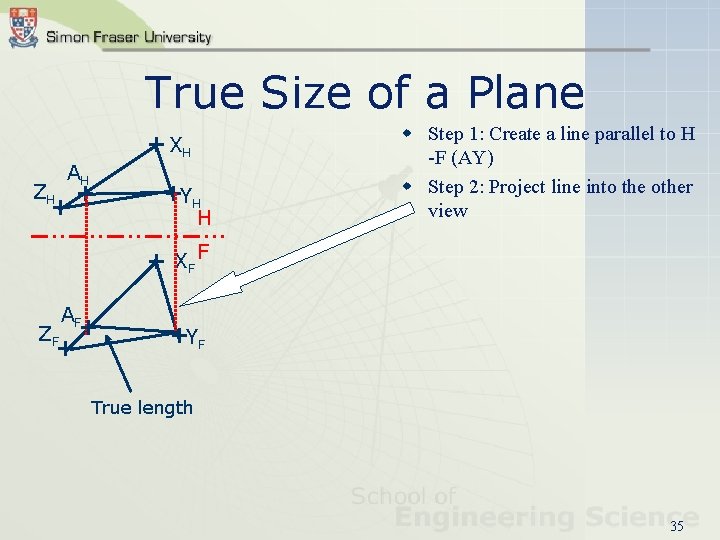
True Size of a Plane + XH ZH AH + + +YH H w Step 1: Create a line parallel to H -F (AY) w Step 2: Project line into the other view + XF F ZF AF + + +YF True length 35

True Size of a Plane + XH ZH AH + + +YH H + XF F F 1 ZF AF + + w Step 1: Create a line parallel to H -F (AY) w Step 2: Project line into the other view w Step 3: Construct a fold line perpendicular to AY +YF 36
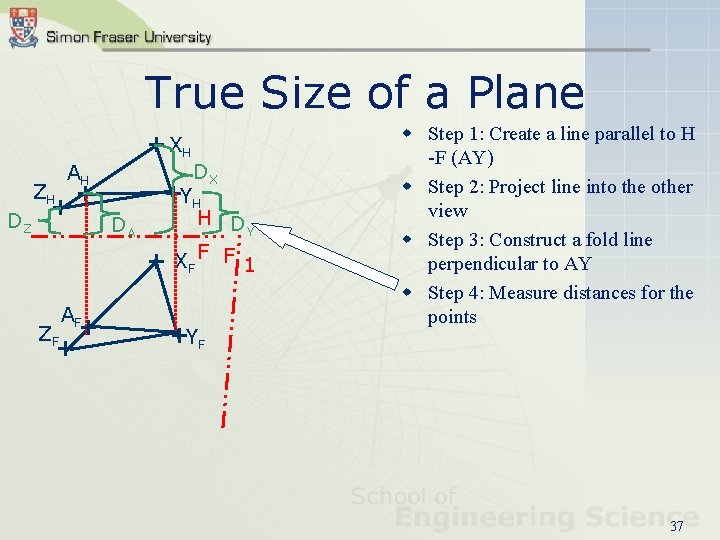
True Size of a Plane + XH ZH DZ AH + +YH + DA + ZF AF + + DX H D Y XF F F 1 +YF w Step 1: Create a line parallel to H -F (AY) w Step 2: Project line into the other view w Step 3: Construct a fold line perpendicular to AY w Step 4: Measure distances for the points 37
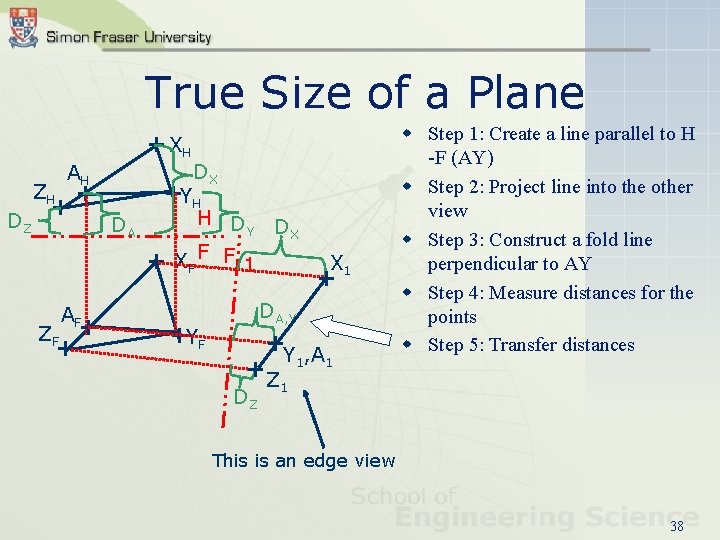
True Size of a Plane + XH ZH DZ AH + +YH + DA + ZF AF + + DX H D D Y X XF F F 1 +YF X 1 + DA, Y +Y , A +Z 1 1 DZ w Step 1: Create a line parallel to H -F (AY) w Step 2: Project line into the other view w Step 3: Construct a fold line perpendicular to AY w Step 4: Measure distances for the points w Step 5: Transfer distances 1 This is an edge view 38
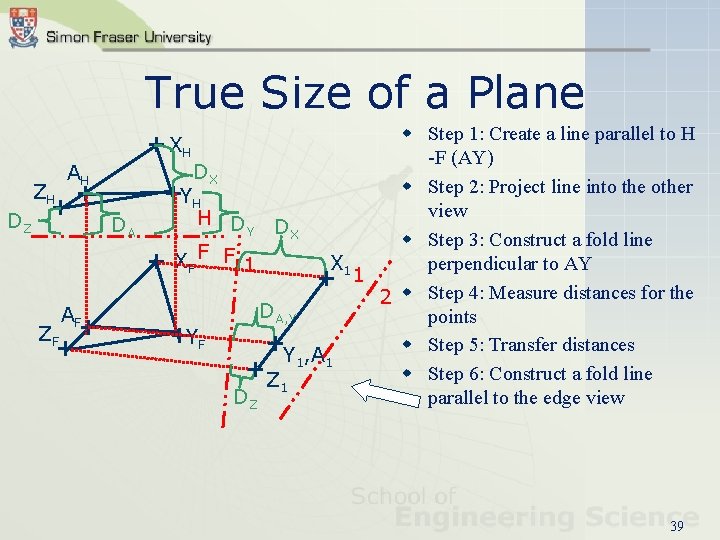
True Size of a Plane w Step 1: Create a line parallel to H -F (AY) DX AH w Step 2: Project line into the other ZH + +YH + view H D D DZ DA Y X w Step 3: Construct a fold line F + XF F 1 X 1 perpendicular to AY 1 + 2 w Step 4: Measure distances for the DA, Y AF points + ZF +Y , A w Step 5: Transfer distances + +Z 1 1 w Step 6: Construct a fold line 1 DZ parallel to the edge view + XH 39
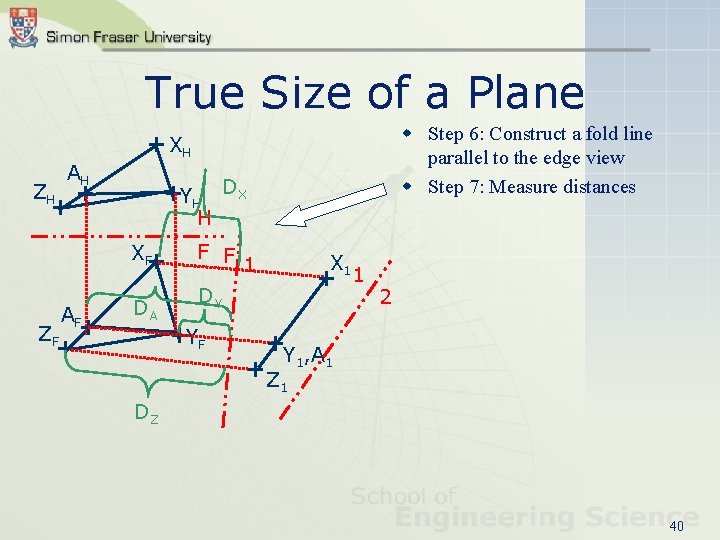
True Size of a Plane w Step 6: Construct a fold line parallel to the edge view w Step 7: Measure distances + XH ZH AH + +YH DX + H XF+ ZF AF + + DA F F 1 X 1 + 1 DY +YF 2 +Y , A +Z 1 1 1 DZ 40
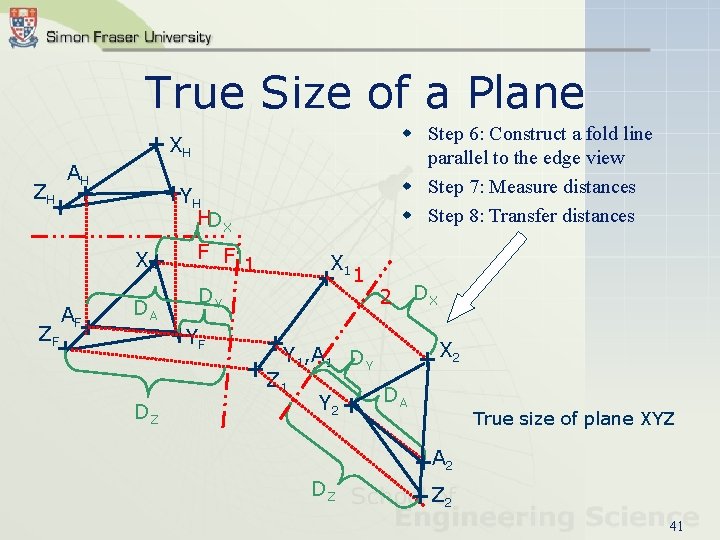
True Size of a Plane w Step 6: Construct a fold line parallel to the edge view w Step 7: Measure distances w Step 8: Transfer distances + XH ZH AH + +YH + HDX X+ F ZF AF + + DA DZ F F 1 DY +YF X 1 + 1 2 DX +Y , A X 2 1 1 DY + +Z 1 Y 2 + D A DZ True size of plane XYZ +A 2 +Z 2 41
- Slides: 41