Dental panoramic radiography has become a very popular

Dental panoramic radiography has become a very popular radiographic technique in dentistry because: üAll teeth & their supporting structures are shown in one film. ü Simple technique. ü The radiation dose relatively low.
. 2. Lesion such as")
Indication 1. Orthodontic assessment (presence & position of developing teeth). 2. Lesion such as cysts , tumors & developmental anomalies in the body & ramie of mandible to establish their size &site. 3. Fractures of all parts of mandible except the anterior part. 4. Investigation of maxillary antrum , to assess the floor, posterior & anterior walls. 5. Investigation of articular surface of the head of the condyle , specially if the patient with the mouth opening limitation.

6. Assessment of any underlying disease before construction of partial & complete denture. 7. Assessment of the presence & position of wisdom teeth. 8. Evaluation of vertical height of alveolar bone before inserting implant. 9. Periodontal condition ; as an overall view of the alveolar bone level but it should be supplemented by periapical radiograph.

Equipment : 1. X-ray tube head : produce narrow fan-shape x-ray beam angled upward at 8 degree. ( narrow x-ray beam emerges from the collimator minimize patient exposure to the radiation). 2. A cassette & its carrier. (Rare earth screens require less xray exposure than calcium tungestate screen & are considered faster). 3. Patient–positioning apparatus include light beam marker.

Theory of panoramic radiography

Focal trough or Image Layer Panoramic Theory Panoramic radiography is a modified type of tomography or image layer radiography.

Patient Positioning: Most panoramic machines offer positioning guides such as lights or plastic guides to position the patient along three major axes: Ø Anterior-posterior or canine/corner (too far forward or back). Ø Vertically (alartragus, Frankfort plane, or cantho-meatal lines), ØMidsagittal alignment (patient twisted or rotated).

The Basic Steps: 1. Set exposure factors, if required. 2. The patient should remove jewelry. 3. The patient should bite on bite rod. 4. Adjust the: a. Chin tilt with the Frankfort light. b. Head rotation with the mid-sagittal light. c. Forward/backward head position with the canine light. 5. Position the side guides or head support. he patient stand up straight, place the tongue on roof of the mouth, and hold still. 8. X-ray

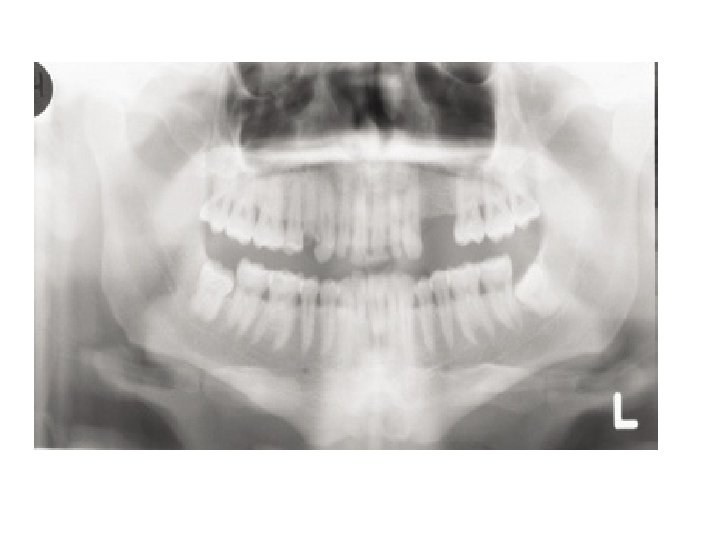
In a good panoramic radiograph: • The mandible is “U” shaped. • The condyles are positioned about equal distance from the inside edges of the image and 1⁄3 of the way down from the top edge of the image. • The occlusal plane exhibits a slight curve or “smile line, ” upwards. • The roots of the maxillary and mandibular anterior teeth are readily visible with minimal distortion. • Magnification is equal on both sides of the midline.

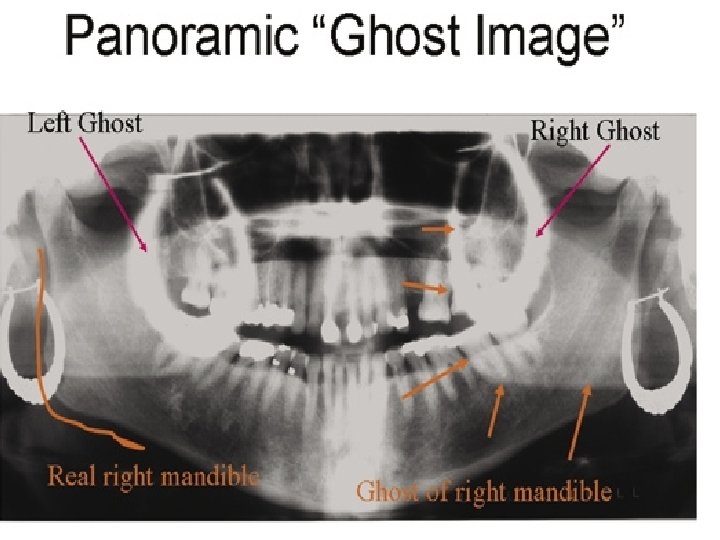
Normal anatomy The normal anatomical shadows can be subdivided into: Ø True or actual image of structures in, or close to the focal trough. Ø Ghost images created by the tomographic movement and cast by structures on the opposite side or a long way from the focal trough. The 8° upward angulation of these ghost shadows appear at a higher level than the structures that have caused them. Ø Double images: structures that are scanned twice by the rotating X-ray beam.
: These include: • Teeth. • Mandible.")
True or actual images (Important hard tissue images): These include: • Teeth. • Mandible. • Maxilla, including the floor, medial and posterior walls of the antra. • Hard palate. Important soft tissue images • Zygomatic arches. • Ear lobes • Styloid processes. • Nasal cartilages • Hyoid bone. • Nasal septum and conchae. • Soft palate • Dorsum of tongue • Orbital rim. • Lips and cheeks • Base of skull. • Nasolabial folds. Air images • Mouth/oral opening • Oropharynx. Ghost images The more important ghost shadows: • Cervical vertebrae. • Body, angle and ramus of the contralateral side of the mandible • Palate. Double images ( hyoid bone, the hard palate, epiglottis).

Fixed orthodontic appliance

Condyle contact with tmj fossa

Site and relation of impaction

Advantages: 1. Large anatomic area is imaged on one film , even when patient is unable to open his mouth. 2. The technique is easy. 3. The radiation dose is about 1/3 of the dose from a full mouth survey of intra-oral radiography. 4. Development of field limited technique with resultant dose reduction. 5. The patient position is relatively simple & minimal experience is required.

6. The overall view of both sides of the jaws allow rapid assessment of any underling unsuspected disease. 7. The view of both sides of the mandible on one film is useful to assessing fracture & its comfortable for injured patient. 8. Useful for initial evaluation of periodontal status & in orthodontic assessment. 9. Show the floor , anterior & posterior walls of maxillary antrum. 10. Both condylar heads are shown on one film for comparison.

Disadvantages 1. Structures & abnormality not in focal trough may not evident. 2. Soft tissue & air shadow can overlies the structures in the focal trough. 3. Tomographic movement & the distance between the focal trough zone & the film produce distortion & magnification ( X 1. 3 ). 4. Not suitable for children below 5 years. 5. Some patient not conform the shape of focal trough & some structures will be out of focus. 6. Ghost shadow can overlies the structures in the focal trough.

1, Mandibular condyle. 2, Articular eminence. 3, Coronoid process of mandible superimposed on zygomatic arch. 4, Posterior wall of maxillary sinus. 5, Posterior wall of zygomatic process of maxilla. 6, Hard palate. 7, Nasal septum. 8, Tip of nose. 9, Dorsum of tongue. 10, Hyoid superimposed over inferior border of mandible. 11, Inferior border of maxillary sinus. 12, Image of cervical spine. 13, Medial border of maxillary sinus. 14, Infraorbital canal. 15, Infraorbital rim. 16, Pterygomaxillary fissure. 17, Anterior border of the pterygoid plates. 18, Lateral pterygoid plate superimposed over soft palate and coronoid process of mandible. 19, Ear lobe. 20, Inferior border of mandibular canal. 21, Mental foramen. 22, Posterior wall of nasopharynx. 23, Inferior border of mandible superimposed from opposite side. 24, Soft palate over mandibular foramen of mandible.

Errors

Step 1: Setting Exposure Factors Problem Cause How to Correct Hints Light, pale image with few dark areas Too little exposure Increase m. A or k. Vp or Do not confuse with use next higher setting fogging (film), which is on machine an overall grayness Dark image with loss of details, amalgams and unex posed areas are still clear Too much exposure Decrease machine settings

Step 2: Have Patient Remove Jewelry, Place Lead Apron on Patient Problem Cause How to Correct Hints White opacities on image; little or no image is visible Ghosts of metal jewelry Remove prior to exposure Watch out for necklaces White opacity in palate Tongue bar Remove prior to exposure Image is projected high onto palate instead of floor of mouth White opacity at bottom of image shaped like inverted “V” or “shark fin” Lead apron above collar line and in X-ray beam Adjust and properly place apron Watch for bunching at back of neck
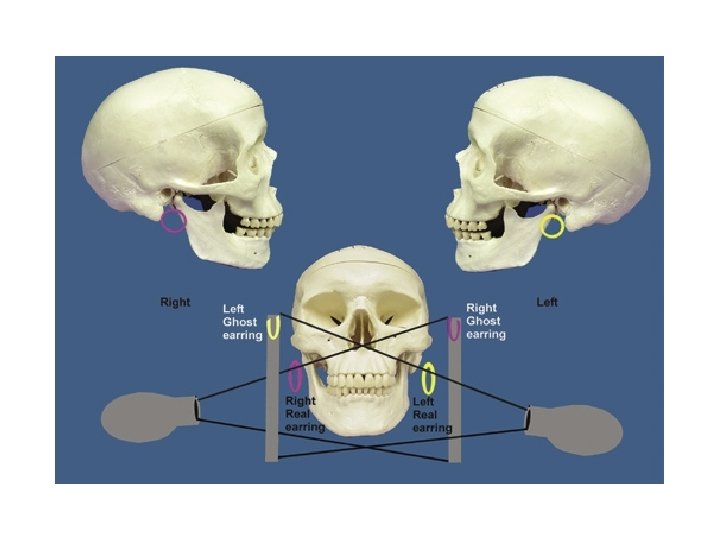
 with ghost shadows (open arrows).")
Stud earrings, real shadows (solid arrows) with ghost shadows (open arrows).

Tongue bar projected over palate

Neck collar artifact

A necklace

Step 3: Bite on Rod Problem Cause How to Correct Hints Anterior teeth blurry, too small and narrow, spine visible on sides of image Patient biting too far forward on bite rod Make sure anterior teeth are located in grooves on rod Make sure mandibular incisors are in groove also, and bite rod is not being bent forward Patient too far forward; note spine superimposed over rami, blurring, and narrowing of anterior teeth

Problem Cause Step 3: Bite on Rod Anterior teeth blurry Patient is biting too and wide, far back ghosting of mandible on rod or not at all and spine, condyles close to edge of image How to Correct Hints Make sure anterior teeth are located in grooves on rod If anterior teeth are missing use edentulous guide Patient too far back; note ghosting of mandible and spine, condyles pushed to outside of film, blurring and widening of anterior teeth

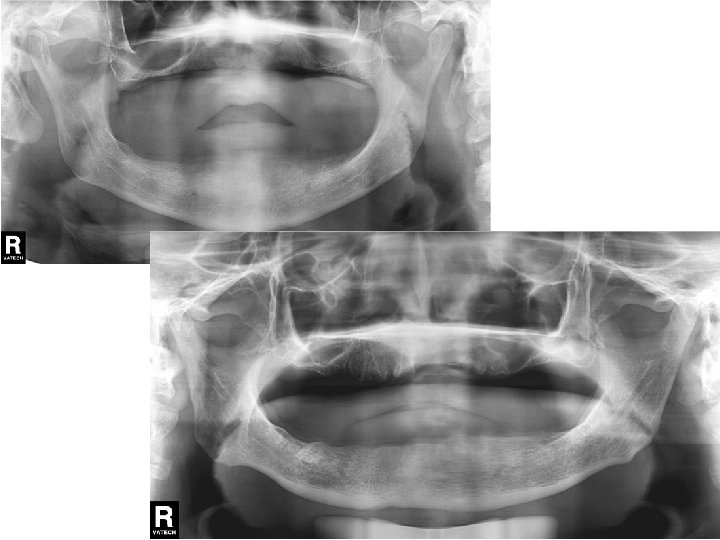
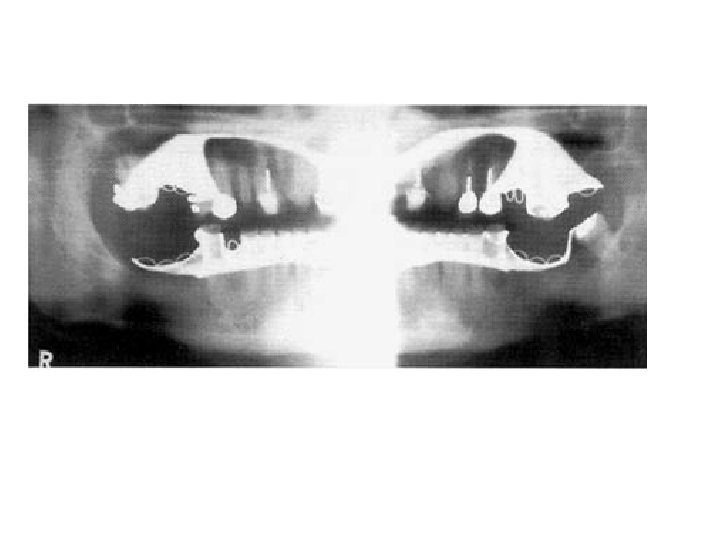
Problem Cause Step 4: Adjust Chin Tilt Roots of lower incisors Patient’s chin is tipped blurry, too far down mandible shaped like a “V”, too much smile line, condyles at top of image, spine forms arch How to Correct Hints Reposition using proper guidelines for that machine, such as ala-tragus line Make sure patient does not have unusual occlusal plane orientation Chin tipped down; note V-shaped mandible, extreme smile line, arching of spine at top of image, condyles placed high over the mandible on film, and streaking of the hyoid bone

Step 4: Adjust Chin Tilt Problem Cause How to Correct Maxillary incisors blurry, hard palate superimposed on roots, flat occlusal plane, mandible is broad and flat, condyles at edge of image Patient’s chin is tipped Reposition using Make sure bite rod too far up proper remains guidelines for that seated in its guide machine such as ala-tragus line Chin up too high; note flattened occlusal plane, palate superimposed on maxillary tooth roots, and broad flat mandible Hints

Problem Step 5: Have Patient Stand Up Straight White tapered opacity in middle of image Cause How to Correct Ghost of spinal column Have patient take a due to slumping step forward and straighten neck Slumped; note the white spine shadow in midline Hints Do not allow patient to reach forward into machine; make them step forward

Metallic bone plates used for fixation of a fracture of the left side of the mandible
- Slides: 37