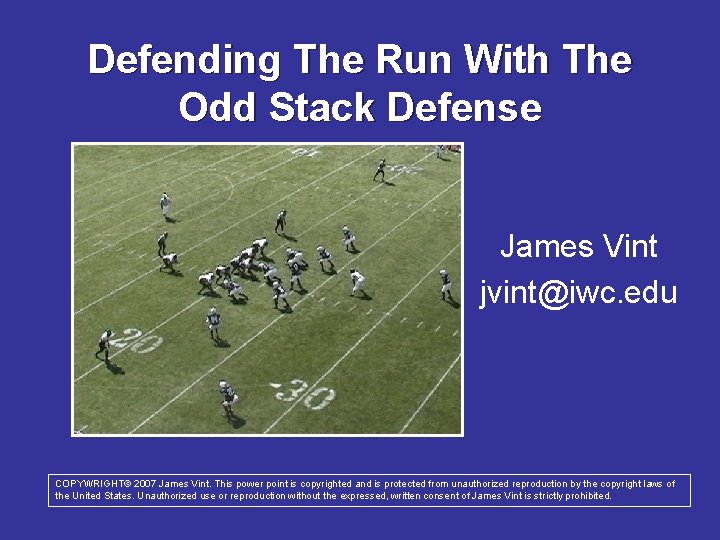
Defending The Run With The Odd Stack Defense
- Slides: 72

Defending The Run With The Odd Stack Defense James Vint jvint@iwc. edu COPYWRIGHT© 2007 James Vint. This power point is copyrighted and is protected from unauthorized reproduction by the copyright laws of the United States. Unauthorized use or reproduction without the expressed, written consent of James Vint is strictly prohibited.

Topics We Will Cover • • Defensive Absolutes Personnel in the 30 Stack Alignment Rules Versus Formations Fronts Stunts Blitzes Defending Specific Concepts Defending Personnel Groups

Defensive Absolutes 1. We will stop the run! 2. We will control the pass! 3. We will be the best tackling team in our conference! 4. We will have great pursuit and get 11 defenders to the football using proper angles! 5. We will create takeaways!

Why The 30 Stack • Puts Your Athletes On The Field • Linebackers Are Harder To Block Than Down Guys • Allows You Multiple Stunts and Fronts • Linebackers Work From Attack Mode • LB’s Read Less and Play Downhill • Attack and Redirect rather than Read and React • Great Change-Up To Your Base Front

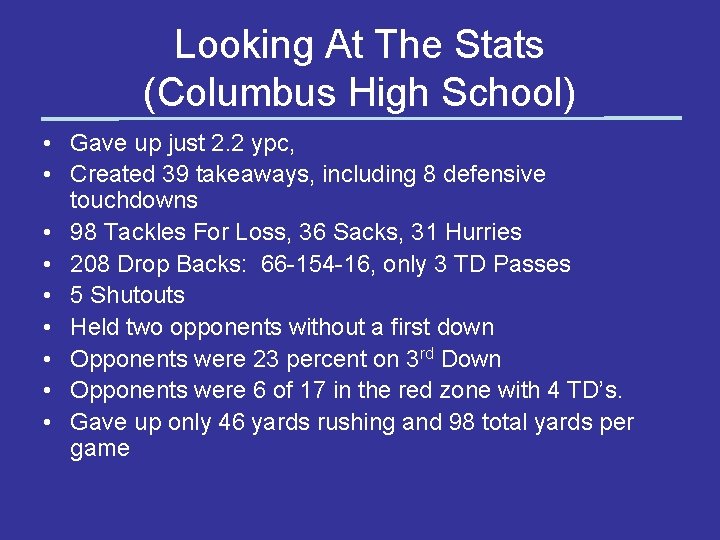
Looking At The Stats (Columbus High School) • Gave up just 2. 2 ypc, • Created 39 takeaways, including 8 defensive touchdowns • 98 Tackles For Loss, 36 Sacks, 31 Hurries • 208 Drop Backs: 66 -154 -16, only 3 TD Passes • 5 Shutouts • Held two opponents without a first down • Opponents were 23 percent on 3 rd Down • Opponents were 6 of 17 in the red zone with 4 TD’s. • Gave up only 46 yards rushing and 98 total yards per game

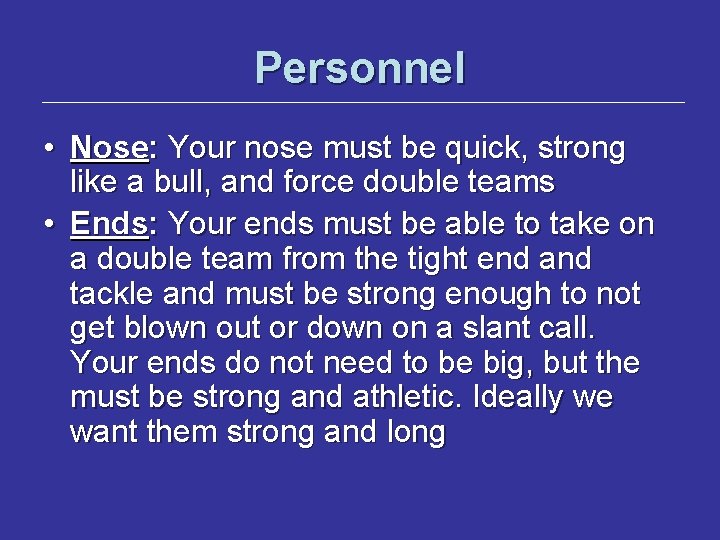
Personnel • Nose: Your nose must be quick, strong like a bull, and force double teams • Ends: Your ends must be able to take on a double team from the tight end and tackle and must be strong enough to not get blown out or down on a slant call. Your ends do not need to be big, but the must be strong and athletic. Ideally we want them strong and long

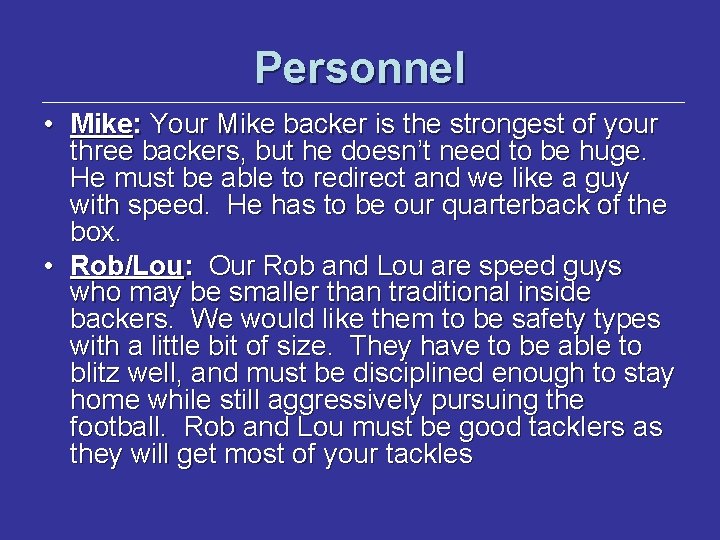
Personnel • Mike: Your Mike backer is the strongest of your three backers, but he doesn’t need to be huge. He must be able to redirect and we like a guy with speed. He has to be our quarterback of the box. • Rob/Lou: Our Rob and Lou are speed guys who may be smaller than traditional inside backers. We would like them to be safety types with a little bit of size. They have to be able to blitz well, and must be disciplined enough to stay home while still aggressively pursuing the football. Rob and Lou must be good tacklers as they will get most of your tackles

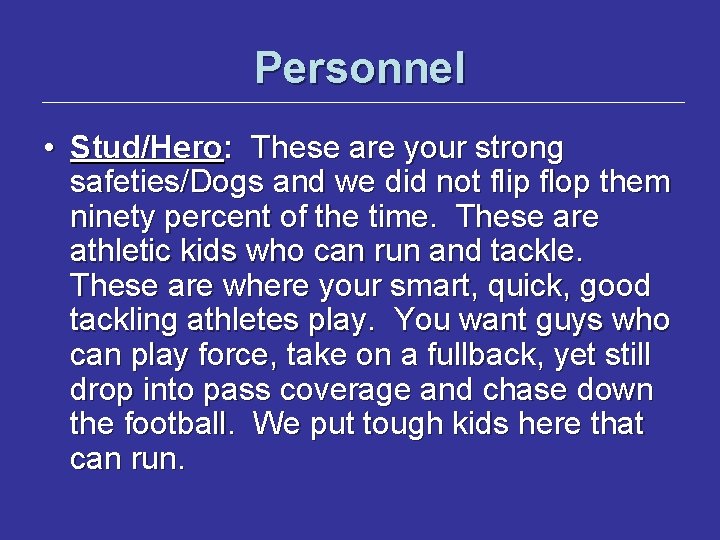
Personnel • Stud/Hero: These are your strong safeties/Dogs and we did not flip flop them ninety percent of the time. These are athletic kids who can run and tackle. These are where your smart, quick, good tackling athletes play. You want guys who can play force, take on a fullback, yet still drop into pass coverage and chase down the football. We put tough kids here that can run.

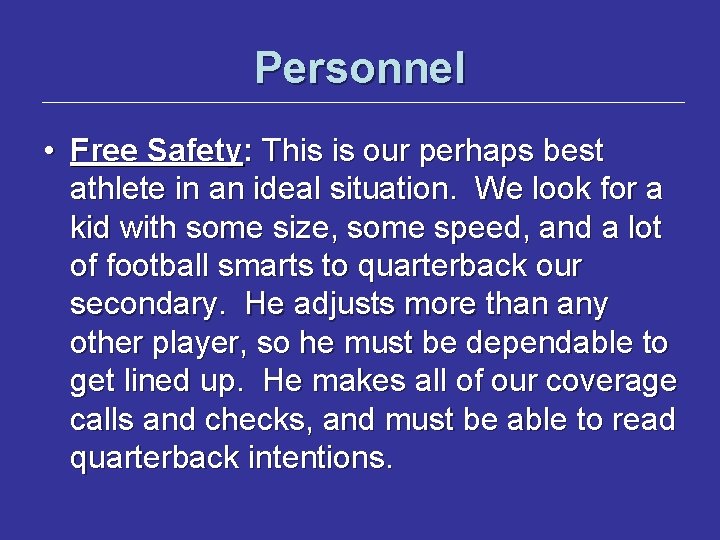
Personnel • Free Safety: This is our perhaps best athlete in an ideal situation. We look for a kid with some size, some speed, and a lot of football smarts to quarterback our secondary. He adjusts more than any other player, so he must be dependable to get lined up. He makes all of our coverage calls and checks, and must be able to read quarterback intentions.

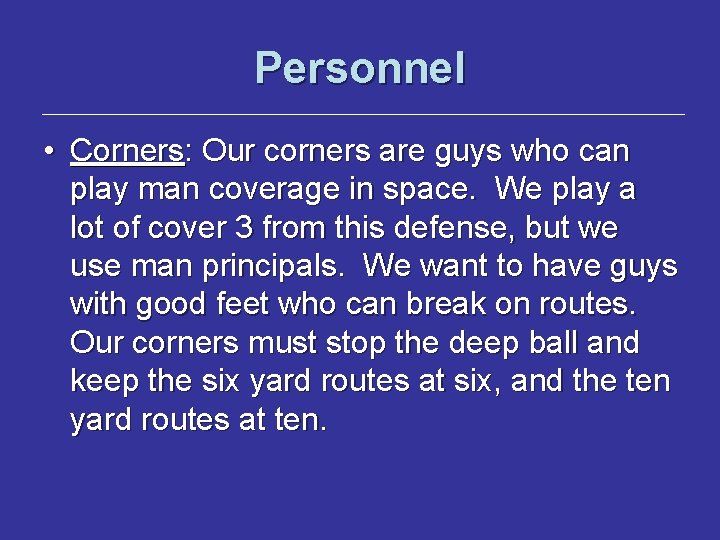
Personnel • Corners: Our corners are guys who can play man coverage in space. We play a lot of cover 3 from this defense, but we use man principals. We want to have guys with good feet who can break on routes. Our corners must stop the deep ball and keep the six yard routes at six, and the ten yard routes at ten.

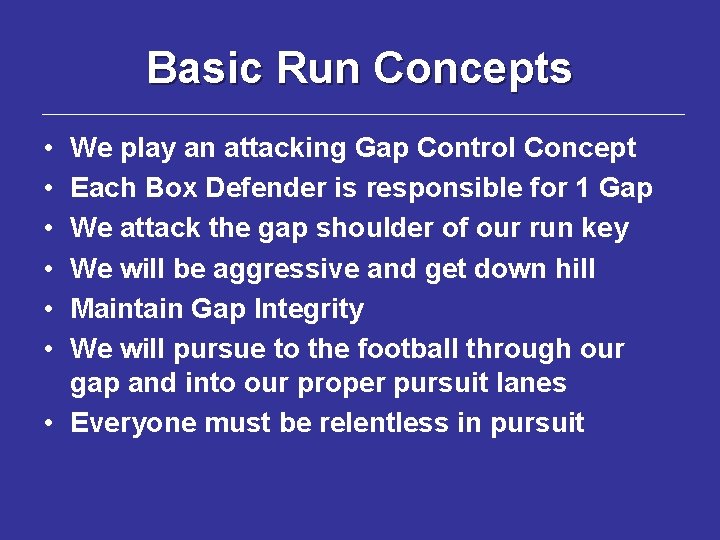
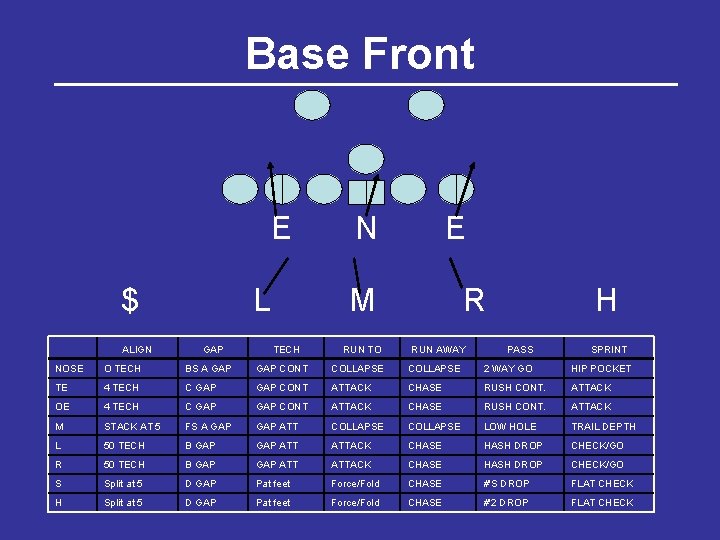
Basic Run Concepts • • • We play an attacking Gap Control Concept Each Box Defender is responsible for 1 Gap We attack the gap shoulder of our run key We will be aggressive and get down hill Maintain Gap Integrity We will pursue to the football through our gap and into our proper pursuit lanes • Everyone must be relentless in pursuit

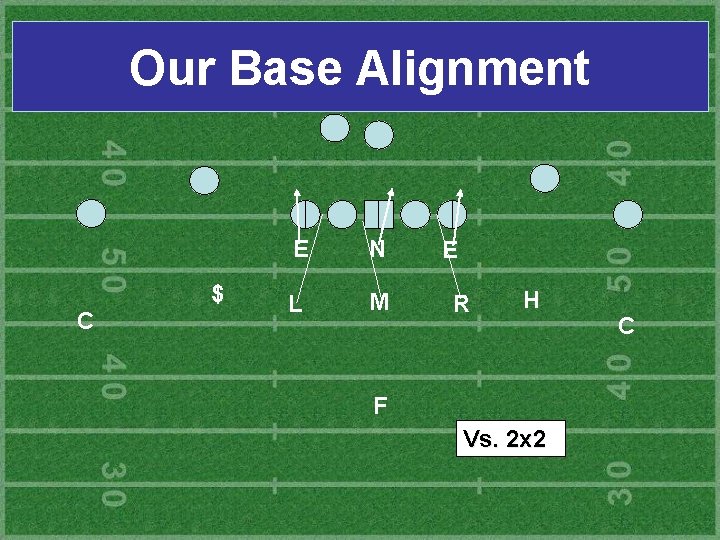
Our Base Alignment $ C E N L M E R H F Vs. 2 x 2 C

Base Front E $ ALIGN L GAP N E M TECH RUN TO R RUN AWAY H PASS SPRINT NOSE O TECH BS A GAP CONT COLLAPSE 2 WAY GO HIP POCKET TE 4 TECH C GAP CONT ATTACK CHASE RUSH CONT. ATTACK OE 4 TECH C GAP CONT ATTACK CHASE RUSH CONT. ATTACK M STACK AT 5 FS A GAP ATT COLLAPSE LOW HOLE TRAIL DEPTH L 50 TECH B GAP ATTACK CHASE HASH DROP CHECK/GO R 50 TECH B GAP ATTACK CHASE HASH DROP CHECK/GO S Split at 5 D GAP Pat feet Force/Fold CHASE #'S DROP FLAT CHECK H Split at 5 D GAP Pat feet Force/Fold CHASE #'2 DROP FLAT CHECK

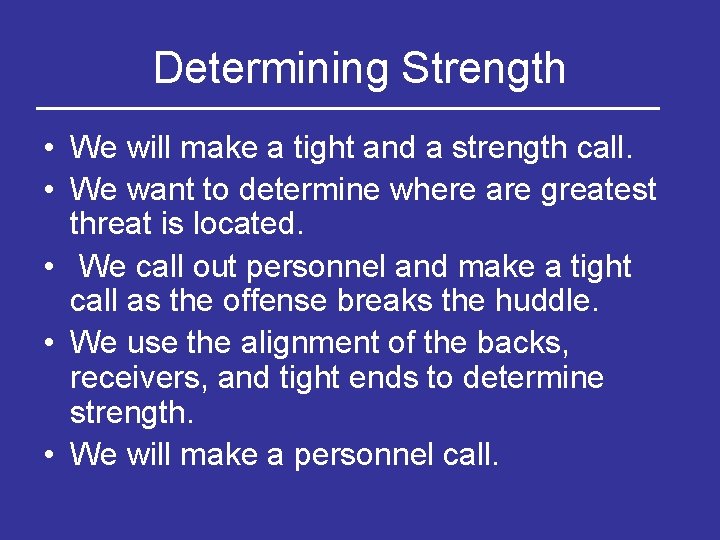
Determining Strength • We will make a tight and a strength call. • We want to determine where are greatest threat is located. • We call out personnel and make a tight call as the offense breaks the huddle. • We use the alignment of the backs, receivers, and tight ends to determine strength. • We will make a personnel call.

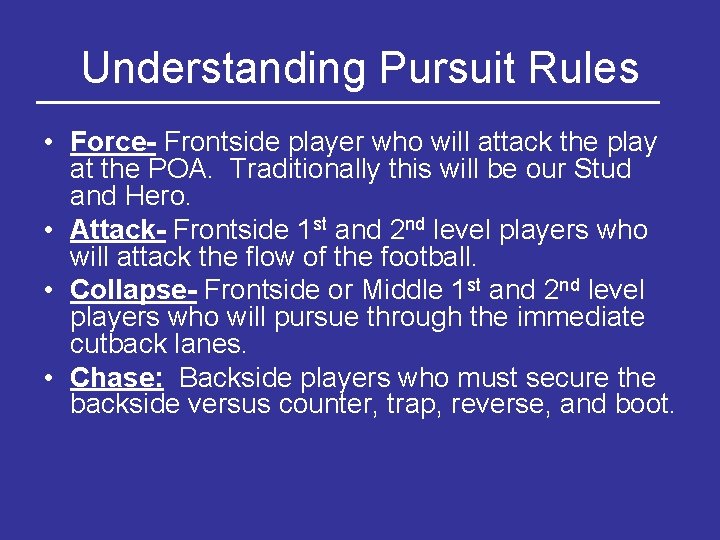
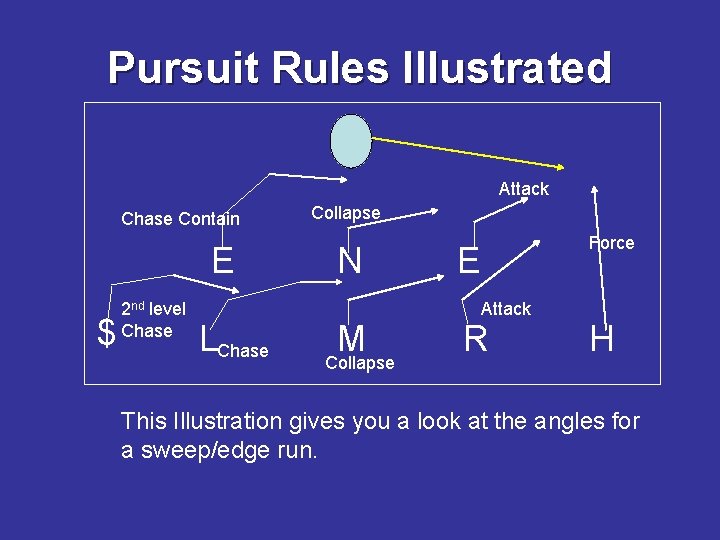
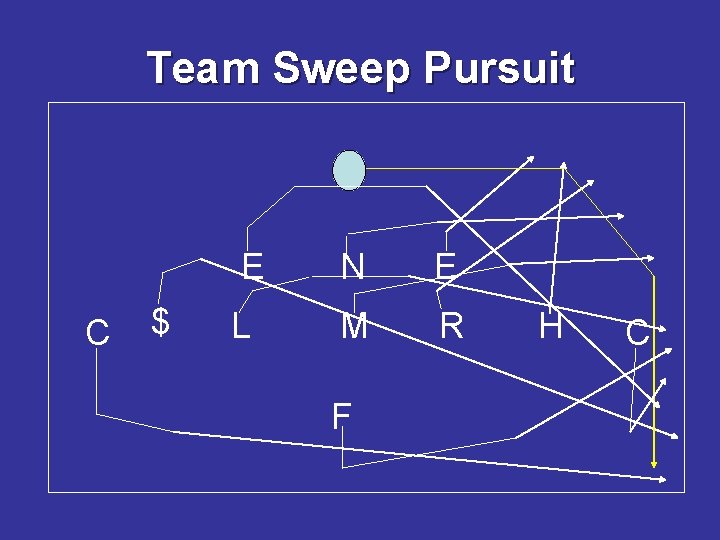
Understanding Pursuit Rules • Force- Frontside player who will attack the play at the POA. Traditionally this will be our Stud and Hero. • Attack- Frontside 1 st and 2 nd level players who will attack the flow of the football. • Collapse- Frontside or Middle 1 st and 2 nd level players who will pursue through the immediate cutback lanes. • Chase: Backside players who must secure the backside versus counter, trap, reverse, and boot.

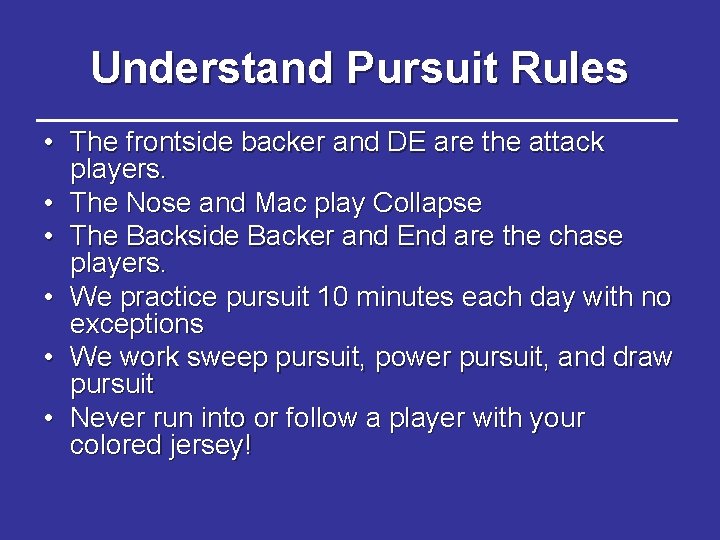
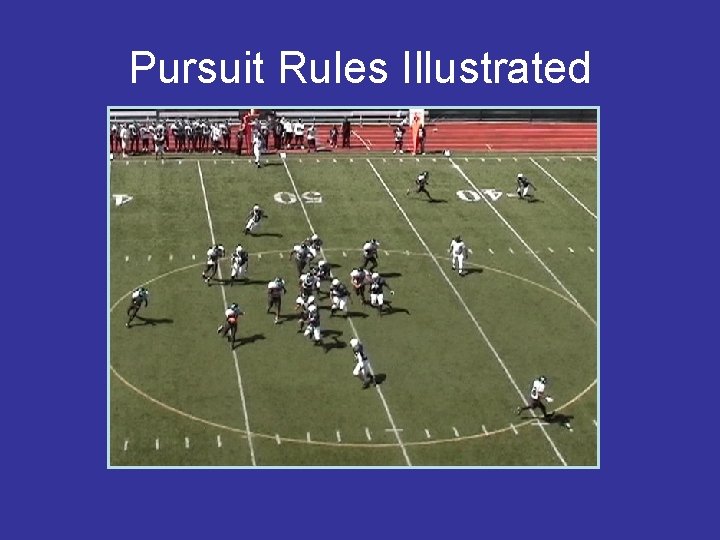
Understand Pursuit Rules • The frontside backer and DE are the attack players. • The Nose and Mac play Collapse • The Backside Backer and End are the chase players. • We practice pursuit 10 minutes each day with no exceptions • We work sweep pursuit, power pursuit, and draw pursuit • Never run into or follow a player with your colored jersey!

Pursuit Rules Illustrated Attack Chase Contain E $ 2 nd level Chase LChase Collapse N M Collapse Force E Attack R H This Illustration gives you a look at the angles for a sweep/edge run.

Team Sweep Pursuit C $ E N E L M R F H C

Pursuit Rules Illustrated

Defending Popular Two Back Concepts • • • Lead/Iso Power/Toss Inside Zone Outside Zone Option Responsibilities

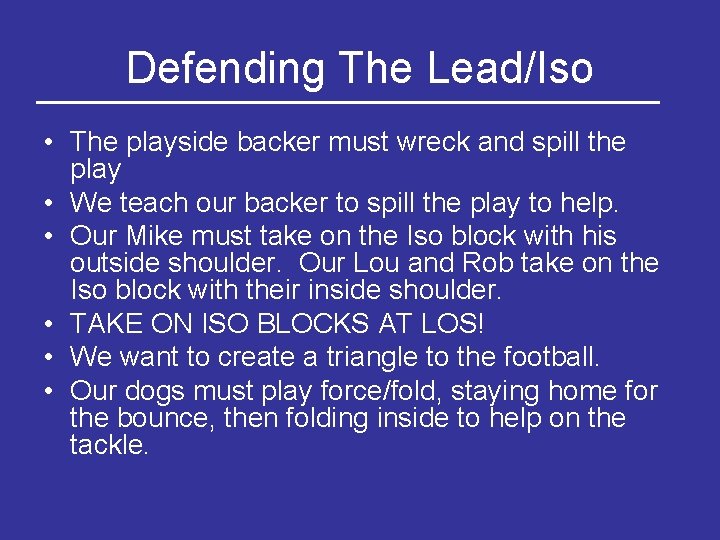
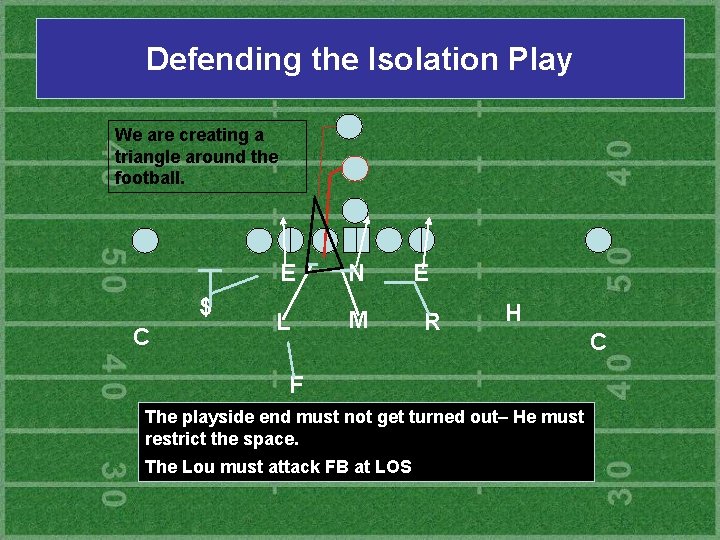
Defending The Lead/Iso • The playside backer must wreck and spill the play • We teach our backer to spill the play to help. • Our Mike must take on the Iso block with his outside shoulder. Our Lou and Rob take on the Iso block with their inside shoulder. • TAKE ON ISO BLOCKS AT LOS! • We want to create a triangle to the football. • Our dogs must play force/fold, staying home for the bounce, then folding inside to help on the tackle.

Defending the Isolation Play We are creating a triangle around the football. $ C E N L M E R H F The playside end must not get turned out– He must restrict the space. The Lou must attack FB at LOS C

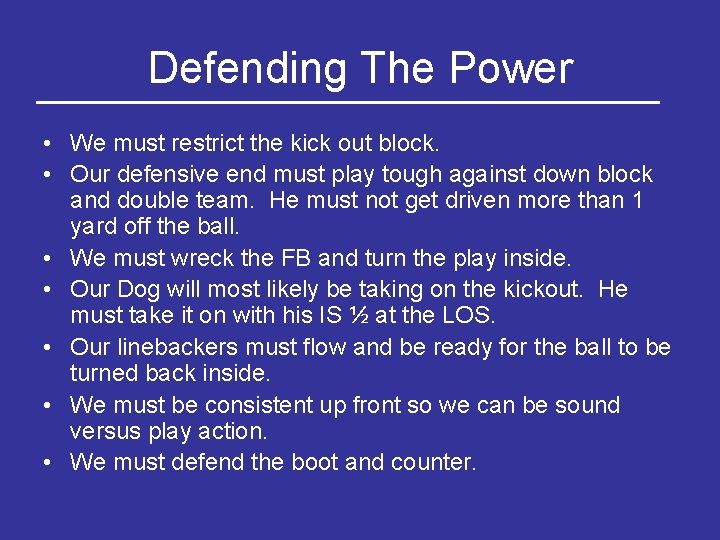
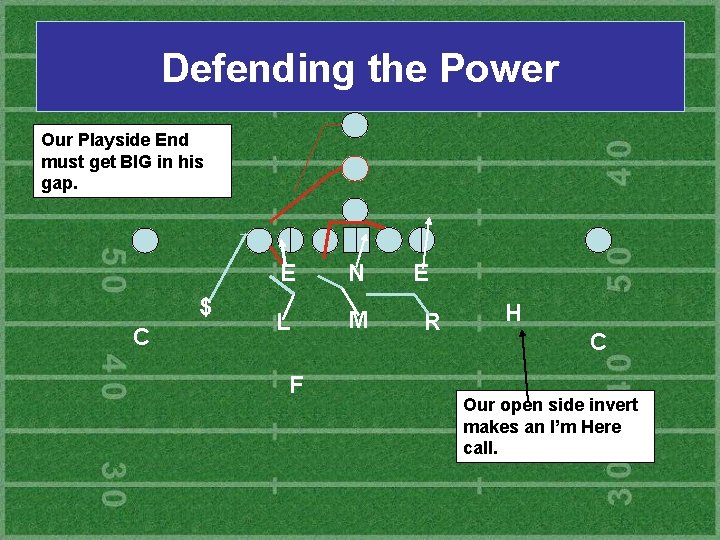
Defending The Power • We must restrict the kick out block. • Our defensive end must play tough against down block and double team. He must not get driven more than 1 yard off the ball. • We must wreck the FB and turn the play inside. • Our Dog will most likely be taking on the kickout. He must take it on with his IS ½ at the LOS. • Our linebackers must flow and be ready for the ball to be turned back inside. • We must be consistent up front so we can be sound versus play action. • We must defend the boot and counter.

Defending the Power Our Playside End must get BIG in his gap. $ C E N L M F E R H C Our open side invert makes an I’m Here call.

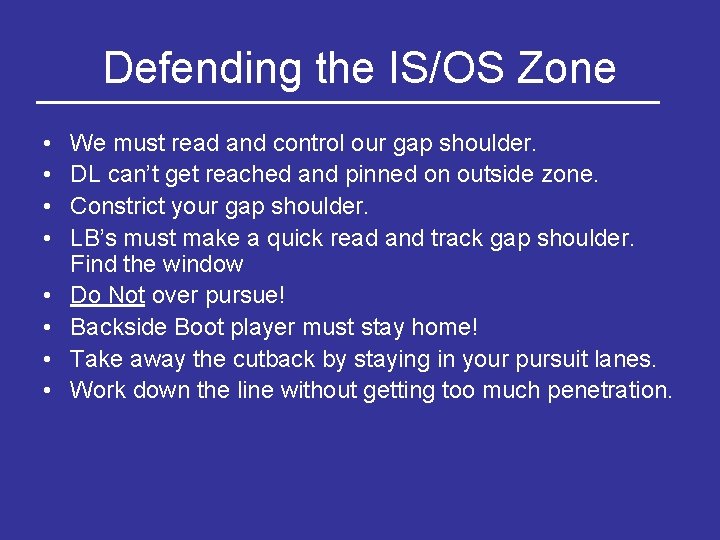
Defending the IS/OS Zone • • We must read and control our gap shoulder. DL can’t get reached and pinned on outside zone. Constrict your gap shoulder. LB’s must make a quick read and track gap shoulder. Find the window Do Not over pursue! Backside Boot player must stay home! Take away the cutback by staying in your pursuit lanes. Work down the line without getting too much penetration.

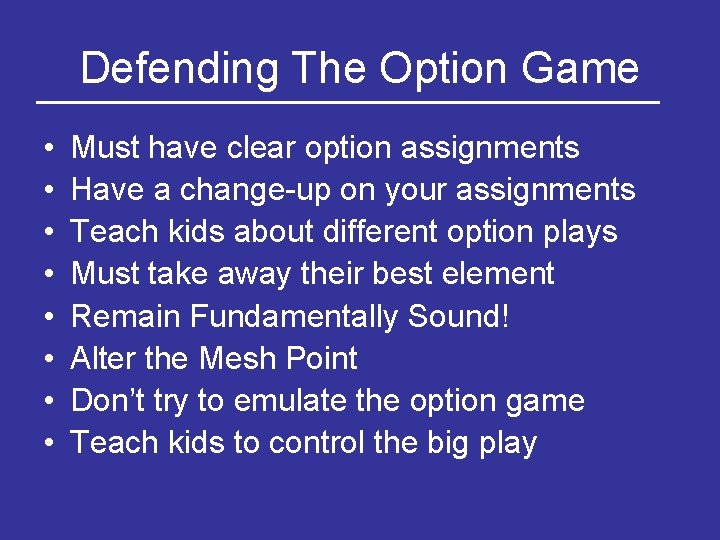
Defending The Option Game • • Must have clear option assignments Have a change-up on your assignments Teach kids about different option plays Must take away their best element Remain Fundamentally Sound! Alter the Mesh Point Don’t try to emulate the option game Teach kids to control the big play

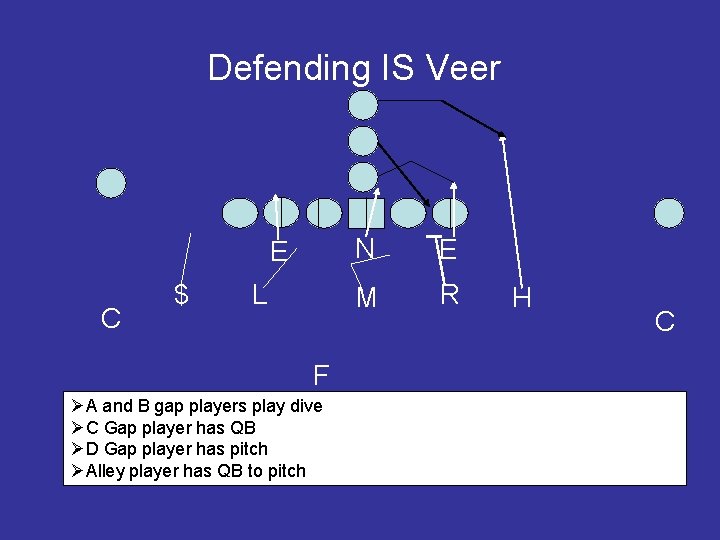
Defending IS Veer E C $ L F ØA and B gap players play dive ØC Gap player has QB ØD Gap player has pitch ØAlley player has QB to pitch N E M R H C

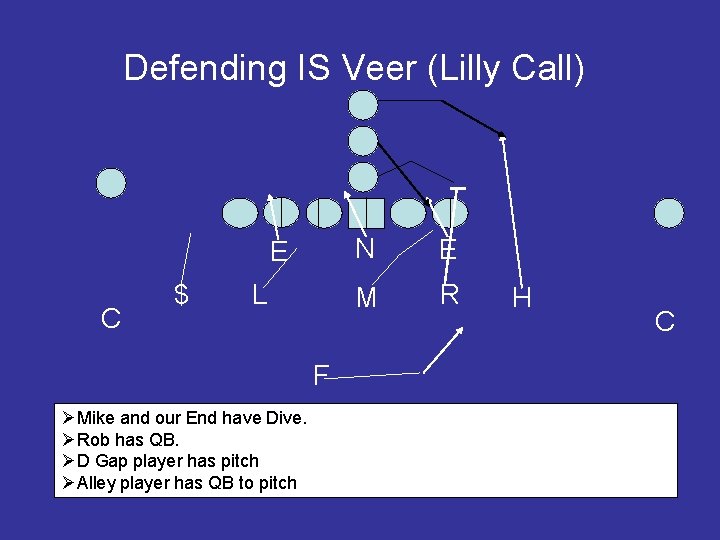
Defending IS Veer (Lilly Call) E C $ L F ØMike and our End have Dive. ØRob has QB. ØD Gap player has pitch ØAlley player has QB to pitch N E M R H C

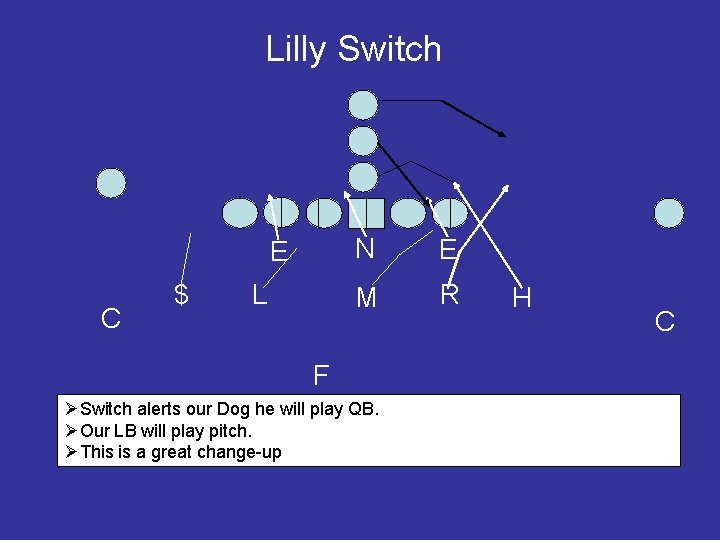
Lilly Switch E C $ L N E M R F ØSwitch alerts our Dog he will play QB. ØOur LB will play pitch. ØThis is a great change-up H C

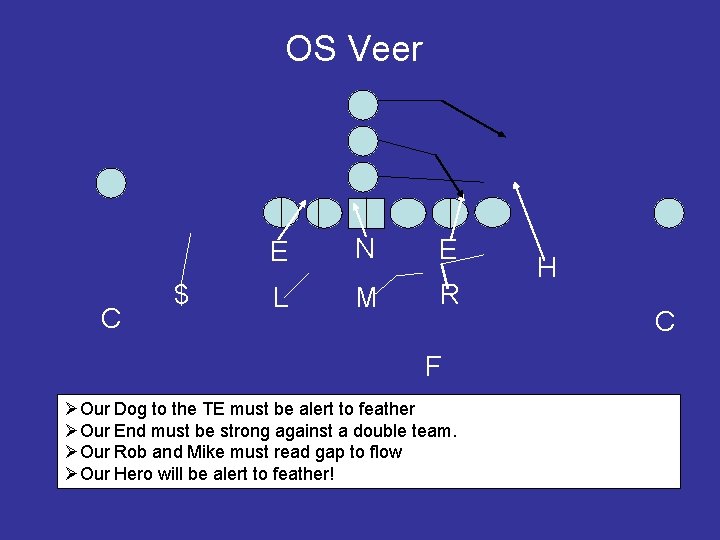
OS Veer C $ E N E L M R F ØOur Dog to the TE must be alert to feather ØOur End must be strong against a double team. ØOur Rob and Mike must read gap to flow ØOur Hero will be alert to feather! H C

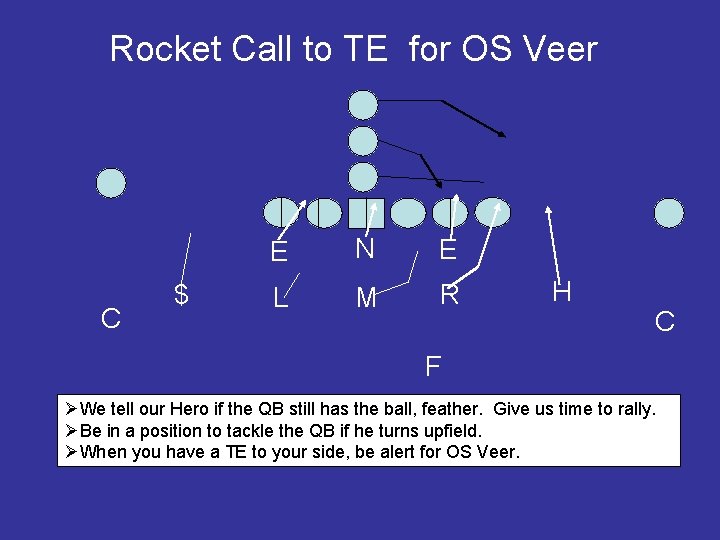
Rocket Call to TE for OS Veer C $ E N E L M R H C F ØWe tell our Hero if the QB still has the ball, feather. Give us time to rally. ØBe in a position to tackle the QB if he turns upfield. ØWhen you have a TE to your side, be alert for OS Veer.

Defending Spread Sets • We will discourage the bubble by alignment. • We will not get in a bad coverage match-up. • We will always have a quarterback player if they are an option team. • We will game plan to eliminate their best running threat. • We must understand which concepts they are running. • When in doubt, be aggressive in your base.

Defending Spread Sets • Understand down and distance! • Teach your players how to be aggressive against the run and still get a good pass drop. • Drill your players on the high/hat low/hat concept. • Understand their will be no lead play without motion. • Who will the read player be? • What are their formation tendencies?

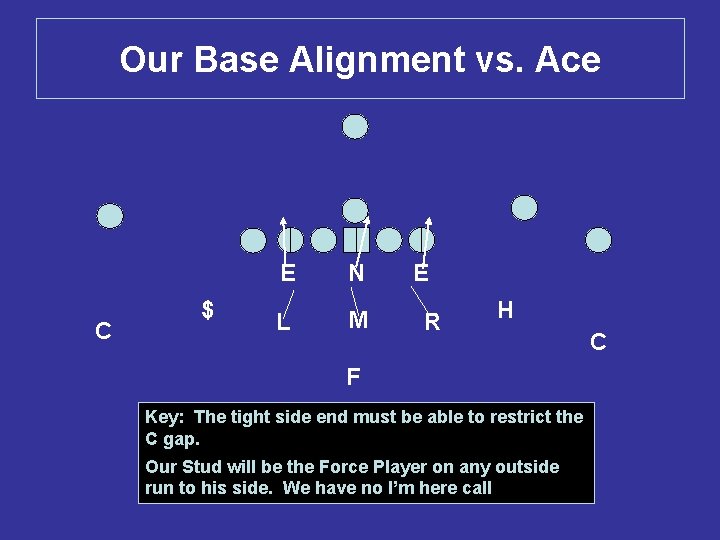
Our Base Alignment vs. Ace C $ E N L M E R H F Key: The tight side end must be able to restrict the C gap. Our Stud will be the Force Player on any outside run to his side. We have no I’m here call C

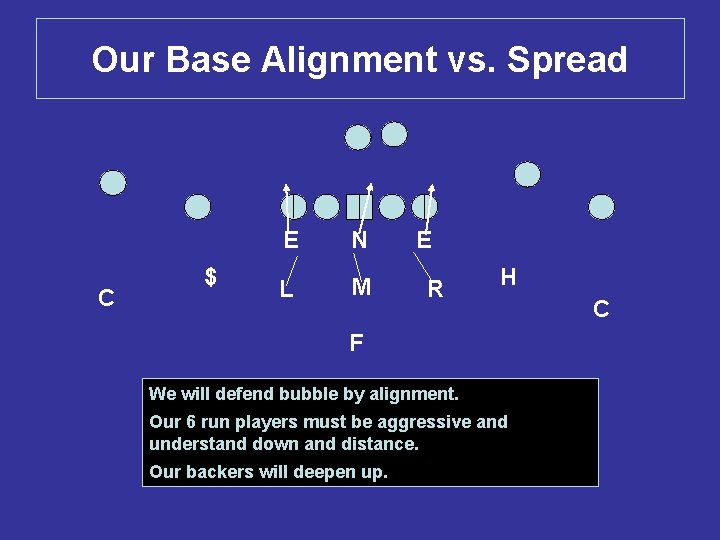
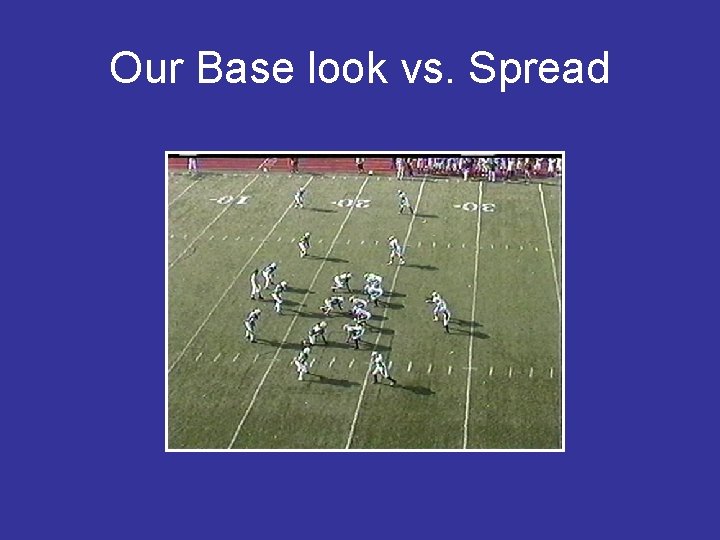
Our Base Alignment vs. Spread C $ E N L M E R H F We will defend bubble by alignment. Our 6 run players must be aggressive and understand down and distance. Our backers will deepen up. C

Our Base look vs. Spread

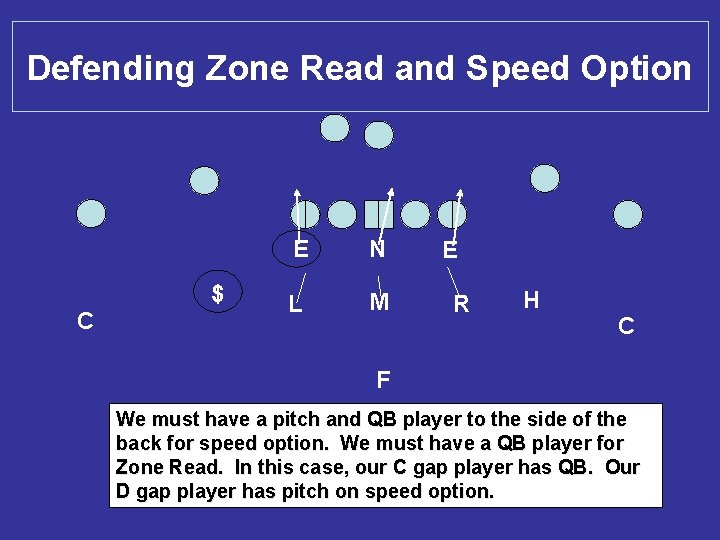
Defending Zone Read and Speed Option $ C E N L M E R H C F We must have a pitch and QB player to the side of the back for speed option. We must have a QB player for Zone Read. In this case, our C gap player has QB. Our D gap player has pitch on speed option.

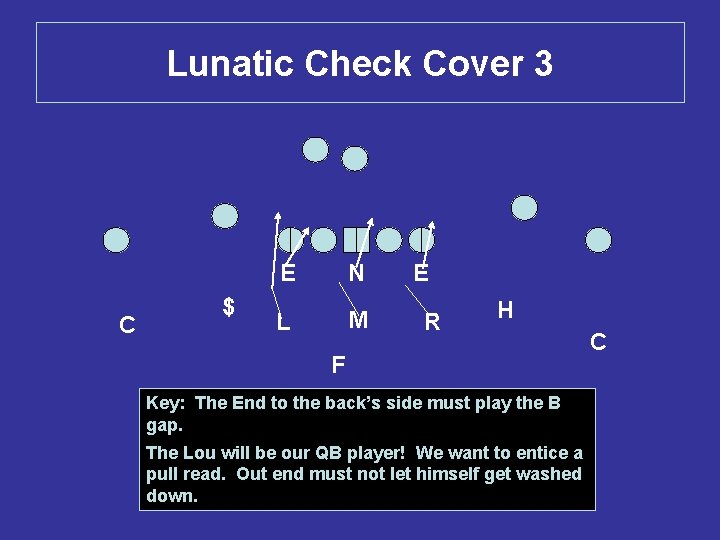
Lunatic Check Cover 3 C $ E N L M E R H F Key: The End to the back’s side must play the B gap. The Lou will be our QB player! We want to entice a pull read. Out end must not let himself get washed down. C

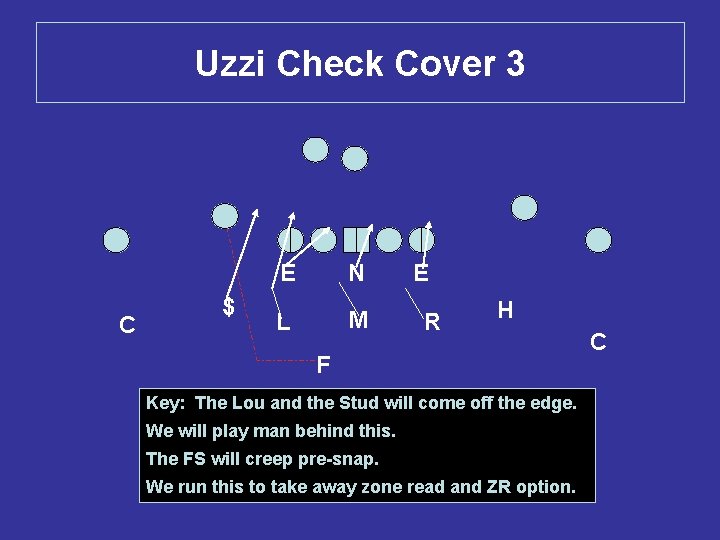
Uzzi Check Cover 3 C $ E N L M E R H F Key: The Lou and the Stud will come off the edge. We will play man behind this. The FS will creep pre-snap. We run this to take away zone read and ZR option. C

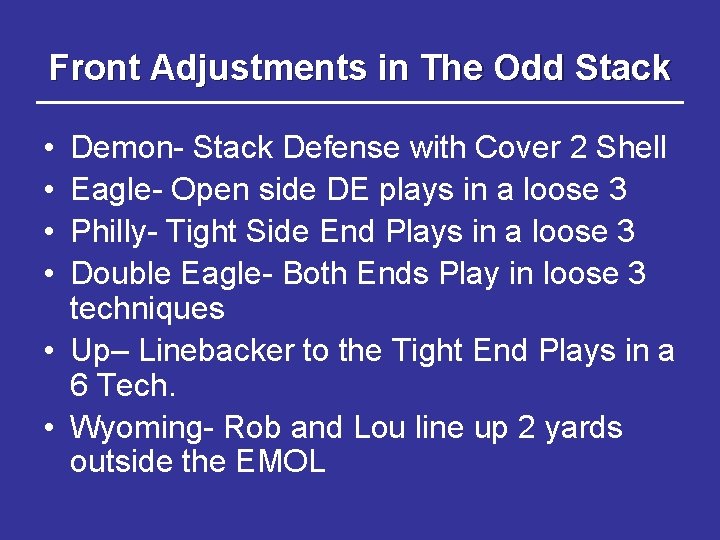
Front Adjustments in The Odd Stack • • Demon- Stack Defense with Cover 2 Shell Eagle- Open side DE plays in a loose 3 Philly- Tight Side End Plays in a loose 3 Double Eagle- Both Ends Play in loose 3 techniques • Up– Linebacker to the Tight End Plays in a 6 Tech. • Wyoming- Rob and Lou line up 2 yards outside the EMOL

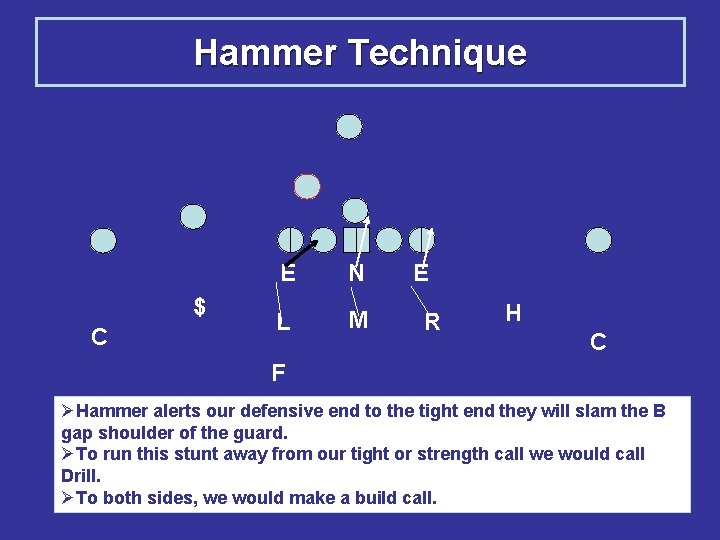
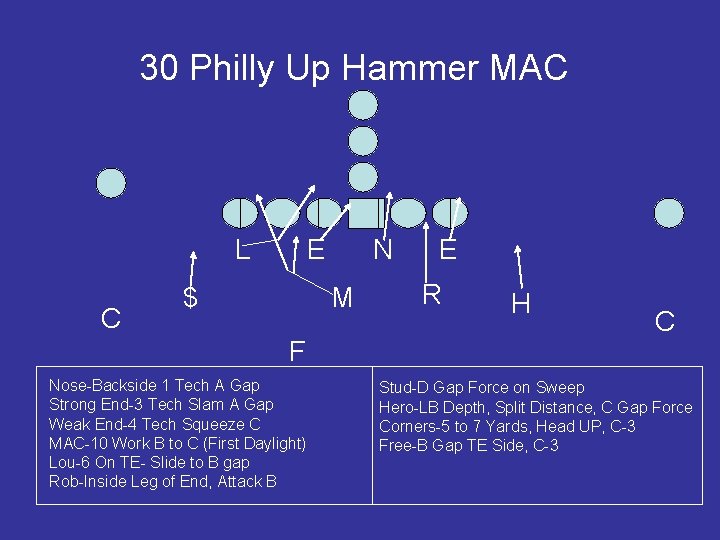
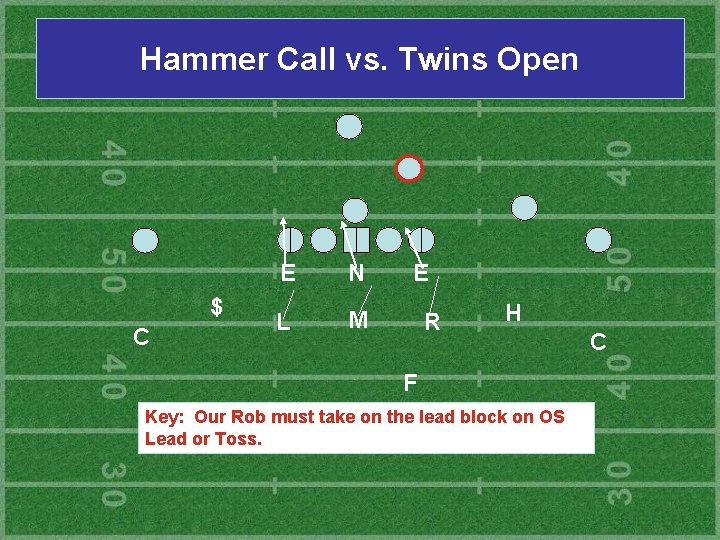
Hammer Technique $ C E N L M E R H C F ØHammer alerts our defensive end to the tight end they will slam the B gap shoulder of the guard. ØTo run this stunt away from our tight or strength call we would call Drill. ØTo both sides, we would make a build call.

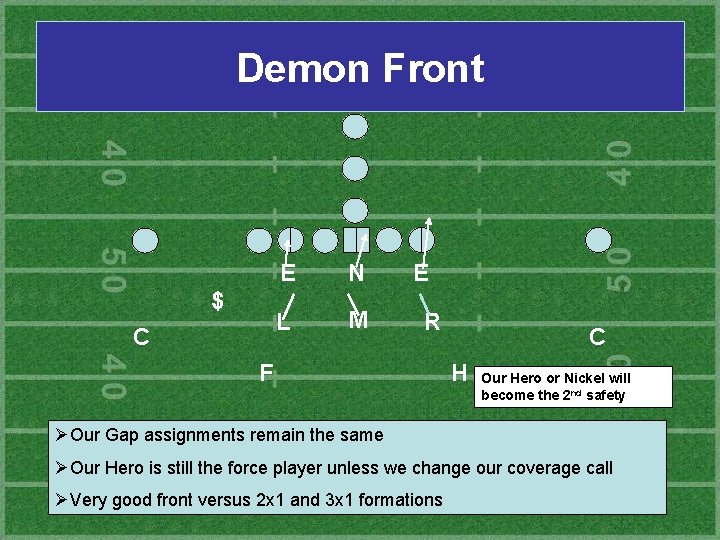
Demon Front $ C E N L M E R F C H Our Hero or Nickel will become the 2 nd safety ØOur Gap assignments remain the same ØOur Hero is still the force player unless we change our coverage call ØVery good front versus 2 x 1 and 3 x 1 formations

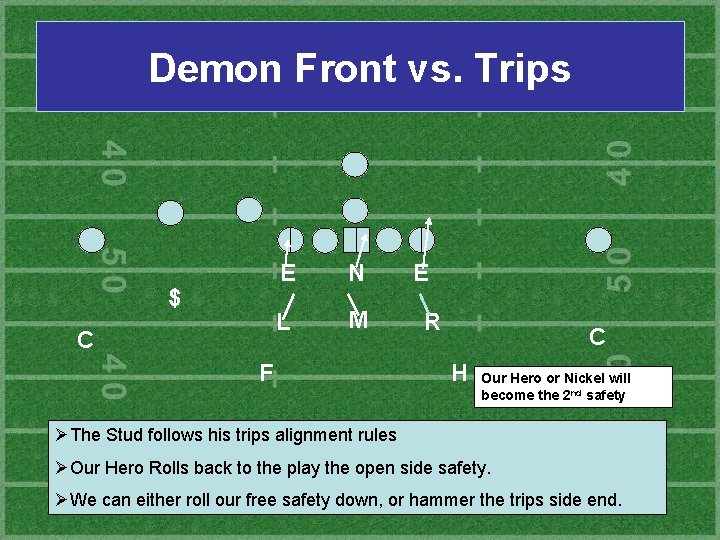
Demon Front vs. Trips $ C E N L M F E R C H Our Hero or Nickel will become the 2 nd safety ØThe Stud follows his trips alignment rules ØOur Hero Rolls back to the play the open side safety. ØWe can either roll our free safety down, or hammer the trips side end.

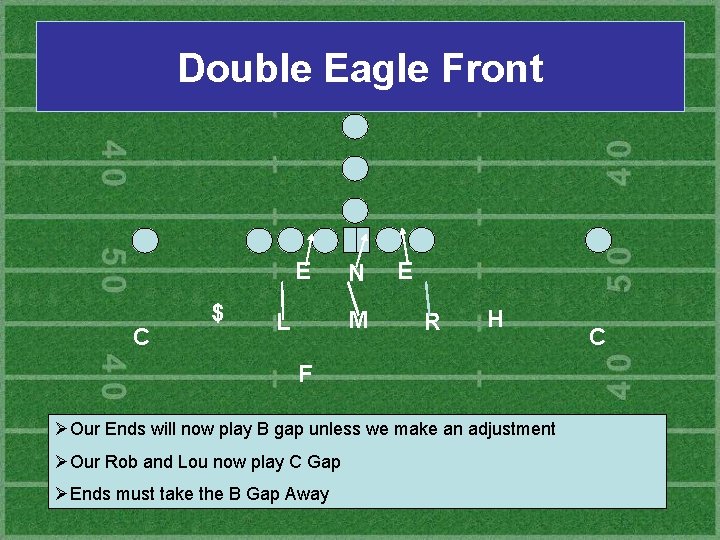
Double Eagle Front E C $ N M L E R H F ØOur Ends will now play B gap unless we make an adjustment ØOur Rob and Lou now play C Gap ØEnds must take the B Gap Away C

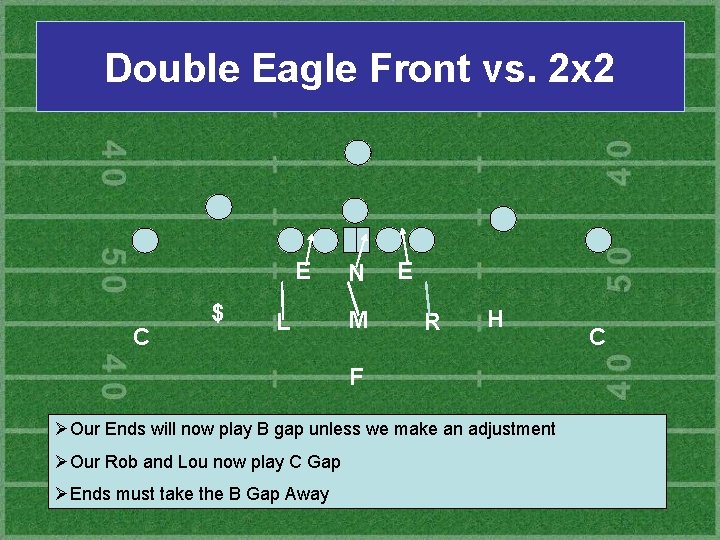
Double Eagle Front vs. 2 x 2 E C $ L N M E R H F ØOur Ends will now play B gap unless we make an adjustment ØOur Rob and Lou now play C Gap ØEnds must take the B Gap Away C

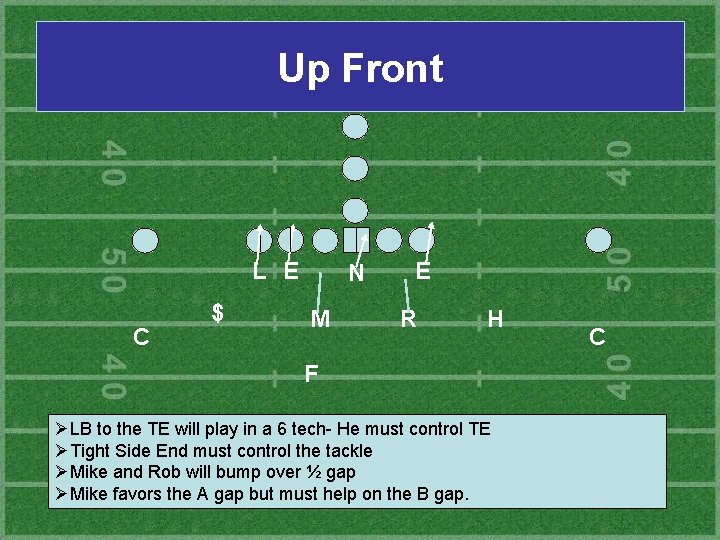
Up Front L E C $ N M E R H F ØLB to the TE will play in a 6 tech- He must control TE ØTight Side End must control the tackle ØMike and Rob will bump over ½ gap ØMike favors the A gap but must help on the B gap. C

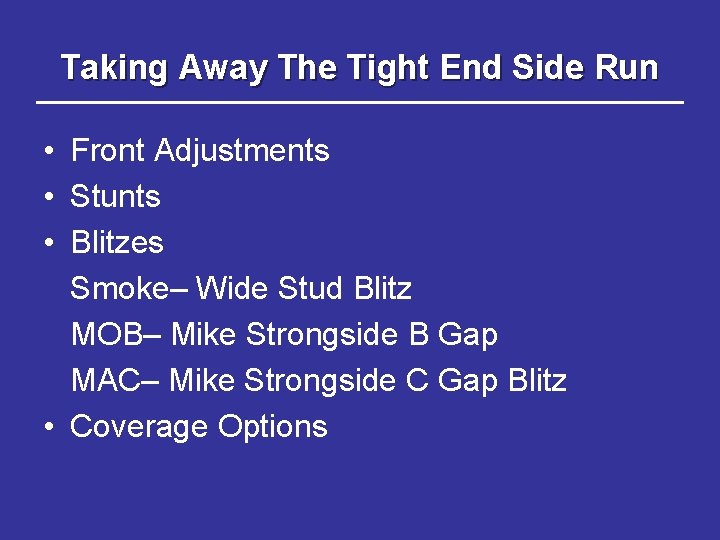
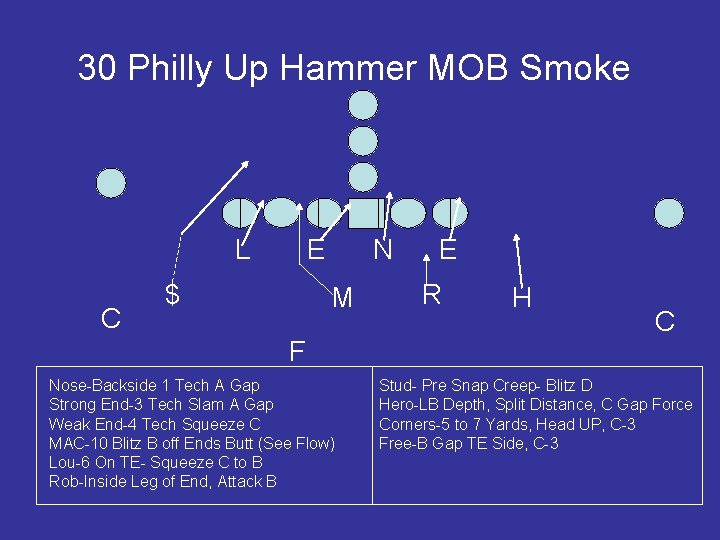
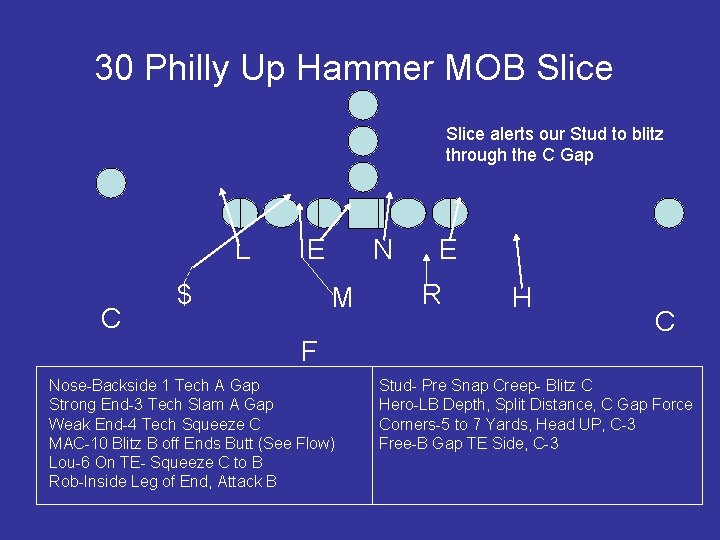
Taking Away The Tight End Side Run • Front Adjustments • Stunts • Blitzes Smoke– Wide Stud Blitz MOB– Mike Strongside B Gap MAC– Mike Strongside C Gap Blitz • Coverage Options

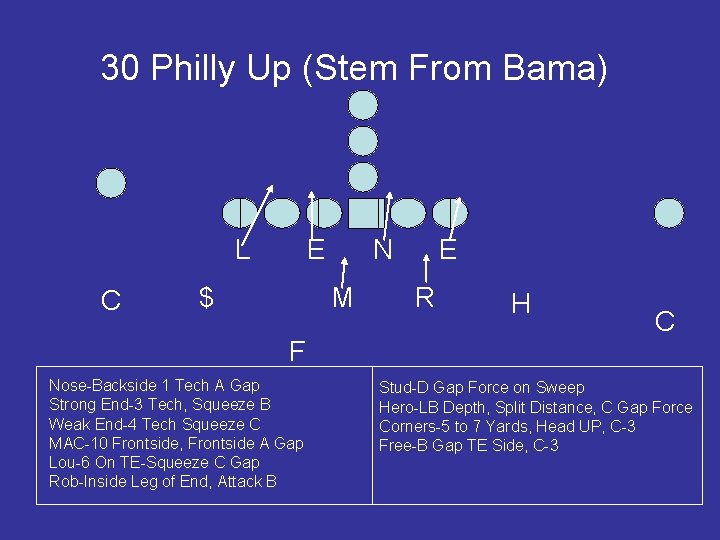
30 Philly Up (Stem From Bama) L C E $ N M F Nose-Backside 1 Tech A Gap Strong End-3 Tech, Squeeze B Weak End-4 Tech Squeeze C MAC-10 Frontside, Frontside A Gap Lou-6 On TE-Squeeze C Gap Rob-Inside Leg of End, Attack B E R H C Stud-D Gap Force on Sweep Hero-LB Depth, Split Distance, C Gap Force Corners-5 to 7 Yards, Head UP, C-3 Free-B Gap TE Side, C-3

30 Philly Up Hammer MAC L C E $ N M F Nose-Backside 1 Tech A Gap Strong End-3 Tech Slam A Gap Weak End-4 Tech Squeeze C MAC-10 Work B to C (First Daylight) Lou-6 On TE- Slide to B gap Rob-Inside Leg of End, Attack B E R H C Stud-D Gap Force on Sweep Hero-LB Depth, Split Distance, C Gap Force Corners-5 to 7 Yards, Head UP, C-3 Free-B Gap TE Side, C-3

30 Philly Up Hammer MOB Smoke L C E $ N M F Nose-Backside 1 Tech A Gap Strong End-3 Tech Slam A Gap Weak End-4 Tech Squeeze C MAC-10 Blitz B off Ends Butt (See Flow) Lou-6 On TE- Squeeze C to B Rob-Inside Leg of End, Attack B E R H C Stud- Pre Snap Creep- Blitz D Hero-LB Depth, Split Distance, C Gap Force Corners-5 to 7 Yards, Head UP, C-3 Free-B Gap TE Side, C-3

30 Philly Up Hammer MOB Slice alerts our Stud to blitz through the C Gap L C E $ N M F Nose-Backside 1 Tech A Gap Strong End-3 Tech Slam A Gap Weak End-4 Tech Squeeze C MAC-10 Blitz B off Ends Butt (See Flow) Lou-6 On TE- Squeeze C to B Rob-Inside Leg of End, Attack B E R H C Stud- Pre Snap Creep- Blitz C Hero-LB Depth, Split Distance, C Gap Force Corners-5 to 7 Yards, Head UP, C-3 Free-B Gap TE Side, C-3

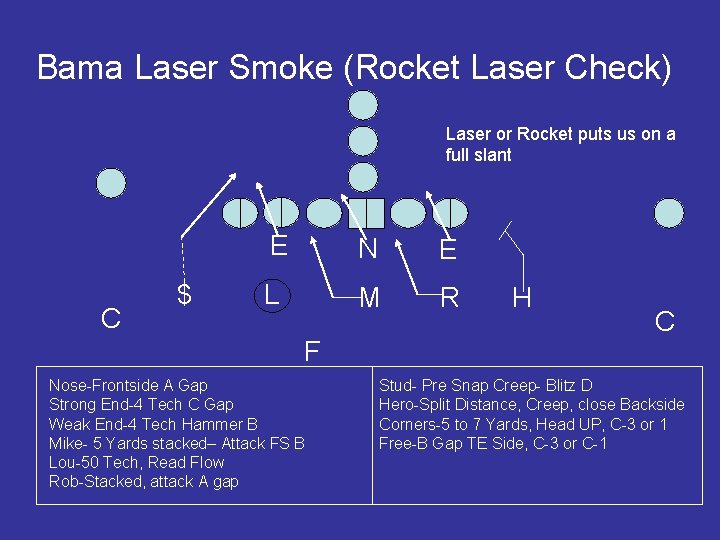
Bama Laser Smoke (Rocket Laser Check) Laser or Rocket puts us on a full slant C $ E N E L M R F Nose-Frontside A Gap Strong End-4 Tech C Gap Weak End-4 Tech Hammer B Mike- 5 Yards stacked– Attack FS B Lou-50 Tech, Read Flow Rob-Stacked, attack A gap H C Stud- Pre Snap Creep- Blitz D Hero-Split Distance, Creep, close Backside Corners-5 to 7 Yards, Head UP, C-3 or 1 Free-B Gap TE Side, C-3 or C-1

Dangers of Blitzing ØWhen you blitz, you expose weaknesses ØBe sure you prepare for worst case scenario ØMake sure you account for each gap ØDrill your kids on blitz reaction ØDrill your kids on which zones are voided and where we are weak.

Defending Personnel Groups • • Defending The Wing-T Defending 31 and 32 Personnel Defending 21 and 22 Personnel Defending the 1 back run game

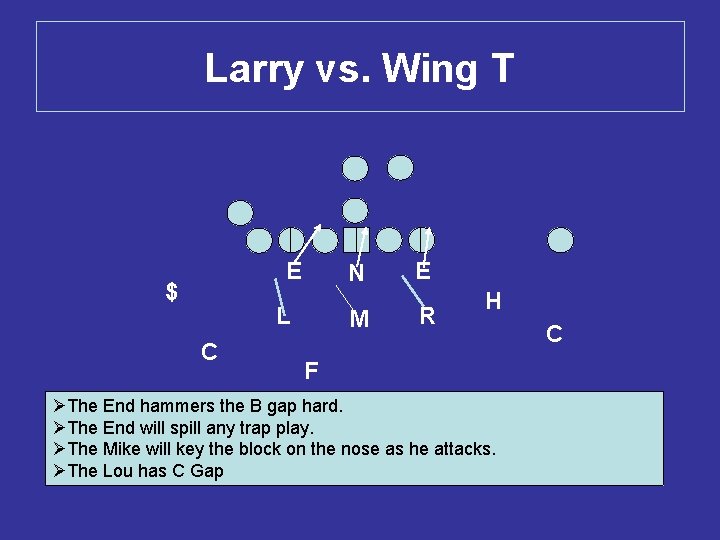
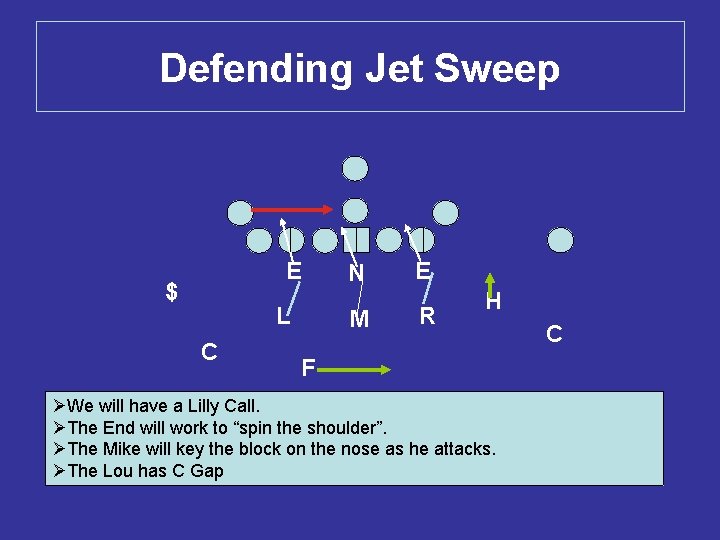
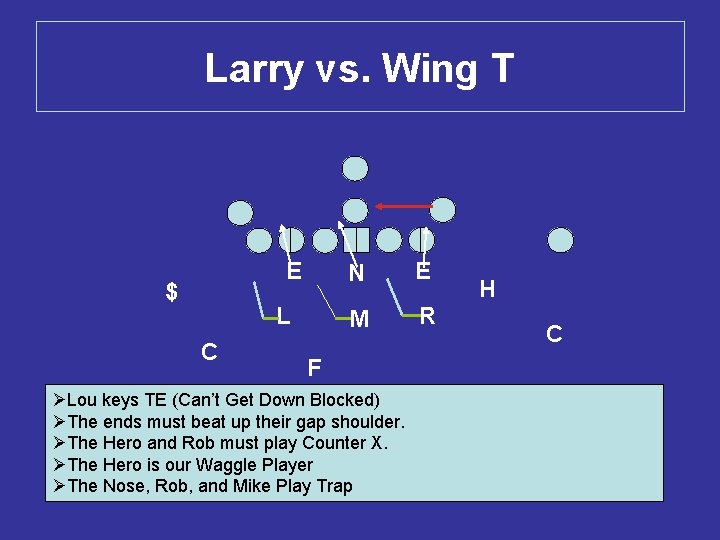
Larry/Lilly • Larry Alerts our defensive line they will go to the gap to their right. • Lilly alerts out defensive line they will go to the gap to their left. • Our linebackers our responsible for the gap opposite the defensive lineman. • You must practice this during your option and pursuit periods.

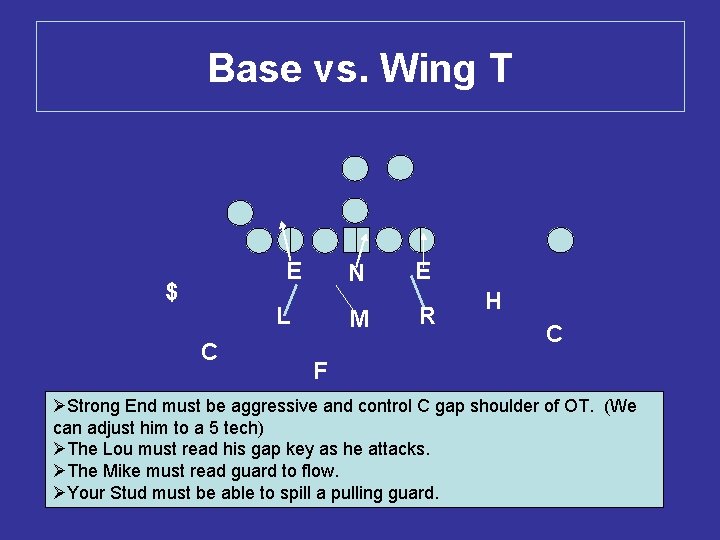
Defending The Wing-T • • • Create Chaos with aggressive linebacker play STOP THEIR BREAD AND BUTTER Keep your defensive integrity Keep your keys in-tact Be aggressive and attack with your front 6 Don’t get outflanked– Force player must keep outside arm free. • As a general rule we want 4 players from the tackle out to the wing side, and 3 players from the tackle out to the open side.

Base vs. Wing T E $ N L C M E R H C F ØStrong End must be aggressive and control C gap shoulder of OT. (We can adjust him to a 5 tech) ØThe Lou must read his gap key as he attacks. ØThe Mike must read guard to flow. ØYour Stud must be able to spill a pulling guard.

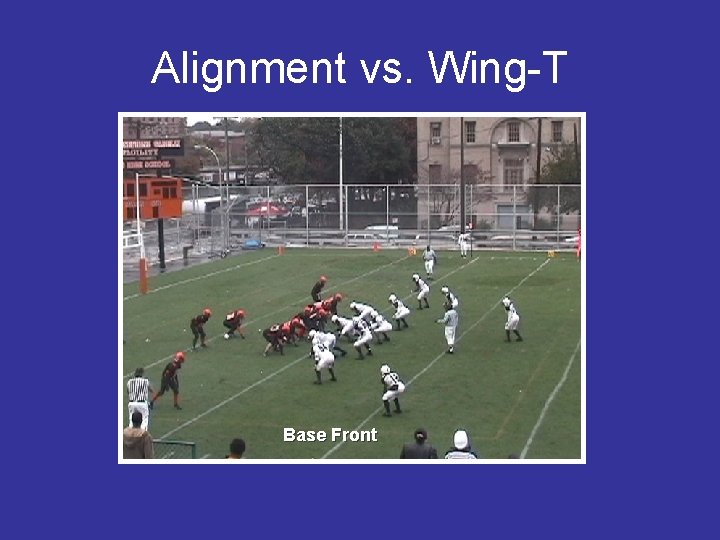
Alignment vs. Wing-T Base Front

Larry vs. Wing T E $ N L C M E R H F ØThe End hammers the B gap hard. ØThe End will spill any trap play. ØThe Mike will key the block on the nose as he attacks. ØThe Lou has C Gap C

Defending Jet Sweep E $ L C N M E R H F ØWe will have a Lilly Call. ØThe End will work to “spin the shoulder”. ØThe Mike will key the block on the nose as he attacks. ØThe Lou has C Gap C

Larry vs. Wing T E $ L C N E M R F ØLou keys TE (Can’t Get Down Blocked) ØThe ends must beat up their gap shoulder. ØThe Hero and Rob must play Counter X. ØThe Hero is our Waggle Player ØThe Nose, Rob, and Mike Play Trap H C

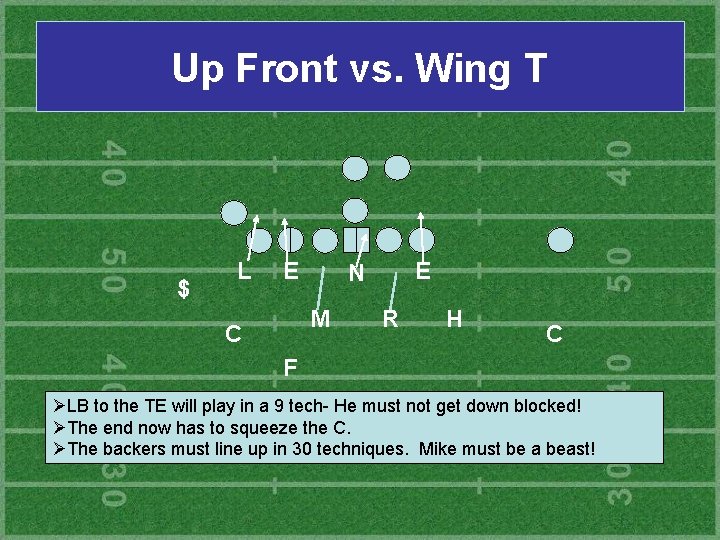
Up Front vs. Wing T $ L E M C E N R H C F ØLB to the TE will play in a 9 tech- He must not get down blocked! ØThe end now has to squeeze the C. ØThe backers must line up in 30 techniques. Mike must be a beast!

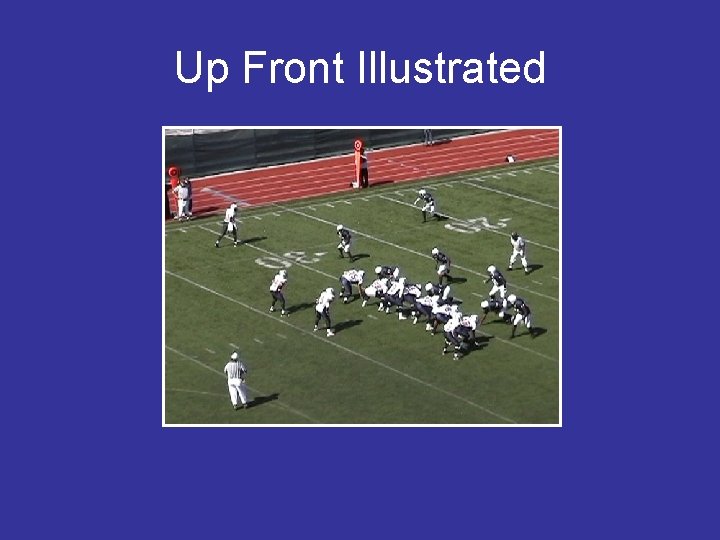
Up Front Illustrated

Defending 31 and 32 Personnel • Stop their best athlete! • Keep your backers at their proper depth. – Backers have a tendency to creep too close to the line versus 3 back sets. • Be aggressive with your force player, but don’t let him cross the LOS by more than 1 yard. • Your players must understand leverage • Your C gap players must control the C Gap. • We frequently adjusted our Dogs to 2 x 2 or 3 x 3 alignment

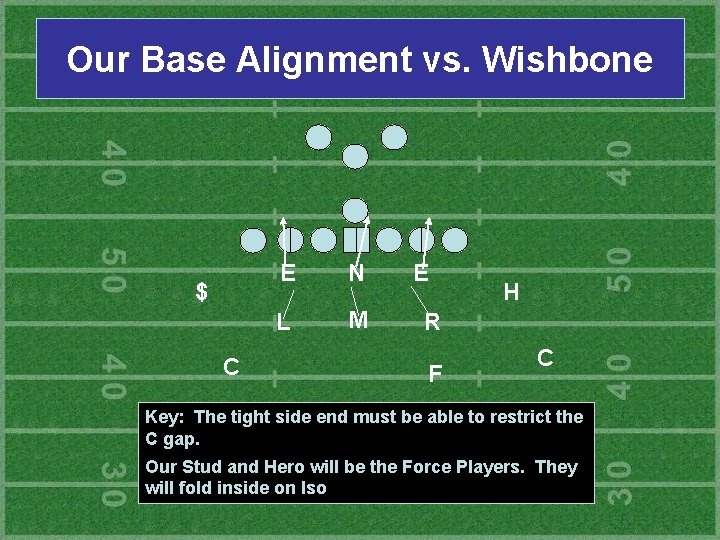
Our Base Alignment vs. Wishbone $ C E N L M E H R F C Key: The tight side end must be able to restrict the C gap. Our Stud and Hero will be the Force Players. They will fold inside on Iso

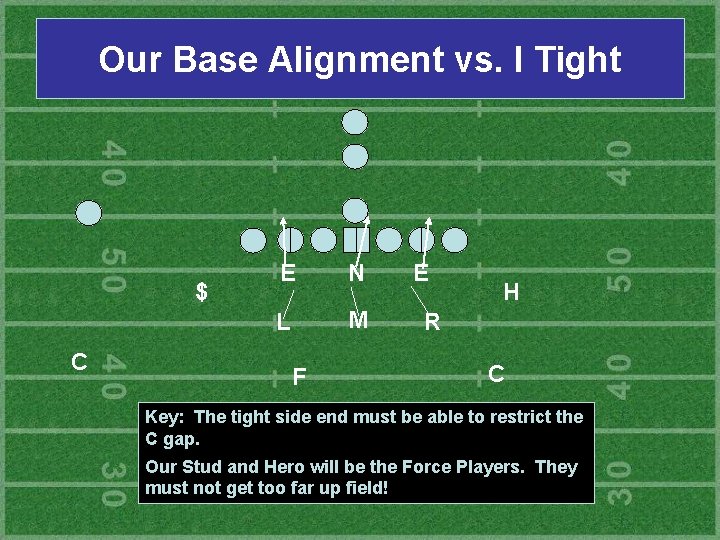
Our Base Alignment vs. I Tight $ C E N L M F E H R C Key: The tight side end must be able to restrict the C gap. Our Stud and Hero will be the Force Players. They must not get too far up field!

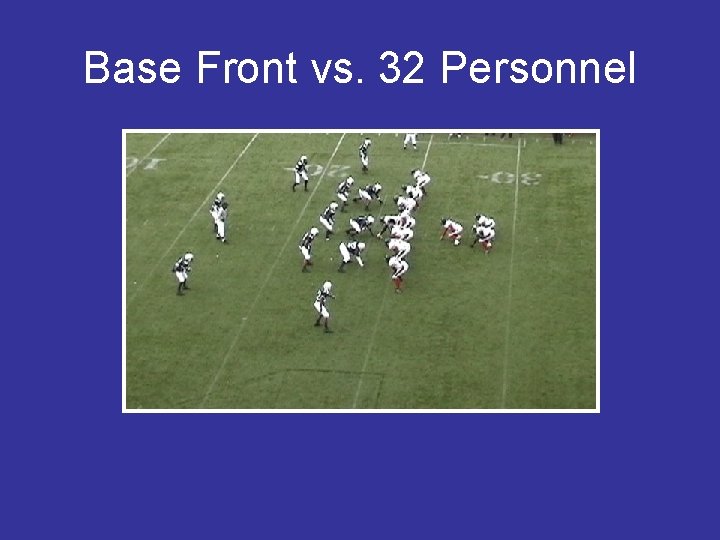
Base Front vs. 32 Personnel

Defending 21 Personnel Sets Ø 21 Personnel: 2 Backs 1 TE Ø We will line up in our base front. Ø By alignment we should be in great shape to the open side. Ø We will play cover 0, 1, 2, 3, and 4. Ø We will always have an I’m Here Player.

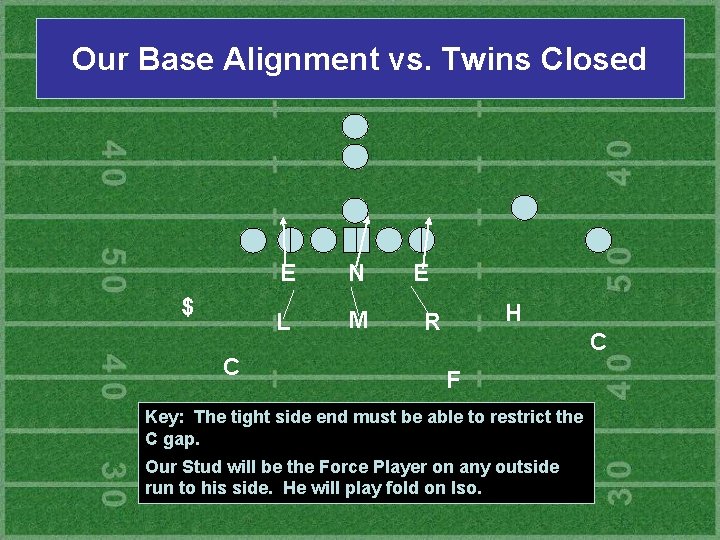
Our Base Alignment vs. Twins Closed $ C E N L M E H R C F Key: The tight side end must be able to restrict the C gap. Our Stud will be the Force Player on any outside run to his side. He will play fold on Iso.

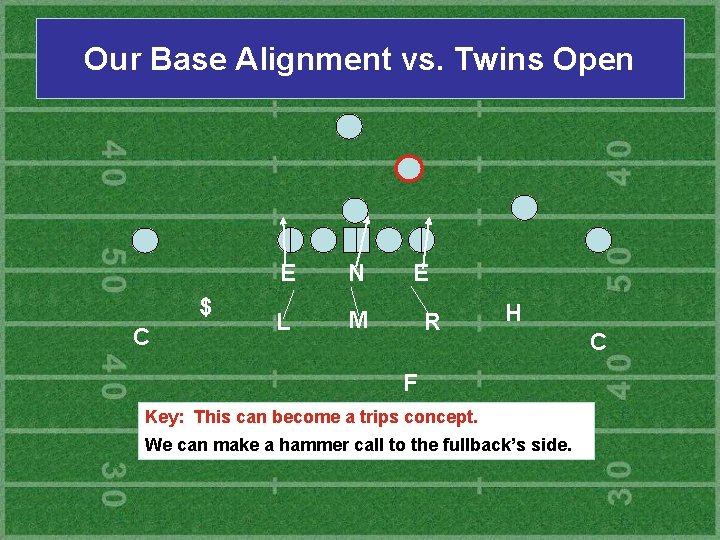
Our Base Alignment vs. Twins Open $ C E N L M E R H F Key: This can become a trips concept. We can make a hammer call to the fullback’s side. C

Hammer Call vs. Twins Open $ C E N L M E R H F Key: Our Rob must take on the lead block on OS Lead or Toss. C

jvint@iwc. edu