D C MACHINES Design of Field Poles Field


 Lmt - Length of mean")


")


 Leakage Coefficient (Cl ) 50 100 200")

 and")

 Actual copper loss = If")


 As their polarity is the")
 Another function of the interpoles is to neutralize the cross-magnetising effect")


")

Eddy")
- Slides: 55
D. C MACHINES Design of Field Poles & Field Coils Design of Commutator & Brushes Design of Interpoles
Magnetic circuit • The path of magnetic flux is called magnetic circuit • Magnetic circuit of dc machine comprises of yoke , poles, airgap, armature teeth and armature core • Flux produced by field coils emerges from N pole and cross the air gap to enter the armature teeth. Then it flows through armature core and again cross the air gap to enter the S pole. Yoke Armature Core Flux Path N S Pole Body S N Magnetic Circuit of 4 -Pole DC Machine ly hpl • The circuit close through the yoke of a machine. lc hpl
Magnetic circuit Bg – Max. flux density in the core Kg- Gap contraction factor lc – Length of magnetic path in the core l y – Length of magnetic path in the yoke ds - Depth of the slot dc - Depth of core hpl - Height of field pole Dm – Mean diameter of armature When the leakage flux is neglected magnetic circuit of a DC machine consists of following: i. Yoke ii. Pole and pole shoe iii. Air gap iv. Armature teeth and Armature core Let
Total MMF to be developed by each pole is given by the sum of MMF required for the above five sections. • MMF for air gap ATg=800000 Bg Kg lg • MMF for teeth ATt=att X ds • MMF for core ATc=atc X lc/2 • MMF for pole ATp = atp X hpl • MMF for yoke ATy= aty X ly/2 • att , atc , atp , aty - are determined B-H curves • • lc = πDm/P = π(D – 2 ds – dc)/P ly = πDmy/P = π(D+ 2 lg + 2 hpl +dy)/P Total AT per pole at no-load and normal voltage =ATg + ATt + ATc + ATp +ATy
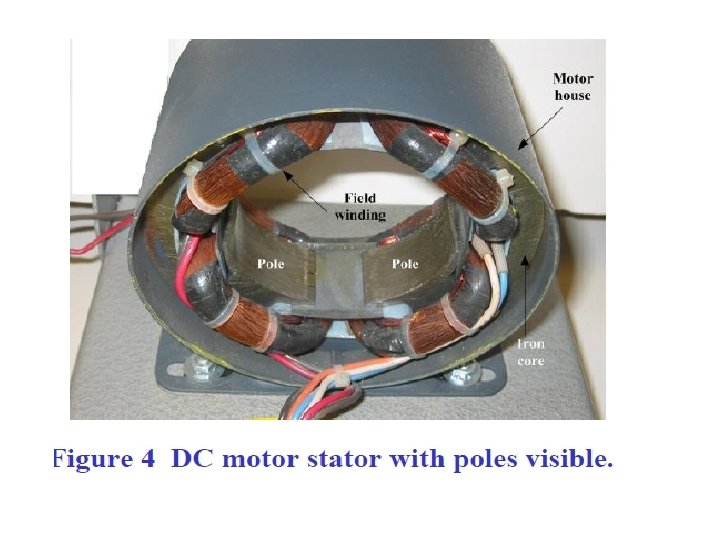
Design of field winding Ê Consists of poles, pole shoe and field winding. Ê Types: § Shunt field winding § Series field winding Ê Shunt field winding – have large no. of turns made of thin conductors , because current carried by them is very low. Ê Series field winding is designed to carry heavy current and so it is made of thick conductors/strips. Ê Field coils are formed, insulated and fixed over the field poles.
Design of shunt field winding Ê Involves the determination of the following information regarding the pole and shunt field winding § Dimensions of the main field pole , § Dimensions of the field coil , § Current in shunt field winding, § Resistance of coil, § Dimensions of field conductor, § Number of turns in the field coil , § Losses in field coil. Ê Dimensions of the main field pole § For rectangular field poles o Cross sectional area, length, width , height of the body § For cylindrical pole o Cross sectional area, diameter, height of the body
Design of field system Tentative design of field winding Let , ATfl -MMF developed by field winding at full load Qf - Copper loss in each field coil(W) qf normal temperature rise(W/m 2 ) Sf - Copper space factor ρ - Resistivity ( –m) hf - Height of winding(m) df - Depth of winding(m)
S - Cooling surface of field coil(m 2 ) Lmt - Length of mean turn of field winding(m) Rf - Resistance of each field coil (ohms) Tf - Number of turns in each field coil Af - Area of each conductor of field winding(m 2) If - Current in the field winding (A) δf - Current density in the field winding(A/mm 2 )
Typical values of various terms used in field design ØB p = ØATfl= Øqf = ØSf = Ødf = Øρ = Øδf = 1. 2 to 1. 7 Wb /m 2 (1. 1 to 1. 25) AT 700 W/m 2 0. 4 to 0. 75 30 to 55 mm 2 x 10 -8 Ω-m 1. 2 to 3. 5 A / m m 2
Important Points § In a DC machine, each field pole carries one field coil. (No of field coils is equal to the no. of poles) § The total amount of flux produced from the main pole is called Main flux or field flux. § The amount of flux that strays away (diverts) from the usual path is called leakage flux or loss flux. § The amount of flux that links with armature conductors to induced emf – Useful flux or utilised flux.
Design of field system Cooling surface of the field winding, S=2 Lmthf -- (1) Permissible copper loss in each field coil, Sqf=2 Lmthfqf -- (2) Area of X-section of field coil=hfdf -- (3) Area of copper in each section=Sfhfdf -- (4) i. e, T f a f =S f h f d f -- (5) Copper loss in each field coil, Qf=If 2 Rf=If 2 (Tf Lmt)/af i. e. , Copper loss f 2 (Square of the current density)
Design of field system To have temperature rise within the limit, the copper loss should be equal to the permissible loss. Using Eqns. (2) & (6), 2 Lmt hf qf = f 2 Lmt (Sfhf df ) => MMF per metre height of field winding
Design of field system Ê Normal values: Ê Permissible loss, qf -700 W/m 2 Ê Copper Space factor, Sf : Ê Small wires: 0. 4 Ê Large round wires: 0. 65 Ê Large rectangular conductors: 0. 75 Ê Depth of the field winding, df : Armature Dia (m) Winding Depth (mm) 0. 2 30 0. 35 35 0. 5 40 0. 65 45 1. 00 50 1. 00 and above 55
Design of field system Height of field, Total height of the pole, hpl=hf+hs+ height for insulation and curvature of yoke where, hs - Height of the pole shoe (≈0. 1 to 0. 2 of the pole height)
Design of shunt field winding Ê Area of the pole body can be estimated from the knowledge of flux per pole , leakage coefficient and flux density in the pole. Ê Leakage coefficient (Cl) depends on power output of the DC machine. Ê Bp in the pole 1. 2 to 1. 7 wb/m 2 Ê Ф p = C l. Ф Ê Ap = Фp/Bp Ê When circular poles are employed, cross section area will be a circle Ê Ap = πdp 2 /4
Design of shunt field winding Ê When rectangular poles employed, length of pole is chosen as 10 to 15 mm less than the length of armature ÊLp=L –(0. 001 to 0. 015) ÊNet iron length Lpi = 0. 9 Lp ÊWidth of pole, bp = Ap/Lpi Ê Height of pole body hp = hf + thickness of insulation and clearance Ê Total height of the pole hpl = hp + hs
Design of shunt field winding Ê Field coils are former wound and placed on the poles. Ê They may be of rectangular or circular cross section depends on the type of poles. Ê Dimensions – Lmt, depth, height, diameter. Ê Depth(df) – depends on armature. Ê Height (hf) - depends on surface required for cooling the coil and no. of turns(Tf). Ê hf, Tf – cannot be independently designed.
Design of shunt field winding Ê Lmt - Calculated using the dimensions of pole and depth of the coil Ê For rectangular coils ÊLmt =2(Lp + bp + 2 df) or (Lo +Li)/2 ÊWhere Lo – length of outer most turn & Li – length of inner most turn Ê For cylindrical coils ÊLmt = π(dp +df) Ê No. of turns in field coil: When the ampere turns to be developed by the field coil is known, the turns can be estimated Ê Field ampere turns on load, ATfl= If. Tf Ê Turns in field coil, Tf = ATfl/If
Design of shunt field winding Power Loss in the field coil: • Power loss in the field coil is copper loss, depends on Resistance and current • Heat is developed in the field coil due to this loss and it is dissipated through the surface of the coil • In field coil design , loss dissipated per unit surface area is specified and from which the required surface area can be estimated. • Surface area of field coil – depends on Lmt, depth and height of the coil.
Design of shunt field winding • Lmt – estimated from dimensions of pole • Depth – assumed (depends on diameter of armature) • Height – estimated in order to provide required surface area Heat can be dissipated from all the four sides of a coil. i. e, inner , outer, top and bottom surface of the coil üInner surface area= Lmt (hf – df) üOuter surface area = Lmt (hf + df) üTop and bottom surface area = Lmt df Total surface area of field coil, S= Lmt (hf – df)+ = Lmt (hf + df)+ Lmt df S= 2 Lmt hf +Lmt df = 2 Lmt (hf +df) Permissible copper loss, Qf=S. qf [qf -Loss dissipated/ unit area]
Design of shunt field winding Substitute S in Qf , Qf = 2 Lmt (hf +df). qf Actual Cu loss in field coil=If 2 Rf=Ef 2/Rf Substituting Rf=( Lmt Tf)/ af , Actual Cu loss in field coil=Ef 2. af /( Lmt Tf)
Procedure for shunt field design Step 1 : determine the dimensions of the pole. Assume a suitable value of leakage coefficient and B = 1. 2 to 1. 7 T Ф p= C l. Ф Ap = Фp/Bp When circular poles are employed, cross section area will be a circle Ap = πdp 2 /4 : dp =Ѵ(4 Ap/π) When rectangular poles employed, length of pole is chosen as 10 to 15 mm less than the length of armature Lp=L –(0. 001 to 0. 015) Net iron length Lpi = 0. 9 Lp Width of pole = Ap/Lpi
Step 1: Leakage Coefficient Output (k. W) Leakage Coefficient (Cl ) 50 100 200 500 1000 1. 12 to 1. 25 1. 11 to 1. 22 1. 10 to 1. 20 1. 09 to 1. 18 1. 08 to 1. 16
Procedure for shunt field design. Winding Armature Step 2 : Determine Lmt of field coil Assume suitable depth of field winding For rectangular coils Lmt =2(Lp + bp + 2 df) or (Lo +Li)/2 For cylindrical coils Lmt = π(dp +df) Dia (m) Depth (mm) 0. 2 30 0. 35 35 0. 5 40 0. 65 45 1. 00 50 1. 00 coil and Step 3: Calculate the voltage across each shunt field above Ef = (0. 8 to 0. 85) V/P Step 4 : Calculate cross section area of field conductor af = ρLmt ATfl/Ef Step 5: Calculate diameter of field conductor dfc =Ѵ(4 af/π) Diameter including thickness dfci = dfc + insulation thickness Copper space factor Sf = 0. 75(dfc/dfci)2 55
Procedure for shunt field design Step 6 : Determine no. of turns (Tf) and height of coil (hf) They can be determined by solving the following two equations 2 Lmtqf (hf + df) = Ef 2 af/ρLmt Tf Tf. af = Sf. hf. df Step 7 : Calculate Rf and If : Rf = Tf. ρLmt /af If = Ef/Rf Step 8 : Check for δf δf = If / af δf – not to exceed 3. 5 A/mm 2. If it exceeds then increase af by 5% and then proceed again
Procedure for shunt field design Step 9 : Check for desired value of AT ATactual= If. Tf ATdesired- 1. 1 to 1. 25 times armature MMF at full load When ATactual less than the desired value then increase the depth of field winding by 5% and proceed again.
Step 10: Check for temp rise: (Class of Insulation) Actual copper loss = If 2 Rf Surface area = S = 2 Lmt (hf + df) Cooling coefficient C = (0. 14 to 0. 16)/(1 + 0. 1 Va) m = Actual copper loss X (C/S) If temperature rise exceeds the limit , then increase the depth of field winding by 5% and proceed again.
Design of Series Field Winding • In compound machines, each pole carries a shunt field coil and a series field coil. (appro. 80% of the height – shunt field coil and 20 % by series field coil) • Design of shunt field coil for compound machine is same – Already discussed. • The series field coil is provided to compensate for the reduction in field mmf due to armature reaction. • The ampere turns to be developed by the series field will be 15 to 25% of full load armature ampere turns.
• In case of series machines, each pole carries a series field coil and all the field coils are connected in series to form series field winding. • The ampere turns to be developed by the series field will be 1. 15 to 1. 25 times the full load armature ampere turns.
Design of Series Field Winding Step 1: Estimate the AT to be developed by series field coil, AT /pole = (Iz. (Z/2))/P For compound m/c, ATse = (0. 15 to. 25) (Iz. Z)/2 P For series m/c, ATse = (1. 15 to 1. 25) (Iz. Z)/2 P Step 2: Calculate the no. of turns in the series field coil, Tse = ATse/Ise (Corrected to an integer) (Ia = Ise ---Full load) Step 3: Determine cross sectional area of series field conductor, ase = Ise /δse Normally, δse - 2 to 2. 3 A /mm 2
Design of Series Field Winding Step 4 : Estimate the dimension of the field coil Conductor area of field coil = Tse. ase Also Conductor area of field coil = Sfse. hse. dse When circular conductors are used Sfse = 0. 6 to 0. 7 For rectangular conductors, Sfse – depends on thickness and type of insulation On equating above two expressions, Tse. ase = Sfse. hse. dse hse= (Tse. ase )/(Sfse. dse) In case of compound machine, the total height of pole required to accommodate field winding will be sum of the height of shunt field coil and series field coil.
• Step 5: Estimate the resistance of series field coil. • Resistance of series field coil = ρLmtse Tse ase • where Lmtse = Length of mean turn of series field coil • The length of mean turn of series field coil can be estimated from the dimensions of the pole. • Length of mean turn of series field coil = Lmtse = 2 (Lp +bp + 2 dse)
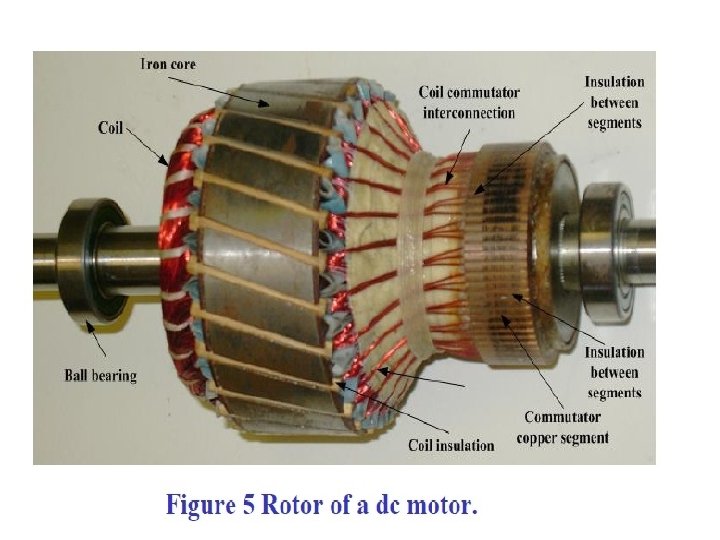
Design of commutator and brushes Commutator and brush arrangement are used to convert the bidirectional current to unidirectional current Brushes are located at the magnetic neutral axis (mid way between two adjacent poles) • When a armature conductor pass through the magnetic neutral axis, the current in the conductor reverse from the direction to the other. Since the brushes are mounted on magnetic neutral axis, the coil undergoing current reversal is short circuited by carbon brush.
During this short circuit period, the current must be reduced from its original value to zero and then built up to an equal value in the opposite direction. This process is called commutation and the time during which the current reversal takes place is called the time of commutation. The phenomenon of commutation is affected by resistance of the brush , reactance emf induced by leakage flux, emf induced by armature flux.
Design of Commutator and brushes Classification of commutation process 1. 2. 3. 4. Resistance commutation Retarded commutation Accelerated commutation Sinusoidal commutation When the reactance and rotational emfs are eliminated by the compoles, the commutation is assisted only by the resistance of the brush - Resistance commutation. By employing high resistance carbon brushes, a straight line or linear resistance commutation can be achieved.
• When the brushes are placed at geometrical neutral axis, a reactance voltage and rotational emf are induced in the coil under going commutation. This is due to the shift in magnetic neutral axis during load conditions. These voltages delays the process of current reversal and this type of commutation is called delayed commutation. – In this case the commutation is completed before the current can reach its final value and so the current has to jump through the air in the form of a spark at the trailing edge of brush. • When the brushes are slightly shifted from magnetic neutral axis in the direction of rotation, the emf induced in the coil undergoing commutation will accelerate the process of current reversal. This type of commutation is called accelerated commutation. This type of commutation may give rise to burning of brushes at the leading edge.
When the process of current reversal is delayed at the leading edge and accelerated at the trailing edge, the commutation is called sinusoidal commutation. Commutator is of cylindrical in shape and placed at one end of the armature Consists of number of copper bars or segments separated from one another by a suitable insulating material of thickness of 0. 5 to 1 mm Number of commutator segments = no. of coils in the armature Materials used : Commutator segments: Hard Drawn Copper or Aluminum Copper Insulation : Mica, Resin Bonded Asbestos Brushes : Natural Graphite, Hard Carbon , Electro Graphite, Metal Graphite
Design of Commutator and brushes Design formulae 1. No. of commutator segments, C = ½ u. Sa where, u – coils sides/slot (always even no) Sa – no. of armature slots 2. Minimum no. of segments = Ep/15 3. Commutator segment pitch = βc = πDc/C where, Commutator Diameter Dc – 60% to 80% of diameter of armature βc ≥ 4 mm • The commutator diameter is also chosen such that the commutator peripheral speed is limited to 15 m/s to 30 m/s. • Thickness of brush is selected such that it covers 1 to 3 commutator segments. 4. Current carried by each brush Ib= 2 Ia/P for lap winding Ib= Ia for wave winding 5. Total brush contact area/spindle Ab= Ib/δb 6. Number of brush locations are decided by the type of winding Lap winding: No of brush location = no. of poles Wave winding : No of brush location =2
Design of Commutator and brushes 7. Area of each individual brush should be chosen such that , it does not carry more than 70 A Let , ab – Contact area of each brush nb – Number of brushes / spindle Contact area of brushes in a spindle, Ab = nb. ab also ab = wb. tb Ab = nb. wb. tb Usually, tb = (1 to 3) βc wb = Ab/ (nb. tb) = ab/tb 8. Lc – depends on space required for mounting the brushes and to dissipate the heat generated by commutator losses Lc = nb(wb + Cb) + C 1 + C 2 where, Cb - Clearance between brushes (5 mm) C 1 - Clearance allowed for staggering of brushes (10 mm, 30 mm) C 2 – Clearance for allowing end play (10 to 25 mm)
Design of Commutator and brushes 9. Losses : Brush contact losses: depends on material, condition, quality of commutation Brush friction losses Brush friction loss Pbf = μ pb AB. Vc μ – Coefficient of friction pb-Brush contact pressure on commutator (N/m 2) AB - Total contact area of all brushes (m 2) AB =P Ab (for lap winding) = 2 Ab (for wave winding) Vc – Peripheral speed of commutator (m/s)
Design of Inter poles • Inter poles are used for reduced the effect of ‘ARMATURE REACTION’
§ Armature Reaction - Armature Reaction is the effect of “Armature field” on the “Main Field”. -Armature field is the field which is produced by the armature conductors due to current flowing through them. - Main field is the field which is produced by the poles which is necessary for the operation.
Direction of rotation S N Main Field Armature Field Current going inside Current coming outside
§ Effects Of Armature Reaction o Magnetic flux density increases over one half of the core and decreases over the other half. o The flux wave is distorted and there is a shift in the position of M. N. A. o It causes the commutation problem.
§ Inter-poles: o As the compensating windings are too costly, inter-poles are used to neutralize the Crossmagnetizing effect of armature reaction. o These are small poles fixed to the yoke and spaced in between the main poles.
§ The two function of interpoles : • (i) As their polarity is the same as that of the main pole ahead, they induce an emf in the coil (under commutation) which helps the reversal of current. • The emf induced by the interpoles is known as commutating or reversing emf. • The commutating emf neutralizes the reactance emf thereby making commutation sparkless. With interpoles, sparkles commutation can be obtained up to 20 to 30% overload with fixed brush position. In fact, interpoles raise sparking limit of a machine to almost the same value as heating limit. • Hence, for a given output, an interpole machine can be made smaller and, therefore, cheaper than a non-interpolar machine. • As interpoles carry armature current, their commutating emf is proportional to the armature current. This ensures automatic neutralization of reactance voltage which is also due to armature current.
• (ii) Another function of the interpoles is to neutralize the cross-magnetising effect of armature reaction. Hence, brushes are not to be shifted from the original position. • OF as, represents the mmf due to main poles. OA represents the crossmagnetising mmf due to armature. BC which represents mmf due to interpoles, is obviously in opposition to OA, hence they cancel each other out. • This cancellation of crossmagnetisation is automatic and for all loads because both are produced by the same armature current.
N N S D. C. Generator S S S N N Main Pole Inter-Pole
S N N S D. C. Motor S Main Pole N N S Inter-Pole
S Field by inter poles S N Field by inter poles Main Field N Main Field Armature Field
Design of Interpoles: Small poles placed between main poles Materials Used: Cast steel (or) Punched from sheet steel without pole shoes Purposes: To neutralize cross magnetizing armature MMF To produce flux density required to generate rotational voltage in the coil undergoing commutation to cancel the reactance voltage. Since both effects related to armature current, interpole winding should be connected in series with armature winding Average reactance voltage of coil by Pitchelmayer’s Equation is, Erav = 2 Tc ac Va. L. λ Inductance of a coil in armature =2 Tc 2. L. λ
Design of Interpoles • • • Normally, Length of interpole = length of main pole Flux density under interpole, Bgi = ac. λ. (L/Lip) where, Lip- length of interpole In general, Bgi = 2 Iz. Zs. (L/Lip). (1/Va. Tc). λ • • • MMF required to establish Bgi = 800000 Bgi. Kgi. lgi
Design of Interpoles Losses and efficiency : 1. 2. 3. Iron Loss - i)Eddy current loss ii) Hysteresis loss Rotational losses - Windage and friction losses Variable or copper loss Condition for maximum efficiency : Constant Loss= Variable Loss