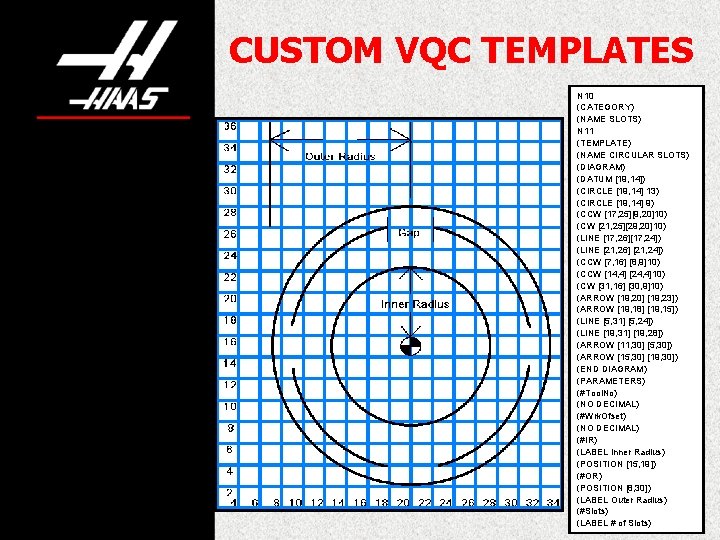
CUSTOM VQC TEMPLATES N 10 CATEGORY NAME SLOTS



- Slides: 75


CUSTOM VQC TEMPLATES N 10 (CATEGORY) (NAME SLOTS) N 11 (TEMPLATE) (NAME CIRCULAR SLOTS) (DIAGRAM) (DATUM [19, 14]) (CIRCLE [19, 14] 13) (CIRCLE [19, 14] 9) (CCW [17, 25][9, 20]10) (CW [21, 25][29, 20]10) (LINE [17, 26][17, 24]) (LINE [21, 26] [21, 24]) (CCW [7, 16] [8, 9]10) (CCW [14, 4] [24, 4]10) (CW [31, 16] [30, 9]10) (ARROW [19, 20] [19, 23]) (ARROW [19, 18] [19, 15]) (LINE [5, 31] [5, 24]) (LINE [19, 31] [19, 28]) (ARROW [11, 30] [5, 30]) (ARROW [15, 30] [19, 30]) (END DIAGRAM) (PARAMETERS) (#Tool. No) (NO DECIMAL) (#Wrk. Ofset) (NO DECIMAL) (#IR) (LABEL Inner Radius) (POSITION [15, 19]) (#OR) (POSITION [8, 30]) (LABEL Outer Radius) (#Slots) (LABEL # of Slots)

SLIDE LEGEND PRESS ACTIONS KEYS THREE TIMES TO GET TO THIS PAGE INSTRUCTIONS (Continued on next slide) INFORMATION Note: OTHER INFORMATION

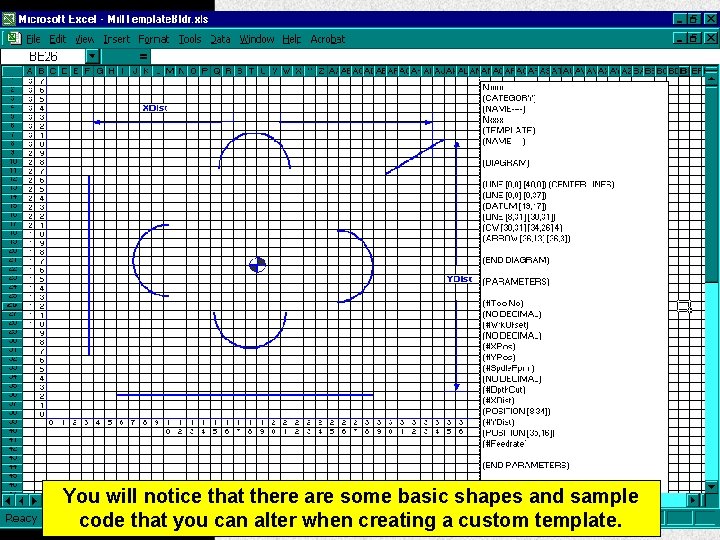
This presentation will show you how to create a completely new VQC Template. You should review the VQC Templates presentation prior to this one to get a basic understanding of customizing templates. This presentation will use an aid called the “Template Builder”. It is simply a spreadsheet with some grids and code samples to make it a little easier to see how templates are created.

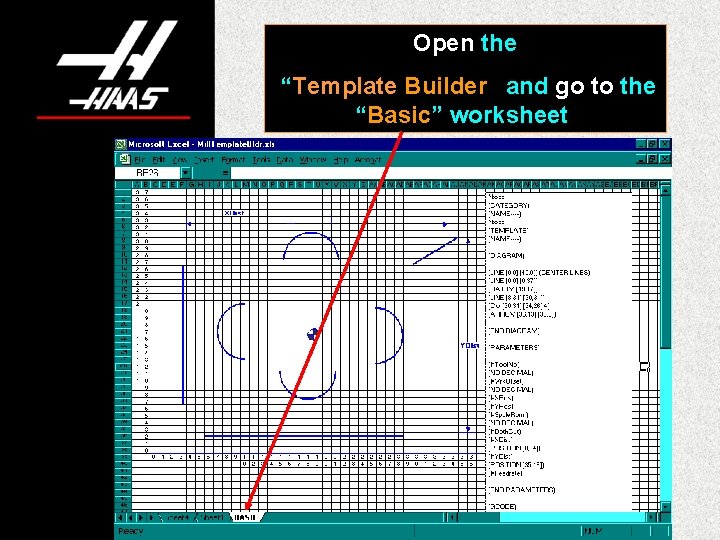
Open the “Template Builder” and go to the “Basic” worksheet.

You will notice that there are some basic shapes and sample code that you can alter when creating a custom template.

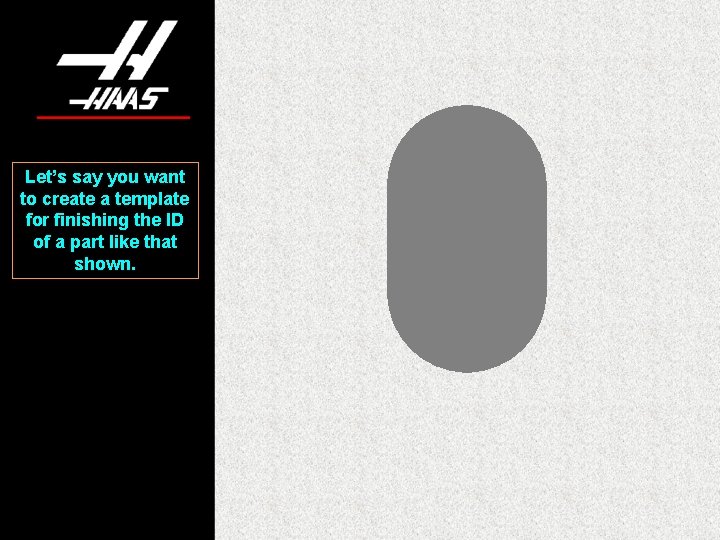
Let’s say you want to create a template for finishing the ID of a part like that shown.

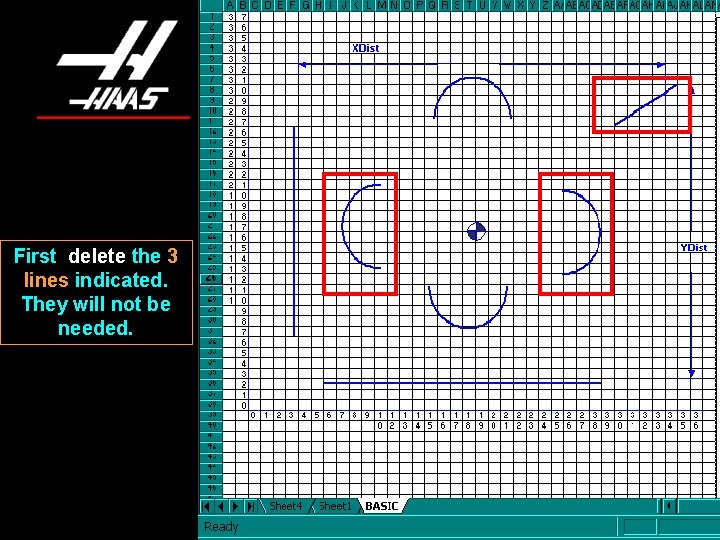
First delete the 3 lines indicated. They will not be needed.

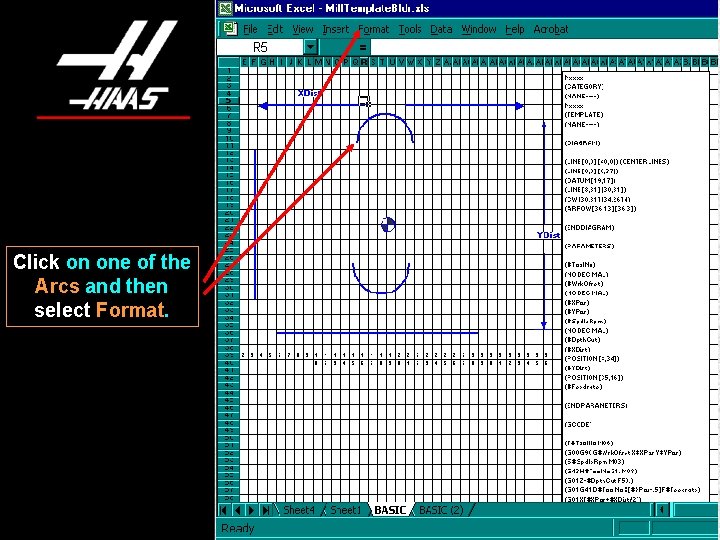
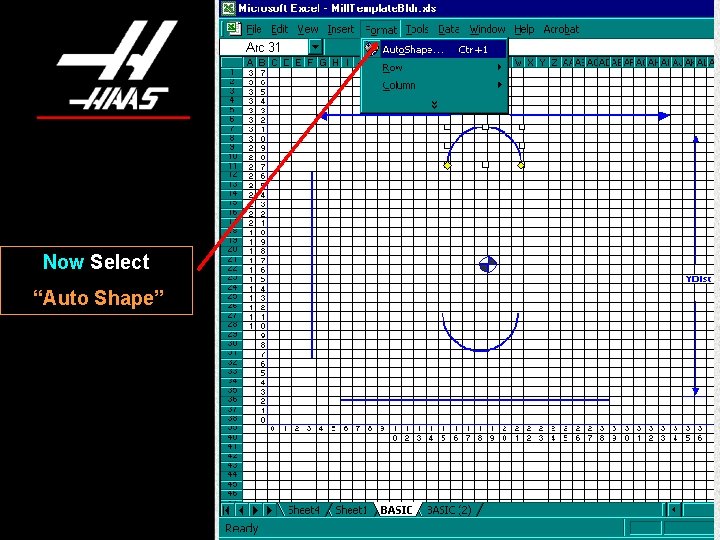
Click on one of the Arcs and then select Format.

Now Select “Auto Shape”

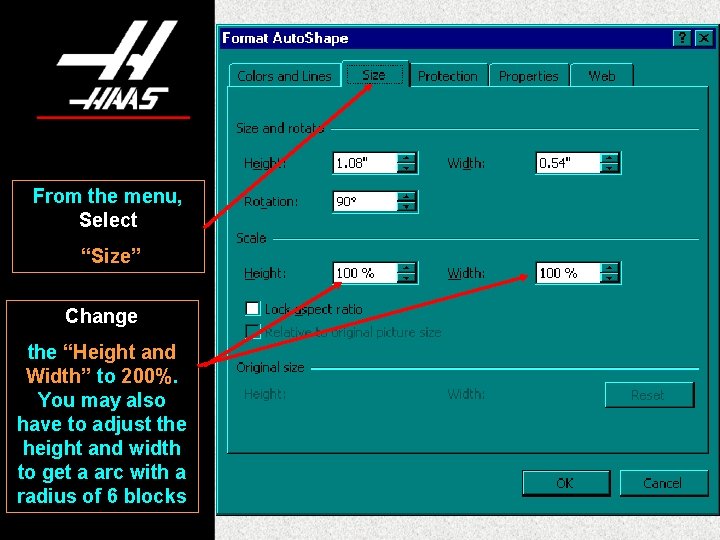
From the menu, Select “Size” Change the “Height and Width” to 200%. You may also have to adjust the height and width to get a arc with a radius of 6 blocks

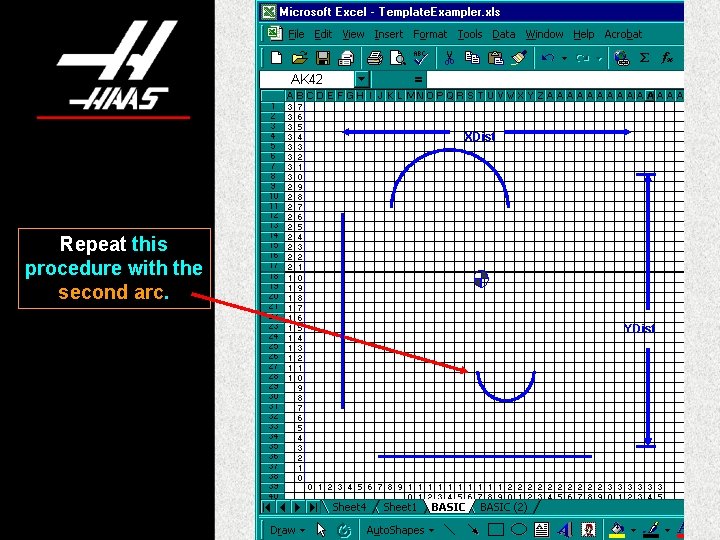
XDist Repeat this procedure with the second arc. YDist

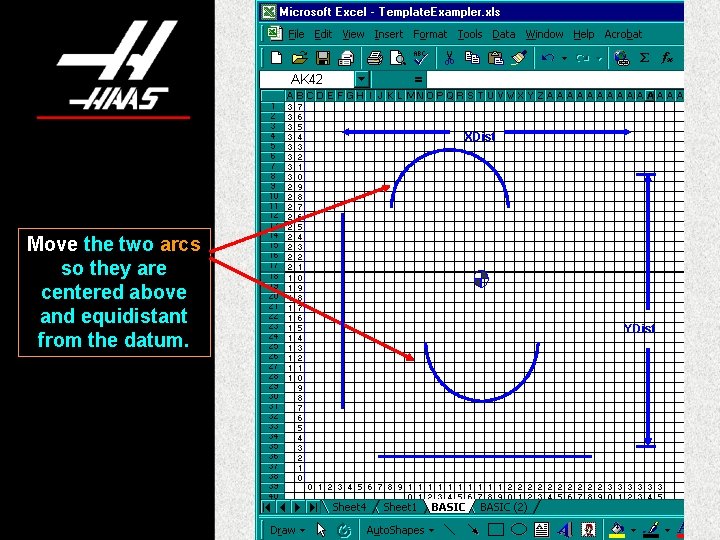
XDist Move the two arcs so they are centered above and equidistant from the datum. YDist

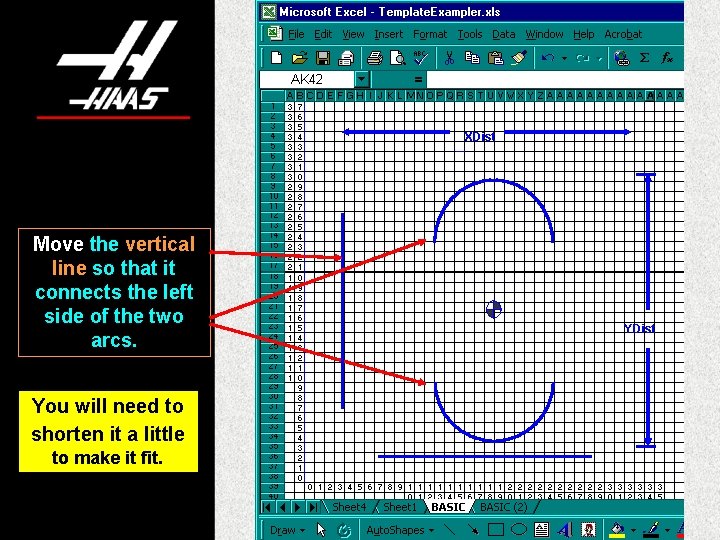
XDist Move the vertical line so that it connects the left side of the two arcs. You will need to shorten it a little to make it fit. YDist

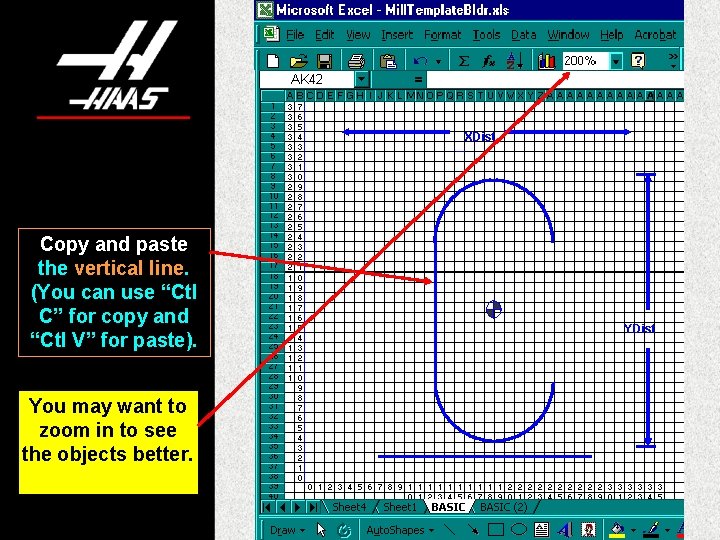
XDist Copy and paste the vertical line. (You can use “Ctl C” for copy and “Ctl V” for paste). You may want to zoom in to see the objects better. YDist

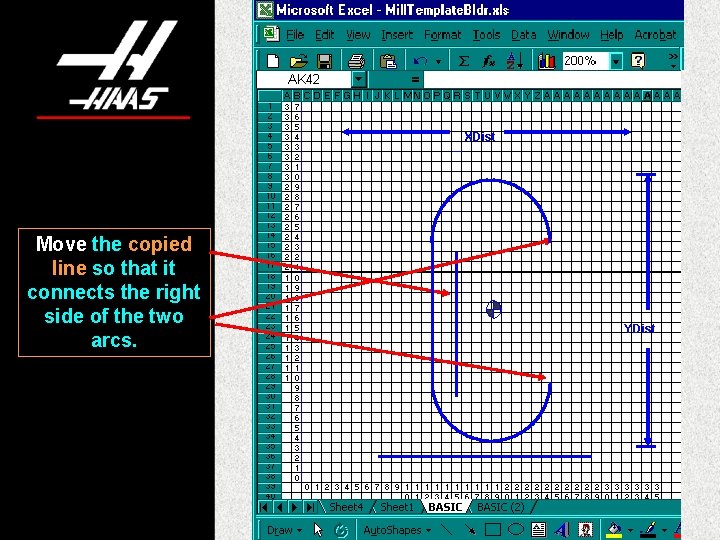
XDist Move the copied line so that it connects the right side of the two arcs. YDist

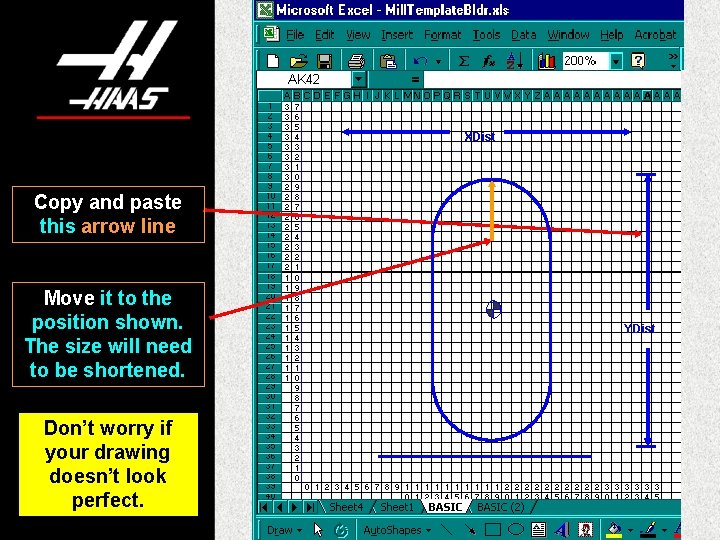
XDist Copy and paste this arrow line Move it to the position shown. The size will need to be shortened. Don’t worry if your drawing doesn’t look perfect. YDist

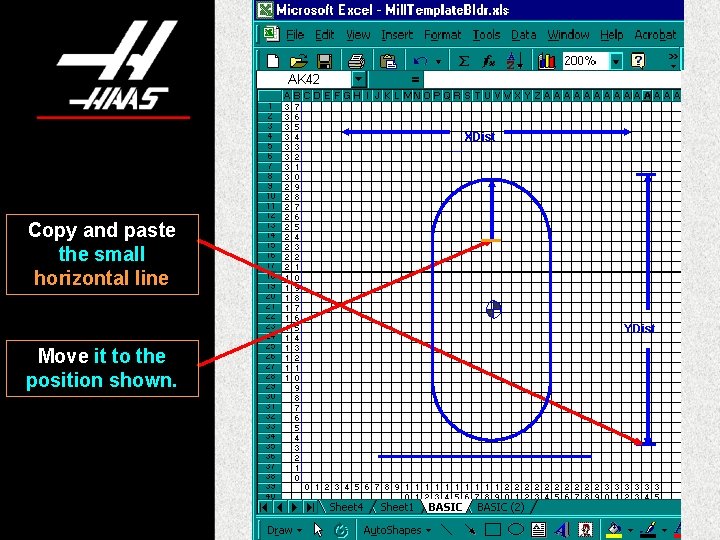
XDist Copy and paste the small horizontal line YDist Move it to the position shown.

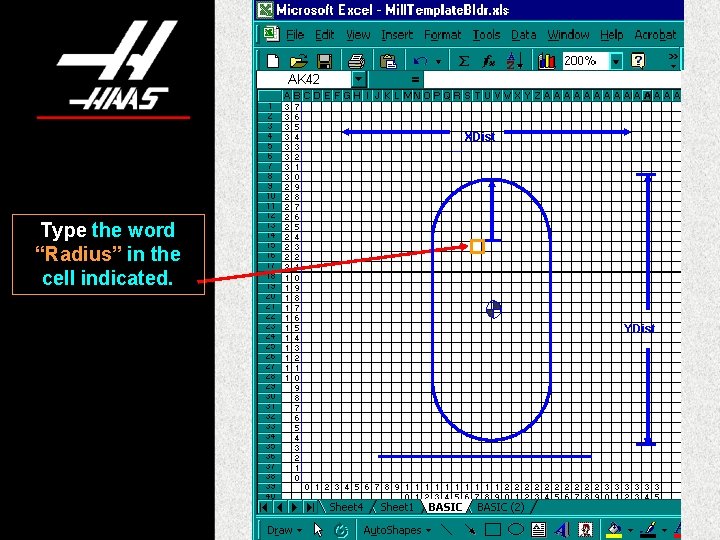
XDist Type the word “Radius” in the cell indicated. YDist

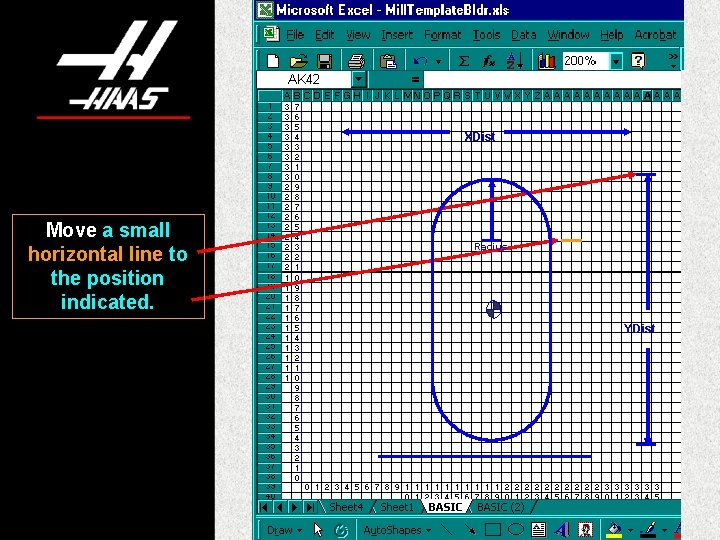
XDist Move a small horizontal line to the position indicated. Radius YDist

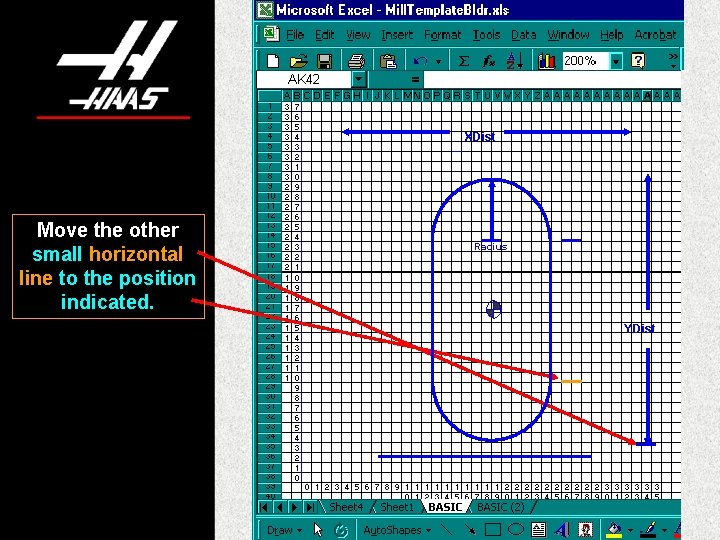
XDist Move the other small horizontal line to the position indicated. Radius YDist

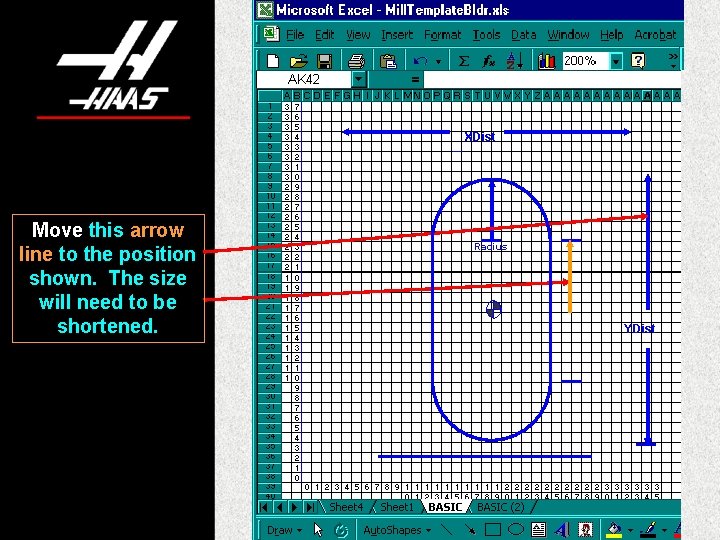
XDist Move this arrow line to the position shown. The size will need to be shortened. Radius YDist

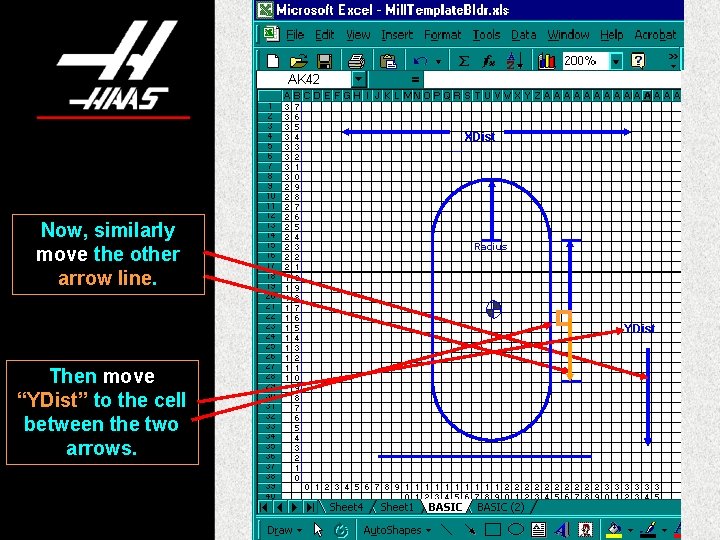
XDist Now, similarly move the other arrow line. Radius YDist Then move “YDist” to the cell between the two arrows.

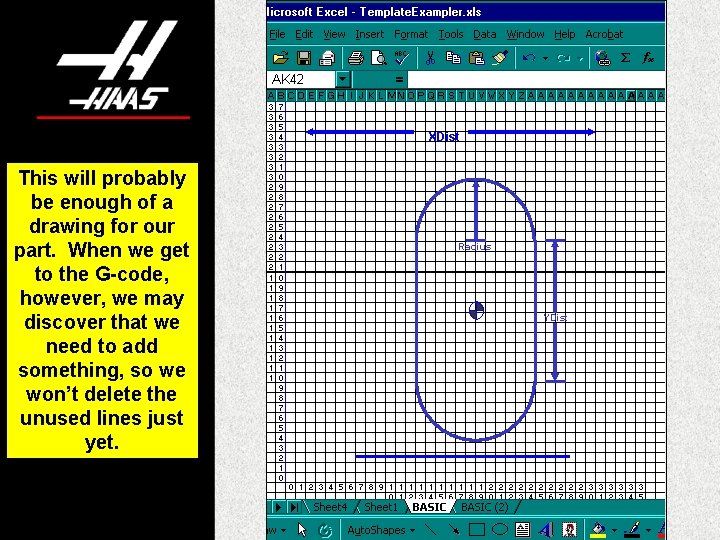
XDist This will probably be enough of a drawing for our part. When we get to the G-code, however, we may discover that we need to add something, so we won’t delete the unused lines just yet. Radius YDist

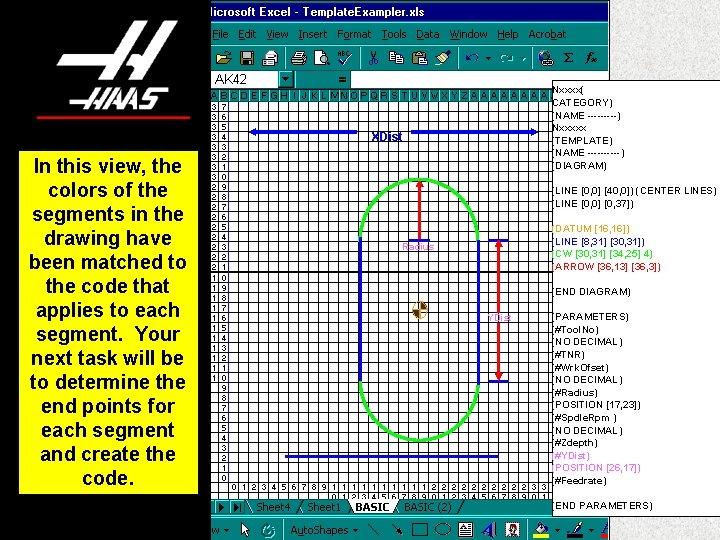
Nxxxx( CATEGORY) (NAME -----) Nxxxxx (TEMPLATE) (NAME -----) (DIAGRAM) XDist In this view, the colors of the segments in the drawing have been matched to the code that applies to each segment. Your next task will be to determine the end points for each segment and create the code. (LINE [0, 0] [40, 0]) (CENTER LINES) (LINE [0, 0] [0, 37]) (DATUM [16, 16]) (LINE [8, 31] [30, 31]) (CW [30, 31] [34, 25] 4) (ARROW [36, 13] [36, 3]) Radius (END DIAGRAM) YDist (PARAMETERS) (#Tool. No) (NO DECIMAL) (#TNR) (#Wrk. Ofset) (NO DECIMAL) (#Radius) (POSITION [17, 23]) (#Spdle. Rpm ) (NO DECIMAL) (#Zdepth) (#YDist) (POSITION [26, 17]) (#Feedrate) (END PARAMETERS)

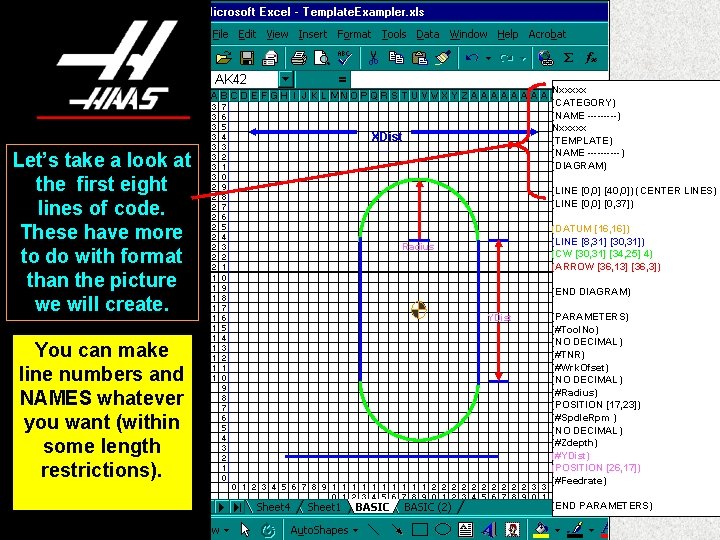
Nxxxxx (CATEGORY) (NAME -----) Nxxxxx (TEMPLATE) (NAME -----) (DIAGRAM) XDist Let’s take a look at the first eight lines of code. These have more to do with format than the picture we will create. You can make line numbers and NAMES whatever you want (within some length restrictions). (LINE [0, 0] [40, 0]) (CENTER LINES) (LINE [0, 0] [0, 37]) (DATUM [16, 16]) (LINE [8, 31] [30, 31]) (CW [30, 31] [34, 25] 4) (ARROW [36, 13] [36, 3]) Radius (END DIAGRAM) YDist (PARAMETERS) (#Tool. No) (NO DECIMAL) (#TNR) (#Wrk. Ofset) (NO DECIMAL) (#Radius) (POSITION [17, 23]) (#Spdle. Rpm ) (NO DECIMAL) (#Zdepth) (#YDist) (POSITION [26, 17]) (#Feedrate) (END PARAMETERS)

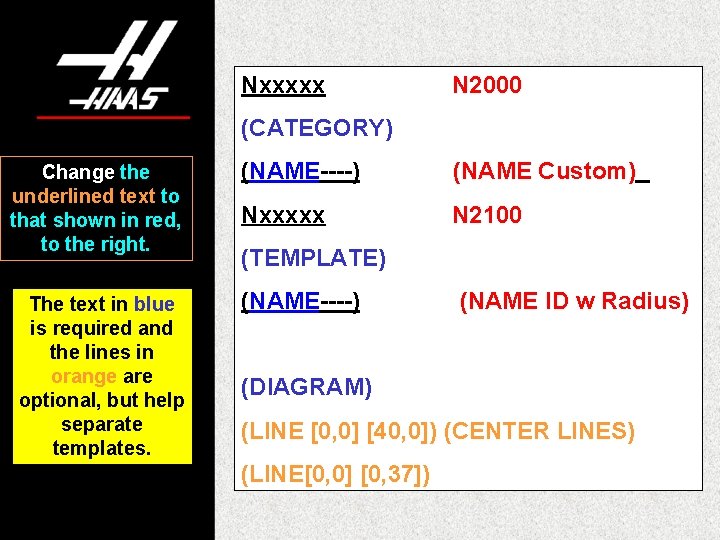
Nxxxxx N 2000 (CATEGORY) Change the underlined text to that shown in red, to the right. (NAME----) (NAME Custom) Nxxxxx N 2100 The text in blue is required and the lines in orange are optional, but help separate templates. (NAME----) (TEMPLATE) (NAME ID w Radius) (DIAGRAM) (LINE [0, 0] [40, 0]) (CENTER LINES) (LINE[0, 0] [0, 37])

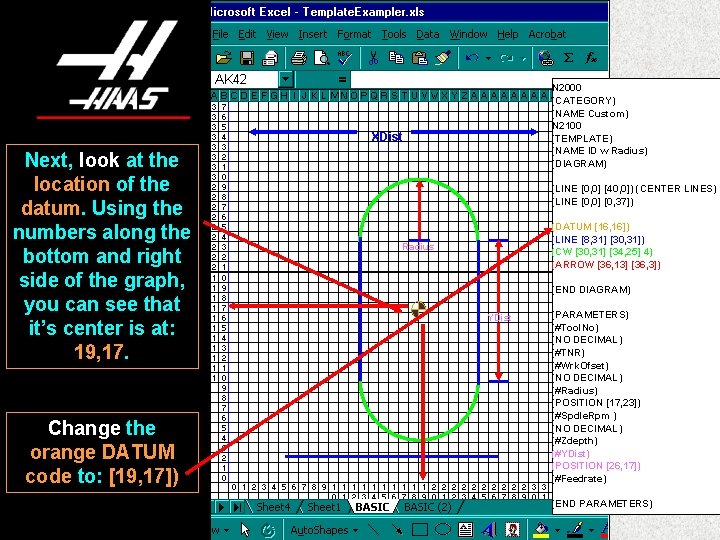
N 2000 (CATEGORY) (NAME Custom) N 2100 (TEMPLATE) (NAME ID w Radius) (DIAGRAM) XDist Next, look at the location of the datum. Using the numbers along the bottom and right side of the graph, you can see that it’s center is at: 19, 17. Change the orange DATUM code to: [19, 17]) (LINE [0, 0] [40, 0]) (CENTER LINES) (LINE [0, 0] [0, 37]) (DATUM [16, 16]) (LINE [8, 31] [30, 31]) (CW [30, 31] [34, 25] 4) (ARROW [36, 13] [36, 3]) Radius (END DIAGRAM) YDist (PARAMETERS) (#Tool. No) (NO DECIMAL) (#TNR) (#Wrk. Ofset) (NO DECIMAL) (#Radius) (POSITION [17, 23]) (#Spdle. Rpm ) (NO DECIMAL) (#Zdepth) (#YDist) (POSITION [26, 17]) (#Feedrate) (END PARAMETERS)

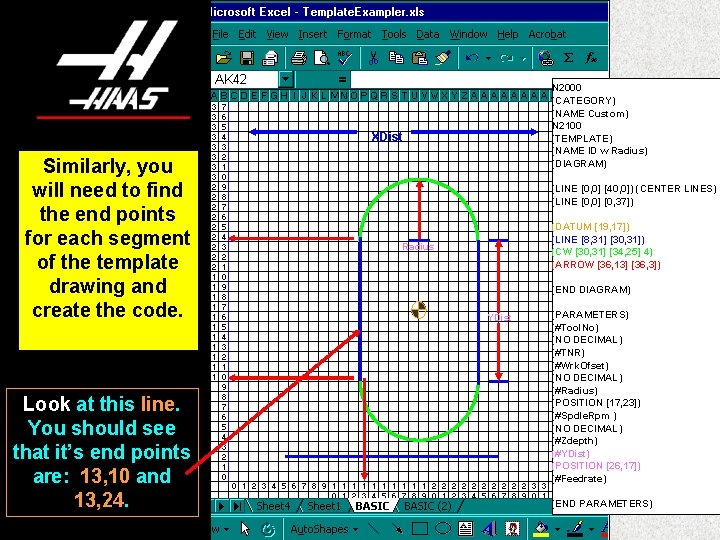
N 2000 (CATEGORY) (NAME Custom) N 2100 (TEMPLATE) (NAME ID w Radius) (DIAGRAM) XDist Similarly, you will need to find the end points for each segment of the template drawing and create the code. Look at this line. You should see that it’s end points are: 13, 10 and 13, 24. (LINE [0, 0] [40, 0]) (CENTER LINES) (LINE [0, 0] [0, 37]) (DATUM [19, 17]) (LINE [8, 31] [30, 31]) (CW [30, 31] [34, 25] 4) (ARROW [36, 13] [36, 3]) Radius (END DIAGRAM) YDist (PARAMETERS) (#Tool. No) (NO DECIMAL) (#TNR) (#Wrk. Ofset) (NO DECIMAL) (#Radius) (POSITION [17, 23]) (#Spdle. Rpm ) (NO DECIMAL) (#Zdepth) (#YDist) (POSITION [26, 17]) (#Feedrate) (END PARAMETERS)

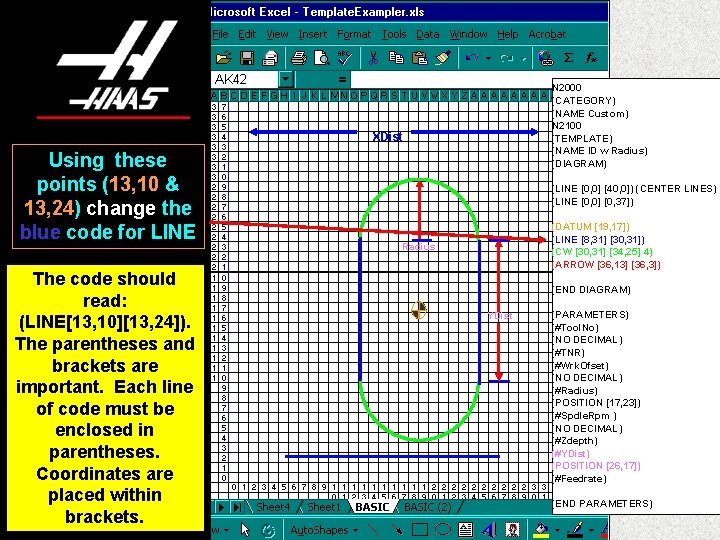
N 2000 (CATEGORY) (NAME Custom) N 2100 (TEMPLATE) (NAME ID w Radius) (DIAGRAM) XDist Using these points (13, 10 & 13, 24) change the blue code for LINE The code should read: (LINE[13, 10][13, 24]). The parentheses and brackets are important. Each line of code must be enclosed in parentheses. Coordinates are placed within brackets. (LINE [0, 0] [40, 0]) (CENTER LINES) (LINE [0, 0] [0, 37]) (DATUM [19, 17]) (LINE [8, 31] [30, 31]) (CW [30, 31] [34, 25] 4) (ARROW [36, 13] [36, 3]) Radius (END DIAGRAM) YDist (PARAMETERS) (#Tool. No) (NO DECIMAL) (#TNR) (#Wrk. Ofset) (NO DECIMAL) (#Radius) (POSITION [17, 23]) (#Spdle. Rpm ) (NO DECIMAL) (#Zdepth) (#YDist) (POSITION [26, 17]) (#Feedrate) (END PARAMETERS)

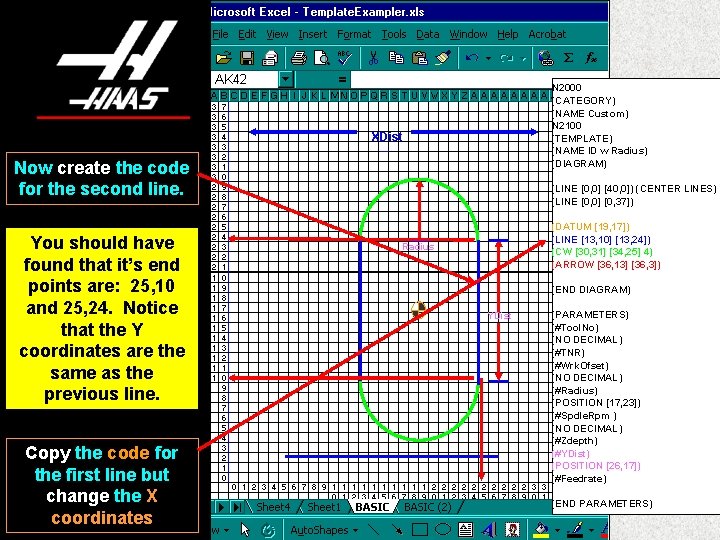
N 2000 (CATEGORY) (NAME Custom) N 2100 (TEMPLATE) (NAME ID w Radius) (DIAGRAM) XDist Now create the code for the second line. You should have found that it’s end points are: 25, 10 and 25, 24. Notice that the Y coordinates are the same as the previous line. Copy the code for the first line but change the X coordinates (LINE [0, 0] [40, 0]) (CENTER LINES) (LINE [0, 0] [0, 37]) (DATUM [19, 17]) (LINE [13, 10] [13, 24]) (CW [30, 31] [34, 25] 4) (ARROW [36, 13] [36, 3]) Radius (END DIAGRAM) YDist (PARAMETERS) (#Tool. No) (NO DECIMAL) (#TNR) (#Wrk. Ofset) (NO DECIMAL) (#Radius) (POSITION [17, 23]) (#Spdle. Rpm ) (NO DECIMAL) (#Zdepth) (#YDist) (POSITION [26, 17]) (#Feedrate) (END PARAMETERS)

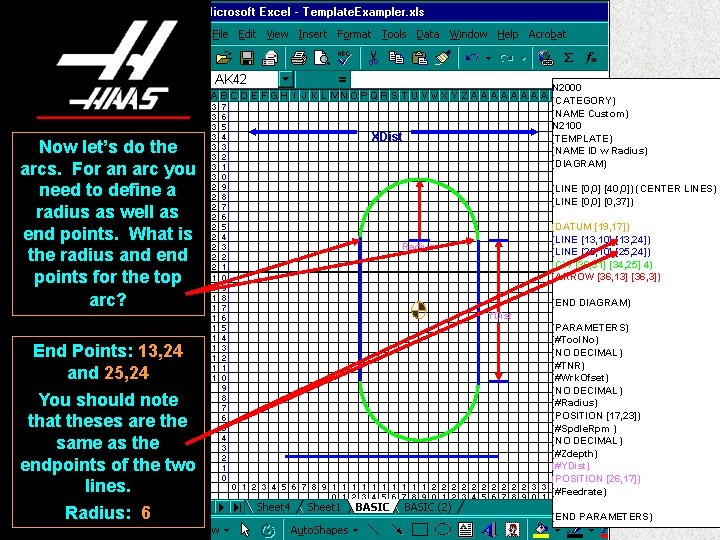
Now let’s do the arcs. For an arc you need to define a radius as well as end points. What is the radius and end points for the top arc? N 2000 (CATEGORY) (NAME Custom) N 2100 (TEMPLATE) (NAME ID w Radius) (DIAGRAM) XDist (LINE [0, 0] [40, 0]) (CENTER LINES) (LINE [0, 0] [0, 37]) (DATUM [19, 17]) (LINE [13, 10] [13, 24]) (LINE [25, 10] [25, 24]) (CW [30, 31] [34, 25] 4) (ARROW [36, 13] [36, 3]) Radius (END DIAGRAM) YDist End Points: 13, 24 and 25, 24 You should note that theses are the same as the endpoints of the two lines. Radius: 6 (PARAMETERS) (#Tool. No) (NO DECIMAL) (#TNR) (#Wrk. Ofset) (NO DECIMAL) (#Radius) (POSITION [17, 23]) (#Spdle. Rpm ) (NO DECIMAL) (#Zdepth) (#YDist) (POSITION [26, 17]) (#Feedrate) (END PARAMETERS)

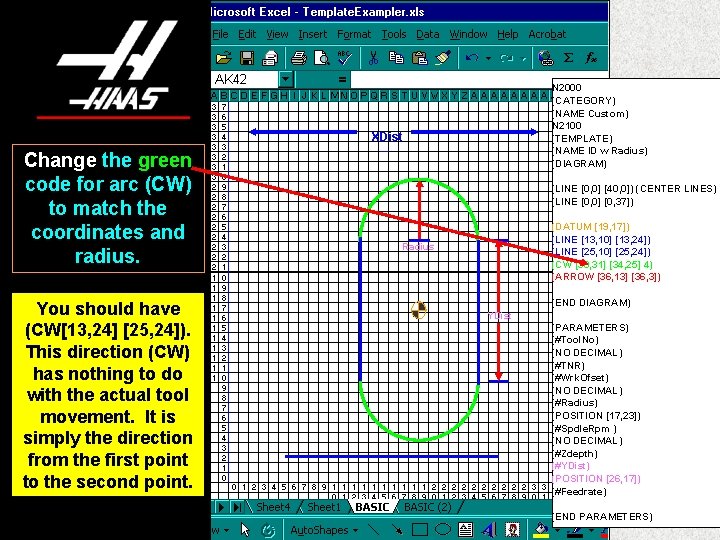
N 2000 (CATEGORY) (NAME Custom) N 2100 (TEMPLATE) (NAME ID w Radius) (DIAGRAM) XDist Change the green code for arc (CW) to match the coordinates and radius. You should have (CW[13, 24] [25, 24]). This direction (CW) has nothing to do with the actual tool movement. It is simply the direction from the first point to the second point. (LINE [0, 0] [40, 0]) (CENTER LINES) (LINE [0, 0] [0, 37]) (DATUM [19, 17]) (LINE [13, 10] [13, 24]) (LINE [25, 10] [25, 24]) (CW [30, 31] [34, 25] 4) (ARROW [36, 13] [36, 3]) Radius (END DIAGRAM) YDist (PARAMETERS) (#Tool. No) (NO DECIMAL) (#TNR) (#Wrk. Ofset) (NO DECIMAL) (#Radius) (POSITION [17, 23]) (#Spdle. Rpm ) (NO DECIMAL) (#Zdepth) (#YDist) (POSITION [26, 17]) (#Feedrate) (END PARAMETERS)

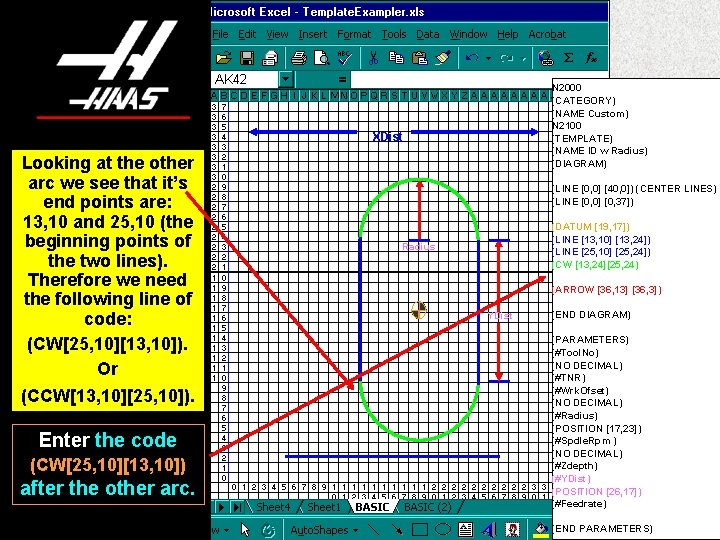
N 2000 (CATEGORY) (NAME Custom) N 2100 (TEMPLATE) (NAME ID w Radius) (DIAGRAM) XDist Looking at the other arc we see that it’s end points are: 13, 10 and 25, 10 (the beginning points of the two lines). Therefore we need the following line of code: (CW[25, 10][13, 10]). Or (CCW[13, 10][25, 10]). Enter the code (CW[25, 10][13, 10]) after the other arc. (LINE [0, 0] [40, 0]) (CENTER LINES) (LINE [0, 0] [0, 37]) (DATUM [19, 17]) (LINE [13, 10] [13, 24]) (LINE [25, 10] [25, 24]) (CW [13, 24][25, 24) Radius (ARROW [36, 13] [36, 3]) YDist (END DIAGRAM) (PARAMETERS) (#Tool. No) (NO DECIMAL) (#TNR) (#Wrk. Ofset) (NO DECIMAL) (#Radius) (POSITION [17, 23]) (#Spdle. Rpm ) (NO DECIMAL) (#Zdepth) (#YDist) (POSITION [26, 17]) (#Feedrate) (END PARAMETERS)

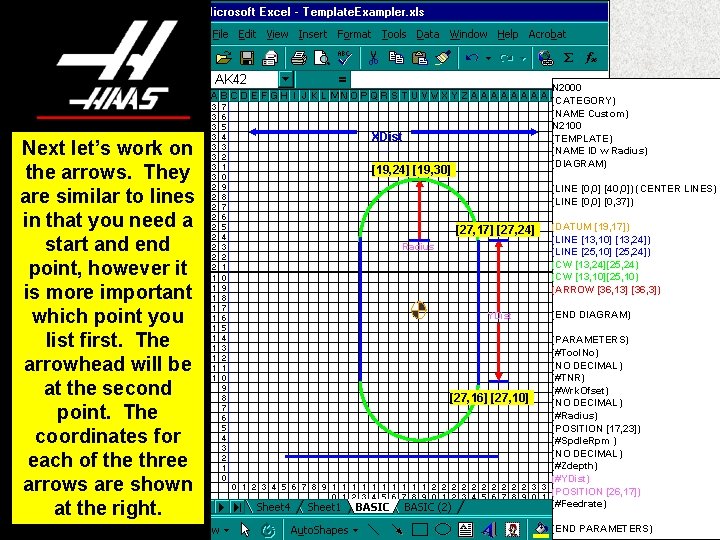
Next let’s work on the arrows. They are similar to lines in that you need a start and end point, however it is more important which point you list first. The arrowhead will be at the second point. The coordinates for each of the three arrows are shown at the right. N 2000 (CATEGORY) (NAME Custom) N 2100 (TEMPLATE) (NAME ID w Radius) (DIAGRAM) XDist [19, 24] [19, 30] (LINE [0, 0] [40, 0]) (CENTER LINES) (LINE [0, 0] [0, 37]) [27, 17] [27, 24] Radius YDist [27, 16] [27, 10] (DATUM [19, 17]) (LINE [13, 10] [13, 24]) (LINE [25, 10] [25, 24]) (CW [13, 24][25, 24) (CW [13, 10][25, 10) (ARROW [36, 13] [36, 3]) (END DIAGRAM) (PARAMETERS) (#Tool. No) (NO DECIMAL) (#TNR) (#Wrk. Ofset) (NO DECIMAL) (#Radius) (POSITION [17, 23]) (#Spdle. Rpm ) (NO DECIMAL) (#Zdepth) (#YDist) (POSITION [26, 17]) (#Feedrate) (END PARAMETERS)

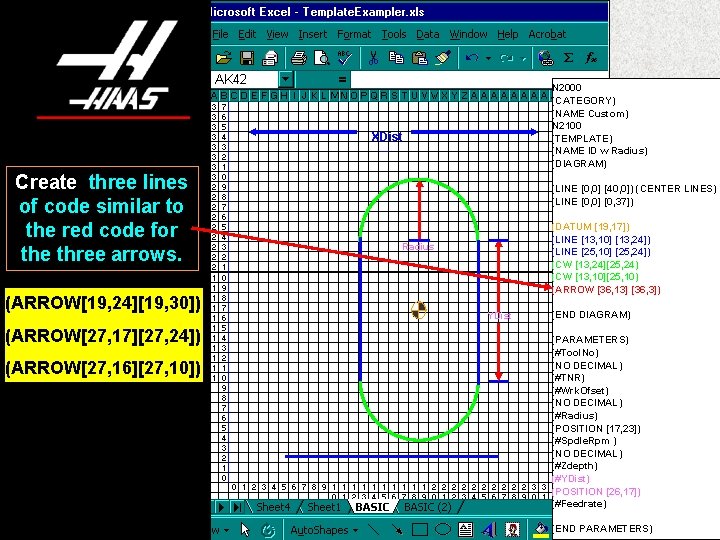
N 2000 (CATEGORY) (NAME Custom) N 2100 (TEMPLATE) (NAME ID w Radius) (DIAGRAM) XDist Create three lines of code similar to the red code for the three arrows. (ARROW[19, 24][19, 30]) (ARROW[27, 17][27, 24]) (ARROW[27, 16][27, 10]) (LINE [0, 0] [40, 0]) (CENTER LINES) (LINE [0, 0] [0, 37]) (DATUM [19, 17]) (LINE [13, 10] [13, 24]) (LINE [25, 10] [25, 24]) (CW [13, 24][25, 24) (CW [13, 10][25, 10) (ARROW [36, 13] [36, 3]) Radius YDist (END DIAGRAM) (PARAMETERS) (#Tool. No) (NO DECIMAL) (#TNR) (#Wrk. Ofset) (NO DECIMAL) (#Radius) (POSITION [17, 23]) (#Spdle. Rpm ) (NO DECIMAL) (#Zdepth) (#YDist) (POSITION [26, 17]) (#Feedrate) (END PARAMETERS)

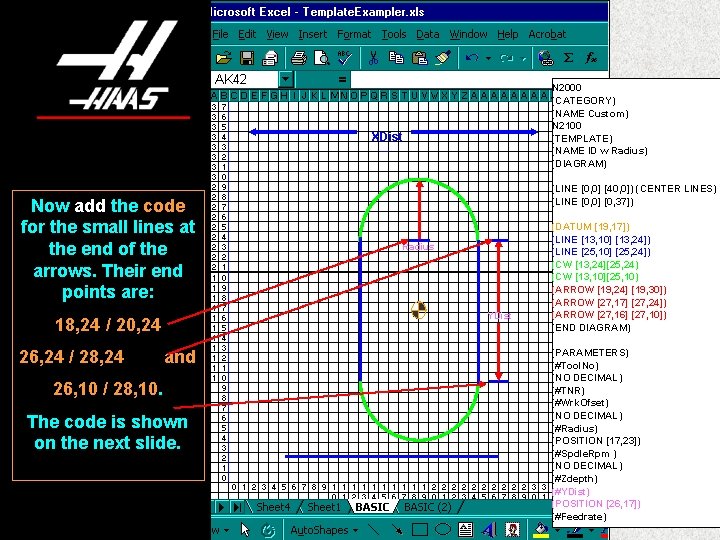
N 2000 (CATEGORY) (NAME Custom) N 2100 (TEMPLATE) (NAME ID w Radius) (DIAGRAM) XDist Now add the code for the small lines at the end of the arrows. Their end points are: Radius YDist 18, 24 / 20, 24 26, 24 / 28, 24 (LINE [0, 0] [40, 0]) (CENTER LINES) (LINE [0, 0] [0, 37]) and 26, 10 / 28, 10. The code is shown on the next slide. (DATUM [19, 17]) (LINE [13, 10] [13, 24]) (LINE [25, 10] [25, 24]) (CW [13, 24][25, 24) (CW [13, 10][25, 10) (ARROW [19, 24] [19, 30]) (ARROW [27, 17] [27, 24]) (ARROW [27, 16] [27, 10]) (END DIAGRAM) (PARAMETERS) (#Tool. No) (NO DECIMAL) (#TNR) (#Wrk. Ofset) (NO DECIMAL) (#Radius) (POSITION [17, 23]) (#Spdle. Rpm ) (NO DECIMAL) (#Zdepth) (#YDist) (POSITION [26, 17]) (#Feedrate)

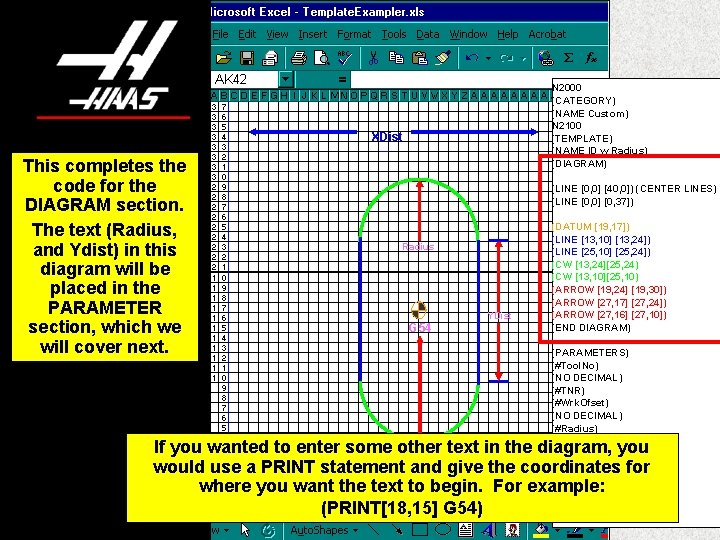
N 2000 (CATEGORY) (NAME Custom) N 2100 (TEMPLATE) (NAME ID w Radius) (DIAGRAM) XDist This completes the code for the DIAGRAM section. The text (Radius, and Ydist) in this diagram will be placed in the PARAMETER section, which we will cover next. (LINE [0, 0] [40, 0]) (CENTER LINES) (LINE [0, 0] [0, 37]) Radius G 54 YDist (DATUM [19, 17]) (LINE [13, 10] [13, 24]) (LINE [25, 10] [25, 24]) (CW [13, 24][25, 24) (CW [13, 10][25, 10) (ARROW [19, 24] [19, 30]) (ARROW [27, 17] [27, 24]) (ARROW [27, 16] [27, 10]) (END DIAGRAM) (PARAMETERS) (#Tool. No) (NO DECIMAL) (#TNR) (#Wrk. Ofset) (NO DECIMAL) (#Radius) (POSITION [17, 23]) (#Spdle. Rpm ) (NO DECIMAL) (#Zdepth) (#YDist) (POSITION [26, 17]) (#Feedrate) If you wanted to enter some other text in the diagram, you would use a PRINT statement and give the coordinates for where you want the text to begin. For example: (PRINT[18, 15] G 54)

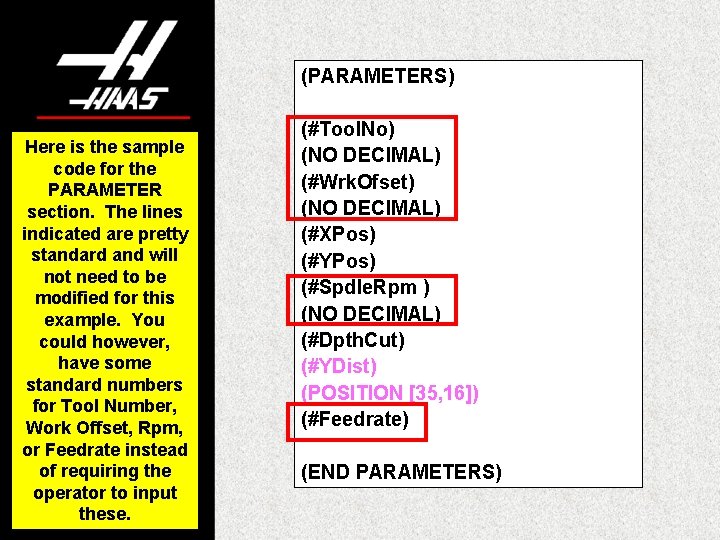
(PARAMETERS) Here is the sample code for the PARAMETER section. The lines indicated are pretty standard and will not need to be modified for this example. You could however, have some standard numbers for Tool Number, Work Offset, Rpm, or Feedrate instead of requiring the operator to input these. (#Tool. No) (NO DECIMAL) (#Wrk. Ofset) (NO DECIMAL) (#XPos) (#YPos) (#Spdle. Rpm ) (NO DECIMAL) (#Dpth. Cut) (#YDist) (POSITION [35, 16]) (#Feedrate) (END PARAMETERS)

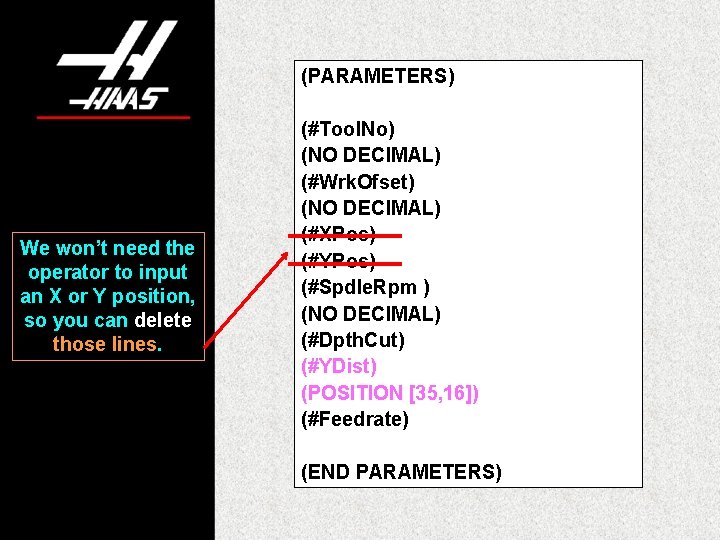
(PARAMETERS) We won’t need the operator to input an X or Y position, so you can delete those lines. (#Tool. No) (NO DECIMAL) (#Wrk. Ofset) (NO DECIMAL) (#XPos) (#YPos) (#Spdle. Rpm ) (NO DECIMAL) (#Dpth. Cut) (#YDist) (POSITION [35, 16]) (#Feedrate) (END PARAMETERS)

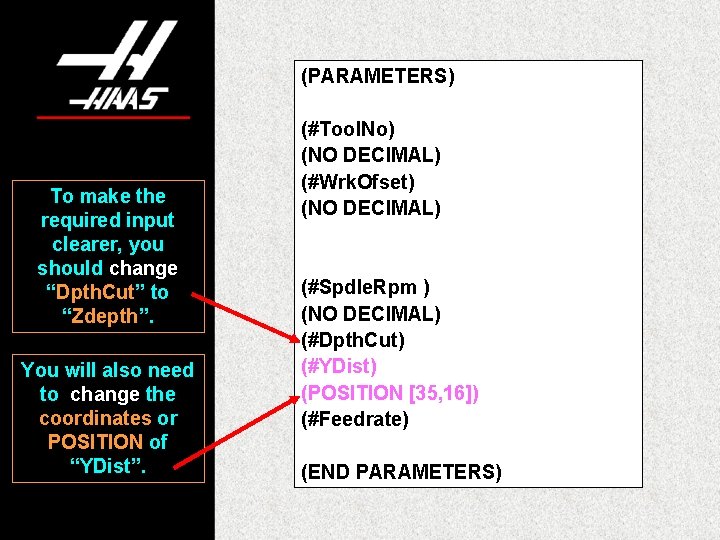
(PARAMETERS) To make the required input clearer, you should change “Dpth. Cut” to “Zdepth”. You will also need to change the coordinates or POSITION of “YDist”. (#Tool. No) (NO DECIMAL) (#Wrk. Ofset) (NO DECIMAL) (#Spdle. Rpm ) (NO DECIMAL) (#Dpth. Cut) (#YDist) (POSITION [35, 16]) (#Feedrate) (END PARAMETERS)

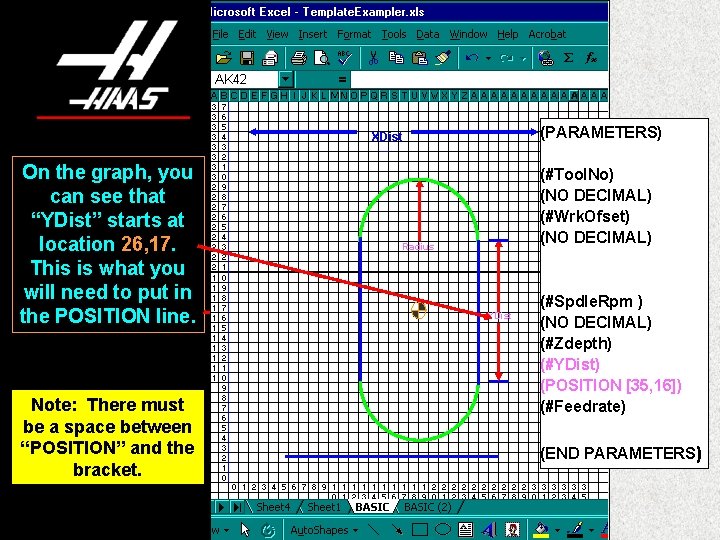
(PARAMETERS) XDist On the graph, you can see that “YDist” starts at location 26, 17. This is what you will need to put in the POSITION line. Note: There must be a space between “POSITION” and the bracket. (#Tool. No) (NO DECIMAL) (#Wrk. Ofset) (NO DECIMAL) Radius YDist (#Spdle. Rpm ) (NO DECIMAL) (#Zdepth) (#YDist) (POSITION [35, 16]) (#Feedrate) (END PARAMETERS)

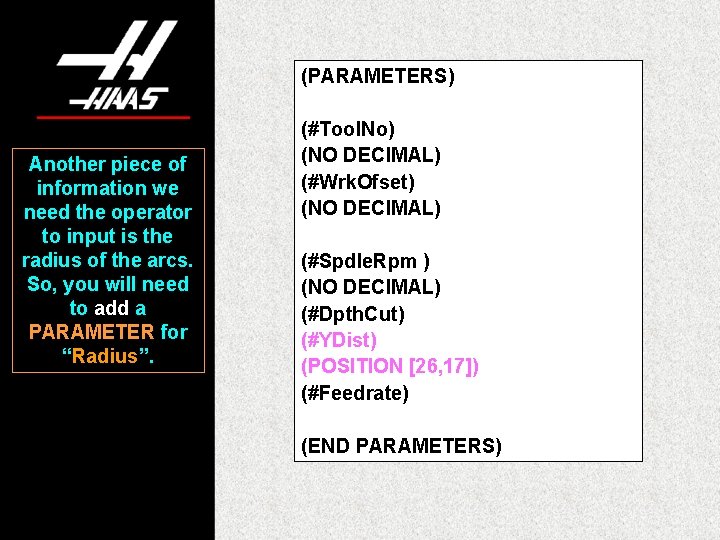
(PARAMETERS) Another piece of information we need the operator to input is the radius of the arcs. So, you will need to add a PARAMETER for “Radius”. (#Tool. No) (NO DECIMAL) (#Wrk. Ofset) (NO DECIMAL) (#Spdle. Rpm ) (NO DECIMAL) (#Dpth. Cut) (#YDist) (POSITION [26, 17]) (#Feedrate) (END PARAMETERS)

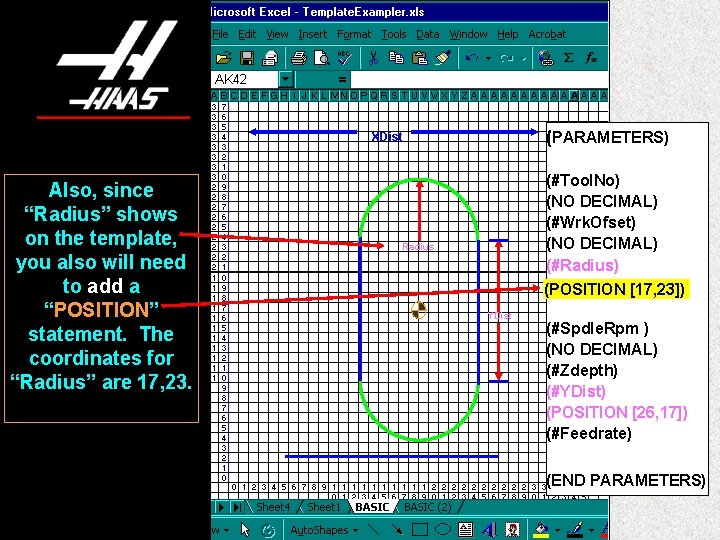
(PARAMETERS) XDist Also, since “Radius” shows on the template, you also will need to add a “POSITION” statement. The coordinates for “Radius” are 17, 23. (#Tool. No) (NO DECIMAL) (#Wrk. Ofset) (#Radius) (NO DECIMAL) (POSITION[18, 23]) (#Radius) Radius (POSITION [17, 23]) YDist (#Spdle. Rpm ) (NO DECIMAL) (#Zdepth) (#YDist) (POSITION [26, 17]) (#Feedrate) (END PARAMETERS)

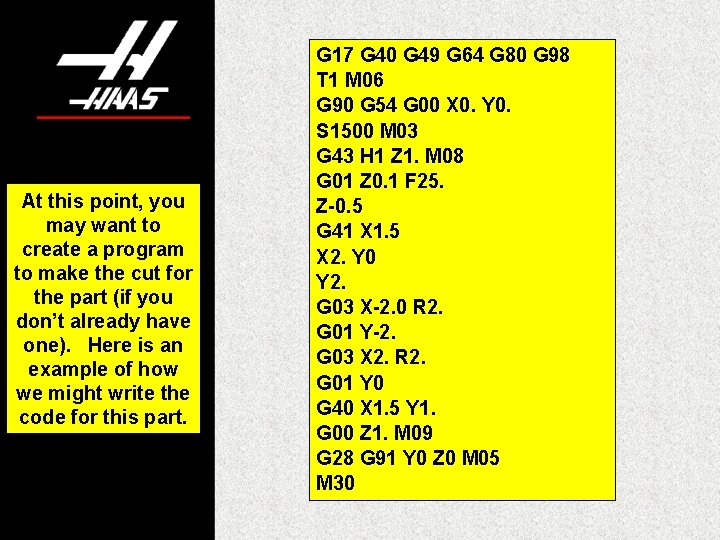
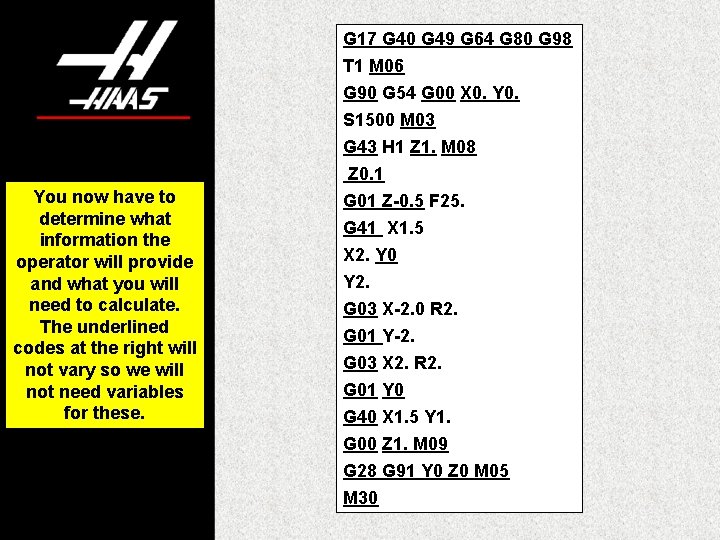
At this point, you may want to create a program to make the cut for the part (if you don’t already have one). Here is an example of how we might write the code for this part. G 17 G 40 G 49 G 64 G 80 G 98 T 1 M 06 G 90 G 54 G 00 X 0. Y 0. S 1500 M 03 G 43 H 1 Z 1. M 08 G 01 Z 0. 1 F 25. Z-0. 5 G 41 X 1. 5 X 2. Y 0 Y 2. G 03 X-2. 0 R 2. G 01 Y-2. G 03 X 2. R 2. G 01 Y 0 G 40 X 1. 5 Y 1. G 00 Z 1. M 09 G 28 G 91 Y 0 Z 0 M 05 M 30

G 17 G 40 G 49 G 64 G 80 G 98 T 1 M 06 G 90 G 54 G 00 X 0. Y 0. S 1500 M 03 You now have to determine what information the operator will provide and what you will need to calculate. The underlined codes at the right will not vary so we will not need variables for these. G 43 H 1 Z 1. M 08 Z 0. 1 G 01 Z-0. 5 F 25. G 41 X 1. 5 X 2. Y 0 Y 2. G 03 X-2. 0 R 2. G 01 Y-2. G 03 X 2. R 2. G 01 Y 0 G 40 X 1. 5 Y 1. G 00 Z 1. M 09 G 28 G 91 Y 0 Z 0 M 05 M 30

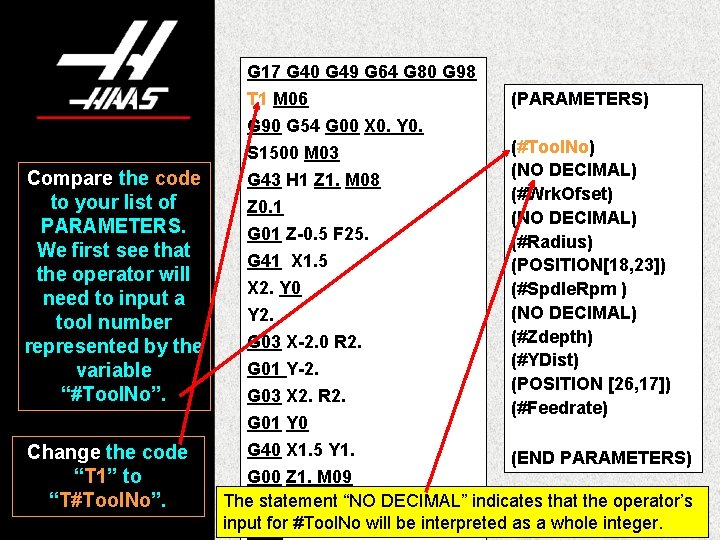
G 17 G 40 G 49 G 64 G 80 G 98 Compare the code to your list of PARAMETERS. We first see that the operator will need to input a tool number represented by the variable “#Tool. No”. Change the code “T 1” to “T#Tool. No”. T 1 M 06 G 90 G 54 G 00 X 0. Y 0. (PARAMETERS) S 1500 M 03 (#Tool. No) (NO DECIMAL) (#Wrk. Ofset) (NO DECIMAL) (#Radius) (POSITION[18, 23]) (#Spdle. Rpm ) (NO DECIMAL) (#Zdepth) (#YDist) (POSITION [26, 17]) (#Feedrate) G 43 H 1 Z 1. M 08 Z 0. 1 G 01 Z-0. 5 F 25. G 41 X 1. 5 X 2. Y 0 Y 2. G 03 X-2. 0 R 2. G 01 Y-2. G 03 X 2. R 2. G 01 Y 0 G 40 X 1. 5 Y 1. (END PARAMETERS) G 00 Z 1. M 09 The. G 28 statement DECIMAL” indicates that the operator’s G 91 Y 0“NO Z 0 M 05 input for #Tool. No will be interpreted as a whole integer. M 30

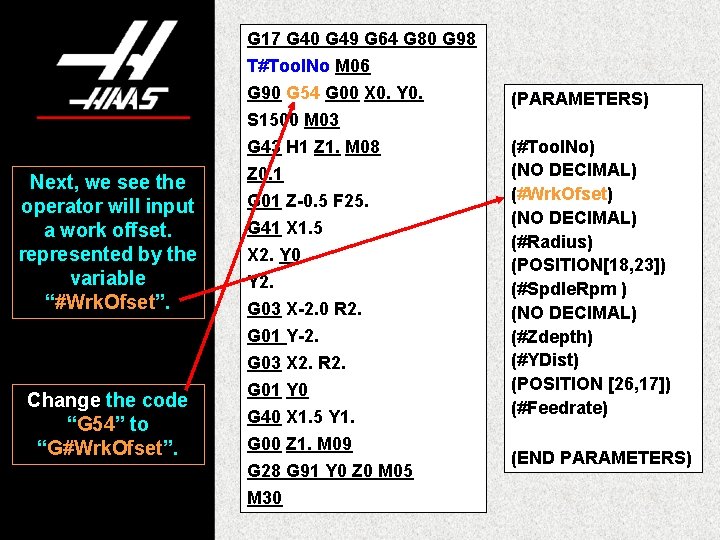
G 17 G 40 G 49 G 64 G 80 G 98 T#Tool. No M 06 G 90 G 54 G 00 X 0. Y 0. (PARAMETERS) S 1500 M 03 Next, we see the operator will input a work offset. represented by the variable “#Wrk. Ofset”. Change the code “G 54” to “G#Wrk. Ofset”. G 43 H 1 Z 1. M 08 Z 0. 1 G 01 Z-0. 5 F 25. G 41 X 1. 5 X 2. Y 0 Y 2. G 03 X-2. 0 R 2. G 01 Y-2. G 03 X 2. R 2. G 01 Y 0 G 40 X 1. 5 Y 1. G 00 Z 1. M 09 G 28 G 91 Y 0 Z 0 M 05 M 30 (#Tool. No) (NO DECIMAL) (#Wrk. Ofset) (NO DECIMAL) (#Radius) (POSITION[18, 23]) (#Spdle. Rpm ) (NO DECIMAL) (#Zdepth) (#YDist) (POSITION [26, 17]) (#Feedrate) (END PARAMETERS)

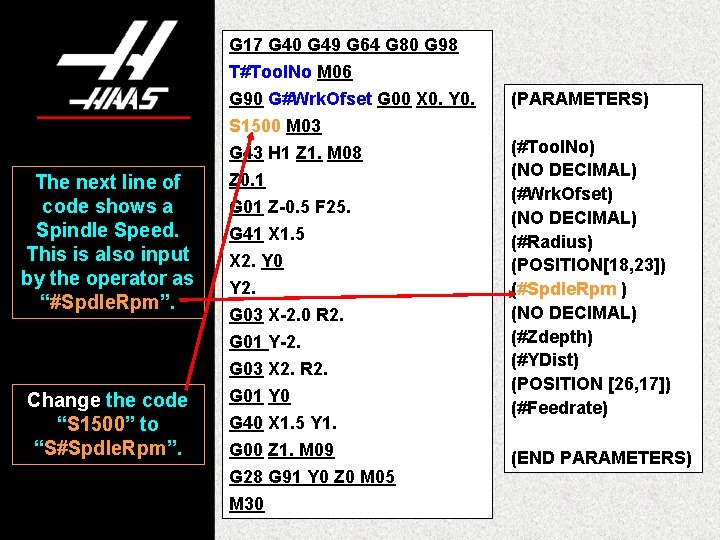
G 17 G 40 G 49 G 64 G 80 G 98 T#Tool. No M 06 G 90 G#Wrk. Ofset G 00 X 0. Y 0. (PARAMETERS) S 1500 M 03 The next line of code shows a Spindle Speed. This is also input by the operator as “#Spdle. Rpm”. Change the code “S 1500” to “S#Spdle. Rpm”. G 43 H 1 Z 1. M 08 Z 0. 1 G 01 Z-0. 5 F 25. G 41 X 1. 5 X 2. Y 0 Y 2. G 03 X-2. 0 R 2. G 01 Y-2. G 03 X 2. R 2. G 01 Y 0 G 40 X 1. 5 Y 1. G 00 Z 1. M 09 G 28 G 91 Y 0 Z 0 M 05 M 30 (#Tool. No) (NO DECIMAL) (#Wrk. Ofset) (NO DECIMAL) (#Radius) (POSITION[18, 23]) (#Spdle. Rpm ) (NO DECIMAL) (#Zdepth) (#YDist) (POSITION [26, 17]) (#Feedrate) (END PARAMETERS)

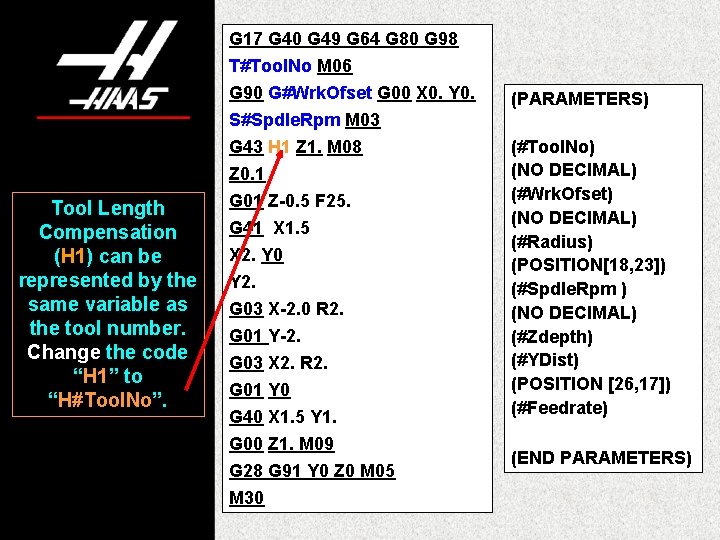
G 17 G 40 G 49 G 64 G 80 G 98 T#Tool. No M 06 G 90 G#Wrk. Ofset G 00 X 0. Y 0. (PARAMETERS) S#Spdle. Rpm M 03 Tool Length Compensation (H 1) can be represented by the same variable as the tool number. Change the code “H 1” to “H#Tool. No”. G 43 H 1 Z 1. M 08 Z 0. 1 G 01 Z-0. 5 F 25. G 41 X 1. 5 X 2. Y 0 Y 2. G 03 X-2. 0 R 2. G 01 Y-2. G 03 X 2. R 2. G 01 Y 0 G 40 X 1. 5 Y 1. G 00 Z 1. M 09 G 28 G 91 Y 0 Z 0 M 05 M 30 (#Tool. No) (NO DECIMAL) (#Wrk. Ofset) (NO DECIMAL) (#Radius) (POSITION[18, 23]) (#Spdle. Rpm ) (NO DECIMAL) (#Zdepth) (#YDist) (POSITION [26, 17]) (#Feedrate) (END PARAMETERS)

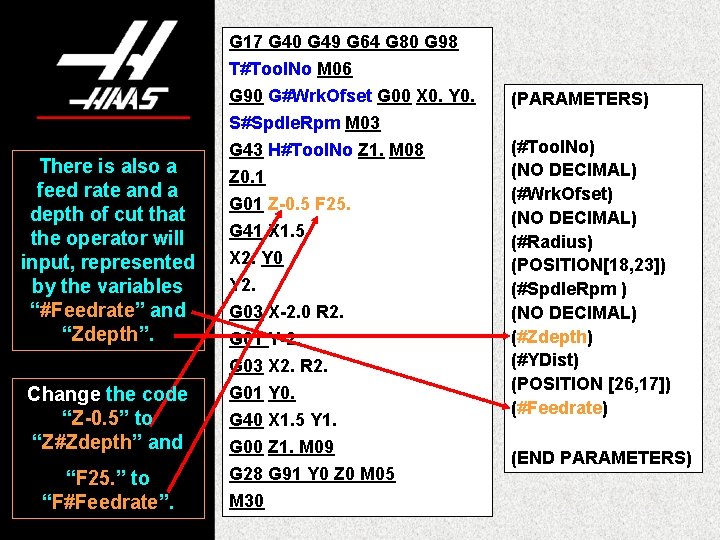
G 17 G 40 G 49 G 64 G 80 G 98 T#Tool. No M 06 G 90 G#Wrk. Ofset G 00 X 0. Y 0. (PARAMETERS) S#Spdle. Rpm M 03 There is also a feed rate and a depth of cut that the operator will input, represented by the variables “#Feedrate” and “Zdepth”. Change the code “Z-0. 5” to “Z#Zdepth” and “F 25. ” to “F#Feedrate”. G 43 H#Tool. No Z 1. M 08 Z 0. 1 G 01 Z-0. 5 F 25. G 41 X 1. 5 X 2. Y 0 Y 2. G 03 X-2. 0 R 2. G 01 Y-2. G 03 X 2. R 2. G 01 Y 0. G 40 X 1. 5 Y 1. G 00 Z 1. M 09 G 28 G 91 Y 0 Z 0 M 05 M 30 (#Tool. No) (NO DECIMAL) (#Wrk. Ofset) (NO DECIMAL) (#Radius) (POSITION[18, 23]) (#Spdle. Rpm ) (NO DECIMAL) (#Zdepth) (#YDist) (POSITION [26, 17]) (#Feedrate) (END PARAMETERS)

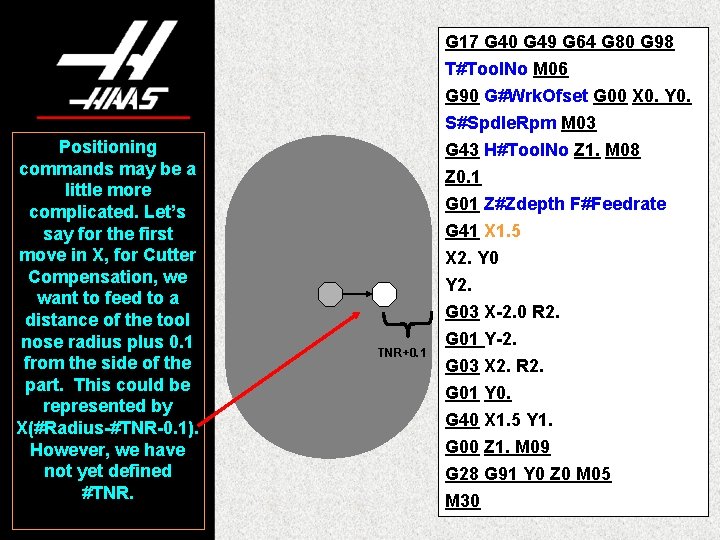
G 17 G 40 G 49 G 64 G 80 G 98 T#Tool. No M 06 G 90 G#Wrk. Ofset G 00 X 0. Y 0. S#Spdle. Rpm M 03 Positioning commands may be a little more complicated. Let’s say for the first move in X, for Cutter Compensation, we want to feed to a distance of the tool nose radius plus 0. 1 from the side of the part. This could be represented by X(#Radius-#TNR-0. 1). However, we have not yet defined #TNR. TNR+0. 1 G 43 H#Tool. No Z 1. M 08 Z 0. 1 G 01 Z#Zdepth F#Feedrate G 41 X 1. 5 X 2. Y 0 Y 2. G 03 X-2. 0 R 2. G 01 Y-2. G 03 X 2. R 2. G 01 Y 0. G 40 X 1. 5 Y 1. G 00 Z 1. M 09 G 28 G 91 Y 0 Z 0 M 05 M 30

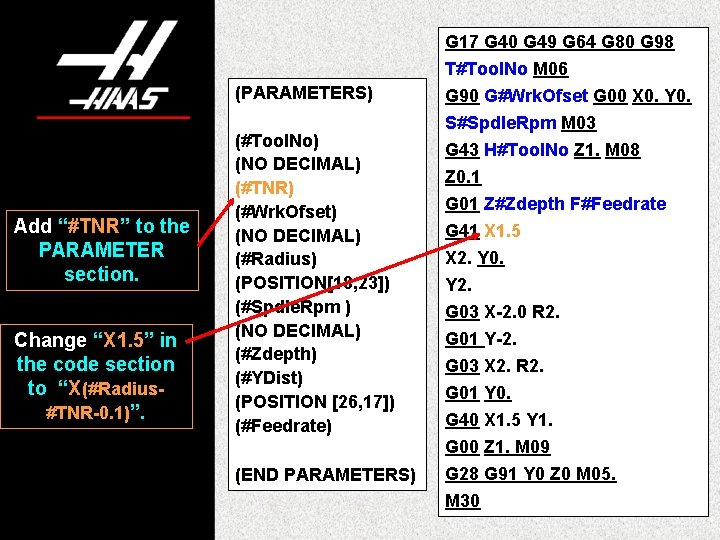
G 17 G 40 G 49 G 64 G 80 G 98 (PARAMETERS) Add “#TNR” to the PARAMETER section. Change “X 1. 5” in the code section to “X(#Radius#TNR-0. 1)”. (#Tool. No) (NO DECIMAL) (#TNR) (#Wrk. Ofset) (NO DECIMAL) (#Radius) (POSITION[18, 23]) (#Spdle. Rpm ) (NO DECIMAL) (#Zdepth) (#YDist) (POSITION [26, 17]) (#Feedrate) (END PARAMETERS) T#Tool. No M 06 G 90 G#Wrk. Ofset G 00 X 0. Y 0. S#Spdle. Rpm M 03 G 43 H#Tool. No Z 1. M 08 Z 0. 1 G 01 Z#Zdepth F#Feedrate G 41 X 1. 5 X 2. Y 0. Y 2. G 03 X-2. 0 R 2. G 01 Y-2. G 03 X 2. R 2. G 01 Y 0. G 40 X 1. 5 Y 1. G 00 Z 1. M 09 G 28 G 91 Y 0 Z 0 M 05. M 30

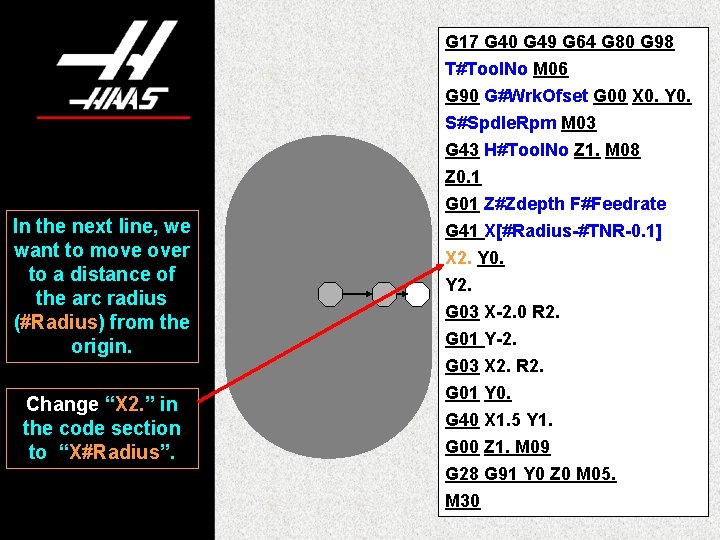
G 17 G 40 G 49 G 64 G 80 G 98 T#Tool. No M 06 G 90 G#Wrk. Ofset G 00 X 0. Y 0. S#Spdle. Rpm M 03 In the next line, we want to move over to a distance of the arc radius (#Radius) from the origin. Change “X 2. ” in the code section to “X#Radius”. G 43 H#Tool. No Z 1. M 08 Z 0. 1 G 01 Z#Zdepth F#Feedrate G 41 X[#Radius-#TNR-0. 1] X 2. Y 0. Y 2. G 03 X-2. 0 R 2. G 01 Y-2. G 03 X 2. R 2. G 01 Y 0. G 40 X 1. 5 Y 1. G 00 Z 1. M 09 G 28 G 91 Y 0 Z 0 M 05. M 30

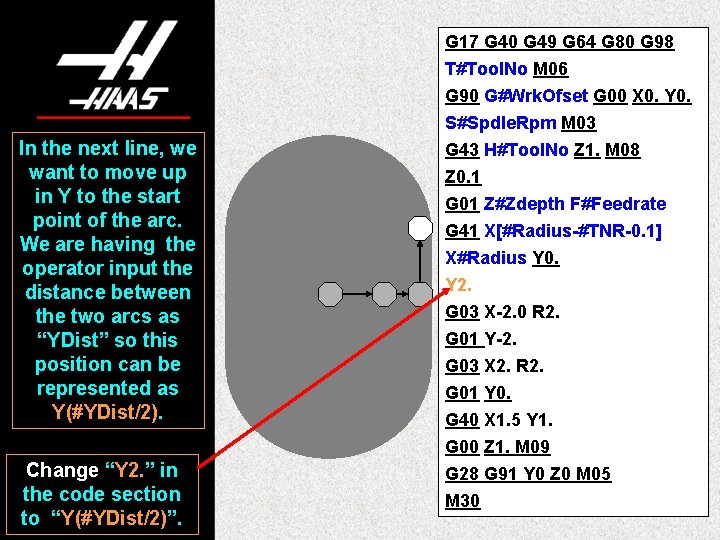
G 17 G 40 G 49 G 64 G 80 G 98 T#Tool. No M 06 G 90 G#Wrk. Ofset G 00 X 0. Y 0. S#Spdle. Rpm M 03 In the next line, we want to move up in Y to the start point of the arc. We are having the operator input the distance between the two arcs as “YDist” so this position can be represented as Y(#YDist/2). Change “Y 2. ” in the code section to “Y(#YDist/2)”. G 43 H#Tool. No Z 1. M 08 Z 0. 1 G 01 Z#Zdepth F#Feedrate G 41 X[#Radius-#TNR-0. 1] X#Radius Y 0. Y 2. G 03 X-2. 0 R 2. G 01 Y-2. G 03 X 2. R 2. G 01 Y 0. G 40 X 1. 5 Y 1. G 00 Z 1. M 09 G 28 G 91 Y 0 Z 0 M 05 M 30

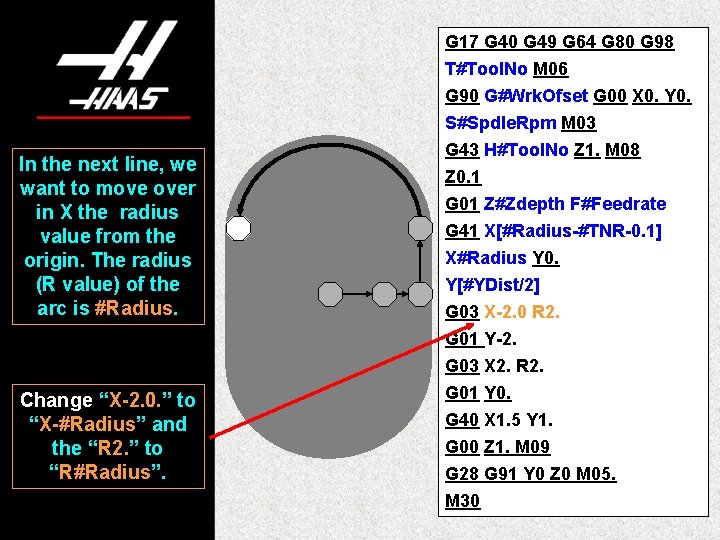
G 17 G 40 G 49 G 64 G 80 G 98 T#Tool. No M 06 G 90 G#Wrk. Ofset G 00 X 0. Y 0. S#Spdle. Rpm M 03 In the next line, we want to move over in X the radius value from the origin. The radius (R value) of the arc is #Radius. Change “X-2. 0. ” to “X-#Radius” and the “R 2. ” to “R#Radius”. G 43 H#Tool. No Z 1. M 08 Z 0. 1 G 01 Z#Zdepth F#Feedrate G 41 X[#Radius-#TNR-0. 1] X#Radius Y 0. Y[#YDist/2] G 03 X-2. 0 R 2. G 01 Y-2. G 03 X 2. R 2. G 01 Y 0. G 40 X 1. 5 Y 1. G 00 Z 1. M 09 G 28 G 91 Y 0 Z 0 M 05. M 30

G 17 G 40 G 49 G 64 G 80 G 98 T#Tool. No M 06 G 90 G#Wrk. Ofset G 00 X 0. Y 0. S#Spdle. Rpm M 03 The next move is down the “YDist”. Change “Y-2. ” to “Y(-#YDist/2)”. G 43 H#Tool. No Z 1. M 08 Z 0. 1 G 01 Z#Zdepth F#Feedrate G 41 X[#Radius-#TNR-0. 1] X#Radius Y 0. Y[#YDist/2] G 03 X-#Radius R#Radius G 01 Y-2. G 03 X 2. R 2. G 01 Y 0. G 40 X 1. 5 Y 1. G 00 Z 1. M 09 G 28 G 91 Y 0 Z 0 M 05. M 30

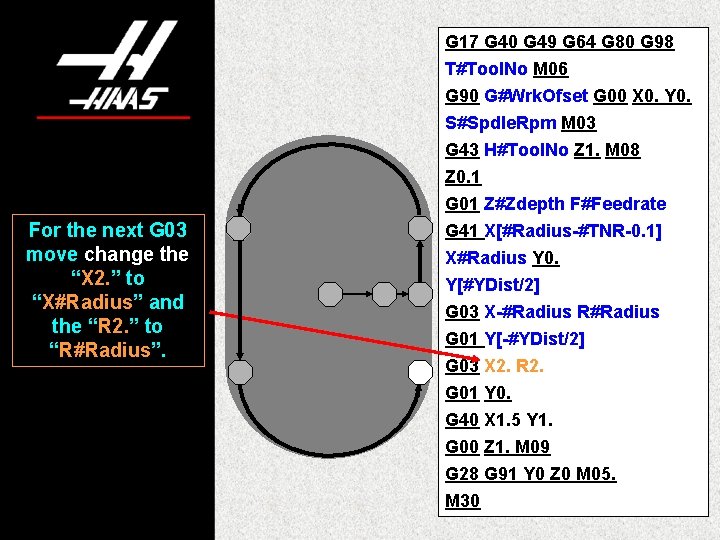
G 17 G 40 G 49 G 64 G 80 G 98 T#Tool. No M 06 G 90 G#Wrk. Ofset G 00 X 0. Y 0. S#Spdle. Rpm M 03 For the next G 03 move change the “X 2. ” to “X#Radius” and the “R 2. ” to “R#Radius”. G 43 H#Tool. No Z 1. M 08 Z 0. 1 G 01 Z#Zdepth F#Feedrate G 41 X[#Radius-#TNR-0. 1] X#Radius Y 0. Y[#YDist/2] G 03 X-#Radius R#Radius G 01 Y[-#YDist/2] G 03 X 2. R 2. G 01 Y 0. G 40 X 1. 5 Y 1. G 00 Z 1. M 09 G 28 G 91 Y 0 Z 0 M 05. M 30

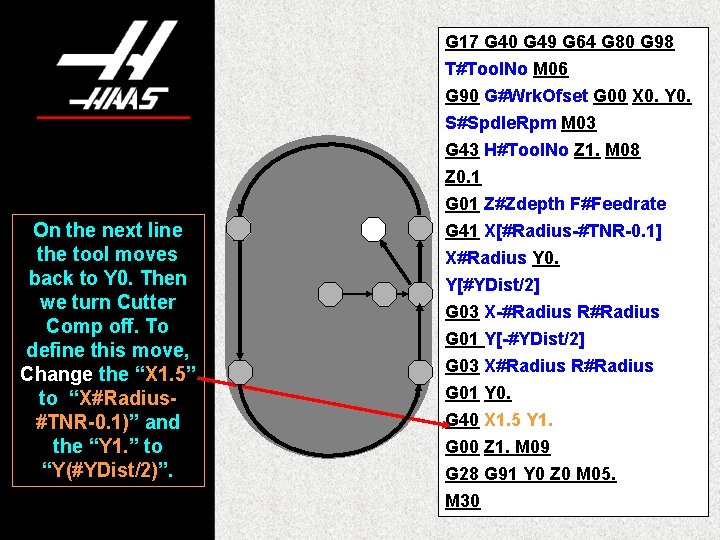
G 17 G 40 G 49 G 64 G 80 G 98 T#Tool. No M 06 G 90 G#Wrk. Ofset G 00 X 0. Y 0. S#Spdle. Rpm M 03 On the next line the tool moves back to Y 0. Then we turn Cutter Comp off. To define this move, Change the “X 1. 5” to “X#Radius#TNR-0. 1)” and the “Y 1. ” to “Y(#YDist/2)”. G 43 H#Tool. No Z 1. M 08 Z 0. 1 G 01 Z#Zdepth F#Feedrate G 41 X[#Radius-#TNR-0. 1] X#Radius Y 0. Y[#YDist/2] G 03 X-#Radius R#Radius G 01 Y[-#YDist/2] G 03 X#Radius R#Radius G 01 Y 0. G 40 X 1. 5 Y 1. G 00 Z 1. M 09 G 28 G 91 Y 0 Z 0 M 05. M 30

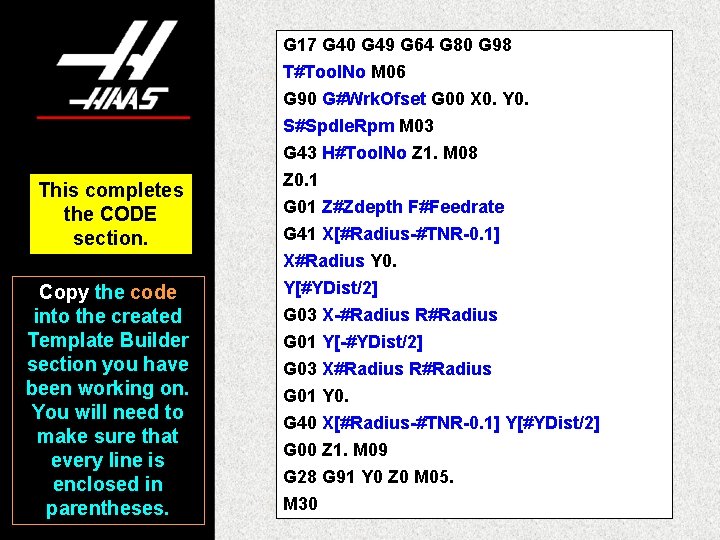
G 17 G 40 G 49 G 64 G 80 G 98 T#Tool. No M 06 G 90 G#Wrk. Ofset G 00 X 0. Y 0. S#Spdle. Rpm M 03 This completes the CODE section. Copy the code into the created Template Builder section you have been working on. You will need to make sure that every line is enclosed in parentheses. G 43 H#Tool. No Z 1. M 08 Z 0. 1 G 01 Z#Zdepth F#Feedrate G 41 X[#Radius-#TNR-0. 1] X#Radius Y 0. Y[#YDist/2] G 03 X-#Radius R#Radius G 01 Y[-#YDist/2] G 03 X#Radius R#Radius G 01 Y 0. G 40 X[#Radius-#TNR-0. 1] Y[#YDist/2] G 00 Z 1. M 09 G 28 G 91 Y 0 Z 0 M 05. M 30

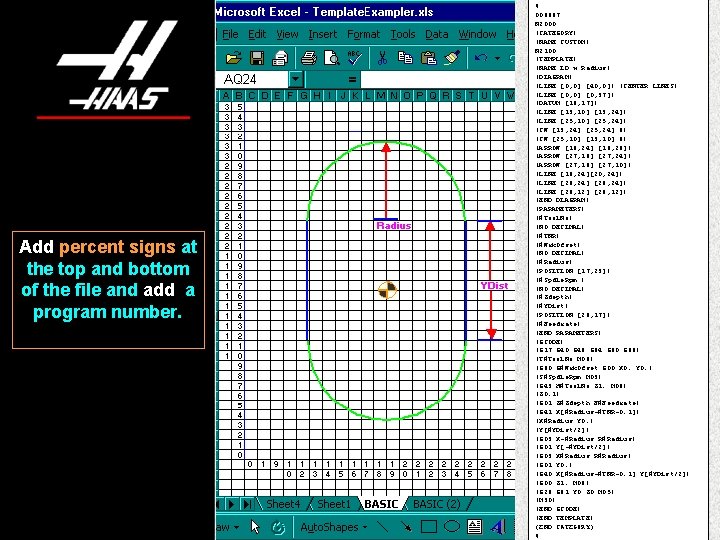
Add percent signs at the top and bottom of the file and add a program number. % O 09997 N 2000 (CATEGORY) (NAME CUSTOM) N 2100 (TEMPLATE) (NAME ID w Radius) (DIAGRAM) (LINE [0, 0] [40, 0]) (CENTER LINES) (LINE [0, 0] [0, 37]) (DATUM [19, 17]) (LINE [13, 10] [13, 24]) (LINE [25, 10] [25, 24]) (CW [13, 24] [25, 24] 6) (CW [25, 10] [13, 10] 6) (ARROW [19, 24] [19, 29]) (ARROW [27, 19] [27, 24]) (ARROW [27, 16] [27, 10]) (LINE [18, 24][20, 24]) (LINE [26, 24] [28, 24]) (LINE [26, 12] [28, 12]) (END DIAGRAM) (PARAMETERS) (#Tool. No) (NO DECIMAL) (#TNR) (#Wrk. Ofset) (NO DECIMAL) (#Radius) (POSITION [17, 23]) (#Spdle. Rpm ) (NO DECIMAL) (#Zdepth) (#YDist) (POSITION [26, 17]) (#Feedrate) (END PARAMETERS) (GCODE) (G 17 G 40 G 49 G 64 G 80 G 98) (T#Tool. No M 06) (G 90 G#Wrk. Ofset G 00 X 0. Y 0. ) (S#Spdle. Rpm M 03) (G 43 H#Tool. No Z 1. M 08) (Z 0. 1) (G 01 Z#Zdepth F#Feedrate) (G 41 X[#Radius-#TNR-0. 1]) (X#Radius Y 0. ) (Y[#YDist/2]) (G 03 X-#Radius R#Radius) (G 01 Y[-#YDist/2]) (G 03 X#Radius R#Radius) (G 01 Y 0. ) (G 40 X[#Radius-#TNR-0. 1] Y[#YDist/2]) (G 00 Z 1. M 09) (G 28 G 91 Y 0 Z 0 M 05) (M 30) (END GCODE) (END TEMPLATE) (END CATEGORY) %

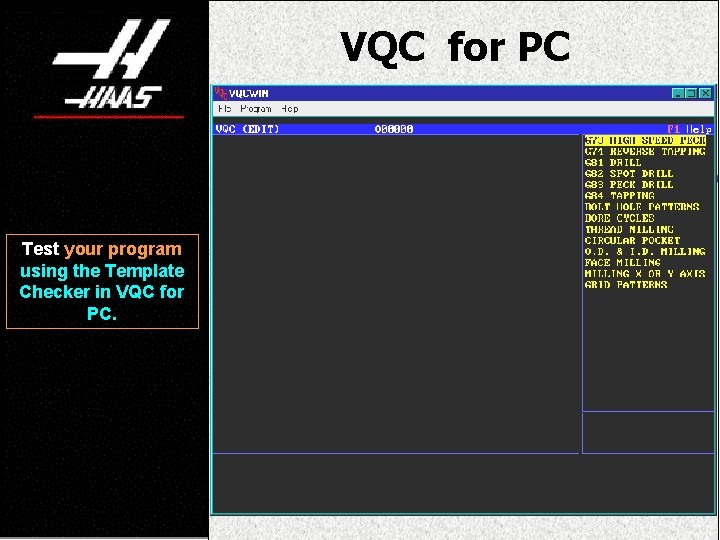
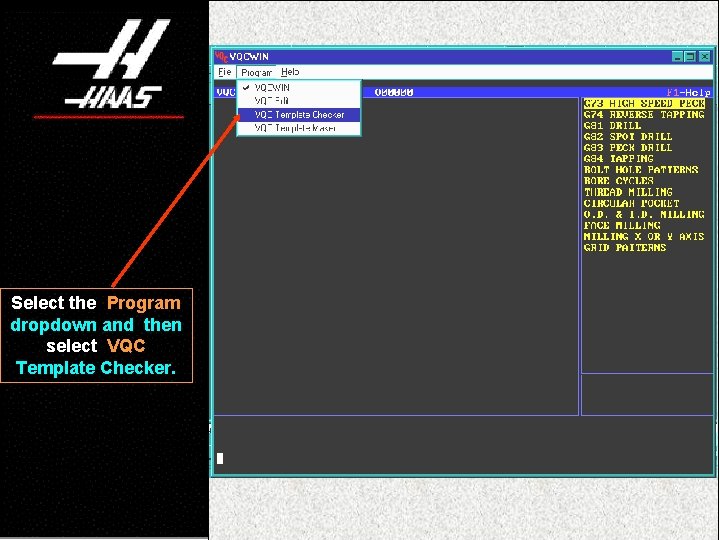
VQC for PC Test your program using the Template Checker in VQC for PC.

Select the Program dropdown and then select VQC Template Checker.

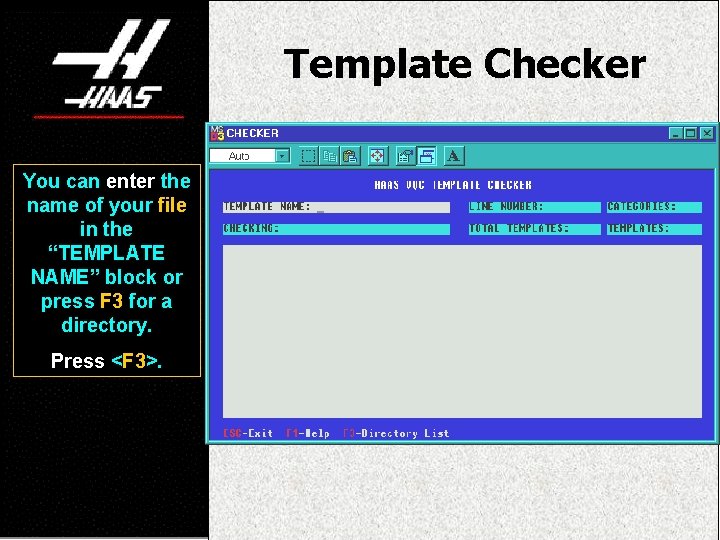
Template Checker You can enter the name of your file in the “TEMPLATE NAME” block or press F 3 for a directory. Press <F 3>.

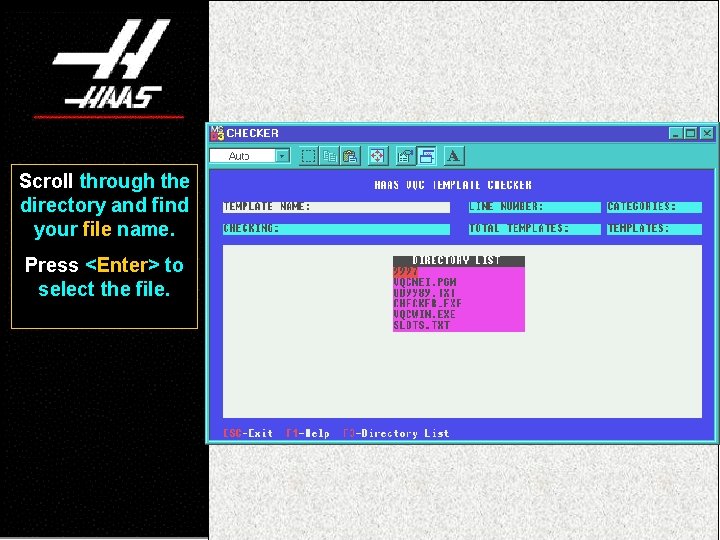
Scroll through the directory and find your file name. Press <Enter> to select the file.

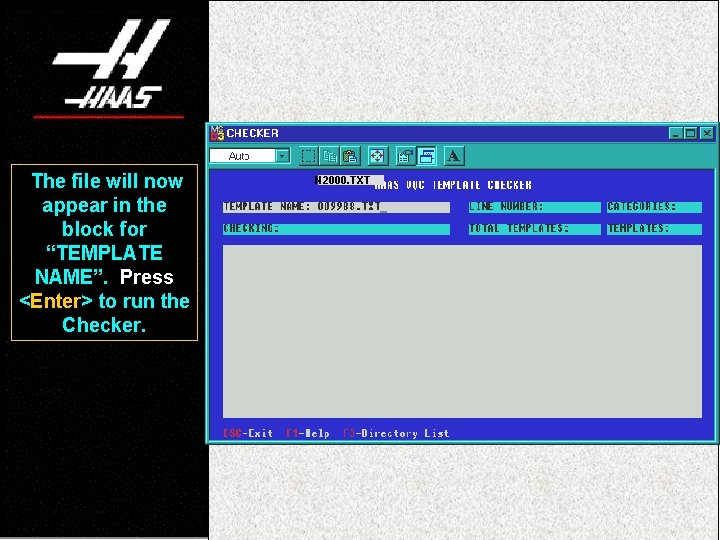
The file will now appear in the block for “TEMPLATE NAME”. Press <Enter> to run the Checker. N 2000. TXT

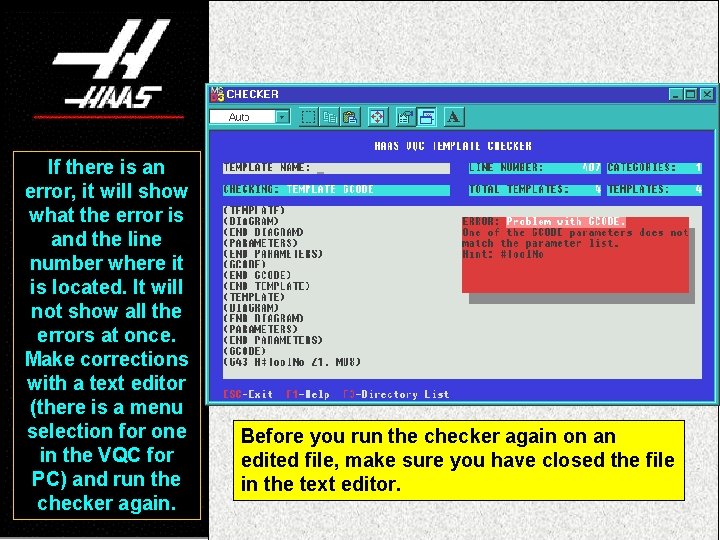
If there is an error, it will show what the error is and the line number where it is located. It will not show all the errors at once. Make corrections with a text editor (there is a menu selection for one in the VQC for PC) and run the checker again. Before you run the checker again on an edited file, make sure you have closed the file in the text editor.

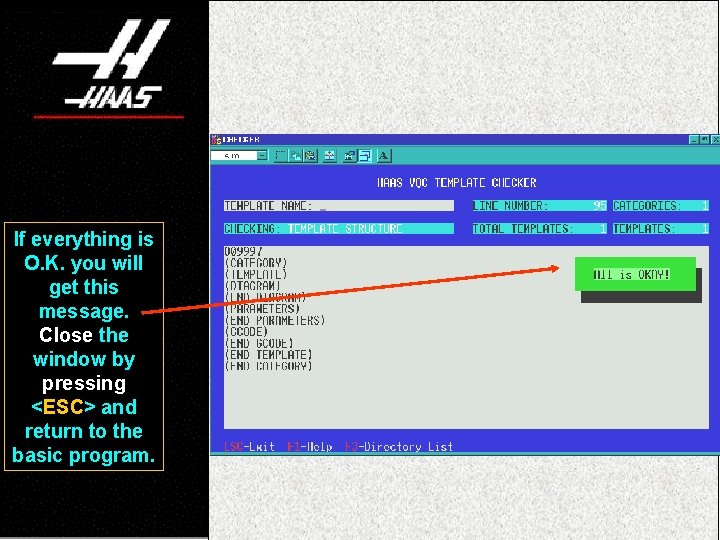
If everything is O. K. you will get this message. Close the window by pressing <ESC> and return to the basic program.

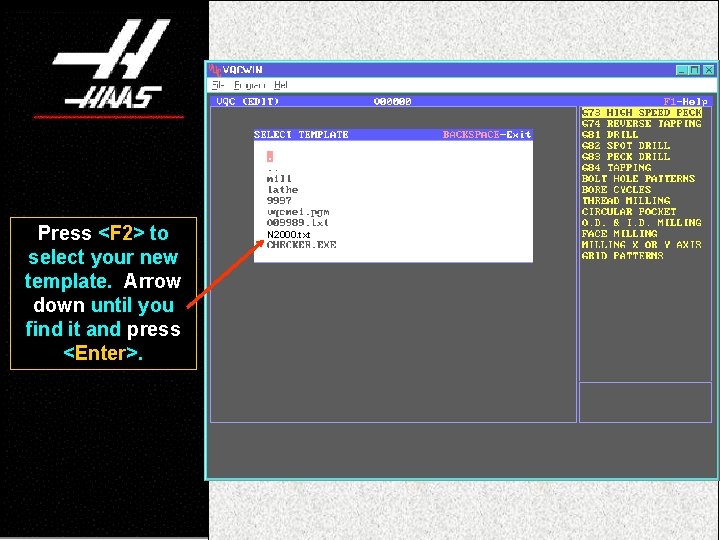
Press <F 2> to select your new template. Arrow down until you find it and press <Enter>. N 2000. txt

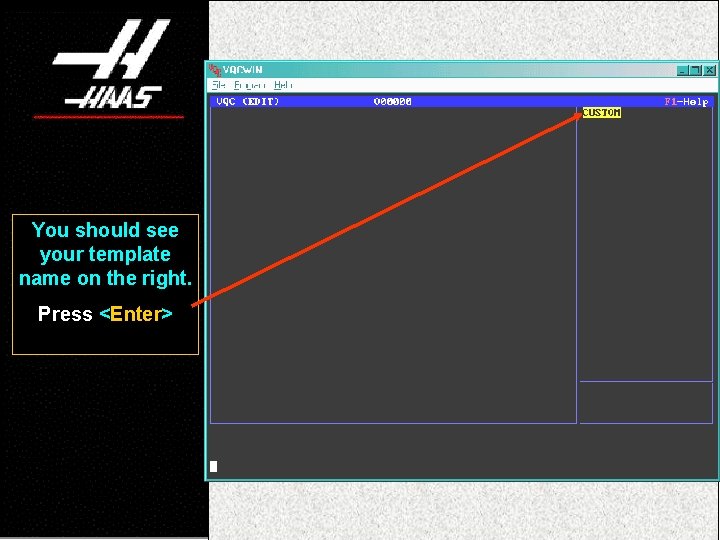
You should see your template name on the right. Press <Enter>

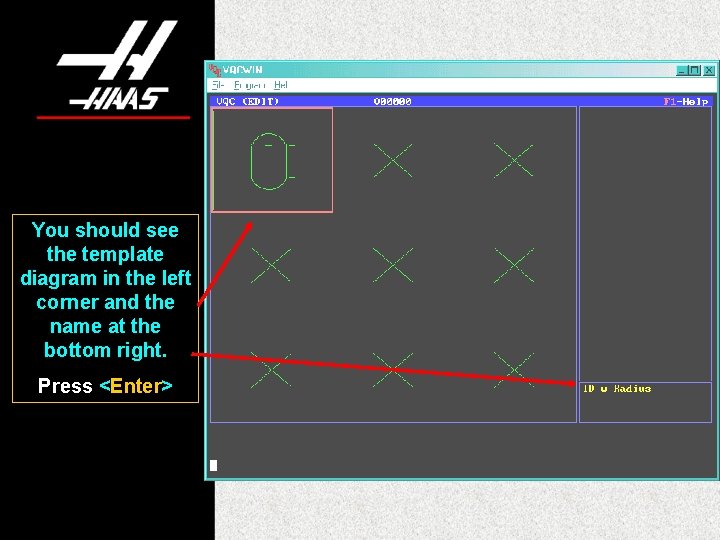
You should see the template diagram in the left corner and the name at the bottom right. Press <Enter>

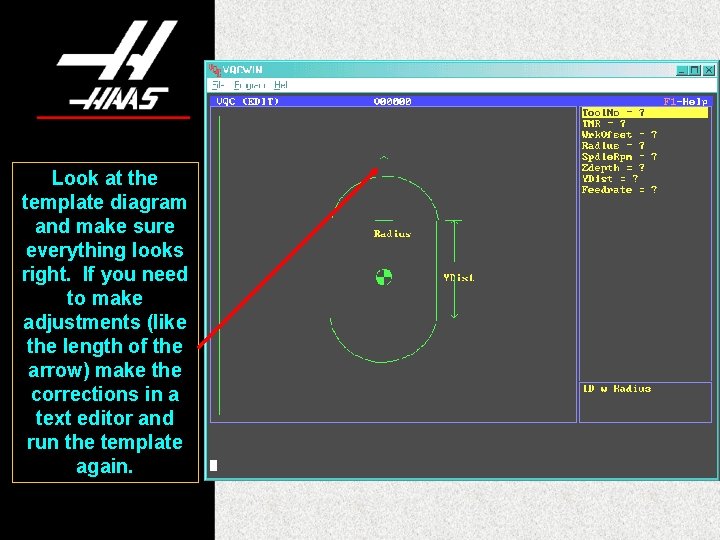
Look at the template diagram and make sure everything looks right. If you need to make adjustments (like the length of the arrow) make the corrections in a text editor and run the template again.

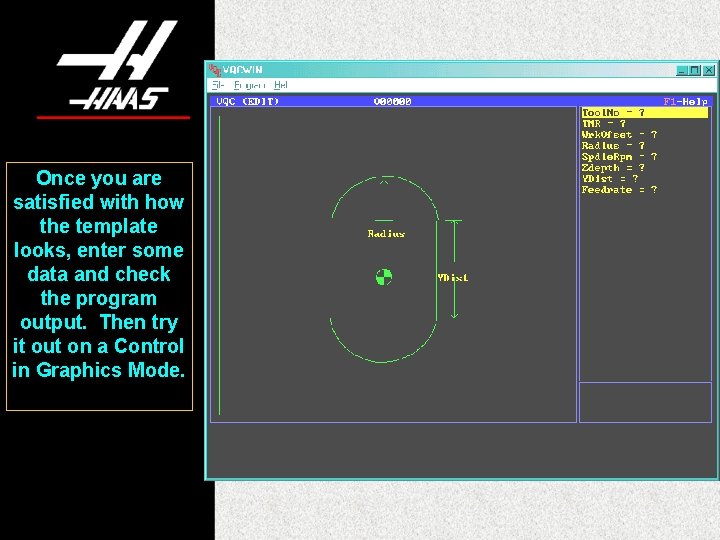
Once you are satisfied with how the template looks, enter some data and check the program output. Then try it out on a Control in Graphics Mode.

Instead of using the “Template Builder”, you could just draw a sketch on some graph paper, or use a drawing or CAD program. Making the drawing on a graph will help you to plot the points. You could then use the sample program in this presentation or the Manual to help you construct the necessary code.

Prepared by Haas Automation Training Department Oxnard, CA 93030