CT 1514 Macromedia Flash mxIntroduction What is Macromedia
![3. Tool Box: Drawing Tool 7) Paint Bucket Tool[2] • The Paint Bucket fills 3. Tool Box: Drawing Tool 7) Paint Bucket Tool[2] • The Paint Bucket fills](https://slidetodoc.com/presentation_image/b8cd3c0c68272c083e9e3206204601ed/image-23.jpg)
![3. Tool Box: Drawing Tool 7) Gradient Tool[3] • (See Example 3)To fill a 3. Tool Box: Drawing Tool 7) Gradient Tool[3] • (See Example 3)To fill a](https://slidetodoc.com/presentation_image/b8cd3c0c68272c083e9e3206204601ed/image-25.jpg)
![3. Tool Box: Drawing Tool 6) Fill Transformed Tool[3] • It is used to 3. Tool Box: Drawing Tool 6) Fill Transformed Tool[3] • It is used to](https://slidetodoc.com/presentation_image/b8cd3c0c68272c083e9e3206204601ed/image-28.jpg)
![Frames: Types [11] Key Frame: Any time your wish that your animation to undergo Frames: Types [11] Key Frame: Any time your wish that your animation to undergo](https://slidetodoc.com/presentation_image/b8cd3c0c68272c083e9e3206204601ed/image-51.jpg)
![Type of Animations Type of Tweened Animation: 1. Motion tween[9]: you create the motion Type of Animations Type of Tweened Animation: 1. Motion tween[9]: you create the motion](https://slidetodoc.com/presentation_image/b8cd3c0c68272c083e9e3206204601ed/image-61.jpg)
![Type of Animations Type of Tweened Animation: 2. Shape tween[10] : involves drawing a Type of Animations Type of Tweened Animation: 2. Shape tween[10] : involves drawing a](https://slidetodoc.com/presentation_image/b8cd3c0c68272c083e9e3206204601ed/image-62.jpg)
![References [1]http: //en. wikipedia. org/wiki/Macromedia_Flash [2]http: //www. lanoie. com/classes/Flash/Toolbox/lectures/lecture. D. html [3]http: //www. peachpit. References [1]http: //en. wikipedia. org/wiki/Macromedia_Flash [2]http: //www. lanoie. com/classes/Flash/Toolbox/lectures/lecture. D. html [3]http: //www. peachpit.](https://slidetodoc.com/presentation_image/b8cd3c0c68272c083e9e3206204601ed/image-65.jpg)
- Slides: 65

CT 1514 Macromedia Flash mx-Introduction

What is Macromedia Flash One of Adobe Products also called Adobe Flash is a multimedia platform used to add animation, video, and interactivity to web pages

Flash Uses Flash is frequently used for advertisements games flash animations for broadcast

Macromedia Flash Features It manipulates vector and raster graphics It Provides animation for Text Drawings Still images It supports bidirectional streaming of audio and video. it can capture user input via mouse, keyboard, microphone, and camera. It contains an object-oriented language called Action Script

Adobe Flash Player The Adobe Flash Player is software for viewing multimedia, Rich Internet Applications and streaming video and audio, on a computer web browser or on supported mobile devices. Flash Player runs SWF (see Table 1) files that can be created by the Adobe Flash

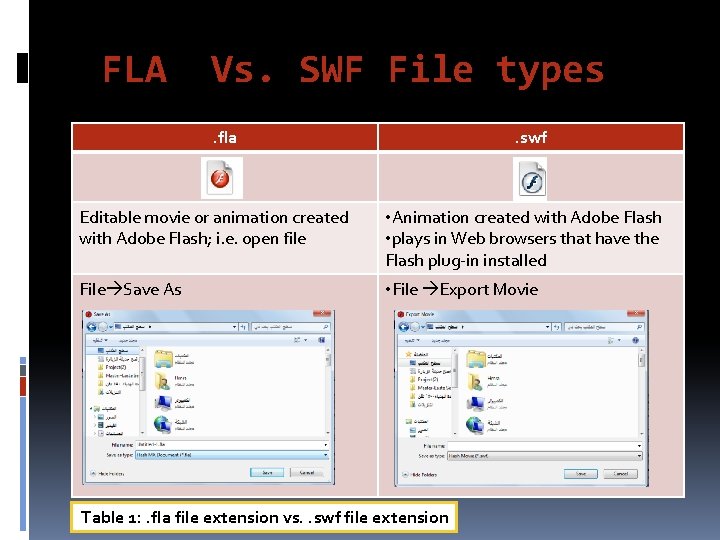
FLA Vs. SWF File types. fla . swf Editable movie or animation created with Adobe Flash; i. e. open file • Animation created with Adobe Flash • plays in Web browsers that have the Flash plug-in installed File Save As • File Export Movie Table 1: . fla file extension vs. . swf file extension

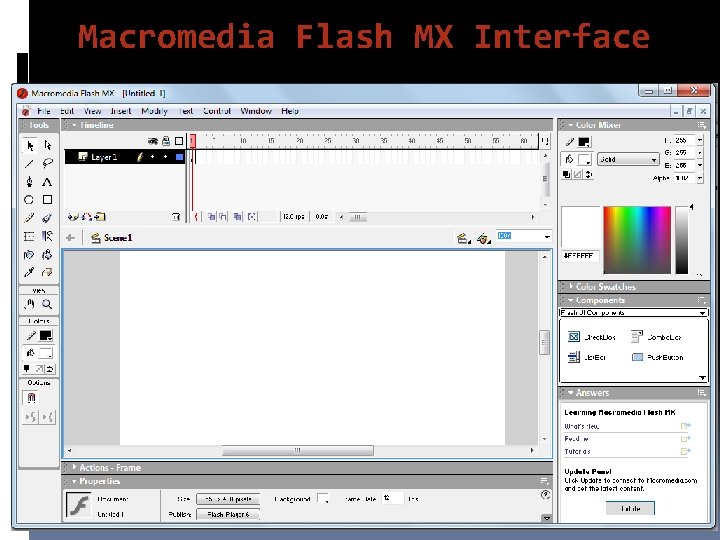
Macromedia Flash MX Interface

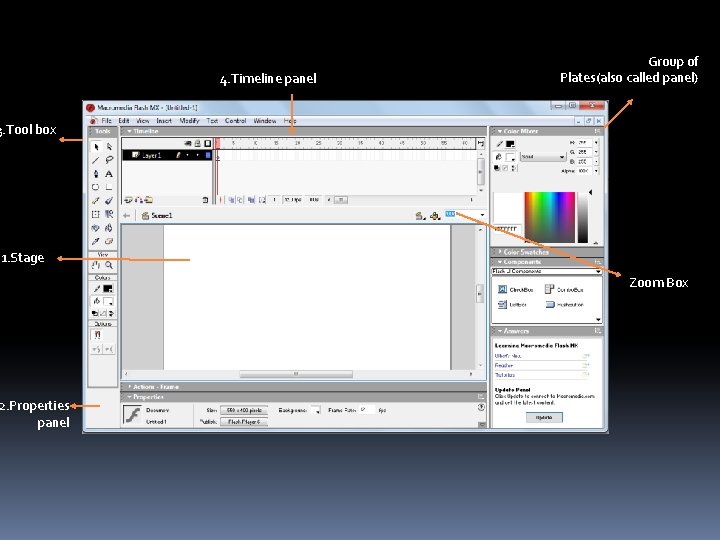
4. Timeline panel Group of Plates(also called panel) 3. Tool box 1. Stage 2. Properties panel Zoom Box

1. Stage The Stage in Adobe Flash is the rectangular area where you place All the graphic contents. The gray area surrounding the stage is called “Work Area” The work area my contain graphical items also BUT only the ones on the stage will appear in the final flash file

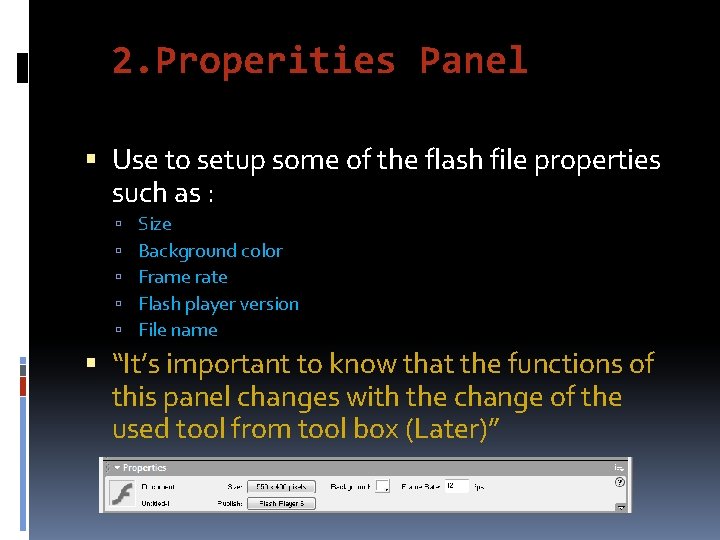
2. Properities Panel Use to setup some of the flash file properties such as : Size Background color Frame rate Flash player version File name “It’s important to know that the functions of this panel changes with the change of the used tool from tool box (Later)”

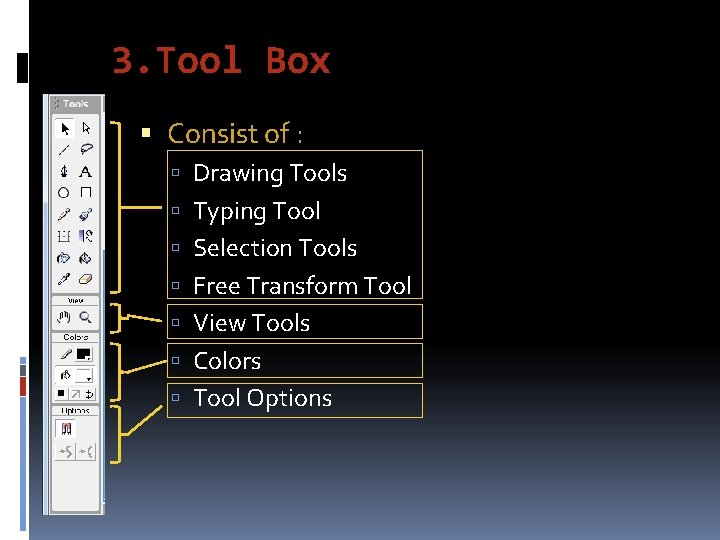
3. Tool Box Consist of : Drawing Tools Typing Tool Selection Tools Free Transform Tool View Tools Colors Tool Options

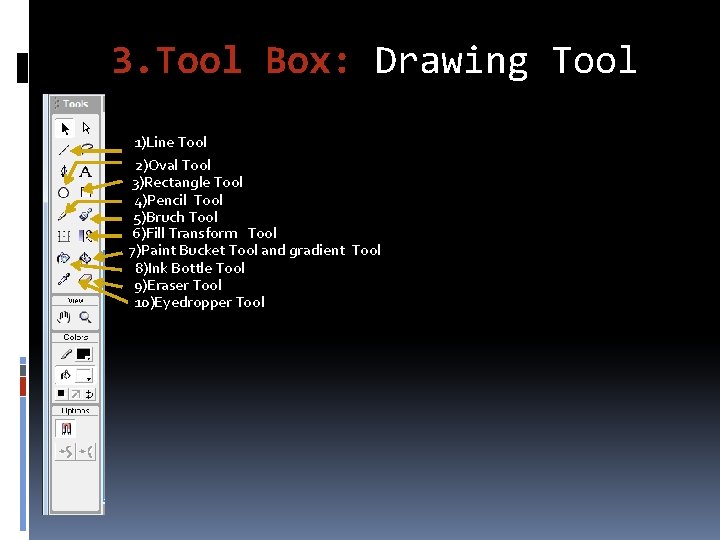
3. Tool Box: Drawing Tool 1)Line Tool 2)Oval Tool 3)Rectangle Tool 4)Pencil Tool 5)Bruch Tool 6)Fill Transform Tool 7)Paint Bucket Tool and gradient Tool 8)Ink Bottle Tool 9)Eraser Tool 10)Eyedropper Tool

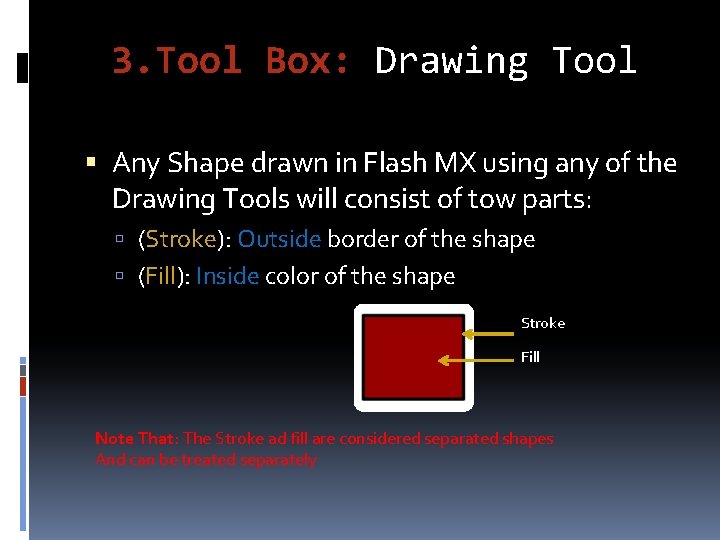
3. Tool Box: Drawing Tool Any Shape drawn in Flash MX using any of the Drawing Tools will consist of tow parts: (Stroke): Outside border of the shape (Fill): Inside color of the shape Stroke Fill Note That: The Stroke ad fill are considered separated shapes And can be treated separately

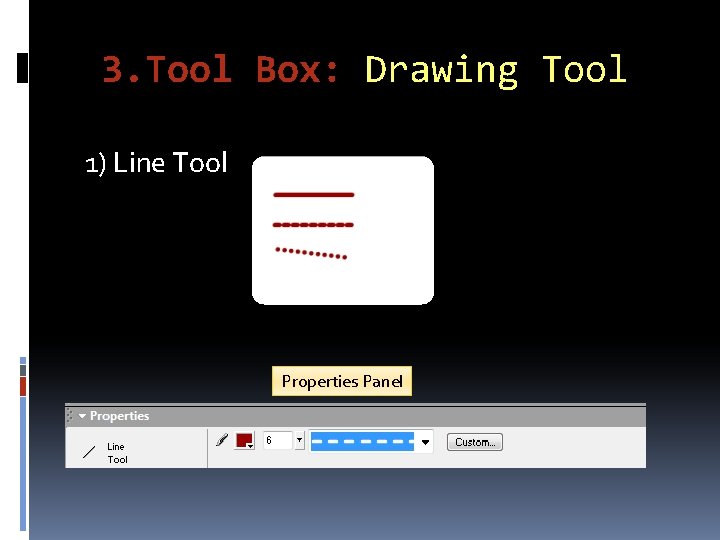
3. Tool Box: Drawing Tool 1) Line Tool Properties Panel

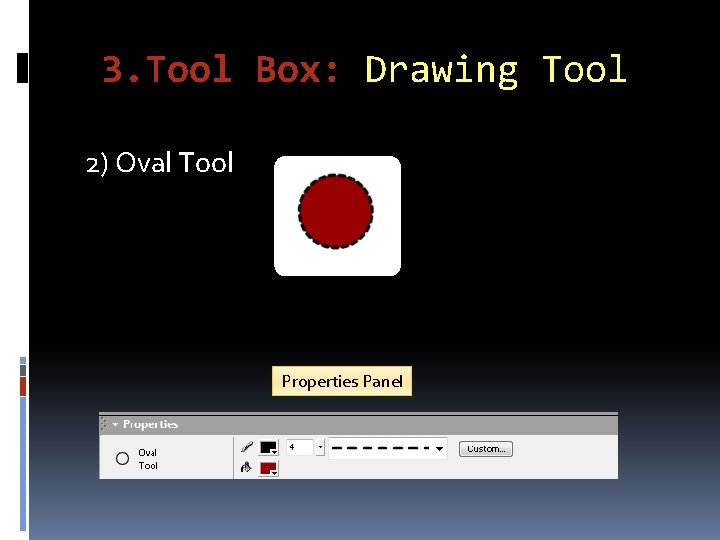
3. Tool Box: Drawing Tool 2) Oval Tool Properties Panel

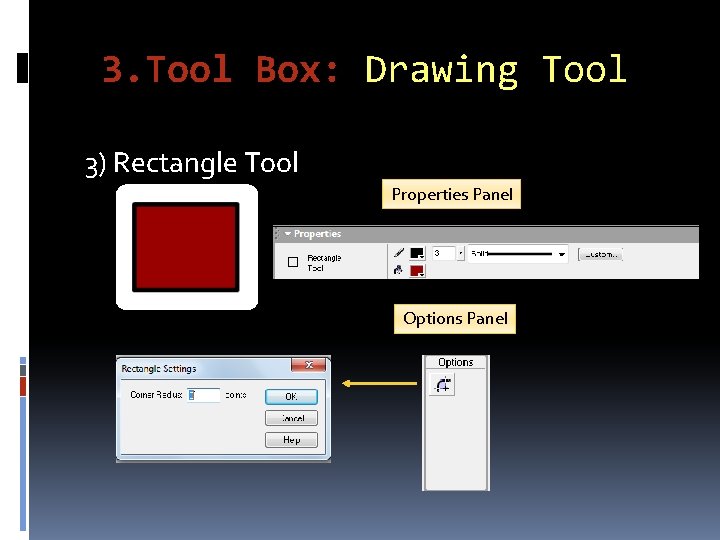
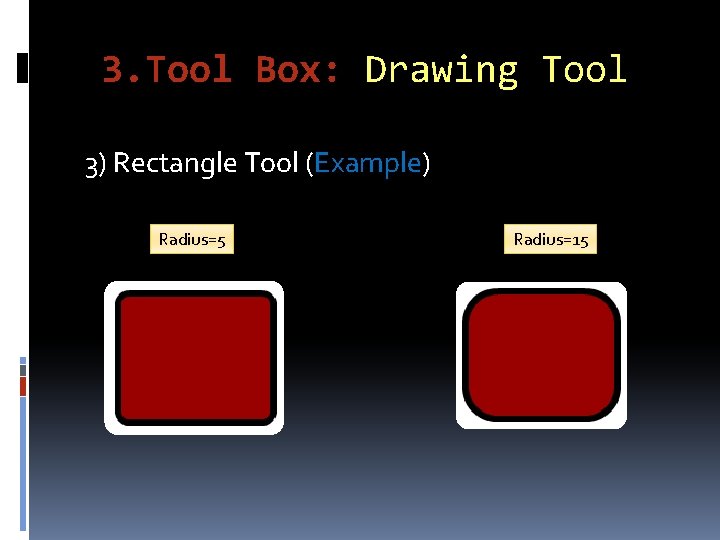
3. Tool Box: Drawing Tool 3) Rectangle Tool Properties Panel Options Panel

3. Tool Box: Drawing Tool 3) Rectangle Tool (Example) Radius=5 Radius=15

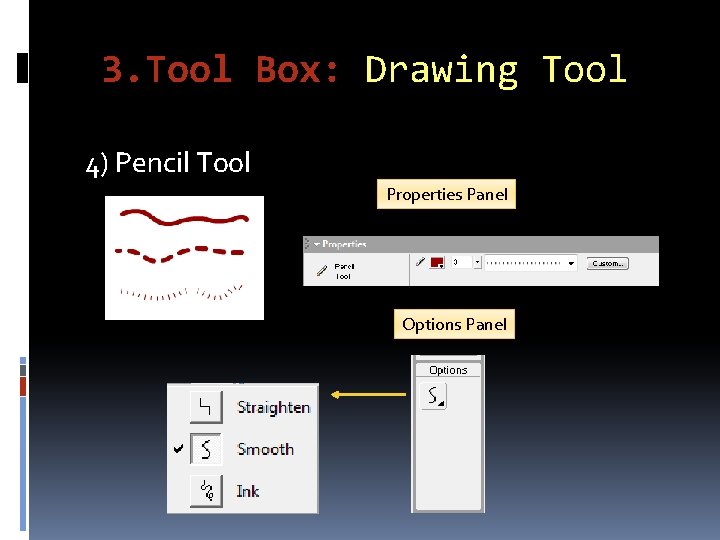
3. Tool Box: Drawing Tool 4) Pencil Tool Properties Panel Options Panel

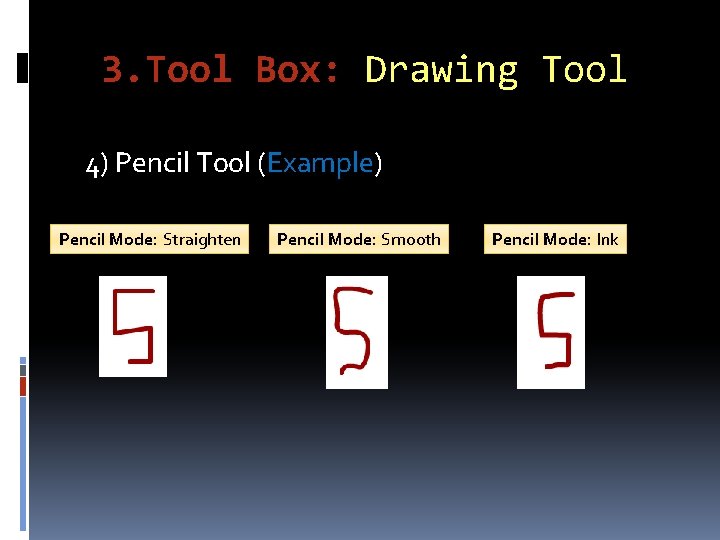
3. Tool Box: Drawing Tool 4) Pencil Tool (Example) Pencil Mode: Straighten Pencil Mode: Smooth Pencil Mode: Ink

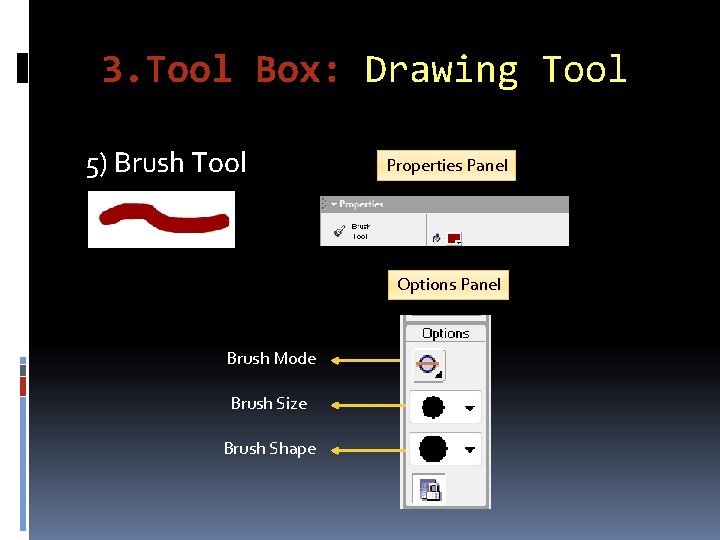
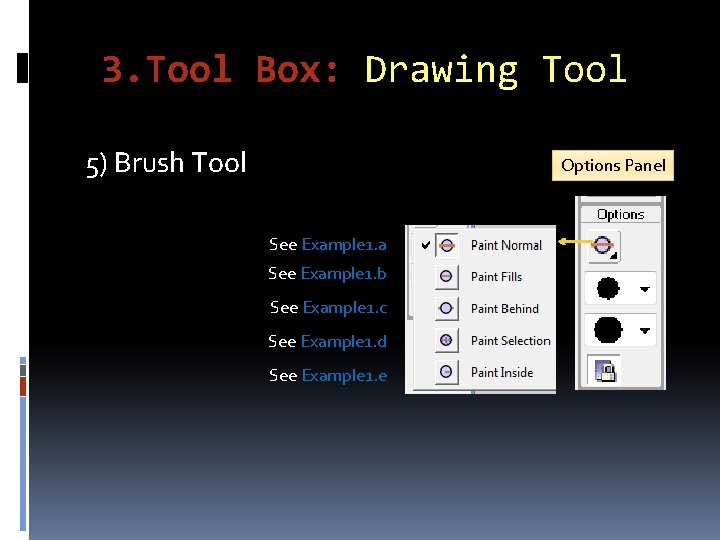
3. Tool Box: Drawing Tool 5) Brush Tool Properties Panel Options Panel Brush Mode Brush Size Brush Shape

3. Tool Box: Drawing Tool 5) Brush Tool Options Panel See Example 1. a See Example 1. b See Example 1. c See Example 1. d See Example 1. e

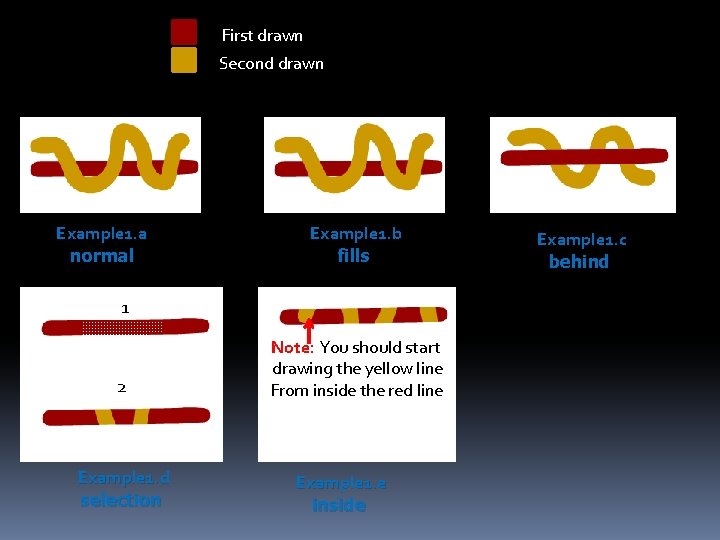
First drawn Second drawn Example 1. a normal Example 1. b fills 1 2 Example 1. d selection Note: You should start drawing the yellow line From inside the red line Example 1. e inside Example 1. c behind
![3 Tool Box Drawing Tool 7 Paint Bucket Tool2 The Paint Bucket fills 3. Tool Box: Drawing Tool 7) Paint Bucket Tool[2] • The Paint Bucket fills](https://slidetodoc.com/presentation_image/b8cd3c0c68272c083e9e3206204601ed/image-23.jpg)
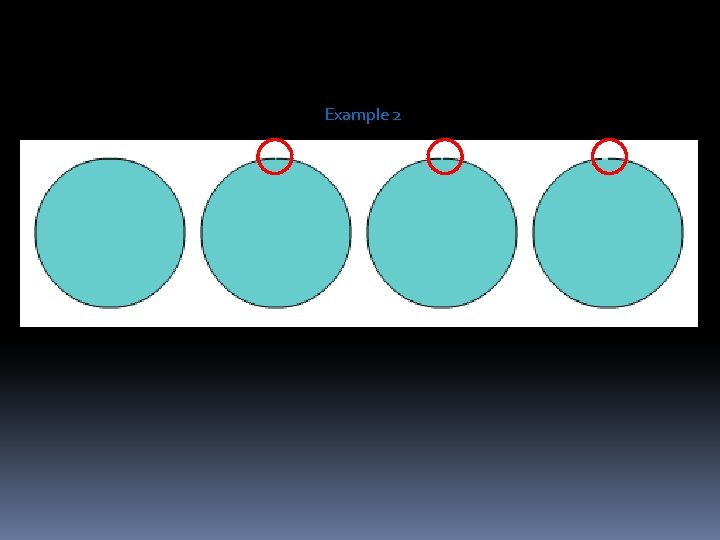
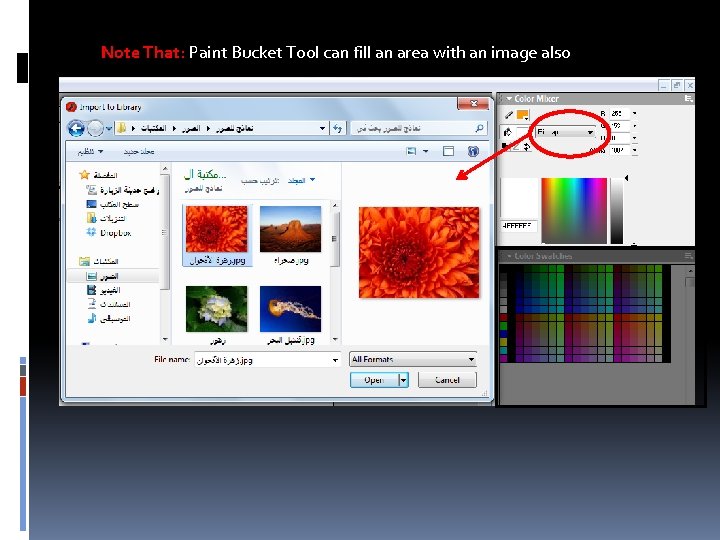
3. Tool Box: Drawing Tool 7) Paint Bucket Tool[2] • The Paint Bucket fills enclosed areas with color. • It fills empty areas as well as changes the color of areas already filled • It has a Gap Size modifier that can overlook gaps so that you can fill areas that aren't completely closed (See Example 2) Note That: Paint Bucket Tool can’t fill the color of an area’s boundaries(i. e. the can't fill the Stroke) Properties Panel Options Panel

Example 2
![3 Tool Box Drawing Tool 7 Gradient Tool3 See Example 3To fill a 3. Tool Box: Drawing Tool 7) Gradient Tool[3] • (See Example 3)To fill a](https://slidetodoc.com/presentation_image/b8cd3c0c68272c083e9e3206204601ed/image-25.jpg)
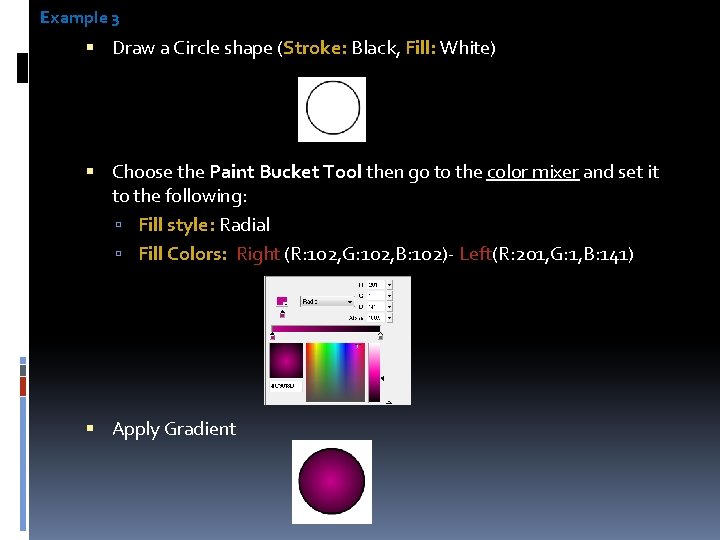
3. Tool Box: Drawing Tool 7) Gradient Tool[3] • (See Example 3)To fill a shape (or replace a solid fill) with a gradient as following: • In the Toolbar, select the paintbucket icon. • In the Color Mixer panel, define a new gradient. or From the Color Swatches panel, or the fill-color box in the Toolbar or Property Inspector, choose an existing linear gradient

Example 3 Draw a Circle shape (Stroke: Black, Fill: White) Choose the Paint Bucket Tool then go to the color mixer and set it to the following: Fill style: Radial Fill Colors: Right (R: 102, G: 102, B: 102)- Left(R: 201, G: 1, B: 141) Apply Gradient

Note That: Paint Bucket Tool can fill an area with an image also
![3 Tool Box Drawing Tool 6 Fill Transformed Tool3 It is used to 3. Tool Box: Drawing Tool 6) Fill Transformed Tool[3] • It is used to](https://slidetodoc.com/presentation_image/b8cd3c0c68272c083e9e3206204601ed/image-28.jpg)
3. Tool Box: Drawing Tool 6) Fill Transformed Tool[3] • It is used to modify applied gradient.

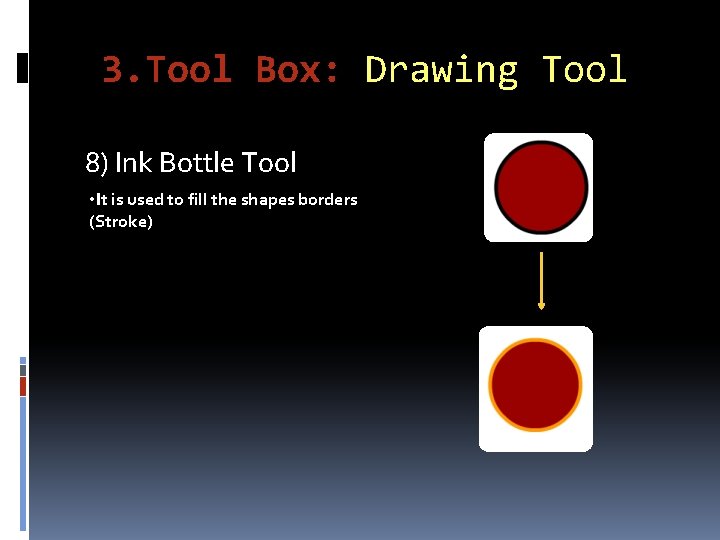
3. Tool Box: Drawing Tool 8) Ink Bottle Tool • It is used to fill the shapes borders (Stroke)

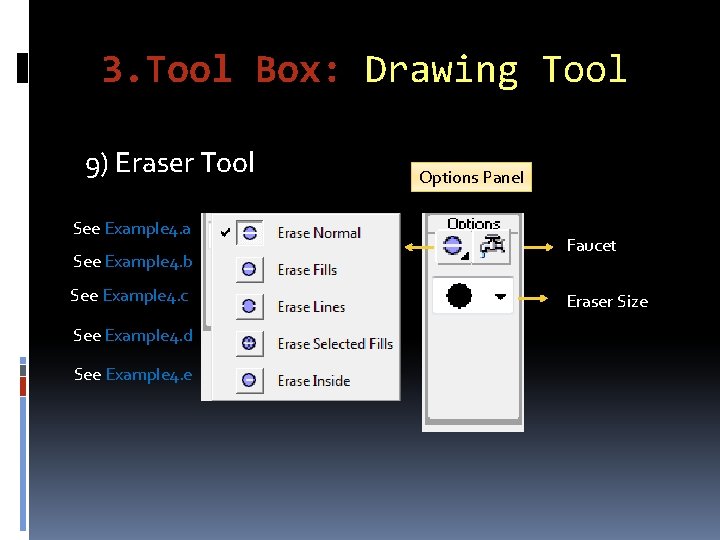
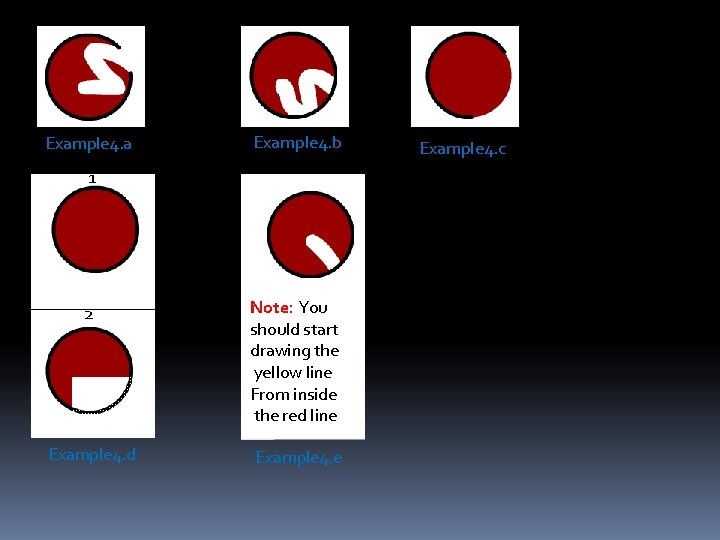
3. Tool Box: Drawing Tool 9) Eraser Tool See Example 4. a See Example 4. b See Example 4. c See Example 4. d See Example 4. e Options Panel Faucet Eraser Size

Example 4. a Example 4. b 1 2 Note: You should start drawing the yellow line From inside the red line Example 4. d Example 4. e Example 4. c

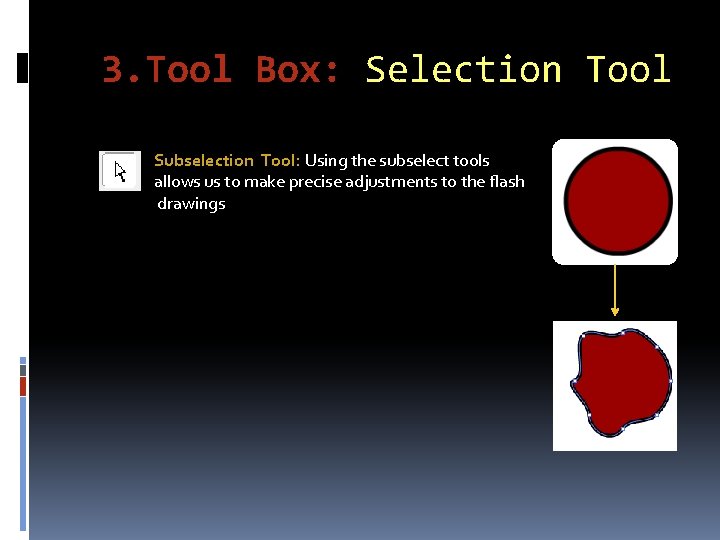
3. Tool Box: Selection Tool Subselection Tool: Using the subselect tools allows us to make precise adjustments to the flash drawings

3. Tool Box: Selection Tool Arrow Tool

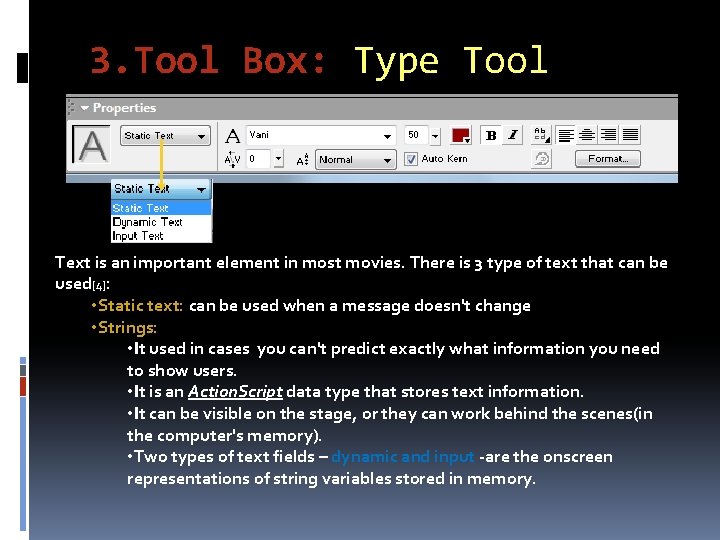
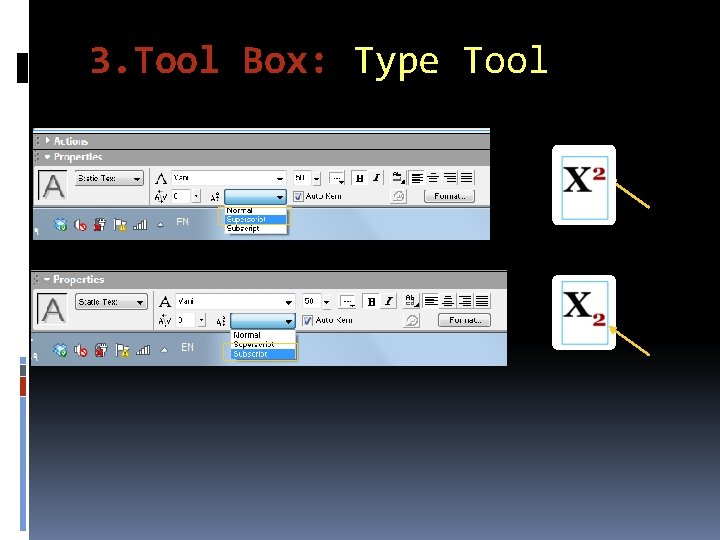
3. Tool Box: Type Tool Text is an important element in most movies. There is 3 type of text that can be used[4]: • Static text: can be used when a message doesn't change • Strings: • It used in cases you can't predict exactly what information you need to show users. • It is an Action. Script data type that stores text information. • It can be visible on the stage, or they can work behind the scenes(in the computer's memory). • Two types of text fields – dynamic and input -are the onscreen representations of string variables stored in memory.

Dynamic Text Vs. Input Text between input and dynamic text are both used to display changing text values The main difference between them is that users can type and paste directly into input text fields.

3. Tool Box: Type Tool

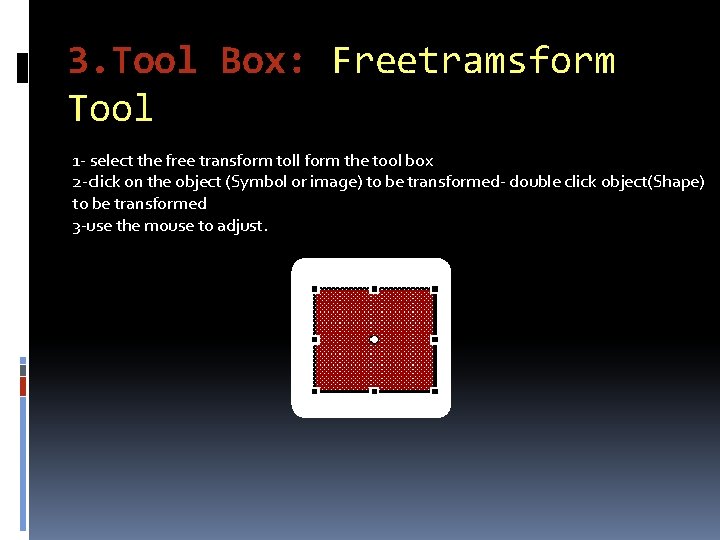
3. Tool Box: Freetramsform Tool 1 - select the free transform toll form the tool box 2 -click on the object (Symbol or image) to be transformed- double click object(Shape) to be transformed 3 -use the mouse to adjust.

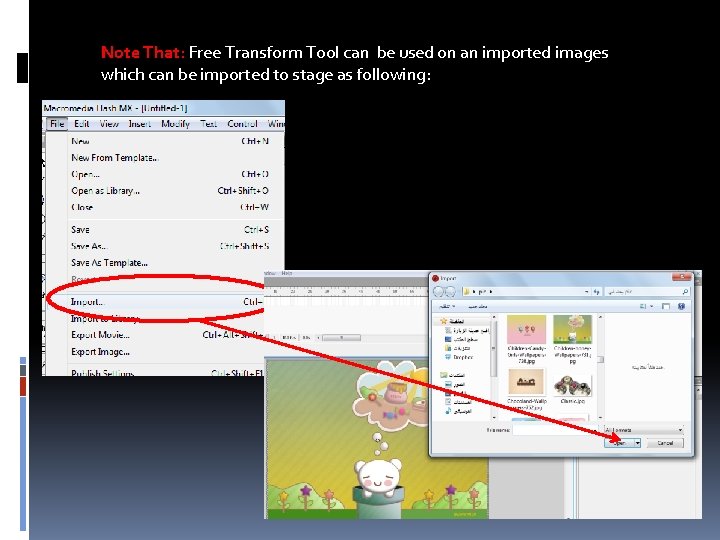
Note That: Free Transform Tool can be used on an imported images which can be imported to stage as following:

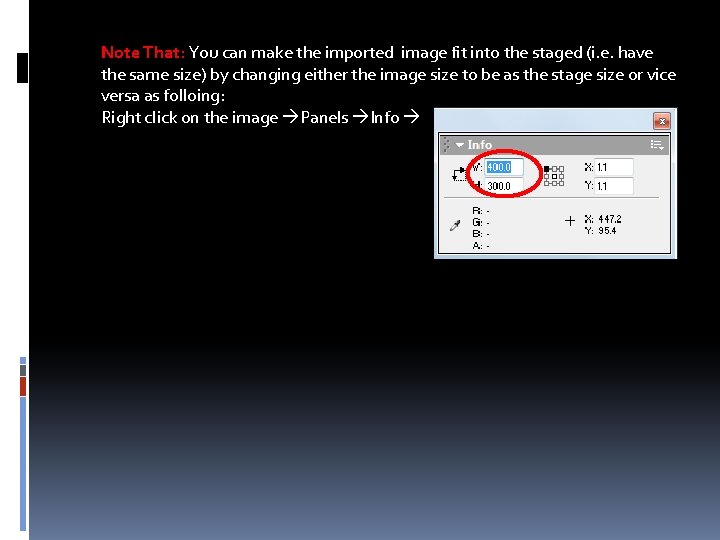
Note That: You can make the imported image fit into the staged (i. e. have the same size) by changing either the image size to be as the stage size or vice versa as folloing: Right click on the image Panels Info

4. Timeline The Timeline organizes and controls a document’s content over time in layers and frames Like films, Flash documents divide lengths of time into frames. Layers are like multiple film strips stacked on top of one another, each containing a different image that appears on the Stage.

4. Timeline A flash document consist of Layer(s) Each layer consist of Frames

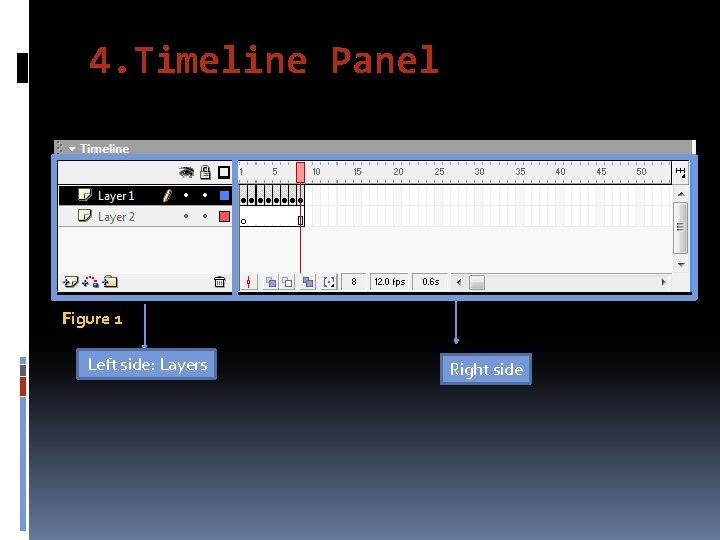
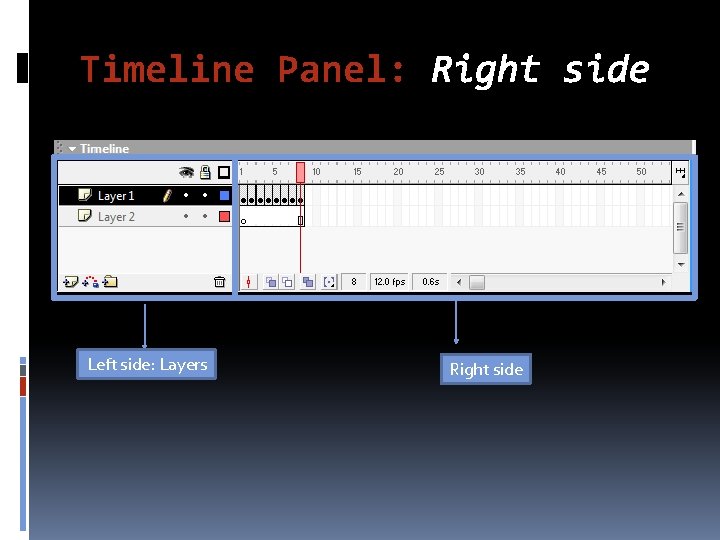
4. Timeline Panel Figure 1 Left side: Layers Right side

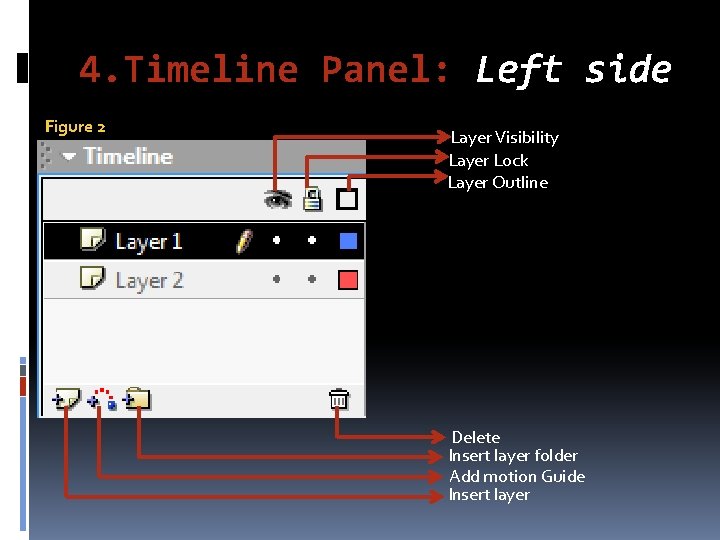
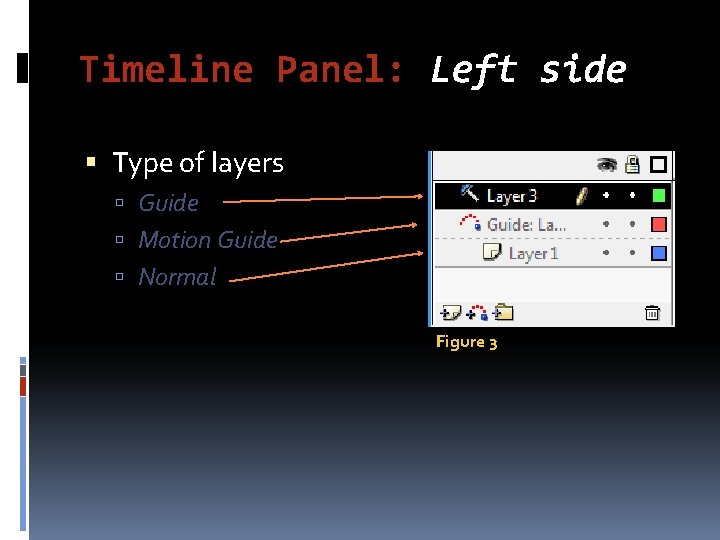
4. Timeline Panel: Left side Figure 2 Layer Visibility Layer Lock Layer Outline Delete Insert layer folder Add motion Guide Insert layer

Timeline Panel: Left side Type of layers Guide Motion Guide Normal Figure 3

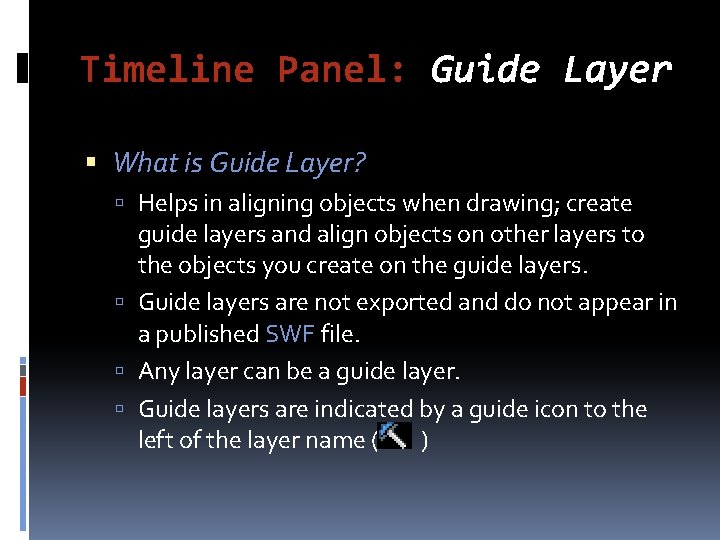
Timeline Panel: Guide Layer What is Guide Layer? Helps in aligning objects when drawing; create guide layers and align objects on other layers to the objects you create on the guide layers. Guide layers are not exported and do not appear in a published SWF file. Any layer can be a guide layer. Guide layers are indicated by a guide icon to the left of the layer name ( )

Timeline Panel: Guide Layer How to create a Guide Layer? Select the layer and Right-click Guide from the context menu. To change the layer back to a normal layer, Rightclick select Guide again.

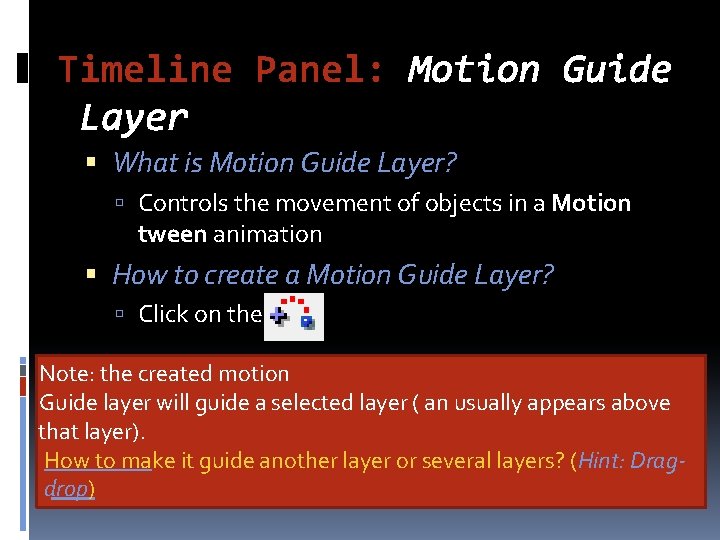
Timeline Panel: Motion Guide Layer What is Motion Guide Layer? Controls the movement of objects in a Motion tween animation How to create a Motion Guide Layer? Click on the Note: the created motion Guide layer will guide a selected layer ( an usually appears above that layer). How to make it guide another layer or several layers? (Hint: Drag- drop)

Timeline Panel: Normal Layer What is Normal Layer? A layer contains objects, drawings, texts, bitmap images. . etc How to create & manage a Normal layer From the layer panel as seen in figure 2

Timeline Panel: Right side Left side: Layers Right side

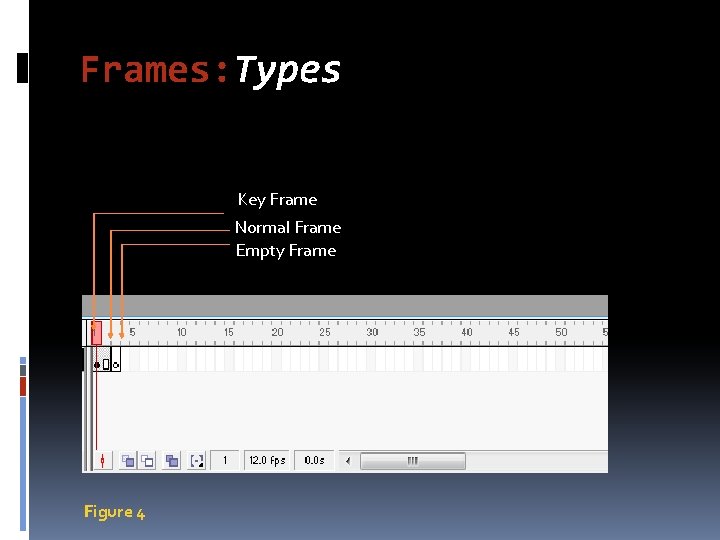
Frames: Types Key Frame Normal Frame Empty Frame Figure 4
![Frames Types 11 Key Frame Any time your wish that your animation to undergo Frames: Types [11] Key Frame: Any time your wish that your animation to undergo](https://slidetodoc.com/presentation_image/b8cd3c0c68272c083e9e3206204601ed/image-51.jpg)
Frames: Types [11] Key Frame: Any time your wish that your animation to undergo a visual change or you want an action to occur, you must use a keyframe at that point on the timeline Empty Frame: Ready to contain a change and/or action A keyframe with content visible on the stage is identified by a solid black dot; a blank keyframe is identified by a hollow dot; and a keyframe with an attached action is identified with a small a (Later). Normal (Regular) Frame: A keyframe on the timeline denotes a change; the regular frames that follow a keyframe determine the duration of that change. Thus, Regular frames always follow keyframes and contain the same content as the last keyframe on the same layer

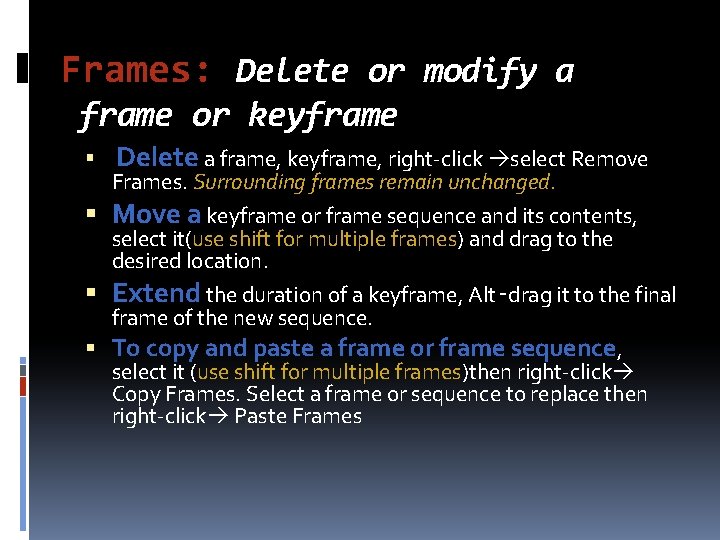
Frames: Delete or modify a frame or keyframe Delete a frame, keyframe, right-click select Remove Frames. Surrounding frames remain unchanged. Move a keyframe or frame sequence and its contents, select it(use shift for multiple frames) and drag to the desired location. Extend the duration of a keyframe, Alt‑drag it to the final frame of the new sequence. To copy and paste a frame or frame sequence, select it (use shift for multiple frames)then right-click Copy Frames. Select a frame or sequence to replace then right-click Paste Frames

Frames: Delete or modify a frame or keyframe (Cont. ) To copy a keyframe or frame sequence by dragging, select it and Alt‑drag To convert a keyframe to a frame, select the keyframe then: select Modify > Timeline > Clear Keyframe or , right-click it and select Clear Keyframe. Important: The cleared keyframe and all frames up to the subsequent keyframe are replaced with the contents of the frame preceding the cleared keyframe. . To change the length of a tweened sequence, drag the beginning or ending keyframe left or right. To reverse an animation sequence, select the appropriate frames in one or more layers then: select Modify Timeline Reverse Frames or Right-click Reverse Frames Keyframes must be at the beginning and end of the sequence.

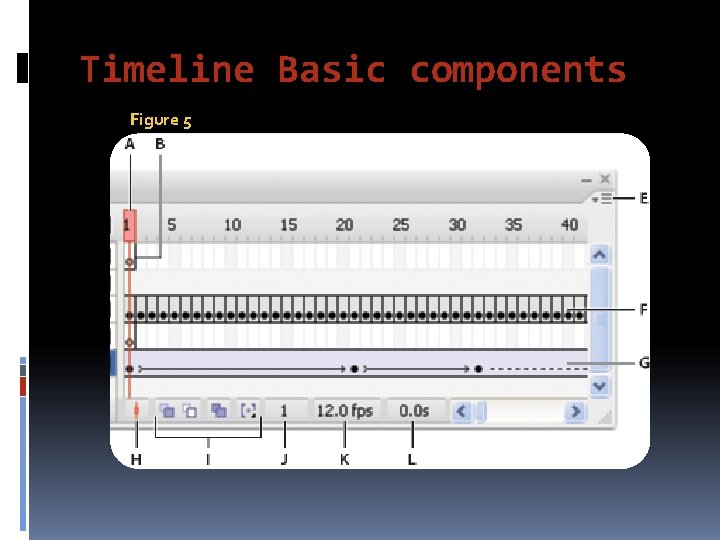
Timeline Basic components Figure 5

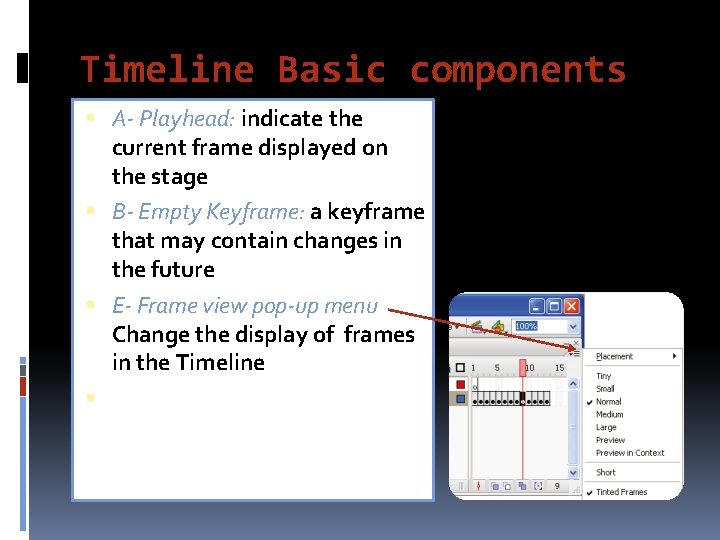
Timeline Basic components A- Playhead: indicate the current frame displayed on the stage B- Empty Keyframe: a keyframe that may contain changes in the future E- Frame view pop-up menu Change the display of frames in the Timeline

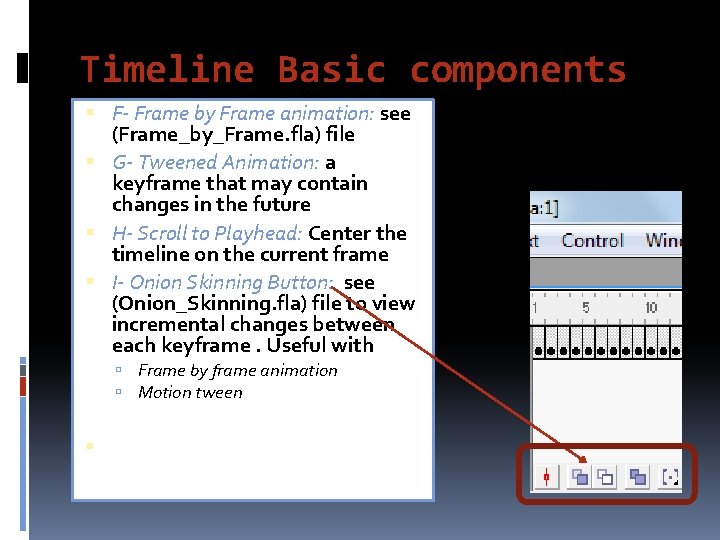
Timeline Basic components F- Frame by Frame animation: see (Frame_by_Frame. fla) file G- Tweened Animation: a keyframe that may contain changes in the future H- Scroll to Playhead: Center the timeline on the current frame I- Onion Skinning Button: see (Onion_Skinning. fla) file to view incremental changes between each keyframe. Useful with Frame by frame animation Motion tween

Timeline Basic components K- Frame Rate indicator: L- Elapsed time indicator:

Type of Animations Frame by Frame Animation Twined Animation

Type of Animations Frame by Frame Animation frame-by-frame animation changes the contents of the Stage in every frame and is best suited to a complex animation in which an image changes in every frame instead of simply moving across the Stage. [8] To create a frame-by-frame animation, you define each frame as a keyframe and create a different (typically modified) image for each frame. Note: This type of animation increases the file size more rapidly than tweened animation because Flash stores the values for each keyframe.

Type of Animations Tweened Animation: A tween is an animation that is: Created by specifying a value for an object property in one frame and another value for that same property in another frame. Flash calculates the values for that property in between those two frames. The term tween comes from the words “in between”. [7]
![Type of Animations Type of Tweened Animation 1 Motion tween9 you create the motion Type of Animations Type of Tweened Animation: 1. Motion tween[9]: you create the motion](https://slidetodoc.com/presentation_image/b8cd3c0c68272c083e9e3206204601ed/image-61.jpg)
Type of Animations Type of Tweened Animation: 1. Motion tween[9]: you create the motion tween and then define properties such as position, size, and rotation for an instance or text block at one point in time, and then you change those properties at another point in time. Flash automatically creates the gradual change between the first and second point in time. You can also apply a motion tween that follows a motion path (Using Motion Guid Layer). It works on symbols and texts blocks
![Type of Animations Type of Tweened Animation 2 Shape tween10 involves drawing a Type of Animations Type of Tweened Animation: 2. Shape tween[10] : involves drawing a](https://slidetodoc.com/presentation_image/b8cd3c0c68272c083e9e3206204601ed/image-62.jpg)
Type of Animations Type of Tweened Animation: 2. Shape tween[10] : involves drawing a vector shape on one specific keyframe in the Timeline and then creating another keyframe and drawing another shape on the second keyframe Flash interpolates the intermediate shapes for the frames in between, creating an animation of the first shape morphing into the second shape.

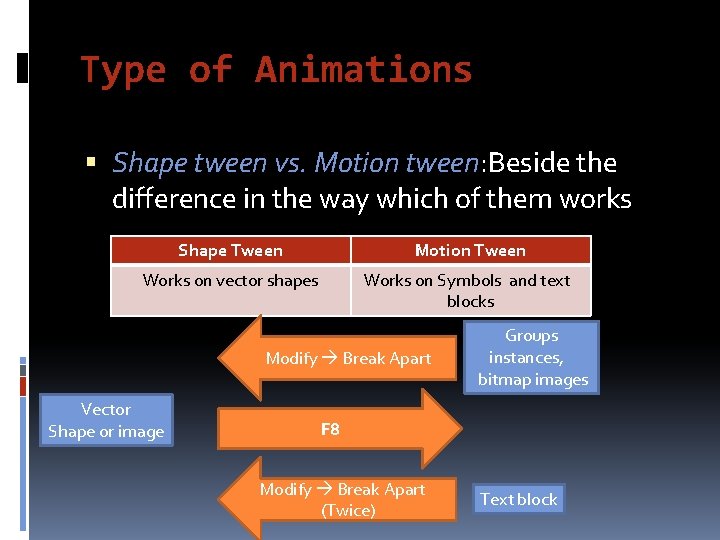
Type of Animations Shape tween vs. Motion tween: Beside the difference in the way which of them works Shape Tween Motion Tween Works on vector shapes Works on Symbols and text blocks Modify Break Apart Vector Shape or image Groups instances, bitmap images F 8 Modify Break Apart (Twice) Text block

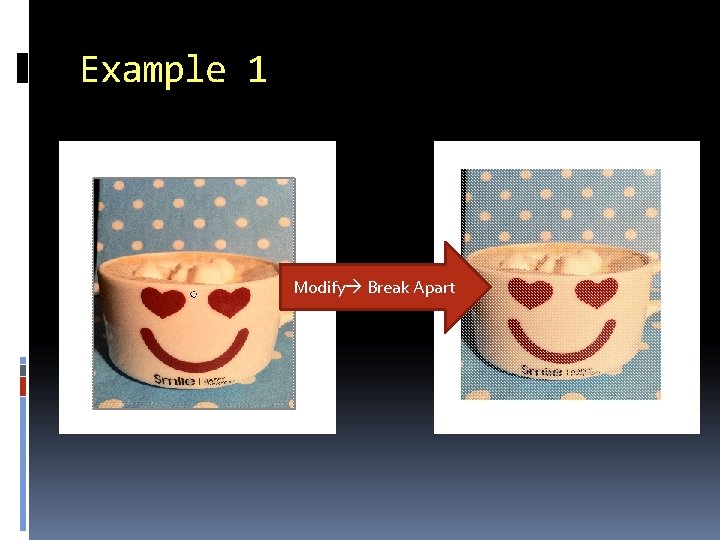
Example 1 Modify Break Apart
![References 1http en wikipedia orgwikiMacromediaFlash 2http www lanoie comclassesFlashToolboxlectureslecture D html 3http www peachpit References [1]http: //en. wikipedia. org/wiki/Macromedia_Flash [2]http: //www. lanoie. com/classes/Flash/Toolbox/lectures/lecture. D. html [3]http: //www. peachpit.](https://slidetodoc.com/presentation_image/b8cd3c0c68272c083e9e3206204601ed/image-65.jpg)
References [1]http: //en. wikipedia. org/wiki/Macromedia_Flash [2]http: //www. lanoie. com/classes/Flash/Toolbox/lectures/lecture. D. html [3]http: //www. peachpit. com/articles/article. aspx? p=605038&seq. Num=28 [4] http: //www. informit. com/articles/article. aspx? p=131047 [5]http: //help. adobe. com/en_US/Flash/10. 0_Using. Flash/WSd 60 f 23110762 d 6 b 88 3 b 18 f 10 cb 1 fe 1 af 6 -7 f 84 a. html [6] http: //www. dummies. com/how-to/content/creating-and-using-guide-layersin-flash-cs 3. html [7]http: //help. adobe. com/en_US/Flash/10. 0_Using. Flash/WSd 60 f 23110762 d 6 b 88 3 b 18 f 10 cb 1 fe 1 af 6 -7 d 8 aa. html [8]http: //www. adobe. com/devnet/flash/learning_guide/animation/part 04. html [9]http: //www. adobe. com/devnet/flash/learning_guide/animation/part 05. html [10] http: //www. adobe. com/devnet/flash/articles/concept_shape_tween. html [11] http: //www. adobepress. com/articles/article. asp? p=30346&seq. Num=4