Crime Scene Sketch An Overview n A sketch


, ruler or")


- Slides: 24
Crime Scene Sketch: An Overview n A sketch is worth a 1, 000 words Photo: http: //www. sleeping-demon. freeserve. co. uk/23 rd-ltr/part 1. html
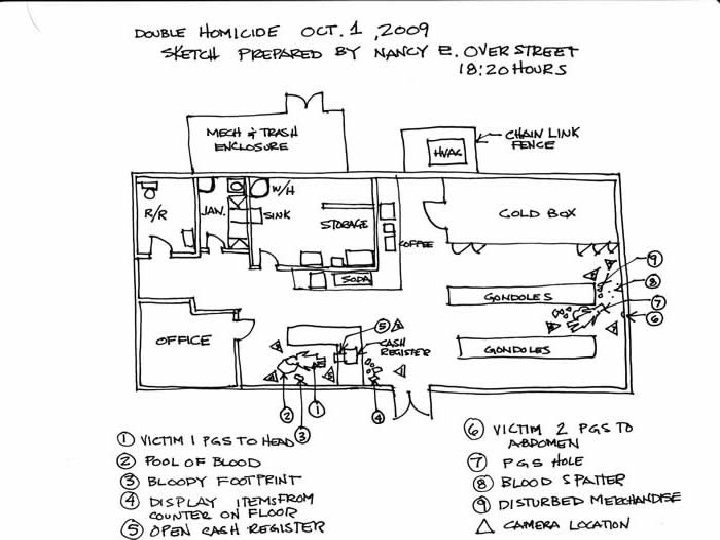
The Rough Sketch The rough sketch is the first pencil drawn outline of a scene and the location of objects and evidence within this outline. n Sketch after photographs are taken and before anything is moved. n
Sketching Materials n Paper, pencil, long steel measuring tape (longer the better), ruler or straightedge, clipboard, eraser, compass, protractor and thumbtacks.
Steps in Sketching the Crime Scene n n n n Observe and Plan Measure distances Outline the area Locate objects and evidence within the outline Record details Make notes Identify the sketch with a legend and scale Reassess the sketch
Steps in Sketching the Crime Scene n Observe and Plan Decide where to start l Use fixed locations l n Measure Distances l n To Scale Plot Objects and Evidence Rectangular – Coordinate Method l Baseline Method l Triangulation Method l Compass-Point Method l
Steps in Sketching the Crime Scene n Rectangular – Coordinate Method l Uses two adjacent walls as fixed points. Measures at right angles.
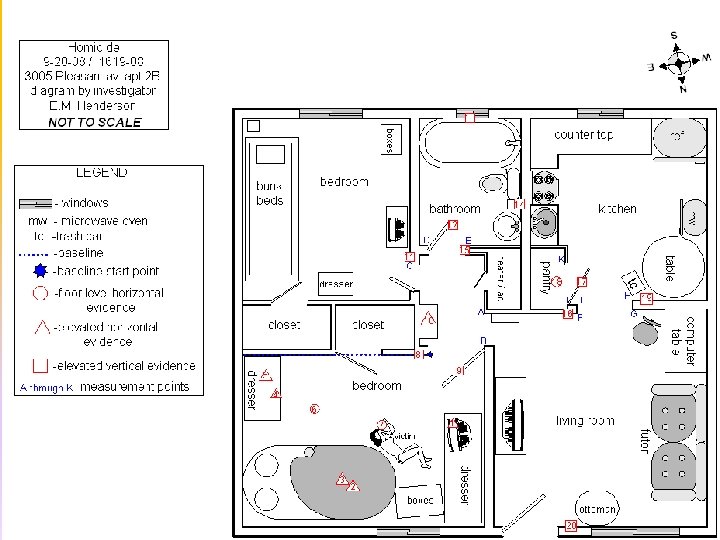
Steps in Sketching the Crime Scene n Baseline Method
Steps in Sketching the Crime Scene n Triangulation Method l Uses straight line measurements from two fixed objects to the evidence.
Steps in Sketching the Crime Scene n Cross Projection Method l Presents the walls and floor as they were one surface.
Compass Point Method
File the Sketch n Place sketch in secure location.
The Finished Scale Drawing The finished scale drawing is done in ink and on a good grade of paper. n You will not be drawing a sketch to scale at the crime scene. n
Computer Assisted Drawing n Many companies have developed computer hardware to assist in drawing a crime scene.
Admissibility of Sketches and Drawings in Court n An admissible sketch is one drawn or personally witnessed by an investigator that accurately portrays the crime scene.
Where do I start? Step 1: Draw a rough outline of the area- include windows (represented by the rectangles) and doors (represented by openings in the outline)
n Step 2: Measure the room or space in which the crime occurred. Label the dimensions on the sketch
Step 3 Sketch in the furniture and location of evidence using basic shapes
Step 4 Label each item in the diagram with a number or letter, then write the name in a key.
Step 5 n Label the diagram with the date, time, location, and victim’s name (if known) n Note: An unknown victim is commonly given the name of John
Step 6: MEASURING FROM FIXED POINTS A. B. Make two measurements from fixed (not moveable) points to each piece of evidence These measurements are noted on a separate document, and not on actual sketch
FINAL SKETCH A. There is never a second chance to sketch a scene, so all information must be noted before leaving B. The final sketch will be completed after leaving the crime scene. C. The final sketch will be drawn with a ruler to scale and may be done on graph paper.