Course Design philosophy and principles of course design

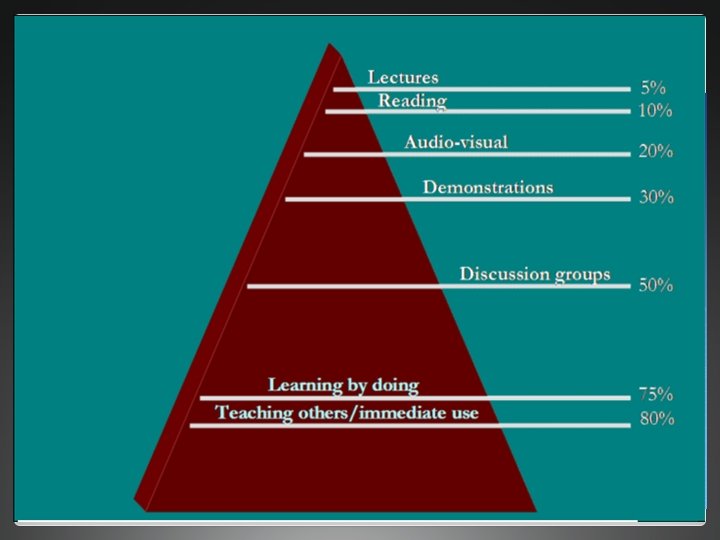


- Slides: 32
Course Design philosophy and principles of course design and planning Wayne Copping
Initial Planning l It was with some trepidation that I sat down to write some notes about my philosophy and principles of cross-country course design. The prospect of putting my thoughts down on paper seemed awfully daunting at first and I had not the slightest idea where or how to go about it. After some thought, I realised that if I approached the subject as I would when preparing a concept design for a brand new course, everything would probably just flow in a logical order. l A good course, just as a written article on any subject needs much thought and preparation before commencing work.
Requirements l Firstly, it is most important to fully understand as well as know the requirements not only for your proposed course, but also the sport of eventing in general. l l Is it for private schooling, is it for training or is it for competition? What part or season of the year is it going to be held? It could be developed as a lead up to a major competition, which would then influence your design considerably. l l You may end up designing courses for many years and experience much change in safety of design, changes to the rules and be exposed to many different thoughts and ideas. The courses you will work on may and will vary enormously from venue to venue with a wide range of competency in skill levels of both horses and riders.
Confidence and Training l The successful course designer will be able to develop and maintain their own philosophy and principles of course design from a sound working knowledge of horses and how they are trained. It is vitally important to understand the process of the confidence building and systematic training of both horse and rider from the entry level to international competition.
Course Designer Qualities l The first is common sense! l The ability to think clearly and logically is not an easy skill to acquire but must be worked at constantly to achieve success. If you let your ego take charge there will be no winners, only losers with the horse being the innocent victim of your poor design. You must have sound reasons for designing the course or obstacles and be prepared to accept responsibility for the end result.
Course Designer Qualities l The second quality is horse sense! l This can only be developed through watching and examining horses competing at all levels over many different types of courses. Spend time trying to interpret the actions and movements of horses when confronted with different situations. Try to understand how a horse reads a fence (light into dark, roof over obstacle, combinations of rails blending into each other etc. ) and how he reacts with subtle changes in striding and to his approach. Remember that a horse does not possess the ability to think through a situation, and reacts entirely to what is presented before him. You should endeavour to gain some skill and knowledge in all aspects of eventing. Being involved with judging and training in dressage and show jumping will give you a better understanding of the overall development of the horse from beginner to accomplished athlete. As a course designer, you must remember that you are in partnership with competitors, not in competition.
Course Planning and Layout l Before we can move further into the design of our cross-country course the overall layout of the venue must be taken in to consideration. The cross-country naturally should be situated on the best ground available, but land should also be set aside for dressage and jumping arenas. These arenas should have easy access to the parking and camping areas for the competitors. l l The positioning of the cross-country course can be influenced by many factors; l
Ground conditions l These can be dictated by the soil type, time of the year, drainage etc. Sandy loam over clay has proven to be the most suitable type of ground to gallop over. It is forgiving in its impact on horses’ legs; it drains well and has an ability to regenerate into a level surface. Heavier soils tend to retain the imprint of horse’s hooves and must be levelled or filled after a competition especially around the obstacles. Land that has anything more than a sprinkling of stones should be avoided also as ultimately the soil type (due to the seasons) will play a pivotal role in the timing of any competition.
Ground Contours l Hilly or undulating ground can play a prominent part in the design of your course. If it is hilly try to develop your course around or across the hills and not principally up and down. You will encounter many problems with drop landings, and the uphill fences while jumping well will look ridiculously small and you will be unhappy with the overall appearance of the course. Undulating ground is by far the easiest to work with and the most attractive to spectators. l
Natural Features l Try to make the most of the natural features on your piece of ground but don’t over do it! A good course will make use of the existing features but also incorporate more standard type cross-country obstacles in between the stylish and artfully designed ones. If you overdo this the effect will be lost. Any course can stand one or two sponsor or logo type fences, but in my opinion this is all that should be allowed. Lessor sponsors can be catered for by appropriate signage to the side or back of the obstacles if the design allows for it.
Spectators l Even though the majority of events in Australia do not attract a large audience, this group of people must be treated with the greatest of respect. They are responsible for creating an atmosphere and are usually pivotal to the success or failure of an event. This is because exposure to the general public is not only linked to sponsorship monies but also gate receipts and canteen sales. For greatest spectator benefit the major complexes must be sited in close proximity to each other. This can be achieved by careful consideration before starting work on any of the more expensive constructions.
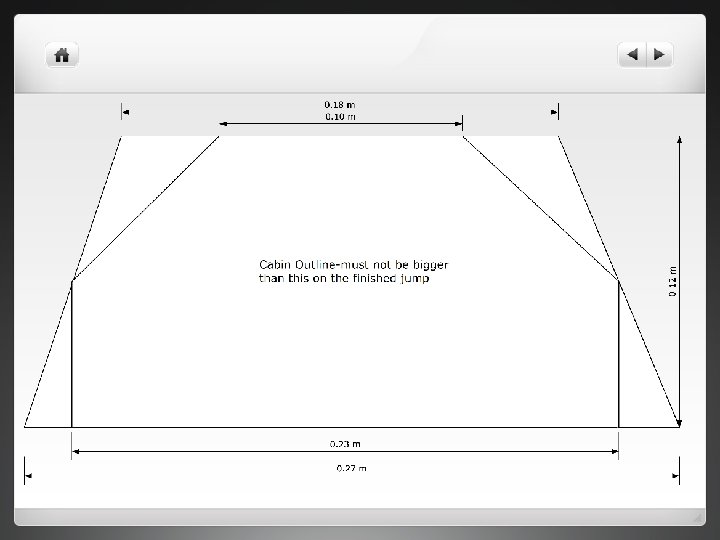
Conceptual Design l The safety of the conceptual design must be guaranteed before you start work. In other words all of the proposed obstacles must be able to be constructed in a safe and workmanlike manner. You must have a written down list of all the fences and a clear interpretation of the flagging of these obstacles. So many jumps fail to achieve their objectives simply because they have not been thought through well enough before building commences.
Conceptual Design l Only by putting your ideas down on paper, adding or deleting efforts, working out material types for each jump, making sure you have the right balance of tests for each grade, a building time table and drawings for the more complex constructions, the right tools and machinery with the ability to work within a budget can give you any guarantee of success in your endeavours. l If the event budget does not allow you to employ a professional course builder, you should consider volunteering or working along side one for a while as the construction of a cross-country course requires many skilful techniques for it to be a safe and worthwhile exercise.
Number 1 Effort Jump Name 1 Triple Bar Comment Logs on an ascending plane to share with PN (in ground) BUILT 2 2 Rising Oxer Squarer type oxer to get horses in the air, 1* only (in ground) BUILT 3 3 Hay Feeder (P) Round top feeder with straight front and slats for effect (portable)3. 6 mts 4 4 Swale & Brush (P) Portable brush box over swale in open area before gully-ground rail-sloping splits as cladding 5 a 5 Roll Top (P) Roll top on the edge of gully to share with PN/2 by 3 mts/can be joined or have tree in middl 5 b 6 Roll Top (P) Roll top on the top of gully with narrower face for accuracy/splits for cladding/1. 6 face 6 7 Bark Hut (Woodcutters) Bark roof hut in trees on a right turn 7 a 8 Coffin In Log on blocks on rise before ditch/2 mt face 7 b 9 Coffin Ditch after 2 strides/BUILT 7 c 10 Coffin Out Log on blocks on 2 strides out/1. 6 mt face 8 11 Corner Portable brush corner right with deck around a tree after crossing under the bridge on the way out 9 a 12 Barn (P) Skillion roof shed with old cladding 9 b 13 Rose Inn (P) Gable roof house with flat middle clad with old materials on 3 strides from the A element /BUILT 10 14 Open Oxer Open oxer on the gallop stretch around to the water/power poles 11 a 15 Sloping Brush (P) Sloping brush at 2. 5 mts on 3 strides before the water/BUILT 11 b 16 Water In Log on edge of drop into water/less than 30 cms 12 a 17 Out of water Wall out 12 b 18 After Water (P) Triple brush with narrow face on top of ramp after water/1. 8 wide at the back
Design Development Structure l The structure of the course is I believe the single most important factor in determining the difference between a good course and a bad course. The structure of the course is the first consideration when you set out your conceptual design. l Consider the obstacles as building blocks in your course. Build a strong foundation in the first four to six fences by asking the horse and rider to settle quickly, establish a rhythm and gain confidence from obstacles that require nothing more than straight forward riding and jumping. l The use of large curving lines on both reins throughout the initial fences will make them easier to jump and help to establish that rhythm and confidence.
Design Development Structure l As the blocks start to grow in height, so does the cross-country increase in difficulty. Remember, after you have added a block (technical test, intense effort etc. ), reward the horse with a less confronting obstacle before continuing to build. You should have used up all of your full sized blocks two -thirds to three quarters of the way around and have only half blocks left (less intense but with some degree of technicality) to bring your horse’s home safely and confidently. How you place your foundation blocks and apply the finishing touches to complete your building will ultimately decide the success or failure of your design.
Design Development Balance and Flow l Having decided on the general structure of your course, the balance and flow of the individual fences is the next most important consideration. Rather than over doing one particular type of test, try to have a good spread of all the usual and accepted cross country obstacles all the way around your track. l It can be beneficial to set up horses and riders before a technical obstacle by asking a similar question of a slightly lesser nature at the fence before. This could take the shape of a downhill landing before a drop fence, an angled rail before an arrowhead or even a creek crossing before a water jump
Design Development Balance and Flow l Remember that if you close the horses frame up with a gymnastic type test, you should then give him a chance to open up by having a straight forward fly fence (triple bar or ascending front oxer for example) before perhaps a large ditch and palisade for which the horse needs maximum scope and spread. l Endeavour to give horses the opportunity to maintain their rhythm at all times. One obstacle should compliment the next so do not ask conflicting questions or produce confrontational fences one after the other. The balance of the obstacles are integral to the over all structure of a successful cross-country course.
Degrees of Difficulty l Assess the degrees of difficulty in each of your courses. The degree of difficulty in a cross country course is not only assessed by the size, shape and nature of the obstacles but also the intensity of effort in the course. l By intensity of effort, I mean the concentration and number of technical tests, the ability required to negotiate them and the numbers of single fences that don’t require anything other than straight forward riding. Obviously, the higher the standard, the greater the intensity of effort, resulting in a greater degree of difficulty. This can be achieved in many ways.
Degrees of Difficulty l The positioning of and striding between obstacles whether on straight or curving lines, the width of the face on accuracy fences, the height of banks, steps and jumps up to bounces or longer distances, the degrees of boldness asked for (coffins, into space fences, uphill and downhill tests, roof over or keyholes).
Degrees of Difficulty l Having said all of this, you must not compromise on the standards required for each grade. The fences must be built up to the appropriate dimensions where conditions allow. Keeping the integrity of size in your course will automatically adjust the degree of difficulty and technicality through the levels. For example, the majority of technical tests can be jumped easily by a relatively inexperienced horse if the heights are kept down. By keeping the dimensions to the upper limit for each division these technical obstacles will look far to strong for anything other than the appropriate class.
Teaching and Testing l To play your part as a Course Designer in the systematic training of horses and riders from entry level to advanced, you must understand the concept of teaching and testing in your cross country courses. l At the lower levels your emphasis should be on teaching horses and riders to ride forward confidently and boldly while introducing only very subtle changes to obstacles, lines of approach and striding. Small versions of grown up fences can be used but not over done! l It can be useful to use different ways of filling or dressing obstacles also in preparation for the more intense efforts horses will encounter later in their careers. By doing this you will be rewarding the well trained horse while not asking for anything more than natural boldness and basic riding skills.
Teaching and Testing l With testing, the emphasis should not be centred entirely around the horse’s inborn ability of speed, stamina and jumping prowess, but more on the rider’s skill or lack of it in training and riding his horse across country. The face of the obstacles can become narrower, the distances more crucial, the lines of approach more angled, steps and banks become higher and gymnastic tests more intense with the efforts closer together. Only by practising the art of course design at all levels at many different venues over a number of years will you be able to fully understand this concept.
Options l Options play a very important part in the progression of horses through the levels of eventing. Obstacles that require a technical test of some description should have sensible alternatives that are time consuming but are still of the correct standard for that particular class. They must not be built to a lower dimension or grade if at all possible. If this is not the case a very significant time penalty must be incurred.
Options l Options can be used on any sizeable ditch, water fence, gymnastic test or obstacle that could have a profound effect on a horse’s future performance. They must incorporate the same or a similar style of test as the direct line. In other words, if you set a ditch they must jump a ditch on the optional line. If you ask them to jump into water, the option must have a jump into water. Remember, as the Course Designer, you have a responsibility to make sure that any one who completes the cross country has achieved the standard that you had originally set out to achieve in your conceptual design.
Horse Welfare l Safeguard the horse at all times. He did not ask to go across country and you must endeavour to keep him happy, positive and confident all of the time. Remember that during the course of a cross-country round he will suffer many unseen penalties such as uneven ground putting pressure on his legs, stone bruises, rubs to his knees and stifles from many of the fences and many sharp attacks on his mouth even from the best of riders.
Fence Assessment l Assess the probable result of a fence. If it is likely to be a fall, change the design! We must work towards getting the refusal or glance off. The quickest way to avert tragedy is to keep falls to an absolute minimum.
Do’s and Don’ts l Do accept responsibility for your actions l Do be clear in your mind about what you are trying to achieve l Do not compromise on size or standard of obstacles relative to each grade l Do not accept the old adage “those who rode it well jumped it well”. If riders are apprehensive about a fence, they will ride it poorly
Do’s and Don’ts l Do make riders want to ride your fences well l Do not design obstacles out of context with the rest of the course l Do remember rider and spectator participation. They will always remember a good course and good fences rather than bad ones l Do listen to criticism and suggestions. You do not have to act on it, but at the very least be open and accepting and able to explain your reasons for building the obstacles
Finally l During the course of your career, you will experience all the highs and lows of eventing and quite often the results will be different to what you intended. You must learn from all of these situations and continue to develop your skills as a course designer. It has probably been said before some where, but remember that the “art of course designing is not an exact science!”