Correct SPC PROCESS CONTROL FOR PRECISION MACHINING 2010



- Slides: 90


Correct. SPC PROCESS CONTROL FOR PRECISION MACHINING © 2010 Bob Doering © 2010 Bob Doering All Rights Reserved

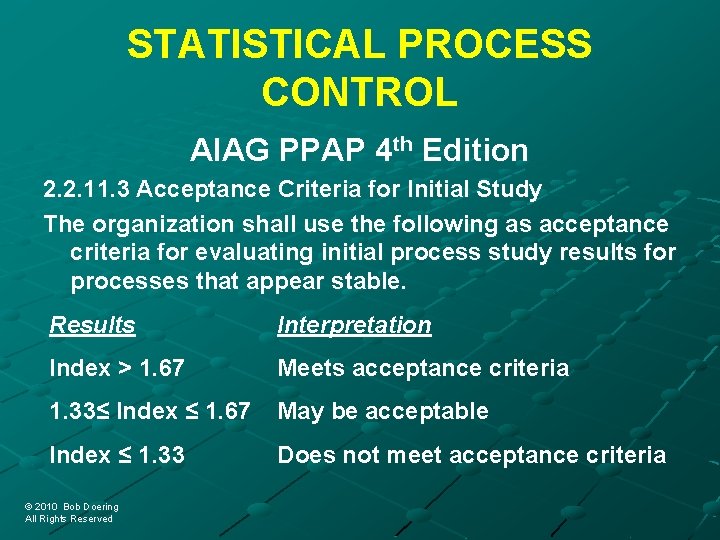
STATISTICAL PROCESS CONTROL AIAG PPAP 4 th Edition 2. 2. 11. 3 Acceptance Criteria for Initial Study The organization shall use the following as acceptance criteria for evaluating initial process study results for processes that appear stable. Results Interpretation Index > 1. 67 Meets acceptance criteria 1. 33≤ Index ≤ 1. 67 May be acceptable Index ≤ 1. 33 Does not meet acceptance criteria © 2010 Bob Doering © 2010 Bob Doering All Rights Reserved

STATISTICAL PROCESS CONTROL AIAG PPAP 4 th Edition 2. 2. 11. 5 Processes with One-Sided Specifications or Non-Normal Distributions The organization shall determine with the authorized customer representative alternative acceptance criteria for processes with one sided specifications or non-normal distributions. © 2010 Bob Doering © 2010 Bob Doering All Rights Reserved

STATISTICAL PROCESS CONTROL AIAG PPAP 4 th Edition 2. 2. 11. 5 Processes with One-Sided Specifications or Non-Normal Distributions NOTE: The above mentioned acceptance criteria (2. 2. 11. 3) assume normality and a two-sided specification (target in the center). When this is not true, using this analysis may result in unreliable information. © 2010 Bob Doering © 2010 Bob Doering All Rights Reserved

STATISTICAL PROCESS CONTROL AIAG PPAP 4 th Edition 2. 2. 11. 5 Processes with One-Sided Specifications or Non-Normal Distributions NOTE (cont. ): These alternate acceptance criteria could require different type of index or some method of transformation of the data. The focus should be on understanding reasons for the non-normality (e. g. is it stable over time? ) and managing variation. © 2010 Bob Doering © 2010 Bob Doering All Rights Reserved

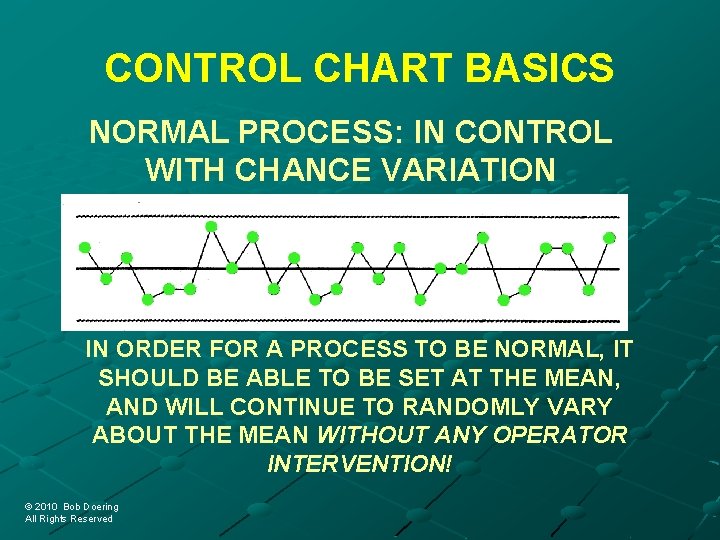
CONTROL CHART BASICS NORMAL PROCESS: IN CONTROL WITH CHANCE VARIATION IN ORDER FOR A PROCESS TO BE NORMAL, IT SHOULD BE ABLE TO BE SET AT THE MEAN, AND WILL CONTINUE TO RANDOMLY VARY ABOUT THE MEAN WITHOUT ANY OPERATOR INTERVENTION! © 2010 Bob Doering © 2010 Bob Doering All Rights Reserved

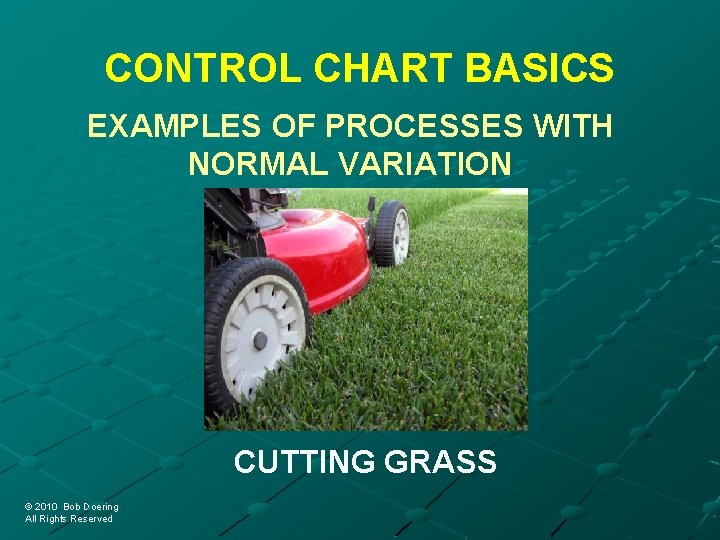
CONTROL CHART BASICS EXAMPLES OF PROCESSES WITH NORMAL VARIATION CUTTING GRASS © 2010 Bob Doering © 2010 Bob Doering All Rights Reserved

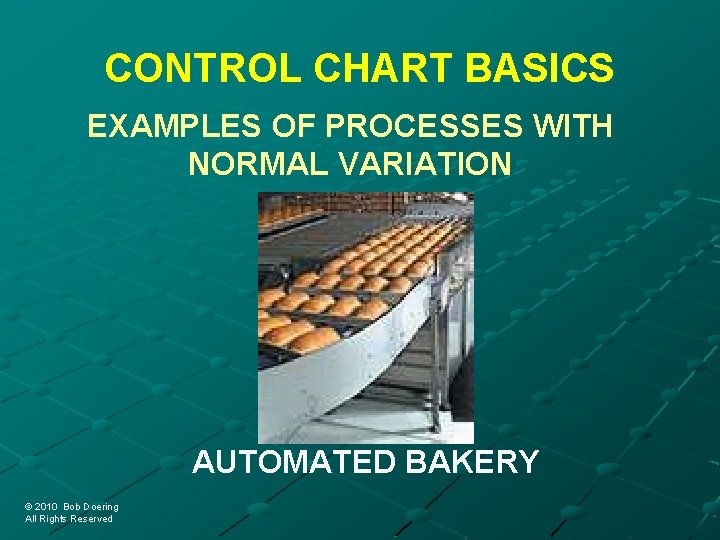
CONTROL CHART BASICS EXAMPLES OF PROCESSES WITH NORMAL VARIATION AUTOMATED BAKERY © 2010 Bob Doering © 2010 Bob Doering All Rights Reserved

WHAT IS CONTROL? A process in control is in the ideal state 100% conforming and predictable must remain stable over time must operate in a stable and consistent manner must be set at the proper level (centered) the natural process spread must not exceed the product’s specified tolerance (capable) © 2010 Bob Doering © 2010 Bob Doering All Rights Reserved

WHAT ARE THE TYPES OF VARIATION CAUSES? COMMON CAUSE Inherent in the process Affects every part Examples: gravity, air pressure, tool wear SPECIAL CAUSE “Assignable” Does not affect every part Examples: tool breakage, start up, change of operators © 2010 Bob Doering © 2010 Bob Doering All Rights Reserved

TRADITIONAL SPC Expects all “special causes” have been eliminated Expects the remaining variation is random, with most variation close to a central value Seeks to find trends from within an otherwise random output to act upon when they occur © 2010 Bob Doering © 2010 Bob Doering All Rights Reserved

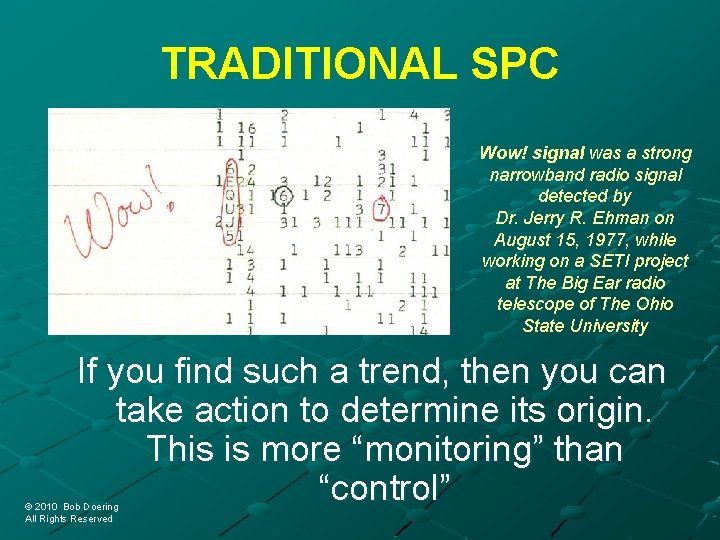
TRADITIONAL SPC Search for Extraterrestrial Intelligence (SETI) Traditional SPC is like looking out into space seeking signs of life © 2010 Bob Doering © 2010 Bob Doering All Rights Reserved

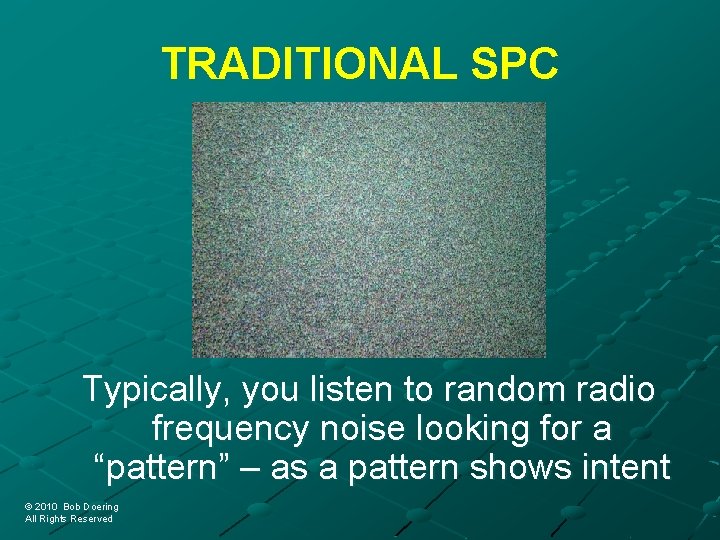
TRADITIONAL SPC Typically, you listen to random radio frequency noise looking for a “pattern” – as a pattern shows intent © 2010 Bob Doering © 2010 Bob Doering All Rights Reserved

TRADITIONAL SPC Wow! signal was a strong narrowband radio signal detected by Dr. Jerry R. Ehman on August 15, 1977, while working on a SETI project at The Big Ear radio telescope of The Ohio State University If you find such a trend, then you can take action to determine its origin. This is more “monitoring” than “control” © 2010 Bob Doering © 2010 Bob Doering All Rights Reserved

PROCESS DEFINITION OF PRECISION MACHINING A process where material is removed by a cutting surface – such as grinding, honing, turning, milling, etc. The process must be controlled in a manner that all variation (vibration, bearings, gage error) is statistically insignificant except tool wear. © 2010 Bob Doering © 2010 Bob Doering All Rights Reserved

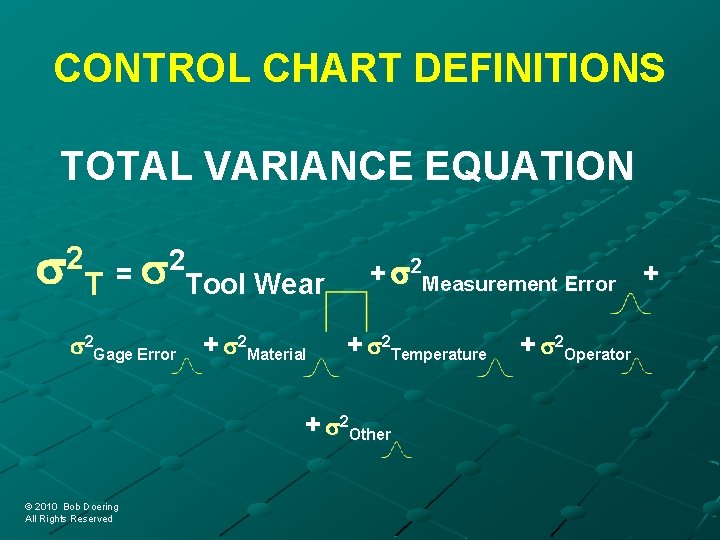
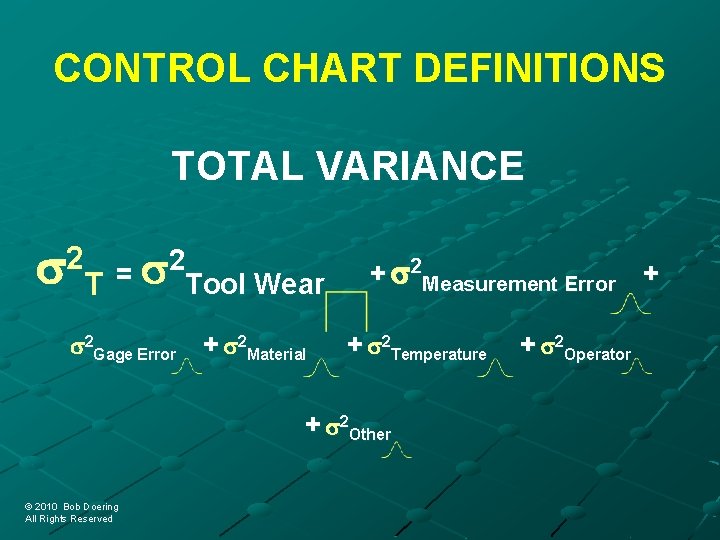
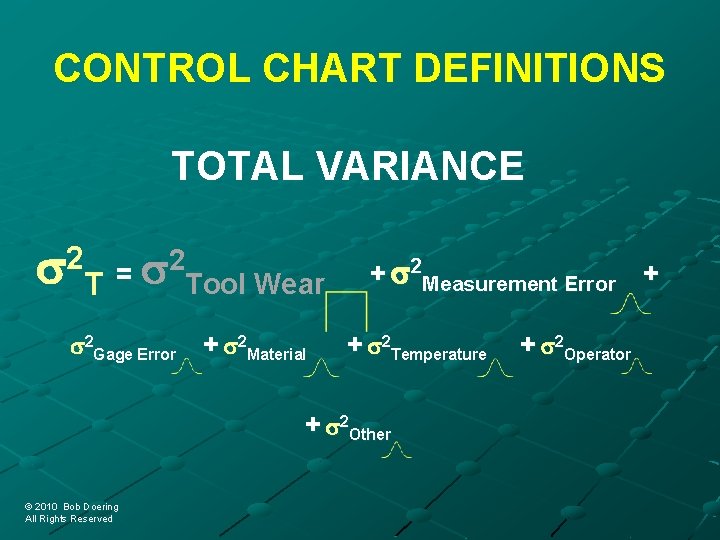
CONTROL CHART DEFINITIONS TOTAL VARIANCE EQUATION s 2 T = s 2 Tool Wear s 2 Gage Error + s 2 Material + s 2 Measurement Error + + s 2 Temperature + s 2 Other © 2010 Bob Doering © 2010 Bob Doering All Rights Reserved + s 2 Operator

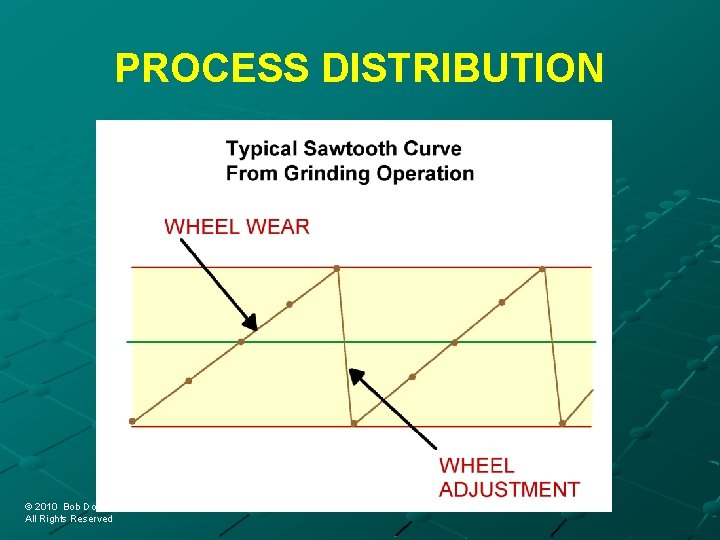
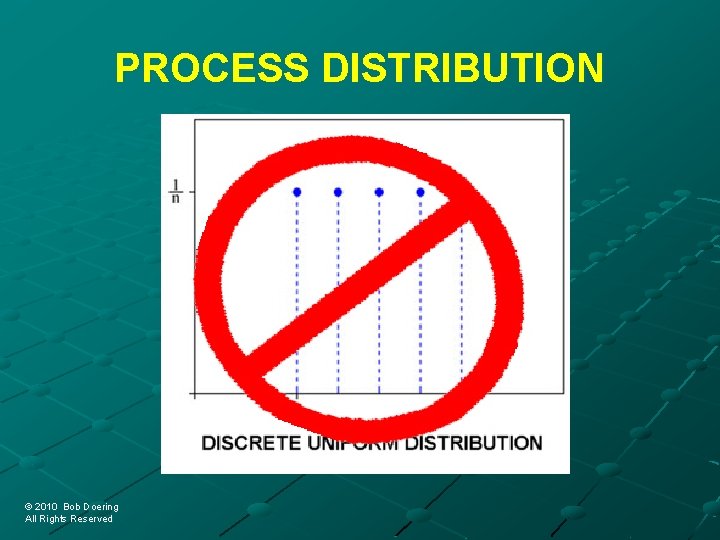
PROCESS DISTRIBUTION © 2010 Bob Doering © 2010 Bob Doering All Rights Reserved

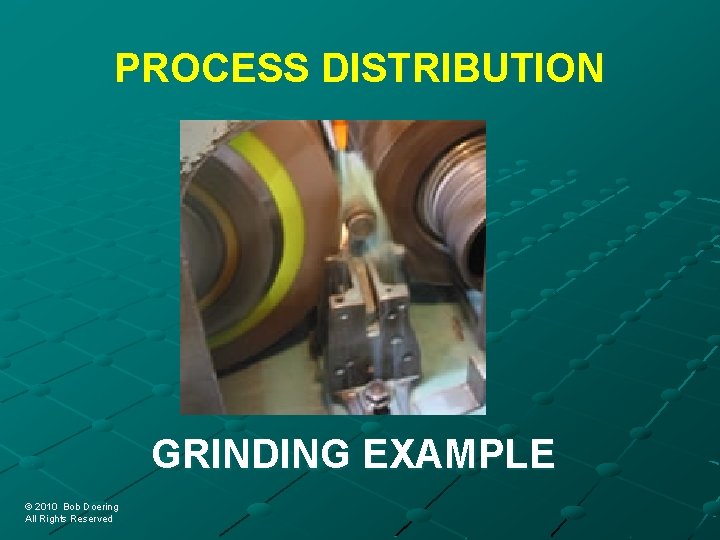
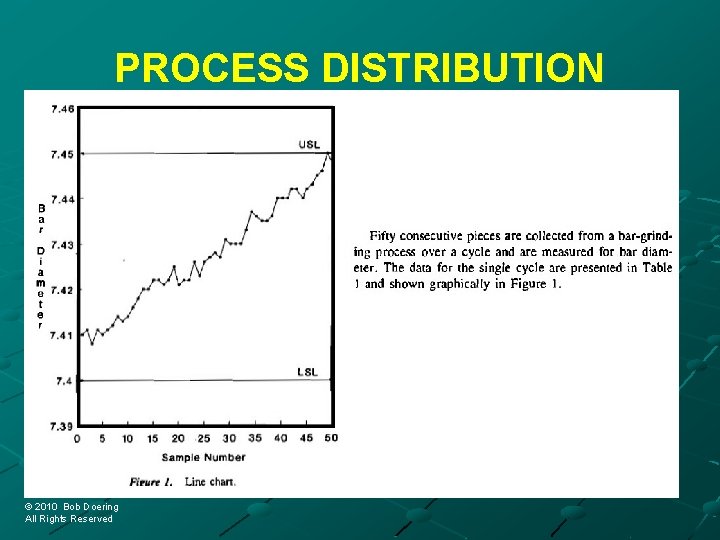
PROCESS DISTRIBUTION GRINDING EXAMPLE © 2010 Bob Doering © 2010 Bob Doering All Rights Reserved

PROCESS DISTRIBUTION © 2010 Bob Doering © 2010 Bob Doering All Rights Reserved

PROCESS DISTRIBUTION © 2010 Bob Doering © 2010 Bob Doering All Rights Reserved

PROCESS DISTRIBUTION © 2010 Bob Doering © 2010 Bob Doering All Rights Reserved

PROCESS DISTRIBUTION © 2010 Bob Doering © 2010 Bob Doering All Rights Reserved

PROCESS DISTRIBUTION “Process Control and Evaluation in the Presence of Systematic Assignable Cause”, Ashok Sarkar and Surajit, Pal, Quality Engineering, Volume 10(2), 1997 -1998 © 2010 Bob Doering © 2010 Bob Doering All Rights Reserved

PROCESS DISTRIBUTION © 2010 Bob Doering © 2010 Bob Doering All Rights Reserved

PROCESS DISTRIBUTION © 2010 Bob Doering © 2010 Bob Doering All Rights Reserved

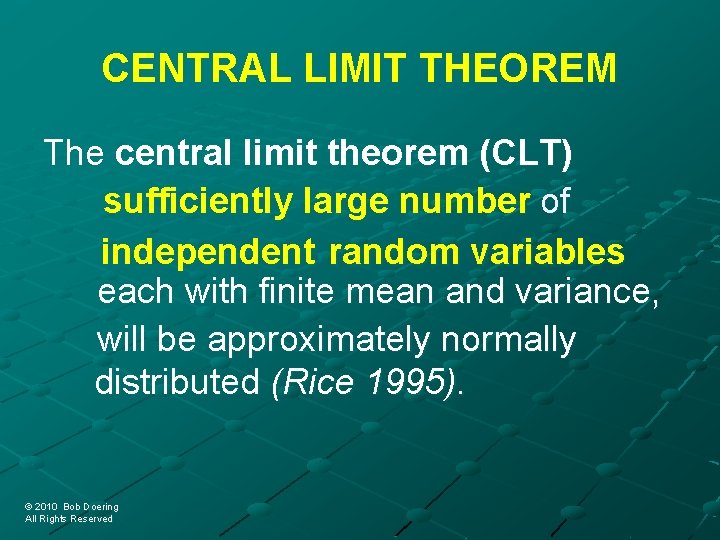
CENTRAL LIMIT THEOREM The central limit theorem (CLT) of sufficiently large number independent random variables each with finite mean and variance, will be approximately normally distributed (Rice 1995). © 2010 Bob Doering © 2010 Bob Doering All Rights Reserved

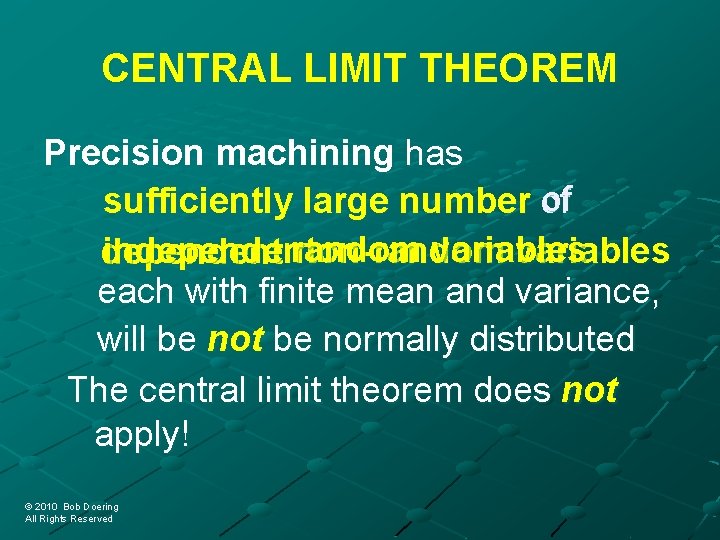
CENTRAL LIMIT THEOREM Precision machining has of sufficiently large number random variables non-random variables independent each with finite mean and variance, will be not be normally distributed The central limit theorem does not apply! © 2010 Bob Doering © 2010 Bob Doering All Rights Reserved

CENTRAL LIMIT THEOREM © 2010 Bob Doering © 2010 Bob Doering All Rights Reserved

CENTRAL LIMIT THEOREM © 2010 Bob Doering © 2010 Bob Doering All Rights Reserved

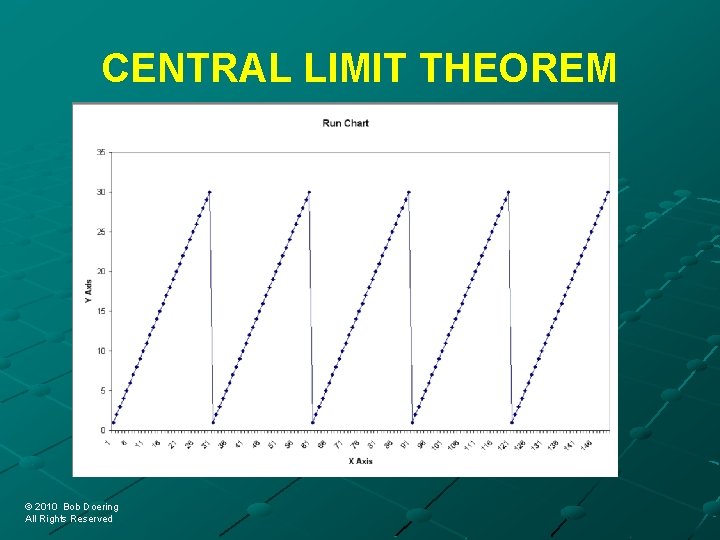
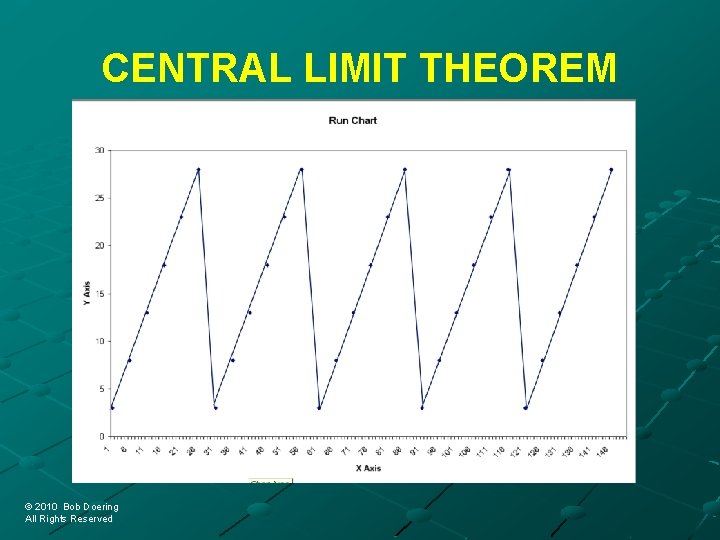
CONTROL CHART FEATURES Interesting points: The MEAN has no real value in controlling a process with the uniform distribution “Running to the mean” is not how to control a process with the uniform distribution – it causes overcontrol! © 2010 Bob Doering © 2010 Bob Doering All Rights Reserved

TYPES OF VARIABLE CONTROL CHARTS There are many types, but the most common on the precision machining shop floor is: X Bar-R (or X Mean - R) X-Moving Range and then there is a new option: X Hi/Low – R © 2010 Bob Doering © 2010 Bob Doering All Rights Reserved But, which is best?

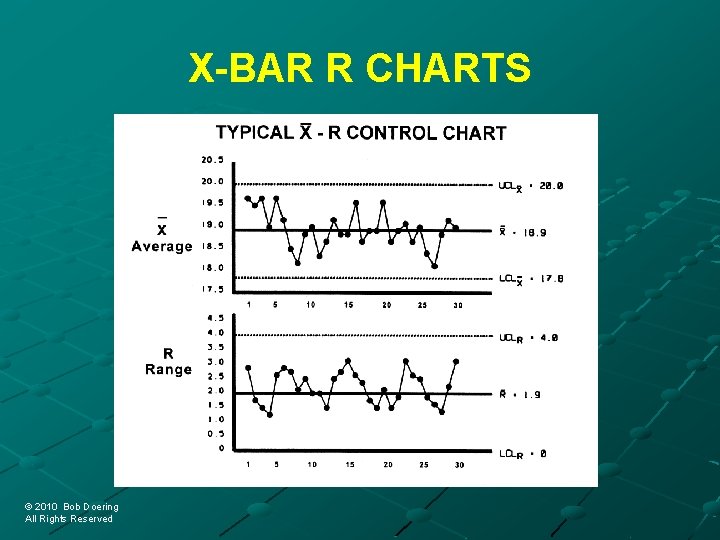
X-BAR R CHARTS © 2010 Bob Doering © 2010 Bob Doering All Rights Reserved

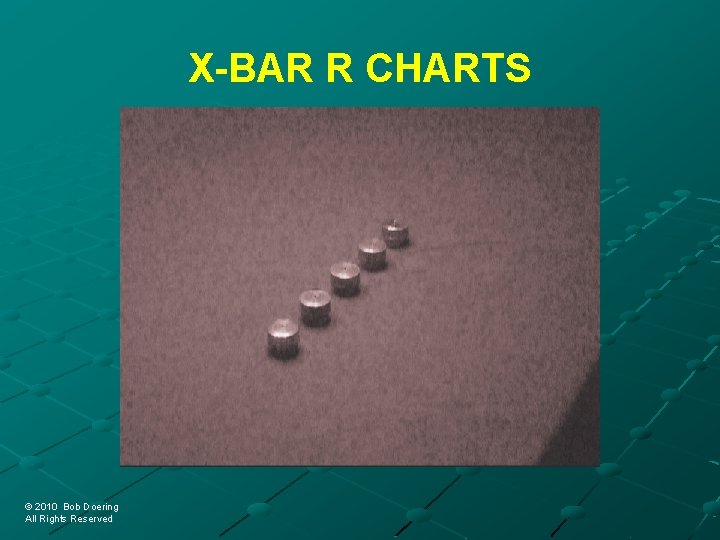
X-BAR R CHARTS © 2010 Bob Doering © 2010 Bob Doering All Rights Reserved

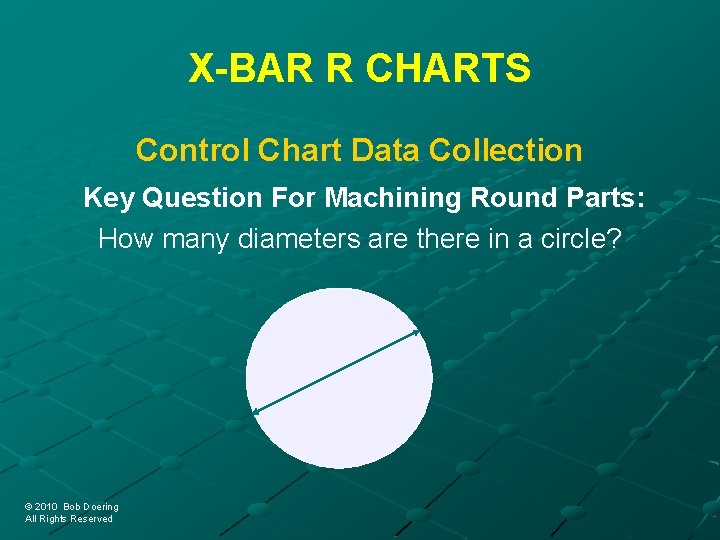
X-BAR R CHARTS Control Chart Data Collection Key Question For Machining Round Parts: How many diameters are there in a circle? d © 2010 Bob Doering © 2010 Bob Doering All Rights Reserved

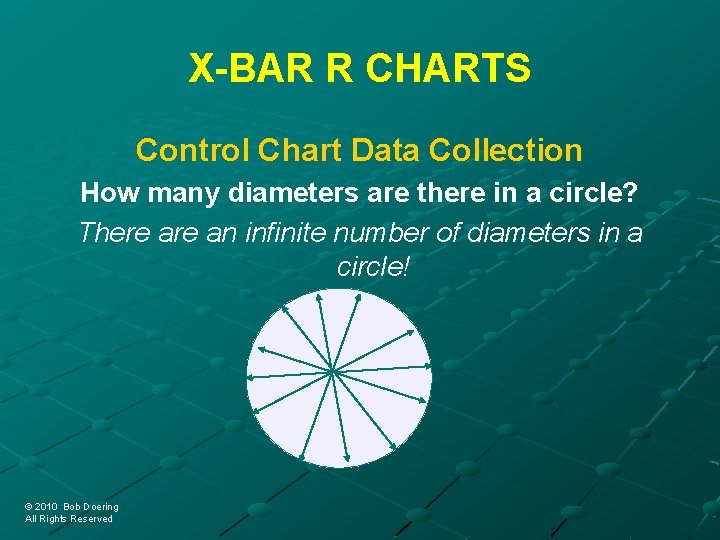
X-BAR R CHARTS Control Chart Data Collection How many diameters are there in a circle? There an infinite number of diameters in a circle! © 2010 Bob Doering © 2010 Bob Doering All Rights Reserved

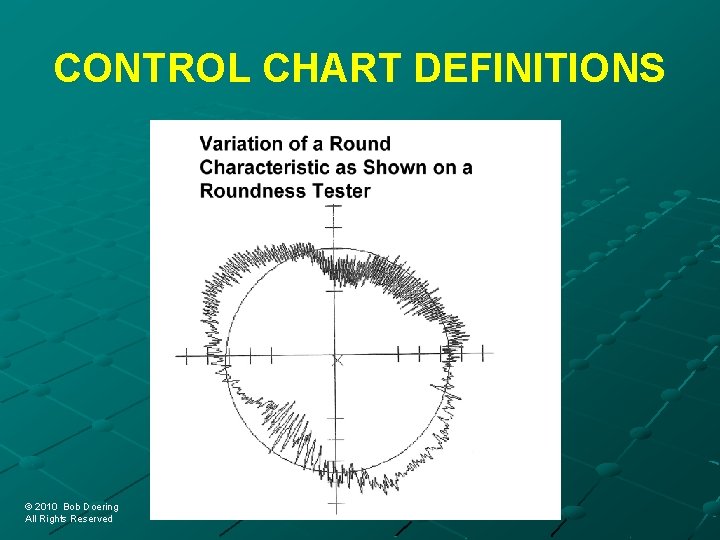
CONTROL CHART DEFINITIONS © 2010 Bob Doering © 2010 Bob Doering All Rights Reserved

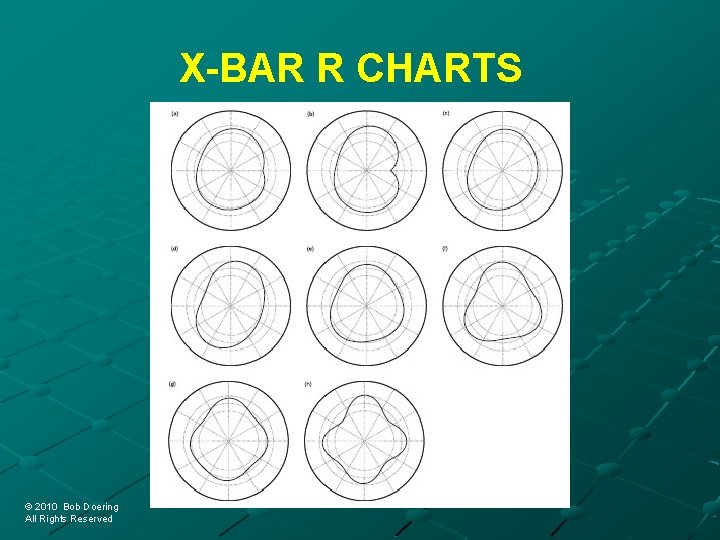
X-BAR R CHARTS © 2010 Bob Doering © 2010 Bob Doering All Rights Reserved

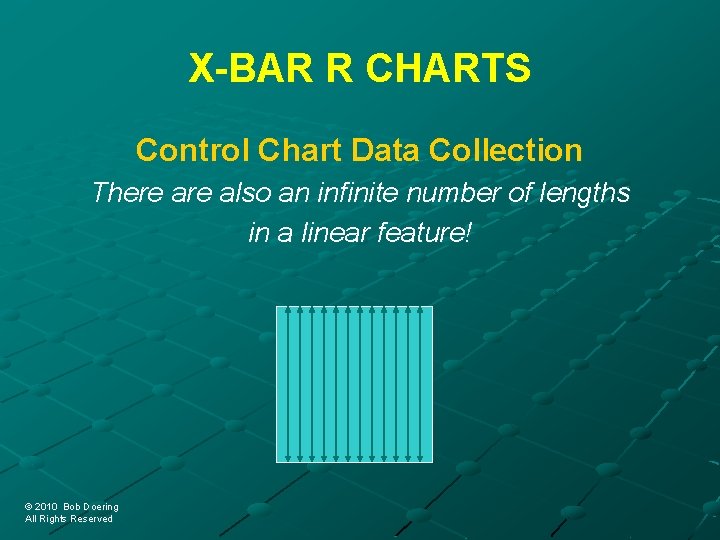
X-BAR R CHARTS Control Chart Data Collection There also an infinite number of lengths in a linear feature! © 2010 Bob Doering © 2010 Bob Doering All Rights Reserved

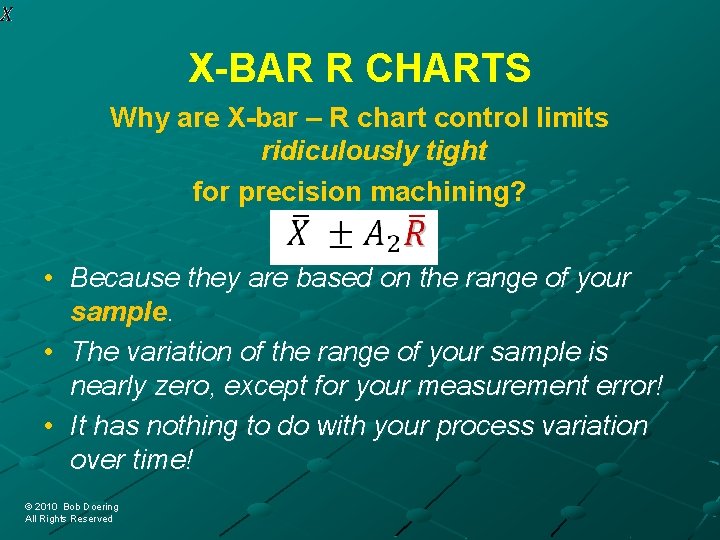
X-BAR R CHARTS Why are X-bar – R chart control limits ridiculously tight for precision machining? • Because they are based on the range of your sample. • The variation of the range of your sample is nearly zero, except for your measurement error! • It has nothing to do with your process variation over time! © 2010 Bob Doering © 2010 Bob Doering All Rights Reserved

X-BAR R CHARTS The X bar chart from the X bar – R charts represent the average of an insignificant sample of measurements for a of a circular feature Measuring multiple samples is a waste of time in precision machining R charts from the X bar – R charts represent the range of measurement error Control limits are calculated using statistics for the wrong distribution – the normal distribution © 2010 Bob Doering © 2010 Bob Doering All Rights Reserved

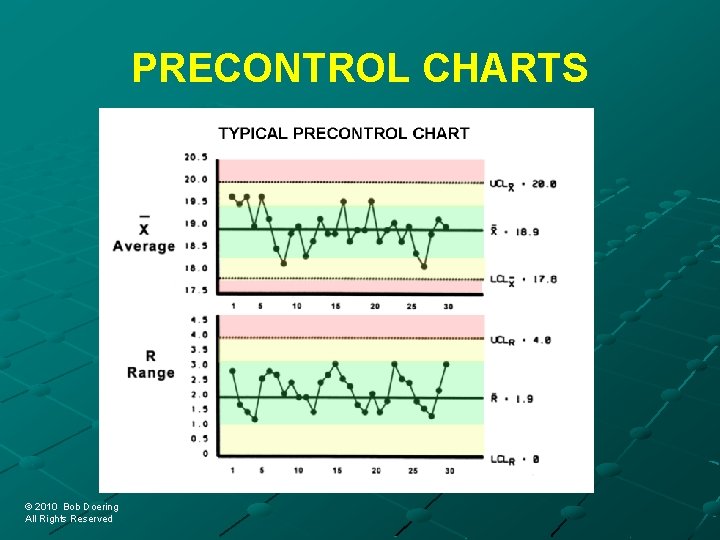
PRECONTROL CHARTS © 2010 Bob Doering © 2010 Bob Doering All Rights Reserved

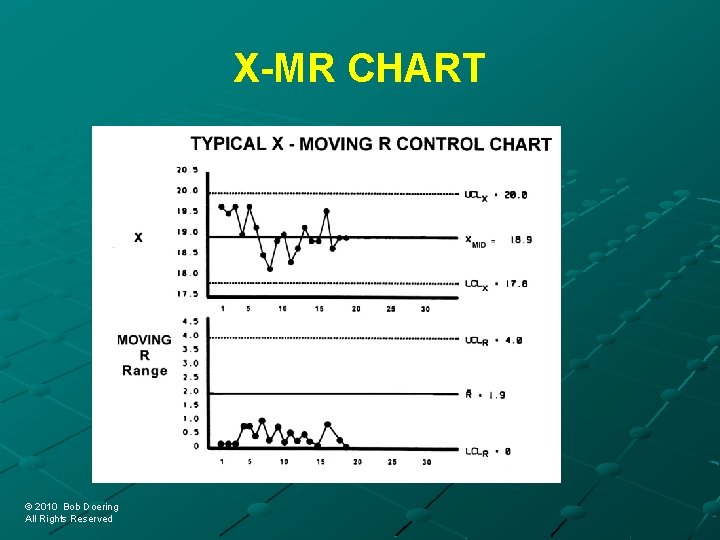
X-MR CHART © 2010 Bob Doering © 2010 Bob Doering All Rights Reserved

X-MR CHART • You might be able to use the X-MR chart if your roundness is insignificant versus your specification • If you use the X-MR chart, you cannot use the traditional calculations for control limits for the X chart – you must use the control limits for the uniform distribution • If you use the X-MR chart, you can use the traditional calculations for control limits for the MR chart © 2010 Bob Doering © 2010 Bob Doering All Rights Reserved

Rule No. 1 Original data should be presented in a way that will preserve the evidence of the original data for all the predictions assumed to be useful. -Dr. Walter A. Shewhart Statistical Method from the Viewpoint of Quality Control © 2010 Bob Doering © 2010 Bob Doering All Rights Reserved

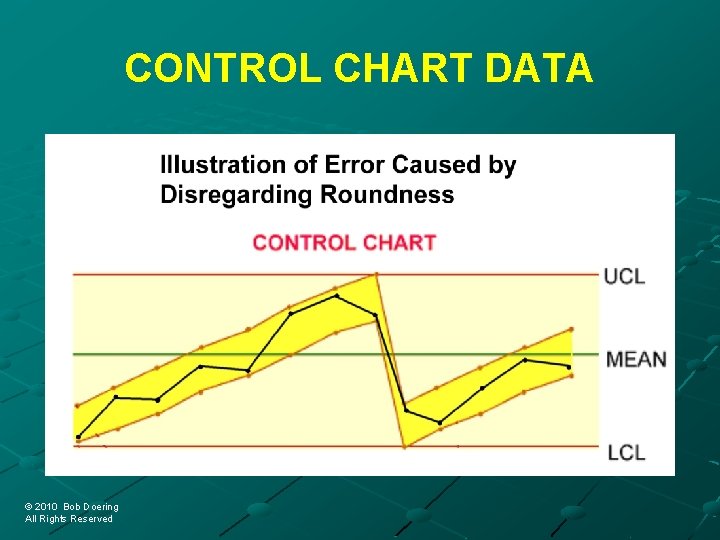
CONTROL CHART DATA Rule of life: If you measure one diameter, you will measure a good one …and the customer will measure a bad one! © 2010 Bob Doering © 2010 Bob Doering All Rights Reserved

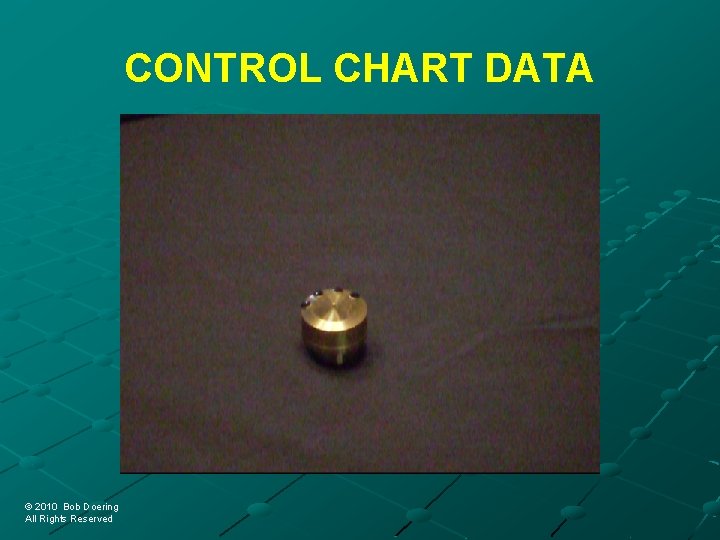
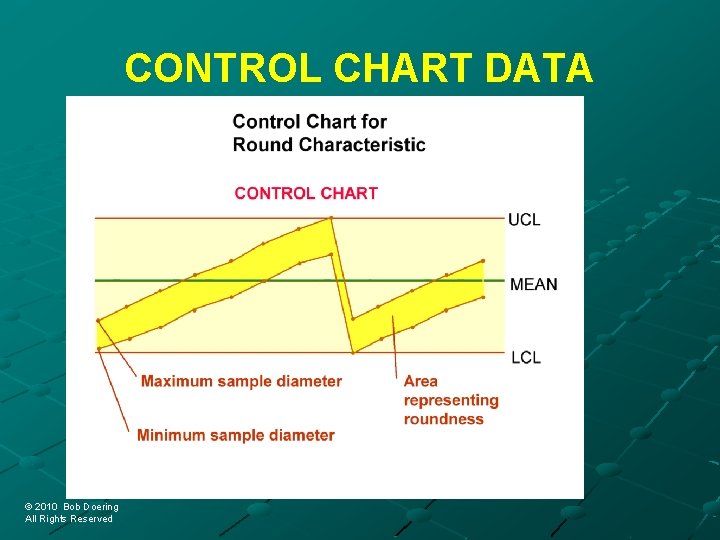
CONTROL CHART DATA How do you control diameters? Measure the part and record the largest and smallest diameters – then you are controlling all possible diameters! © 2010 Bob Doering © 2010 Bob Doering All Rights Reserved

CONTROL CHART DATA © 2010 Bob Doering © 2010 Bob Doering All Rights Reserved

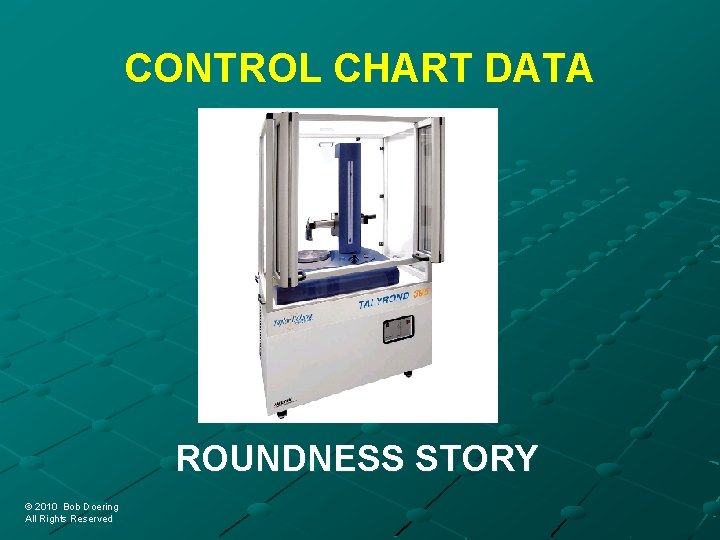
CONTROL CHART DATA What else can you learn from the largest and smallest diameter? The difference between the largest and smallest diameter – by definition – is the roundness! © 2010 Bob Doering © 2010 Bob Doering All Rights Reserved

CONTROL CHART DATA ROUNDNESS STORY © 2010 Bob Doering © 2010 Bob Doering All Rights Reserved

CONTROL CHART DATA © 2010 Bob Doering © 2010 Bob Doering All Rights Reserved

CONTROL CHART DATA © 2010 Bob Doering © 2010 Bob Doering All Rights Reserved

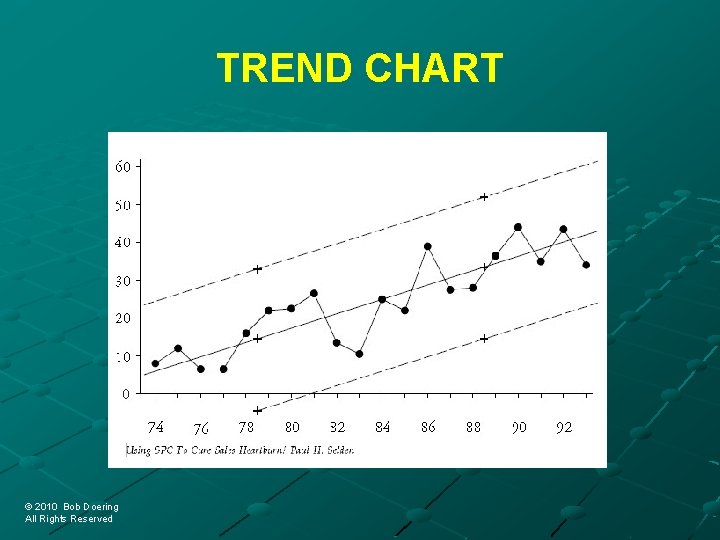
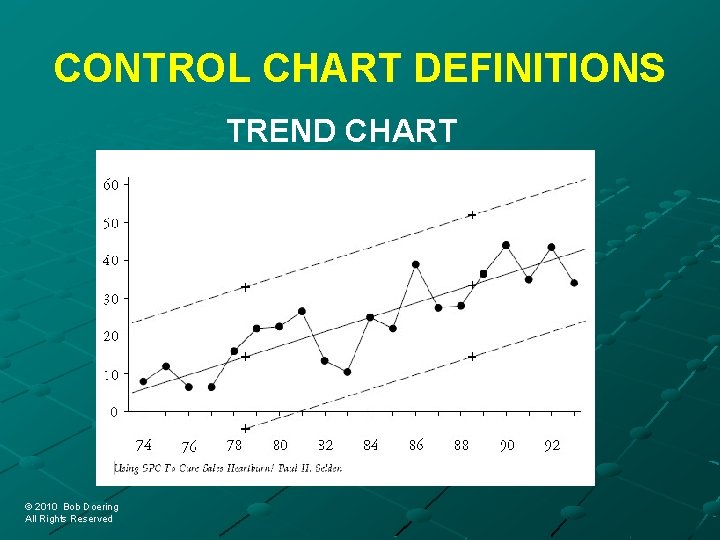
TREND CHART © 2010 Bob Doering © 2010 Bob Doering All Rights Reserved

CONTROL CHART DEFINITIONS TOTAL VARIANCE s 2 T = s 2 Tool Wear s 2 Gage Error + s 2 Material + s 2 Measurement Error + + s 2 Temperature + s 2 Other © 2010 Bob Doering © 2010 Bob Doering All Rights Reserved + s 2 Operator

CONTROL CHART DEFINITIONS TOTAL VARIANCE s 2 T = s 2 Tool Wear s 2 Gage Error + s 2 Material + s 2 Measurement Error + + s 2 Temperature + s 2 Other © 2010 Bob Doering © 2010 Bob Doering All Rights Reserved + s 2 Operator

CONTROL CHART DEFINITIONS TREND CHART © 2010 Bob Doering © 2010 Bob Doering All Rights Reserved

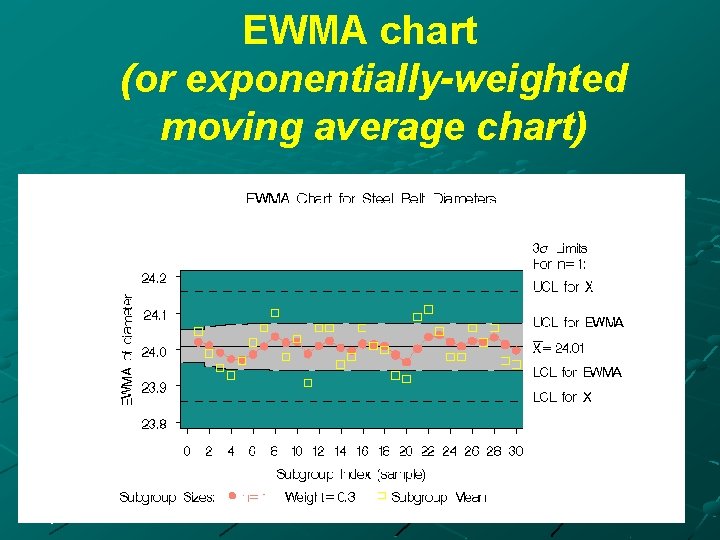
EWMA chart (or exponentially-weighted moving average chart) © 2010 Bob Doering © 2010 Bob Doering All Rights Reserved

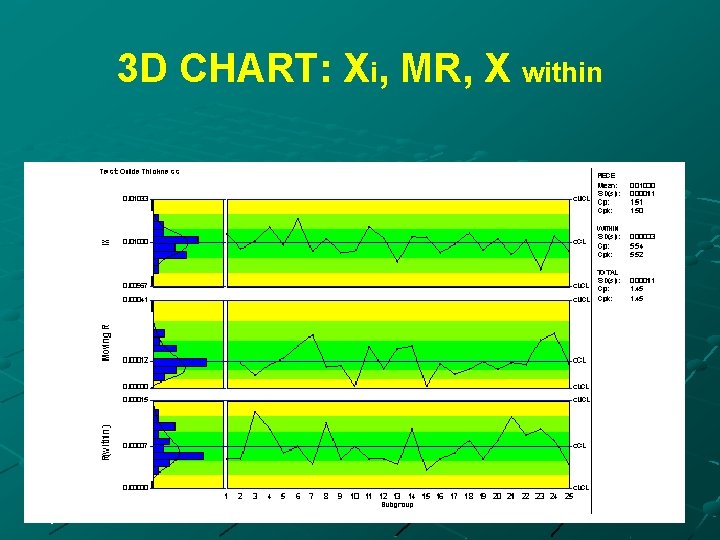
3 D CHART: Xi, MR, X within © 2010 Bob Doering © 2010 Bob Doering All Rights Reserved

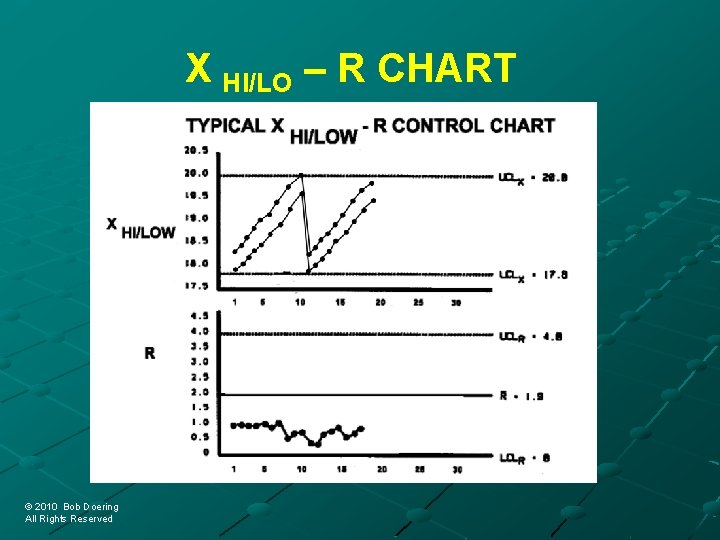
X HI/LO – R CHART © 2010 Bob Doering © 2010 Bob Doering All Rights Reserved

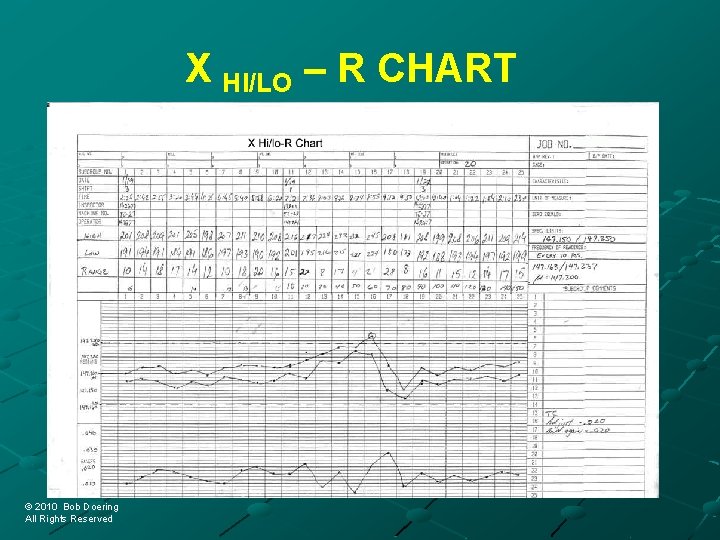
X HI/LO – R CHART © 2010 Bob Doering © 2010 Bob Doering All Rights Reserved

X HI/LO – R CHART © 2010 Bob Doering © 2010 Bob Doering All Rights Reserved

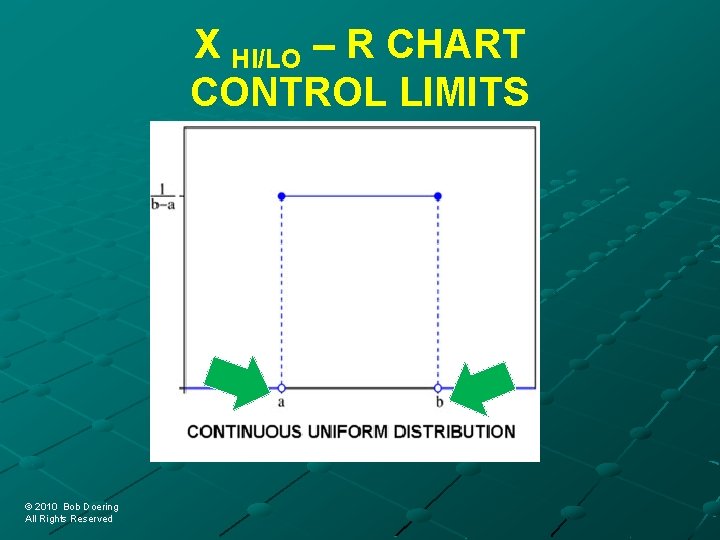
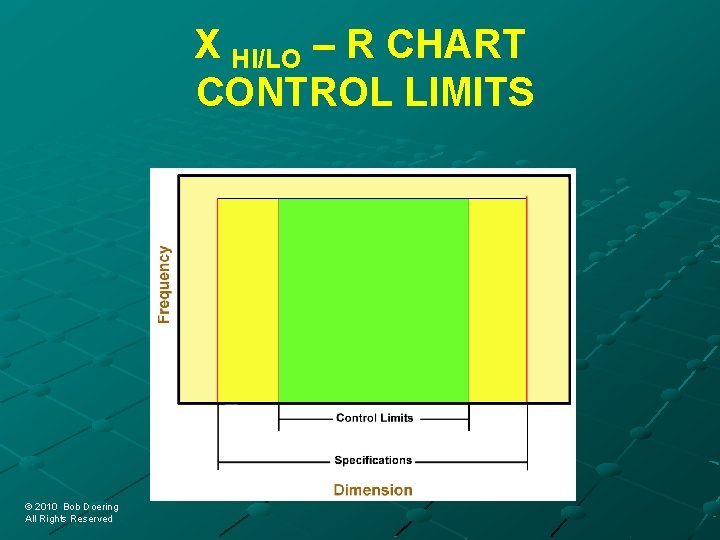
X HI/LO – R CHART CONTROL LIMITS © 2010 Bob Doering © 2010 Bob Doering All Rights Reserved

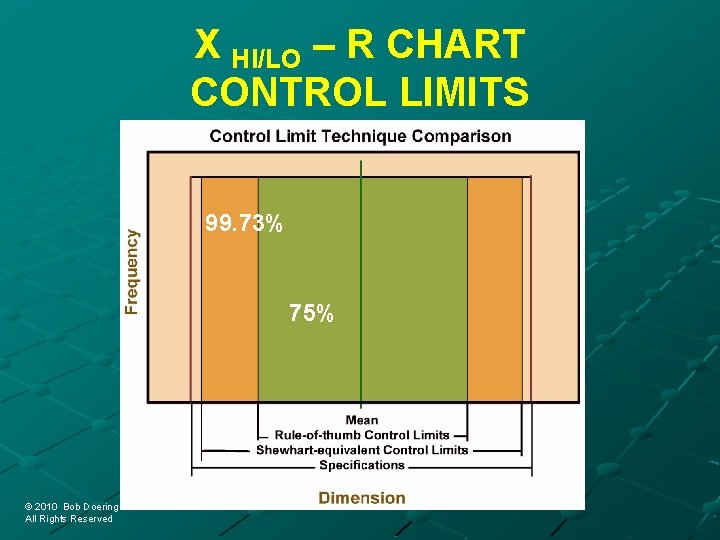
X HI/LO – R CHART CONTROL LIMITS 99. 73% 75% © 2010 Bob Doering © 2010 Bob Doering All Rights Reserved

X HI/LO – R CHART CONTROL LIMITS © 2010 Bob Doering © 2010 Bob Doering All Rights Reserved

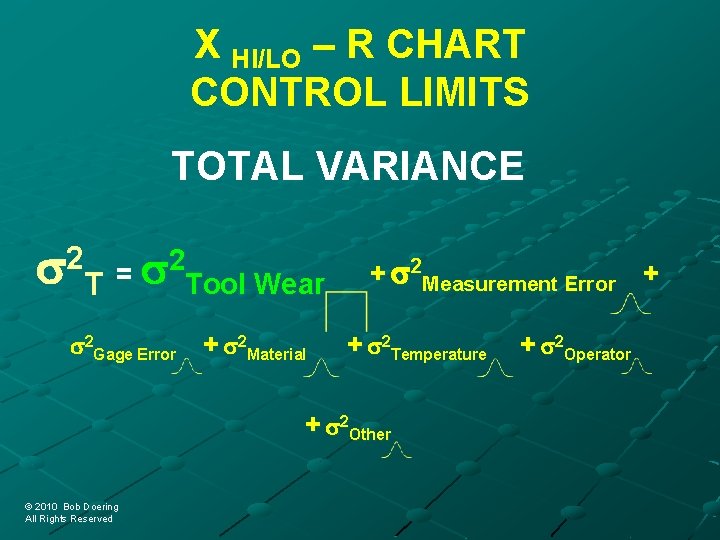
X HI/LO – R CHART CONTROL LIMITS TOTAL VARIANCE s 2 T = s 2 Tool Wear s 2 Gage Error + s 2 Material + s 2 Measurement Error + + s 2 Temperature + s 2 Other © 2010 Bob Doering © 2010 Bob Doering All Rights Reserved + s 2 Operator

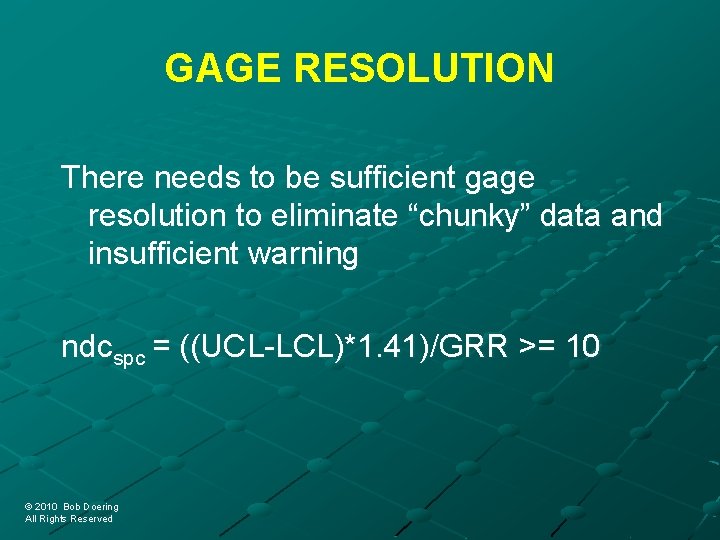
GAGE RESOLUTION There needs to be sufficient gage resolution to eliminate “chunky” data and insufficient warning ndcspc = ((UCL-LCL)*1. 41)/GRR >= 10 © 2010 Bob Doering © 2010 Bob Doering All Rights Reserved

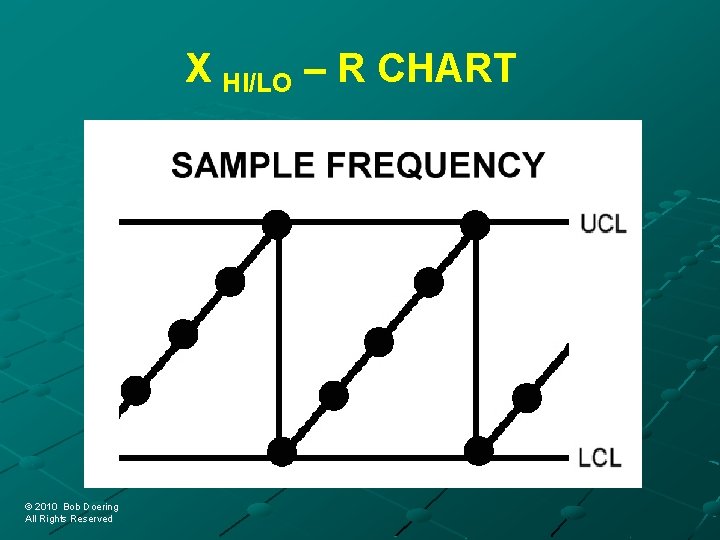
X HI/LO – R CHART TECHNIQUE Start an OD with the “Lo” value at the lower control limit. (Start at the center during the special cause of ‘warm-up’) Allow the tool to wear until the “Hi” value hits the upper control limit, Then adjust down until the “Lo” value hits the lower control limit. © 2010 Bob Doering © 2010 Bob Doering All Rights Reserved

X HI/LO – R CHART TECHNIQUE Start an ID with the “Hi” value at the upper control limit. (Start at the center during the special cause of ‘warm-up’) Allow the tool to wear until the “Lo” value hits the lower control limit, Then adjust down until the “Hi” value hits the upper control limit. © 2010 Bob Doering © 2010 Bob Doering All Rights Reserved

X HI/LO CHART RULES Look for trends in the “wrong” direction Can occur with roughing/finishing operations Roughing tool wears at a different rate that finishing tool Change in tool pressure can affect finished dimension As long as you know the cause – continue If not, stop and assess the problem © 2010 Bob Doering © 2010 Bob Doering All Rights Reserved

R CHART RULES If the Range starts to increase, this means the roundness is getting worse Increased roundness is a leading indicator of tool wear, and by changing the tool at the control limit for the range, you will maintain more consistent results and may catch the tool before it breaks © 2010 Bob Doering © 2010 Bob Doering All Rights Reserved

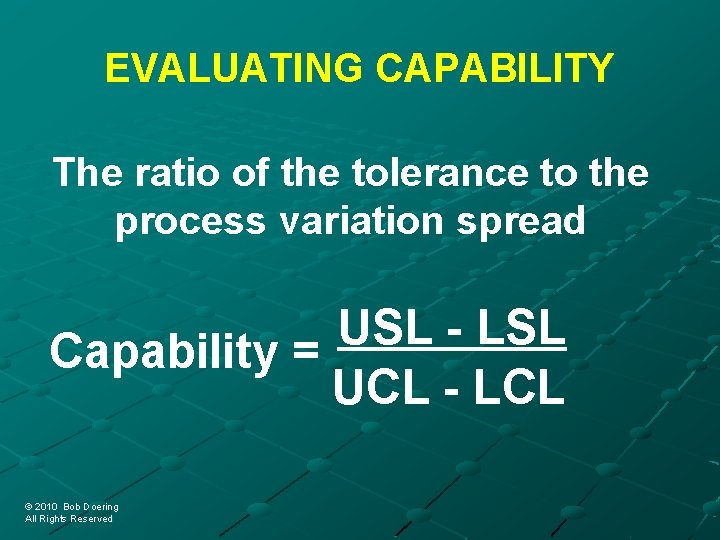
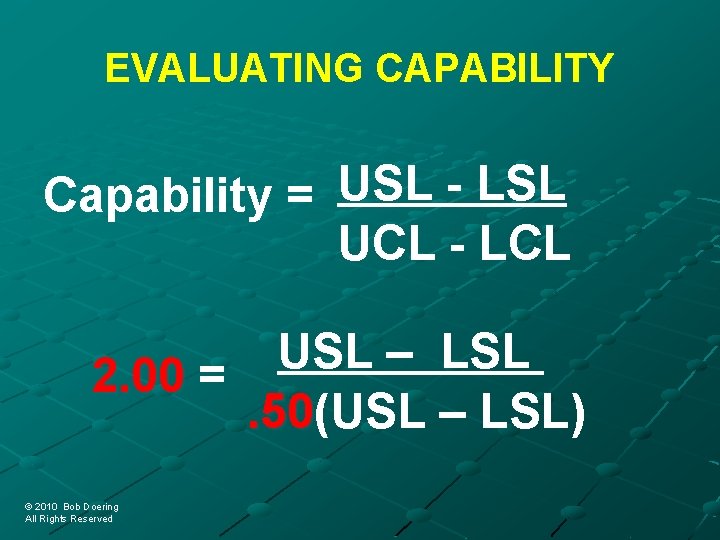
EVALUATING CAPABILITY The ratio of the tolerance to the process variation spread USL LSL Capability = UCL - LCL © 2010 Bob Doering © 2010 Bob Doering All Rights Reserved

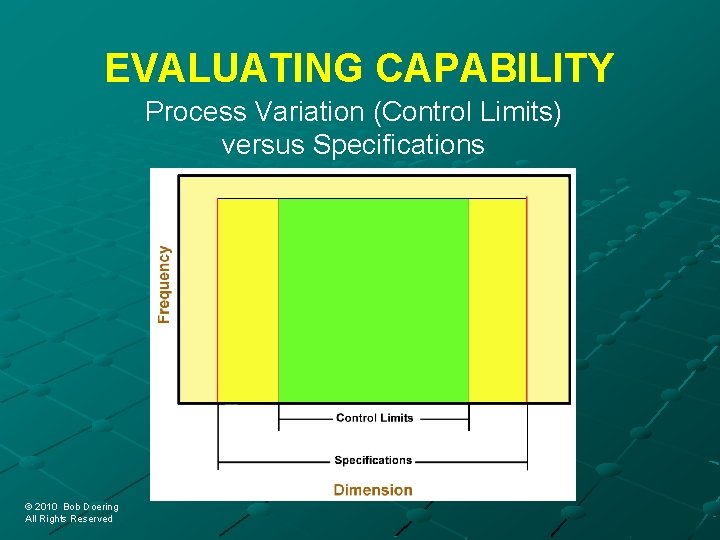
EVALUATING CAPABILITY Process Variation (Control Limits) versus Specifications © 2010 Bob Doering © 2010 Bob Doering All Rights Reserved

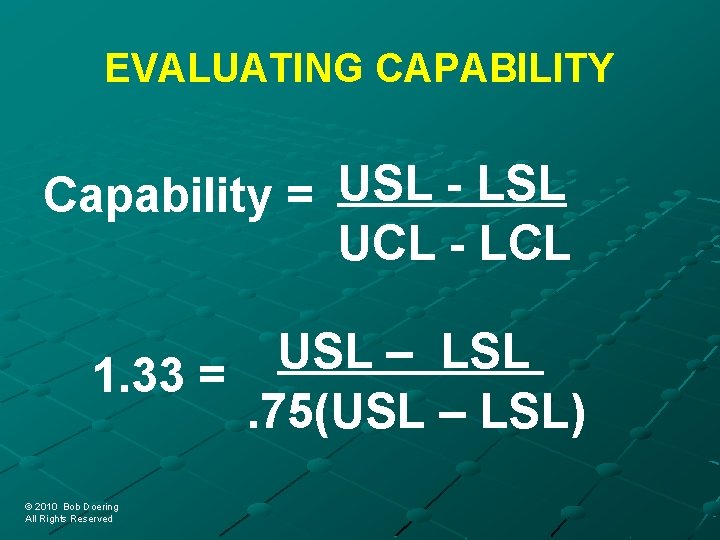
EVALUATING CAPABILITY Capability = USL - LSL UCL - LCL USL – LSL 1. 33 =. 75(USL – LSL) © 2010 Bob Doering © 2010 Bob Doering All Rights Reserved

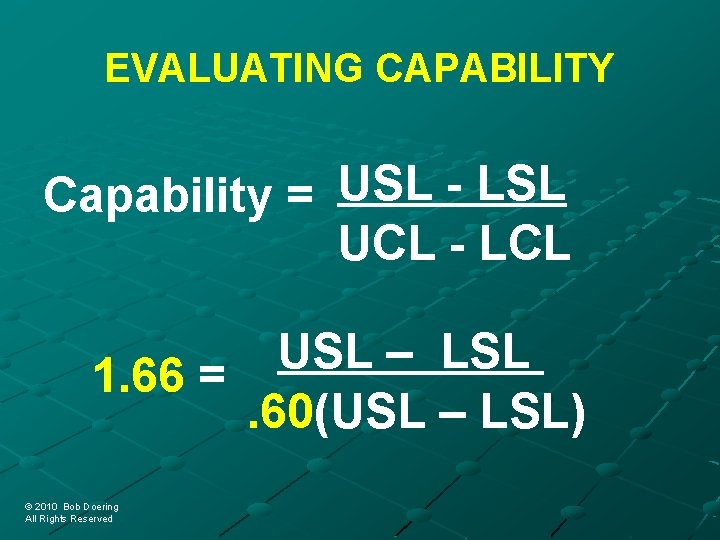
EVALUATING CAPABILITY Capability = USL - LSL UCL - LCL USL – LSL 1. 66 =. 60(USL – LSL) © 2010 Bob Doering © 2010 Bob Doering All Rights Reserved

EVALUATING CAPABILITY Capability = USL - LSL UCL - LCL USL – LSL 2. 00 =. 50(USL – LSL). 50 © 2010 Bob Doering © 2010 Bob Doering All Rights Reserved

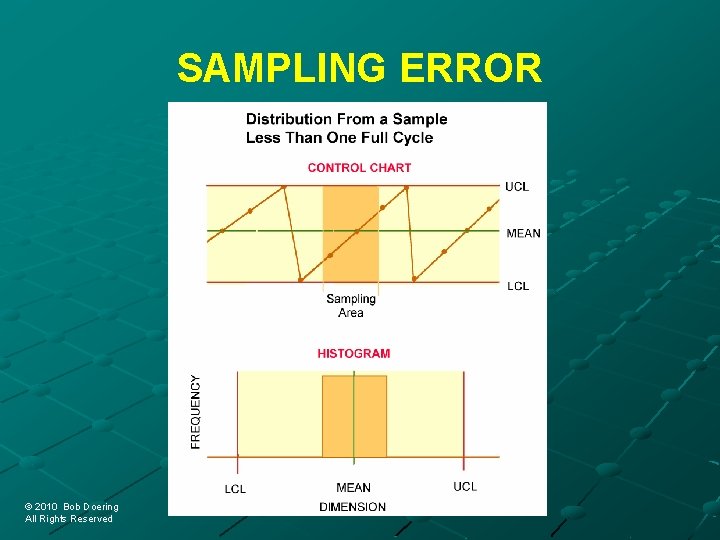
SAMPLING ERROR © 2010 Bob Doering © 2010 Bob Doering All Rights Reserved

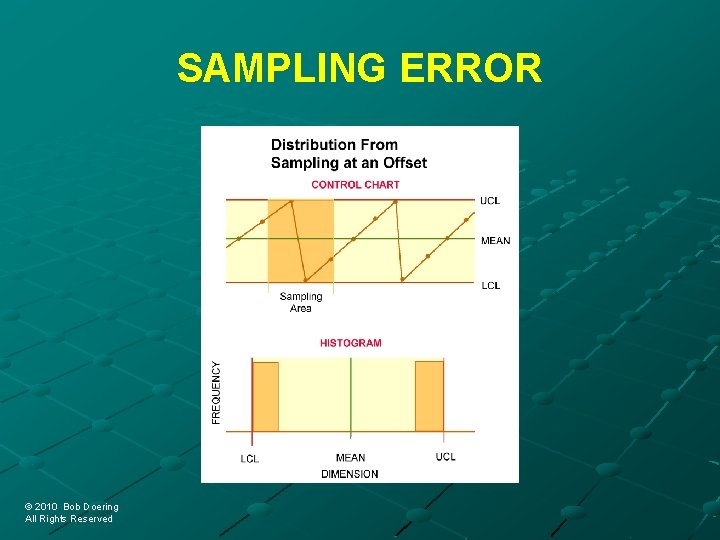
SAMPLING ERROR © 2010 Bob Doering © 2010 Bob Doering All Rights Reserved

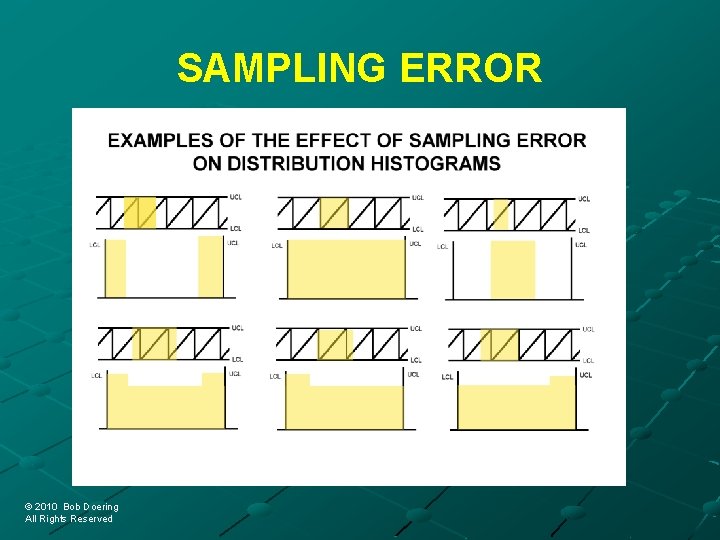
SAMPLING ERROR © 2010 Bob Doering © 2010 Bob Doering All Rights Reserved

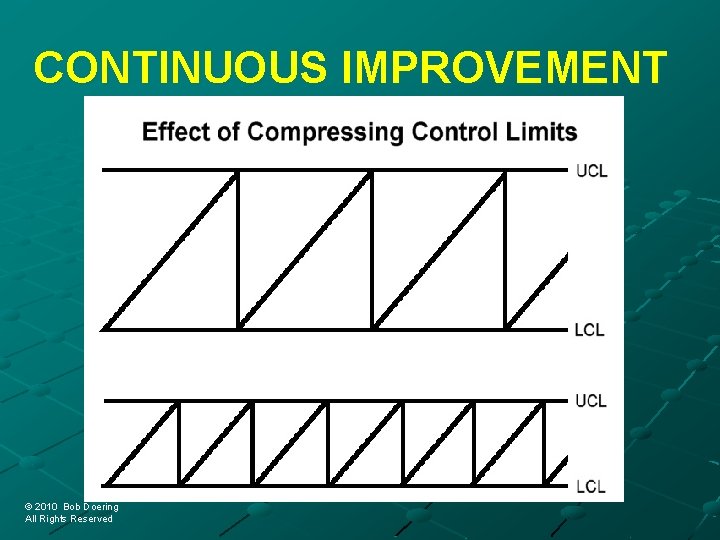
CONTINUOUS IMPROVEMENT © 2010 Bob Doering © 2010 Bob Doering All Rights Reserved

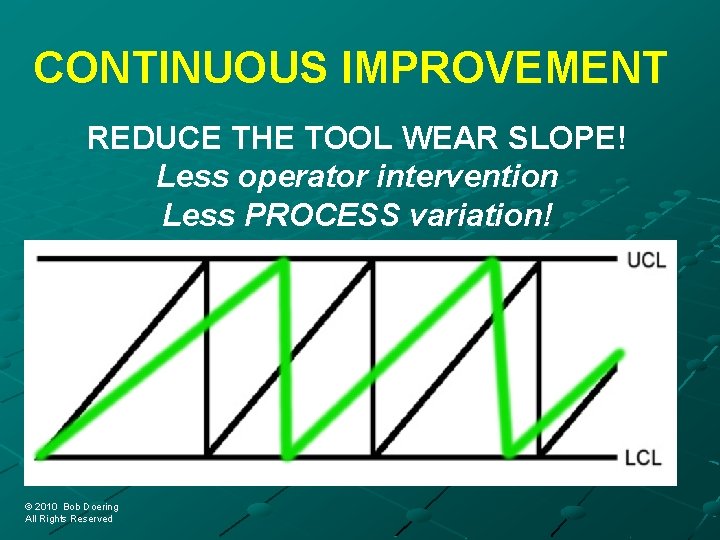
CONTINUOUS IMPROVEMENT REDUCE THE TOOL WEAR SLOPE! Less operator intervention Less PROCESS variation! © 2010 Bob Doering © 2010 Bob Doering All Rights Reserved

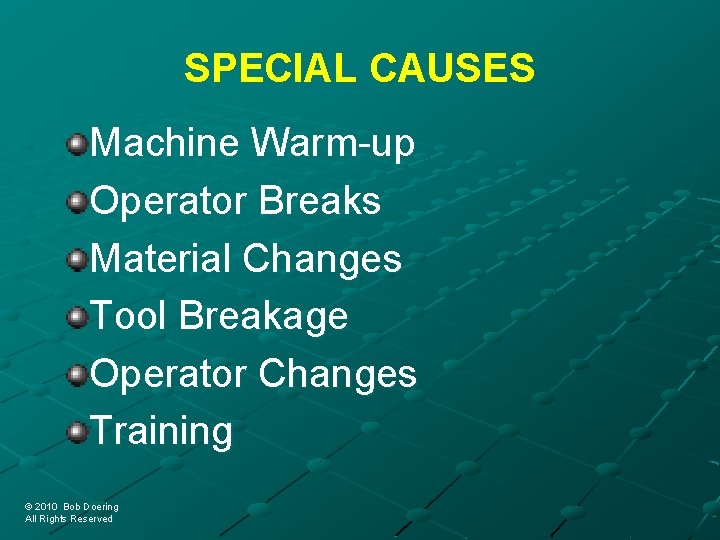
SPECIAL CAUSES Machine Warm-up Operator Breaks Material Changes Tool Breakage Operator Changes Training © 2010 Bob Doering © 2010 Bob Doering All Rights Reserved

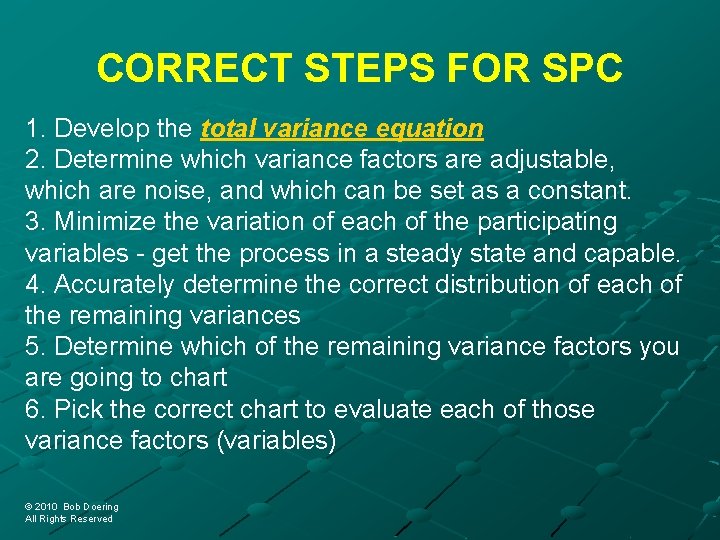
CORRECT STEPS FOR SPC 1. Develop the total variance equation 2. Determine which variance factors are adjustable, which are noise, and which can be set as a constant. 3. Minimize the variation of each of the participating variables - get the process in a steady state and capable. 4. Accurately determine the correct distribution of each of the remaining variances 5. Determine which of the remaining variance factors you are going to chart 6. Pick the correct chart to evaluate each of those variance factors (variables) © 2010 Bob Doering © 2010 Bob Doering All Rights Reserved

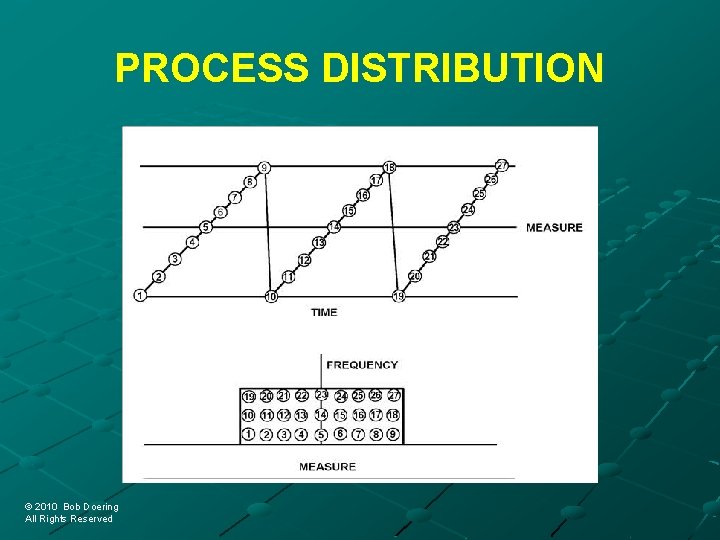
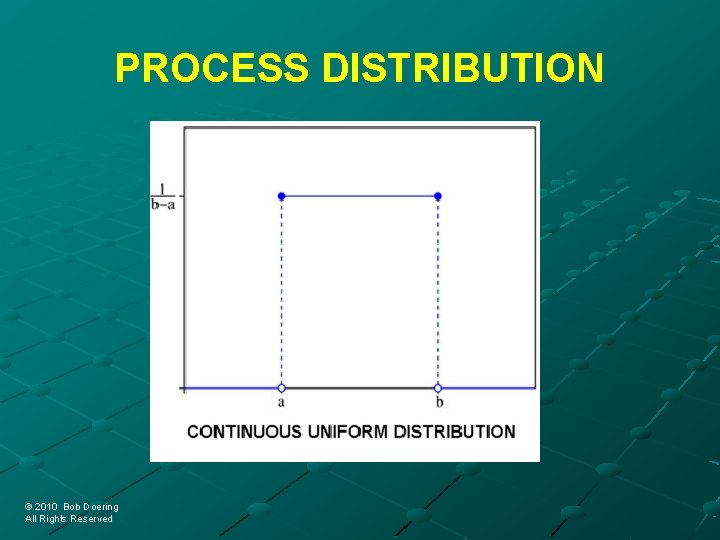
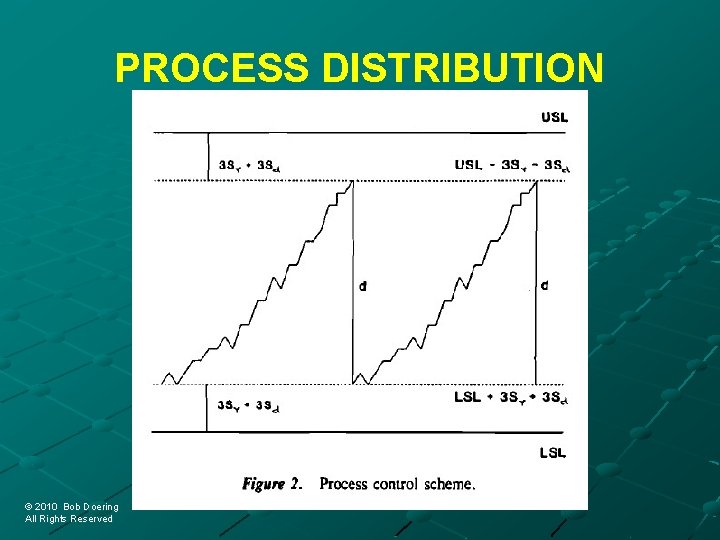
CONCLUSION • Precision diameters and lengths should be primarily affected by tool wear • Tool wear and associated adjustment for tool wear generates the “sawtooth curve” • The sawtooth curve’s distribution is the uniform or rectangular distribution • The uniform distribution is non-normal, and does not follow the rules of normality, such as Cpk calculations or the ‘Western Electric Rules” for control chart evaluation © 2010 Bob Doering © 2010 Bob Doering All Rights Reserved

CONCLUSION • The X bar chart from the X bar – R charts represent the average of a statistically insignificant sample of measurements for a of a circular feature • R charts from the X bar – R charts represent the range of measurement error • Control limits are calculated using statistics for the wrong distribution – the normal distribution © 2010 Bob Doering © 2010 Bob Doering All Rights Reserved

CONCLUSION • X hi/lo – R charts represent the GD&T characteristics of a circular feature: diameter and the zone represented by roundness (or length and parallelism for a linear dimension) • X hi/lo – R charts provide more valuable data, such as tool wear rate • X hi/lo – R charts use the correct uniform distribution for precision machining © 2010 Bob Doering © 2010 Bob Doering All Rights Reserved

CONCLUSION • X hi/lo – R charting techniques can be expanded to control taper • Automated tool wear compensation is not statistical process control • The algorithm for compensation becomes the process, not tool wear • Lose some benefits of SPC because the constant adjustment masks the information • Would help if the compensation was tracked © 2010 Bob Doering © 2010 Bob Doering All Rights Reserved

CONCLUSION "The total information is given by the observed distribution. ” -Dr. Walter A. Shewhart Economic Control of Quality of Manufactured Product © 2010 Bob Doering © 2010 Bob Doering All Rights Reserved

Correct. SPC PROCESS CONTROL FOR PRECISION MACHINING © 2010 Bob Doering © 2010 Bob Doering All Rights Reserved

© 2010 Bob Doering © 2010 Bob Doering All Rights Reserved

Correct. SPC • Bob Doering has been in the quality field for over 18 years. • He is currently a quality engineer for an automotive component manufacturing firm. • He has industrial experience for over 33 years, many of which were in precision machining of automotive and medical components. • He is an adjunct instructor at Lorain County Community College in Engineering Technology and Enrollment Services departments, and has lectured classes in Metrology and Quality Management. • He holds associates degrees from Lorain County Community College of Elyria, Ohio and The University of Akron, Ohio; BA in Business and MBA in Systems Management from Baldwin-Wallace College, Berea, Ohio. • He holds CMQ/OE, CQA, CMI (ASQ) certifications. • He has implemented the Correct. SPC concepts in precision machining for 15 years with significant success. © 2010 Bob Doering © 2010 Bob Doering All Rights Reserved