Corning Tropel Metrology Instruments Light Gage Frequency Scanning









- Slides: 28

Corning Tropel Metrology Instruments Light. Gage™ Frequency Scanning Technology Thomas J. Dunn 26 October 2007

Introduction Presentation Outline • • • Introduction Review of Conventional Interferometry FSI Technology Description System Design Measurement Results and Applications Conclusion Tropel Metrology Instruments Corning Incorporated 2

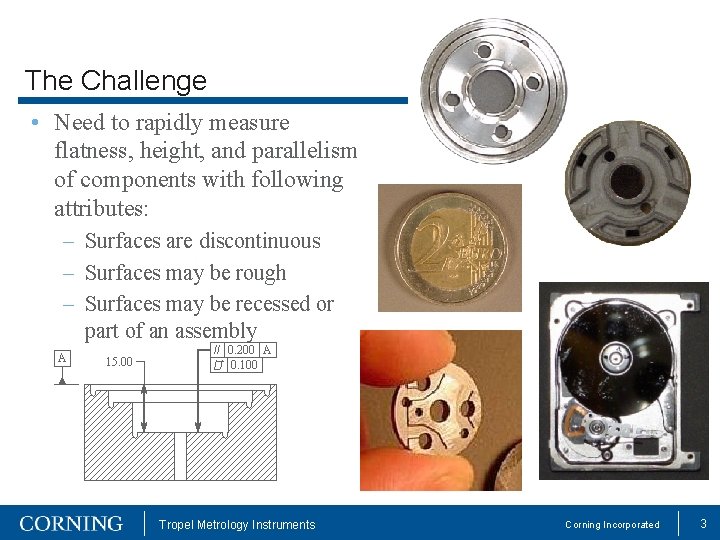
The Challenge • Need to rapidly measure flatness, height, and parallelism of components with following attributes: – Surfaces are discontinuous – Surfaces may be rough – Surfaces may be recessed or part of an assembly A 15. 00 // 0. 200 A / / 0. 100 Tropel Metrology Instruments Corning Incorporated 3

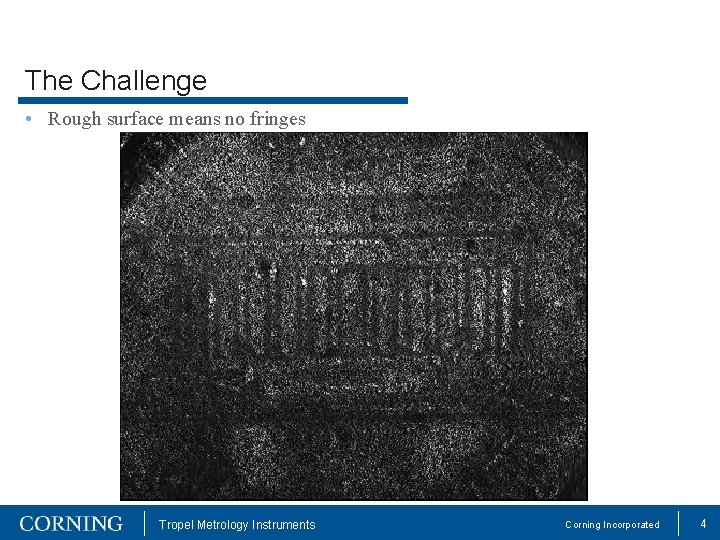
The Challenge • Rough surface means no fringes Tropel Metrology Instruments Corning Incorporated 4

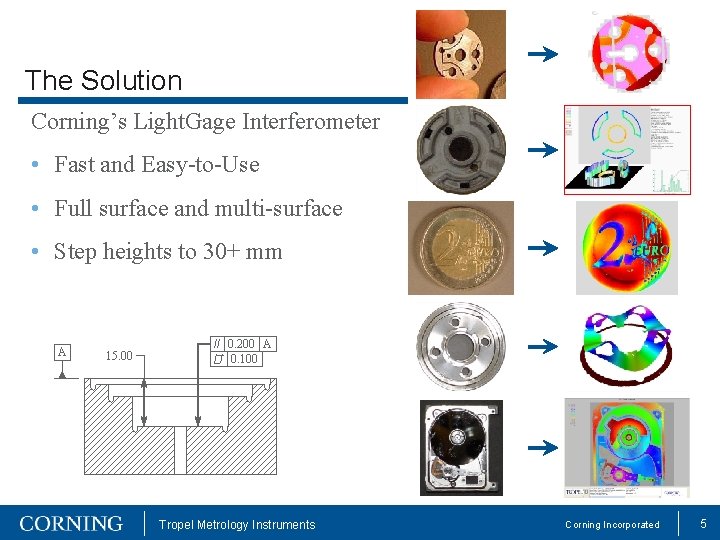
The Solution Corning’s Light. Gage Interferometer • Fast and Easy-to-Use • Full surface and multi-surface • Step heights to 30+ mm A 15. 00 // 0. 200 A / / 0. 100 Tropel Metrology Instruments Corning Incorporated 5

Light. Gage™ Frequency Stepping Interferometer Corning’s new Light. Gage™ system is an advanced, full surface, interferometer for measuring form (i. e. flatness), parallelism and depth Tropel Metrology Instruments Corning Incorporated 6

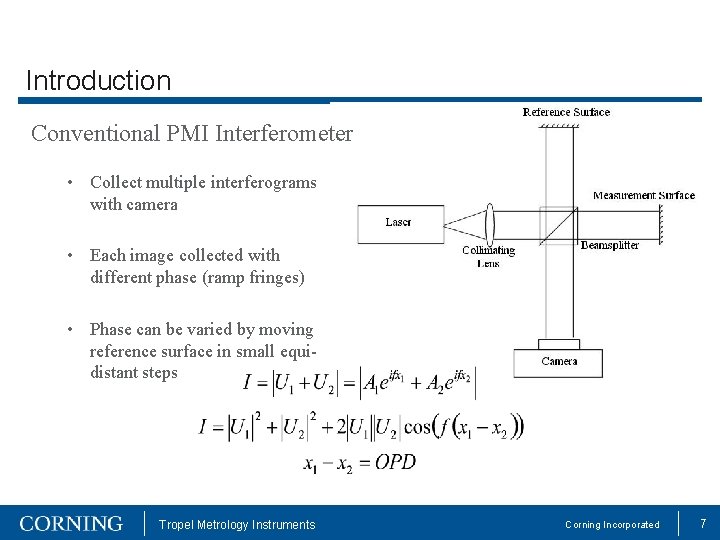
Introduction Conventional PMI Interferometer • Collect multiple interferograms with camera • Each image collected with different phase (ramp fringes) • Phase can be varied by moving reference surface in small equidistant steps Tropel Metrology Instruments Corning Incorporated 7

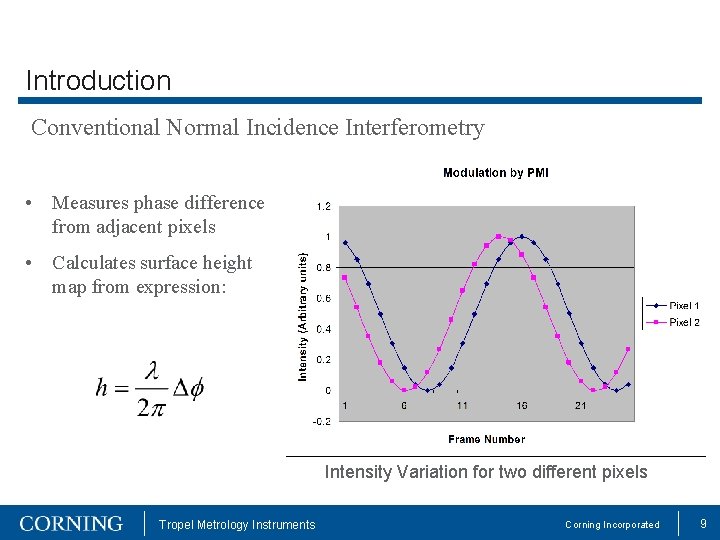
Introduction Conventional PMI Interferometer • Interferometric fringe pattern from a spacer is shown. Fringes show deviation from ideal plane • Multiple images are collected as OPD is varied in equi-distant steps • For each pixel we can plot intensity versus step number Tropel Metrology Instruments Corning Incorporated 8

Introduction Conventional Normal Incidence Interferometry • Measures phase difference from adjacent pixels • Calculates surface height map from expression: Intensity Variation for two different pixels Tropel Metrology Instruments Corning Incorporated 9

Introduction Conventional PMI Interferometer PRO’s CON’s • High Resolution and Accuracy • Works only on smooth surfaces • Cannot measure across discontinuous surfaces (depth, height, etc) • Limited Dynamic Range • High Speed Tropel Metrology Instruments Corning Incorporated 10

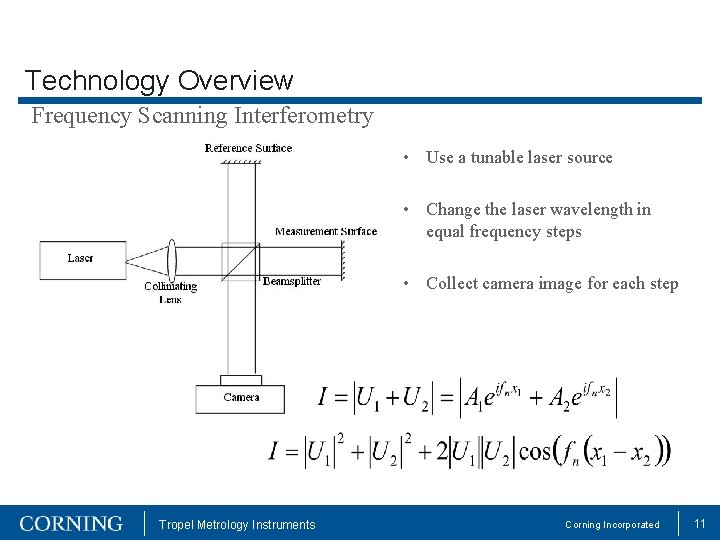
Technology Overview Frequency Scanning Interferometry • Use a tunable laser source • Change the laser wavelength in equal frequency steps • Collect camera image for each step Tropel Metrology Instruments Corning Incorporated 11

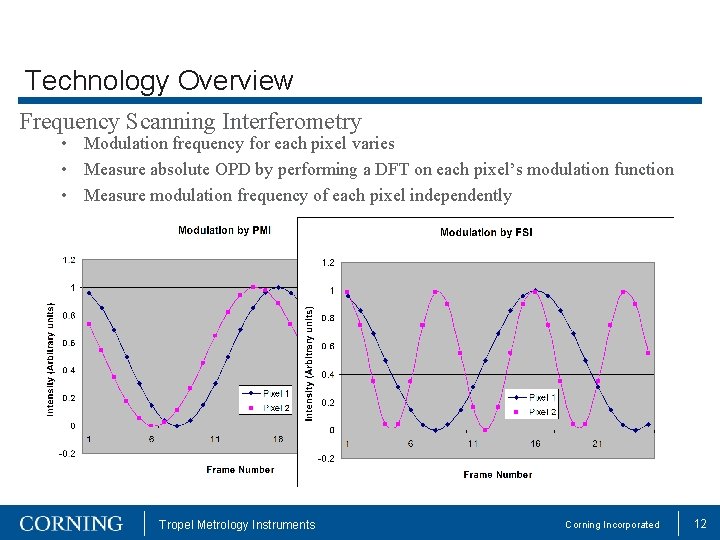
Technology Overview Frequency Scanning Interferometry • Modulation frequency for each pixel varies • Measure absolute OPD by performing a DFT on each pixel’s modulation function • Measure modulation frequency of each pixel independently Tropel Metrology Instruments Corning Incorporated 12

Technology Overview US Penny Height of each pixel independent of one another Tropel Metrology Instruments Corning Incorporated 13

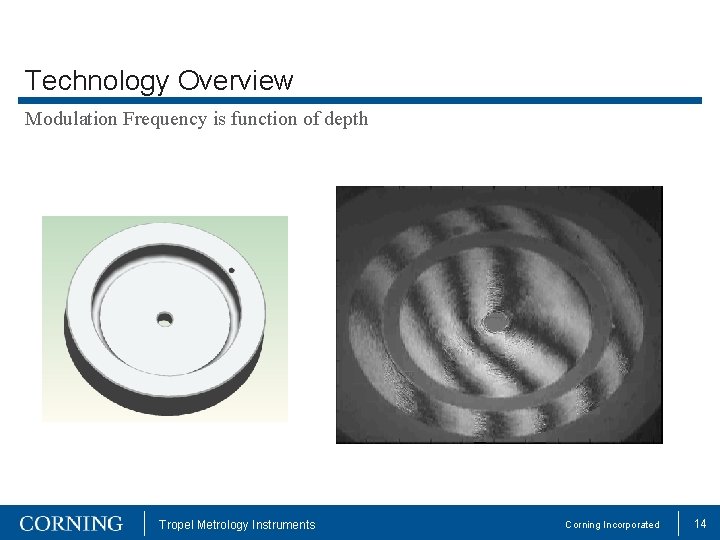
Technology Overview Modulation Frequency is function of depth Tropel Metrology Instruments Corning Incorporated 14

Technology Overview Frequency Scanning Interferometry • Laser has a “step-like” tuning behavior • Eliminates frequency errors caused by positioning errors • Allows faster tuning Tropel Metrology Instruments Corning Incorporated 15

System Design External Cavity Tunable Laser Source • Both diode cavity and external cavity have longitudinal laser modes • Mode-matching optimizes frequency stability, guarantees equal frequency steps, and optimizes fringe contrast Transmission Intensity • Desirable to tune the length of the external cavity to mode match the diode cavity Transmission Intensity Diode Cavity Frequency Tropel Metrology Instruments Corning Incorporated 16

System Design Interferometer Head • Compact design - Coupled through fiber optic cable - Can be mounted in any orientation - Can be located remotely - Easily integrated for in-line applications Tropel Metrology Instruments Corning Incorporated 17

System Design Interferometer Head • Fizeau Interferometer - Common path minimizes environmental impact - Small form factor Object Fizeau Plate Objective Lens Camera • Diffuser disk - Speckle busting - Variable spatial coherence Diffuser Disk BS TLD Tropel Metrology Instruments Corning Incorporated 18

System Design Interferometer Head Master System Controller • Single side or dual side measurements 5 meters Sensor Controller (PC) Source Unit Sensor Parts Handling Tropel Metrology Instruments Corning Incorporated 19

Light. Gage Gen 1 Specifications Field of View (Circular) 36 mm (1. 42 inch), Fixed Z-Resolution 10 nm (0. 40 μinch) Lateral Resolution 0. 08 mm (0. 003 inch) Measurement Range Up to 36 mm (1. 42 inch) Measurement Time 30 seconds typical Measurement Method Frequency Scanning Interferometry Data Points Up to 785, 000 pts /measurement Tropel Metrology Instruments Corning Incorporated 20

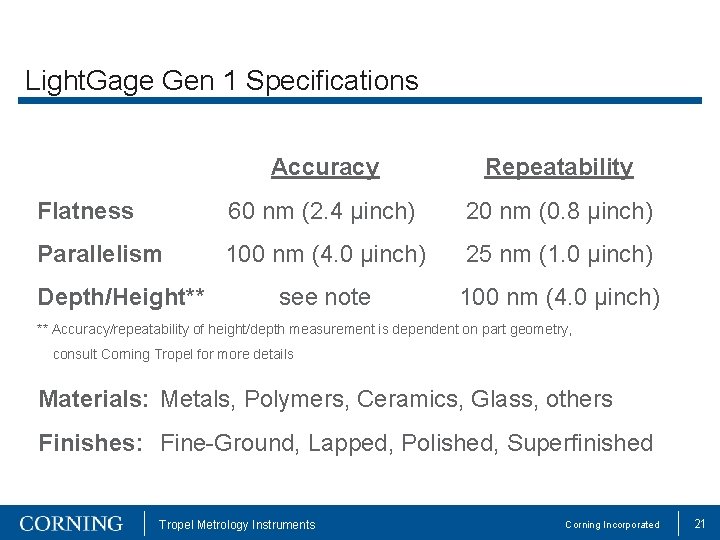
Light. Gage Gen 1 Specifications Accuracy Repeatability Flatness 60 nm (2. 4 μinch) 20 nm (0. 8 μinch) Parallelism 100 nm (4. 0 μinch) 25 nm (1. 0 μinch) see note 100 nm (4. 0 μinch) Depth/Height** ** Accuracy/repeatability of height/depth measurement is dependent on part geometry, consult Corning Tropel for more details Materials: Metals, Polymers, Ceramics, Glass, others Finishes: Fine-Ground, Lapped, Polished, Superfinished Tropel Metrology Instruments Corning Incorporated 21

Light. Gage Measurement Examples Spacers and Components (Fuel Injector - Automotive) Tropel Metrology Instruments Corning Incorporated 22

Light. Gage Measurement Examples Flatness and Parallelism of two surfaces (Fuel Pump - Automotive) Tropel Metrology Instruments Corning Incorporated 23

Light. Gage Measurement Examples Form of a precision recessed surface (HDD – Motor hub) Tropel Metrology Instruments Corning Incorporated 24

Light. Gage Measurement Examples Failure analysis on compressor plates Seal Ring Mounts Tropel Metrology Instruments Corning Incorporated 25

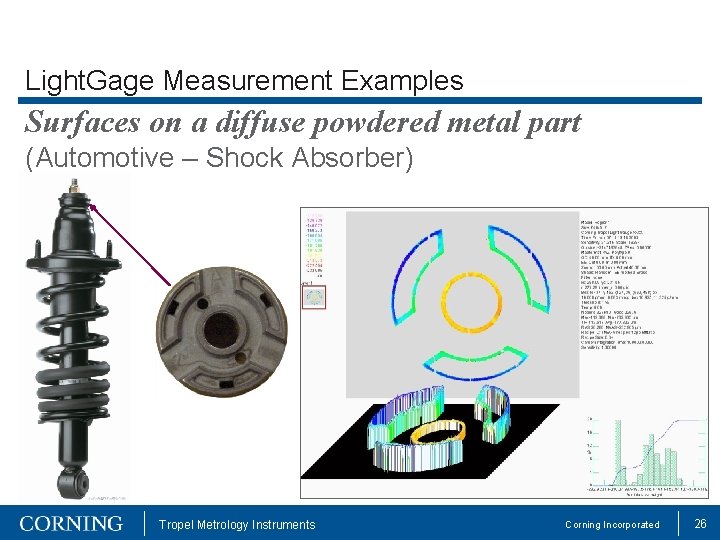
Light. Gage Measurement Examples Surfaces on a diffuse powdered metal part (Automotive – Shock Absorber) Tropel Metrology Instruments Corning Incorporated 26

Light. Gage Measurement Examples Form of a precision assembly (HDD – Wavy washer) Tropel Metrology Instruments Corning Incorporated 27

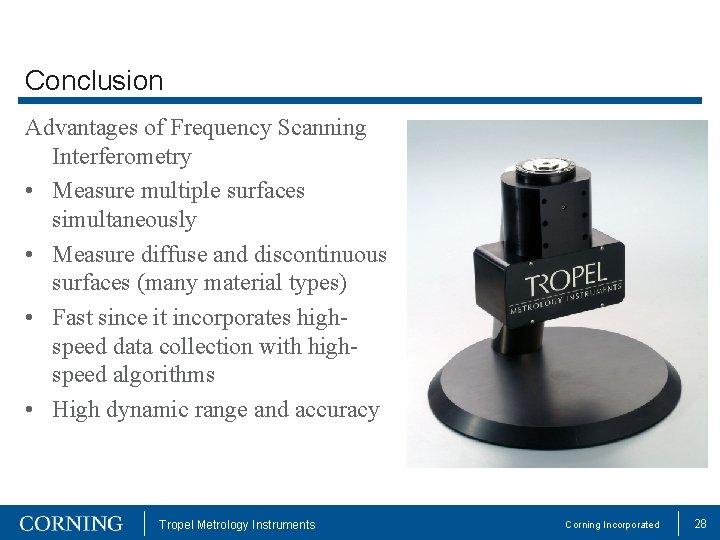
Conclusion Advantages of Frequency Scanning Interferometry • Measure multiple surfaces simultaneously • Measure diffuse and discontinuous surfaces (many material types) • Fast since it incorporates highspeed data collection with highspeed algorithms • High dynamic range and accuracy Tropel Metrology Instruments Corning Incorporated 28