
Conversion of wedge dash to Fischer projection The

- Slides: 31
Conversion of wedge - dash to Fischer projection The concepts deals with the conversion of the wedge dash representation of a given molecule in a Fischer projection With the help of this animation user will be easily able to convert any molecule given in wedge dash representation to planer Fischer projection , hence will be able to study the stereochemistry of the given molecule By Rachit Agarwal Department of chemistry IIT Bombay
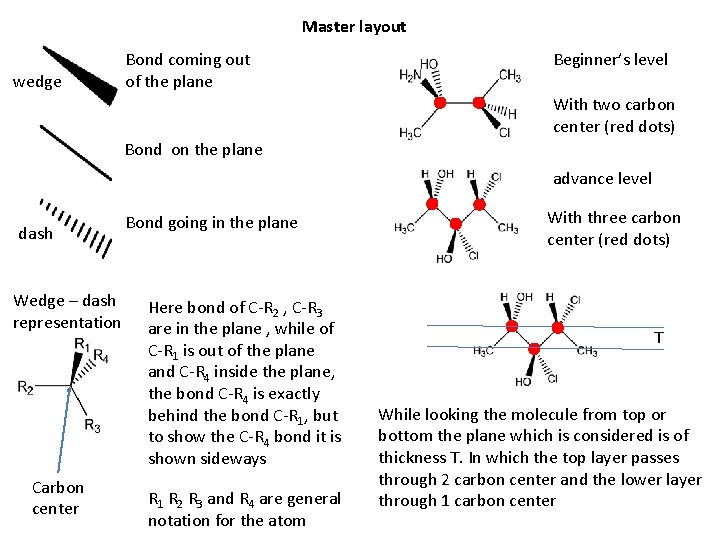
Master layout wedge Bond coming out of the plane Beginner’s level With two carbon center (red dots) Bond on the plane advance level dash Wedge – dash representation Carbon center Bond going in the plane Here bond of C-R 2 , C-R 3 are in the plane , while of C-R 1 is out of the plane and C-R 4 inside the plane, the bond C-R 4 is exactly behind the bond C-R 1, but to show the C-R 4 bond it is shown sideways R 1 R 2 R 3 and R 4 are general notation for the atom With three carbon center (red dots) T While looking the molecule from top or bottom the plane which is considered is of thickness T. In which the top layer passes through 2 carbon center and the lower layer through 1 carbon center
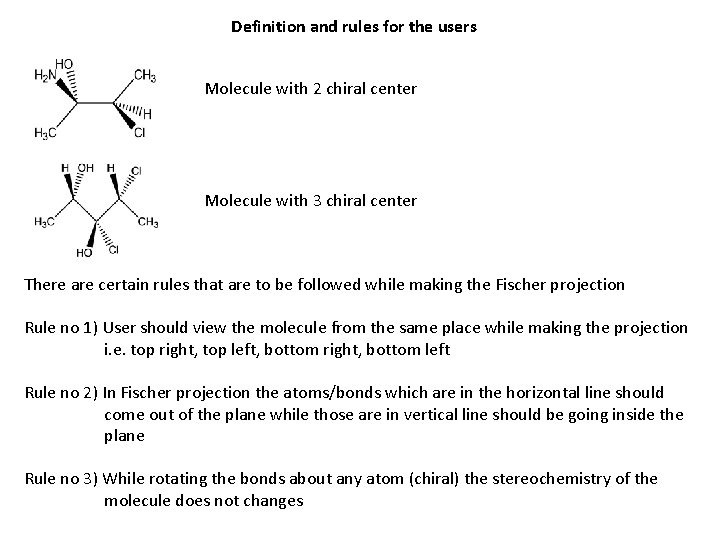
Definition and rules for the users Molecule with 2 chiral center Molecule with 3 chiral center There are certain rules that are to be followed while making the Fischer projection Rule no 1) User should view the molecule from the same place while making the projection i. e. top right, top left, bottom right, bottom left Rule no 2) In Fischer projection the atoms/bonds which are in the horizontal line should come out of the plane while those are in vertical line should be going inside the plane Rule no 3) While rotating the bonds about any atom (chiral) the stereochemistry of the molecule does not changes
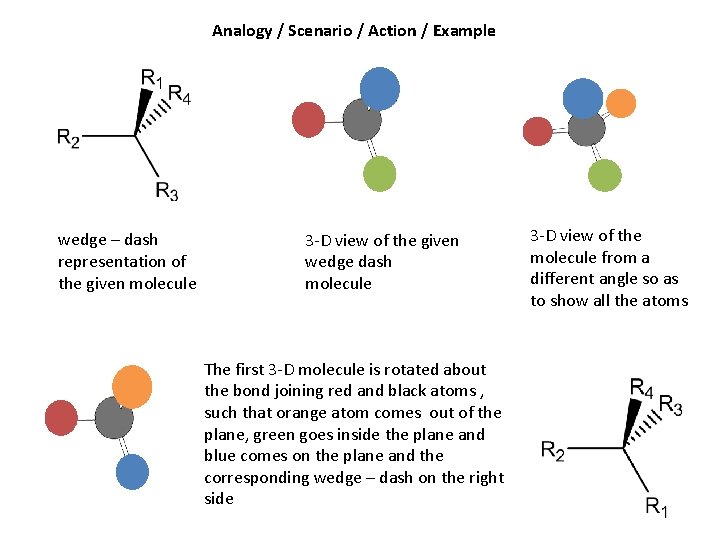
Analogy / Scenario / Action / Example wedge – dash representation of the given molecule 3 -D view of the given wedge dash molecule The first 3 -D molecule is rotated about the bond joining red and black atoms , such that orange atom comes out of the plane, green goes inside the plane and blue comes on the plane and the corresponding wedge – dash on the right side 3 -D view of the molecule from a different angle so as to show all the atoms
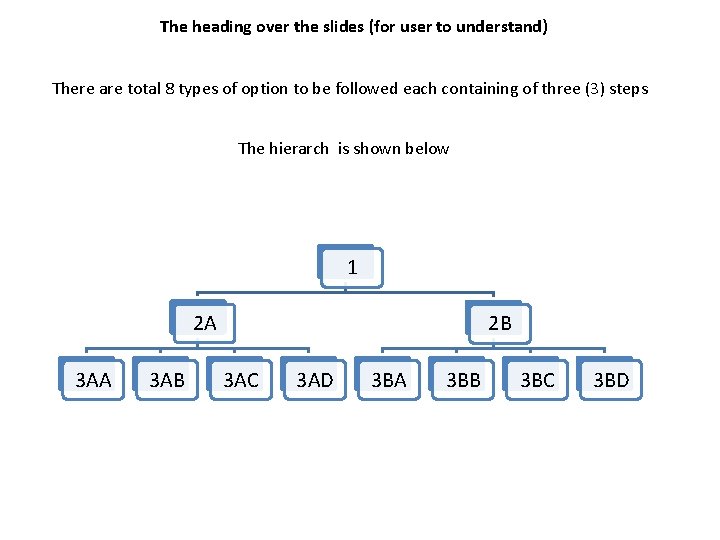
The heading over the slides (for user to understand) There are total 8 types of option to be followed each containing of three (3) steps The hierarch is shown below 1 2 A 3 AB 2 B 3 AC 3 AD 3 BA 3 BB 3 BC 3 BD
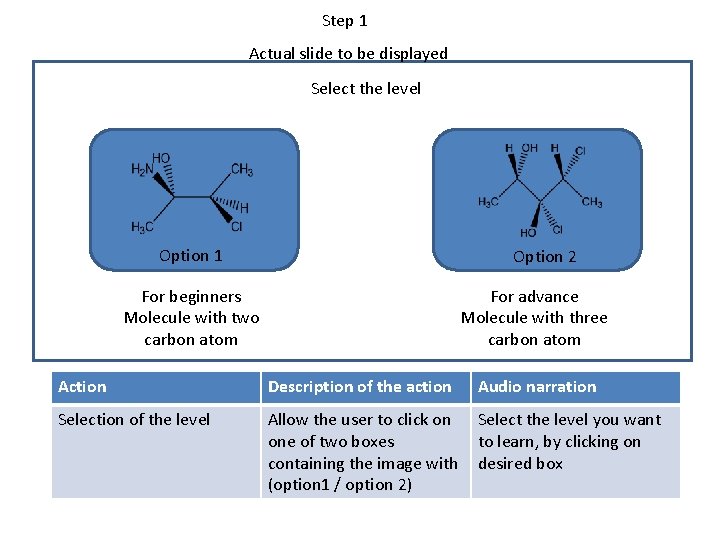
Step 1 Actual slide to be displayed Select the level Option 1 Option 2 For beginners Molecule with two carbon atom For advance Molecule with three carbon atom Action Description of the action Audio narration Selection of the level Allow the user to click on one of two boxes containing the image with (option 1 / option 2) Select the level you want to learn, by clicking on desired box
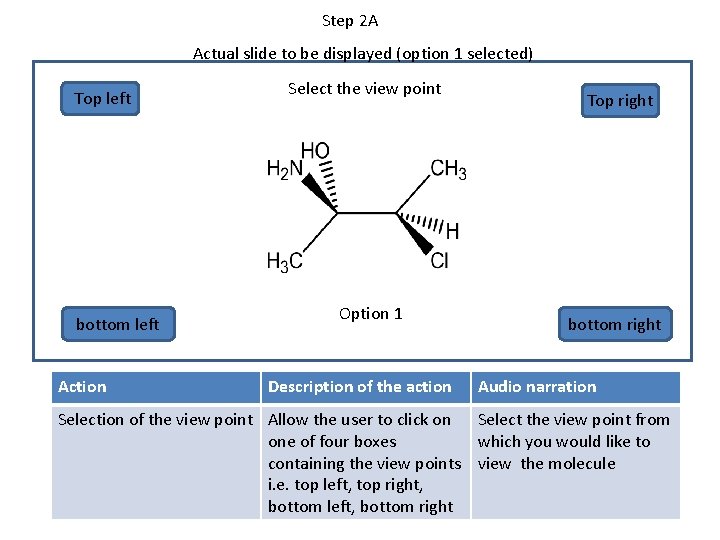
Step 2 A Actual slide to be displayed (option 1 selected) Top left bottom left Action Select the view point Option 1 Description of the action Top right bottom right Audio narration Selection of the view point Allow the user to click on Select the view point from one of four boxes which you would like to containing the view points view the molecule i. e. top left, top right, bottom left, bottom right
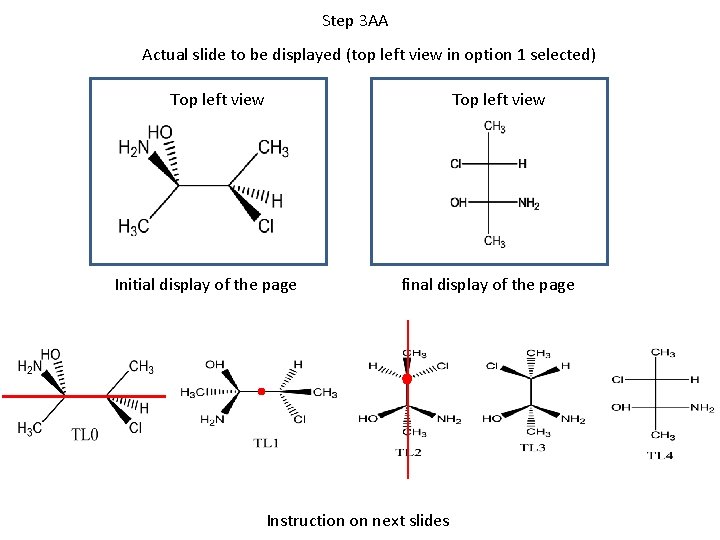
Step 3 AA Actual slide to be displayed (top left view in option 1 selected) Top left view Initial display of the page final display of the page Instruction on next slides
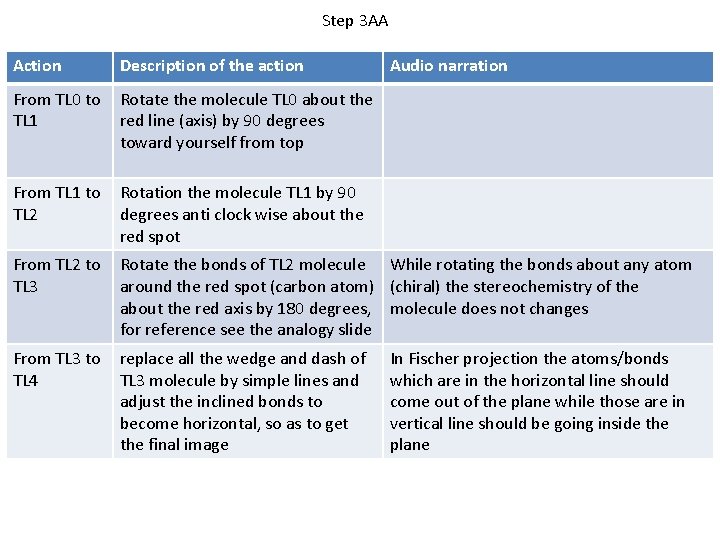
Step 3 AA Action Description of the action Audio narration From TL 0 to TL 1 Rotate the molecule TL 0 about the red line (axis) by 90 degrees toward yourself from top From TL 1 to TL 2 Rotation the molecule TL 1 by 90 degrees anti clock wise about the red spot From TL 2 to TL 3 Rotate the bonds of TL 2 molecule While rotating the bonds about any atom around the red spot (carbon atom) (chiral) the stereochemistry of the about the red axis by 180 degrees, molecule does not changes for reference see the analogy slide From TL 3 to TL 4 replace all the wedge and dash of TL 3 molecule by simple lines and adjust the inclined bonds to become horizontal, so as to get the final image In Fischer projection the atoms/bonds which are in the horizontal line should come out of the plane while those are in vertical line should be going inside the plane
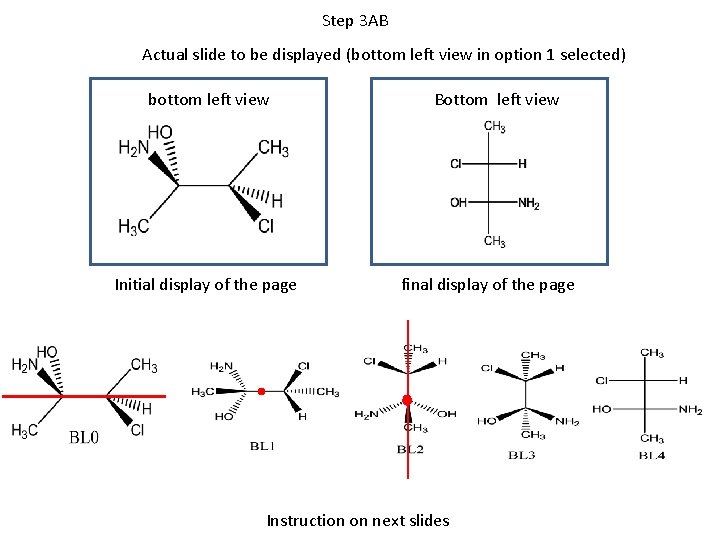
Step 3 AB Actual slide to be displayed (bottom left view in option 1 selected) bottom left view Initial display of the page Bottom left view final display of the page Instruction on next slides
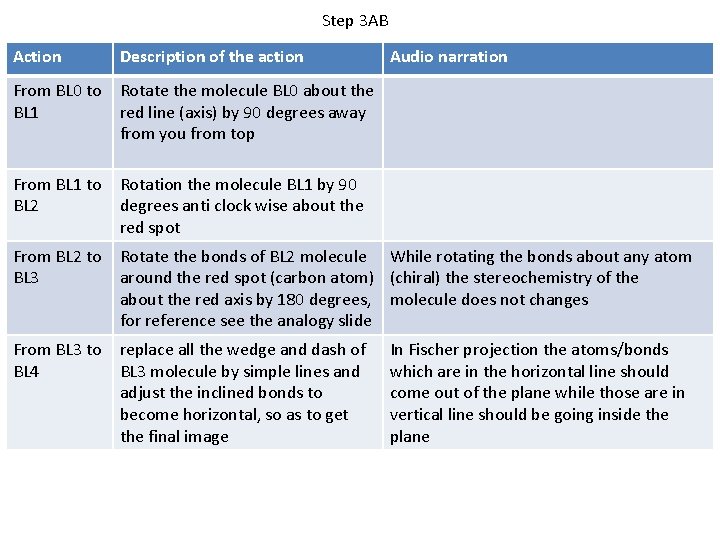
Step 3 AB Action Description of the action Audio narration From BL 0 to BL 1 Rotate the molecule BL 0 about the red line (axis) by 90 degrees away from you from top From BL 1 to BL 2 Rotation the molecule BL 1 by 90 degrees anti clock wise about the red spot From BL 2 to BL 3 Rotate the bonds of BL 2 molecule While rotating the bonds about any atom around the red spot (carbon atom) (chiral) the stereochemistry of the about the red axis by 180 degrees, molecule does not changes for reference see the analogy slide From BL 3 to BL 4 replace all the wedge and dash of BL 3 molecule by simple lines and adjust the inclined bonds to become horizontal, so as to get the final image In Fischer projection the atoms/bonds which are in the horizontal line should come out of the plane while those are in vertical line should be going inside the plane
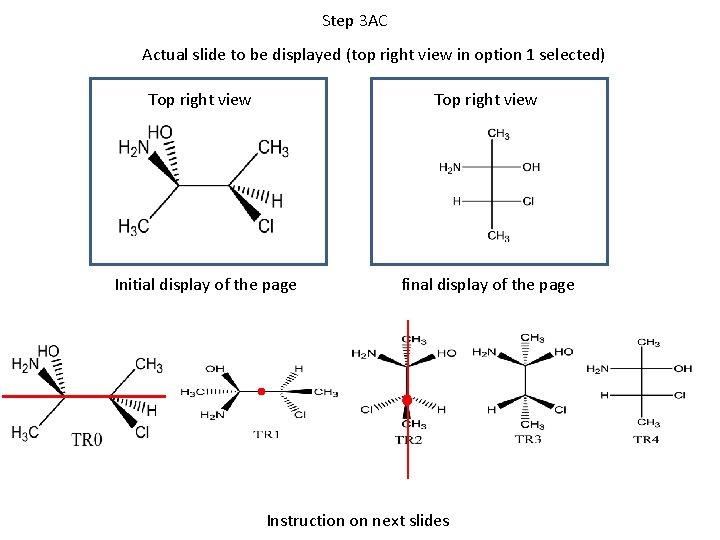
Step 3 AC Actual slide to be displayed (top right view in option 1 selected) Top right view Initial display of the page final display of the page Instruction on next slides
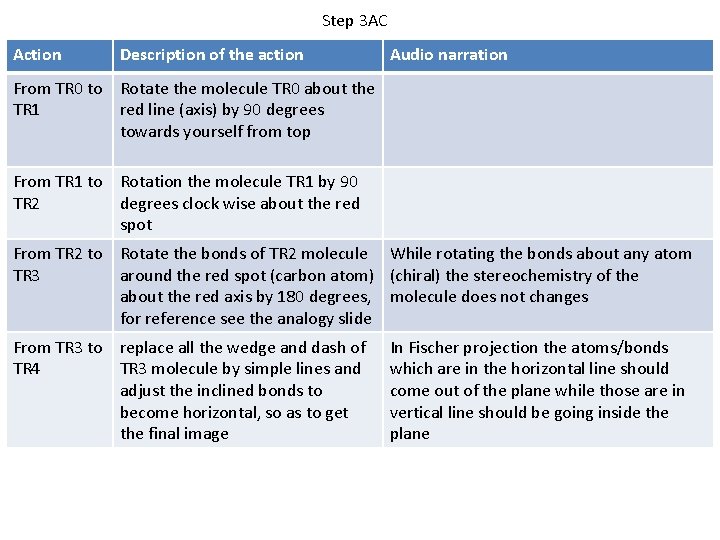
Step 3 AC Action Description of the action Audio narration From TR 0 to Rotate the molecule TR 0 about the TR 1 red line (axis) by 90 degrees towards yourself from top From TR 1 to Rotation the molecule TR 1 by 90 TR 2 degrees clock wise about the red spot From TR 2 to Rotate the bonds of TR 2 molecule While rotating the bonds about any atom TR 3 around the red spot (carbon atom) (chiral) the stereochemistry of the about the red axis by 180 degrees, molecule does not changes for reference see the analogy slide From TR 3 to replace all the wedge and dash of TR 4 TR 3 molecule by simple lines and adjust the inclined bonds to become horizontal, so as to get the final image In Fischer projection the atoms/bonds which are in the horizontal line should come out of the plane while those are in vertical line should be going inside the plane
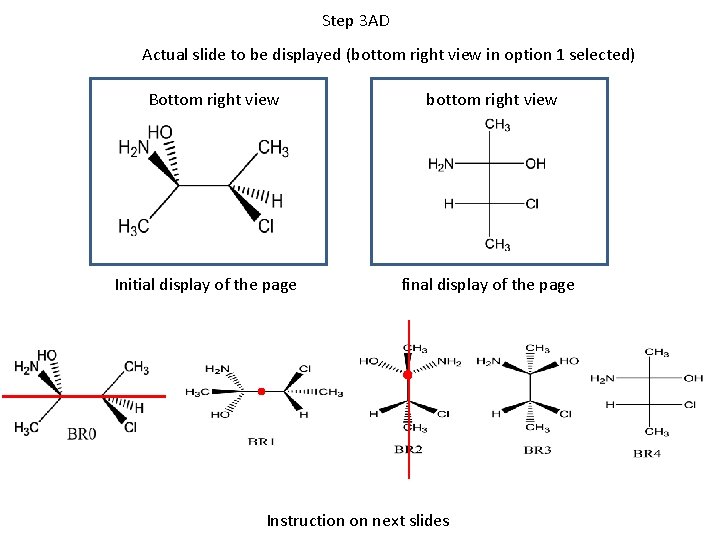
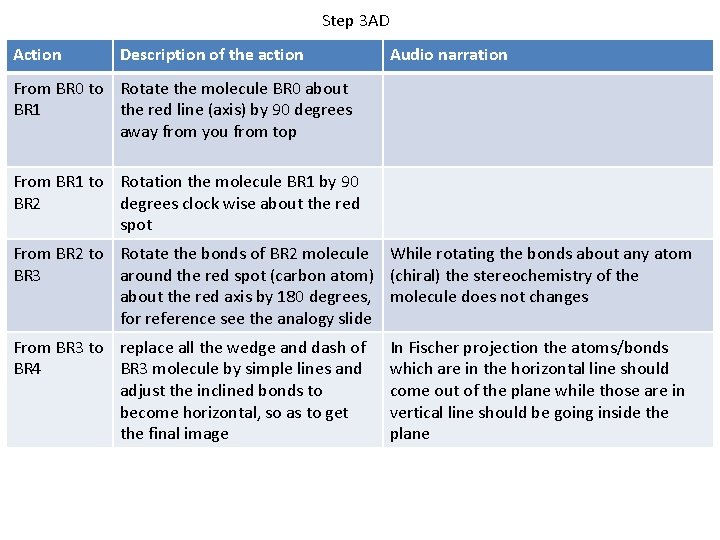
Step 3 AD Actual slide to be displayed (bottom right view in option 1 selected) Bottom right view Initial display of the page bottom right view final display of the page Instruction on next slides
Step 3 AD Action Description of the action Audio narration From BR 0 to Rotate the molecule BR 0 about BR 1 the red line (axis) by 90 degrees away from you from top From BR 1 to Rotation the molecule BR 1 by 90 BR 2 degrees clock wise about the red spot From BR 2 to Rotate the bonds of BR 2 molecule While rotating the bonds about any atom BR 3 around the red spot (carbon atom) (chiral) the stereochemistry of the about the red axis by 180 degrees, molecule does not changes for reference see the analogy slide From BR 3 to replace all the wedge and dash of BR 4 BR 3 molecule by simple lines and adjust the inclined bonds to become horizontal, so as to get the final image In Fischer projection the atoms/bonds which are in the horizontal line should come out of the plane while those are in vertical line should be going inside the plane
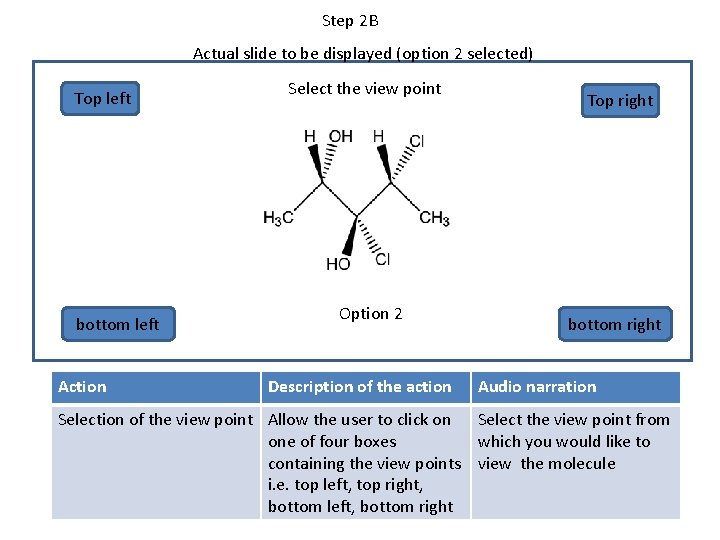
Step 2 B Actual slide to be displayed (option 2 selected) Top left bottom left Action Select the view point Option 2 Description of the action Top right bottom right Audio narration Selection of the view point Allow the user to click on Select the view point from one of four boxes which you would like to containing the view points view the molecule i. e. top left, top right, bottom left, bottom right
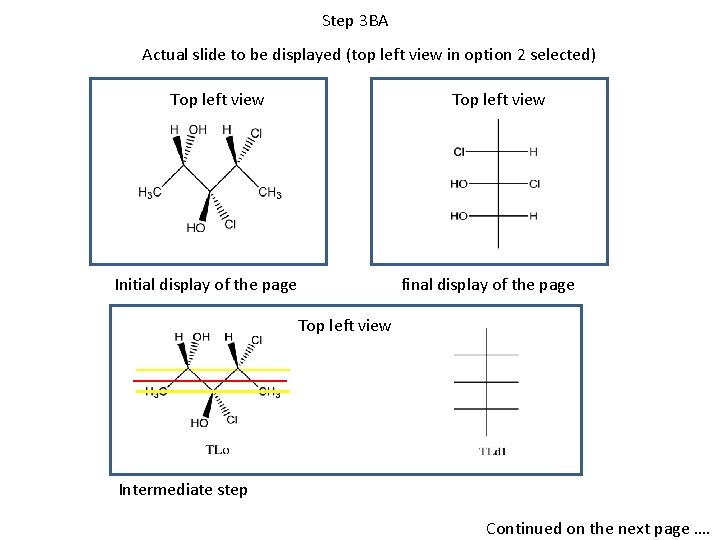
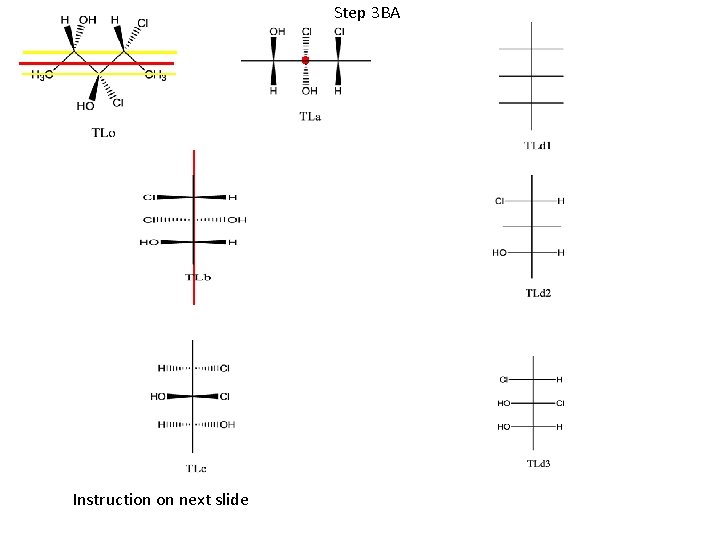
Step 3 BA Actual slide to be displayed (top left view in option 2 selected) Top left view Initial display of the page final display of the page Top left view Intermediate step Continued on the next page ….
Step 3 BA Instruction on next slide
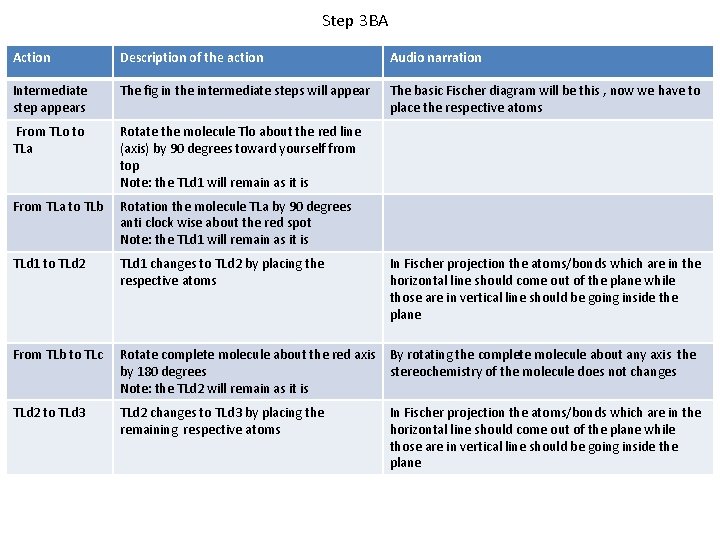
Step 3 BA Action Description of the action Audio narration Intermediate step appears The fig in the intermediate steps will appear The basic Fischer diagram will be this , now we have to place the respective atoms From TLo to TLa Rotate the molecule Tlo about the red line (axis) by 90 degrees toward yourself from top Note: the TLd 1 will remain as it is From TLa to TLb Rotation the molecule TLa by 90 degrees anti clock wise about the red spot Note: the TLd 1 will remain as it is TLd 1 to TLd 2 TLd 1 changes to TLd 2 by placing the respective atoms In Fischer projection the atoms/bonds which are in the horizontal line should come out of the plane while those are in vertical line should be going inside the plane From TLb to TLc Rotate complete molecule about the red axis by 180 degrees Note: the TLd 2 will remain as it is By rotating the complete molecule about any axis the stereochemistry of the molecule does not changes TLd 2 to TLd 3 TLd 2 changes to TLd 3 by placing the remaining respective atoms In Fischer projection the atoms/bonds which are in the horizontal line should come out of the plane while those are in vertical line should be going inside the plane
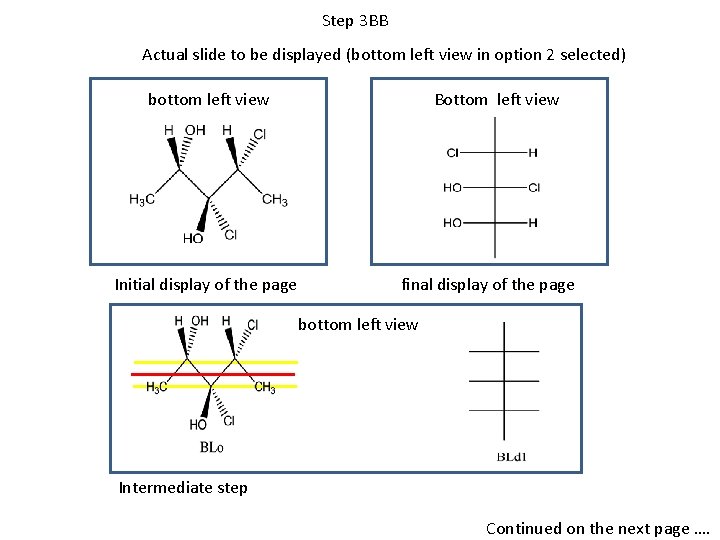
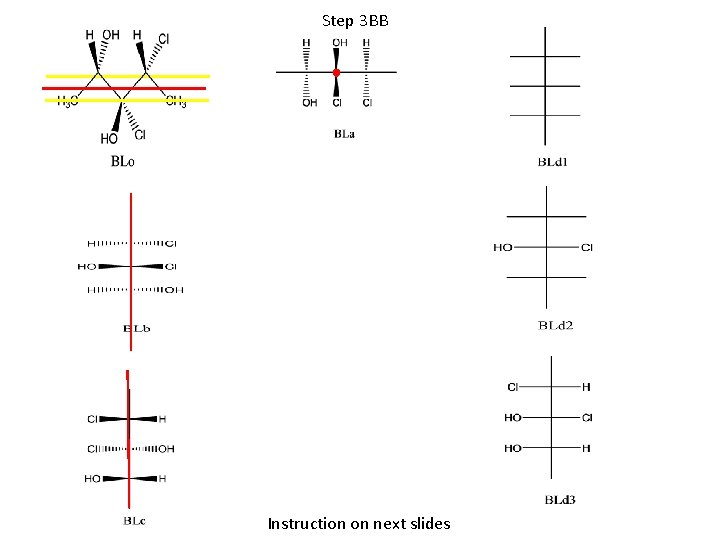
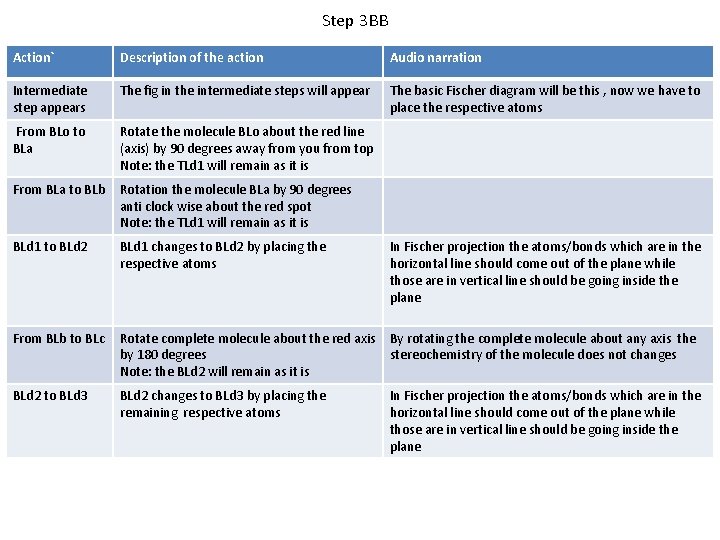
Step 3 BB Actual slide to be displayed (bottom left view in option 2 selected) Bottom left view bottom left view Initial display of the page final display of the page bottom left view Intermediate step Continued on the next page ….
Step 3 BB Instruction on next slides
Step 3 BB Action` Description of the action Audio narration Intermediate step appears The fig in the intermediate steps will appear The basic Fischer diagram will be this , now we have to place the respective atoms From BLo to BLa Rotate the molecule BLo about the red line (axis) by 90 degrees away from you from top Note: the TLd 1 will remain as it is From BLa to BLb Rotation the molecule BLa by 90 degrees anti clock wise about the red spot Note: the TLd 1 will remain as it is BLd 1 to BLd 2 BLd 1 changes to BLd 2 by placing the respective atoms In Fischer projection the atoms/bonds which are in the horizontal line should come out of the plane while those are in vertical line should be going inside the plane From BLb to BLc Rotate complete molecule about the red axis by 180 degrees Note: the BLd 2 will remain as it is By rotating the complete molecule about any axis the stereochemistry of the molecule does not changes BLd 2 to BLd 3 BLd 2 changes to BLd 3 by placing the remaining respective atoms In Fischer projection the atoms/bonds which are in the horizontal line should come out of the plane while those are in vertical line should be going inside the plane
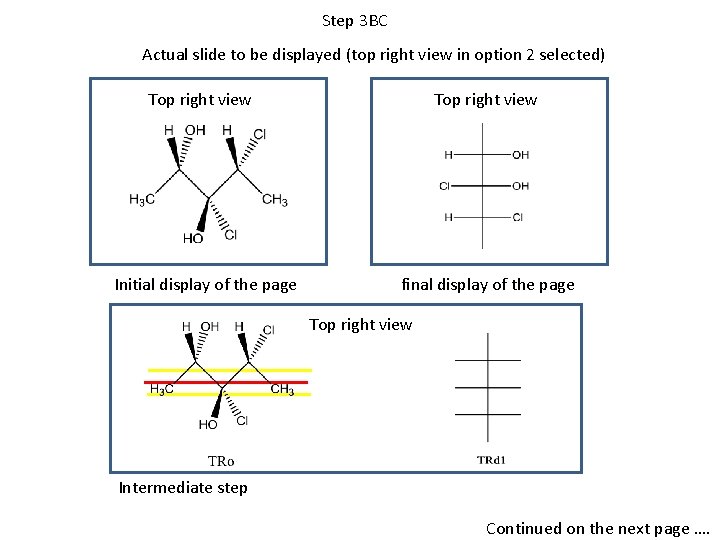
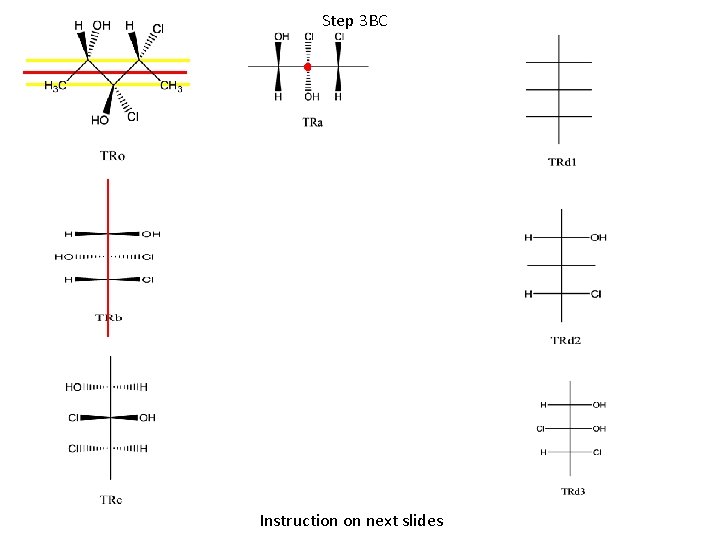
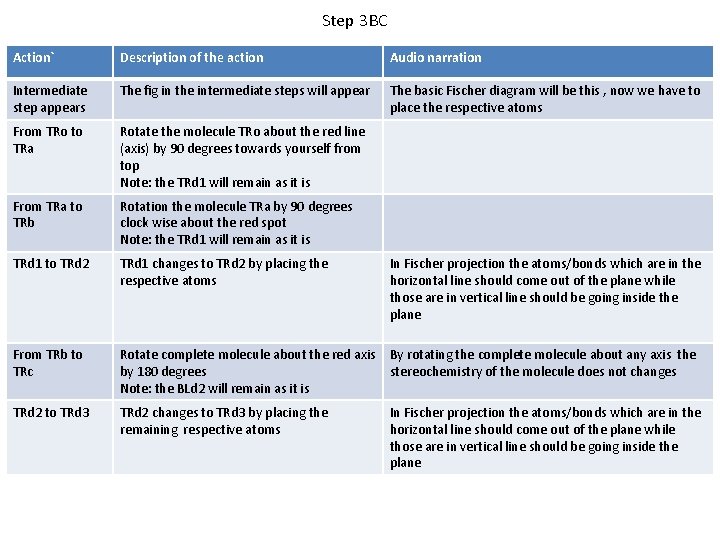
Step 3 BC Actual slide to be displayed (top right view in option 2 selected) Top right view Initial display of the page final display of the page Top right view Intermediate step Continued on the next page ….
Step 3 BC Instruction on next slides
Step 3 BC Action` Description of the action Audio narration Intermediate step appears The fig in the intermediate steps will appear The basic Fischer diagram will be this , now we have to place the respective atoms From TRo to TRa Rotate the molecule TRo about the red line (axis) by 90 degrees towards yourself from top Note: the TRd 1 will remain as it is From TRa to TRb Rotation the molecule TRa by 90 degrees clock wise about the red spot Note: the TRd 1 will remain as it is TRd 1 to TRd 2 TRd 1 changes to TRd 2 by placing the respective atoms In Fischer projection the atoms/bonds which are in the horizontal line should come out of the plane while those are in vertical line should be going inside the plane From TRb to TRc Rotate complete molecule about the red axis by 180 degrees Note: the BLd 2 will remain as it is By rotating the complete molecule about any axis the stereochemistry of the molecule does not changes TRd 2 to TRd 3 TRd 2 changes to TRd 3 by placing the remaining respective atoms In Fischer projection the atoms/bonds which are in the horizontal line should come out of the plane while those are in vertical line should be going inside the plane
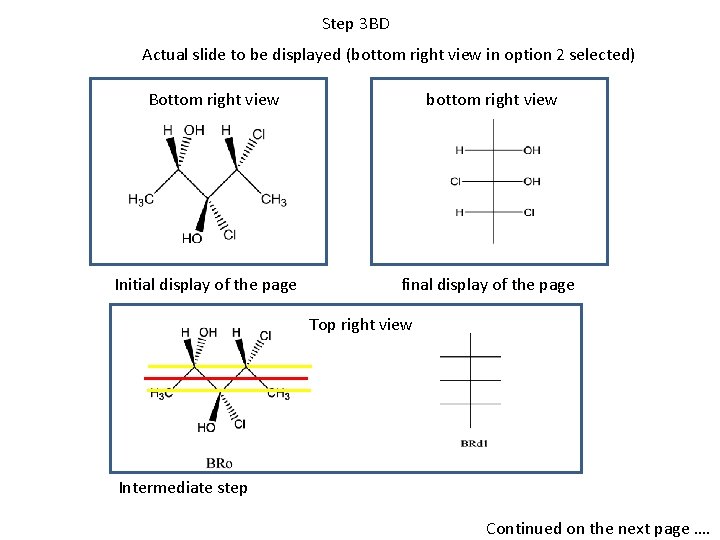
Step 3 BD Actual slide to be displayed (bottom right view in option 2 selected) bottom right view Bottom right view Initial display of the page final display of the page Top right view Intermediate step Continued on the next page ….
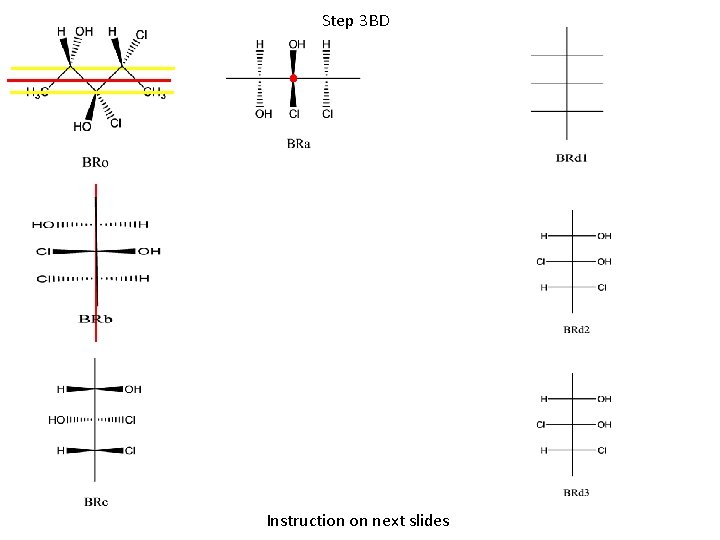
Step 3 BD Instruction on next slides
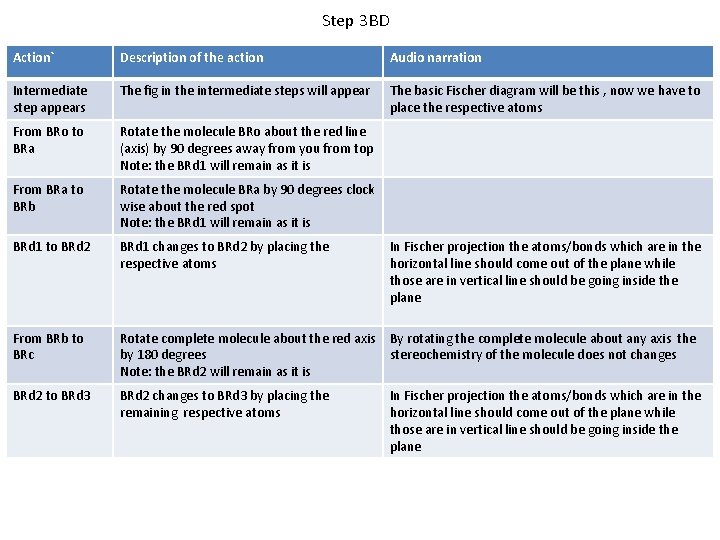
Step 3 BD Action` Description of the action Audio narration Intermediate step appears The fig in the intermediate steps will appear The basic Fischer diagram will be this , now we have to place the respective atoms From BRo to BRa Rotate the molecule BRo about the red line (axis) by 90 degrees away from you from top Note: the BRd 1 will remain as it is From BRa to BRb Rotate the molecule BRa by 90 degrees clock wise about the red spot Note: the BRd 1 will remain as it is BRd 1 to BRd 2 BRd 1 changes to BRd 2 by placing the respective atoms In Fischer projection the atoms/bonds which are in the horizontal line should come out of the plane while those are in vertical line should be going inside the plane From BRb to BRc Rotate complete molecule about the red axis by 180 degrees Note: the BRd 2 will remain as it is By rotating the complete molecule about any axis the stereochemistry of the molecule does not changes BRd 2 to BRd 3 BRd 2 changes to BRd 3 by placing the remaining respective atoms In Fischer projection the atoms/bonds which are in the horizontal line should come out of the plane while those are in vertical line should be going inside the plane
Links for further studies References books 1) Organic Chemistry Jonathan Clayden, Nick Greeves, Stuart Warren, and Peter Wothers 2) Solomons, Fryhle: Organic Chemistry, 8 th Edition Websites 1) http: //www. youtube. com/watch? v=KKOY 1 sd. YEes
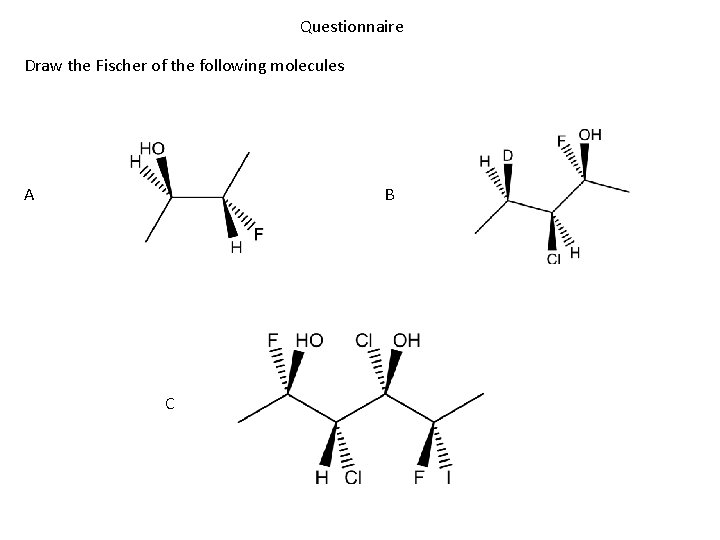
Questionnaire Draw the Fischer of the following molecules A B C
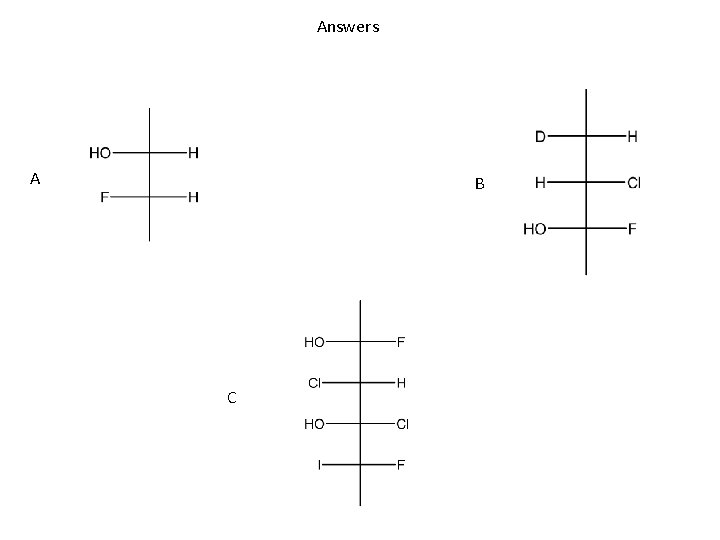
Answers A B C