Computer Graphics Filled Area Primitives II Lecture 09


 1 (10, 1 6 ) 2 (16,")


 § if ((x")
 && (current != fill. Color)) set. Pixel(fill.")


 § if ((x < 0)")
 == old. Color) then § set.")

 flood.")


- Slides: 64
Computer Graphics Filled Area Primitives II Lecture 09 Taqdees A. Siddiqi cs 602@vu. edu. pk
Filled Area Primitives § There are two basic approaches to area filling on raster systems. § scan-line polygon filling § Boundary-fill and Flood-fill
Polygon § A polygon can be defined as a shape that is formed by line segments that are placed end to end, creating a continuous closed path. Polygons can be divided into three basic types: § convex § concave § complex
Polygon types § Does a straight line connecting ANY two points that are inside the polygon intersect any edges of the polygon?
Convex polygons § If the answer is no then polygon is convex
Concave polygons § Otherwise the polygon is concave
Complex polygons § Complex polygons are basically concave polygons that may have self-intersecting edges
Unfilled polygons § When an unfilled polygon is rendered, only the points on the perimeter of the polygon are drawn.
Filled Polygons § When a polygon is filled, the interior of the polygon must be considered. All of the pixels within the boundaries of the polygon must be set to the specified color or pattern.
Parity § Parity is a concept used to determine which pixels lie within a polygon, i. e. which pixels should be filled for a given polygon.
ODD number of edges § Point is inside the polygon filled area
Even number of edges I § Point lies outside the polygon
Even number of edges II § Point lies outside the circle
Polygon Filling Algorithm § When filling a polygon, you will most likely just have a set of vertices, indicating the x and y Cartesian coordinates of each vertex of the polygon. The following steps should be taken to turn your set of vertices into a filled polygon.
1. Initialize all of the edges
§ For each edge, the following information needs to be kept in a table: 1. The minimum y value of the two vertices 2. The maximum y value of the two vertices 3. The x value associated with the minimum y value 4. The slope of the edge
Cont… § The slope of the edge can be calculated from the formula for a line y = mx + b
where m = slope b = y-intercept, y 0 = maximum y value, y 1 = minimum y value, x 0 = maximum x value, x 1 = minimum x value The formula for the slope is as follows: m = (y 0 - y 1) / (x 0 - x 1).
Index Y-min Y-max X-val 1/m 0 10 16 10 0 1 16 20 10 1. 5 - - - - 10 16 28 0 N Table: All edges
2. Initialize the Global edge Table § Edges with the same minimum y values are sorted on minimum x values as follows: 1. 2. 3. First edge with non zero slope. If the slope of an edge is zero, do not add it. For every other edge, start at index 0 and look for an appropriate position for the edge, in ascending order of minimum y-values
3. Initialize Parity § The initial parity is even since no edges have been crossed yet.
4. Initializing the Scan-Line § The initial scan-line is equal to the lowest y value for all of the global edges.
5. Initializing the Active Edge Table In de x 0 Y- X- 1/ ma val m x 16 10 0 1 20 10 1. 5 - - - 16 28 0 N
6. Filling the Polygon § Starting with the initial scan-line, until the active edge table is empty, do the following steps:
Step 1 § Draw all pixels from the x value of odd to the x value of even parity edge pairs.
Step 2 § Increase the scan-line by 1.
Step 3 § Remove any edges from the active edge table for which the maximum y value is equal to the scan line.
Step 4 § Update the x value for each edge in the active edge table using the formula § x 1 = x 0 + 1/m § (This is based on the line formula and the fact that the next scan-line equals the old scan-line plus one. )
Step 5 § Remove any edges from the global edge table for which the minimum y value = the scan-line and place them in the active edge table.
Step 6 § Reorder the edges in the active edge table according to increasing x value. This is done in case edges have crossed.
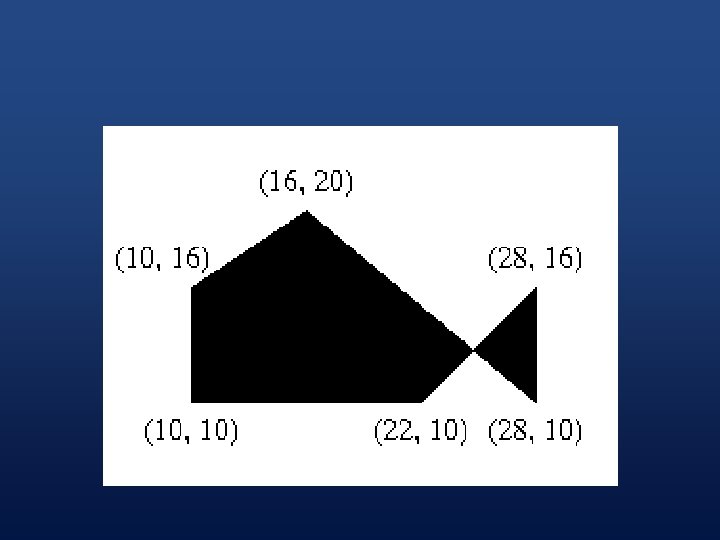
An Example 0 (10, 1 0 ) 1 (10, 1 6 ) 2 (16, 2 0 ) 3 (28, 1
Steps involved § We will now walk through the steps of the algorithm to fill in the polygon:
1. Initializing All of the Edges Index Y-min Y-max X-val 1/m 0 10 16 10 0 1 16 20 10 1. 5 2 10 20 28 -1. 2 3 10 16 28 0 4 10 16 22 1 5 10 10 10 Inf
2. Initializing the Global Edge Table: Index Y-min Y-max X-val 1/m 0 10 16 10 0 1 10 16 22 1 2 10 16 28 0 3 10 20 28 -1. 2 4 16 20 10 1. 5
3. Initialize Parity § Parity is initially set to Even
4. Initializing the Scan-Line § Since the lowest y value in the global edge table is 10, we can safely choose 10 as our initial scan-line.
5. Initializing the Active Edge Table Index Y-max X-val 1/m 0 16 10 0 1 16 22 1 2 16 28 0 3 20 28 -1. 2 4 20 10 1. 5
6. Filling the polygon
6. Filling the polygon
6. Filling the polygon
6. Filling the polygon
6. Filling the polygon
6. Filling the polygon
6. Filling the polygon
6. Filling the polygon
6. Filling the polygon
6. Filling the polygon
Boundary fill § § Check the pixel for boundary color Check the pixel for fill color Set the pixel in fill color Run the process for neighbors
Boundary fill § Boundary fill is pixel checking and setting method that involves following steps: 1. Check the width and height of area 2. Get the current pixel 3. Apply boundary checking 4. Set the pixel 5. Call this function recursively and set all neighboring pixels.
Process
Algorithm § Boundary. Fill (x, y, fill. Color , boundary. Color) § if ((x < 0) || (x >= width)) then return § if ((y < 0) || (y >= height)) then return § current = Get. Pixel(x, y)
Algorithm § if ((current != boundary. Color) && (current != fill. Color)) set. Pixel(fill. Color, x, y) Boundary. Fill(x+1, y, fill. Color, boundary. Color) Boundary. Fill(x, y+1, fill. Color, boundary. Color) Boundary. Fill (x-1, y, fill. Color, boundary. Color) Boundary. Fill (x, y-1, fill. Color, boundary. Color)
How about this? ?
Flood Fill § An area fill algorithm that replaces all connected pixels of a selected color with a fill color.
Algorithm § flood. Fill(x, y, fill. Color, old. Color) § if ((x < 0) || (x >= width)) then return § if ((y < 0) || (y >= height)) then return
Algorithm § if ( get. Pixel (x, y) == old. Color) then § set. Pixel (fill. Color, x, y) § flood. Fill (x+1, y, fill. Color, old. Color) § flood. Fill (x, y+1, fill. Color, old. Color) § flood. Fill (x-1, y, fill. Color, old. Color) § flood. Fill (x, y-1, fill. Color, old. Color)
Neighborhood
4 -connected § § flood. Fill 4 (x+1, y, fill. Color, old. Color) flood. Fill 4 (x, y+1, fill. Color, old. Color) flood. Fill 4 (x-1, y, fill. Color, old. Color) flood. Fill 4 (x, y-1, fill. Color, old. Color)
8 -connected § § § § flood. Fill 8 (x+1, y, fill. Color, old. Color) flood. Fill 8 (x, y+1, fill. Color, old. Color) flood. Fill 8 (x-1, y, fill. Color, old. Color) flood. Fill 8 (x, y-1, fill. Color, old. Color) flood. Fill 8 (x+1, y+1, fill. Color, old. Color) flood. Fill 8 (x-1, y-1, fill. Color, old. Color) flood. Fill 8 (x+1, y-1, fill. Color, old. Color)
Recursion § § Recursive calls to functions… When can it cause problems? Why? What can be done to prevent the problem?
Computer Graphics Filled Area Primitives II Lecture 09 Taqdees A. Siddiqi cs 602@vu. edu. pk